


前言
在《ImageMagick简介及试用》中,我学习了安装它并尝试用命令行调用了它。而正如 官方文档中 所说,你还可以使用一些API来调用它。对于C语言的API,有 MagickCore API 和 MagickWand API 可供选择。
MagickCore API 和 MagickWand API
官方文档中对于二者的描述如下:
The
MagickCore APIis a low-level interface between the C programming language and the ImageMagick image processing libraries and is recommended for wizard-level programmers only. Unlike theMagickWand C APIwhich uses only a few opaque types and accessors, with MagickCore you almost exlusively access the structure members directly
MagickCore API 是C语言和 ImageMagick 图像处理库之间的低级接口,仅推荐较为熟练的程序员使用。与仅使用少数不透明的类型和访问器的 MagickWand C API 不同,使用 MagickCore,你几乎可以直接访问结构体的成员。
The
MagickWand APIis the recommended interface between the C programming language and the ImageMagick image processing libraries. Unlike theMagickCore C API, MagickWand uses only a few opaque types. Accessors are available to set or get important wand properties.
MagickWand API 是C语言和 ImageMagick 图像处理库之间推荐的接口。 与 MagickCore C API 不同,MagickWand 只使用少数不透明的类型。访问器可用于设置或获取重要的 wand 属性。
对此我的理解是:
- MagickCore 更为底层,但是对使用者要求较高。
- MagickWand 更为方便,但是一些接口并不透明。
头文件与库的位置
在安装目录可以直接看到头文件与库:(安装时需要勾选相应的内容)


项目环境配置
我决定尝试 MagickWand ,毕竟我是一个初学者。
建立VS工程。
然后将include文件夹添加到 “附加包含目录” 中:

将lib文件夹添加到 “附加库目录”:

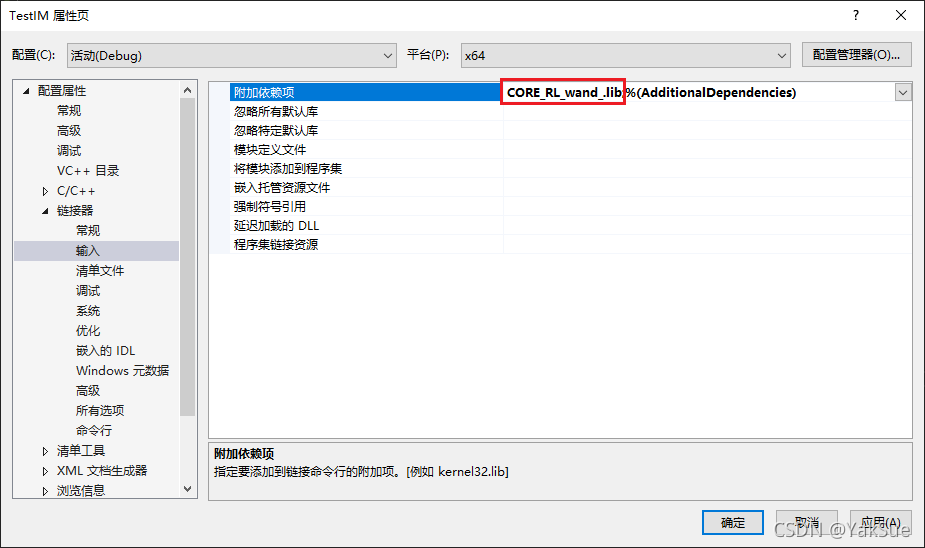
添加 CORE_RL_wand_.lib 到 “附加依赖项”:
实验代码
关于 MagickWand 可在这里找到API的文档: https://imagemagick.org/api/MagickWand/index.html
我这里实验的代码来自于官方文档中的小范例,它输出了一个图片的缩略图(就是缩放尺寸并输出):
#include <stdio.h>
#include <stdlib.h>
#include <wand/MagickWand.h>

int main(int argc,char **argv)
{
#define ThrowWandException(wand) \
{ \
  char \
    *description; \
 \
  ExceptionType \
    severity; \
 \
  description=MagickGetException(wand,&severity); \
  (void) fprintf(stderr,"%s %s %lu %s\n",GetMagickModule(),description); \
  description=(char *) MagickRelinquishMemory(description); \
  exit(-1); \
}

  MagickBooleanType
    status;

  MagickWand
    *magick_wand;

  if (argc != 3)
    {
      (void) fprintf(stdout,"Usage: %s image thumbnail\n",argv[0]);
      exit(0);
    }
  /*
    Read an image.
  */
  MagickWandGenesis();
  magick_wand=NewMagickWand();
  status=MagickReadImage(magick_wand,argv[1]);
  if (status == MagickFalse)
    ThrowWandException(magick_wand);
  /*
    Turn the images into a thumbnail sequence.
  */
  MagickResetIterator(magick_wand);
  while (MagickNextImage(magick_wand) != MagickFalse)
    MagickResizeImage(magick_wand,106,80,LanczosFilter,1.0);
  /*
    Write the image then destroy it.
  */
  status=MagickWriteImages(magick_wand,argv[2],MagickTrue);
  if (status == MagickFalse)
    ThrowWandException(magick_wand);
  magick_wand=DestroyMagickWand(magick_wand);
  MagickWandTerminus();
  return(0);
}
不过作为“第一个”范例,我觉得它还是加入了一些“让问题变得复杂”的元素,因此我做了简化。简化的内容包括:
- 去除了异常处理的宏。
- 原范例由命令行参数传入输入与输出文件,我改成了硬编码,且只考虑单个图片的情况。
- 添加了注释
简化后如下:
#include <stdio.h>
#include <stdlib.h>
#include <wand/MagickWand.h>

int main()
{
    //输入文件:
    const char* InputFile = "D:/Temp/test.exr";
    //输出文件:
    const char* OutputFile = "D:/Temp/output.png";

    //MagickWand实例
    MagickWand* magick_wand;

    //记录Magick函数返回的状态,有true和false之分。
    MagickBooleanType status;


    //初始化MagickWand
    MagickWandGenesis();

    //创建一个MagickWand实例
    magick_wand = NewMagickWand();

    //读取输入图片
    status = MagickReadImage(magick_wand, InputFile);
    if (status == MagickFalse)
        return -1;

    //重设尺寸:
    MagickResizeImage(magick_wand, 160, 90, LanczosFilter, 1.0);

    //写到输出文件中
    status = MagickWriteImages(magick_wand, OutputFile, MagickTrue);
    if (status == MagickFalse)
        return -1;

    //销毁MagickWand实例
    magick_wand = DestroyMagickWand(magick_wand);

    //结束MagickWand
    MagickWandTerminus();

    return(0);
}
上面代码读取了 D:/Temp/test.exr 图片,然后将尺寸重设为 160x90,最后输出到了 D:/Temp/output.png中。
运行后结果符合预期。


 4475
4475


 被折叠的 条评论
为什么被折叠?
被折叠的 条评论
为什么被折叠?
 到【灌水乐园】发言


