Unity-SteamVR物体交互

谈到Unity VR开发,即使是初学者也会听过SteamVR或者HTC VIVE,这款设备是目前在国内能够方便买到且在使用上不错的一款设备。其实SteamVR是集成在Steam里的一个VR插件,而HTC是硬件设备,运行时用到SteamVR这个插件(也是HTC运行时必须的环境),对于SteamVR在前面一篇有介绍,它是基于OpenVR开发的一套开源的插件。

打开Unity在Window>Asset Store中下载SteamVR插件,导入到工程中。
[CameraRig]分析:
导入完成后,在Project面板看到SteamVR文件夹,依次找到SteamVR>Proefabs>[CameraRig],将这个拖到场景中,然后按照下面的结构创建一个测试的环境,一个地面一张桌子,一个可操作的Cube。
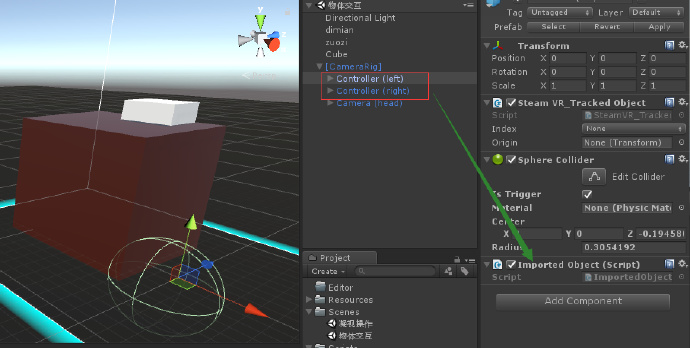
其他环境都好理解,这个SteamVR的[CameraRig]就是一个最简练最基础的VR预制体了。首先光标点中[CameraRig],在Inspector面板,这个预制体中有两个主要的组件1.SteamVR_ControllerManager、2.SteamVR_PlayArea。 这里SteamVR_ControllerManager,字面意思看,也能大概明白控制器管理类,往下看能看到两个属性,绑定了子物体的Control(left)和Control(right),作用是分别控制硬件设备的左手和右手;SteamVR_PlayArea,是用户的活动区域,只有指定了活动区域,用户才可以在指定区域中活动。[CameraRig]的3个子物体,前两个是左手右手,最后那个就是头部了,是带有相机的,模拟头部视角。重点说明,需要被SteamVR所认识的物体,都挂载了SteamVR_TrackedObject,这里可以看出,SteamVR把可以操作的物体都看作是对象。
案例:
通过以上的了解,下面做个简单的测试。
1.首先脚本带上,新建一个类,命名为ImportedObject:
using System.Collections;
using System.Collections.Generic;
using UnityEngine;

public class ImportedObject : MonoBehaviour {

private SteamVR_TrackedObject trackedOjbect;
private SteamVR_Controller.Device device;
private GameObject interactBox;
// Use this for initialization
void Start () {
    // 获取手柄的引用
    trackedOjbect = GetComponent ();
    device = SteamVR_Controller.Input ((int)trackedOjbect.index);
}

// Update is called once per frame
void Update () {
        if (device == null)
            return;
        if (device.GetAxis ().x != 0 || device.GetAxis ().y != 0) {
            Debug.Log (device.GetAxis ().x+" | "+device.GetAxis ().y);
        }
        /// 获取Trigger 是否按下
        if (device.GetPressDown (SteamVR_Controller.ButtonMask.Trigger)) {
            Debug.Log ("Trigger Down");
            if (interactBox != null) {
                interactBox.transform.parent = transform;
                Rigidbody rig = interactBox.GetComponent ();
                rig.useGravity = false;
                rig.isKinematic = true;
            }
        }
        /// 获取Trigger 是否松开
        if (device.GetPressUp (SteamVR_Controller.ButtonMask.Trigger)) {
            Debug.Log ("Trigger Up");
            if (interactBox != null) {
                interactBox.transform.parent = null;
                Rigidbody rig = interactBox.GetComponent ();
                rig.useGravity = true;
                rig.isKinematic = false;
            }
        }
    }
    ///
    /// 碰撞体进入时触发
    ///
    /// Other.
    private void OnTriggerEnter(Collider other)
    {
    Debug.Log ("Enter ");
    interactBox = other.transform.gameObject;
    }
    ///
    /// 碰撞体离开时触发
    ///
    /// Other.
    private void OnTriggerExit(Collider other)
    {
    Debug.Log ("Exit ");
    interactBox = null;
    }

    private void OnTriggerStay(Collider other)
    {
        if (device != null) {
            /// 手柄震动 单位是毫秒级
            device.TriggerHapticPulse (700);
        }
    }
}
脚本中,首先获取手柄引用,运行时,每个TrTrackedObject都有唯一且不重复的ID,通过id即可获取到该Obj的Device,SteamVR为手柄定义了基本的按键操作,SteamVR_Controller.ButtonMask.Trigger(Trigger扳机键、Touchpad触摸板、System系统按钮、Grip侧边按钮、ApplicationMenu菜单按钮,Axis0/1/2/3/4触摸板方向按钮)。物体的触发函数OnTriggerEnter进入、OnTriggerExit移出、OnTriggerStay停留,是Unity再触发时自动会调用的,只要对其函数进行实现即可。
2.分别给两个手柄挂在这个脚本,效果如图:
 

3.Unity检测碰撞,必须有一个物体挂载Rigidbody。


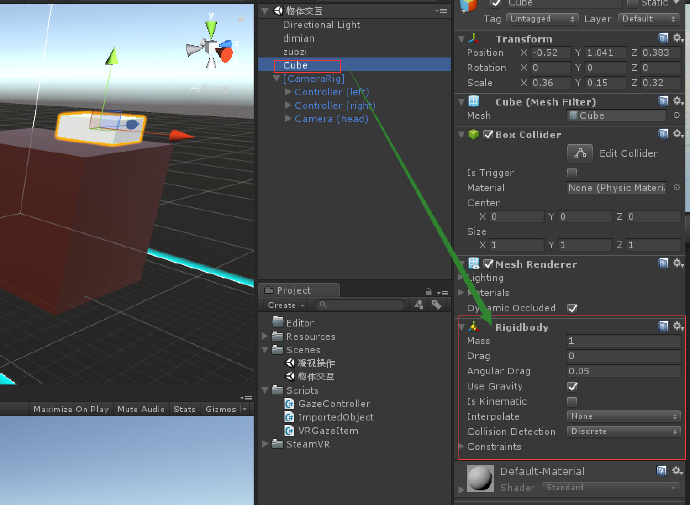
以上完成后,点击运行就可以对面前的物体进行操作了。
以下是一个简单的SteamVR 3D物体交互代码示例,使用了UnitySteamVR插件: ```csharp using UnityEngine; using System.Collections; using Valve.VR; public class ObjectInteraction : MonoBehaviour { public SteamVR_Input_Sources handType; // 左手或右手 public SteamVR_Action_Boolean grabAction; // 抓取动作 public SteamVR_Action_Boolean throwAction; // 抛出动作 private GameObject collidingObject; // 当前碰撞的物体 private GameObject objectInHand; // 当前手中的物体 // 当物体进入碰撞器时,将其设置为当前碰撞的物体 private void OnTriggerEnter(Collider other) { if (other.gameObject.CompareTag("Interactable")) { collidingObject = other.gameObject; } } // 当物体离开碰撞器时,将当前碰撞的物体设为空 private void OnTriggerExit(Collider other) { if (other.gameObject.CompareTag("Interactable")) { collidingObject = null; } } private void Update() { // 抓取物体 if (grabAction.GetLastStateDown(handType)) { if (collidingObject) { GrabObject(); } } // 抛出物体 if (throwAction.GetLastStateDown(handType)) { if (objectInHand) { ReleaseObject(); } } } // 抓取物体 private void GrabObject() { objectInHand = collidingObject; collidingObject = null; var joint = AddFixedJoint(); joint.connectedBody = objectInHand.GetComponent<Rigidbody>(); } // 添加FixedJoint组件 private FixedJoint AddFixedJoint() { FixedJoint fx = gameObject.AddComponent<FixedJoint>(); fx.breakForce = 20000; fx.breakTorque = 20000; return fx; } // 释放物体 private void ReleaseObject() { if (GetComponent<FixedJoint>()) { GetComponent<FixedJoint>().connectedBody = null; Destroy(GetComponent<FixedJoint>()); objectInHand.GetComponent<Rigidbody>().velocity = SteamVR_Input.GetAction<SteamVR_Action_Vector2>("Squeeze").axis * SteamVR_Input.GetAction<SteamVR_Action_Boolean>("GrabPinch").stateDown * SteamVR_Input.GetAction<SteamVR_Action_Boolean>("GrabGrip").stateDown * 10f; objectInHand.GetComponent<Rigidbody>().angularVelocity = SteamVR_Input.GetAction<SteamVR_Action_Vector2>("Touchpad").axis * SteamVR_Input.GetAction<SteamVR_Action_Boolean>("GrabPinch").stateDown * SteamVR_Input.GetAction<SteamVR_Action_Boolean>("GrabGrip").stateDown * 10f; objectInHand = null; } } } ``` 这段代码假设您已经设置好了SteamVR插件和控制器,将此脚本添加到控制器物体上,将“手类型”设置为左手或右手,将“抓取动作”和“抛出动作”设置为您在控制器上使用的实际手势动作。当手部进入物体的触发器时,它将被标记为“当前碰撞的物体”,然后您可以使用“抓取动作”将其抓起,并使用“抛出动作”将其释放。当您释放物体时,它将获得一些速度和角速度,以模拟您实际释放物体时的动作。
评论
添加红包

请填写红包祝福语或标题

红包个数最小为10个

红包金额最低5元

当前余额3.43前往充值 >
需支付:10.00
成就一亿技术人!
领取后你会自动成为博主和红包主的粉丝 规则
hope_wisdom
发出的红包

打赏作者

GarFe-Liu

你的鼓励将是我创作的最大动力

¥1 ¥2 ¥4 ¥6 ¥10 ¥20
扫码支付:¥1
获取中
扫码支付

您的余额不足,请更换扫码支付或充值

打赏作者

实付
使用余额支付
点击重新获取
扫码支付
钱包余额 0

抵扣说明:

1.余额是钱包充值的虚拟货币,按照1:1的比例进行支付金额的抵扣。
2.余额无法直接购买下载,可以购买VIP、付费专栏及课程。

余额充值