


本文档记录了如何安装Windows版VRTE2.1.0开发环境并进行开发,并且总结了当部署在安装了比较陈旧版本Linux内核(如<4.5)和库的板子上所遭遇的困难,如S32V234EVB。
| Definition | |
| ECU | Electronic Control Unit |
| RTE | Run-Time Environment |
Table 1.1 - Definitions and abbreviations
| S. No. | Software | Version | Description |
| 1 | ISOLAR-AB | 9.2.2 | Used for SWC and RTE configuration and code generation for this release. |
| 2 | RTA-VRTE | 2.1.0 | Used for AUTOSAR middleware. |
Table 1.2 – Configuration Tools
- 相关文档(Related documents Documentation)
- 0. RTA-VRTE V2.1.0 Getting Started Guide
- 1. RTA-VRTE V2.1.0 User Guide
- 2. ISOLAR-AB_V9.2.2_ReleaseNotes.pdf
RTA-VRTE 2.1.0.exe是Windows版本VRTE 2.1.0的安装包。
当安装完成后,默认将在C:\VRTE_SDK_2.1.0目录下生成VRTE SDK;默认将在C:\Program Files (x86)\ETAS\RTA-VRTE_2.1.0目录下生成全部文件的根目录。VRTE 2.1.0的使用不需要license。

Figure 3‑1 VRTE 2.1.0 SDK安装路径
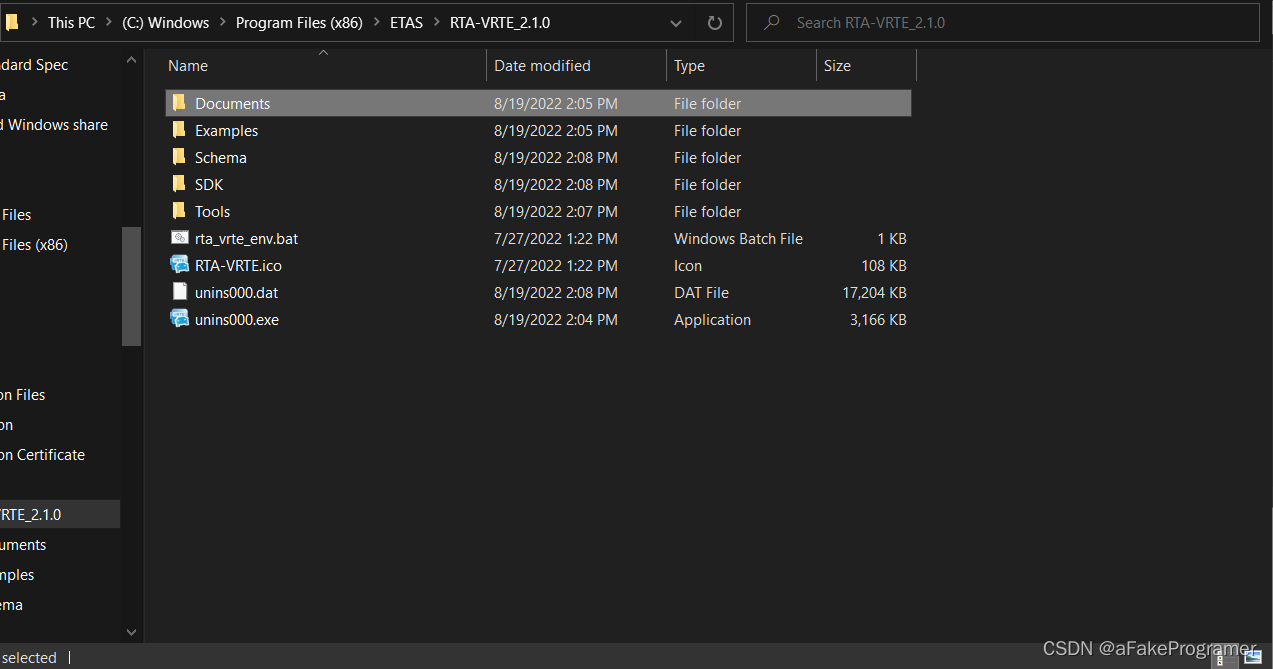
Figure 3‑2 VRTE 2.1.0 全部文件安装路径
ISOLAR-AB_V9.2.2_Image.zip中的ISOLAR-AB_V9.2.2.zip是Windows版本ISOLAR-A_Adaptive安装包。
ISOLAR默认安装在C:\ETAS\ISOLAR-AB_V9.2.2。

Figure 3‑3 ISOLAR-AB_V9.2.2安装路径
ISOLAR需要安装ISOLAR-A Adaptive AddOns.exe插件才能使用Autosar AP开发需要的相关工具。
ISOLAR-A_ADAPTIVE安装包路径如下:
ISOLAR needs install ISOLAR-A Adaptive AddOns.exe add-on to make Autosar AP related tools be usable.
The ISOLAR-A_ADAPTIVE installer is available here:
ISOLAR-AB_V9.2.2_Image\Updatesites\ISOLAR-A_Adaptive\Addons\ISOLAR-A Adaptive AddOns.exe

Figure 3‑4 ISOLAR-A Adaptive AddOns.exe存在路径
ISOLAR需要license_ISOLAR-ADAPTIVE才能使用。请从ETAS获得。
ISOLAR need ISOLAR-ADAPTIVE license. Please consultant to ETAS.
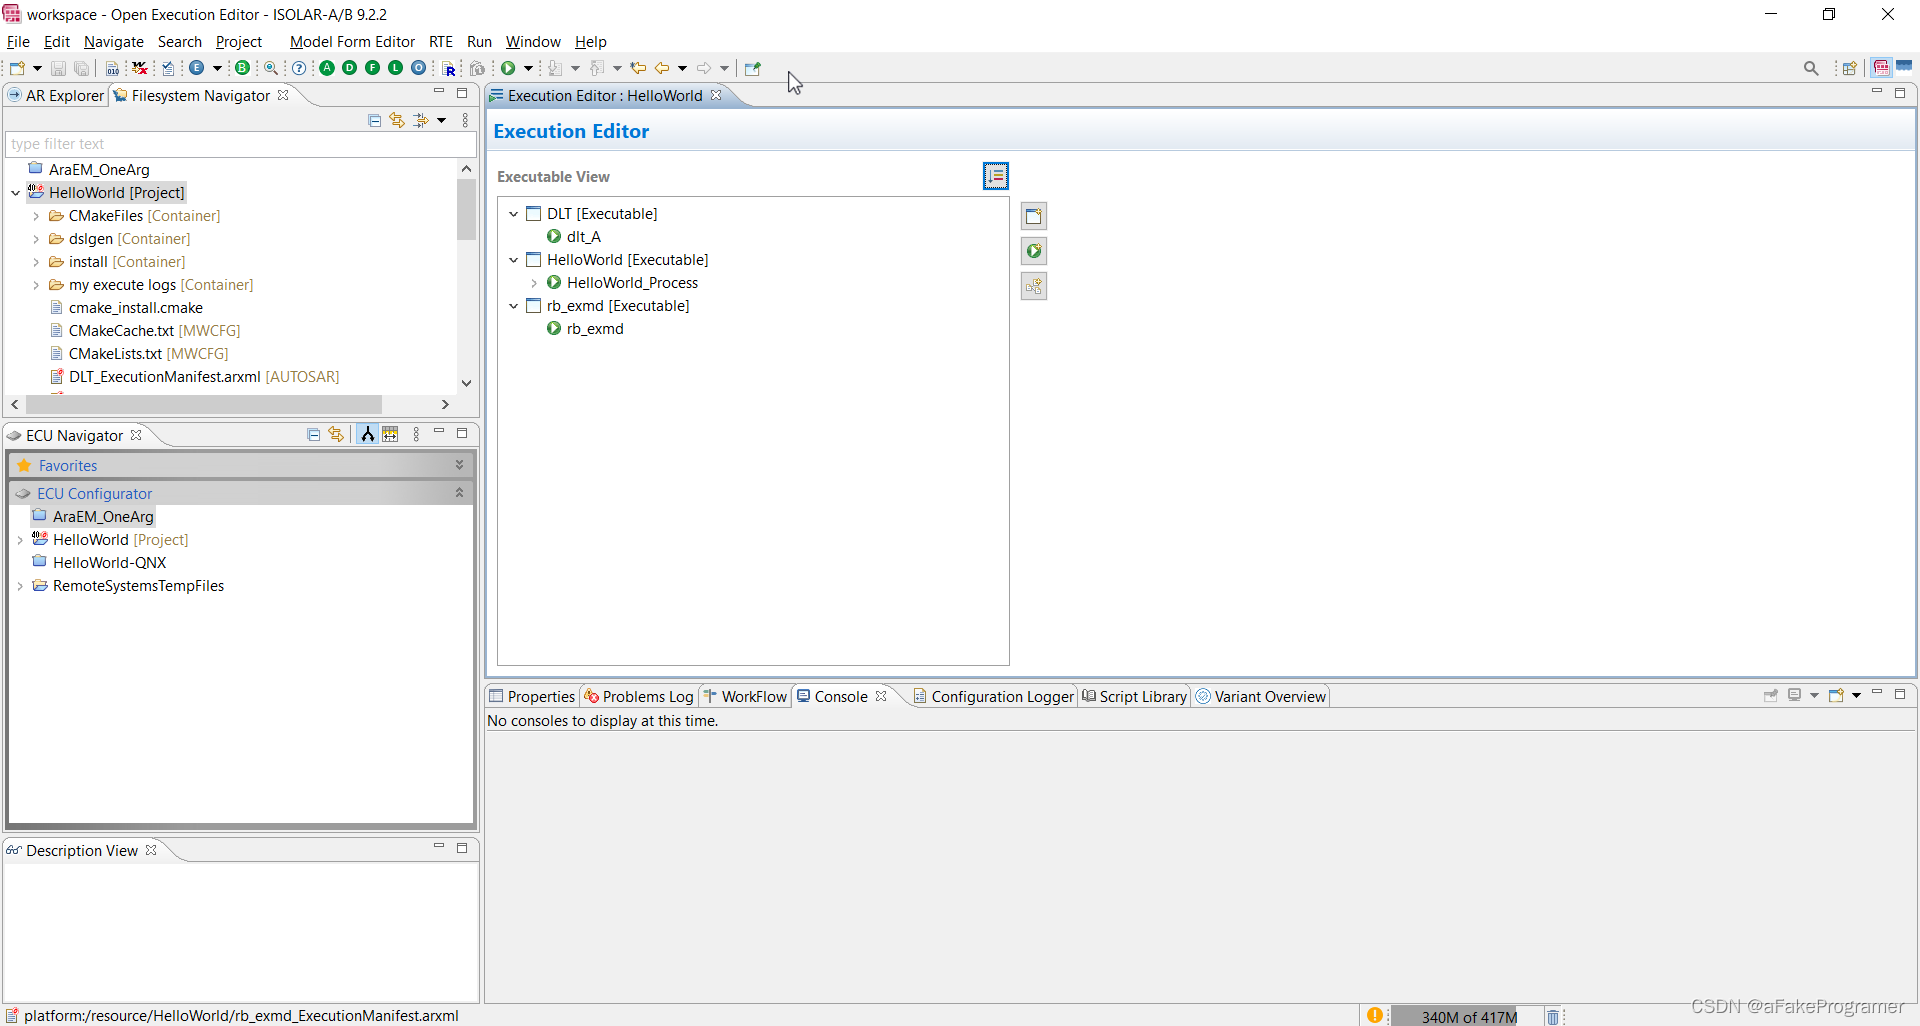
Figure 3‑6 ISOLAR-AB_V9.2.2运行界面
cmake-3.24.1-windows-x86_64.msi是Windows版本cmake安装包,下载地址:Download | CMake。
cmake-3.24.1-windows-x86_64.msi is the Windows version of cmake installation package. Download Address: Download | CMake
cmake默认安装在C:\Program Files\CMake。检查系统环境变量Path是否包含CMake命令。
cmake is installed at C:\Program Files\CMake definitely. Please check the system env whether the Path variable involves the CMake bins.
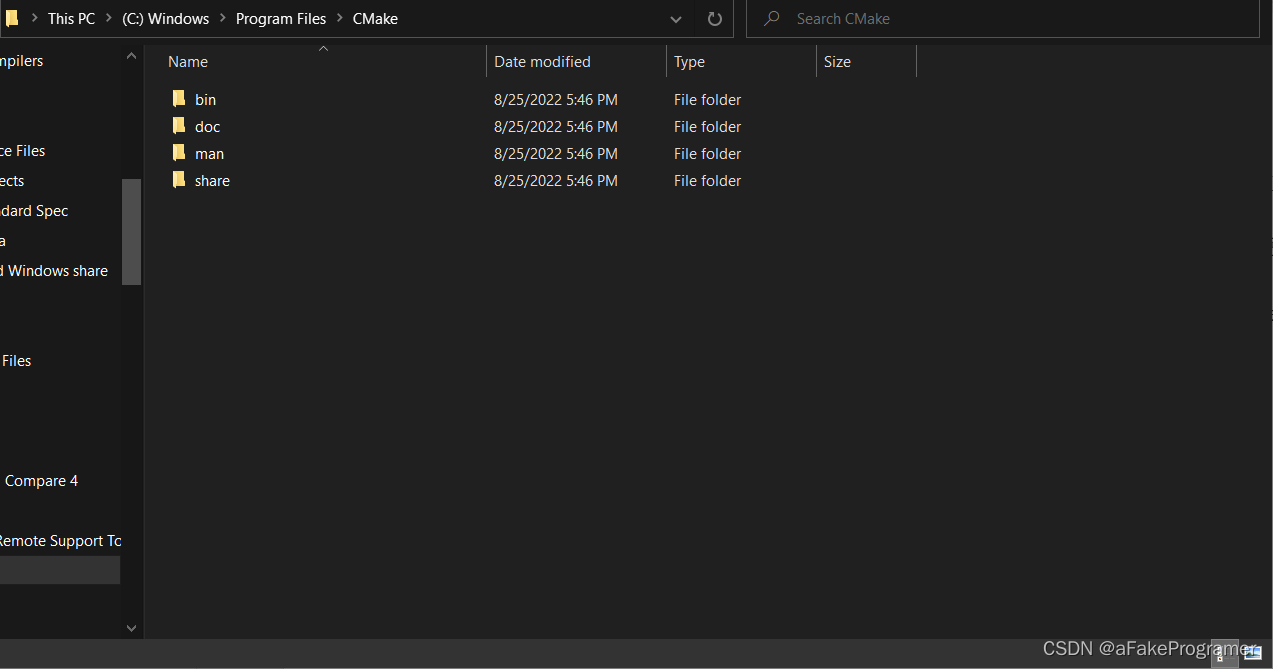
Figure 3‑7 cmake安装路径
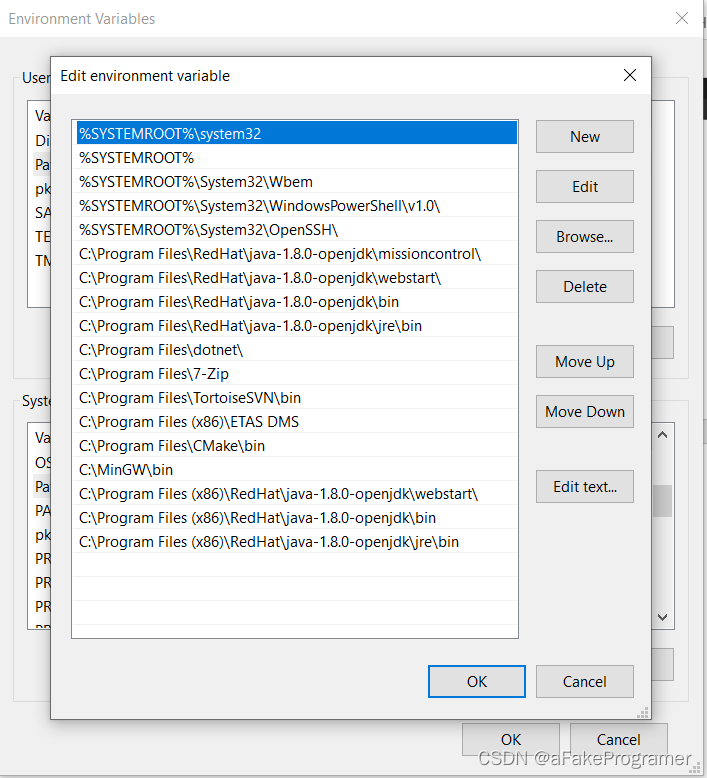
Figure 3‑8 cmake环境变量设置
注:该版本cmake已经验证,使用其他版本不保证不会遇到问题。
Notice: This version of cmake is already verified, using other versions does not guarantee that there will be no problems.
mingw-get-setup.exe是Windows版本mingw installation manager安装包。通过mingw installation manager安装所有与make命令相关的包。
mingw-get-setup.exe is the Windows version of mingw installation manager installation package. Through mingw installation manager you should install all packages related to make command.

Figure 3‑9 mingw版本信息
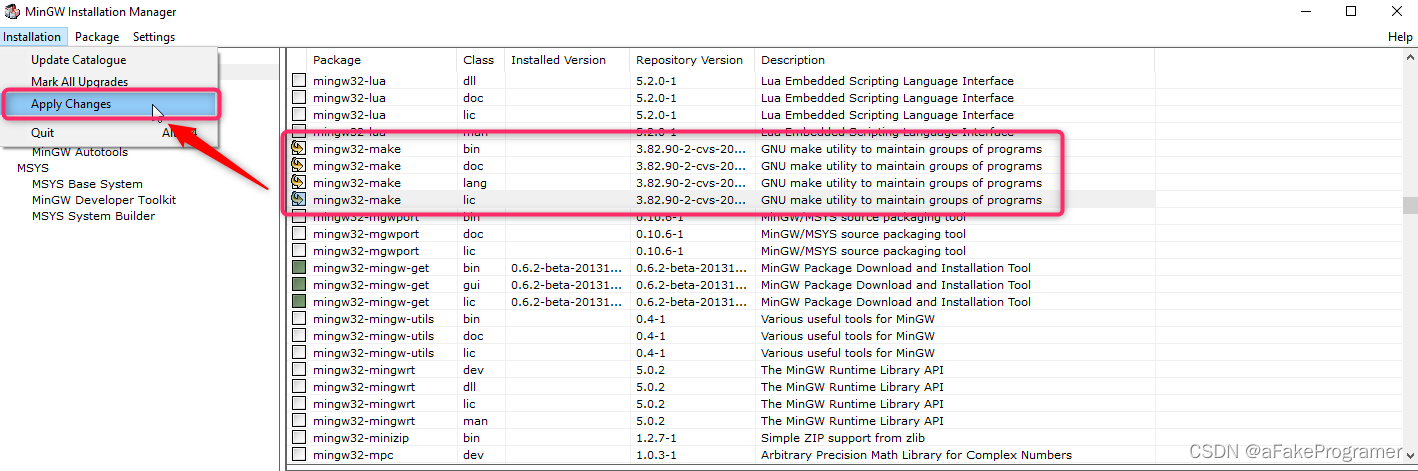
Figure 3-10 mingw installation manager安装项

Figure 3-11 mingw installation manager安装项
mingw默认安装在C:\MinGW。检查系统环境变量Path是否包含mingw命令。
mingw is installed at C:\MinGW definitely. Please check the system env whether the Path variable involves the mingw bins.
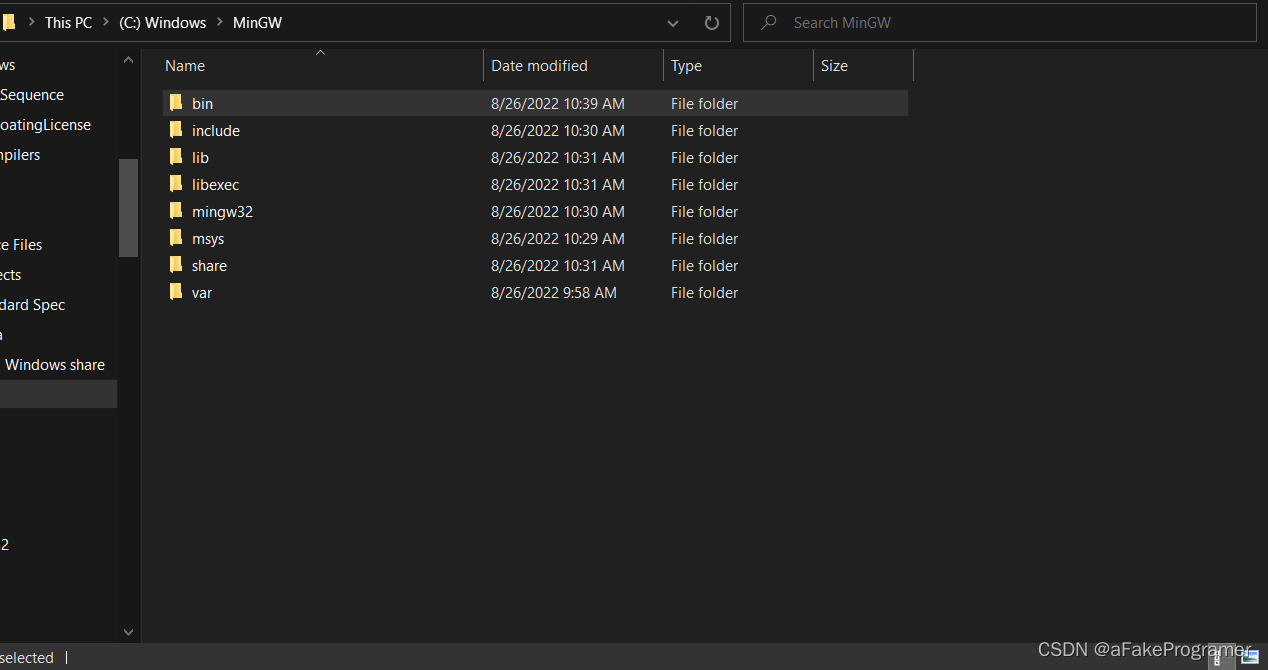
Figure 3‑12 mingw安装路径
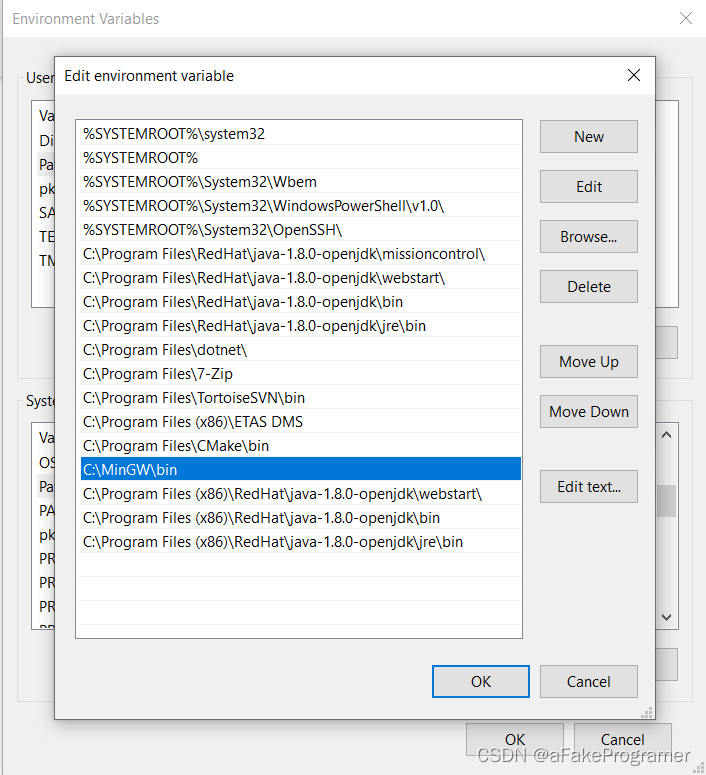
Figure 3‑13 mingw环境变量设置
注:该版本mingw已经验证,使用其他版本不保证不会遇到问题。
Notice: This version of mingw is already verified, using other versions does not guarantee that there will be no problems.
gcc-arm-10.2-2020.11-mingw-w64-i686-aarch64-none-linux-gnu.tar.xz是Windows 64版本以ARM 64 Linux为目标的gcc安装包。下载地址:Downloads | GNU-A Downloads – Arm Developer
gcc-arm-10.2-2020.11-mingw-w64-i686-aarch64-none-linux-gnu.tar.xz is the Windows 64 hosted, ARM 64 targeted version of gcc installation package. Download address: Downloads | GNU-A Downloads – Arm Developer
可以直接将其解压在C:\CrossCompilers目录,不需要设置环境变量。
You may decompress it into C:\CrossCompilers directory, without setting the system environment variables.
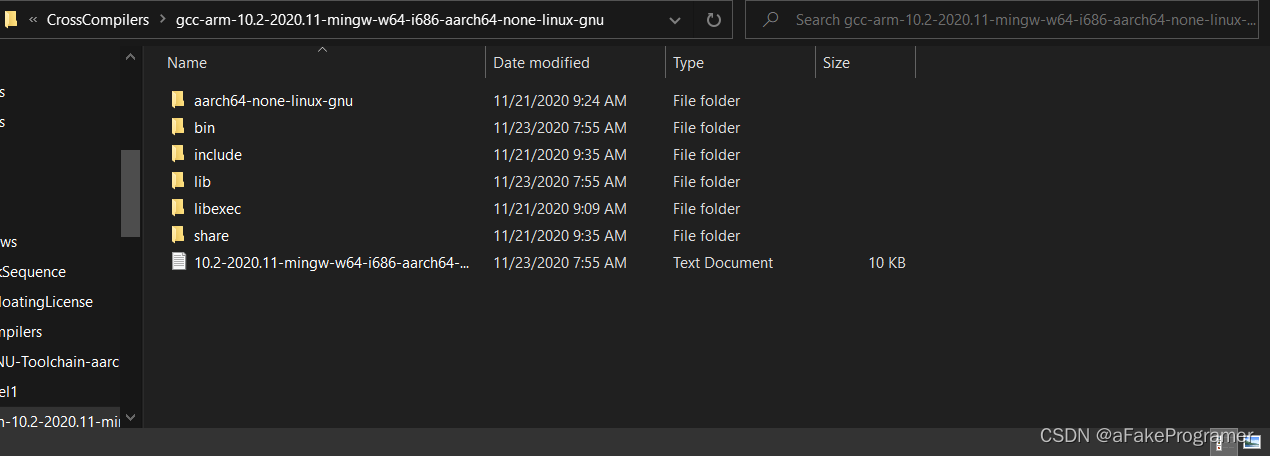
Figure 3‑14 gcc安装路径
注:该版本gcc已经验证,使用其他版本不保证不会遇到问题。
Notice: This version of gcc is already verified, using other versions does not guarantee that there will be no problems.
- 用例开发和编译流程(Use case development and compilation process)
-
- 确定工程目录(Determine project directory exe)
从C:\Program Files (x86)\ETAS\RTA-VRTE_2.1.0\Examples拷贝HelloWorld到合适的工作路径,以将其拷贝到C:\Users\HNN4SGH\Downloads\HelloWorld为例。
Copy the Hello use case from C:\Program Files (x86)\ETAS\RTA-VRTE_2.1.0\Examples to a reasonable place, below I copy it to C:\Users\HNN4SGH\Downloads\HelloWorld for example.
-
- 构建.cmake文件(Construct .cmake file)
从 \RTA-VRTE_2.1.0\SDK\toolchain_files拷贝rta-vrte_common_toolchain.cmake到HelloWorld目录。创建helloworld_toolchain.cmake文件并输入以下内容:
Copy the rta-vrte_common_toolchain.cmake file from \RTA-VRTE_2.1.0\SDK\toolchain_files to Hello directory. Create helloworld_toolchain.cmake and input below content:
##########################################################

# File Name: helloworld_toolchain.cmake

# System Version: Linux

# Date: 2022.09.08

##########################################################

include(${CMAKE_CURRENT_LIST_DIR}/rta-vrte_common_toolchain.cmake)


set(CMAKE_SYSTEM_NAME Linux)

######set(TOOLCHAIN_PATH C:/CrossCompilers/Arm-GNU-Toolchain-aarch64-none-linux-gnu/11.3-rel1)

set(TOOLCHAIN_PATH C:/CrossCompilers/gcc-arm-10.2-2020.11-mingw-w64-i686-aarch64-none-linux-gnu)

set(CMAKE_C_COMPILER ${TOOLCHAIN_PATH}/bin/aarch64-none-linux-gnu-gcc.exe)

set(CMAKE_CXX_COMPILER ${TOOLCHAIN_PATH}/bin/aarch64-none-linux-gnu-g++.exe)


set(LINUX_AARCH64_SDK_PATH ${SDK_PATH}/linux-aarch64)

message(STATUS "The RTA-VRTE LINUX aarch64 SDK path is: ${LINUX_AARCH64_SDK_PATH}")


set(CMAKE_FIND_ROOT_PATH ${LINUX_AARCH64_SDK_PATH}/opt/vrte ${LINUX_AARCH64_SDK_PATH})其中,TOOLCHAIN_PATH需换成安装的真实路径。
Among this file, the TOOLCHAIN_PATH variable should be set as the actual installation path.
-
- 生成ecucfg文件(Generate ecucfg files)
可以使用ISOLAR生成ecucfg文件,也可以执行下一步cmake命令时同时生成ecucfg文件。使用ISOLAR生成ecucfg文件的方法如下:
You can use ISOLAR to generate ecucfg files, you can also execute the next cmake command to generate ecucfg files simultaneously. Below is the ISOLAR method:

Figure 4‑1 使用ISOLAR生成ecucfg方法
-
- 执行VRTE配置脚本(Execute VRTE configuration script)
VRTE配置脚本为C:\ETAS\RTA-VRTE_2.1.0\rta_vrte_env.bat。打开系统cmd执行该脚本。
VRTE configuration script is C: \ETAS\RTA-VRTE_2.1.0\rta_vrte_env. bat. Open the system cmd window and execute this script.
-
- 执行cmake命令(Execute cmake command)
在helloword工程目录下进入CMD窗口并执行cmake命令,创建CMakeFiles目录结构和Makefile:
In the helloword project folder, go to CMD window and Execute cmake command, creating CMakeFiles index and Makefile:
cmake -G "Unix Makefiles" -DCMAKE_TOOLCHAIN_FILE=C:\ETASData\ISOLAR-AB\workspace_adaptive\HelloWorld\helloworld_toolchain.cmake -DSDK_PATH=C:\VRTE_SDK_2.1.0

Figure 4‑2 cmake -G命令执行打印1
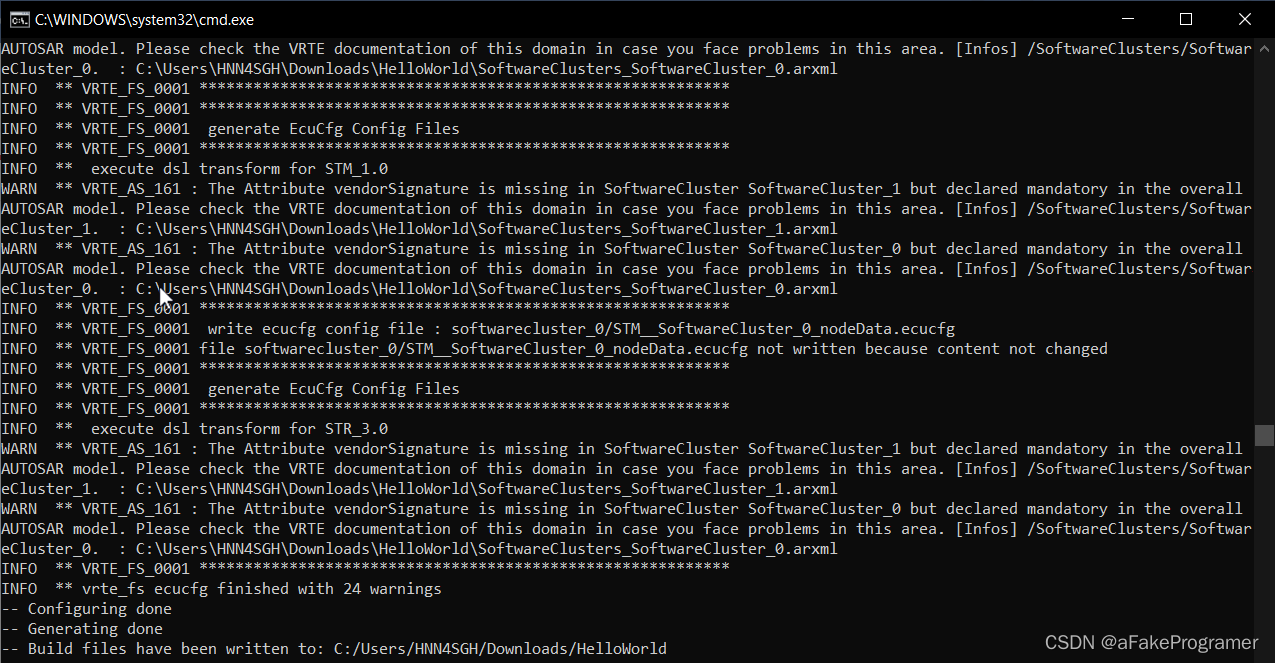
Figure 4‑3 cmake -G命令执行打印2
-
- 执行make命令(Execute make command)
执行make命令,编译HelloWorld可执行文件:
Execute make command, compiling the HelloWorld executable:
make

Figure 4‑4 make命令执行打印1

Figure 4‑5 make命令执行打印2
-
- 执行make install命令(Execute make install command)
执行make install命令, 将可执行文件和ecucfg文件放置到HelloWorld/install/bin目录下:
Execute make install command, putting the executable and ecucfg files into HelloWorld/install/bin path:
make install
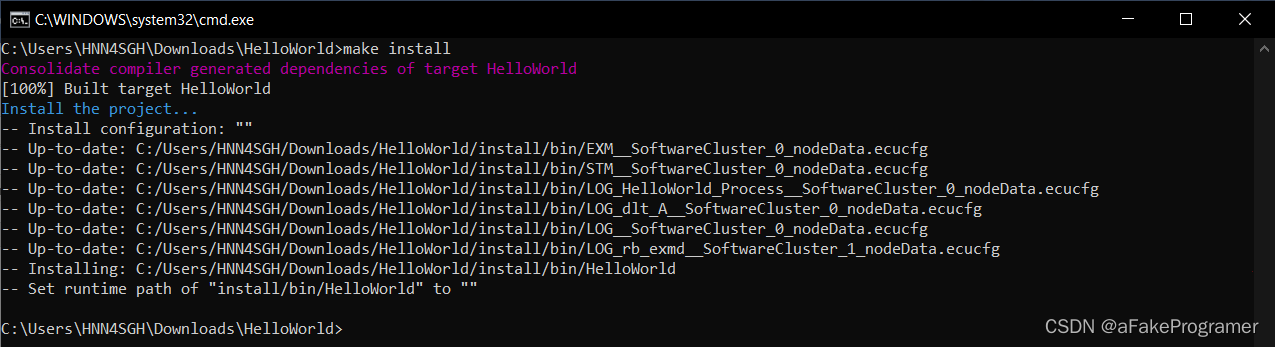
Figure 4‑5 make install命令执行打印
- 用例部署和执行流程(Use case deployment and execution process)
-
- VRTE SDK 部署(VRTE SDK deployment)
从C:\VRTE_SDK_2.1.0\linux-aarch64\opt拷贝vrte到开发板文件系统的/opt下。事实上不需要拷贝include和lib中的.a文件。
Copy the vrte folder from C:\VRTE_SDK_2.1.0\linux-aarch64\opt to target board’s /opt directory. Actually you don’t need copy the include folder and the .a files in lib folder.
在开发板文件系统中创建以下目录:
Create below directories in target board:
mkdir -p /opt/vrte/user/bin /opt/vrte/user/share /opt/vrte/user/etc/ecu-cfg/ar-20-11
-
- Bin和Ecucfg文件部署(Bin and Ecucfg files deployment)
通过SD卡读卡器、scp、ftp等方式将bin和ecucfg文件拷贝到开发板文件系统的以下目录:
Copy the bin and ecucfg files from HelloWorld/install/bin to target board’s below directories, through SD card reader, scp command and ftp etc:
LOG_HelloWorld_Process__SoftwareCluster_0_nodeData.ecucfg > /opt/vrte/usr/etc/ecu-cfg/ar-20-11
EXM__SoftwareCluster_0_nodeData.ecucfg > /opt/vrte/exm-aap-execution-manager/etc/ecu-cfg/ar-20-11
LOG_rb_exmd__SoftwareCluster_1_nodeData.ecucfg > /opt/vrte/exm-aap-execution-manager/etc/ecu-cfg/ar-20-11
LOG_dlt_A__SoftwareCluster_0_nodeData.ecucfg > /opt/vrte/dev-aap-dlt/etc/ecu-cfg/ar-20-11
LOG__SoftwareCluster_0_nodeData.ecucfg > /opt/vrte/dev-aap-dlt/etc/ecu-cfg/ar-20-11
STM__SoftwareCluster_0_nodeData.ecucfg > /opt/vrte/stm-project/etc/ecu-cfg/ar-20-11
HelloWorld > /opt/vrte/usr/bin
-
- 执行脚本创建和部署(Execution script creation and deployment)
在开发板文件系统的/opt/vrte/usr/bin目录下创建exmd.sh文件并输入以下内容:
Create exmd.sh file in target board’s /opt/vrte/usr/bin directory and input below:
echo "Creating dlt runtime cfg..."
touch /tmp/dlt-runtime-application.cfg
touch /tmp/dlt-runtime-context.cfg
touch /tmp/dlt-runtime.cfg
export ECUCFG_ENV_VAR_ROOTFOLDER=/opt/vrte/exm-aap-execution-manager/etc/ecu-cfg
export LD_LIBRARY_PATH=/opt/vrte/lib:$LD_LIBRARY_PATH
export LOGTRACEDEFAULTLOGLEVEL=info
export LOGTRACELOGMODE=network,console
export LOGTRACEPROCESSDESC="VRTE:EXM: daemon logging"
export LOGTRACEPROCESSID=EXM
export PROCESSIDENTIFIER=rb_exmd
chmod 777 /opt/vrte/dev-aap-dlt/etc/*
chmod 777 /opt/vrte/exm-aap-execution-manager/etc/*
chmod 777 /opt/vrte/stm-project/etc/*
chmod 777 /opt/vrte/usr/etc/*
chmod +x /opt/vrte/dev-aap-dlt/bin/rb-dltd
chmod +x /opt/vrte/usr/bin/*
/opt/vrte/exm-aap-execution-manager/bin/rb-exmd -t 60000 &
然后赋予exmd.sh执行权限:
Then give exmd.sh execution permission:
chmod +x exmd.sh
-
- 用例执行(Execution use case)
在开发板文件系统的/opt/vrte/usr/bin目录下执行./exmd.sh:
Execute ./exmd.sh in target board’s /opt/vrte/usr/bin directory:
./exmd.sh
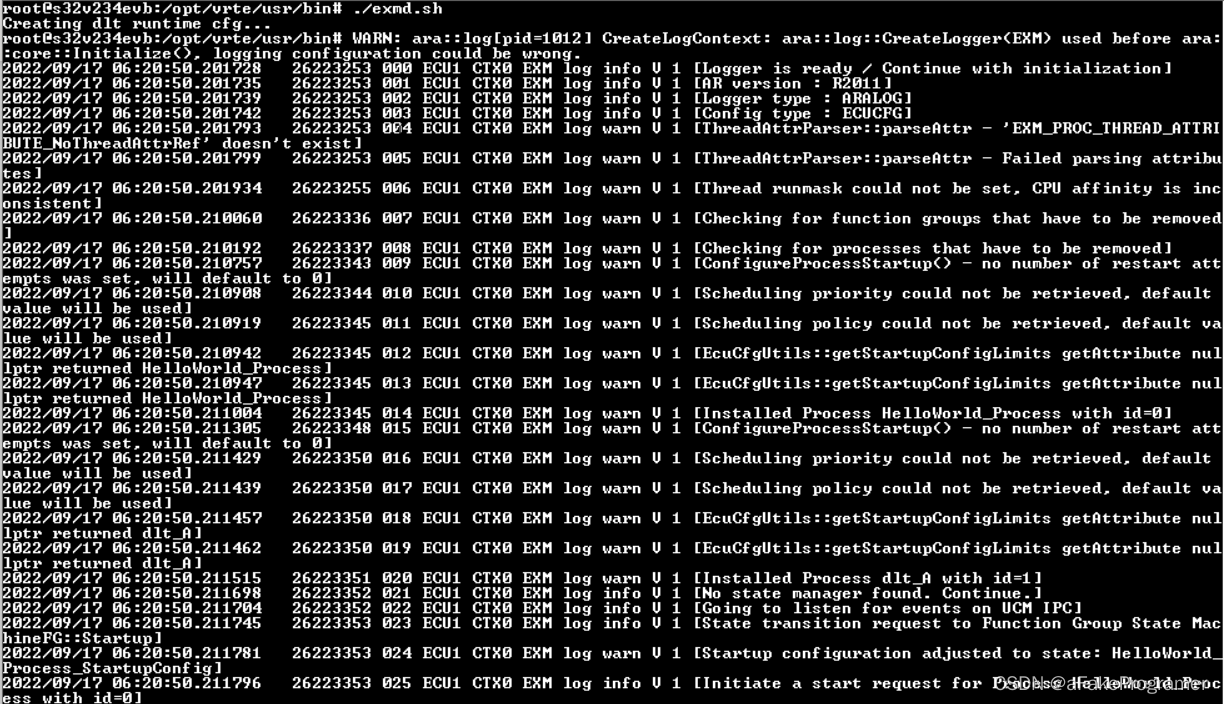
Figure 5‑1 用例执行打印1
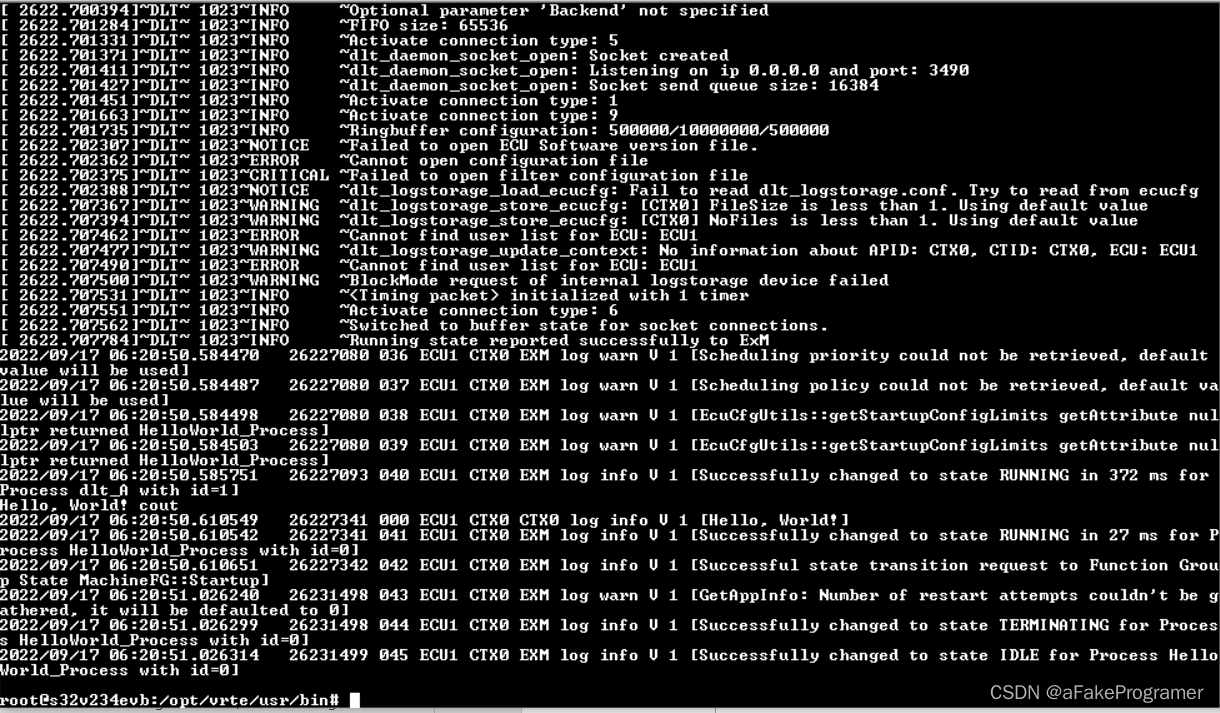
Figure 5‑2 用例执行打印2
- 附录(Appendix)
-
- S32V234EVB实验遇到的错误和纠正方法(S32V234EVB experiment encountered errors and work arounds)
6.1.1. 版本分析(Version analysis)
S32V234EVB运行4.19.59内核,安装2.26版本的GLIBC和3.4.22版本的GLIBCXX。

Figure 6‑1 S32V234EVB的Linux内核分析

Figure 6‑2 S32V234EVB的GLIBC分析

Figure 6‑3 S32V234EVB的GLIBC++分析
6.1.2. 执行错误分析(Execution error analysis)
执行rb-exmd会报GLIBC和GLIBC++找不到的错误:

Figure 6‑4 S32V234EVB执行rb-exmd报错
6.1.3. GLIBC问题纠正(GLIBC error work around)
使用objdump查看librb-ecucfg.so具体的GLIBC_2.27的使用情况,发现只有glob符号。

Figure 6‑5 objdump查看librb-ecucfg.so具体的GLIBC_2.27的使用情况
进一步查看S32V234EVB的2.26版本GLIBC是否实现了glob符号,结果是同样实现了。

Figure 6‑6 查看S32V234EVB的2.26版本GLIBC的glob符号使用情况
使用readelf查看librb-ecucfg.so符号表。.gnu.version_r表示二进制程序实际依赖的库文件版本,从输出结果中得出,该表从0x01e918偏移量开始。而libc.so.6的GLIBC_2.27和GLIBC_2.17的偏移量分别从0x01e918开始算为0x0050和0x0060。
readelf -sV librb-ecucfg.so

Figure 6‑7 readelf查看librb-ecucfg.so符号表
由于Linux系统中的LD库(ld-linux-aarch64.so.1)加载ELF时检查.gnu.version_r表中的符号,可以强制修改.gnu.version_r来强制使用老版本函数实现。使用vim打开librb-ecucfg.so并使用命令%!xxd切换到十六进制显示,修改0x01e918下面第5行画红框数据,即从第6行相同位置进行复制。即修改了GLIBC_2.27的库名称的hash值、表中符号的版本值、库名称字符串的偏移量。最后使用命令%!xxd -r,wq保存。
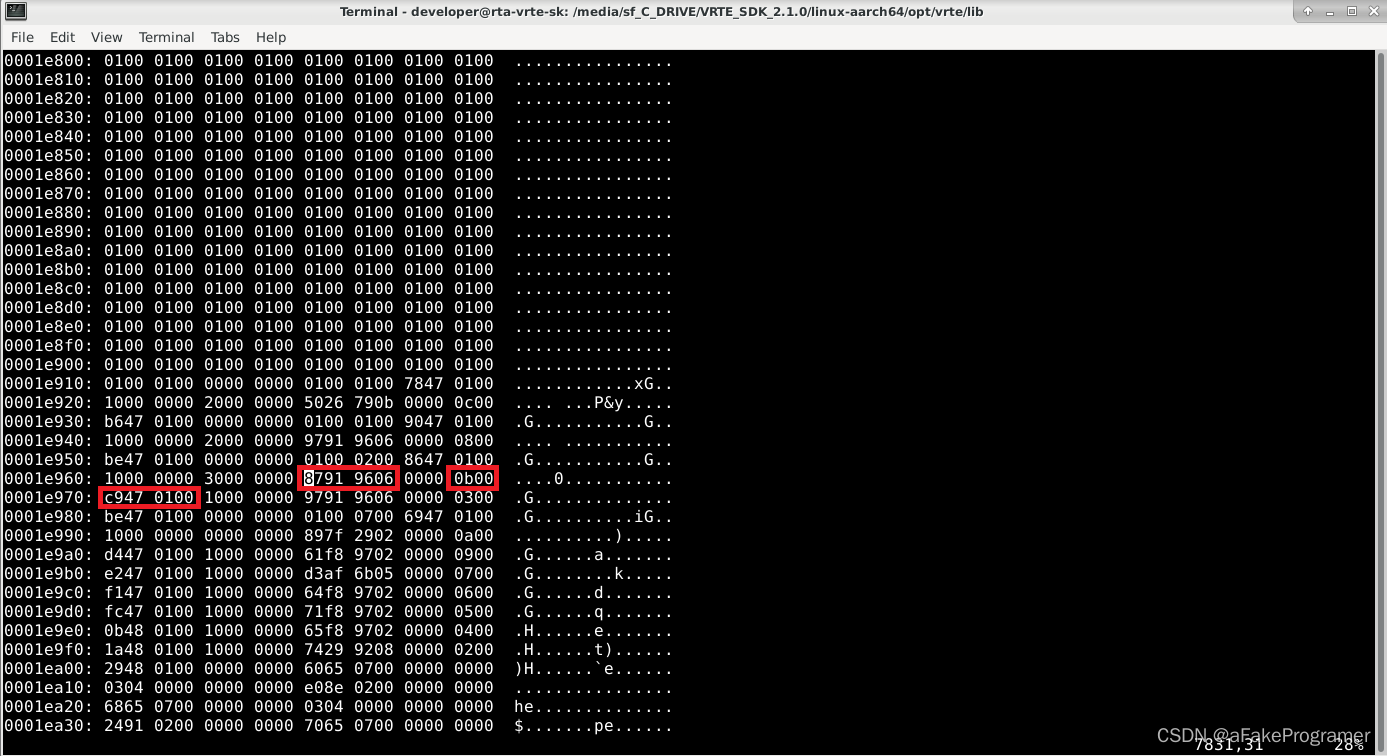
Figure 6‑8 使用vim强制librb-ecucfg.so强制修改函数实现版本
修改之后使用readelf查看librb-ecucfg.so符号表,修复完成。结果如下:
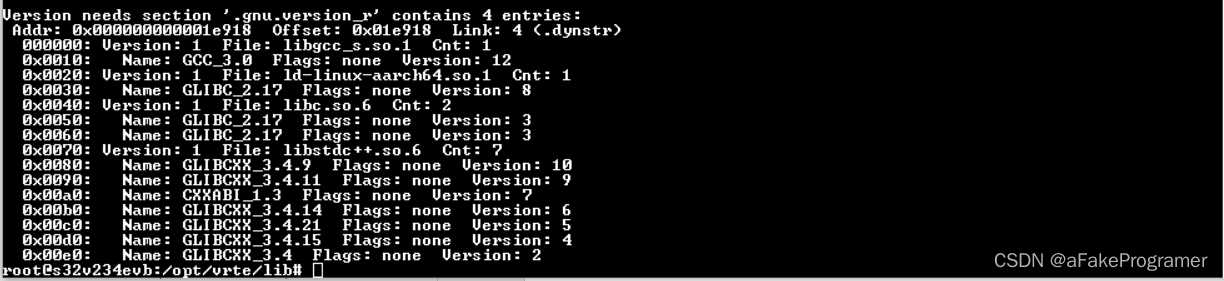
Figure 6‑9 readelf查看librb-ecucfg.so符号表,修复完成
6.1.4. GLIBCXX问题纠正(GLIBCXX error work around)
拷贝aarch64版本的libstdc++.so.6.0.28到目标开发板的/usr/lib下,并备份相关链接文件并创建新的链接文件:
mv libstdc++.so libstdc++.so.bak
mv libstdc++.so.6 libstdc++.so.6.bak
ln -s libstdc++.so.6.0.28 libstdc++.so
ln -s libstdc++.so.6.0.28 libstdc++.so.6
Figure 10‑1
In order to achieve all the purpose this document sets, th


 124
124


 被折叠的 条评论
为什么被折叠?
被折叠的 条评论
为什么被折叠?
 到【灌水乐园】发言


