


Vulkan官方英文原文:Shader modules - Vulkan Tutorial
对应的Vulkan技术规格说明书版本: Vulkan 1.3.2
Unlike earlier APIs, shader code in Vulkan has to be specified in a bytecode format as opposed to human-readable syntax like GLSL and HLSL. This bytecode format is called SPIR-V and is designed to be used with both Vulkan and OpenCL (both Khronos APIs). It is a format that can be used to write graphics and compute shaders, but we will focus on shaders used in Vulkan's graphics pipelines in this tutorial.
不像早期的各种图形API,在Vulkan中的shader代码是以(二进制)字节码的格式被使用而不像GLSL和HLSL这样易读的语法。这种字节码格式被称作 SPIR-V,并且他被设计为Vulkan和OpenCL这两者一起使用。这种代码可以写图形和计算shader,但是在这个教程中我们关注的是用在Vulkan图形管线的shader。
The advantage of using a bytecode format is that the compilers written by GPU vendors to turn shader code into native code are significantly less complex. The past has shown that with human-readable syntax like GLSL, some GPU vendors were rather flexible with their interpretation of the standard. If you happen to write non-trivial shaders with a GPU from one of these vendors, then you'd risk other vendor's drivers rejecting your code due to syntax errors, or worse, your shader running differently because of compiler bugs. With a straightforward bytecode format like SPIR-V that will hopefully be avoided.
使用字节码的优势是GPU厂商编写的shader编译器将shader代码转换为原生代码的复杂度显著降低。过去的经验表明像GLSL这样可读性强的语法,一些GPU厂商对于标准的解释是相当地灵活。假如你碰巧在这些厂商的GPU上写了特别实现的shader代码,那么你会有由于其他厂商的驱动不适配你写的shader代码的风险,可能导致语法错误,或糟糕的是,由于编译器自身存在的问题,你的shader运行过程存在差异。用像SPIR-V这种直接了当的字节码格式,这些问题大概率会避免掉。
However, that does not mean that we need to write this bytecode by hand. Khronos has released their own vendor-independent compiler that compiles GLSL to SPIR-V. This compiler is designed to verify that your shader code is fully standards compliant and produces one SPIR-V binary that you can ship with your program. You can also include this compiler as a library to produce SPIR-V at runtime, but we won't be doing that in this tutorial. Although we can use this compiler directly via glslangValidator.exe, we will be using glslc.exe by Google instead. The advantage of glslc is that it uses the same parameter format as well-known compilers like GCC and Clang and includes some extra functionality like includes. Both of them are already included in the Vulkan SDK, so you don't need to download anything extra.
但是,这并不意味着我们需要去手写这些字节码。Khronos 已经发布了他们自己的厂商无关的编译器,能将GLSL文件编译为SPIR-V字节码文件。设计的这个编译器用来验证你的shader代码是否完全符合标准,并且能生成一个运行在你的程序中的SPIR-V格式的二进制文件。你也可以将这个编译器当做一个库包括在你的程序中以便在运行时生成 SPIR-V 文件,但是当前教程中不会这么用。尽管我们能通过 glslangValidator.exe 直接的使用编译器,但是我们将改用 Google 的 glslc.exe。glslc的优势是它使用类似于知名的编译器(像GCC和Clang)的命令行参数格式,而且glslc包含了像 includes 这些额外的功能。他们两个(glslangValidator和glslc)已经包含在Vulkan SDK(安装文件)中了,因此你不需要额外下载。
GLSL is a shading language with a C-style syntax. Programs written in it have a main function that is invoked for every object. Instead of using parameters for input and a return value as output, GLSL uses global variables to handle input and output. The language includes many features to aid in graphics programming, like built-in vector and matrix primitives. Functions for operations like cross products, matrix-vector products and reflections around a vector are included. The vector type is called vec with a number indicating the amount of elements. For example, a 3D position would be stored in a vec3. It is possible to access single components through members like .x, but it's also possible to create a new vector from multiple components at the same time. For example, the expression vec3(1.0, 2.0, 3.0).xy would result in vec2. The constructors of vectors can also take combinations of vector objects and scalar values. For example, a vec3 can be constructed with vec3(vec2(1.0, 2.0), 3.0).
GLSL是一种C风格语法的着色语言。GLSL程序以main函数为入口函数。GLSL不会以参数作为输入和返回值作为输出,而是用全局变量来处理输入输出。该语言包含许多有助于图形编程的特性,像内建的矢量和矩阵基础运算。像叉乘,矩阵和矢量乘法,围绕一个矢量反射这些操作功能都包含在内。举个例子,一个3D坐标可以存放在一个vec3类型的变量里。它可以通过vec3成员来单独的访问一个分量例如 .x,但同时也可以用多个分量创建一个新的矢量。举个例子,表达式 vec3(1.0, 2.0, 3.0).xy 将生成一个 vec2 类型的变量。矢量的构造函数也接受是对象和标量值的组合。例如,一个 vec3 对象可以用 vec3(vec2(1.0, 2.0), 3.0) 的形式来构造。
As the previous chapter mentioned, we need to write a vertex shader and a fragment shader to get a triangle on the screen. The next two sections will cover the GLSL code of each of those and after that I'll show you how to produce two SPIR-V binaries and load them into the program.
如前一章节所述,我们需要写一个顶点shader和一个片段shader,以便在盘屏幕上呈现一个三角形。后续两小节的内容将涵盖这两个shader的GLSL代码,之后,我将展示如何生成两个 SPIR-V 格式的二进制文件并将他们载入程序中。
Vertex shader
顶点着色器
The vertex shader processes each incoming vertex. It takes its attributes, like world position, color, normal and texture coordinates as input. The output is the final position in clip coordinates and the attributes that need to be passed on to the fragment shader, like color and texture coordinates. These values will then be interpolated over the fragments by the rasterizer to produce a smooth gradient.
顶点着色器处理每一个进来的顶点数据。这些顶点数据的属性,例如世界坐标,颜色,法线和纹理坐标等作为输入。它的输出是裁剪坐标空间的最终位置和被传入片段着色器的属性数据,例如颜色和纹理坐标。这些数值通过光栅化操作过程的插值计算应用在片段上,以产生平滑的过渡。
A clip coordinate is a four dimensional vector from the vertex shader that is subsequently turned into a normalized device coordinate by dividing the whole vector by its last component. These normalized device coordinates are homogeneous coordinates that map the framebuffer to a [-1, 1] by [-1, 1] coordinate system that looks like the following:
裁剪坐标空间是顶点shader产生的一个四维向量,随后,用整个矢量除以矢量本身的最后一个分量( .w ),将此矢量转换到规范化设备坐标空间。规范化设备坐标空间是齐次坐标空间,是由[-1.0, 1.0]的坐标系统将帧缓冲区的位置坐标映射到[-1.0, 1.0]的标准值,如下所示:
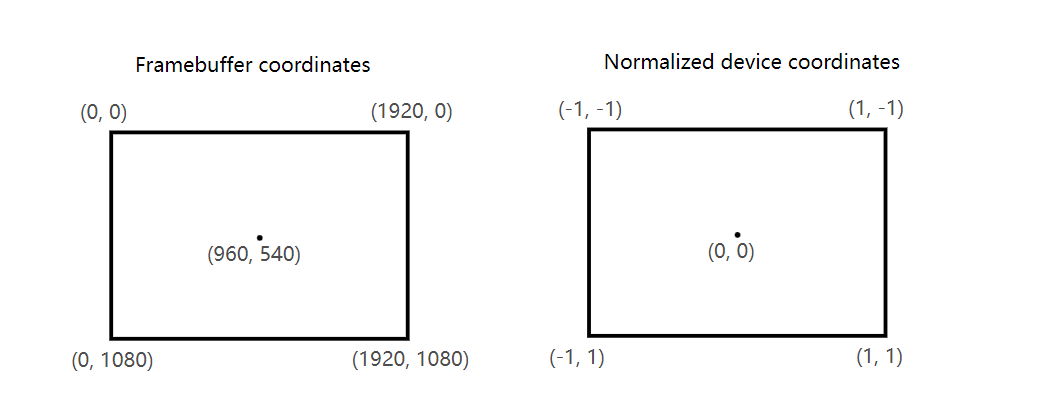
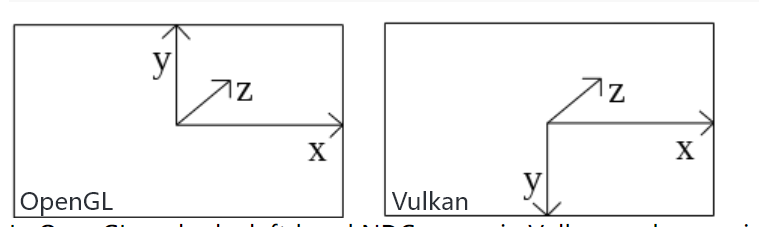
You should already be familiar with these if you have dabbled in computer graphics before. If you have used OpenGL before, then you'll notice that the sign of the Y coordinates is now flipped. The Z coordinate now uses the same range as it does in Direct3D, from 0 to 1.
如果你以前了解计算机图形学的话,你应该已经熟悉了这些机制。如果你以前用过OpenGL,你会注意到一个不同之处:Y坐标轴被翻转了。Z坐标轴用法和Direct3D一样,裁剪空间取值范围是0.0 到 1.0(包含0.0和1.0)。
如下图所示,左侧图是OpenGL坐标系,右侧图是Vulkan坐标系。
For our first triangle we won't be applying any transformations, we'll just specify the positions of the three vertices directly as normalized device coordinates to create the following shape:
因为这是我们的第一个,所以我们没有应用任何空间变换,我们只是用规范化设备空间指定三个顶点的坐标位置来创建如下三角形:

We can directly output normalized device coordinates by outputting them as clip coordinates from the vertex shader with the last component set to 1. That way, the division to transform clip coordinates to normalized device coordinates will not change anything.
我们能通过顶点shader,在裁剪空间将vec4类型变量的顶点坐标的第四个分量设为1.0,直接输出规范化设备坐标。用这个方法,将裁剪空间坐标转换为规范化设备坐标的除法将不改变任何数值。
Normally these coordinates would be stored in a vertex buffer, but creating a vertex buffer in Vulkan and filling it with data is not trivial. Therefore, I've decided to postpone that until after we've had the satisfaction of seeing a triangle pop up on the screen. We're going to do something a little unorthodox in the meanwhile: include the coordinates directly inside the vertex shader. The code looks like this:
这些坐标应该存放在一个顶点缓冲区里面,但是在Vulkan中创建一个顶点缓冲区并且设置好数据却不是一个小事。因此,我决定了延缓它直到 我们已经很满意的看到屏幕上显示出一个三角形之后。与此同时,我们将做一点不专业的事情:在顶点shader中直接包含顶点坐标数据。shader代码看起来如下所示:
#version 450

vec2 positions[3] = vec2[](
    vec2(0.0, -0.5),
    vec2(0.5, 0.5),
    vec2(-0.5, 0.5)
);

void main() {
    gl_Position = vec4(positions[gl_VertexIndex], 0.0, 1.0);
}
The main function is invoked for every vertex. The built-in gl_VertexIndex variable contains the index of the current vertex. This is usually an index into the vertex buffer, but in our case it will be an index into a hardcoded array of vertex data. The position of each vertex is accessed from the constant array in the shader and combined with dummy z and w components to produce a position in clip coordinates. The built-in variable gl_Position functions as the output.
这个main函数是每个顶点shader的入口函数。内建的 gl_VertexIndex 变量包含了当前被顶点shader正在处理的顶点索引。通常来说这是一个顶点缓冲区中的索引,但是我们现在用的索引是硬编码数组的顶点数据的索引。每一个顶点坐标是可以从当前shader的常量数组被访问到,并且结合模拟的z和w分量生产一个vec4类型的裁剪坐标空间的顶点数据。内建的变量 gl_Position 用于输出顶点坐标在顶点shader中的计算结果。
Fragment shader
片段着色器
The triangle that is formed by the positions from the vertex shader fills an area on the screen with fragments. The fragment shader is invoked on these fragments to produce a color and depth for the framebuffer (or framebuffers). A simple fragment shader that outputs the color red for the entire triangle looks like this:
由顶点shader计算出来的顶点坐标形成的三角形用片段在屏幕中填充一个区域。片段着色器在这些片段上被调用,计算出颜色和深度写入帧缓冲。一个在整个三角形输中出红色的简单片段着色器如下所示:
#version 450

layout(location = 0) out vec4 outColor;

void main() {
    outColor = vec4(1.0, 0.0, 0.0, 1.0);
}
The main function is called for every fragment just like the vertex shader main function is called for every vertex. Colors in GLSL are 4-component vectors with the R, G, B and alpha channels within the [0, 1] range. Unlike gl_Position in the vertex shader, there is no built-in variable to output a color for the current fragment. You have to specify your own output variable for each framebuffer where the layout(location = 0) modifier specifies the index of the framebuffer. The color red is written to this outColor variable that is linked to the first (and only) framebuffer at index 0.
片段着色器中的main函数被每一个片段调用,和顶点着色器的main函数一样。颜色在GLSL是由R、G、B、Alpha四个颜色通道构成的4分量矢量,每个分量取值范围是[0.0,1.0]。不像顶点shader中的 gl_Position ,片段着色器中没有在当前片段上输出颜色的内建变量。你必须对每个目标帧缓冲区指定你自己的输出变量,这里的 layout(location = 0)修饰符指定了目标帧缓冲区的索引。上面glsl代码中的红色颜色写到 outColor 变量中,此变量对应索引为0的第一个(目前也只有一个)目标帧缓冲区。
Per-vertex colors
逐顶点颜色
Making the entire triangle red is not very interesting. Wouldn't something like the following look a lot nicer?
绘制一个纯红色三角形不怎么有意思,像下面这种三角形看起来不是更好吗?
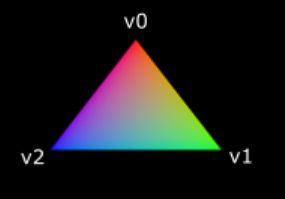
We have to make a couple of changes to both shaders to accomplish this. First off, we need to specify a distinct color for each of the three vertices. The vertex shader should now include an array with colors just like it does for positions:
达成上图的显示效果,我们必须在两个shader上做几处调整。首先,我们必须为三个顶点指定不同的颜色。顶点shader应该包含一个颜色数组,和顶点数据的做法类似:
vec3 colors[3] = vec3[](
    vec3(1.0, 0.0, 0.0),
    vec3(0.0, 1.0, 0.0),
    vec3(0.0, 0.0, 1.0)
);
Now we just need to pass these per-vertex colors to the fragment shader so it can output their interpolated values to the framebuffer. Add an output for color to the vertex shader and write to it in the main function:
现在我们只需将每个顶点颜色传入片段着色器中,这样以来它就能将他们被插值计算之后的数值输出到当前的帧缓冲区了。添加和(从顶点着色器)输出颜色到顶点shader并在main函数中写入,代码如下所示:
layout(location = 0) out vec3 fragColor;

void main() {
    gl_Position = vec4(positions[gl_VertexIndex], 0.0, 1.0);
    fragColor = colors[gl_VertexIndex];
}
Next, we need to add a matching input in the fragment shader:
接着,我们需要在片段着色器添加一个对应的输入:
layout(location = 0) in vec3 fragColor;

void main() {
    outColor = vec4(fragColor, 1.0);
}
The input variable does not necessarily have to use the same name, they will be linked together using the indexes specified by the location directives. The main function has been modified to output the color along with an alpha value. As shown in the image above, the values for fragColor will be automatically interpolated for the fragments between the three vertices, resulting in a smooth gradient.
顶点着色器的输出变量和片段着色器的输入变量的变量名不必一致,他们由 location 指令指定的序号链接在一起。这个main函数已经被调整输出颜色值和Alpha值。如上图所示,fragColor 的值会被自动插值计算出来应用在三个顶点之间的片段上,从而产生平滑的渐变。
Compiling the shaders
编译这些shader
Create a directory called shaders in the root directory of your project and store the vertex shader in a file called shader.vert and the fragment shader in a file called shader.frag in that directory. GLSL shaders don't have an official extension, but these two are commonly used to distinguish them.
The contents of shader.vert should be:
在你的项目根目录下创建一个shaders 目录,用一个名为 shader.vert 的文件存放顶点shader,片段shader存放在相同目录下的shader.frag 文件中。GLSL shader文件没有官方的扩展名,但是常用这两个来区分他们。
顶点shader的程序代码内容如下:
#version 450

layout(location = 0) out vec3 fragColor;

vec2 positions[3] = vec2[](
    vec2(0.0, -0.5),
    vec2(0.5, 0.5),
    vec2(-0.5, 0.5)
);

vec3 colors[3] = vec3[](
    vec3(1.0, 0.0, 0.0),
    vec3(0.0, 1.0, 0.0),
    vec3(0.0, 0.0, 1.0)
);

void main() {
    gl_Position = vec4(positions[gl_VertexIndex], 0.0, 1.0);
    fragColor = colors[gl_VertexIndex];
}
And the contents of shader.frag should be:
片段shader的程序代码内容如下:
#version 450

layout(location = 0) in vec3 fragColor;

layout(location = 0) out vec4 outColor;

void main() {
    outColor = vec4(fragColor, 1.0);
}
We're now going to compile these into SPIR-V bytecode using the glslc program.
我们这里会用 glslc 后台程序将这些GLSL shader文件编译为 SPIR-V 二进制字节码文件。
注意:shader.frag 和 shader.vert 这两个文件(在windows系统中测试过)编码需要是不带BOM的UTF-8编码格式。否则会报shader程序格式不识别的错误或者语法错误。
Windows
Create a compile.bat file with the following contents:
创建一个compile.bat 文件,文件内容如下:
C:/VulkanSDK/x.x.x.x/Bin32/glslc.exe shader.vert -o vert.spv
C:/VulkanSDK/x.x.x.x/Bin32/glslc.exe shader.frag -o frag.spv
pause
Replace the path to glslc.exe with the path to where you installed the Vulkan SDK. Double click the file to run it.
用你本地安装的Vulkan SDK路径替换 glslc.exe 程序路径。双击运行此bat程序(即可完成编译)。
Linux
Create a compile.sh file with the following contents:
创建一个compile.sh 文件,文件内容如下:
/home/user/VulkanSDK/x.x.x.x/x86_64/bin/glslc shader.vert -o vert.spv
/home/user/VulkanSDK/x.x.x.x/x86_64/bin/glslc shader.frag -o frag.spv
Replace the path to glslc with the path to where you installed the Vulkan SDK. Make the script executable with chmod +x compile.sh and run it.
用你本地安装的Vulkan SDK路径替换 glslc.exe 程序路径。用chmod +x compile.sh 命令确保此shell文件可执行,然后运行它(即可完成编译)。
也可以用如下的python程序编译:
shader_files = []
for exts in ('*.vert', '*.frag', '*.comp', '*.geom', '*.tesc', '*.tese'):
    shader_files.extend(glob.glob(os.path.join("./", exts)))

failed_files = []
for shader_file in shader_files:
    print("compiling %s\n" % shader_file)
    if subprocess.call("glslangvalidator -V %s -o ./%s.spv" % (shader_file, shader_file), shell=True) != 0:
        failed_files.append(shader_file)

for failed_file in failed_files:
    print("Failed to compile " + failed_file + "\n")
注意: vulkan的bin目录需要写到path环境变量里面
End of platform-specific instructions
These two commands tell the compiler to read the GLSL source file and output a SPIR-V bytecode file using the -o (output) flag.
If your shader contains a syntax error then the compiler will tell you the line number and problem, as you would expect. Try leaving out a semicolon for example and run the compile script again. Also try running the compiler without any arguments to see what kinds of flags it supports. It can, for example, also output the bytecode into a human-readable format so you can see exactly what your shader is doing and any optimizations that have been applied at this stage.
这两个命令调用编译器读取GLSL源文件并在编译后输出对应的 SPIR-V 字节码文件,用 -o 输出标志指定输出文件路径。
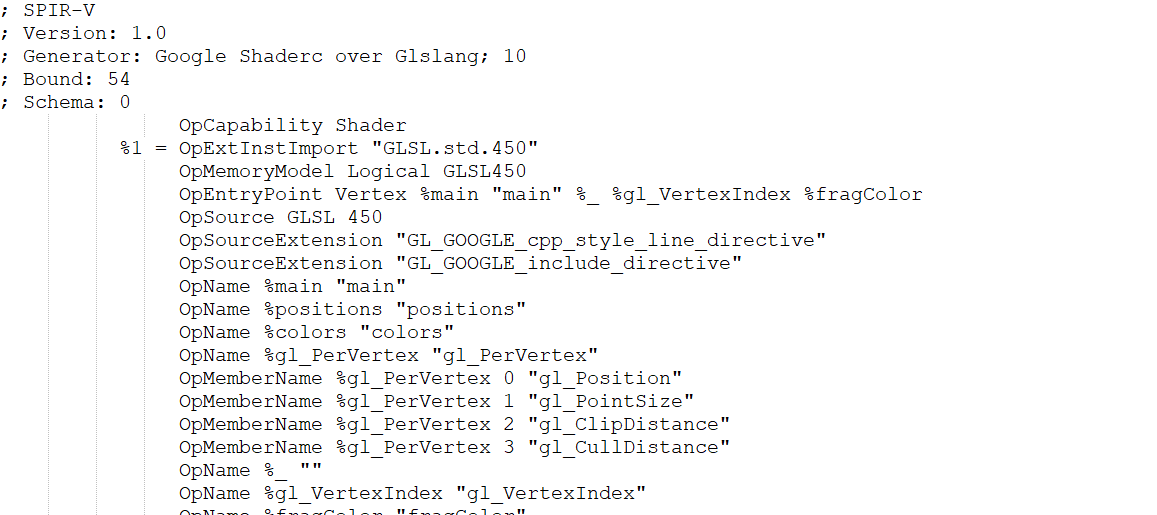
如你所愿,如果你的shader代码有语法错误,编译器在编译的时候会打印出对应的问题和行号。试着在shader代码里少写一个分号再编译看看。还可以尝试不带任何参数运行编译器,看看它支持哪些类型的标志。它支持很多参数,例如,也可以将二进制字节码输出为高可读性格式源码,因此你能明确的看到你的shader做了什么以及发生在这个阶段的任何优化。
例如,windows下命令行里面执行 glslc.exe -S shader.vert 就能看到SPIR-V二进制字节码的对应直观可读的源码shader.vert.spvasm。内容如下图所示:
一些glslc程序的命令行用法示例:
# Preprocess
glslc -E shader.glsl
# Compile
glslc -c shader.vert
# Disassemble
glslc -S shader.vert
# Optimize
glslc -c -Os shader.vert
# Specify shader stage
glslc -c -fshader-stage=vertex shader.glsl
# Specify language version and profile
glslc -c -std=310es shader.vert
# Specify target environment
glslc -c --target-env=vulkan shader.vert
# Specify output file name
glslc -c shader.vert -o shader.spv
# Specify output format
# E.g., output SPIR-V binary code as
# a C-style initializer list
glslc -c -mfmt=c shader.vert
# Define
glslc -E -DVALUE=42 shader.glsl
# Include
glslc -E -I../include shader.glsl
# Generate dependencies for builds
glslc -MD -c shader.glsl
# Warnings and errors
glslc -c -Werror shader.vert
Compiling shaders on the commandline is one of the most straightforward options and it's the one that we'll use in this tutorial, but it's also possible to compile shaders directly from your own code. The Vulkan SDK includes libshaderc, which is a library to compile GLSL code to SPIR-V from within your program.
在命令行里编译shader是最方便的选择之一,并且是我们教程中使用的一种方式,但它也能直接从你的代码中编译shader。Vulkan SDK包含了libshaderc这个shader编译相关的库,它能在你的程序中将GLSL和HLSL编译为SPIR-V字节码。
一些相关信息的链接:
-
glslc 程序使用帮助文档链接 https://github.com/vilyLei/shaderc/tree/main/glslc
-
Make SPIR-V Modules: https://www.khronos.org/assets/uploads/developers/library/2017-vulkan-devu-vancouver/007%20-%20Making%20SPIR-V%20Modules.pdf
-
SPIR-V的官方说明文档:SPIR-V Specification Provisional
-
KlayGE引擎关于跨平台shader编译的思考: 跨平台shader编译的过去、现在和未来 - KlayGE游戏引擎
-
SPIR-V编译机制的背景知识:
Loading a shader
加载shader
Now that we have a way of producing SPIR-V shaders, it's time to load them into our program to plug them into the graphics pipeline at some point. We'll first write a simple helper function to load the binary data from the files.
现在,我们已经有方办法生成SPIR-V二进制字节码格式的shader了,是时候将它们加载到我们的程序中了,以便在某个时候将它们插入图形管线中。我们接下来写一个简单的辅助函数从shader文件中加载二进制数据。
#include <fstream>

...

static std::vector<char> readFile(const std::string& filename) {
    std::ifstream file(filename, std::ios::ate | std::ios::binary);

    if (!file.is_open()) {
        throw std::runtime_error("failed to open file!");
    }
}
The readFile function will read all of the bytes from the specified file and return them in a byte array managed by std::vector. We start by opening the file with two flags:
-
ate: Start reading at the end of the file
-
binary: Read the file as binary file (avoid text transformations)
The advantage of starting to read at the end of the file is that we can use the read position to determine the size of the file and allocate a buffer:
这个readFile 函数从指定的文件里读入所有的字节,并且返回一个 std::vector 形式的字节数组。我们首先通过两个标志位打开文件:
-
ate:定位到文件末尾,从文件尾开始读。
-
binary:以二进制的方式读文件(避免文本转换)。
从文件末尾开始读取的优点是我们能从当前读的位置确定文件字节数(文件大小),并且据此建立一个对应的内存缓冲区(准备用来存放这些数据):
size_t fileSize = (size_t) file.tellg();
std::vector<char> buffer(fileSize);
After that, we can seek back to the beginning of the file and read all of the bytes at once:
做完上面步骤之后,我们可以追溯至起始位置,一次读完所有字节:
file.seekg(0);
file.read(buffer.data(), fileSize);
And finally close the file and return the bytes:
最后,关闭文件返回字节数据:
file.close();

return buffer;
We'll now call this function from createGraphicsPipeline to load the bytecode of the two shaders:
我们在 createGraphicsPipeline 函数中调用上述函数去载入两个shader文件的字节数据:
void createGraphicsPipeline() {
    auto vertShaderCode = readFile("shaders/vert.spv");
    auto fragShaderCode = readFile("shaders/frag.spv");
}
Make sure that the shaders are loaded correctly by printing the size of the buffers and checking if they match the actual file size in bytes. Note that the code doesn't need to be null terminated since it's binary code and we will later be explicit about its size.
确保通过获得的缓冲区大小正确的价值这些shader数据,检测他们是否匹配实际的文件字节数大小。请注意,代码不需要以 null 结尾,因为它是二进制代码,稍后我们将明确说明其大小。
Creating shader modules
Before we can pass the code to the pipeline, we have to wrap it in a VkShaderModule object. Let's create a helper function createShaderModule to do that.
我们传递shader代码到管线之前,我们必须用VkShaderModule 对象来包装它。让我们创建一个辅助函数 createShaderModule 来做这件事。
VkShaderModule createShaderModule(const std::vector<char>& code) {

}
The function will take a buffer with the bytecode as parameter and create a VkShaderModule from it.
Creating a shader module is simple, we only need to specify a pointer to the buffer with the bytecode and the length of it. This information is specified in a VkShaderModuleCreateInfo structure. The one catch is that the size of the bytecode is specified in bytes, but the bytecode pointer is a uint32_t pointer rather than a char pointer. Therefore we will need to cast the pointer with reinterpret_cast as shown below. When you perform a cast like this, you also need to ensure that the data satisfies the alignment requirements of uint32_t. Lucky for us, the data is stored in an std::vector where the default allocator already ensures that the data satisfies the worst case alignment requirements.
这个函数以存放字节码的缓冲区作为参数,并且创建一个VkShaderModule 对象。
创建一个shader模块很简单,我们只需指定一个存放字节码的缓冲区(内存块)的指针及其字节数长度。创建信息是一个具体的 VkShaderModuleCreateInfo 结构体。一个事情是设置字节码的字节长度,但是设置的字节码缓冲区的指针是uint32_t 类型的指针而不是 char 类型的指针。因此我们必须用 reinterpret_cast 函数来转换,如下面代码所示。当你用一个转换的时候,你也需要确保内存数据的对齐方式是符合uint32_t类型需求的。幸运的是,数据存放在 一个std::vector 对象里,它默认的分配器已经确保数据满足最差情况的分配需求了。
VkShaderModuleCreateInfo createInfo{};
createInfo.sType = VK_STRUCTURE_TYPE_SHADER_MODULE_CREATE_INFO;
createInfo.codeSize = code.size();
createInfo.pCode = reinterpret_cast<const uint32_t*>(code.data());
The VkShaderModule can then be created with a call to vkCreateShaderModule:
调用 vkCreateShaderModule 函数创建 VkShaderModule 对象:
VkShaderModule shaderModule;
if (vkCreateShaderModule(device, &createInfo, nullptr, &shaderModule) != VK_SUCCESS) {
    throw std::runtime_error("failed to create shader module!");
}
The parameters are the same as those in previous object creation functions: the logical device, pointer to create info structure, optional pointer to custom allocators and handle output variable. The buffer with the code can be freed immediately after creating the shader module. Don't forget to return the created shader module:
函数参数和前面一些对象的创建一样:逻辑设备,指向创建信息结构体的指针,可选分配器的指针以及输出的变量指针。创建好shader模块对象之后,存放shader代码数据的缓冲区能被立即释放。别忘了返回创建的shader模块对象:
return shaderModule;Shader modules are just a thin wrapper around the shader bytecode that we've previously loaded from a file and the functions defined in it. The compilation and linking of the SPIR-V bytecode to machine code for execution by the GPU doesn't happen until the graphics pipeline is created. That means that we're allowed to destroy the shader modules again as soon as pipeline creation is finished, which is why we'll make them local variables in the createGraphicsPipeline function instead of class members:
shader模块对象只是对前面从shader文件中载入的shader字节码数据很简易的包装,shader功能函数定义在shader文件内。编译和链接SPIR-V字节码到能被GPU执行的机器码这个操作不会触发,触发图形管线被创建。也就是说我们是被允许在管线创建完毕就能销毁对应的shader模块对象了,这也是为什么我们在 createGraphicsPipeline 函数中用局部变量来存放shader模块对象而不是类成员变量:
oid createGraphicsPipeline() {
    auto vertShaderCode = readFile("shaders/vert.spv");
    auto fragShaderCode = readFile("shaders/frag.spv");

    VkShaderModule vertShaderModule = createShaderModule(vertShaderCode);
    VkShaderModule fragShaderModule = createShaderModule(fragShaderCode);
The cleanup should then happen at the end of the function by adding two calls to vkDestroyShaderModule. All of the remaining code in this chapter will be inserted before these lines.
清除操作应该发生在函数结尾,通过调用两次 vkDestroyShaderModule 函数。本章节用到的其余的相关代码放在这两行代码之前。
    ...
    vkDestroyShaderModule(device, fragShaderModule, nullptr);
    vkDestroyShaderModule(device, vertShaderModule, nullptr);
}
Shader stage creation
Shader阶段创建
To actually use the shaders we'll need to assign them to a specific pipeline stage through VkPipelineShaderStageCreateInfo structures as part of the actual pipeline creation process.
We'll start by filling in the structure for the vertex shader, again in the createGraphicsPipeline function.
要实际使用着色器,我们需要通过VkPipelineShaderStageCreateInfo 创建信息结构体将它们分配给特定的图像管线阶段,作为实际管线创建过程的一部分。再回到createGraphicsPipeline 函数,我们从顶点着色器开始填充这个结构(的相关数据)。
VkPipelineShaderStageCreateInfo vertShaderStageInfo{};
vertShaderStageInfo.sType = VK_STRUCTURE_TYPE_PIPELINE_SHADER_STAGE_CREATE_INFO;
vertShaderStageInfo.stage = VK_SHADER_STAGE_VERTEX_BIT;
The first step, besides the obligatory sType member, is telling Vulkan in which pipeline stage the shader is going to be used. There is an enum value for each of the programmable stages described in the previous chapter.
除了必须的 sType 成员变量外,第一步是告诉Vulkan系统将在哪个管线阶段使用shader。上一章中描述的每个可编程阶段都有一个枚举值。
vertShaderStageInfo.module = vertShaderModule;
vertShaderStageInfo.pName = "main";
The next two members specify the shader module containing the code, and the function to invoke, known as the entrypoint. That means that it's possible to combine multiple fragment shaders into a single shader module and use different entry points to differentiate between their behaviors. In this case, we'll stick to the standard main, however.
后面两个成员变量指定shader模型包含的代码,以及入口函数,成为入口点(entrypoint)。那就意味着多个片段着色器程序可能被合并在单个shader模块中,使用不同的入口点(入口函数)来分别应用它们的功能(使用不同的入口函数就能调用对应的不同shader功能)。不管怎样,当前我们直接使用标准的main 函数作为入口函数。
There is one more (optional) member, pSpecializationInfo, which we won't be using here, but is worth discussing. It allows you to specify values for shader constants. You can use a single shader module where its behavior can be configured at pipeline creation by specifying different values for the constants used in it. This is more efficient than configuring the shader using variables at render time, because the compiler can do optimizations like eliminating if statements that depend on these values. If you don't have any constants like that, then you can set the member to nullptr, which our struct initialization does automatically.
还有一个(可选的)成员变量,pSpecializationInfo 在这里我们不会使用它,但是有必要讨论一下。它允许你指定shader常量的值。你可以使用单个shader,在管线创建过程中可以通过将其中使用的常量指定不同的值来配置其行为。这比使用变量在渲染运行时配置shader高效得多,因为编译器可以进行优化,例如消除依赖于这些值的 if 分支语句。假如像这些测试shader代码一样,你没有使用任何常量,那么你可以将这个值设置为 nullptr ,(即便你不设置为 nullptr)我们的结构体初始化会自动完成这个操作。
Modifying the structure to suit the fragment shader is easy:
修改对应的创建信息结构体适合片段着色器很简单:
VkPipelineShaderStageCreateInfo fragShaderStageInfo{};
fragShaderStageInfo.sType = VK_STRUCTURE_TYPE_PIPELINE_SHADER_STAGE_CREATE_INFO;
fragShaderStageInfo.stage = VK_SHADER_STAGE_FRAGMENT_BIT;
fragShaderStageInfo.module = fragShaderModule;
fragShaderStageInfo.pName = "main";
Finish by defining an array that contains these two structs, which we'll later use to reference them in the actual pipeline creation step.
最后定义一个包含这两个结构体的数组,稍后我们将在实际的图形管线创建步骤中使用它来引用它们。
VkPipelineShaderStageCreateInfo shaderStages[] = {vertShaderStageInfo, fragShaderStageInfo};That's all there is to describing the programmable stages of the pipeline. In the next chapter we'll look at the fixed-function stages.
这就是描述图形管线中可编程阶段的全部内容。下个章节我们将研究固定功能阶段。
源码:
#define GLFW_INCLUDE_VULKAN
#include <GLFW/glfw3.h>

#include <iostream>
#include <fstream>
#include <stdexcept>
#include <algorithm>
#include <vector>
#include <cstring>
#include <cstdlib>
#include <cstdint>
#include <limits>
#include <optional>
#include <set>

const uint32_t WIDTH = 800;
const uint32_t HEIGHT = 600;

const std::vector<const char*> validationLayers = {
    "VK_LAYER_KHRONOS_validation"
};

const std::vector<const char*> deviceExtensions = {
    VK_KHR_SWAPCHAIN_EXTENSION_NAME
};

#ifdef NDEBUG
const bool enableValidationLayers = false;
#else
const bool enableValidationLayers = true;
#endif

VkResult CreateDebugUtilsMessengerEXT(VkInstance instance, const VkDebugUtilsMessengerCreateInfoEXT* pCreateInfo, const VkAllocationCallbacks* pAllocator, VkDebugUtilsMessengerEXT* pDebugMessenger) {
    auto func = (PFN_vkCreateDebugUtilsMessengerEXT) vkGetInstanceProcAddr(instance, "vkCreateDebugUtilsMessengerEXT");
    if (func != nullptr) {
        return func(instance, pCreateInfo, pAllocator, pDebugMessenger);
    } else {
        return VK_ERROR_EXTENSION_NOT_PRESENT;
    }
}

void DestroyDebugUtilsMessengerEXT(VkInstance instance, VkDebugUtilsMessengerEXT debugMessenger, const VkAllocationCallbacks* pAllocator) {
    auto func = (PFN_vkDestroyDebugUtilsMessengerEXT) vkGetInstanceProcAddr(instance, "vkDestroyDebugUtilsMessengerEXT");
    if (func != nullptr) {
        func(instance, debugMessenger, pAllocator);
    }
}

struct QueueFamilyIndices {
    std::optional<uint32_t> graphicsFamily;
    std::optional<uint32_t> presentFamily;

    bool isComplete() {
        return graphicsFamily.has_value() && presentFamily.has_value();
    }
};

struct SwapChainSupportDetails {
    VkSurfaceCapabilitiesKHR capabilities;
    std::vector<VkSurfaceFormatKHR> formats;
    std::vector<VkPresentModeKHR> presentModes;
};

class HelloTriangleApplication {
public:
    void run() {
        initWindow();
        initVulkan();
        mainLoop();
        cleanup();
    }

private:
    GLFWwindow* window;

    VkInstance instance;
    VkDebugUtilsMessengerEXT debugMessenger;
    VkSurfaceKHR surface;

    VkPhysicalDevice physicalDevice = VK_NULL_HANDLE;
    VkDevice device;

    VkQueue graphicsQueue;
    VkQueue presentQueue;

    VkSwapchainKHR swapChain;
    std::vector<VkImage> swapChainImages;
    VkFormat swapChainImageFormat;
    VkExtent2D swapChainExtent;
    std::vector<VkImageView> swapChainImageViews;

    void initWindow() {
        glfwInit();

        glfwWindowHint(GLFW_CLIENT_API, GLFW_NO_API);
        glfwWindowHint(GLFW_RESIZABLE, GLFW_FALSE);

        window = glfwCreateWindow(WIDTH, HEIGHT, "Vulkan", nullptr, nullptr);
    }

    void initVulkan() {
        createInstance();
        setupDebugMessenger();
        createSurface();
        pickPhysicalDevice();
        createLogicalDevice();
        createSwapChain();
        createImageViews();
        createGraphicsPipeline();
    }

    void mainLoop() {
        while (!glfwWindowShouldClose(window)) {
            glfwPollEvents();
        }
    }

    void cleanup() {
        for (auto imageView : swapChainImageViews) {
            vkDestroyImageView(device, imageView, nullptr);
        }

        vkDestroySwapchainKHR(device, swapChain, nullptr);
        vkDestroyDevice(device, nullptr);

        if (enableValidationLayers) {
            DestroyDebugUtilsMessengerEXT(instance, debugMessenger, nullptr);
        }

        vkDestroySurfaceKHR(instance, surface, nullptr);
        vkDestroyInstance(instance, nullptr);

        glfwDestroyWindow(window);

        glfwTerminate();
    }

    void createInstance() {
        if (enableValidationLayers && !checkValidationLayerSupport()) {
            throw std::runtime_error("validation layers requested, but not available!");
        }

        VkApplicationInfo appInfo{};
        appInfo.sType = VK_STRUCTURE_TYPE_APPLICATION_INFO;
        appInfo.pApplicationName = "Hello Triangle";
        appInfo.applicationVersion = VK_MAKE_VERSION(1, 0, 0);
        appInfo.pEngineName = "No Engine";
        appInfo.engineVersion = VK_MAKE_VERSION(1, 0, 0);
        appInfo.apiVersion = VK_API_VERSION_1_0;

        VkInstanceCreateInfo createInfo{};
        createInfo.sType = VK_STRUCTURE_TYPE_INSTANCE_CREATE_INFO;
        createInfo.pApplicationInfo = &appInfo;

        auto extensions = getRequiredExtensions();
        createInfo.enabledExtensionCount = static_cast<uint32_t>(extensions.size());
        createInfo.ppEnabledExtensionNames = extensions.data();

        VkDebugUtilsMessengerCreateInfoEXT debugCreateInfo{};
        if (enableValidationLayers) {
            createInfo.enabledLayerCount = static_cast<uint32_t>(validationLayers.size());
            createInfo.ppEnabledLayerNames = validationLayers.data();

            populateDebugMessengerCreateInfo(debugCreateInfo);
            createInfo.pNext = (VkDebugUtilsMessengerCreateInfoEXT*) &debugCreateInfo;
        } else {
            createInfo.enabledLayerCount = 0;

            createInfo.pNext = nullptr;
        }

        if (vkCreateInstance(&createInfo, nullptr, &instance) != VK_SUCCESS) {
            throw std::runtime_error("failed to create instance!");
        }
    }

    void populateDebugMessengerCreateInfo(VkDebugUtilsMessengerCreateInfoEXT& createInfo) {
        createInfo = {};
        createInfo.sType = VK_STRUCTURE_TYPE_DEBUG_UTILS_MESSENGER_CREATE_INFO_EXT;
        createInfo.messageSeverity = VK_DEBUG_UTILS_MESSAGE_SEVERITY_VERBOSE_BIT_EXT | VK_DEBUG_UTILS_MESSAGE_SEVERITY_WARNING_BIT_EXT | VK_DEBUG_UTILS_MESSAGE_SEVERITY_ERROR_BIT_EXT;
        createInfo.messageType = VK_DEBUG_UTILS_MESSAGE_TYPE_GENERAL_BIT_EXT | VK_DEBUG_UTILS_MESSAGE_TYPE_VALIDATION_BIT_EXT | VK_DEBUG_UTILS_MESSAGE_TYPE_PERFORMANCE_BIT_EXT;
        createInfo.pfnUserCallback = debugCallback;
    }

    void setupDebugMessenger() {
        if (!enableValidationLayers) return;

        VkDebugUtilsMessengerCreateInfoEXT createInfo;
        populateDebugMessengerCreateInfo(createInfo);

        if (CreateDebugUtilsMessengerEXT(instance, &createInfo, nullptr, &debugMessenger) != VK_SUCCESS) {
            throw std::runtime_error("failed to set up debug messenger!");
        }
    }

    void createSurface() {
        if (glfwCreateWindowSurface(instance, window, nullptr, &surface) != VK_SUCCESS) {
            throw std::runtime_error("failed to create window surface!");
        }
    }

    void pickPhysicalDevice() {
        uint32_t deviceCount = 0;
        vkEnumeratePhysicalDevices(instance, &deviceCount, nullptr);

        if (deviceCount == 0) {
            throw std::runtime_error("failed to find GPUs with Vulkan support!");
        }

        std::vector<VkPhysicalDevice> devices(deviceCount);
        vkEnumeratePhysicalDevices(instance, &deviceCount, devices.data());

        for (const auto& device : devices) {
            if (isDeviceSuitable(device)) {
                physicalDevice = device;
                break;
            }
        }

        if (physicalDevice == VK_NULL_HANDLE) {
            throw std::runtime_error("failed to find a suitable GPU!");
        }
    }

    void createLogicalDevice() {
        QueueFamilyIndices indices = findQueueFamilies(physicalDevice);

        std::vector<VkDeviceQueueCreateInfo> queueCreateInfos;
        std::set<uint32_t> uniqueQueueFamilies = {indices.graphicsFamily.value(), indices.presentFamily.value()};

        float queuePriority = 1.0f;
        for (uint32_t queueFamily : uniqueQueueFamilies) {
            VkDeviceQueueCreateInfo queueCreateInfo{};
            queueCreateInfo.sType = VK_STRUCTURE_TYPE_DEVICE_QUEUE_CREATE_INFO;
            queueCreateInfo.queueFamilyIndex = queueFamily;
            queueCreateInfo.queueCount = 1;
            queueCreateInfo.pQueuePriorities = &queuePriority;
            queueCreateInfos.push_back(queueCreateInfo);
        }

        VkPhysicalDeviceFeatures deviceFeatures{};

        VkDeviceCreateInfo createInfo{};
        createInfo.sType = VK_STRUCTURE_TYPE_DEVICE_CREATE_INFO;

        createInfo.queueCreateInfoCount = static_cast<uint32_t>(queueCreateInfos.size());
        createInfo.pQueueCreateInfos = queueCreateInfos.data();

        createInfo.pEnabledFeatures = &deviceFeatures;

        createInfo.enabledExtensionCount = static_cast<uint32_t>(deviceExtensions.size());
        createInfo.ppEnabledExtensionNames = deviceExtensions.data();

        if (enableValidationLayers) {
            createInfo.enabledLayerCount = static_cast<uint32_t>(validationLayers.size());
            createInfo.ppEnabledLayerNames = validationLayers.data();
        } else {
            createInfo.enabledLayerCount = 0;
        }

        if (vkCreateDevice(physicalDevice, &createInfo, nullptr, &device) != VK_SUCCESS) {
            throw std::runtime_error("failed to create logical device!");
        }

        vkGetDeviceQueue(device, indices.graphicsFamily.value(), 0, &graphicsQueue);
        vkGetDeviceQueue(device, indices.presentFamily.value(), 0, &presentQueue);
    }

    void createSwapChain() {
        SwapChainSupportDetails swapChainSupport = querySwapChainSupport(physicalDevice);

        VkSurfaceFormatKHR surfaceFormat = chooseSwapSurfaceFormat(swapChainSupport.formats);
        VkPresentModeKHR presentMode = chooseSwapPresentMode(swapChainSupport.presentModes);
        VkExtent2D extent = chooseSwapExtent(swapChainSupport.capabilities);

        uint32_t imageCount = swapChainSupport.capabilities.minImageCount + 1;
        if (swapChainSupport.capabilities.maxImageCount > 0 && imageCount > swapChainSupport.capabilities.maxImageCount) {
            imageCount = swapChainSupport.capabilities.maxImageCount;
        }

        VkSwapchainCreateInfoKHR createInfo{};
        createInfo.sType = VK_STRUCTURE_TYPE_SWAPCHAIN_CREATE_INFO_KHR;
        createInfo.surface = surface;

        createInfo.minImageCount = imageCount;
        createInfo.imageFormat = surfaceFormat.format;
        createInfo.imageColorSpace = surfaceFormat.colorSpace;
        createInfo.imageExtent = extent;
        createInfo.imageArrayLayers = 1;
        createInfo.imageUsage = VK_IMAGE_USAGE_COLOR_ATTACHMENT_BIT;

        QueueFamilyIndices indices = findQueueFamilies(physicalDevice);
        uint32_t queueFamilyIndices[] = {indices.graphicsFamily.value(), indices.presentFamily.value()};

        if (indices.graphicsFamily != indices.presentFamily) {
            createInfo.imageSharingMode = VK_SHARING_MODE_CONCURRENT;
            createInfo.queueFamilyIndexCount = 2;
            createInfo.pQueueFamilyIndices = queueFamilyIndices;
        } else {
            createInfo.imageSharingMode = VK_SHARING_MODE_EXCLUSIVE;
        }

        createInfo.preTransform = swapChainSupport.capabilities.currentTransform;
        createInfo.compositeAlpha = VK_COMPOSITE_ALPHA_OPAQUE_BIT_KHR;
        createInfo.presentMode = presentMode;
        createInfo.clipped = VK_TRUE;

        createInfo.oldSwapchain = VK_NULL_HANDLE;

        if (vkCreateSwapchainKHR(device, &createInfo, nullptr, &swapChain) != VK_SUCCESS) {
            throw std::runtime_error("failed to create swap chain!");
        }

        vkGetSwapchainImagesKHR(device, swapChain, &imageCount, nullptr);
        swapChainImages.resize(imageCount);
        vkGetSwapchainImagesKHR(device, swapChain, &imageCount, swapChainImages.data());

        swapChainImageFormat = surfaceFormat.format;
        swapChainExtent = extent;
    }

    void createImageViews() {
        swapChainImageViews.resize(swapChainImages.size());

        for (size_t i = 0; i < swapChainImages.size(); i++) {
            VkImageViewCreateInfo createInfo{};
            createInfo.sType = VK_STRUCTURE_TYPE_IMAGE_VIEW_CREATE_INFO;
            createInfo.image = swapChainImages[i];
            createInfo.viewType = VK_IMAGE_VIEW_TYPE_2D;
            createInfo.format = swapChainImageFormat;
            createInfo.components.r = VK_COMPONENT_SWIZZLE_IDENTITY;
            createInfo.components.g = VK_COMPONENT_SWIZZLE_IDENTITY;
            createInfo.components.b = VK_COMPONENT_SWIZZLE_IDENTITY;
            createInfo.components.a = VK_COMPONENT_SWIZZLE_IDENTITY;
            createInfo.subresourceRange.aspectMask = VK_IMAGE_ASPECT_COLOR_BIT;
            createInfo.subresourceRange.baseMipLevel = 0;
            createInfo.subresourceRange.levelCount = 1;
            createInfo.subresourceRange.baseArrayLayer = 0;
            createInfo.subresourceRange.layerCount = 1;

            if (vkCreateImageView(device, &createInfo, nullptr, &swapChainImageViews[i]) != VK_SUCCESS) {
                throw std::runtime_error("failed to create image views!");
            }
        }
    }

    void createGraphicsPipeline() {
        auto vertShaderCode = readFile("shaders/vert.spv");
        auto fragShaderCode = readFile("shaders/frag.spv");

        VkShaderModule vertShaderModule = createShaderModule(vertShaderCode);
        VkShaderModule fragShaderModule = createShaderModule(fragShaderCode);

        VkPipelineShaderStageCreateInfo vertShaderStageInfo{};
        vertShaderStageInfo.sType = VK_STRUCTURE_TYPE_PIPELINE_SHADER_STAGE_CREATE_INFO;
        vertShaderStageInfo.stage = VK_SHADER_STAGE_VERTEX_BIT;
        vertShaderStageInfo.module = vertShaderModule;
        vertShaderStageInfo.pName = "main";

        VkPipelineShaderStageCreateInfo fragShaderStageInfo{};
        fragShaderStageInfo.sType = VK_STRUCTURE_TYPE_PIPELINE_SHADER_STAGE_CREATE_INFO;
        fragShaderStageInfo.stage = VK_SHADER_STAGE_FRAGMENT_BIT;
        fragShaderStageInfo.module = fragShaderModule;
        fragShaderStageInfo.pName = "main";

        VkPipelineShaderStageCreateInfo shaderStages[] = {vertShaderStageInfo, fragShaderStageInfo};

        vkDestroyShaderModule(device, fragShaderModule, nullptr);
        vkDestroyShaderModule(device, vertShaderModule, nullptr);
    }

    VkShaderModule createShaderModule(const std::vector<char>& code) {
        VkShaderModuleCreateInfo createInfo{};
        createInfo.sType = VK_STRUCTURE_TYPE_SHADER_MODULE_CREATE_INFO;
        createInfo.codeSize = code.size();
        createInfo.pCode = reinterpret_cast<const uint32_t*>(code.data());

        VkShaderModule shaderModule;
        if (vkCreateShaderModule(device, &createInfo, nullptr, &shaderModule) != VK_SUCCESS) {
            throw std::runtime_error("failed to create shader module!");
        }

        return shaderModule;
    }

    VkSurfaceFormatKHR chooseSwapSurfaceFormat(const std::vector<VkSurfaceFormatKHR>& availableFormats) {
        for (const auto& availableFormat : availableFormats) {
            if (availableFormat.format == VK_FORMAT_B8G8R8A8_SRGB && availableFormat.colorSpace == VK_COLOR_SPACE_SRGB_NONLINEAR_KHR) {
                return availableFormat;
            }
        }

        return availableFormats[0];
    }

    VkPresentModeKHR chooseSwapPresentMode(const std::vector<VkPresentModeKHR>& availablePresentModes) {
        for (const auto& availablePresentMode : availablePresentModes) {
            if (availablePresentMode == VK_PRESENT_MODE_MAILBOX_KHR) {
                return availablePresentMode;
            }
        }

        return VK_PRESENT_MODE_FIFO_KHR;
    }

    VkExtent2D chooseSwapExtent(const VkSurfaceCapabilitiesKHR& capabilities) {
        if (capabilities.currentExtent.width != std::numeric_limits<uint32_t>::max()) {
            return capabilities.currentExtent;
        } else {
            int width, height;
            glfwGetFramebufferSize(window, &width, &height);

            VkExtent2D actualExtent = {
                static_cast<uint32_t>(width),
                static_cast<uint32_t>(height)
            };

            actualExtent.width = std::clamp(actualExtent.width, capabilities.minImageExtent.width, capabilities.maxImageExtent.width);
            actualExtent.height = std::clamp(actualExtent.height, capabilities.minImageExtent.height, capabilities.maxImageExtent.height);

            return actualExtent;
        }
    }

    SwapChainSupportDetails querySwapChainSupport(VkPhysicalDevice device) {
        SwapChainSupportDetails details;

        vkGetPhysicalDeviceSurfaceCapabilitiesKHR(device, surface, &details.capabilities);

        uint32_t formatCount;
        vkGetPhysicalDeviceSurfaceFormatsKHR(device, surface, &formatCount, nullptr);

        if (formatCount != 0) {
            details.formats.resize(formatCount);
            vkGetPhysicalDeviceSurfaceFormatsKHR(device, surface, &formatCount, details.formats.data());
        }

        uint32_t presentModeCount;
        vkGetPhysicalDeviceSurfacePresentModesKHR(device, surface, &presentModeCount, nullptr);

        if (presentModeCount != 0) {
            details.presentModes.resize(presentModeCount);
            vkGetPhysicalDeviceSurfacePresentModesKHR(device, surface, &presentModeCount, details.presentModes.data());
        }

        return details;
    }

    bool isDeviceSuitable(VkPhysicalDevice device) {
        QueueFamilyIndices indices = findQueueFamilies(device);

        bool extensionsSupported = checkDeviceExtensionSupport(device);

        bool swapChainAdequate = false;
        if (extensionsSupported) {
            SwapChainSupportDetails swapChainSupport = querySwapChainSupport(device);
            swapChainAdequate = !swapChainSupport.formats.empty() && !swapChainSupport.presentModes.empty();
        }

        return indices.isComplete() && extensionsSupported && swapChainAdequate;
    }

    bool checkDeviceExtensionSupport(VkPhysicalDevice device) {
        uint32_t extensionCount;
        vkEnumerateDeviceExtensionProperties(device, nullptr, &extensionCount, nullptr);

        std::vector<VkExtensionProperties> availableExtensions(extensionCount);
        vkEnumerateDeviceExtensionProperties(device, nullptr, &extensionCount, availableExtensions.data());

        std::set<std::string> requiredExtensions(deviceExtensions.begin(), deviceExtensions.end());

        for (const auto& extension : availableExtensions) {
            requiredExtensions.erase(extension.extensionName);
        }

        return requiredExtensions.empty();
    }

    QueueFamilyIndices findQueueFamilies(VkPhysicalDevice device) {
        QueueFamilyIndices indices;

        uint32_t queueFamilyCount = 0;
        vkGetPhysicalDeviceQueueFamilyProperties(device, &queueFamilyCount, nullptr);

        std::vector<VkQueueFamilyProperties> queueFamilies(queueFamilyCount);
        vkGetPhysicalDeviceQueueFamilyProperties(device, &queueFamilyCount, queueFamilies.data());

        int i = 0;
        for (const auto& queueFamily : queueFamilies) {
            if (queueFamily.queueFlags & VK_QUEUE_GRAPHICS_BIT) {
                indices.graphicsFamily = i;
            }

            VkBool32 presentSupport = false;
            vkGetPhysicalDeviceSurfaceSupportKHR(device, i, surface, &presentSupport);

            if (presentSupport) {
                indices.presentFamily = i;
            }

            if (indices.isComplete()) {
                break;
            }

            i++;
        }

        return indices;
    }

    std::vector<const char*> getRequiredExtensions() {
        uint32_t glfwExtensionCount = 0;
        const char** glfwExtensions;
        glfwExtensions = glfwGetRequiredInstanceExtensions(&glfwExtensionCount);

        std::vector<const char*> extensions(glfwExtensions, glfwExtensions + glfwExtensionCount);

        if (enableValidationLayers) {
            extensions.push_back(VK_EXT_DEBUG_UTILS_EXTENSION_NAME);
        }

        return extensions;
    }

    bool checkValidationLayerSupport() {
        uint32_t layerCount;
        vkEnumerateInstanceLayerProperties(&layerCount, nullptr);

        std::vector<VkLayerProperties> availableLayers(layerCount);
        vkEnumerateInstanceLayerProperties(&layerCount, availableLayers.data());

        for (const char* layerName : validationLayers) {
            bool layerFound = false;

            for (const auto& layerProperties : availableLayers) {
                if (strcmp(layerName, layerProperties.layerName) == 0) {
                    layerFound = true;
                    break;
                }
            }

            if (!layerFound) {
                return false;
            }
        }

        return true;
    }

    static std::vector<char> readFile(const std::string& filename) {
        std::ifstream file(filename, std::ios::ate | std::ios::binary);

        if (!file.is_open()) {
            throw std::runtime_error("failed to open file!");
        }

        size_t fileSize = (size_t) file.tellg();
        std::vector<char> buffer(fileSize);

        file.seekg(0);
        file.read(buffer.data(), fileSize);

        file.close();

        return buffer;
    }

    static VKAPI_ATTR VkBool32 VKAPI_CALL debugCallback(VkDebugUtilsMessageSeverityFlagBitsEXT messageSeverity, VkDebugUtilsMessageTypeFlagsEXT messageType, const VkDebugUtilsMessengerCallbackDataEXT* pCallbackData, void* pUserData) {
        std::cerr << "validation layer: " << pCallbackData->pMessage << std::endl;

        return VK_FALSE;
    }
};

int main() {
    HelloTriangleApplication app;

    try {
        app.run();
    } catch (const std::exception& e) {
        std::cerr << e.what() << std::endl;
        return EXIT_FAILURE;
    }

    return EXIT_SUCCESS;
}


 986
986


 被折叠的 条评论
为什么被折叠?
被折叠的 条评论
为什么被折叠?
 到【灌水乐园】发言


