


本次我们梳理Lyra的技能激活流程
首先从技能组件UAbilitySystemComponent开始,该组件的初始化我们之前已经提到过,是在ALyraGameState的构造函数中初始化的。
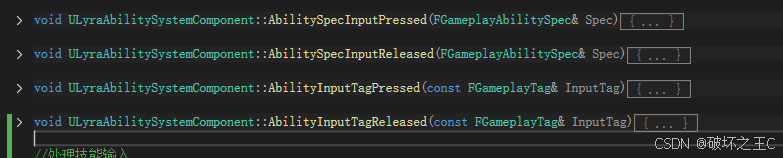
在该文件中有两种处理输入的函数,这里解释下这两种函数的区别的应用场景:
AbilitySpecInputPressed/Released: 直接关联到具体的技能实例(AbilitySpec),处理绑定的输入动作ID,当与技能绑定的具体输入按键(如键盘按键或手柄按钮)被按下或释放时触发。由父类AbilitySystemComponent管理,通过输入ID直接绑定到技能实例。
AbilityInputTagPressed/Released: 基于GameplayTag的抽象输入系统,与具体按键无关。当输入动作映射到某个标签(如Input.Attack)时触发,无论实际按键如何绑定。实现跨设备/按键配置的输入逻辑(例如不同平台的“跳跃”动作统一由Input.Jump标签处理),支持复杂的技能逻辑(如连击、蓄力技能通过标签状态判断阶段),供多个技能或系统共享输入状态(如UI提示根据标签是否按下改变),通常由输入子系统或标签管理器广播,技能通过订阅标签响应。
我们着重用注释解释后者的内部逻辑如下:
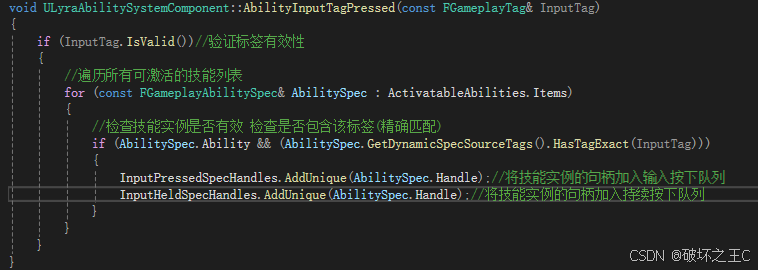
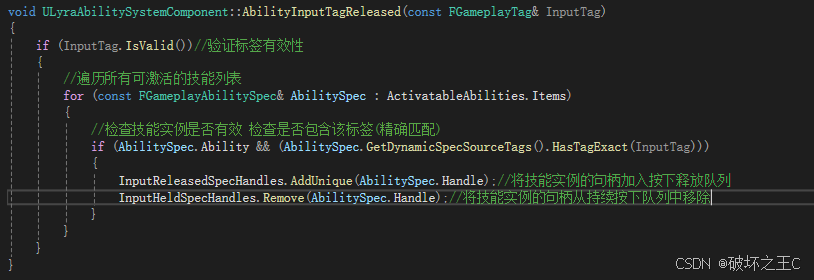
以上函数主要作用就是将玩家输入加入到不同的队列中批量处理,我们继续看具体处理输入的函数

从这个函数的形参,可以猜测出该函数是在Tick中处理的,具体内部逻辑如下
//处理技能输入
void ULyraAbilitySystemComponent::ProcessAbilityInput(float DeltaTime, bool bGamePaused)
{
	if (HasMatchingGameplayTag(TAG_Gameplay_AbilityInputBlocked))
	{
		ClearAbilityInput();
		return;
	}

	static TArray<FGameplayAbilitySpecHandle> AbilitiesToActivate;
	AbilitiesToActivate.Reset();

	//@TODO: See if we can use FScopedServerAbilityRPCBatcher ScopedRPCBatcher in some of these loops

	//
	// 批量处理所有持续按下的技能
	//
	for (const FGameplayAbilitySpecHandle& SpecHandle : InputHeldSpecHandles)
	{
		if (const FGameplayAbilitySpec* AbilitySpec = FindAbilitySpecFromHandle(SpecHandle))
		{
			if (AbilitySpec->Ability && !AbilitySpec->IsActive())
			{
				const ULyraGameplayAbility* LyraAbilityCDO = Cast<ULyraGameplayAbility>(AbilitySpec->Ability);
				if (LyraAbilityCDO && LyraAbilityCDO->GetActivationPolicy() == ELyraAbilityActivationPolicy::WhileInputActive)
				{
					AbilitiesToActivate.AddUnique(AbilitySpec->Handle);//加入激活队列
				}
			}
		}
	}

	//
	// 批量处理所有按下激活的技能
	//
	for (const FGameplayAbilitySpecHandle& SpecHandle : InputPressedSpecHandles)
	{
		if (FGameplayAbilitySpec* AbilitySpec = FindAbilitySpecFromHandle(SpecHandle))
		{
			if (AbilitySpec->Ability)
			{
				AbilitySpec->InputPressed = true;

				if (AbilitySpec->IsActive())
				{
					// 技能已激活 传递输入事件
					AbilitySpecInputPressed(*AbilitySpec);
				}
				else
				{
					const ULyraGameplayAbility* LyraAbilityCDO = Cast<ULyraGameplayAbility>(AbilitySpec->Ability);

					if (LyraAbilityCDO && LyraAbilityCDO->GetActivationPolicy() == ELyraAbilityActivationPolicy::OnInputTriggered)
					{
						AbilitiesToActivate.AddUnique(AbilitySpec->Handle);//加入激活队列
					}
				}
			}
		}
	}

	//
	// Try to activate all the abilities that are from presses and holds.
	// We do it all at once so that held inputs don't activate the ability
	// and then also send a input event to the ability because of the press.
	//尝试激活所有队列中的技能
	for (const FGameplayAbilitySpecHandle& AbilitySpecHandle : AbilitiesToActivate)
	{
		TryActivateAbility(AbilitySpecHandle);
	}

	//
	// 批量处理所有按下释放的技能
	//
	for (const FGameplayAbilitySpecHandle& SpecHandle : InputReleasedSpecHandles)
	{
		if (FGameplayAbilitySpec* AbilitySpec = FindAbilitySpecFromHandle(SpecHandle))
		{
			if (AbilitySpec->Ability)
			{
				AbilitySpec->InputPressed = false;

				if (AbilitySpec->IsActive())
				{
					// Ability is active so pass along the input event.
					AbilitySpecInputReleased(*AbilitySpec);
				}
			}
		}
	}

	//
	// Clear the cached ability handles.
	//
	InputPressedSpecHandles.Reset();
	InputReleasedSpecHandles.Reset();
}
我们继续跟代码,找到Tick驱动的地方,调用栈如下
- APlayerController::TickActor
- APlayerController::TickPlayerInput
- UPlayerInput::ProcessInputStack
- ALyraPlayerController::PostProcessInput
- ULyraAbilitySystemComponent::ProcessAbilityInput
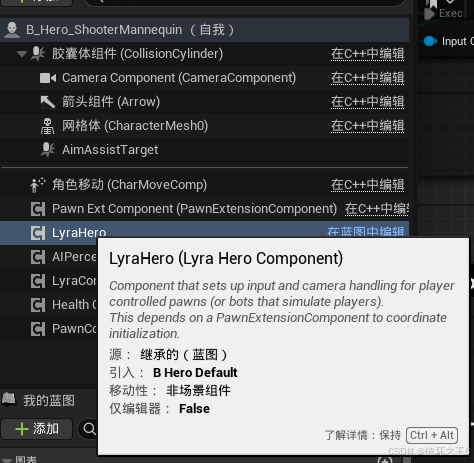
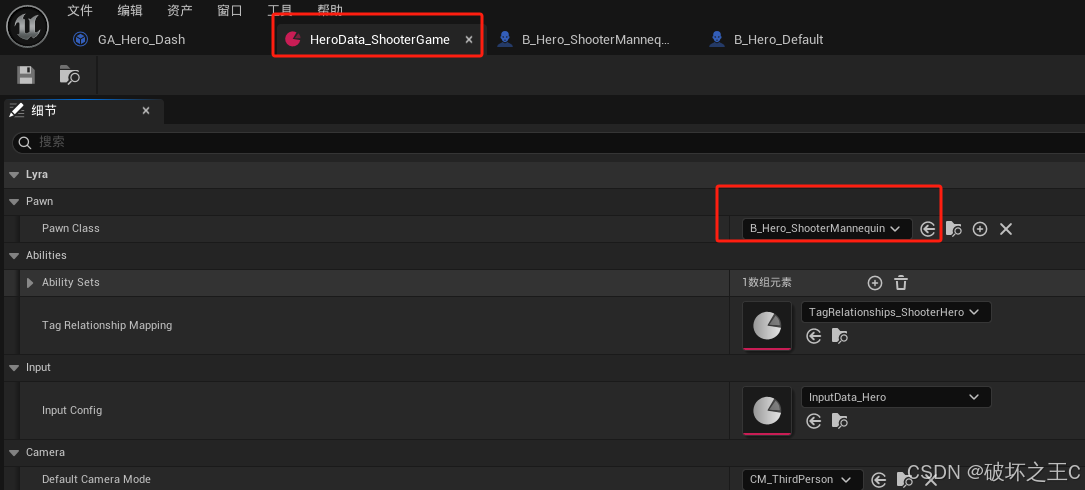
以上就是处理玩家输入的流程。接下来我们去找玩家发起输入的地方将整个流程串联起来,我们跟踪ULyraAbilitySystemComponent组件中获取输入的函数,看看他的调用栈。我们跟踪ULyraAbilitySystemComponent的AbilityInputTagPressed函数找到了ULyraHeroComponent组件,看名字就知道这玩意儿是跟角色相关的,我们找到它初始化的地方是直接被挂载蓝图B_Hero_ShooterMannequin上通过蓝图初始化的
同样,该蓝图也是通过资产配置加载
我们再次回到ULyraHeroComponent组件,在其InitializePlayerInput函数中绑定了用户输入,代码如下:
void ULyraHeroComponent::InitializePlayerInput(UInputComponent* PlayerInputComponent)
{
	check(PlayerInputComponent);

	const APawn* Pawn = GetPawn<APawn>();
	if (!Pawn)
	{
		return;
	}

	const APlayerController* PC = GetController<APlayerController>();
	check(PC);

	const ULyraLocalPlayer* LP = Cast<ULyraLocalPlayer>(PC->GetLocalPlayer());
	check(LP);

	UEnhancedInputLocalPlayerSubsystem* Subsystem = LP->GetSubsystem<UEnhancedInputLocalPlayerSubsystem>();
	check(Subsystem);

	Subsystem->ClearAllMappings();

	if (const ULyraPawnExtensionComponent* PawnExtComp = ULyraPawnExtensionComponent::FindPawnExtensionComponent(Pawn))
	{
		if (const ULyraPawnData* PawnData = PawnExtComp->GetPawnData<ULyraPawnData>())
		{
			if (const ULyraInputConfig* InputConfig = PawnData->InputConfig)
			{
				for (const FInputMappingContextAndPriority& Mapping : DefaultInputMappings)
				{
					if (UInputMappingContext* IMC = Mapping.InputMapping.Get())
					{
						if (Mapping.bRegisterWithSettings)
						{
							if (UEnhancedInputUserSettings* Settings = Subsystem->GetUserSettings())
							{
								Settings->RegisterInputMappingContext(IMC);
							}

							FModifyContextOptions Options = {};
							Options.bIgnoreAllPressedKeysUntilRelease = false;
							// Actually add the config to the local player
							Subsystem->AddMappingContext(IMC, Mapping.Priority, Options);
						}
					}
				}

				// The Lyra Input Component has some additional functions to map Gameplay Tags to an Input Action.
				// If you want this functionality but still want to change your input component class, make it a subclass
				// of the ULyraInputComponent or modify this component accordingly.
				ULyraInputComponent* LyraIC = Cast<ULyraInputComponent>(PlayerInputComponent);
				if (ensureMsgf(LyraIC, TEXT("Unexpected Input Component class! The Gameplay Abilities will not be bound to their inputs. Change the input component to ULyraInputComponent or a subclass of it.")))
				{
					// Add the key mappings that may have been set by the player
					LyraIC->AddInputMappings(InputConfig, Subsystem);

					// This is where we actually bind and input action to a gameplay tag, which means that Gameplay Ability Blueprints will
					// be triggered directly by these input actions Triggered events.
					TArray<uint32> BindHandles;
					LyraIC->BindAbilityActions(InputConfig, this, &ThisClass::Input_AbilityInputTagPressed, &ThisClass::Input_AbilityInputTagReleased, /*out*/ BindHandles);

					LyraIC->BindNativeAction(InputConfig, LyraGameplayTags::InputTag_Move, ETriggerEvent::Triggered, this, &ThisClass::Input_Move, /*bLogIfNotFound=*/ false);
					LyraIC->BindNativeAction(InputConfig, LyraGameplayTags::InputTag_Look_Mouse, ETriggerEvent::Triggered, this, &ThisClass::Input_LookMouse, /*bLogIfNotFound=*/ false);
					LyraIC->BindNativeAction(InputConfig, LyraGameplayTags::InputTag_Look_Stick, ETriggerEvent::Triggered, this, &ThisClass::Input_LookStick, /*bLogIfNotFound=*/ false);
					LyraIC->BindNativeAction(InputConfig, LyraGameplayTags::InputTag_Crouch, ETriggerEvent::Triggered, this, &ThisClass::Input_Crouch, /*bLogIfNotFound=*/ false);
					LyraIC->BindNativeAction(InputConfig, LyraGameplayTags::InputTag_AutoRun, ETriggerEvent::Triggered, this, &ThisClass::Input_AutoRun, /*bLogIfNotFound=*/ false);
				}
			}
		}
	}

	if (ensure(!bReadyToBindInputs))
	{
		bReadyToBindInputs = true;
	}

	UGameFrameworkComponentManager::SendGameFrameworkComponentExtensionEvent(const_cast<APlayerController*>(PC), NAME_BindInputsNow);
	UGameFrameworkComponentManager::SendGameFrameworkComponentExtensionEvent(const_cast<APawn*>(Pawn), NAME_BindInputsNow);
}
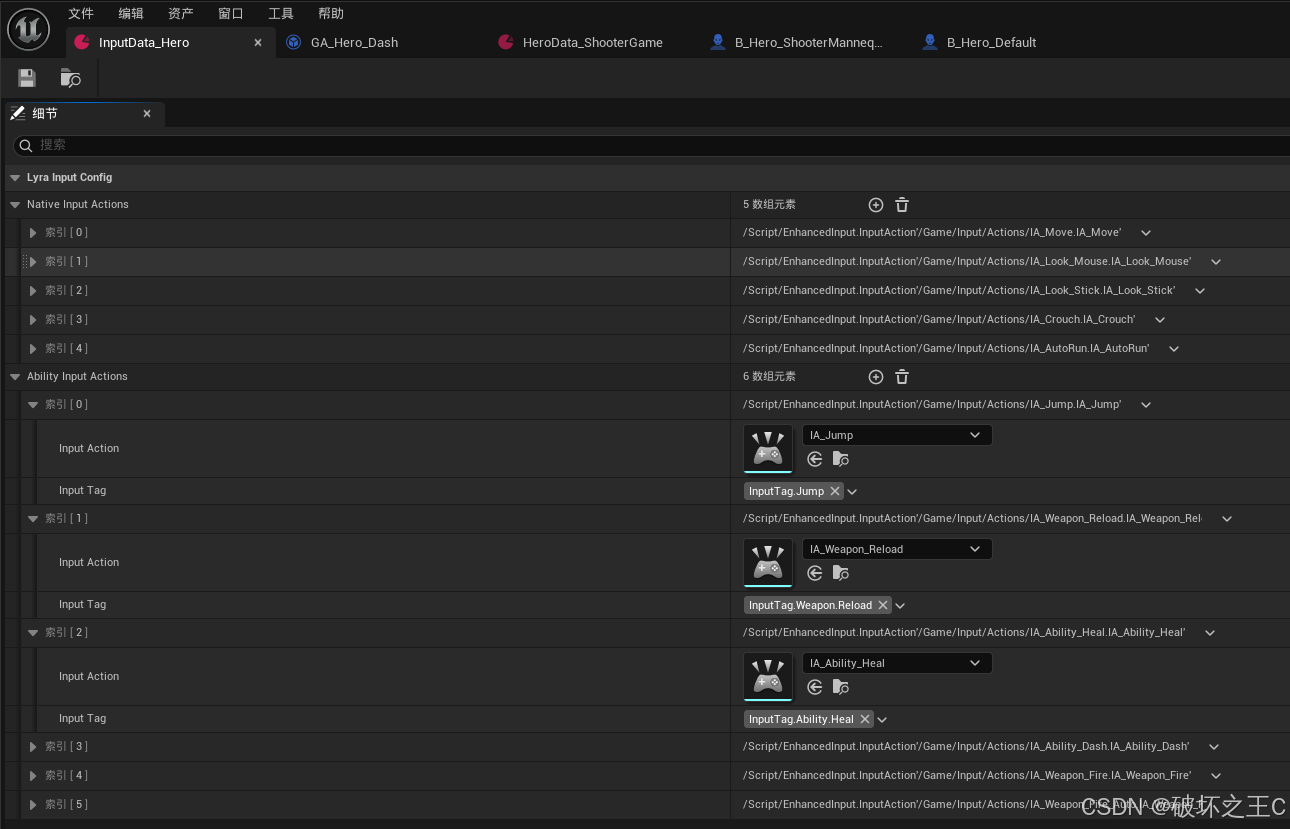
它是通过输入配置绑定的,输入配置如下
以上就是Lyra使用技能的整个流程了。


 2024
2024

 被折叠的 条评论
为什么被折叠?
被折叠的 条评论
为什么被折叠?
 到【灌水乐园】发言


