


什么是RAG
RAG顾名思义,通过检索的方法来增强生成模型的能力
为什么需要RAG?
因为大模型目前固有的局限性
- LLM的知识不是实时的
- LLM可能不知道你私有的领域/业务知识
导致使用开源的模型会出现不准确,幻觉等情况,而微调门槛和成本比较高,那么最简单的就是外挂一个知识库,就是RAG
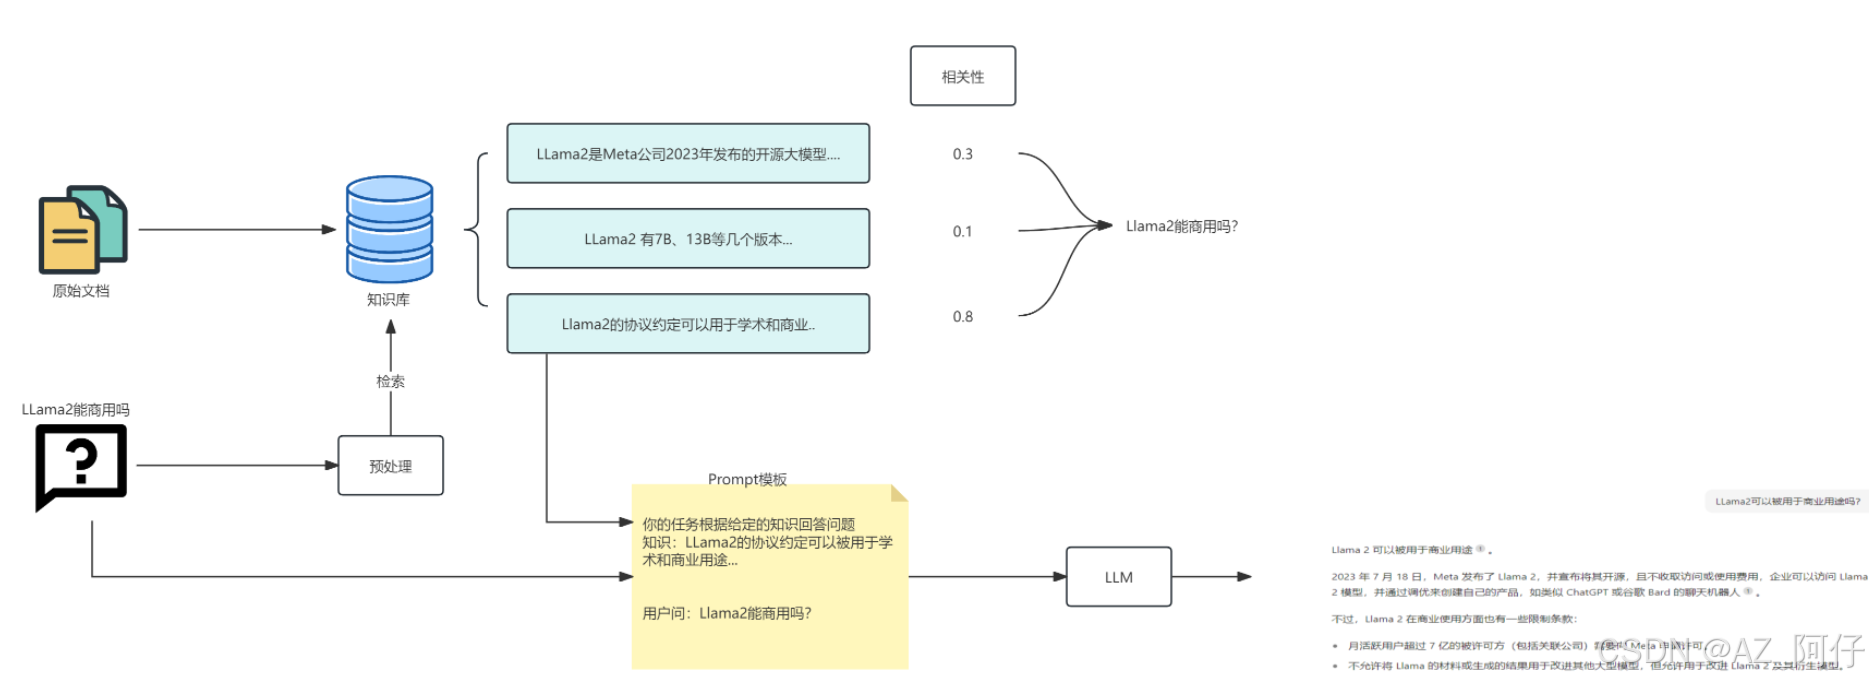
step1 原始文档构建知识库
step2 用户问一句话“LLama2能商用吗?”,首先从知识库检索原始文档,原始文档的相关性要排序
step3 原始文档给到Prompt
step4 prompt给到LLm,LLm最后进行归纳总结
需要做的事情有两个阶段
第一个阶段:需要将企业私有化的数据存储到知识库,知识库的RAG解决方案基本用的都是向量数据库,作为知识存储
第二个阶段:问题预处理,需要将问题处理成向量,然后在向量数据库中做相似检索
RAG的基本原理
向量数据库中的存储方式,向量作为索引: <向量, 原始文本>
- 通过向量进行相似距离,然后将原始文本找出,这里就是所谓的top-k,这里的原始文本会有一个相 关性得分,而相似度相关最高的不一定在最前面,所以需要有一个结果重排序动作
- 将得分top-k的数据灌到 promot模板,给到大模型
- 大模型归纳总结后得到答案,这里LLM没有自己创新的生成词语,而言从检索得到的数据进行组织
- 如果大模型检索不到,那么LLM给回我不知道你的问题的答案。
可以认为是开卷考试,让LLM先翻书,再考试
RAG系统的基本搭建流程
RAG搭建过程
- 文档加载,并按照一定条件切割成片段
- 将切割的文本片段灌入检索引擎
- 封装检索接口
- 构建调用流程:Query -> 检索 -> Promot -> LLM -> 回复
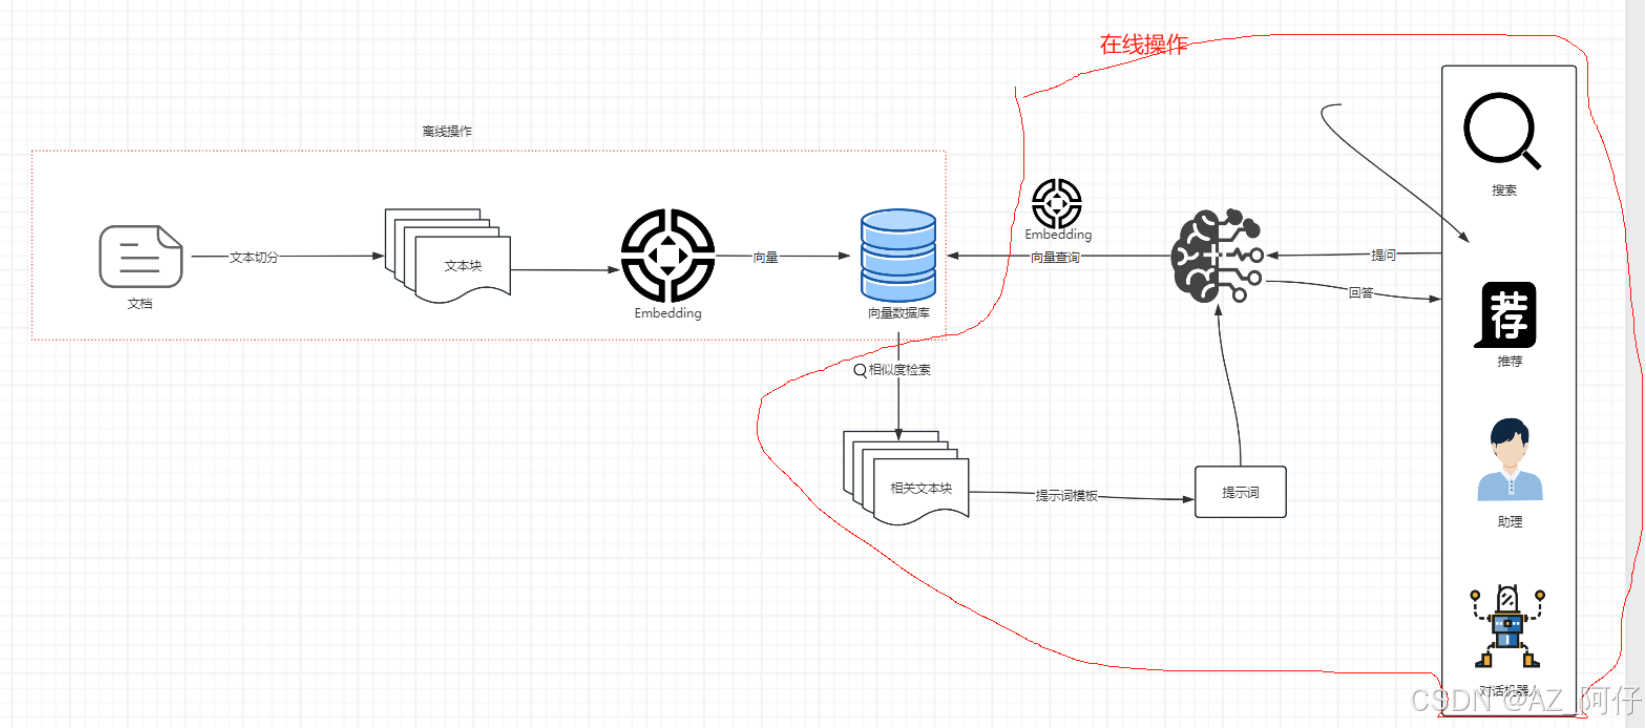
Embedding模型的作用,将文本块转化为向量,然后存贮在 向量数据库,多模态的rag也可以做
离线操作,经常会是一个增量的过程,随着企业业务增长,新的业务数据会不断的以离线操作的方式将数据存储到 向量数据库
随着文档越来越大,内容越来越多的时候,做检索,推理的速度会变慢。
只要涉及到检索,都会有性能瓶颈,需要保证向量数据库的稳定性,又回到了分库分表,索引用于优化性能。
需要注意:离线的Embedding模型和在线的Embedding模型需要是同一个,如果不是同一个,那么基本就做不了召回,或者说极大的影响召回率。
RAG适合做什么?
RAG适合做搜索,目前可以认为是第二代搜索引擎(智能化AI搜索引擎),第一代搜索引擎是pc端的百度、google等。
RAG适合做内容推荐,内容推荐很多时候都用到了向量匹配这块。
RAG也可以接入个人助理和对话机器人。
文档的加载与切割
pip install --upgrade openai
# 安装pdf解析库
pip install pdfminer.six
from pdfminer.high_level import extract_pages
from pdfminer.layout import LTTextContainer
def extract_text_from_pdf(filename, page_numbers=None, min_line_length=1):
'''从 PDF 文件中(按指定页码)提取文字'''
paragraphs = []
buffer = ''
full_text = ''
# 提取全部文本
for i, page_layout in enumerate(extract_pages(filename)):
# 如果指定了页码范围,跳过范围外的页
if page_numbers is not None and i not in page_numbers:
continue
for element in page_layout:
if isinstance(element, LTTextContainer):
full_text += element.get_text() + '\n'
# 按空行分隔,将文本重新组织成段落
lines = full_text.split('\n')
for text in lines:
if len(text) >= min_line_length:
buffer += (' '+text) if not text.endswith('-') else text.strip('-')
elif buffer:
paragraphs.append(buffer)
buffer = ''
if buffer:
paragraphs.append(buffer)
return paragraphs
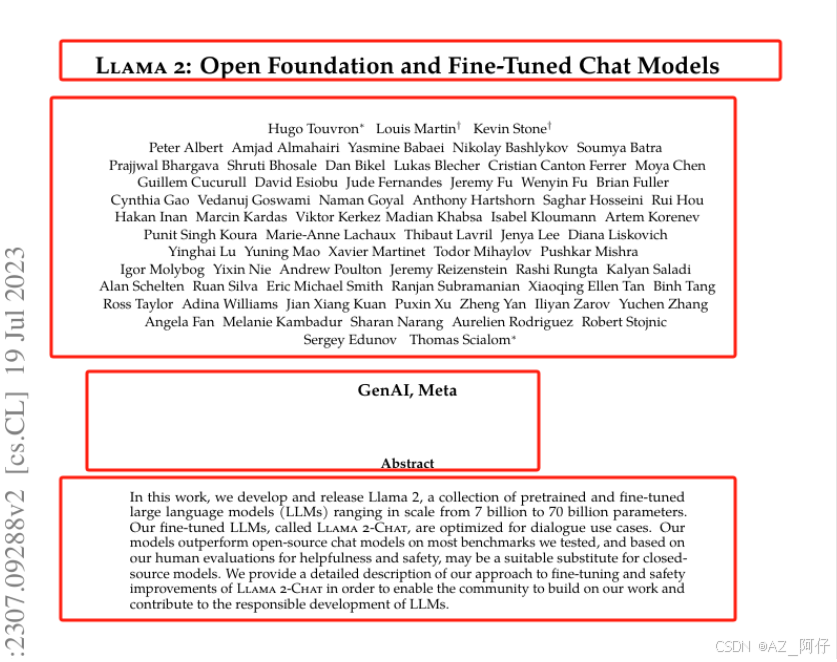
paragraphs = extract_text_from_pdf("llama2.pdf", min_line_length=10)
# 取paragraphs 的前4个元素
for para in paragraphs[:4]:
print(para+"\n")
运行结果
 Llama 2: Open Foundation and Fine-Tuned Chat Models

 Hugo Touvron∗ Louis Martin† Kevin Stone† Peter Albert Amjad Almahairi Yasmine Babaei Nikolay Bashlykov Soumya Batra Prajjwal Bhargava Shruti Bhosale Dan Bikel Lukas Blecher Cristian Canton Ferrer Moya Chen Guillem Cucurull David Esiobu Jude Fernandes Jeremy Fu Wenyin Fu Brian Fuller Cynthia Gao Vedanuj Goswami Naman Goyal Anthony Hartshorn Saghar Hosseini Rui Hou Hakan Inan Marcin Kardas Viktor Kerkez Madian Khabsa Isabel Kloumann Artem Korenev Punit Singh Koura Marie-Anne Lachaux Thibaut Lavril Jenya Lee Diana Liskovich Yinghai Lu Yuning Mao Xavier Martinet Todor Mihaylov Pushkar Mishra Igor Molybog Yixin Nie Andrew Poulton Jeremy Reizenstein Rashi Rungta Kalyan Saladi Alan Schelten Ruan Silva Eric Michael Smith Ranjan Subramanian Xiaoqing Ellen Tan Binh Tang Ross Taylor Adina Williams Jian Xiang Kuan Puxin Xu Zheng Yan Iliyan Zarov Yuchen Zhang Angela Fan Melanie Kambadur Sharan Narang Aurelien Rodriguez Robert Stojnic Sergey Edunov Thomas Scialom∗

 GenAI, Meta

 In this work, we develop and release Llama 2, a collection of pretrained and fine-tuned large language models (LLMs) ranging in scale from 7 billion to 70 billion parameters. Our fine-tuned LLMs, called Llama 2-Chat, are optimized for dialogue use cases. Our models outperform open-source chat models on most benchmarks we tested, and based onour human evaluations for helpfulness and safety, may be a suitable substitute for closed source models. We provide a detailed description of our approach to fine-tuning and safety improvements of Llama 2-Chat in order to enable the community to build on our work and contribute to the responsible development of LLMs.
Rag的难度,如何完成恰当的切割,如果切割没有做好,会影响整个RAG的精度和召回率
一般文档都是一次性加载到内存,如果文档太大,那么指定加载页数,例如第一次加载10页(0-9),第二次加载下一个10页(10-19)
)
LLM接口封装
关于openai的key设置,环境配置有两种方式
-
系统环境变量
- os.getenv(“OPENAI_*API_*KEY”)
-
dotenv**(生产推荐)**
-
使用独立的环境变量配置文件
-
需要新建.env配置文件
- OPENAI_API_KEY = sk-xxxxxx
- OPENAI_BASE_URL = xxxx
-
from openai import OpenAI
import os

client = OpenAI()

# 加载环境变量
# from dotenv import load_dotenv, find_dotenv

# 读取本地 .env 文件,里面定义了 OPENAI_API_KEY
# _ = load_dotenv(find_dotenv(), verbose=True)
# 这里比较简单,使用os
os.environ["OPENAI_API_KEY"] = "sk-proj-your openai key"


def get_completion(prompt, model="gpt-4o"):
    '''封装 openai 接口'''
    messages = [{"role": "user", "content": prompt}]
    response = client.chat.completions.create(
        model=model,
        messages=messages,
        # 模型输出随机性,文风值[0,1] 不要设置太大,设置0.5以下,文案生成需要大一些,调成0.9
        temperature=0,  # 模型输出的随机性,0 表示随机性最小
    )
    return response.choices[0].message.content

# 提示词模板,比较重要
# **kwargs 是一个可变长度的关键字参数,允许你传入任意数量的关键字参数。
# 例如,你可以这样调用函数:build_prompt(template, name="John", description="A developer")。
def build_prompt(prompt_template, **kwargs):
    '''将 Prompt 模板赋值'''
    inputs = {}
    for k, v in kwargs.items():
        if isinstance(v, list) and all(isinstance(elem, str) for elem in v):
            val = '\n\n'.join(v)
        else:
            val = v
        inputs[k] = val
    return prompt_template.format(**inputs)


prompt_template = """
你是一个问答机器人。
你的任务是根据下述给定的已知信息回答用户问题。

已知信息:
{context}

用户问:
{query}

如果已知信息不包含用户问题的答案,或者已知信息不足以回答用户的问题,请直接回复"我无法回答您的问题"。
请不要输出已知信息中不包含的信息或答案。
请用中文回答用户问题。
"""
# {context} 检索出来的原始文档
# {query}  用户的提问
向量检索
什么是向量
向量是一种有大小和方向的数学对象。它可以表示为从一个点到另一个点的有向线段。例如,二维空间中的向量可以表示为 (x,y),表示从原点 (0,0) 到点 (x,y) 的有向线段。
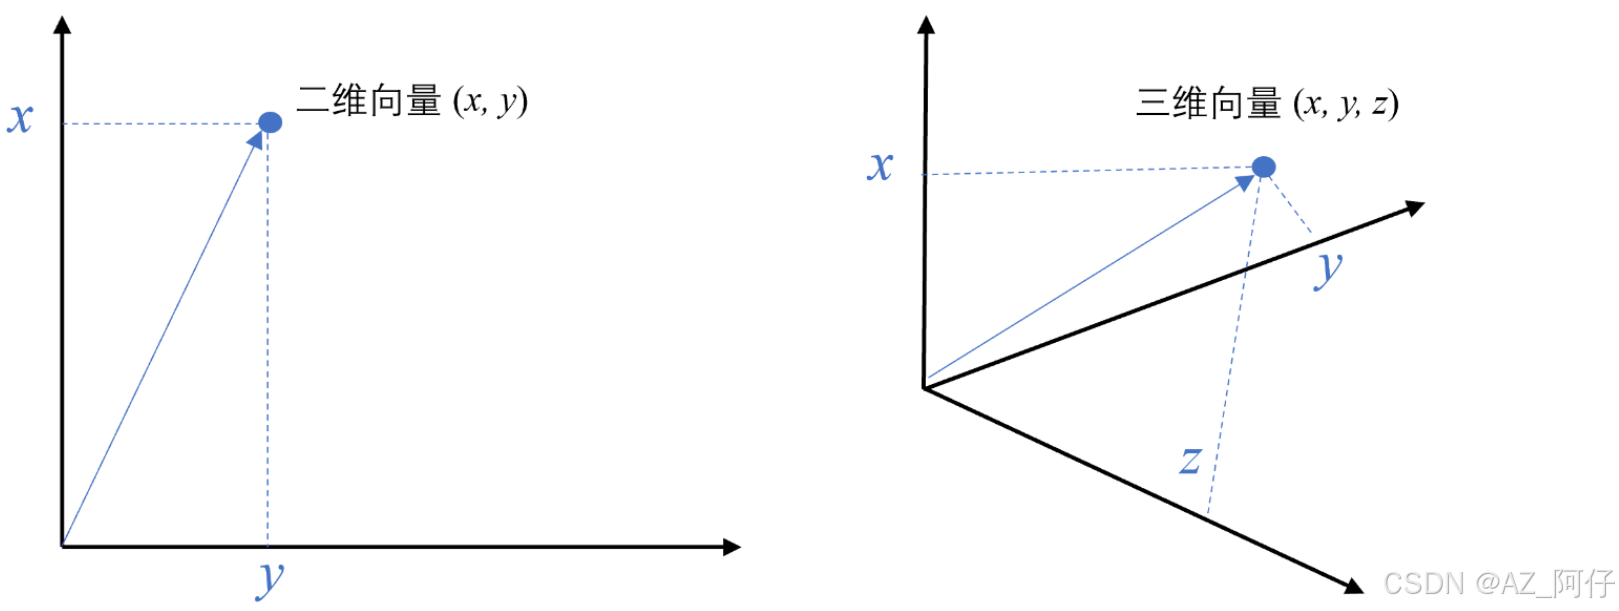
以此类推,我可以用一组坐标 (x0,x1,…,xN−1) 表示一个 N 维空间中的向量,N 叫向量的维度。
文本向量是N维表示,一般的嵌入式模型,维度一般是1000+,对于openai来说
-
text-embedding-ada-002:维度为 1536,是 OpenAI 较为常用的文本嵌入模型,能在多种自然语言处理任务中表现出色,可捕捉文本中较为细致的语义信息。涉及到多语言的情况,就选这个模型,大多数情况下,都使用这个模型。llamaindex和langchain默认使用的也是 text-embedding-ada-002,这个模型不开源。
-
text-embedding-3-small:有报道称其维度为 512,适用于一些对成本敏感且任务相对简单的场景,较低的维度可以减少计算量和存储空间。
-
text-embedding-3-large:默认维度为 3072,可通过指定参数调整为 1024 等其他维度。该模型适用于处理复杂的语义关系和需要高精度的任务,较高的维度能够提供更丰富的语义表示,但同时也会增加计算成本和存储空间。
如何能过选择一个合适的Embedding模型
https://modelscope.cn/models?page=1&tasks=sentence-embedding&type=nlp
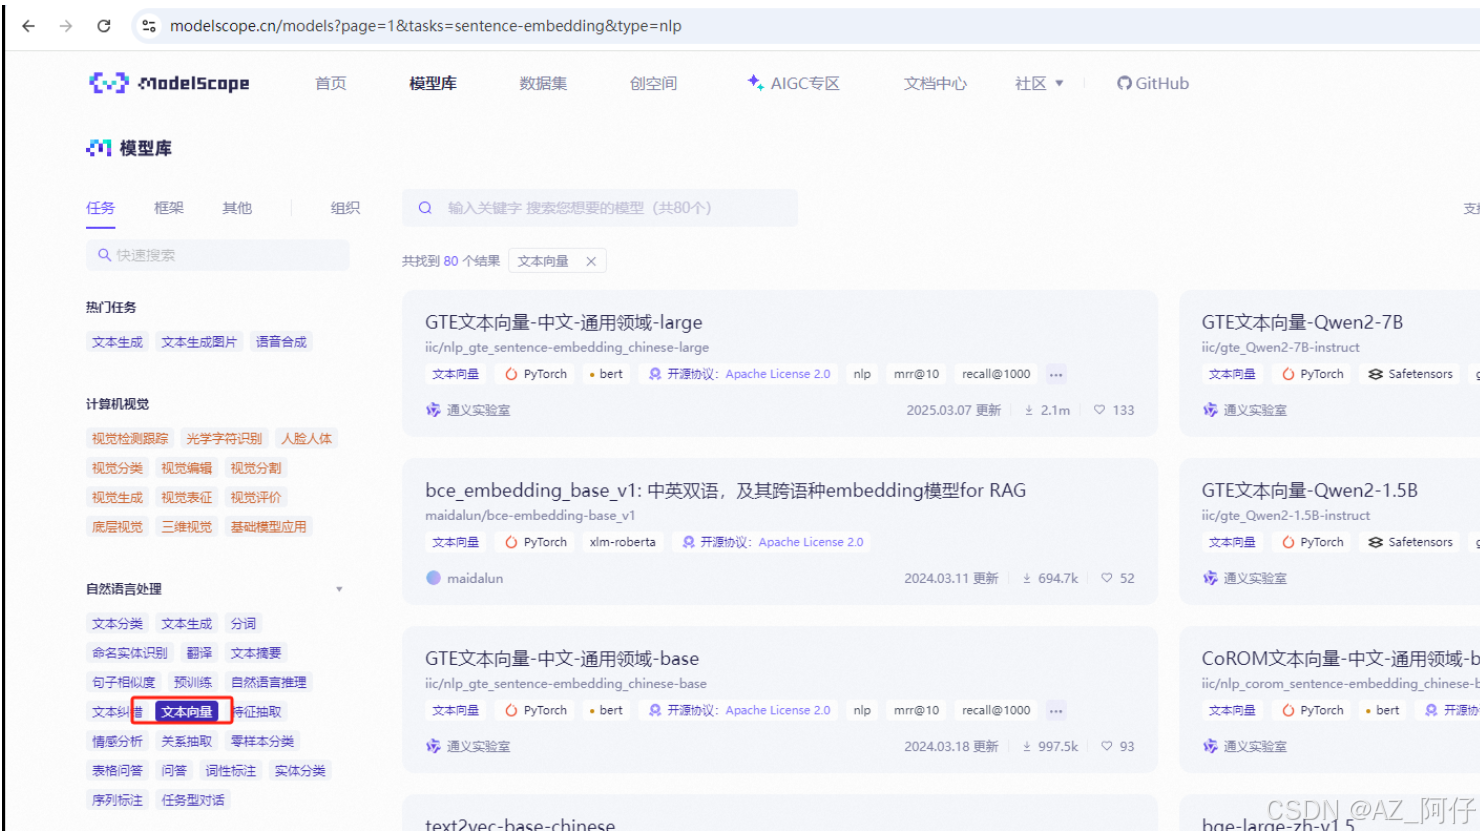
我们看到有很多的模型,那么选择标准是什么?
例如,需要做法律的系统,那么去找需求相关的语料库进行文本向量转换测试,进行评估。
如果意思相近的几句话能够得到的得分差不多,那么认为模型ok。
大多数场景下,开源的嵌入模型都一般,如果要提升检索召回率,建议对模型进行微调。
模型维度越大,表示特征细节提取越丰富。
文本向量是如何计算出来的
- 构建相关(正例)与不相关(负例)的句子对样本
- 训练双塔式模型,让正例间的距离小,负例间的距离大
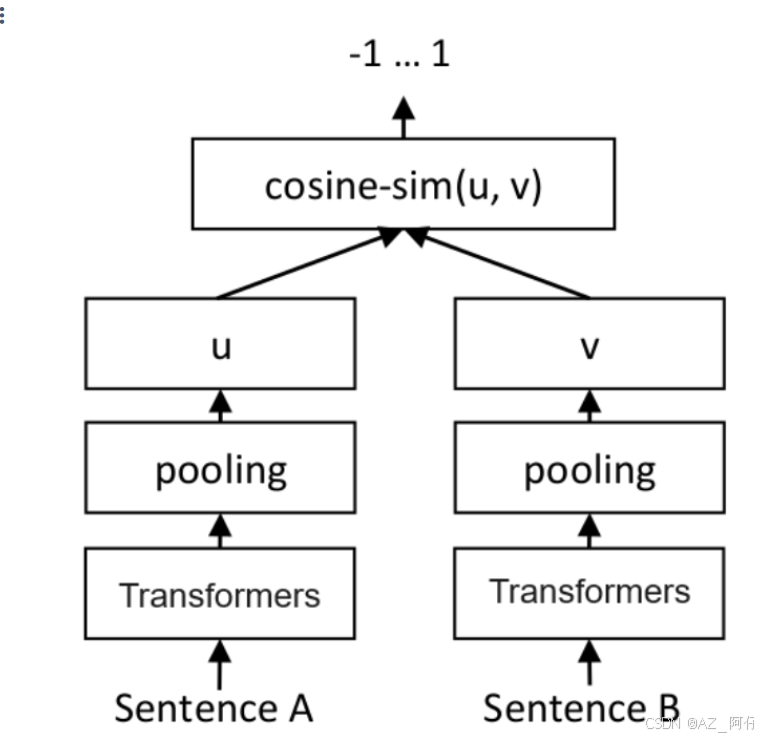
SentenceA 我去吃饭了,SentenceB 我打游戏,这两句的 距离应该是很远的
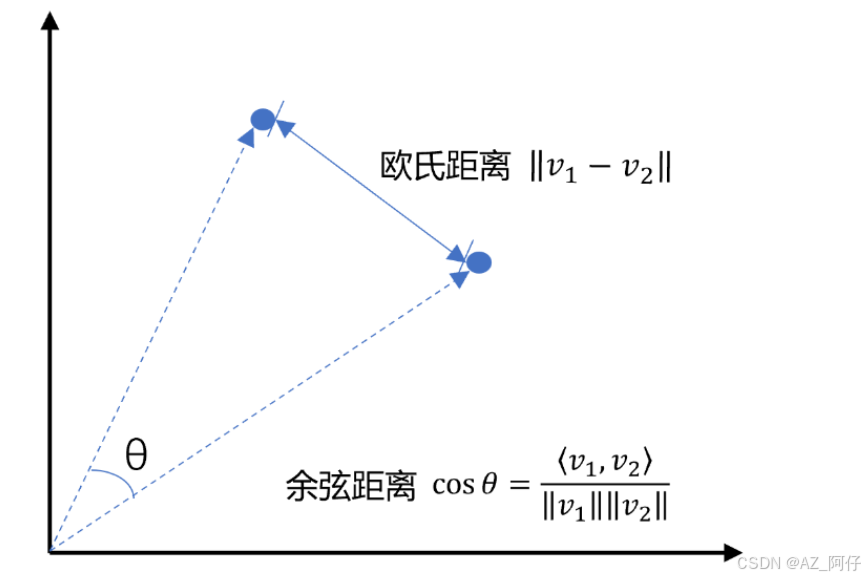
向量相似性计算
- 欧几里得算法, 值越接近于1,那么相似度越高
- 余弦相似度计算,值越接近于0,那么相似度越高
from openai import OpenAI
import os

client = OpenAI()

# 加载环境变量
# from dotenv import load_dotenv, find_dotenv

# 读取本地 .env 文件,里面定义了 OPENAI_API_KEY
# _ = load_dotenv(find_dotenv(), verbose=True)
# 这里比较简单,使用os
os.environ["OPENAI_API_KEY"] = "sk-proj-your open ai key"


def get_completion(prompt, model="gpt-4o"):
    '''封装 openai 接口'''
    messages = [{"role": "user", "content": prompt}]
    response = client.chat.completions.create(
        model=model,
        messages=messages,
        # 模型输出随机性,文风值[0,1] 不要设置太大,设置0.5以下,文案生成需要大一些,调成0.9
        temperature=0,  # 模型输出的随机性,0 表示随机性最小
    )
    return response.choices[0].message.content

# 提示词模板,比较重要
# **kwargs 是一个可变长度的关键字参数,允许你传入任意数量的关键字参数。
# 例如,你可以这样调用函数:build_prompt(template, name="John", description="A developer")。
def build_prompt(prompt_template, **kwargs):
    '''将 Prompt 模板赋值'''
    inputs = {}
    for k, v in kwargs.items():
        if isinstance(v, list) and all(isinstance(elem, str) for elem in v):
            val = '\n\n'.join(v)
        else:
            val = v
        inputs[k] = val
    return prompt_template.format(**inputs)


prompt_template = """
你是一个问答机器人。
你的任务是根据下述给定的已知信息回答用户问题。

已知信息:
{context}

用户问:
{query}

如果已知信息不包含用户问题的答案,或者已知信息不足以回答用户的问题,请直接回复"我无法回答您的问题"。
请不要输出已知信息中不包含的信息或答案。
请用中文回答用户问题。
"""
# {context} 检索出来的原始文档
# {query}  用户的提问

import numpy as np
from numpy import dot
from numpy.linalg import norm

def cos_sim(a, b):
    '''余弦距离 -- 越大越相似'''
    return dot(a, b)/(norm(a)*norm(b))


def l2(a, b):
    '''欧氏距离 -- 越小越相似'''
    x = np.asarray(a)-np.asarray(b)
    return norm(x)

def get_embeddings(texts, model="text-embedding-ada-002", dimensions=None):
    '''封装 OpenAI 的 Embedding 模型接口'''
    if model == "text-embedding-ada-002":
        dimensions = None
    if dimensions:
        data = client.embeddings.create(
            input=texts, model=model, dimensions=dimensions).data
    else:
        data = client.embeddings.create(input=texts, model=model).data
    return [x.embedding for x in data]

test_query = ["测试文本"]
vec = get_embeddings(test_query)[0]
print(f"Total dimension: {len(vec)}")
print(f"First 10 elements: {vec[:10]}")

query = "国际争端"

# 且能支持跨语言
# query = "global conflicts"

documents = [
    "联合国就苏丹达尔富尔地区大规模暴力事件发出警告",
    "土耳其、芬兰、瑞典与北约代表将继续就瑞典“入约”问题进行谈判",
    "日本岐阜市陆上自卫队射击场内发生枪击事件 3人受伤",
    "国家游泳中心(水立方):恢复游泳、嬉水乐园等水上项目运营",
    "我国首次在空间站开展舱外辐射生物学暴露实验",
]

query_vec = get_embeddings([query])[0]
doc_vecs = get_embeddings(documents)

print("Query与自己的余弦距离: {:.2f}".format(cos_sim(query_vec, query_vec)))
print("Query与Documents的余弦距离:")
for vec in doc_vecs:
    print(cos_sim(query_vec, vec))

print()

print("Query与自己的欧氏距离: {:.2f}".format(l2(query_vec, query_vec)))
print("Query与Documents的欧氏距离:")
for vec in doc_vecs:
    print(l2(query_vec, vec))
输出结果
Query与自己的余弦距离: 1.00
Query与Documents的余弦距离:
0.8218706620454886
0.8293604312024739
0.7977419321704446
0.7668734038746805
0.7930347492306307

Query与自己的欧氏距离: 0.00
Query与Documents的欧氏距离:
0.5968741071718394
0.5841910061583281
0.636015828793664
0.6828273510133333
0.6433743189941651

所以对于余弦距离来说,[0.8218706620454886, 0.8293604312024739]更接近于1
对于欧氏距离来说,两个值更接近于0 [0.5968741071718394,0.5841910061583281]
额外可以补充学习 Sentence Transformer模型
Sentence Transformer模型介绍 https://www.sbert.net

向量数据库
向量数据库,是专门为向量检索设计的中间件
向量数据库其实最早在传统的人工智能和机器学习场景中就有所应用。在大模型兴起后,由于目前大模型的token数限制,很多开发者倾向于将数据量庞大的知识、新闻、文献、语料等先通过嵌入(embedding)算法转变为向量数据,然后存储在Chroma等向量数据库中。当用户在大模型输入问题后,将问题本身也embedding,转化为向量,在向量数据库中査找与之最匹配的相关知识,组成大模型的上下文,将其输入给大模型,最终返回大模型处理后的文本给用户,这种方式不仅降低大模型的计算量,提高响应速度,也降低成本,并避免了大模型的tokens限制,是一种简单高效的处理手段。此外,向量数据库还在大模型记忆存储等领域发挥其不可替代的作用。
早期的应用场景是海量图片搜索,及内容推荐,目前因为大模型而再度兴起。
Chroma向量数据库
https://docs.trychroma.com/docs/overview/introduction
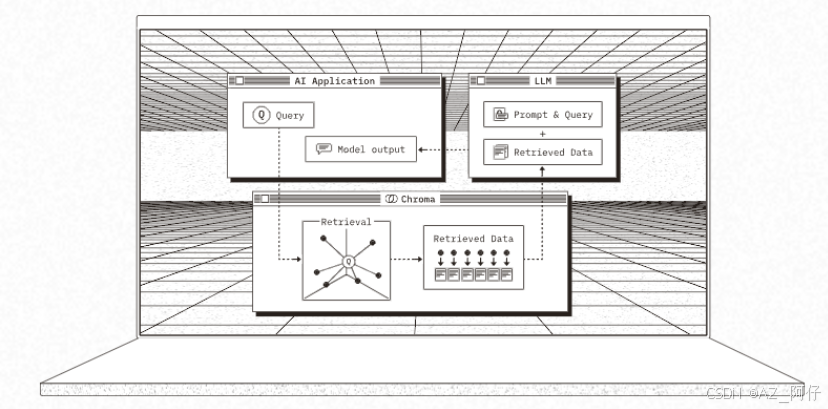
我们将官网首页最大的那张图片截下来进行解读
AI应用程序发起 对chroma发起 query, 我们看到 有一个 Retrieval的图像,这个图像上的点和线意味着将query进行向量化,然后将向量化的query和 retrieved data的数据进行比对,通过相似性算法(欧式算法或者余弦相似度算法)找出相似的向量,再取出相似向量对应的原始文档给到LLM而相似向量对应的原始文档 会与query原文 一同组成 Promot提示词给到大模型进行处理,最终大模型将结果返回给到AI应用程序。
随着大模型的发展,有两个方向,方向一是RAG,另一个方向是将大模型上下文的窗口放大。google的大模型已经将上下文扩大,也可以载入很长的文档,理论上讲整篇文档喂给大模型效果会更好,而且速度是RAG比不了,因为RAG是依托向量数据库,而向量数据库没有做集群部署的时候,会存在明显的性能瓶颈,这个时候,就又回到数据库三高问题如何解决。随着数据量增大之后再考虑优化及性能问题。
使用向量数据库chroma
pip install chromadb
from pdfminer.high_level import extract_pages
from pdfminer.layout import LTTextContainer

from openai import OpenAI
import os
os.environ["OPENAI_API_KEY"] = "sk-proj-your open ai key"
# openai客户端
client = OpenAI()

# 加载pdf文件
def extract_text_from_pdf(filename, page_numbers=None, min_line_length=1):
    '''从 PDF 文件中(按指定页码)提取文字'''
    paragraphs = []
    buffer = ''
    full_text = ''
    # 提取全部文本
    for i, page_layout in enumerate(extract_pages(filename)):
        # 如果指定了页码范围,跳过范围外的页
        if page_numbers is not None and i not in page_numbers:
            continue
        for element in page_layout:
            if isinstance(element, LTTextContainer):
                full_text += element.get_text() + '\n'
    # 按空行分隔,将文本重新组织成段落
    lines = full_text.split('\n')
    for text in lines:
        if len(text) >= min_line_length:
            buffer += (' '+text) if not text.endswith('-') else text.strip('-')
        elif buffer:
            paragraphs.append(buffer)
            buffer = ''
    if buffer:
        paragraphs.append(buffer)
    return paragraphs

def get_embeddings(texts, model="text-embedding-ada-002", dimensions=None):
    '''封装 OpenAI 的 Embedding 模型接口'''
    if model == "text-embedding-ada-002":
        dimensions = None
    if dimensions:
        data = client.embeddings.create(
            input=texts, model=model, dimensions=dimensions).data
    else:
        data = client.embeddings.create(input=texts, model=model).data
    return [x.embedding for x in data]

import chromadb
from chromadb.config import Settings

class MyVectorDBConnector:
    def __init__(self, collection_name, embedding_fn):
		# chroma_client 初始化有三种方式
        # 一、内存模式,高效,但数据重启或者断点就没有了,演示用
        chroma_client = chromadb.Client(Settings(allow_reset=True))
        # 二、持久化,存在db文件中
        # chroma_client = chromadb.PersistentClient(path="./persistentsqlite.sqlite")
		# 三、chroma服务
		# chroma_client = chromadb.HttpClient(host='localhost', port=8000)
        # 向量数据库重置数据,数据丢失不可逆,为了演示,实际不需要每次reset()
        chroma_client.reset()
        # 创建一个Collection
        self.collection = chroma_client.get_or_create_collection(
            name=collection_name
        )
		# 如果不配置embedding_fn ,则chroma会使用默认的 all-MiniLM-L6-v2
        self.embedding_fn = embedding_fn
    def add_documents(self, documents):
        '''向 Collection 中添加文档于向量'''
        self.collection.add(
            embeddings=self.embedding_fn(documents), # 每个文档的向量
            documents=documents, # 文档的原文
            ids=[f"id{i}" for i in range(len(documents))]  # 每个文档的 id
        )

    def search(self, query, top_n):
        '''检索向量数据库'''
        results = self.collection.query(
            query_embeddings=self.embedding_fn([query]),
            n_results=top_n
        )
        return results


# 将目标文本分割成段落,加载到内存
paragraphs = extract_text_from_pdf("llama2.pdf", page_numbers=[2,3], min_line_length=10)
# 创建一个向量数据库对象
vector_db = MyVectorDBConnector("chroma_test", get_embeddings)
# 向向量数据库中添加文档
vector_db.add_documents(paragraphs)

user_query = "Llama 2有多少参数"
# user_query = "Does Llama 2 have a conversational variant"
results = vector_db.search(user_query, 2)

for para in results['documents'][0]:
    print(para+"\n")
运行结果
1. Llama 2, an updated version of Llama 1, trained on a new mix of publicly available data. We also increased the size of the pretraining corpus by 40%, doubled the context length of the model, and adopted grouped-query attention (Ainslie et al., 2023). We are releasing variants of Llama 2 with 7B, 13B, and 70B parameters. We have also trained 34B variants, which we report on in this paper but are not releasing.§

 In this work, we develop and release Llama 2, a family of pretrained and fine-tuned LLMs, Llama 2 and Llama 2-Chat, at scales up to 70B parameters. On the series of helpfulness and safety benchmarks we tested, Llama 2-Chat models generally perform better than existing open-source models. They also appear to be on par with some of the closed-source models, at least on the human evaluations we performed (see Figures 1 and 3). We have taken measures to increase the safety of these models, using safety-specific data annotation and tuning, as well as conducting red-teaming and employing iterative evaluations. Additionally, this paper contributes a thorough description of our fine-tuning methodology and approach to improving LLM safety. We hope that this openness will enable the community to reproduce fine-tuned LLMs and continue to improve the safety of those models, paving the way for more responsible development of LLMs. We also share novel observations we made during the development of Llama 2 and Llama 2-Chat, such as the emergence of tool usage and temporal organization of knowledge.
可以看到结果 中输出 We are releasing variants of Llama 2 with 7B, 13B, and 70B parameters
关于 chroma启动的三种模式,在代码注释已经写了,这里在说一下
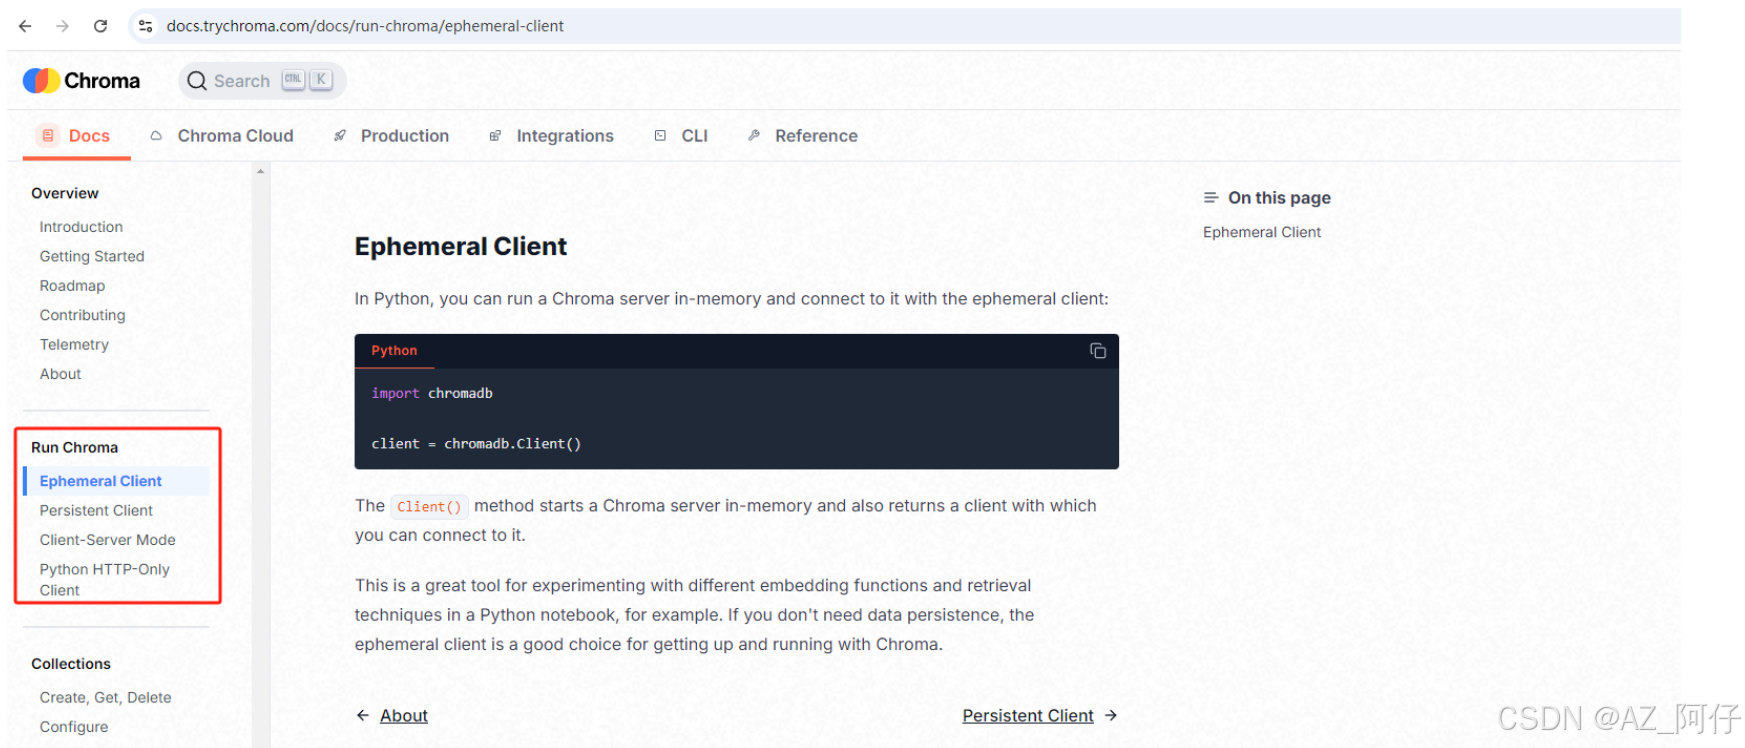
临时客户端即结存模式
内存中启动 Chroma 服务器并返回可以连接到该服务器的客户端,在不需要数据持久性的时候使用,可以在jupyter、或者测试时使用,一般用作演示。
import chromadb

client = chromadb.Client()
持久客户端
Chroma 将其数据库文件存储在磁盘上并在启动时加载它们的位置。如果不提供路径,则默认为.chroma
import chromadb

client = chromadb.PersistentClient(path="/path/to/save/to")
客户端对象有一些有用的便捷方法。
- heartbeat() - 返回纳秒心跳。有助于确保客户端保持连接。
- reset() - 清空并完全重置数据库。⚠️ 这是破坏性的并且不可逆的。
client.heartbeat()
client.reset()
在客户端-服务器模式下运行 Chroma(生产推荐)
Chroma 还可配置为以客户端/服务器模式运行。在此模式下,Chroma 客户端连接到在单独进程中运行的 Chroma 服务器。
要启动 Chroma 服务器,请运行以下命令:
chroma run --path ./chroma_data --host 0.0.0.0
然后使用 Chroma HTTP 客户端连接到服务器:
Python
import chromadb

chroma_client = chromadb.HttpClient(host='localhost', port=8000)
Chroma 还提供了异步 HTTP 客户端。其行为和方法签名与同步客户端相同,只是具体的方法都是异步执行的。要使用它,需要使用异步Http客户端
import asyncio
import chromadb

async def main():
    client = await chromadb.AsyncHttpClient()

    collection = await client.create_collection(name="my_collection")
    await collection.add(
        documents=["hello world"],
        ids=["id1"]
    )

asyncio.run(main())
如果部署了chroma服务器,也可以使用http-only包
在客户端-服务器模式下运行 Chroma,即在不同的机器上运行 Chroma 服务器和客户端,则可以不需要在运行客户端时使用完整的 Chroma 软件包。相反,可以使用轻量级的客户端专用库。 在这种情况下,可以安装chromadb 客户端包。此包是服务器的轻量级 HTTP 客户端,具有最小的依赖性。
使用以下命令安装 chroma
pip install chromadb
运行 Chroma 服务器:
chroma run --path [path/to/persist/data]
客户端上安装仅 HTTP 客户端:
pip install chromadb-client
import chromadb
# Example setup of the client to connect to your chroma server
client = chromadb.HttpClient(host='localhost', port=8000)

# Or for async usage:
async def main():
    client = await chromadb.AsyncHttpClient(host='localhost', port=8000)
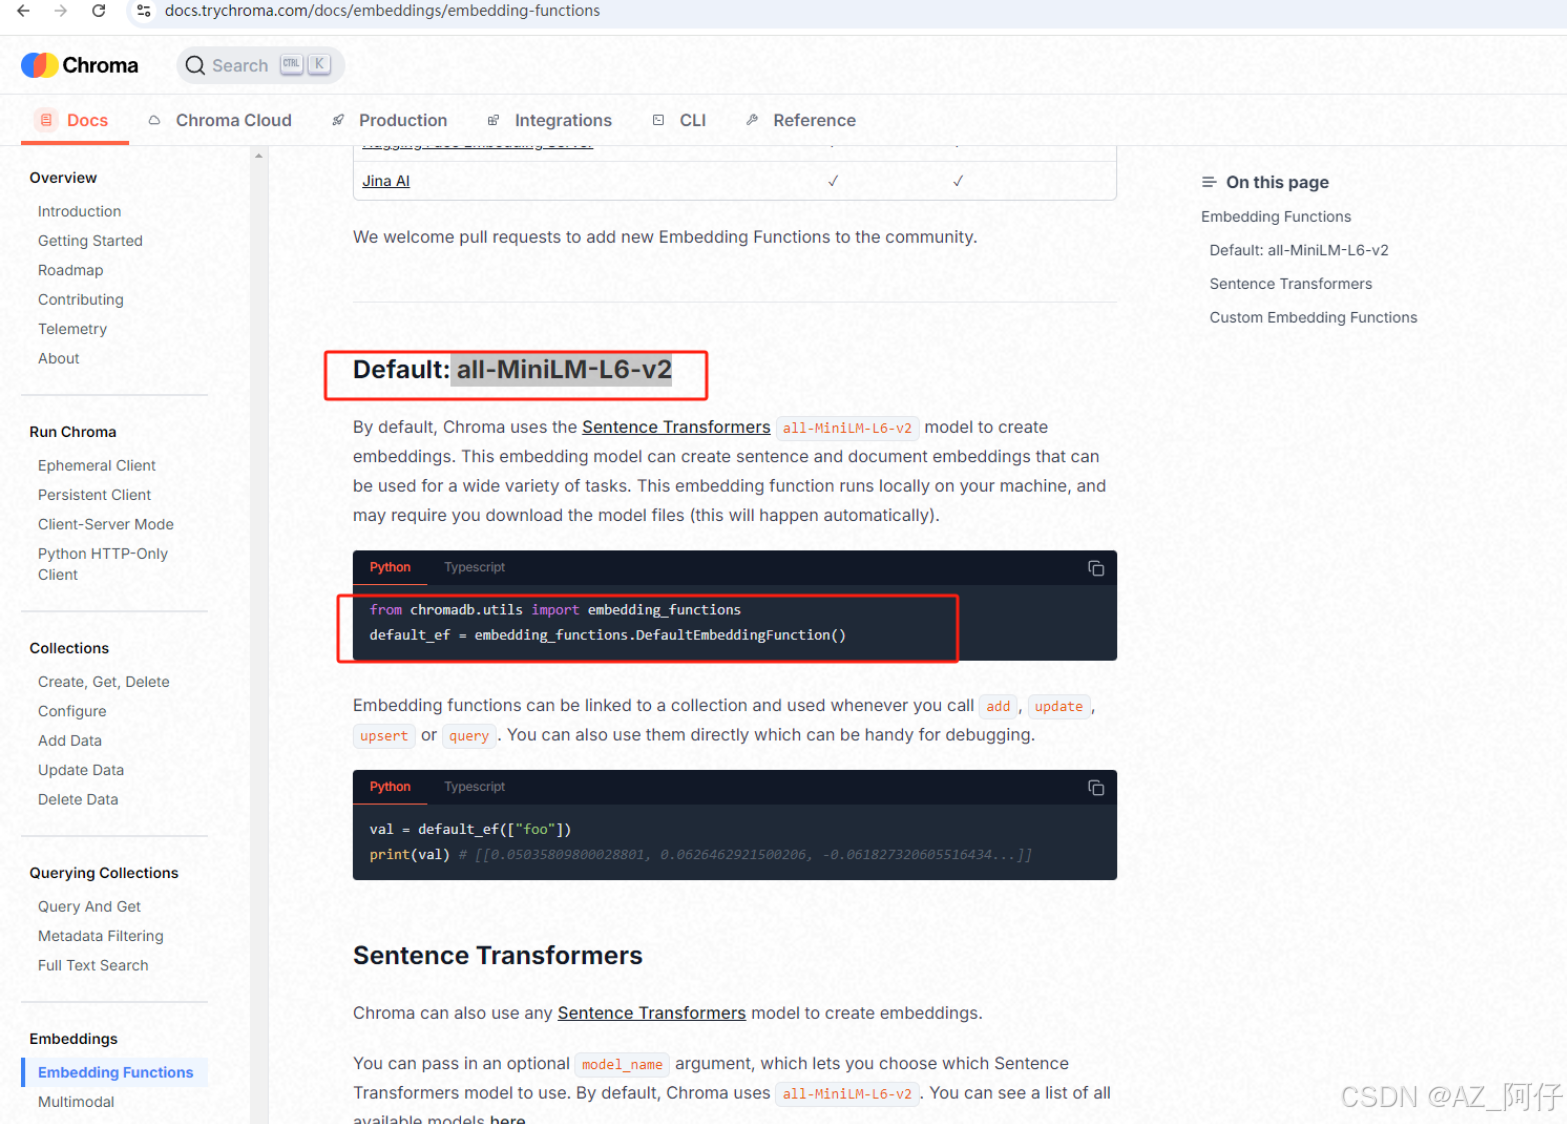
chromadb 客户端软件包是完整 Chroma 库的子集,不包含所有依赖项。如果您想使用完整 Chroma 库,可以安装色度数据库包代替。 最重要的是,没有默认嵌入函数。如果您 add() 没有嵌入的文档,则必须手动指定嵌入函数并安装其依赖项。
对于默认的embedding_fn来说,如果不做配置,那么chroma会使用默认的 all-MiniLM-L6-v2
主流的向量数据库对比
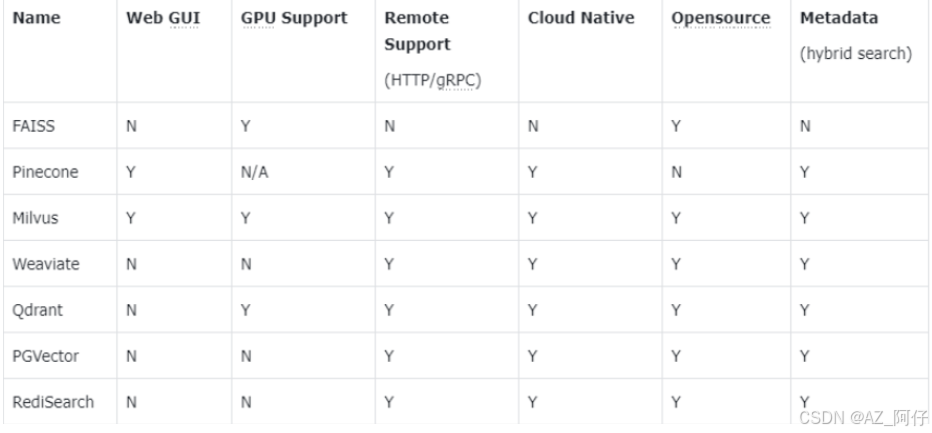
- FAISS: Meta 开源的向量检索引擎 https://github.com/facebookresearch/faiss
- Pinecone: 商用向量数据库,只有云服务 https://www.pinecone.io/
- Milvus: 开源向量数据库,同时有云服务 https://milvus.io/
- Weaviate: 开源向量数据库,同时有云服务 https://weaviate.io/
- Qdrant: 开源向量数据库,同时有云服务 https://qdrant.tech/
- PGVector: Postgres 的开源向量检索引擎 https://github.com/pgvector/pgvector
- RediSearch: Redis 的开源向量检索引擎 https://github.com/RediSearch/RediSearch
- ElasticSearch 也支持向量检索 https://www.elastic.co/enterprise-search/vector-search
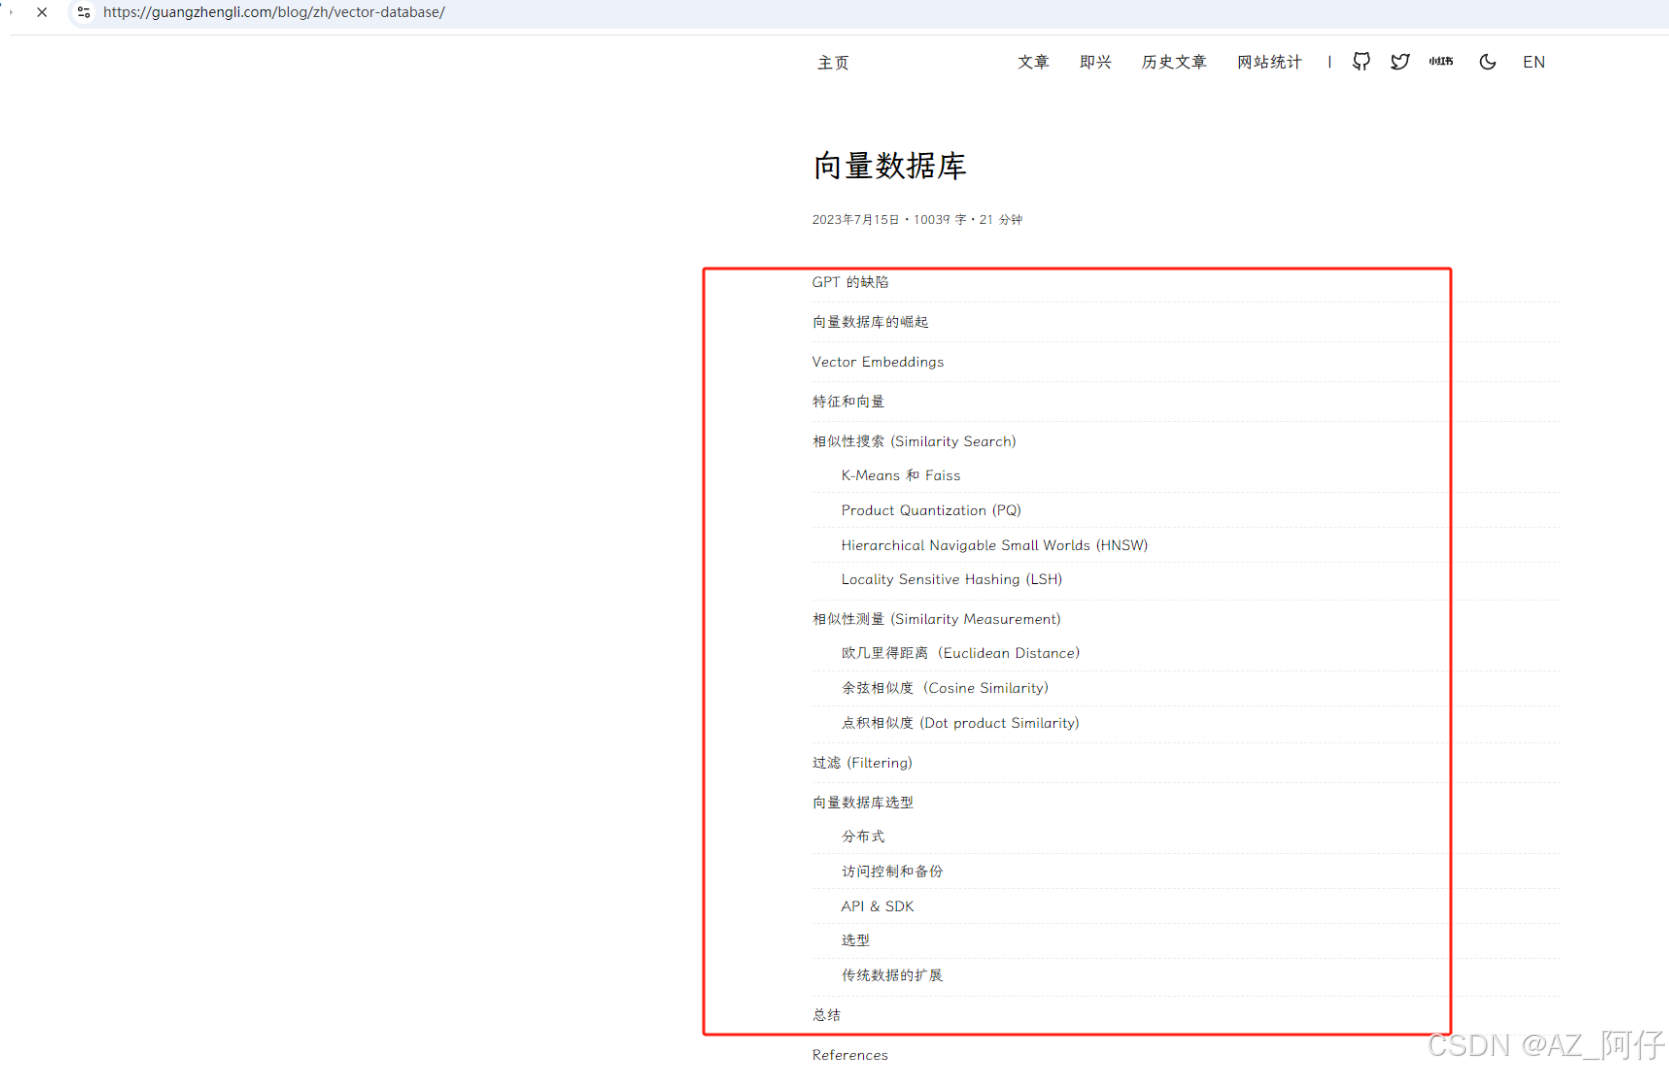
向量数据高级特性:https://guangzhengli.com/blog/zh/vector-database/
基于向量检索的RAG
import chromadb
from chromadb import Settings
from pdfminer.high_level import extract_pages
from pdfminer.layout import LTTextContainer

from openai import OpenAI
import os
os.environ["OPENAI_API_KEY"] = "sk-proj-your open ai key"
# openai客户端
client = OpenAI()

prompt_template = """
你是一个问答机器人。
你的任务是根据下述给定的已知信息回答用户问题。

已知信息:
{context} # 检索出来的原始文档

用户问:
{query} # 用户的提问

如果已知信息不包含用户问题的答案,或者已知信息不足以回答用户的问题,请直接回复"我无法回答您的问题"。
请不要输出已知信息中不包含的信息或答案。
请用中文回答用户问题。
"""

def get_embeddings(texts, model="text-embedding-ada-002", dimensions=None):
    '''封装 OpenAI 的 Embedding 模型接口'''
    if model == "text-embedding-ada-002":
        dimensions = None
    if dimensions:
        data = client.embeddings.create(
            input=texts, model=model, dimensions=dimensions).data
    else:
        data = client.embeddings.create(input=texts, model=model).data
    return [x.embedding for x in data]

def get_completion(prompt, model="gpt-4o"):
    '''封装 openai 接口'''
    messages = [{"role": "user", "content": prompt}]
    response = client.chat.completions.create(
        model=model,
        messages=messages,
        temperature=0,  # 模型输出的随机性,0 表示随机性最小
    )
    return response.choices[0].message.content

# 加载pdf文件
def extract_text_from_pdf(filename, page_numbers=None, min_line_length=1):
    '''从 PDF 文件中(按指定页码)提取文字'''
    paragraphs = []
    buffer = ''
    full_text = ''
    # 提取全部文本
    for i, page_layout in enumerate(extract_pages(filename)):
        # 如果指定了页码范围,跳过范围外的页
        if page_numbers is not None and i not in page_numbers:
            continue
        for element in page_layout:
            if isinstance(element, LTTextContainer):
                full_text += element.get_text() + '\n'
    # 按空行分隔,将文本重新组织成段落
    lines = full_text.split('\n')
    for text in lines:
        if len(text) >= min_line_length:
            buffer += (' '+text) if not text.endswith('-') else text.strip('-')
        elif buffer:
            paragraphs.append(buffer)
            buffer = ''
    if buffer:
        paragraphs.append(buffer)
    return paragraphs


def build_prompt(prompt_template, **kwargs):
    '''将 Prompt 模板赋值'''
    inputs = {}
    for k, v in kwargs.items():
        if isinstance(v, list) and all(isinstance(elem, str) for elem in v):
            val = '\n\n'.join(v)
        else:
            val = v
        inputs[k] = val
    return prompt_template.format(**inputs)

class MyVectorDBConnector:
    def __init__(self, collection_name, embedding_fn):
        # 内存模式
        chroma_client = chromadb.Client(Settings(allow_reset=True))
        # 持久化
        # chroma_client = chromadb.PersistentClient(path="./persistentsqlite.sqlite")
        # 为了演示,实际不需要每次reset(), 不可逆
        chroma_client.reset()
        # 创建一个Collection
        self.collection = chroma_client.get_or_create_collection(
            name=collection_name
        )
        # 如果没有指定向量函数,则chroma会使用内置的
        self.embedding_fn = embedding_fn
    def add_documents(self, documents):
        '''向 Collection 中添加文档于向量'''
        self.collection.add(
            embeddings=self.embedding_fn(documents), # 每个文档的向量
            documents=documents, # 文档的原文
            ids=[f"id{i}" for i in range(len(documents))]  # 每个文档的 id
        )

    def search(self, query, top_n):
        '''检索向量数据库'''
        results = self.collection.query(
            query_embeddings=self.embedding_fn([query]),
            n_results=top_n
        )
        return results


# 将目标文本分割成段落,加载到内存
paragraphs = extract_text_from_pdf("llama2.pdf", page_numbers=[2,3], min_line_length=10)
# 创建一个向量数据库对象
vector_db = MyVectorDBConnector("chroma_test", get_embeddings)
# 向向量数据库中添加文档
vector_db.add_documents(paragraphs)

class RAG_Bot:
    def __init__(self, vector_db, llm_api, n_results=2):
        self.vector_db = vector_db
        self.llm_api = llm_api
        self.n_results = n_results

    def chat(self, user_query):
        # 1. 检索
        search_results = self.vector_db.search(user_query, self.n_results)

        # 2. 构建 Prompt
        prompt = build_prompt(
            prompt_template, context=search_results['documents'][0], query=user_query)

        # 3. 调用 LLM
        response = self.llm_api(prompt)
        return response

# 创建一个RAG机器人
bot = RAG_Bot(
    vector_db,
    llm_api=get_completion
)

user_query = "llama 2有多少参数?"

response = bot.chat(user_query)

print(response)
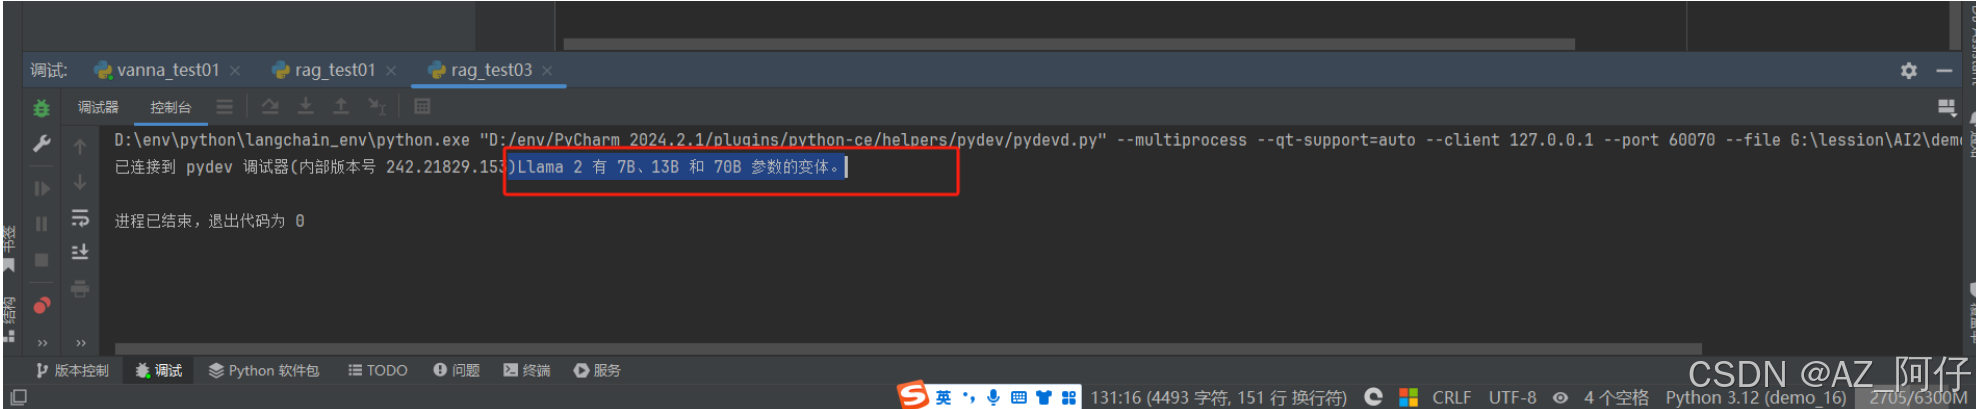
运行结果:
Llama 2 有 7B、13B 和 70B 参数的变体。
当前的Embedding模型 text-embedding-3-large、text-embedding-3-small情况
其最大特点是,支持自定义的缩短向量维度,从而在几乎不影响最终效果的情况下降低向量检索与相似度计算的复杂度。
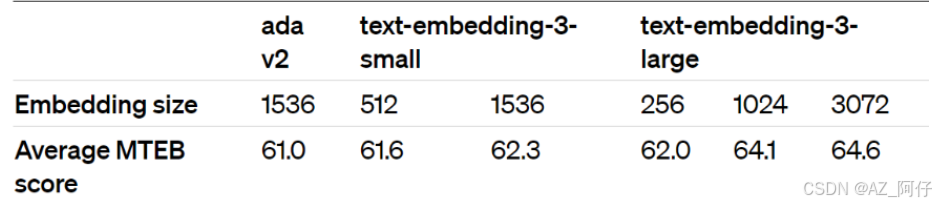
这里需要注意,MTEB(https://huggingface.co/blog/mteb)是一个大规模多任务的Embedding 模型公开评测集
如何使用 text-embedding-3-large、text-embedding-3-small
model = "text-embedding-3-large"
dimensions = 128

# query = "国际争端"

# 且能支持跨语言
query = "global conflicts"

documents = [
    "联合国就苏丹达尔富尔地区大规模暴力事件发出警告",
    "土耳其、芬兰、瑞典与北约代表将继续就瑞典“入约”问题进行谈判",
    "日本岐阜市陆上自卫队射击场内发生枪击事件 3人受伤",
    "国家游泳中心(水立方):恢复游泳、嬉水乐园等水上项目运营",
    "我国首次在空间站开展舱外辐射生物学暴露实验",
]

query_vec = get_embeddings([query], model=model, dimensions=dimensions)[0]
doc_vecs = get_embeddings(documents, model=model, dimensions=dimensions)

print("向量维度: {}".format(len(query_vec)))

print()

print("Query与Documents的余弦距离:")
for vec in doc_vecs:
    print(cos_sim(query_vec, vec))

print()

print("Query与Documents的欧氏距离:")
for vec in doc_vecs:
    print(l2(query_vec, vec))
运行结果
D:\env\python\langchain_env\python.exe "D:/env/PyCharm 2024.2.1/plugins/python-ce/helpers/pydev/pydevd.py" --multiprocess --qt-support=auto --client 127.0.0.1 --port 61292 --file G:\lession\AI2\demo\demo_16\rag\rag_test04.py
已连接到 pydev 调试器(内部版本号 242.21829.153)向量维度: 128

Query与Documents的余弦距离:
0.333955734271017
0.35430139130696536
0.3137800681785673
0.21378494321644861
0.12856250168326994

Query与Documents的欧氏距离:
1.1541614065023613
1.1363966436830832
1.1715118547835923
1.2539657880299067
1.3201799633666724

进程已结束,退出代码为 0
RAG系统进阶知识
关于文本分割的粒度
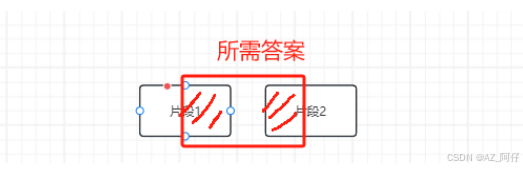
文本分割粒度太大,可能导致检索不精确,粒度太小可能导致信息不全面
问题的答案可能跨越两个片段
import chromadb
from chromadb import Settings
from pdfminer.high_level import extract_pages
from pdfminer.layout import LTTextContainer

from openai import OpenAI
import os
os.environ["OPENAI_API_KEY"] = "sk-proj-your open ai key"
# openai客户端
client = OpenAI()

prompt_template = """
你是一个问答机器人。
你的任务是根据下述给定的已知信息回答用户问题。

已知信息:
{context} # 检索出来的原始文档

用户问:
{query} # 用户的提问

如果已知信息不包含用户问题的答案,或者已知信息不足以回答用户的问题,请直接回复"我无法回答您的问题"。
请不要输出已知信息中不包含的信息或答案。
请用中文回答用户问题。
"""

def get_embeddings(texts, model="text-embedding-ada-002", dimensions=None):
    '''封装 OpenAI 的 Embedding 模型接口'''
    if model == "text-embedding-ada-002":
        dimensions = None
    if dimensions:
        data = client.embeddings.create(
            input=texts, model=model, dimensions=dimensions).data
    else:
        data = client.embeddings.create(input=texts, model=model).data
    return [x.embedding for x in data]

def get_completion(prompt, model="gpt-4o"):
    '''封装 openai 接口'''
    messages = [{"role": "user", "content": prompt}]
    response = client.chat.completions.create(
        model=model,
        messages=messages,
        temperature=0,  # 模型输出的随机性,0 表示随机性最小
    )
    return response.choices[0].message.content

# 加载pdf文件
def extract_text_from_pdf(filename, page_numbers=None, min_line_length=1):
    '''从 PDF 文件中(按指定页码)提取文字'''
    paragraphs = []
    buffer = ''
    full_text = ''
    # 提取全部文本
    for i, page_layout in enumerate(extract_pages(filename)):
        # 如果指定了页码范围,跳过范围外的页
        if page_numbers is not None and i not in page_numbers:
            continue
        for element in page_layout:
            if isinstance(element, LTTextContainer):
                full_text += element.get_text() + '\n'
    # 按空行分隔,将文本重新组织成段落
    lines = full_text.split('\n')
    for text in lines:
        if len(text) >= min_line_length:
            buffer += (' '+text) if not text.endswith('-') else text.strip('-')
        elif buffer:
            paragraphs.append(buffer)
            buffer = ''
    if buffer:
        paragraphs.append(buffer)
    return paragraphs


def build_prompt(prompt_template, **kwargs):
    '''将 Prompt 模板赋值'''
    inputs = {}
    for k, v in kwargs.items():
        if isinstance(v, list) and all(isinstance(elem, str) for elem in v):
            val = '\n\n'.join(v)
        else:
            val = v
        inputs[k] = val
    return prompt_template.format(**inputs)

class MyVectorDBConnector:
    def __init__(self, collection_name, embedding_fn):
        # 内存模式
        chroma_client = chromadb.Client(Settings(allow_reset=True))
        # 持久化
        # chroma_client = chromadb.PersistentClient(path="./persistentsqlite.sqlite")
        # 为了演示,实际不需要每次reset(), 不可逆
        chroma_client.reset()
        # 创建一个Collection
        self.collection = chroma_client.get_or_create_collection(
            name=collection_name
        )
        # 如果没有指定向量函数,则chroma会使用内置的
        self.embedding_fn = embedding_fn
    def add_documents(self, documents):
        '''向 Collection 中添加文档于向量'''
        self.collection.add(
            embeddings=self.embedding_fn(documents), # 每个文档的向量
            documents=documents, # 文档的原文
            ids=[f"id{i}" for i in range(len(documents))]  # 每个文档的 id
        )

    def search(self, query, top_n):
        '''检索向量数据库'''
        results = self.collection.query(
            query_embeddings=self.embedding_fn([query]),
            n_results=top_n
        )
        return results


# 将目标文本分割成段落,加载到内存
paragraphs = extract_text_from_pdf("llama2.pdf", page_numbers=[2,3], min_line_length=10)
# 创建一个向量数据库对象
vector_db = MyVectorDBConnector("demo_text_split", get_embeddings)
# 向向量数据库中添加文档
vector_db.add_documents(paragraphs)

class RAG_Bot:
    def __init__(self, vector_db, llm_api, n_results=2):
        self.vector_db = vector_db
        self.llm_api = llm_api
        self.n_results = n_results

    def chat(self, user_query):
        # 1. 检索
        search_results = self.vector_db.search(user_query, self.n_results)

        # 2. 构建 Prompt
        prompt = build_prompt(
            prompt_template, context=search_results['documents'][0], query=user_query)

        # 3. 调用 LLM
        response = self.llm_api(prompt)
        return response

# 创建一个RAG机器人
bot = RAG_Bot(
    vector_db,
    llm_api=get_completion
)

user_query="llama 2 chat有多少参数"
search_results = vector_db.search(user_query, 2)

for doc in search_results['documents'][0]:
    print(doc+"\n")

print("====回复====")
print(bot.chat(user_query))
运行结果
D:\env\python\langchain_env\python.exe "D:/env/PyCharm 2024.2.1/plugins/python-ce/helpers/pydev/pydevd.py" --multiprocess --qt-support=auto --client 127.0.0.1 --port 63194 --file G:\lession\AI2\demo\demo_16\rag\rag_test05.py
已连接到 pydev 调试器(内部版本号 242.21829.153) In this work, we develop and release Llama 2, a family of pretrained and fine-tuned LLMs, Llama 2 and Llama 2-Chat, at scales up to 70B parameters. On the series of helpfulness and safety benchmarks we tested, Llama 2-Chat models generally perform better than existing open-source models. They also appear to be on par with some of the closed-source models, at least on the human evaluations we performed (see Figures 1 and 3). We have taken measures to increase the safety of these models, using safety-specific data annotation and tuning, as well as conducting red-teaming and employing iterative evaluations. Additionally, this paper contributes a thorough description of our fine-tuning methodology and approach to improving LLM safety. We hope that this openness will enable the community to reproduce fine-tuned LLMs and continue to improve the safety of those models, paving the way for more responsible development of LLMs. We also share novel observations we made during the development of Llama 2 and Llama 2-Chat, such as the emergence of tool usage and temporal organization of knowledge.

 2. Llama 2-Chat, a fine-tuned version of Llama 2 that is optimized for dialogue use cases. We release

====回复====
Llama 2-Chat的参数规模可以达到70B。
这里的问题和答案,实际上并不是特别匹配,问题是 “llama 2 chat有多少参数”,而回答是 “Llama 2-Chat的参数规模可以达到70B。”
实际上这个答案并不精准,原因是切割方式是通过’\n’的方式来切割的,这个时候,我们需要提升精度,那么我们怎么做呢?使用部分重叠式进行文本切割,使得上下文更完整。
什么是部分重叠式切割
在对文本进行切分时,不是将文本完全分割成互不相交的片段,而是使相邻的切分片段之间有一定程度的重叠部分。例如,要将一篇长文本切分成若干个长度为 N 的片段,采用部分重叠方式切分时,每个片段之间会有 M(M < N)个字符的重叠。
-
目的和作用
- 保留上下文信息:文本中的语义和信息往往具有连贯性,部分重叠可以让每个切分片段在一定程度上保留相邻部分的上下文信息,有助于更好地理解文本内容。比如在处理一些具有复杂逻辑关系或上下文依赖较强的文本时,重叠部分能帮助模型或后续处理过程更好地把握文本的整体语义,避免因切分造成信息丢失或误解。
- 提高模型性能:在自然语言处理任务中,如文本分类、情感分析、机器翻译等,模型通常需要依据一定的上下文来做出准确的判断。部分重叠的文本切分方式可以为模型提供更丰富的上下文信息,从而提高模型的准确性和泛化能力。以文本分类为例,重叠部分的信息可能包含一些关键的分类线索,有助于模型更准确地识别文本的类别。
- 适应不同粒度需求:有时候在文本处理中需要不同粒度的文本片段。部分重叠的切分方式可以在提供较细粒度切分的同时,通过重叠部分兼顾到更宏观的文本信息,满足不同应用场景对文本粒度的多样化需求。例如,在信息检索中,既可能需要精确匹配较短的文本片段,也可能需要考虑较长文本片段中的相关信息,部分重叠切分就可以在一定程度上兼顾这两种需求。
-
实现原理:通常可以通过设定窗口大小和步长来实现部分重叠式的文本切分。窗口大小决定了每个切分片段的长度,步长则决定了相邻两个窗口之间的移动距离。当步长小于窗口大小的时候,就会产生部分重叠的效果。例如,窗口大小为 100 个字符,步长为 80 个字符,那么相邻的两个切分片段就会有 20 个字符的重叠。
具体的实现代码如下
pip install nltk
NLTK(Natural Language Toolkit)是一个用于自然语言处理(NLP)的 Python 库,它提供了丰富的语料库、工具和接口,能帮助开发者轻松处理和分析文本数据。下面从安装、核心功能、常用模块及示例代码等方面为你详细介绍。
一般 overlap_size设置为 chunk_size的10%到20%,需要不断测试给到结果,如果文本较长,chunk_size给2000,overlap_size给200,如果本身内容比较短,chunk_size给300,overlap_size给20然而chunk_size 和 overlap_size无论怎么给,都不是完美的银弹方案。对于复杂文本(例如医疗文献或者科学文献)的切分,需要用过NSP任务进行模型微调训练,A和B两个文本块是否有关系,如果B和A之间有关系,那么这两个文本块进行合并。对于Bert模型来说,使用LLM模型训练,或者预测 B文本块是A文本块的下一个文本块。
什么是NSP任务训练
NSP(Next Sentence Prediction)任务训练是自然语言处理(NLP)中的一种预训练任务,常用于语言模型的训练,NSP 任务的目标是预测给定的两个句子在文本中的顺序是否正确,即判断第二个句子是否是第一个句子的下一句。例如,对于句子对 “我喜欢吃苹果。苹果是一种水果。”,模型应该预测为正例,表示这两个句子的顺序是合理的;而对于句子对 “我喜欢吃苹果。天空是蓝色的。”,模型应该预测为负例。
在训练过程中,模型会被输入大量的句子对以及它们对应的标签(正例或负例)。模型通过学习这些句子对的特征,来掌握句子之间的语义关系和连贯性,从而能够准确地预测新的句子对的顺序是否正确。通常,模型会将句子对中的每个句子进行编码,然后通过一些交互机制来融合两个句子的信息,最后根据融合后的信息进行分类预测
NSP 任务训练有助于模型学习到文本中的长距离依赖关系和语义连贯性,提高模型对句子之间逻辑关系的理解能力。这对于许多自然语言处理任务,如问答系统、文本生成、机器翻译等都非常有帮助。通过在大规模语料上进行 NSP 任务训练,模型可以更好地捕捉语言的结构和语义信息,从而在下游任务中取得更好的性能。
回到 ntlk,我们编写如下代码
import chromadb
from chromadb import Settings
from pdfminer.high_level import extract_pages
from pdfminer.layout import LTTextContainer

from openai import OpenAI
import os
os.environ["OPENAI_API_KEY"] = "sk-proj-your open ai key"
# openai客户端
client = OpenAI()

prompt_template = """
你是一个问答机器人。
你的任务是根据下述给定的已知信息回答用户问题。

已知信息:
{context} # 检索出来的原始文档

用户问:
{query} # 用户的提问

如果已知信息不包含用户问题的答案,或者已知信息不足以回答用户的问题,请直接回复"我无法回答您的问题"。
请不要输出已知信息中不包含的信息或答案。
请用中文回答用户问题。
"""

from nltk.tokenize import sent_tokenize
import json


# chunk_size 一般根据文档内容或大小来设置
# overlap_size 一般设置 chunk_size 大小的10%-20%之间
def split_text(paragraphs, chunk_size=300, overlap_size=100):
    '''按指定 chunk_size 和 overlap_size 交叠割文本'''
    sentences = [s.strip() for p in paragraphs for s in sent_tokenize(p)]
    chunks = []
    i = 0
    while i < len(sentences):
        chunk = sentences[i]
        overlap = ''
        prev_len = 0
        prev = i - 1
        # 向前计算重叠部分
        while prev >= 0 and len(sentences[prev])+len(overlap) <= overlap_size:
            overlap = sentences[prev] + ' ' + overlap
            prev -= 1
        chunk = overlap+chunk
        next = i + 1
        # 向后计算当前chunk
        while next < len(sentences) and len(sentences[next])+len(chunk) <= chunk_size:
            chunk = chunk + ' ' + sentences[next]
            next += 1
        chunks.append(chunk)
        i = next
    return chunks

def get_embeddings(texts, model="text-embedding-ada-002", dimensions=None):
    '''封装 OpenAI 的 Embedding 模型接口'''
    if model == "text-embedding-ada-002":
        dimensions = None
    if dimensions:
        data = client.embeddings.create(
            input=texts, model=model, dimensions=dimensions).data
    else:
        data = client.embeddings.create(input=texts, model=model).data
    return [x.embedding for x in data]

def get_completion(prompt, model="gpt-4o"):
    '''封装 openai 接口'''
    messages = [{"role": "user", "content": prompt}]
    response = client.chat.completions.create(
        model=model,
        messages=messages,
        temperature=0,  # 模型输出的随机性,0 表示随机性最小
    )
    return response.choices[0].message.content

# 加载pdf文件
def extract_text_from_pdf(filename, page_numbers=None, min_line_length=1):
    '''从 PDF 文件中(按指定页码)提取文字'''
    paragraphs = []
    buffer = ''
    full_text = ''
    # 提取全部文本
    for i, page_layout in enumerate(extract_pages(filename)):
        # 如果指定了页码范围,跳过范围外的页
        if page_numbers is not None and i not in page_numbers:
            continue
        for element in page_layout:
            if isinstance(element, LTTextContainer):
                full_text += element.get_text() + '\n'
    # 按空行分隔,将文本重新组织成段落
    lines = full_text.split('\n')
    for text in lines:
        if len(text) >= min_line_length:
            buffer += (' '+text) if not text.endswith('-') else text.strip('-')
        elif buffer:
            paragraphs.append(buffer)
            buffer = ''
    if buffer:
        paragraphs.append(buffer)
    return paragraphs


def build_prompt(prompt_template, **kwargs):
    '''将 Prompt 模板赋值'''
    inputs = {}
    for k, v in kwargs.items():
        if isinstance(v, list) and all(isinstance(elem, str) for elem in v):
            val = '\n\n'.join(v)
        else:
            val = v
        inputs[k] = val
    return prompt_template.format(**inputs)

class MyVectorDBConnector:
    def __init__(self, collection_name, embedding_fn):
        # 内存模式
        chroma_client = chromadb.Client(Settings(allow_reset=True))
        # 持久化
        # chroma_client = chromadb.PersistentClient(path="./persistentsqlite.sqlite")
        # 为了演示,实际不需要每次reset(), 不可逆
        chroma_client.reset()
        # 创建一个Collection
        self.collection = chroma_client.get_or_create_collection(
            name=collection_name
        )
        # 如果没有指定向量函数,则chroma会使用内置的
        self.embedding_fn = embedding_fn
    def add_documents(self, documents):
        '''向 Collection 中添加文档于向量'''
        self.collection.add(
            embeddings=self.embedding_fn(documents), # 每个文档的向量
            documents=documents, # 文档的原文
            ids=[f"id{i}" for i in range(len(documents))]  # 每个文档的 id
        )

    def search(self, query, top_n):
        '''检索向量数据库'''
        results = self.collection.query(
            query_embeddings=self.embedding_fn([query]),
            n_results=top_n
        )
        return results


# 将目标文本分割成段落,加载到内存
paragraphs = extract_text_from_pdf("llama2.pdf", page_numbers=[2,3], min_line_length=10)

chunks = split_text(paragraphs, 300, 100)
# 创建一个向量数据库对象
vector_db = MyVectorDBConnector("demo_text_split", get_embeddings)
# 向向量数据库中添加文档
# vector_db.add_documents(paragraphs)
vector_db.add_documents(chunks)

class RAG_Bot:
    def __init__(self, vector_db, llm_api, n_results=2):
        self.vector_db = vector_db
        self.llm_api = llm_api
        self.n_results = n_results

    def chat(self, user_query):
        # 1. 检索
        search_results = self.vector_db.search(user_query, self.n_results)

        # 2. 构建 Prompt
        prompt = build_prompt(
            prompt_template, context=search_results['documents'][0], query=user_query)

        # 3. 调用 LLM
        response = self.llm_api(prompt)
        return response

# 创建一个RAG机器人
bot = RAG_Bot(
    vector_db,
    llm_api=get_completion
)

user_query="llama 2 chat有多少参数"
search_results = vector_db.search(user_query, 2)

for doc in search_results['documents'][0]:
    print(doc+"\n")

print("====回复====")
print(bot.chat(user_query))
运行结果如下:
D:\env\python\langchain_env\python.exe "D:/env/PyCharm 2024.2.1/plugins/python-ce/helpers/pydev/pydevd.py" --multiprocess --qt-support=auto --client 127.0.0.1 --port 61356 --file G:\lession\AI2\demo\demo_16\rag\rag_test07.py
已连接到 pydev 调试器(内部版本号 242.21829.153)2. Llama 2-Chat, a fine-tuned version of Llama 2 that is optimized for dialogue use cases. We release variants of this model with 7B, 13B, and 70B parameters as well. We believe that the open release of LLMs, when done safely, will be a net benefit to society.

In this work, we develop and release Llama 2, a family of pretrained and fine-tuned LLMs, Llama 2 and Llama 2-Chat, at scales up to 70B parameters. On the series of helpfulness and safety benchmarks we tested, Llama 2-Chat models generally perform better than existing open-source models.

====回复====
Llama 2-Chat 有 7B、13B 和 70B 三种参数规模的变体。
结果看起来就比较准确, 我们重点看一下 分割代码
# chunk_size 一般根据文档内容或大小来设置
# overlap_size 一般设置 chunk_size 大小的10%-20%之间
def split_text(paragraphs, chunk_size=300, overlap_size=100):
    '''按指定 chunk_size 和 overlap_size 交叠割文本'''
    sentences = [s.strip() for p in paragraphs for s in sent_tokenize(p)]
    chunks = []
    i = 0
    while i < len(sentences):
        chunk = sentences[i]
        overlap = ''
        prev_len = 0
        prev = i - 1
        # 向前计算重叠部分
        while prev >= 0 and len(sentences[prev])+len(overlap) <= overlap_size:
            overlap = sentences[prev] + ' ' + overlap
            prev -= 1
        chunk = overlap+chunk
        next = i + 1
        # 向后计算当前chunk
        while next < len(sentences) and len(sentences[next])+len(chunk) <= chunk_size:
            chunk = chunk + ' ' + sentences[next]
            next += 1
        chunks.append(chunk)
        i = next
    return chunks
这么看是不是比较抽象,那么我们引入一个小的例子走读代码
被分割的参数是paragraphs ,我们假设 paragraphs 为
被分割的参数是paragraphs ,我们假设 paragraphs 为
paragraphs = [
    "今天天气很好。适合出去散步。",
    "我打算去公园。公园有很多花。",
    "我喜欢欣赏花朵。它们很漂亮。"
]
同时,我们设置 chunk_size = 20,overlap_size = 5。
# 使用列表推导式,sent_tokenize 是ntlk的库,作用是将段落分割为句子
# 代码会遍历 paragraphs 中的每个段落,把每个段落分割成句子,然后去除句子首尾的空白字符,最终将所有处理后的句子存储在 sentences 列表中
sentences = [s.strip() for p in paragraphs for s in sent_tokenize(p)]
这行代码会将段落分割成句子,并去除句子首尾的空白字符。在这个例子中,sentences 列表将变为:
['今天天气很好。', '适合出去散步。', '我打算去公园。', '公园有很多花。', '我喜欢欣赏花朵。', '它们很漂亮。']
进入while循环后的第一次循环,此时i = 0
chunk = sentences[i]  # chunk = '今天天气很好。'
overlap = ''
prev_len = 0
prev = i - 1  # prev = -1
此时prev = -1 不会进入 向前计算重叠部分 代码 ,也就是while prev >= 0 and len(sentences[prev])+len(overlap) <= overlap_size: 这个循环不会进入, overlap 为空
代码往下走 会进入 while next < len(sentences) and len(sentences[next])+len(chunk) <= chunk_size: 这个循环
next = i + 1  # next = 1
while next < len(sentences) and len(sentences[next])+len(chunk) <= chunk_size:
    chunk = chunk + ' ' + sentences[next]
    next += 1
len(sentences[1]) + len(chunk) = len('适合出去散步。') + len('今天天气很好。') = 12 + 7 = 19 <= 20,所以 chunk 变为 '今天天气很好。 适合出去散步。',next 变为 2
此时,len(sentences[2]) + len(chunk) = len('我打算去公园。') + len('今天天气很好。 适合出去散步。') = 8 + 19 = 27 > 20,循环结束。最后,将 chunk 添加到 chunks 列表中,并更新 i
chunks.append(chunk)  # chunks = ['今天天气很好。 适合出去散步。']
i = next  # i = 2
当i = 2 ,进入第二次循环
chunk = sentences[i]  # chunk = '我打算去公园。'
overlap = ''
prev_len = 0
prev = i - 1  # prev = 1
计算重叠部分:
while prev >= 0 and len(sentences[prev])+len(overlap) <= overlap_size:
    overlap = sentences[prev] + ' ' + overlap
    prev -= 1
对于 prev = 1,len(sentences[1]) + len(overlap) = len('适合出去散步。') + len('') = 12 > 5,所以重叠部分 overlap 保持为空,接下来,开始向后计算当前 chunk
next = i + 1  # next = 3
while next < len(sentences) and len(sentences[next])+len(chunk) <= chunk_size:
    chunk = chunk + ' ' + sentences[next]
    next += 1
对于 next = 3,len(sentences[3]) + len(chunk) = len('公园有很多花。') + len('我打算去公园。') = 8 + 8 = 16 <= 20,所以 chunk 变为 '我打算去公园。 公园有很多花。',next 变为 4。此时,len(sentences[4]) + len(chunk) = len('我喜欢欣赏花朵。') + len('我打算去公园。 公园有很多花。') = 10 + 16 = 26 > 20,循环结束,
最后,将 chunk 添加到 chunks 列表中,并更新 i。
检索后排序
检索后有个问题,检索出来的最合适的答案不一定排在检索结果的最前面
解决方案
- 1. 检索时过召回一部分文本
- 2. 通过一个排序模型对query和Document重新打分排序
其实这两种方案本质上都是二次排序。
对于方案一 检索时过召回一部分文本
过召回指的是通过采用较为宽松的检索策略,放宽检索条件拿到符合条件的数据集,比不过召回多,比全数据集少,例如使用更多的同义词、近义词作为检索词,或者减少对检索词的限定条件,从而过召回一部分文本,然后过召回的这部分文本,使用更复杂、精确的相似度计算方法,将用户输入的检索词与每个文本进行详细的匹配和打分,评估它们之间的相关性程度,在得到初步排序的结果后,可以进一步应用一些筛选规则或算法,对结果进行二次筛选和精排。最终得到一个合适的检索结果
给一个简单的例子,匹配上述的原理
import re
# .... 较为宽松的检索策略,放宽检索条件拿到符合条件的数据集,即召回的商品文本信息
# 召回的商品文本信息如下,包含商品名称和描述
recalled_products = [
    {
        "name": "苹果iPhone 15 Pro手机",
        "description": "A17 Pro芯片,6.1英寸超视网膜XDR显示屏,坚固耐用的钛金属设计。",
        "sales_count": 1000  # 商品销量,代表热度
    },
    {
        "name": "华为Pura 70 Ultra手机",
        "description": "超聚光XMAGE影像,第二代昆仑玻璃,强劲续航能力。",
        "sales_count": 800
    },
    {
        "name": "小米14 Pro手机",
        "description": "骁龙8 Gen3处理器,2K分辨率屏幕,徕卡光学镜头。",
        "sales_count": 900
    },
    {
        "name": "戴尔XPS 13笔记本电脑",
        "description": "轻薄机身,高性能处理器,长续航。",
        "sales_count": 500
    }
]

# 用户输入的搜索关键词
user_query = "高性能手机"

# 这里就是所谓的过召回
# step1. 计算文本相关性得分的函数,简单计算关键词在文本中出现的次数
def calculate_text_relevance(query, text):
    query_words = query.lower().split()
    text = text.lower()
    score = 0
    for word in query_words:
        score += len(re.findall(word, text))
    return score

# step2 为每个召回的商品计算相关性得分和综合得分(结合相关性和热度)
for product in recalled_products:
    product_text = product["name"] + " " + product["description"]
    relevance_score = calculate_text_relevance(user_query, product_text)
    popularity_score = product["sales_count"]
    # 这里简单地将相关性得分和热度得分相加作为综合得分,你可以根据实际情况调整权重
    product["comprehensive_score"] = relevance_score + popularity_score

# 根据综合得分对召回的商品进行排序
recalled_products.sort(key=lambda x: x["comprehensive_score"], reverse=True)

# 输出排序后的商品列表
for product in recalled_products:
    print(f"商品名称: {product['name']}, 综合得分: {product['comprehensive_score']}")
对于方案二 使用排序模型做二次排序
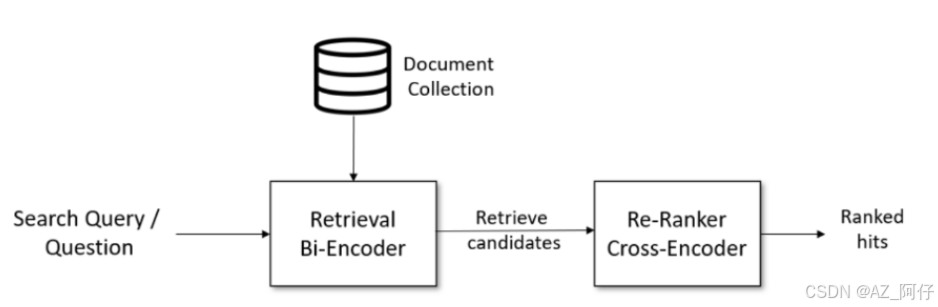
Bi-Encoder模型从 Document Collection得到了初步文档之后,通过Cross-Encoder进行二次排序,最终得到答案
pip install sentence_transformers
import chromadb
from chromadb import Settings
from pdfminer.high_level import extract_pages
from pdfminer.layout import LTTextContainer

from openai import OpenAI
import os
os.environ["OPENAI_API_KEY"] = "sk-proj-your openai key"
# openai客户端
client = OpenAI()

prompt_template = """
你是一个问答机器人。
你的任务是根据下述给定的已知信息回答用户问题。

已知信息:
{context} # 检索出来的原始文档

用户问:
{query} # 用户的提问

如果已知信息不包含用户问题的答案,或者已知信息不足以回答用户的问题,请直接回复"我无法回答您的问题"。
请不要输出已知信息中不包含的信息或答案。
请用中文回答用户问题。
"""

from nltk.tokenize import sent_tokenize
import json


# chunk_size 一般根据文档内容或大小来设置
# overlap_size 一般设置 chunk_size 大小的10%-20%之间
def split_text(paragraphs, chunk_size=300, overlap_size=100):
    '''按指定 chunk_size 和 overlap_size 交叠割文本'''
    sentences = [s.strip() for p in paragraphs for s in sent_tokenize(p)]
    chunks = []
    i = 0
    while i < len(sentences):
        chunk = sentences[i]
        overlap = ''
        prev_len = 0
        prev = i - 1
        # 向前计算重叠部分
        while prev >= 0 and len(sentences[prev])+len(overlap) <= overlap_size:
            overlap = sentences[prev] + ' ' + overlap
            prev -= 1
        chunk = overlap+chunk
        next = i + 1
        # 向后计算当前chunk
        while next < len(sentences) and len(sentences[next])+len(chunk) <= chunk_size:
            chunk = chunk + ' ' + sentences[next]
            next += 1
        chunks.append(chunk)
        i = next
    return chunks

def get_embeddings(texts, model="text-embedding-ada-002", dimensions=None):
    '''封装 OpenAI 的 Embedding 模型接口'''
    if model == "text-embedding-ada-002":
        dimensions = None
    if dimensions:
        data = client.embeddings.create(
            input=texts, model=model, dimensions=dimensions).data
    else:
        data = client.embeddings.create(input=texts, model=model).data
    return [x.embedding for x in data]

def get_completion(prompt, model="gpt-4o"):
    '''封装 openai 接口'''
    messages = [{"role": "user", "content": prompt}]
    response = client.chat.completions.create(
        model=model,
        messages=messages,
        temperature=0,  # 模型输出的随机性,0 表示随机性最小
    )
    return response.choices[0].message.content

# 加载pdf文件
def extract_text_from_pdf(filename, page_numbers=None, min_line_length=1):
    '''从 PDF 文件中(按指定页码)提取文字'''
    paragraphs = []
    buffer = ''
    full_text = ''
    # 提取全部文本
    for i, page_layout in enumerate(extract_pages(filename)):
        # 如果指定了页码范围,跳过范围外的页
        if page_numbers is not None and i not in page_numbers:
            continue
        for element in page_layout:
            if isinstance(element, LTTextContainer):
                full_text += element.get_text() + '\n'
    # 按空行分隔,将文本重新组织成段落
    lines = full_text.split('\n')
    for text in lines:
        if len(text) >= min_line_length:
            buffer += (' '+text) if not text.endswith('-') else text.strip('-')
        elif buffer:
            paragraphs.append(buffer)
            buffer = ''
    if buffer:
        paragraphs.append(buffer)
    return paragraphs


def build_prompt(prompt_template, **kwargs):
    '''将 Prompt 模板赋值'''
    inputs = {}
    for k, v in kwargs.items():
        if isinstance(v, list) and all(isinstance(elem, str) for elem in v):
            val = '\n\n'.join(v)
        else:
            val = v
        inputs[k] = val
    return prompt_template.format(**inputs)

class MyVectorDBConnector:
    def __init__(self, collection_name, embedding_fn):
        # 内存模式
        chroma_client = chromadb.Client(Settings(allow_reset=True))
        # 持久化
        # chroma_client = chromadb.PersistentClient(path="./persistentsqlite.sqlite")
        # 为了演示,实际不需要每次reset(), 不可逆
        chroma_client.reset()
        # 创建一个Collection
        self.collection = chroma_client.get_or_create_collection(
            name=collection_name
        )
        # 如果没有指定向量函数,则chroma会使用内置的
        self.embedding_fn = embedding_fn
    def add_documents(self, documents):
        '''向 Collection 中添加文档于向量'''
        self.collection.add(
            embeddings=self.embedding_fn(documents), # 每个文档的向量
            documents=documents, # 文档的原文
            ids=[f"id{i}" for i in range(len(documents))]  # 每个文档的 id
        )

    def search(self, query, top_n):
        '''检索向量数据库'''
        results = self.collection.query(
            query_embeddings=self.embedding_fn([query]),
            n_results=top_n
        )
        return results


# 将目标文本分割成段落,加载到内存
paragraphs = extract_text_from_pdf("llama2.pdf", page_numbers=[2,3], min_line_length=10)

chunks = split_text(paragraphs, 300, 100)
# 创建一个向量数据库对象
vector_db = MyVectorDBConnector("demo_text_split", get_embeddings)
# 向向量数据库中添加文档
# vector_db.add_documents(paragraphs)
vector_db.add_documents(chunks)

class RAG_Bot:
    def __init__(self, vector_db, llm_api, n_results=2):
        self.vector_db = vector_db
        self.llm_api = llm_api
        self.n_results = n_results

    def chat(self, user_query):
        # 1. 检索
        search_results = self.vector_db.search(user_query, self.n_results)

        # 2. 构建 Prompt
        prompt = build_prompt(
            prompt_template, context=search_results['documents'][0], query=user_query)

        # 3. 调用 LLM
        response = self.llm_api(prompt)
        return response

# 创建一个RAG机器人
bot = RAG_Bot(
    vector_db,
    llm_api=get_completion
)

user_query = "how safe is llama 2"
search_results = vector_db.search(user_query, 10)

# for doc in search_results['documents'][0]:
#     print(doc+"\n")
#
# print("====回复====")
# print(bot.chat(user_query))

from sentence_transformers import CrossEncoder
from transformers import TRANSFORMERS_CACHE
import os

# 指定模型下载的路径
cache_dir = r'G:\lession\AI2\demo\demo_16\model'
os.makedirs(cache_dir, exist_ok=True)
# 设置transformers库的缓存路径
# 如果不指定缓存路径,那么默认会将模型下载到 C:\Users\dengj\.cache\huggingface\hub\models--sentence-transformers--all-MiniLM-L6-v2
TRANSFORMERS_CACHE = cache_dir

model = CrossEncoder('cross-encoder/ms-marco-MiniLM-L-6-v2', max_length=512)

# predict 方法做得分对比
scores = model.predict([(user_query, doc) for doc in search_results['documents'][0]])
# 按得分排序
sorted_list = sorted(zip(scores, search_results['documents'][0]), key=lambda x: x[0], reverse=True)
for score, doc in sorted_list:
    print(f"{score}\t{doc}\n")
这里检索和ES的倒排索引比较类似,运行结果如下
We believe that the open release of LLMs, when done safely, will be a net benefit to society. Like all LLMs, Llama 2 is a new technology that carries potential risks with use (Bender et al., 2021b; Weidinger et al., 2021; Solaiman et al., 2023).

5.310717582702637	In this work, we develop and release Llama 2, a family of pretrained and fine-tuned LLMs, Llama 2 and Llama 2-Chat, at scales up to 70B parameters. On the series of helpfulness and safety benchmarks we tested, Llama 2-Chat models generally perform better than existing open-source models.

5.1842851638793945	2. Llama 2-Chat, a fine-tuned version of Llama 2 that is optimized for dialogue use cases. We release variants of this model with 7B, 13B, and 70B parameters as well. We believe that the open release of LLMs, when done safely, will be a net benefit to society.

4.709955215454102	We provide a responsible use guide¶ and code examples‖ to facilitate the safe deployment of Llama 2 and Llama 2-Chat. More details of our responsible release strategy can be found in Section 5.3.

4.5439653396606445	We also share novel observations we made during the development of Llama 2 and Llama 2-Chat, such as the emergence of tool usage and temporal organization of knowledge. Figure 3: Safety human evaluation results for Llama 2-Chat compared to other open-source and closed source models.

4.3788042068481445	Testing conducted to date has been in English and has not — and could not — cover all scenarios. Therefore, before deploying any applications of Llama 2-Chat, developers should perform safety testing and tuning tailored to their specific applications of the model.

4.0338897705078125	Additionally, these safety evaluations are performed using content standards that are likely to be biased towards the Llama 2-Chat models. We are releasing the following models to the general public for research and commercial use‡: 1.

0.8537297248840332	1. Llama 2, an updated version of Llama 1, trained on a new mix of publicly available data. We also increased the size of the pretraining corpus by 40%, doubled the context length of the model, and adopted grouped-query attention (Ainslie et al., 2023).

0.8353641629219055	Figure 2: Win-rate % for helpfulness andsafety between commercial-licensed baselines and Llama 2-Chat, according to GPT 4. To complement the human evaluation, we used a more capable model, not subject to our own guidance. Green area indicates our model is better according to GPT-4.

-0.4974507987499237	We are releasing the following models to the general public for research and commercial use‡: 1. Llama 2, an updated version of Llama 1, trained on a new mix of publicly available data.
混合检索(Hybird Search)
什么是混合检索?
混合检索(Hybrid Search)是一种将多种不同检索技术或数据源相结合的搜索方法,旨在提高检索的准确性、全面性和效率,以更好地满足用户的搜索需求。
在实际生产中,传统的关键字检索(稀疏表示,例如淘宝的搜索框)与向量检索(稠密表示)各有优劣,举个具体的例子,比如文档中包含很长的专有名字,关键字检索往往更精准而向量检索容易引入概念混淆。
混合检索的方式
- 结合不同的检索技术:例如将基于关键词的检索与基于语义的检索相结合。基于关键词的检索速度快,但可能会因关键词匹配的局限性而遗漏一些相关信息;基于语义的检索能够理解文本的含义,更好地处理语义相关但关键词不完全匹配的情况,但计算成本较高。混合使用这两种技术,可以在保证一定检索速度的同时,提高检索结果的准确性和相关性。
- 融合多种数据源:可以整合来自不同数据库、不同类型文档或不同领域的信息。比如在一个企业的信息检索系统中,将内部的文档管理系统、客户关系管理系统以及外部的行业报告数据库等多个数据源进行混合检索,使用户能够在一个统一的界面下获取到全面的信息,而无需分别在不同的系统中进行查询。
一个简单的例子
# 背景说明:在医学中“小细胞肺癌”和“非小细胞肺癌”是两种不同的癌症

query = "非小细胞肺癌的患者"

documents = [
    "玛丽患有肺癌,癌细胞已转移",
    "刘某肺癌I期",
    "张某经诊断为非小细胞肺癌III期",
    "小细胞肺癌是肺癌的一种"
]

query_vec = get_embeddings([query])[0]
doc_vecs = get_embeddings(documents)

print("Cosine distance:")
for vec in doc_vecs:
    print(cos_sim(query_vec, vec))
运行结果
已连接到 pydev 调试器(内部版本号 242.21829.153)Cosine distance:
0.8912871311166322
0.8894861277646642
0.9039511475378275
0.9132058502875556
我们可以看到向量化之后的余弦相似度 得分很接近,也没有办法直接分辨出 小细胞肺癌 和非小细胞肺癌
所以,有时候我们需要结合不同的检索算法,来达到比单一检索算法更优的效果。这就是混合检索。
混合检索的核心是,综合文档 d 在不同检索算法下的排序名次(rank),为其生成最终排序。
一个最常用的算法叫 Reciprocal Rank Fusion(RRF)
rrf(d)=∑a∈A1k+ranka(d)
其中 A 表示所有使用的检索算法的集合,ranka(d) 表示使用算法 a 检索时,文档 d 的排序,k 是个常数。
很多向量数据库都支持混合检索,比如 Weaviate、Pinecone 等。也可以根据上述原理自己实现。
那么我们结合elasticsearch手写一个例子
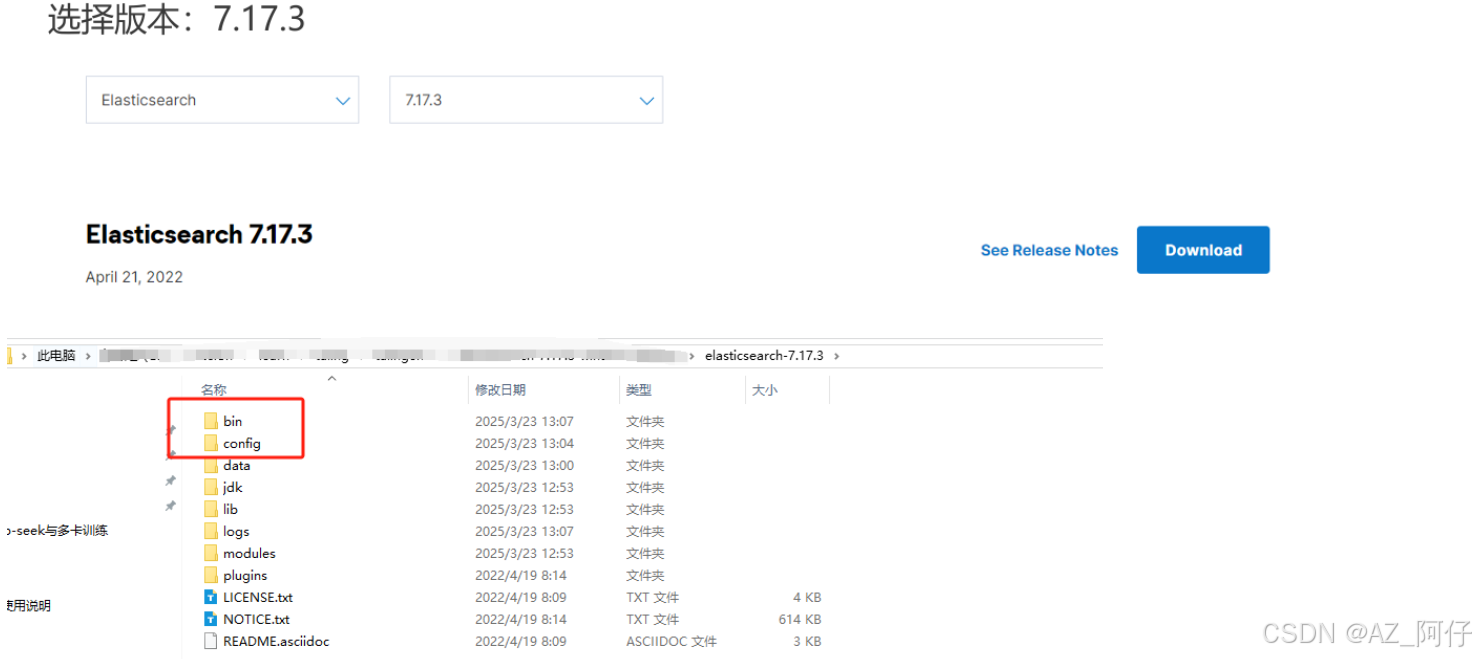
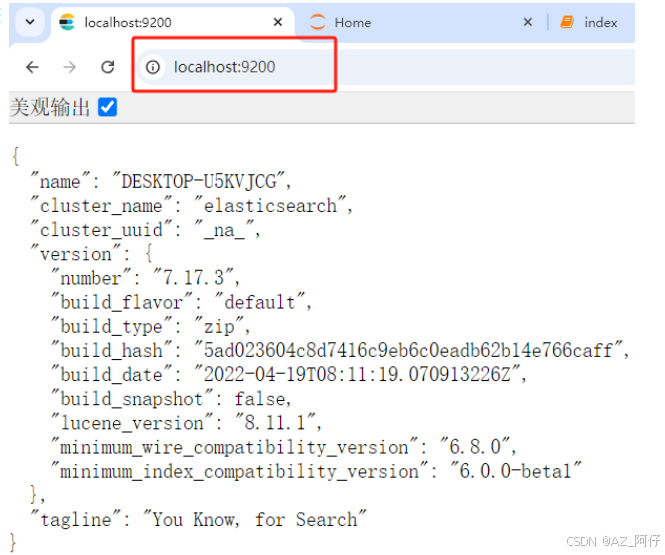
我的系统是win10,首先在本地启动elasticsearch,我这里的版本是7.17.3
https://www.elastic.co/cn/downloads/past-releases#elasticsearch
做如下修改
主配置文件elasticsearch.yml
以集群模式运行单机节点
node.name: single-node
network.host: 0.0.0.0
# 关闭安全检测,不需要账号密码登录
xpack.security.enabled: false
discovery.seed_hosts: ["127.0.0.1"]
# 单节点模式启动
discovery.type: single-node
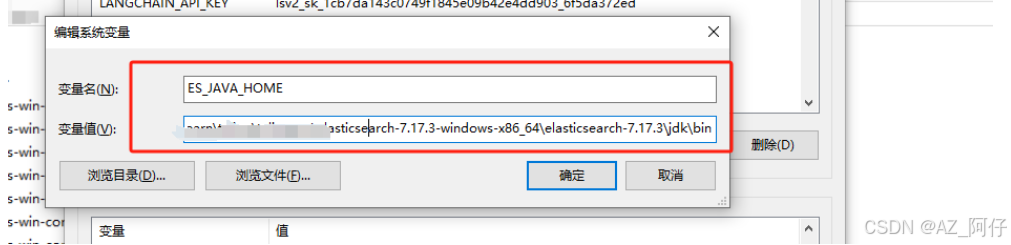
配置ES_JAVA_HOME
set JAVA="%ES_HOME%\jdk\bin\java.exe"
set "ES_JAVA_HOME=%ES_HOME%\jdk"
set JAVA_TYPE=bundled JDK
修改 elasticsearch-env.bat
rem use the bundled JDK (default)
set JAVA="%ES_HOME%\jdk\bin\java.exe"
set "ES_JAVA_HOME=%ES_HOME%\jdk"
set JAVA_TYPE=bundled JDK
使用cmd启动,直接运行 elasticsearch-7.17.3-windows-x86_64\elasticsearch-7.17.3\bin>elasticsearch.bat

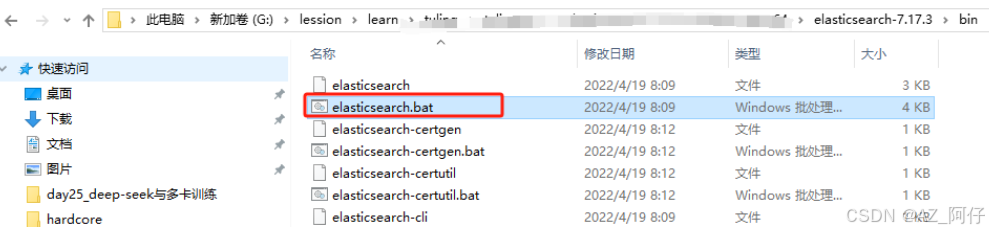
最终通过 http://localhost:9200/
服务端搞定了之后开始客户端,使用pip 安装elasticsearch7客户端,这里与服务端大版本匹配
pip install elasticsearch7
pip install jieba
chinese_utils.py
import re
import jieba
import nltk
from nltk.corpus import stopwords

nltk.download('stopwords')

def to_keywords(input_string):
    """将句子转成检索关键词序列"""
    # 按搜索引擎模式分词
    word_tokens = jieba.cut_for_search(input_string)
    # 加载停用词表
    stop_words = set(stopwords.words('chinese'))
    # 去除停用词
    filtered_sentence = [w for w in word_tokens if not w in stop_words]
    return ' '.join(filtered_sentence)

def sent_tokenize(input_string):
    """按标点断句"""
    # 按标点切分
    sentences = re.split(r'(?<=[。!?;?!])', input_string)
    # 去掉空字符串
    return [sentence for sentence in sentences if sentence.strip()]


if "__main__" == __name__:
    # 测试关键词提取
    print(to_keywords("小明硕士毕业于中国科学院计算所,后在麻省理工学院深造"))
    # 测试断句
    print(sent_tokenize("这是,第一句。这是第二句吗?是的!啊"))
import json
import time
from elasticsearch7 import Elasticsearch, helpers
import chromadb
from chromadb import Settings

from openai import OpenAI
import os
os.environ["OPENAI_API_KEY"] = "sk-proj-your open  ai key"
# openai客户端
client = OpenAI()

documents = [
    "玛丽患有肺癌,癌细胞已转移",
    "刘某肺癌I期",
    "张某经诊断为非小细胞肺癌III期",
    "小细胞肺癌是肺癌的一种"
]

class MyEsConnector:
    def __init__(self, es_client, index_name, keyword_fn):
        self.es_client = es_client
        self.index_name = index_name
        self.keyword_fn = keyword_fn

    def add_documents(self, documents):
        '''文档灌库'''
        if self.es_client.indices.exists(index=self.index_name):
            self.es_client.indices.delete(index=self.index_name)
        self.es_client.indices.create(index=self.index_name)
        actions = [
            {
                "_index": self.index_name,
                "_source": {
                    "keywords": self.keyword_fn(doc),
                    "text": doc,
                    "id": f"doc_{i}"
                }
            }
            for i, doc in enumerate(documents)
        ]
        helpers.bulk(self.es_client, actions)
        time.sleep(1)

    def search(self, query_string, top_n=3):
        '''检索'''
        search_query = {
            "match": {
                "keywords": self.keyword_fn(query_string)
            }
        }
        res = self.es_client.search(
            index=self.index_name, query=search_query, size=top_n)
        return {
            hit["_source"]["id"]: {
                "text": hit["_source"]["text"],
                "rank": i,
            }
            for i, hit in enumerate(res["hits"]["hits"])
        }

from chinese_utils import to_keywords  # 使用中文的关键字提取函数

# 引入配置文件
# ELASTICSEARCH_BASE_URL = os.getenv('ELASTICSEARCH_BASE_URL')
# ELASTICSEARCH_PASSWORD = os.getenv('ELASTICSEARCH_PASSWORD')
# ELASTICSEARCH_NAME= os.getenv('ELASTICSEARCH_NAME')

es = Elasticsearch([{'host': 'localhost', 'port': 9200}])

# 检查连接是否成功
if es.ping():
    print('成功连接到 Elasticsearch')
else:
    print('无法连接到 Elasticsearch')


# 创建 ES 连接器
es_connector = MyEsConnector(es, "demo_es_rrf", to_keywords)

# 文档灌库
es_connector.add_documents(documents)
query = "非小细胞肺癌的患者"
# 关键字检索
keyword_search_results = es_connector.search(query, 3)

print(json.dumps(keyword_search_results, indent=4, ensure_ascii=False))

class MyVectorDBConnector:
    def __init__(self, collection_name, embedding_fn):
        # 内存模式
        chroma_client = chromadb.Client(Settings(allow_reset=True))
        # 持久化
        # chroma_client = chromadb.PersistentClient(path="./persistentsqlite.sqlite")
        # 为了演示,实际不需要每次reset(), 不可逆
        chroma_client.reset()
        # 创建一个Collection
        self.collection = chroma_client.get_or_create_collection(
            name=collection_name
        )
        # 如果没有指定向量函数,则chroma会使用内置的
        self.embedding_fn = embedding_fn
    def add_documents(self, documents):
        '''向 Collection 中添加文档于向量'''
        self.collection.add(
            embeddings=self.embedding_fn(documents), # 每个文档的向量
            documents=documents, # 文档的原文
            ids=[f"id{i}" for i in range(len(documents))]  # 每个文档的 id
        )

    def search(self, query, top_n):
        '''检索向量数据库'''
        results = self.collection.query(
            query_embeddings=self.embedding_fn([query]),
            n_results=top_n
        )
        return results
def get_embeddings(texts, model="text-embedding-ada-002", dimensions=None):
    '''封装 OpenAI 的 Embedding 模型接口'''
    if model == "text-embedding-ada-002":
        dimensions = None
    if dimensions:
        data = client.embeddings.create(
            input=texts, model=model, dimensions=dimensions).data
    else:
        data = client.embeddings.create(input=texts, model=model).data
    return [x.embedding for x in data]
# 创建向量数据库连接器
vecdb_connector = MyVectorDBConnector("demo_vec_rrf", get_embeddings)

# 文档灌库
vecdb_connector.add_documents(documents)

# 向量检索
vector_search_results = {
    "doc_"+str(documents.index(doc)): {
        "text": doc,
        "rank": i
    }
    for i, doc in enumerate(
        vecdb_connector.search(query, 3)["documents"][0]
    )
}  # 把结果转成跟上面关键字检索结果一样的格式

print(json.dumps(vector_search_results, indent=4, ensure_ascii=False))

def rrf(ranks, k=1):
    ret = {}
    # 遍历每次的排序结果
    for rank in ranks:
        # 遍历排序中每个元素
        for id, val in rank.items():
            if id not in ret:
                ret[id] = {"score": 0, "text": val["text"]}
            # 计算 RRF 得分
            ret[id]["score"] += 1.0/(k+val["rank"])
    # 按 RRF 得分排序,并返回
    return dict(sorted(ret.items(), key=lambda item: item[1]["score"], reverse=True))

import json

# 融合两次检索的排序结果
reranked = rrf([keyword_search_results, vector_search_results])

print("rrf result: " + json.dumps(reranked, indent=4, ensure_ascii=False))
运行结果如下:
D:\env\python\langchain_env\python.exe "D:/env/PyCharm 2024.2.1/plugins/python-ce/helpers/pydev/pydevd.py" --multiprocess --qt-support=auto --client 127.0.0.1 --port 54326 --file G:\lession\AI2\demo\demo_16\rag\rag_test010.py
已连接到 pydev 调试器(内部版本号 242.21829.153)[nltk_data] Downloading package stopwords to
[nltk_data]     C:\Users\dengj\AppData\Roaming\nltk_data...
[nltk_data]   Package stopwords is already up-to-date!
成功连接到 Elasticsearch
Building prefix dict from the default dictionary ...
Loading model from cache C:\Users\dengj\AppData\Local\Temp\jieba.cache
Loading model cost 0.984 seconds.
Prefix dict has been built successfully.
{
    "doc_2": {
        "text": "张某经诊断为非小细胞肺癌III期",
        "rank": 0
    },
    "doc_0": {
        "text": "玛丽患有肺癌,癌细胞已转移",
        "rank": 1
    },
    "doc_3": {
        "text": "小细胞肺癌是肺癌的一种",
        "rank": 2
    }
}
{
    "doc_3": {
        "text": "小细胞肺癌是肺癌的一种",
        "rank": 0
    },
    "doc_2": {
        "text": "张某经诊断为非小细胞肺癌III期",
        "rank": 1
    },
    "doc_0": {
        "text": "玛丽患有肺癌,癌细胞已转移",
        "rank": 2
    }
}
rrf result: {
    "doc_2": {
        "score": 1.5,
        "text": "张某经诊断为非小细胞肺癌III期"
    },
    "doc_3": {
        "score": 1.3333333333333333,
        "text": "小细胞肺癌是肺癌的一种"
    },
    "doc_0": {
        "score": 0.8333333333333333,
        "text": "玛丽患有肺癌,癌细胞已转移"
    }
}

进程已结束,退出代码为 0
我们需要根据关键字检索和向量检索,根据rrf将两者的结果融合算分,我们可以看到rrf之后的得分最高的结果 是 张某经诊断为非小细胞肺癌III期 符合查询结果。
可以得到更精确的答案。
关于RRF,可以参考这篇文章
https://learn.microsoft.com/zh-cn/azure/search/hybrid-search-ranking
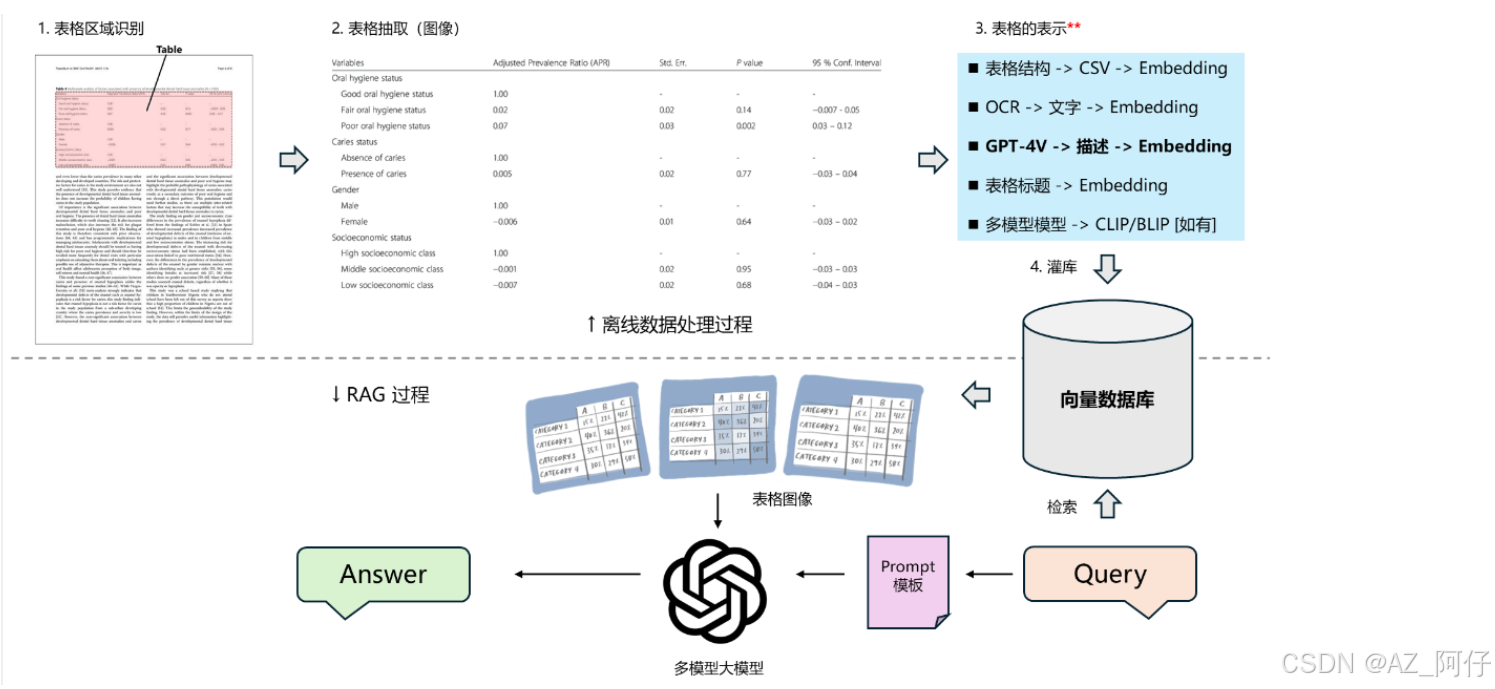
PDF 文档中的表格处理
处理流程如下图所示
实现如下
# 安装 PDF处理库
pip install PyMuPDF
pip install matplotlib

# torchvision transformers
pip install torchvision
pip install transformers
pip install timm
import os
import fitz
from PIL import Image
def pdf2images(pdf_file):
'''将 PDF 每页转成一个 PNG 图像'''
# 保存路径为原 PDF 文件名(不含扩展名)
output_directory_path, _ = os.path.splitext(pdf_file)
if not os.path.exists(output_directory_path):
os.makedirs(output_directory_path)
# 加载 PDF 文件
pdf_document = fitz.open(pdf_file)
# 每页转一张图
for page_number in range(pdf_document.page_count):
# 取一页
page = pdf_document[page_number]
# 转图像
pix = page.get_pixmap()
# 从位图创建 PNG 对象
image = Image.frombytes("RGB", [pix.width, pix.height], pix.samples)
# 保存 PNG 文件
image.save(f"./{output_directory_path}/page_{page_number + 1}.png")
# 关闭 PDF 文件
pdf_document.close()
from PIL import Image
import os
import matplotlib.pyplot as plt
def show_images(dir_path):
'''显示目录下的 PNG 图像'''
for file in os.listdir(dir_path):
if file.endswith('.png'):
# 打开图像
img = Image.open(os.path.join(dir_path, file))
# 显示图像
plt.imshow(img)
plt.axis('off') # 不显示坐标轴
plt.show()
# llama2_page8.pdf 这个pdf只有一页
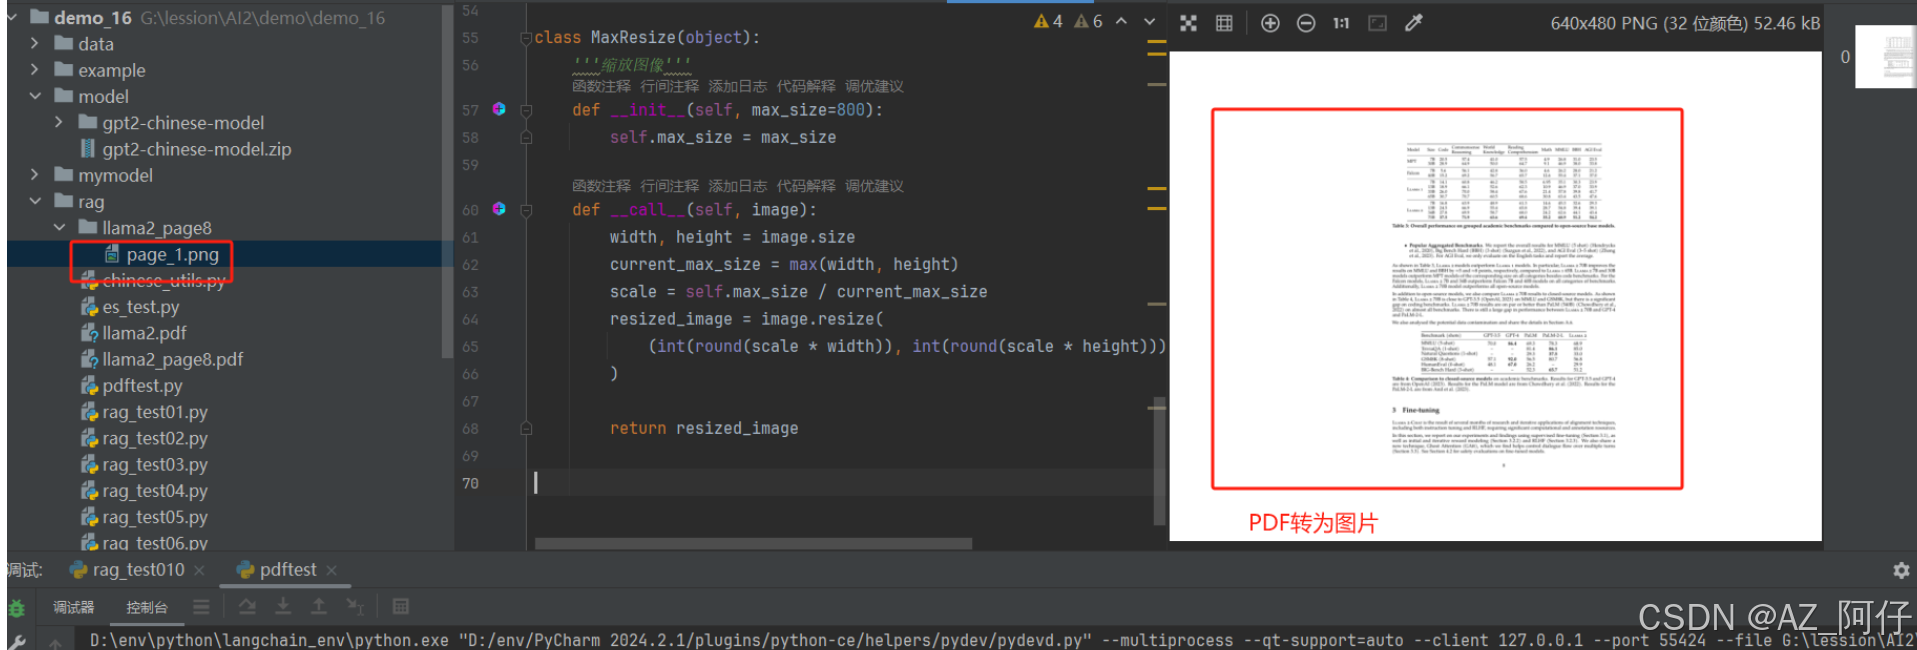
pdf2images("llama2_page8.pdf")
show_images("llama2_page8")
运行结果
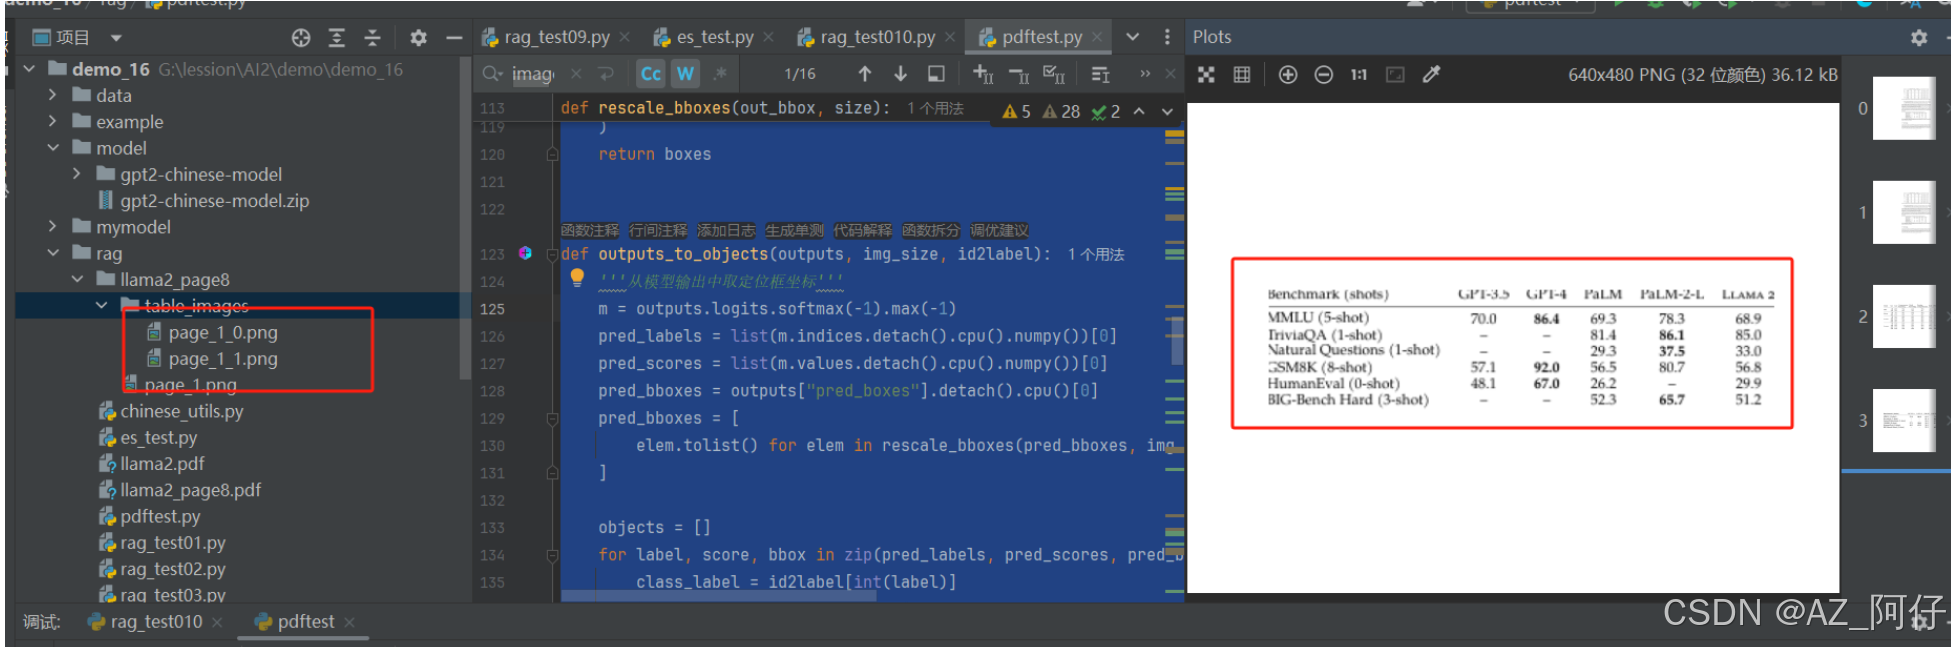
现在我们需要写代码区识别 pdf 中表格的数据
import os
import fitz
from PIL import Image


def get_embeddings(texts, model="text-embedding-ada-002", dimensions=None):
    '''封装 OpenAI 的 Embedding 模型接口'''
    if model == "text-embedding-ada-002":
        dimensions = None
    if dimensions:
        data = client.embeddings.create(
            input=texts, model=model, dimensions=dimensions).data
    else:
        data = client.embeddings.create(input=texts, model=model).data
    return [x.embedding for x in data]


def pdf2images(pdf_file):
    '''将 PDF 每页转成一个 PNG 图像'''
    # 保存路径为原 PDF 文件名(不含扩展名)
    output_directory_path, _ = os.path.splitext(pdf_file)

    if not os.path.exists(output_directory_path):
        os.makedirs(output_directory_path)

    # 加载 PDF 文件
    pdf_document = fitz.open(pdf_file)

    # 每页转一张图
    for page_number in range(pdf_document.page_count):
        # 取一页
        page = pdf_document[page_number]

        # 转图像
        pix = page.get_pixmap()

        # 从位图创建 PNG 对象
        image = Image.frombytes("RGB", [pix.width, pix.height], pix.samples)

        # 保存 PNG 文件
        image.save(f"./{output_directory_path}/page_{page_number + 1}.png")

    # 关闭 PDF 文件
    pdf_document.close()


from PIL import Image
import os
import matplotlib.pyplot as plt

def show_images(dir_path):
    '''显示目录下的 PNG 图像'''
    for file in os.listdir(dir_path):
        if file.endswith('.png'):
            # 打开图像
            img = Image.open(os.path.join(dir_path, file))

            # 显示图像
            plt.imshow(img)
            plt.axis('off')  # 不显示坐标轴
            plt.show()

pdf2images("llama2_page8.pdf")
show_images("llama2_page8")


class MaxResize(object):
    '''缩放图像'''
    def __init__(self, max_size=800):
        self.max_size = max_size

    def __call__(self, image):
        width, height = image.size
        current_max_size = max(width, height)
        scale = self.max_size / current_max_size
        resized_image = image.resize(
            (int(round(scale * width)), int(round(scale * height)))
        )

        return resized_image

import torchvision.transforms as transforms

# 图像预处理
detection_transform = transforms.Compose(
    [
        # 修改图片尺寸的类
        MaxResize(800),
        # 将原始的PILImage格式的数据格式化为可被pytorch快速处理的张量类型
        transforms.ToTensor(),
        # 归一化, 防止过拟合, mean 和std 是固定写法
        transforms.Normalize([0.485, 0.456, 0.406], [0.229, 0.224, 0.225]),
    ]
)

from transformers import AutoModelForObjectDetection

# 加载 TableTransformer 模型
model = AutoModelForObjectDetection.from_pretrained(
    "microsoft/table-transformer-detection"
)

# 识别后的坐标换算与后处理
def box_cxcywh_to_xyxy(x):
    '''坐标转换'''
	# 调用 x.unbind(-1) 沿着最后一个维度(第 1 维)对 x 进行拆分
    x_c, y_c, w, h = x.unbind(-1)
    b = [(x_c - 0.5 * w), (y_c - 0.5 * h), (x_c + 0.5 * w), (y_c + 0.5 * h)]
    return torch.stack(b, dim=1)


def rescale_bboxes(out_bbox, size):
    '''区域缩放'''
    width, height = size
    boxes = box_cxcywh_to_xyxy(out_bbox)
    boxes = boxes * torch.tensor(
        [width, height, width, height], dtype=torch.float32
    )
    return boxes


def outputs_to_objects(outputs, img_size, id2label):
    '''从模型输出中取定位框坐标'''
    m = outputs.logits.softmax(-1).max(-1)
    pred_labels = list(m.indices.detach().cpu().numpy())[0]
    pred_scores = list(m.values.detach().cpu().numpy())[0]
    pred_bboxes = outputs["pred_boxes"].detach().cpu()[0]
    pred_bboxes = [
        elem.tolist() for elem in rescale_bboxes(pred_bboxes, img_size)
    ]

    objects = []
    for label, score, bbox in zip(pred_labels, pred_scores, pred_bboxes):
        class_label = id2label[int(label)]
        if not class_label == "no object":
            objects.append(
                {
                    "label": class_label,
                    "score": float(score),
                    "bbox": [float(elem) for elem in bbox],
                }
            )

    return objects

import torch

# 识别表格,并将表格部分单独存为图像文件
def detect_and_crop_save_table(file_path):
    # 加载图像(PDF页)
    image = Image.open(file_path)

    filename, _ = os.path.splitext(os.path.basename(file_path))

    # 输出路径
    cropped_table_directory = os.path.join(os.path.dirname(file_path), "table_images")

    if not os.path.exists(cropped_table_directory):
        os.makedirs(cropped_table_directory)

    # 预处理
    pixel_values = detection_transform(image).unsqueeze(0)

    # 识别表格
    with torch.no_grad():
        outputs = model(pixel_values)

    # 后处理,得到表格子区域
    id2label = model.config.id2label
    id2label[len(model.config.id2label)] = "no object"
    detected_tables = outputs_to_objects(outputs, image.size, id2label)

    print(f"number of tables detected {len(detected_tables)}")

    for idx in range(len(detected_tables)):
        # 将识别从的表格区域单独存为图像
        cropped_table = image.crop(detected_tables[idx]["bbox"])
        cropped_table.save(os.path.join(cropped_table_directory,f"{filename}_{idx}.png"))

detect_and_crop_save_table("llama2_page8/page_1.png")
show_images("llama2_page8/table_images")

import base64
from openai import OpenAI

client = OpenAI()

def encode_image(image_path):
  with open(image_path, "rb") as image_file:
    return base64.b64encode(image_file.read()).decode('utf-8')

def image_qa(query, image_path):
    base64_image = encode_image(image_path)
    response = client.chat.completions.create(
        model="gpt-4o",
        temperature=0,
        seed=42,
        messages=[{
            "role": "user",
              "content": [
                  {"type": "text", "text": query},
                  {
                      "type": "image_url",
                      "image_url": {
                          "url": f"data:image/jpeg;base64,{base64_image}",
                      },
                  },
              ],
        }],
    )

    return response.choices[0].message.content

response = image_qa("哪个模型在AGI Eval数据集上表现最好。得分多少","llama2_page8/table_images/page_1_0.png")
print(response)

import chromadb
from chromadb.config import Settings

class NewVectorDBConnector:
    def __init__(self, collection_name, embedding_fn):
        chroma_client = chromadb.Client(Settings(allow_reset=True))

        # 为了演示,实际不需要每次 reset()
        chroma_client.reset()

        # 创建一个 collection
        self.collection = chroma_client.get_or_create_collection(
            name=collection_name)
        self.embedding_fn = embedding_fn

    def add_documents(self, documents):
        '''向 collection 中添加文档与向量'''
        self.collection.add(
            embeddings=self.embedding_fn(documents),  # 每个文档的向量
            documents=documents,  # 文档的原文
            ids=[f"id{i}" for i in range(len(documents))]  # 每个文档的 id
        )

    def add_images(self, image_paths):
        '''向 collection 中添加图像'''
        documents = [
            image_qa("请简要描述图片中的信息",image)
            for image in image_paths
        ]
        self.collection.add(
            embeddings=self.embedding_fn(documents),  # 每个文档的向量
            documents=documents,  # 文档的原文
            ids=[f"id{i}" for i in range(len(documents))],  # 每个文档的 id
            metadatas=[{"image": image} for image in image_paths] # 用 metadata 标记源图像路径
        )

    def search(self, query, top_n):
        '''检索向量数据库'''
        results = self.collection.query(
            query_embeddings=self.embedding_fn([query]),
            n_results=top_n
        )
        return results


images = []
dir_path = "llama2_page8/table_images"
for file in os.listdir(dir_path):
    if file.endswith('.png'):
        # 打开图像
        images.append(os.path.join(dir_path, file))

new_db_connector = NewVectorDBConnector("table_demo",get_embeddings)
new_db_connector.add_images(images)

query  = "哪个模型在AGI Eval数据集上表现最差。得分多少"

results = new_db_connector.search(query, 1)
metadata = results["metadatas"][0]
print("====检索结果====")
print(metadata)
print("====回复====")
response = image_qa(query,metadata[0]["image"])
print(response)
运行结果
number of tables detected 2
在AGI Eval数据集上表现最好的模型是LLaMA 2 70B,得分为54.2。
====检索结果====
[{'image': 'llama2_page8/table_images\\page_1_0.png'}]
====回复====
在AGI Eval数据集上表现最差的模型是Falcon 7B,得分为21.2。
总结
-
离线步骤:
- 文档加载
- 文档切分
- 向量化
- 灌入向量数据库
-
在线步骤:
- 获得用户问题
- 用户问题向量化
- 检索向量数据库
- 将检索结果和用户问题填入 Prompt 模版
- 用最终获得的 Prompt 调用 LLM
- 由 LLM 生成回复
开源的 RAG,效果不好怎么办?
- 检查预处理效果:文档加载是否正确,切割的是否合理
- 提示词模板是不是写的足够
- 测试检索效果:问题检索回来的文本片段是否包含答案
- 测试大模型能力:给定问题和包含答案文本片段的前提下,大模型能不能正确回答问题
- 模型二次检索以及混合检索


 983
983

 被折叠的 条评论
为什么被折叠?
被折叠的 条评论
为什么被折叠?
 到【灌水乐园】发言


