


Qualcomm Robotics RB5 平台软件用户指南(7)
4.5 Recorder:五流并发用例
有关上游 GStreamer 插件和元素的信息,请参阅 GStreamer 文档,网址为 https://gstreamer.freedesktop.org/documentation/plugins_doc.html。
4.5.1 五个启用 SHDR 的 H.264 (AVC) 编码流
先决条件:如果/etc/camera/camxoverridesettings.txtdisableAFDStatsProcessing中不存在 ,请运行以下命令以确保存在 SHDR 的相机覆盖设置。
adb shell "echo disableAFDStatsProcessing=TRUE >>
/etc/camera/camxoverridesettings.txt"
adb shell pkill qmmf-server
以下gst-launch管道提供启用 SHDR 的同步五流视频记录用例:
-
一台 4K、两台 720p、一台 480p 和一台 240p,带 SHDR。
gst-launch-1.0 -e qtiqmmfsrc video_2::source-index=1 video_3::source-index=1 video_4::source-index=1 name=qmmf shdr=TRUE ! video/x-h264,format=NV12,width=3840,height=2160,framerate=30/1 ! h264parse ! mp4mux ! queue ! filesink async=true location="/data/mux1.mp4" qmmf. ! video/x-h264,format=NV12,width=1280,height=720, framerate=15/1 ! h264parse ! mp4mux ! queue ! filesink async=true location="/data/mux2.mp4" qmmf. ! video/x-h264,format=NV12,width=1280,height=720, framerate=10/1 ! h264parse ! mp4mux ! queue ! filesink async=true location="/data/mux3.mp4" qmmf. ! video/x-h264,format=NV12,width=720, height=480, framerate=10/1 ! h264parse ! mp4mux ! queue ! filesink async=true location="/data/mux4.mp4" qmmf. ! video/x-h264,format=NV12,width=320, height=240, framerate=10/1 ! h264parse ! mp4mux ! queue ! filesink async=true location="/data/mux5.mp4" -
一台 1080p、两台 720p、一台 480p 和一台 240p,带 SHDR。
gst-launch-1.0 -e qtiqmmfsrc video_2::source-index=1 video_3::source-index=1 video_4::source-index=1 name=qmmf shdr=TRUE ! video/x-h264,format=NV12,width=1920,height=1080,framerate=30/1 ! h264parse ! mp4mux ! queue ! filesink async=true location="/data/mux1.mp4" qmmf. ! video/x-h264,format=NV12,width=1280,height=720, framerate=15/1 ! h264parse ! mp4mux ! queue ! filesink async=true location="/data/mux2.mp4" qmmf. ! video/x-h264,format=NV12,width=1280,height=720, framerate=10/1 ! h264parse ! mp4mux ! queue ! filesink async=true location="/data/mux3.mp4" qmmf. ! video/x-h264,format=NV12,width=720, height=480, framerate=10/1 ! h264parse ! mp4mux ! queue ! filesink async=true location="/data/mux4.mp4" qmmf. ! video/x-h264,format=NV12,width=320, height=240, framerate=10/1 ! h264parse ! mp4mux ! queue ! filesink async=true location="/data/mux5.mp4"
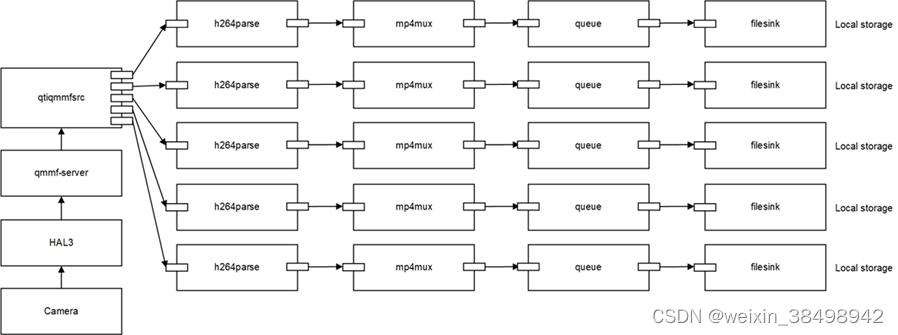
- 该qtiqmmfsrc元件捕获并编码来自摄像机的一个 4K 分辨率和两个 720p 分辨率流,并从中生成剩余的 480p 和 240p 视频流。
- h264parse,元素mp4mux处理缓冲区并准备存储。
- 队列元素确保每个路径/轨道独立于另一个运行。
- 这些filesink元素将缓冲区存储在相应的文件中。
- 播放设备上的内容。
- 要停止用例,请按CTRL + C,使用以下命令从设备中提取录制的内容adb pull ,然后在主机 PC 上播放该内容。
adb pull /data/mux1.mp4
adb pull /data/mux2.mp4
adb pull /data/mux3.mp4
adb pull /data/mux4.mp4
adb pull /data/mux5.mp4
4.5.2 五个启用 SHDR 和 LDC 的 H.264/AVC 编码流
先决条件:如果/etc/camera/camxoverridesettings.txtdisableAFDStatsProcessing中不存在,请运行以下命令以确保存在SHDR 设置。 cameraoverride
adb shell "echo disableAFDStatsProcessing=TRUE >>
/etc/camera/camxoverridesettings.txt"
adb shell pkill qmmf-server
以下gst-launch管道提供启用 SHDR 和 LDC 的同步 5 流视频录制用例。
1 个 4K、2 个 720p、1 个 480p 和 1 个 240p,具有 SHDR 和 LDC
gst-launch-1.0 -e qtiqmmfsrc video_2::source-index=1 video_3::source-index=1 video_4::source-index=1 name=qmmf shdr=TRUE ! video/x-h264,format=NV12,width=3840,height=2160,framerate=30/1 ! h264parse ! mp4mux ! queue ! filesink async=true location="/data/mux1.mp4" qmmf. ! video/x-h264,format=NV12,width=1280,height=720, framerate=15/1 ! h264parse ! mp4mux ! queue ! filesink async=true location="/data/mux2.mp4" qmmf. ! video/x-h264,format=NV12,width=1280,height=720, framerate=10/1 ! h264parse ! mp4mux ! queue ! filesink async=true location="/data/mux3.mp4" qmmf. ! video/x-h264,format=NV12,width=720, height=480, framerate=10/1 ! h264parse ! mp4mux ! queue ! filesink async=true location="/data/mux4.mp4" qmmf. ! video/x-h264,format=NV12,width=320, height=240, framerate=10/1 ! h264parse ! mp4mux ! queue ! filesink async=true location="/data/mux5.mp4"
-
该qtiqmmfsrc元件捕获并编码来自摄像机的一个 4K 分辨率和两个 720p 分辨率流,并从中生成剩余的 480p 和 240p 视频流。
-
h264parse,元素mp4mux处理缓冲区并准备存储。
-
队列元素确保每个路径/轨道独立于其他路径/轨道运行。
-
这些filesink元素将缓冲区存储在相应的文件中。
-
播放设备上的内容。
-
要停止用例,请按CTRL + C,使用以下命令从设备中提取录制的内容adb pull ,然后在主机 PC 上播放该内容。
adb pull /data/mux1.mp4
adb pull /data/mux2.mp4
adb pull /data/mux3.mp4
adb pull /data/mux4.mp4
adb pull /data/mux5.mp4
1 个 4K、2 个 720p、1 个 480p 和 1 个 240p,具有 SHDR 和 LDC
gst-launch-1.0 -e qtiqmmfsrc video_2::source-index=1 video_3::source-index=1 video_4::source-index=1 name=qmmf shdr=TRUE ! video/x-h264,format=NV12,width=1920,height=1080,framerate=30/1 ! h264parse ! mp4mux ! queue ! filesink async=true location="/data/mux1.mp4" qmmf. ! video/x-h264,format=NV12,width=1280,height=720, framerate=15/1 ! h264parse ! mp4mux ! queue ! filesink async=true location="/data/mux2.mp4" qmmf. ! video/x-h264,format=NV12,width=1280,height=720, framerate=10/1 ! h264parse ! mp4mux ! queue ! filesink async=true location="/data/mux3.mp4" qmmf. ! video/x-h264,format=NV12,width=720, height=480, framerate=10/1 ! h264parse ! mp4mux ! queue ! filesink async=true location="/data/mux4.mp4" qmmf. ! video/x-h264,format=NV12,width=320,height=240, framerate=10/1 ! h264parse ! mp4mux ! queue ! filesink async=true location="/data/mux5.mp4"
GST 管道应用程序
QTIgst-pipeline-app是一个辅助工具,具有以下功能:
- 提供与 GStreamer gst-launch-1.0工具相同的功能。
- 提供一个选项来为管道中的任何 GST 元素设置运行时属性,从而允许在 PLAYING 状态下更改属性。
语法是gst-pipeline-app [OPTION?] DESCRIPTION.
- [OPTION?]:支持的选项是-e或–eos-on-exit,在关闭管道之前发送 EOS 事件。
- DESCRIPTION:由感叹号 (!) 分隔的元素列表。属性可以以属性 = 值的形式附加到元素。
当管道运行时,gst-pipeline-app会列出管道中的所有元素。如果指定了元素名称,则该元素会以该名称出现。否则,该元素将以默认名称显示。
-
运行视频编码管道以列出所有元素。
gst-pipeline-app -e qtiqmmfsrc name=qmmf camera=0 ! video/x-raw\(memory:GBM\),format=NV12,width=1920,height=1080,framerate=30/1 ! queue ! qtic2venc ! queue ! h264parse ! mp4mux ! queue ! filesink location=/data/output/mux.mp4 -
选择应修改属性的元素。
所有可以更新的属性均列出并附有说明。对于上述示例,如果qtic2venc-qtic2venc0选择 ,则会列出图中所示的选项。 -
要选择属性,请键入选项编号和当前值。
4.6 相机静态参数用例:LDC 和 SHDR
本主题介绍相机静态参数的用例。
镜头畸变校正 (LDC)
-
针对 LDC 用例运行以下命令。
gst-launch-1.0 -e qtiqmmfsrc name=qmmf ldc=TRUE qmmf.video_0 ! video/x-h264,format=NV12,width=3840,height=2160,framerate=30/1 ! h264parse ! mp4mux ! queue ! filesink location="/data/mux.mp4" -
播放设备上的内容。
-
要停止用例,请按CTRL + C,使用以下命令从设备中提取录制的内容adb pull ,然后在主机 PC 上播放该内容。
adb pull /data/mux.mp4
交错高动态范围 (SHDR)
-
如果/etc/camera/camxoverridesettings.txt中不存在, 请运行以下命令以确保cameraoverride为 SHDR 启用。disableAFDStatsProcessing
adb shell "echo disableAFDStatsProcessing=TRUE >>/etc/camera/camxoverridesettings.txt"adb shell pkill qmmf-server -
运行以下gst-launch命令以从 qtiqmmfsrc元素启用 SHDR。
gst-launch-1.0 -e qtiqmmfsrc name=qmmf shdr=TRUE qmmf.video_0 ! video/x-h264,format=NV12,width=3840,height=2160,framerate=30/1 ! h264parse ! mp4mux ! queue ! filesink location="/data/mux.mp4"


 716
716


 被折叠的 条评论
为什么被折叠?
被折叠的 条评论
为什么被折叠?
 到【灌水乐园】发言


