


BackGround
虽然3D点云的目标检测当前运用十分广泛,但是当前大部分3D目标检测的方法强依赖于带有标注的数据。这些带有标注的数据往往是需要付出昂贵的代价,在2021年的水平大概是¥0.1一个框,那么一帧数据也就是对应的¥1-2不等。然而往往标注量需求往往是数以千计的,可想当前对于标注数据的消耗之大。本篇文章先要使用半监督的方法,缓解数据标注的问题。
Progress
- 提出了一个自集成半监督的3D目标检测框架;
- 设计了一个彻底的扰动方案,增强了网络在标记数据和未标记数据的泛化能力;
- 提出了三个一致性损失的方法来强制两组预测的结果建议的一致性
Solved problem
- 在之前的Transferable semi-supervised 3d object detection from rgb-d data这篇文章中强依赖于2D标记数据对3D目标检测,本文直接处理3D原始点云,消除对2D标注数据的依赖。
- 将半监督的方法直接运用在了点云上
- 解决了点云在经过老师和学生网络后无法对其的问题(Stochatic transform)
- 解决了在经过学生和老师网络后一致性无法计算的问题(Consistency loss)
SESS_Pipline
SESS Architecture
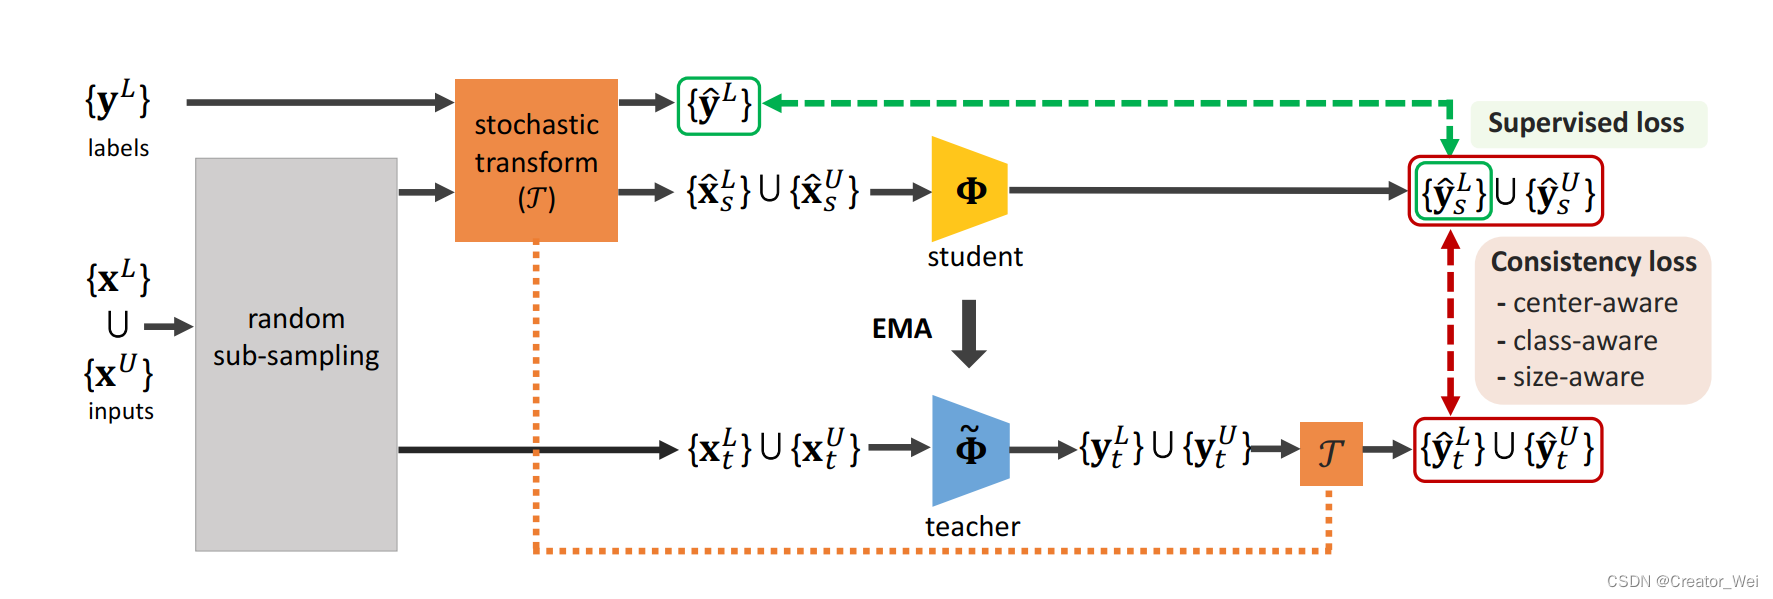
在SESS架构中,作者使用Mean Teacher paradigm作为半监督的3D目标检测架构。其中学生和教师网络是3D对象的检测器,使用的是VoteNet(过几天更一个VoteNet的Paper Reading)。具体的操作如下上图的Pipline。
在Pipline中,分别会有两种数据作为输入。一种是标记的数据(角标带L),另一种是没有标记的数据(角标带U)。其中,标记的数据划分为和
两个部分。首先会将
和
送入随机采样层。之后的输出一部分会经过Stochatic transform(其实就是Transformer)送给学生部分,在这部分数据中包含有带有标签和没有标签的两种。从随机采样层出来的另一部分数据会送给教师部分,在这部分输出的数据也包括带有标签和没有标签的两种。因为教师输出的数据需要和学生输出的数据计算损失,所以需要将教师输出的
和学生输出的对齐,所以需要做也经过Stochatic transform。 对于另一组输入的有标签数据
,因为需要作为
的监督损失的输出比较。对于学生网络和教师网络的输出,需要基于欧氏距离并根据三个一致性损失(Center,Class,Size)来计算两者输出之间的误差,通过梯度下降更新学生网络中的参数,并且从学生网络中的参数使用exponential moving average(EMA)的方法更行教师网络的参数。具体更新策略如下图公式,其中
是一个平滑的超参数,用于控制从教师和学生网络中的信息获取量。

以上就是SESS的Pipline的基本流程。
对于上述计算EMA的代码如下:
def huber_loss(error, delta=1.0):
    """
    Args:
        error: Torch tensor (d1,d2,...,dk)
    Returns:
        loss: Torch tensor (d1,d2,...,dk)

    x = error = pred - gt or dist(pred,gt)
    0.5 * |x|^2                 if |x|<=d
    0.5 * d^2 + d * (|x|-d)     if |x|>d
    Ref: https://github.com/charlesq34/frustum-pointnets/blob/master/models/model_util.py
    """
    abs_error = torch.abs(error)
    #quadratic = torch.min(abs_error, torch.FloatTensor([delta]))
    quadratic = torch.clamp(abs_error, max=delta)
    linear = (abs_error - quadratic)
    loss = 0.5 * quadratic**2 + delta * linear
扰动方案(Transform)
在SESS中扰动方案是为了提高模型性能。具体在SESS中加入了两种扰动方案,分别是Random sub-sampling和Stochatic transform这两种,接下来分别介绍这两种方法;
Radom sub-sampling:
对于输入到教师网络和学生网络的未标记和标记的数据都经过了随机采样。因为给定的两个点云的样本中点的局部几何关系可能存在一些差异,但全局几何关系应该保持不变。因此,在SESS中通过使学生网络和老师网络输出之间的一致来利用全局环境中的潜在集合关系。
对应代码如下:
# ----------------------------------------
# Point Cloud Sampling
# ----------------------------------------

def random_sampling(pc, num_sample, replace=None, return_choices=False):
    """ Input is NxC, output is num_samplexC
    """
    if replace is None: replace = (pc.shape[0]<num_sample)
    choices = np.random.choice(pc.shape[0], num_sample, replace=replace)
    if return_choices:
        return pc[choices], choices
    else:
        return pc[choices]
Stochatic Transform:
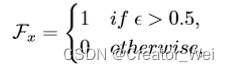
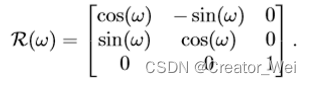
在Stochatic Transform中进行了翻转,旋转和缩放的随机变换。为;
对于随机翻转表示沿着x轴旋转(对于
和
一致):
对于来说(范围为
):
对于来说表示对于点的缩放(范围在
)
对应代码如下:
# ----------------------------------------
# Simple Point manipulations
# ----------------------------------------
def rotate_point_cloud(points, rotation_matrix=None):
    """ Input: (n,3), Output: (n,3) """
    # Rotate in-place around Z axis.
    if rotation_matrix is None:
        rotation_angle = np.random.uniform() * 2 * np.pi
        sinval, cosval = np.sin(rotation_angle), np.cos(rotation_angle)
        rotation_matrix = np.array([[cosval, sinval, 0],
                                    [-sinval, cosval, 0],
                                    [0, 0, 1]])
    ctr = points.mean(axis=0)
    rotated_data = np.dot(points-ctr, rotation_matrix) + ctr
    return rotated_data, rotation_matrix

def rotate_pc_along_y(pc, rot_angle):
    ''' Input ps is NxC points with first 3 channels as XYZ
        z is facing forward, x is left ward, y is downward
    '''
    cosval = np.cos(rot_angle)
    sinval = np.sin(rot_angle)
    rotmat = np.array([[cosval, -sinval],[sinval, cosval]])
    pc[:,[0,2]] = np.dot(pc[:,[0,2]], np.transpose(rotmat))
    return pc

def roty(t):
    """Rotation about the y-axis."""
    c = np.cos(t)
    s = np.sin(t)
    return np.array([[c,  0,  s],
                    [0,  1,  0],
                    [-s, 0,  c]])

def roty_batch(t):
    """Rotation about the y-axis.
    t: (x1,x2,...xn)
    return: (x1,x2,...,xn,3,3)
    """
    input_shape = t.shape
    output = np.zeros(tuple(list(input_shape)+[3,3]))
    c = np.cos(t)
    s = np.sin(t)
    output[...,0,0] = c
    output[...,0,2] = s
    output[...,1,1] = 1
    output[...,2,0] = -s
    output[...,2,2] = c
    return output

def rotz(t):
    """Rotation about the z-axis."""
    c = np.cos(t)
    s = np.sin(t)
    return np.array([[c, -s,  0],
                     [s,  c,  0],
                     [0,  0,  1]])
Consistency loss
因为两组3D检测方案的一致性不能直接计算,所以我们将通过学生和老师的预测方案和对齐方案配对。对成对的方案引入三个损失函数(采用欧氏距离来测量),分别是位置,语义类别和大小。最后的输出可以描述为以下的公式(其中t代表老师模型,s代表学生模型)。

实现代码如下:
#Losses = L_center+L_class+L_size
def get_consistency_loss(end_points, ema_end_points, config):
    """
    Args:
        end_points: dict
            {
                center, size_scores, size_residuals_normalized, sem_cls_scores,
                flip_x_axis, flip_y_axis, rot_mat
            }
        ema_end_points: dict
            {
                center, size_scores, size_residuals_normalized, sem_cls_scores,
            }
    Returns:
        consistency_loss: pytorch scalar tensor
        end_points: dict
    """
    center_consistency_loss, map_ind = compute_center_consistency_loss(end_points, ema_end_points)
    class_consistency_loss = compute_class_consistency_loss(end_points, ema_end_points, map_ind)
    size_consistency_loss = compute_size_consistency_loss(end_points, ema_end_points, map_ind, config)

    consistency_loss =  center_consistency_loss +class_consistency_loss + size_consistency_loss

    end_points['center_consistency_loss'] = center_consistency_loss
    end_points['class_consistency_loss'] = class_consistency_loss
    end_points['size_consistency_loss'] = size_consistency_loss
    end_points['consistency_loss'] = consistency_loss

    return consistency_loss, end_points
接下来分别对这三个量进行描述,其中对于中心距离的一致性损失为:

对于中心距离的实现如下:
#Center
def compute_center_consistency_loss(end_points, ema_end_points):
    center = end_points['center'] #(B, num_proposal, 3)
    ema_center = ema_end_points['center'] #(B, num_proposal, 3)
    flip_x_axis = end_points['flip_x_axis'] #(B,)
    flip_y_axis = end_points['flip_y_axis'] #(B,)
    rot_mat = end_points['rot_mat'] #(B,3,3)
    scale_ratio = end_points['scale'] #(B,1,3)

    # align ema_center with center based on the input augmentation steps
    inds_to_flip_x_axis = torch.nonzero(flip_x_axis).squeeze(1)
    ema_center[inds_to_flip_x_axis, :, 0] = -ema_center[inds_to_flip_x_axis, :, 0]

    inds_to_flip_y_axis = torch.nonzero(flip_y_axis).squeeze(1)
    ema_center[inds_to_flip_y_axis, :, 1] = -ema_center[inds_to_flip_y_axis, :, 1]

    ema_center = torch.bmm(ema_center, rot_mat.transpose(1,2)) #(B, num_proposal, 3)

    ema_center = ema_center * scale_ratio

    dist1, ind1, dist2, ind2 = nn_distance(center, ema_center)  #ind1 (B, num_proposal): ema_center index closest to center

    #TODO: use both dist1 and dist2 or only use dist1
    dist = dist1 + dist2
    return torch.mean(dist), ind2
对于类别损失,作者只考虑了单向的对其(老师向学生):
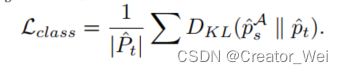
实现代码如下:
#Clas loss
def compute_class_consistency_loss(end_points, ema_end_points, map_ind):
    cls_scores = end_points['sem_cls_scores'] #(B, num_proposal, num_class)
    ema_cls_scores = ema_end_points['sem_cls_scores'] #(B, num_proposal, num_class)

    cls_log_prob = F.log_softmax(cls_scores, dim=2) #(B, num_proposal, num_class)
    # cls_log_prob = F.softmax(cls_scores, dim=2)
    ema_cls_prob = F.softmax(ema_cls_scores, dim=2) #(B, num_proposal, num_class)

    cls_log_prob_aligned = torch.cat([torch.index_select(a, 0, i).unsqueeze(0) for a, i in zip(cls_log_prob, map_ind)])

    class_consistency_loss = F.kl_div(cls_log_prob_aligned, ema_cls_prob)
    # class_consistency_loss = F.mse_loss(cls_log_prob_aligned, ema_cls_prob)

    return class_consistency_loss*2
对于大小的损失,表示为:
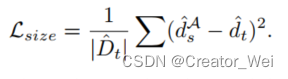
实现代码如下:
#Size loss
def compute_size_consistency_loss(end_points, ema_end_points, map_ind, config):
    mean_size_arr = config.mean_size_arr
    mean_size_arr = torch.from_numpy(mean_size_arr.astype(np.float32)).cuda() #(num_size_cluster,3)
    B, K = map_ind.shape

    scale_ratio = end_points['scale'] #(B,1,3)
    size_class = torch.argmax(end_points['size_scores'], -1) # B,num_proposal
    size_residual = torch.gather(end_points['size_residuals'], 2, size_class.unsqueeze(-1).unsqueeze(-1).expand(-1,-1,-1,3)) # B,num_proposal,1,3
    size_residual.squeeze_(2)

    ema_size_class = torch.argmax(ema_end_points['size_scores'], -1) # B,num_proposal
    ema_size_residual = torch.gather(ema_end_points['size_residuals'], 2, ema_size_class.unsqueeze(-1).unsqueeze(-1).expand(-1,-1,-1,3)) # B,num_proposal,1,3
    ema_size_residual.squeeze_(2)

    size_base = torch.index_select(mean_size_arr, 0, size_class.view(-1))
    size_base = size_base.view(B,K,3)
    size = size_base + size_residual

    ema_size_base = torch.index_select(mean_size_arr, 0, ema_size_class.view(-1))
    ema_size_base = ema_size_base.view(B,K,3)
    ema_size = ema_size_base + ema_size_residual
    ema_size = ema_size * scale_ratio

    size_aligned = torch.cat([torch.index_select(a, 0, i).unsqueeze(0) for a, i in zip(size, map_ind)])

    size_consistency_loss = F.mse_loss(size_aligned, ema_size)

    return size_consistency_loss
Experience
作者在实现的过程中将已标注的样本运用VoteNet进行了预训练,然后使用预训练的权重加入到SESS中进行接下来的工作。
下图是SESS(半监督)和VoteNet(全监督)在不同的标记样本的比例下的性能表现。可以看出,随着标记样本比例的变少,SESS相比VoteNet的提升变大。

对于示例检测结果如下:
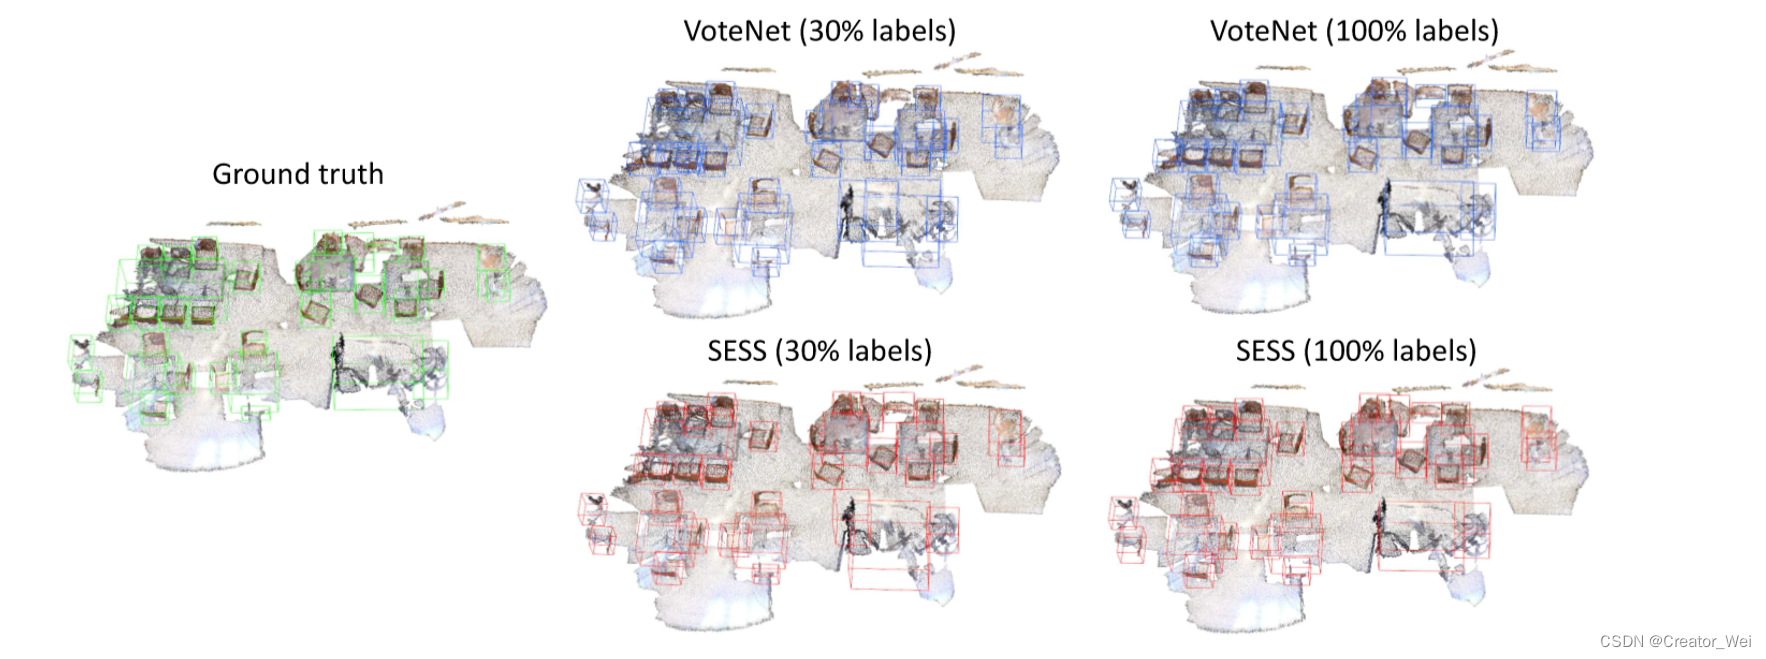
可以看出,半监督的SESS的方法在标注两较少的情况下对比全监督的方法检测结果有质的提升。
Testing
这个git中给的CUDA版本好像有问题啊,我按照git中的配置并且尝试了更高的配置都没有跑通,后续跑通我更上来。


 643
643


 被折叠的 条评论
为什么被折叠?
被折叠的 条评论
为什么被折叠?
 到【灌水乐园】发言


