


lgsvl的API
https://www.svlsimulator.com/docs/python-api/python-api/
SVL Simulator将运行时功能公开给Python API,可以使用该API操作加载场景中的对象放置和车辆移动,检索传感器配置和数据,控制天气、时间状态等。
SVL Simulatorx和API通过在8181端口上运行的websocket服务器上发送json进行通信。
API中的所有坐标都返回Unity坐标系中的值。该坐标系使用米作为距离单位,是一个左手坐标系,其中x指向左侧,z指向前方,y指向上方。
API的核心概念
- Simulator:连接simulator的main object
- Agent:有行为的实体
- EgoVehicle:ego车辆,具有传感器,继承Agent
- NPCVehicle:npc车辆,继承Agent
- Pedestrian:行人,继承Agent
Simulator
1 使用api与simulator进行连接,实例化一个Simulator类
import lgsvl
sim = lgsvl.Simulator(address = "localhost", port = 8181)
2 加载scene/map,使用Simulator类的load方法
# scene通过场景的UUID指定
# seed(optional)决定场景中一些随机的行为
sim.load(scene = "aae03d2a-b7ca-4a88-9e41-9035287a12cc", seed = 650387)
3 重启一个scene使其回到最初状态,使用Simulator类的reset方法
sim.reset()
4 场景开始进行仿真,使用Simulator类的run方法
# 场景仿真进行的时间为5s
sim.run(time_limit = 5.0)
Agent
1 在场景中添加NPC vehicles和pedestrians,使用Simulator类的add_agent方法,ego是一个Agent的实例
# name代表agent的UUID,也可以直接使用agent的名字
# agent_type定义agent的类别
# state(optional)可以创建在特定位置和朝向上的agent
ego = sim.add_agent(name = "511086bd-97ad-4109-b0ad-654ba662fbcf",
agent_type = lgsvl.AgentType.EGO, state = None)
-
agent_type有以下几类:
- AgentType.EGO : EGO vehicle
- AgentType.NPC : NPC vehicle
- AgentType.PEDESTRIAN : pedestrian
-
state参数传入一个
AgentState实例state = lgsvl.AgentState() # 位置为x=10,z=30处 state.transform.position = lgsvl.Vector(10, 0, 30) # y坐标轴旋转90度 state.transform.rotation.y = 90 ego = sim.add_agent("511086bd-97ad-4109-b0ad-654ba662fbcf", lgsvl.AgentType.EGO, state) # 车辆的state可以随时改变,如下将速度的x分量设置为-50m/s s = ego.state s.velocity.x = -50 ego.state = s
2 所有的Agent实例都有下面的属性和方法
state
Agent类的属性,agent的状态(位置、速度等信息)transform
Agent类的属性,即position+rotationbounding_box
Agent类的属性,来获取局部坐标空间中的边界框,注意边界框不是以(0,0,0)为中心的,它取决于代理的实际几何体。on_collision(self, fn)
Agent类的方法,设置一个回调函数,当agent与某个东西(其他agent或静态障碍物)发生碰撞时调用函数fn
Ego Vehicle
EgoVehicle继承Agent类后增加的方法
apply_control(self, control, sticky=False)
对车辆施加特定油门、刹车、转向或其他动作的方法
其中control是VehicleControl类型
stick=True以在每次模拟更新迭代中应用这些值get_sensors(self)
返回传感器list
ego = sim.add_agent("Lincoln2017MKZ (Apollo 5.0)", lgsvl.AgentType.EGO)
c = lgsvl.VehicleControl()
c.throttle = 0.2
ego.apply_control(c, True)
NPC Vehicle
NPCVehicle继承Agent类后增加的方法
change_lane(self, isLeftChange)
使npc vehicle变道,第二个参数为true or falsefollow(self, waypoints, loop=False, waypoints_path_type="Linear")
使vehicle follow指定的waypoints运动
waypoints是DriveWaypoint类表示的点的listfollow_closest_lane(self, follow, max_speed, isLaneChange=True)
follow_closest_lane将使NPC车辆沿着最近的车道行驶。到达十字路口后,它将随机决定直行还是转弯。on_waypoint_reached(self, fn)
当vehicle每一次到达一个waypoint时都会调用fnon_stop_line(self, fn)
当vehicle到达路口的停止线时调用fnon_lane_change(self, fn)
当vehicle准备换道时调用fn
下面是一个使用follow控制NPC vehicle轨迹的例子:
npc = sim.add_agent("Sedan", lgsvl.AgentType.NPC)
waypoints = [
  # 参数具体含义可以看源代码
  lgsvl.DriveWaypoint(lgsvl.Vector(1,0,3), 5, lgsvl.Vector(0, 0, 0), 0, False, 0),
  lgsvl.DriveWaypoint(lgsvl.Vector(5,0,3), 10, lgsvl.Vector(0, 0, 0), 0, False, 0),
  lgsvl.DriveWaypoint(lgsvl.Vector(1,0,5), 5, lgsvl.Vector(0, 0, 0), 0, False, 0),
]
npc.follow(waypoints, loop=True)
NPC将无视所有交通规则,不会避免碰撞以试图到达下一个航路点
下面是一个利用on_waypoint_reached设置回调函数以随时输出到达哪个waypoint的例子
npc = sim.add_agent("Sedan", lgsvl.AgentType.NPC)

def on_waypoint(agent, index):
  print("waypoint {} reached".format(index))

# 设置on_waypoint为回调函数
npc.follow(waypoints, loop=True)
npc.on_waypoint_reached(on_waypoint)

sim.run()
Pedestrians
与前两个相似
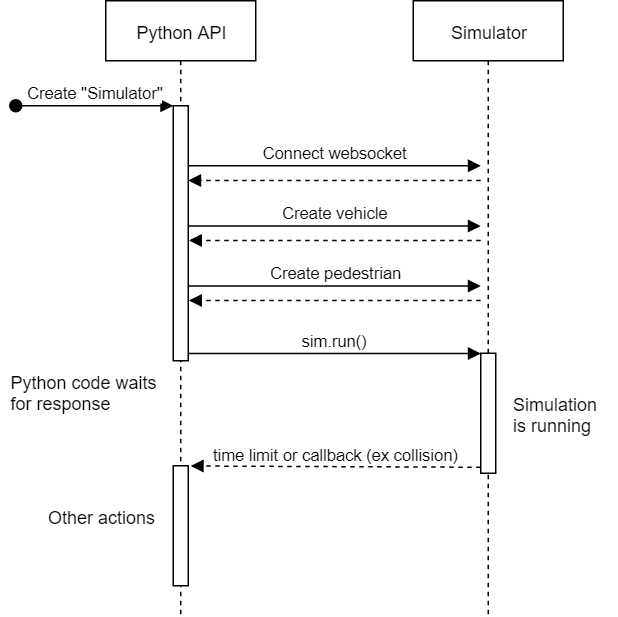
Callbacks回调
python API可以通过调用callback回调函数来告知使用者在simulator执行期间发生了特定的events
callback回调函数在sim.run()中被调用,当callback函数被执行时,simulation暂定,一旦callback函数执行完,simulation继续执行。也可以通过sim.stop()来终止仿真。下面是时序图
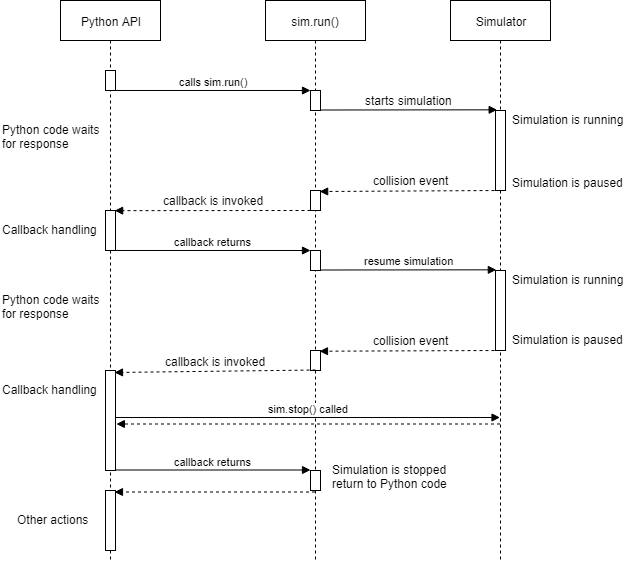
回调函数的名字都是on_XXX
Agent Callbacks
on_collision当agent和其他agent或静态事物发生碰撞时
上面的代码def on_collision(agent1, agent2, contact): # agent1/2是发生碰撞的agent,contact是碰撞点坐标s name1 = "STATIC OBSTACLE" if agent1 is None else agent1.name name2 = "STATIC OBSTACLE" if agent2 is None else agent2.name print("{} collided with {} at {}".format(name1, name2, contact)) ego.on_collision(on_collision)def on_collision是在某个类的方法中定义的局部方法也就是回调函数,而ego.on_collision是Agent类中定义的原有方法,其传入参数只有一个,是回调函数的名字即on_collision。两个on_collision名字一样但参数不一样s
EgoVehicle Callbacks
EgoVehicle是Agent的子类,因此除了on_collision,还有一个回调函数
on_custom当一个传感器插件发出回调信号def on_custom(agent, kind, context): # agent是传感器所在的agent,kind是传感器插件标识,context是JSON pass ego.on_custom(on_custom)
NPCVehicle Callbacks
EgoVehicle是Agent的子类,因此除了on_collision,还有三个回调函数
on_waypoint_reached当agent到达一个waypointdef on_waypoint_reached(agent, index): # agent是agent实例,index是waypoint的整数索引 pass ego.on_waypoint_reached(on_waypoint_reached)on_stop_line当agent停在一个停止线上def on_stop_line(agent): # agent是agent实例 pass ego.on_stop_line(on_stop_line)on_lane_change当agent变道时def on_lane_change(agent): # agent是agent实例 pass ego.on_lane_change(on_lane_change)
Pedestrian Callbacks
on_waypoint_reached当agent到达一个waypoint 同上
总结回调:回调函数的使用都是ego.on_XXX(on_XXX),虽然名字一样但是不是一个函数,ego.on_XXX的参数只有一个是回调函数地址,on_XXX参数有1-3个,内容是自己根据参数编写的
Sensors
Sensors是Ego Vehicle所具备的,所有sensors都具备
name:sensor的名字
transform:位置和旋转角度的变化
enabled:是否可用
天气和时间控制
可以通过读写sim.weather进行场景中天气的控制,可以设置rain, fog, wetness, cloudiness, damage(路面损坏情况),设置范围为0-1的实数
w = sim.weather
w.rain = 0.5     # set rain to 50%
sim.weather = w
可以通过读sim.time_of_day获得当前场景时间,通过调用sim.set_time_of_day更改场景中的时间
# 10设置为当前date的10AM
# fixed为时间是否自然流逝还是不再改变
sim.set_time_of_day(10, fixed=True)
设置具体的date用下面的方式:
from datetime import datetime

dt = datetime(
  year=2020,
  month=12,
  day=25,
  hour=13,
  minute = 0,
  second = 0
)
sim.set_datetime(dt)
Dreamview API
Dreamview API是SVL python api的子包,用于与apollo的dreamview进行通信,Apollo的Dreamview提供了一个web ui,允许用户启用/禁用Apollo中的不同模块,并设置要导航到的目标。Dreamview API允许用户使用Python脚本自动执行此过程。
connection
dreamview包中最主要的类是Connection,使得API与Dreamview建立一个连接,使用实例为:
# simulator是lgsvl.Simulator实例
# ego_agent是lgsvl.EgoVehicle实例
# ip是apollo跑的机器ip地址
# port是dreamview所在的端口号
dreamview.Connection(simulator, ego_agent, ip='localhost', port='8888')
helper functions
-
sim.get_soawn()
在选择车辆放置位置时可能会遇到一些问题,我们很可能事先并不知道 (x,y) 坐标在一个场景中具体处于哪个位置,因此很难设定恰当的放置位置。对于这个问题,实际上仿真环境内置了适合放置车辆的位置信息,可以通过sim.get_soawn()获取,返回一个Spawn类的list,如下:[Transform(position=Vector(210.809997558594, 10.1000003814697, 197.850006103516), rotation=Vector(0.0159243624657393, 269.949066162109, 3.56300406565424e-05)), Transform(position=Vector(214.600006103516, 10.1000003814697, 201.800003051758), rotation=Vector(0.0159243624657393, 269.949066162109, 3.56300406565424e-05))]如果希望车辆放置在第一个位置上,则使用如下代码:
spawns = sim.get_spawn() state = lgsvl.AgentState() state.transform = spawns[0] a = sim.add_agent("XE_Rigged-apollo", lgsvl.AgentType.EGO, state) -
map_point_on_lane()
可以通过 map_point_on_lane() 函数找到离指定点最近的车道,将车放入其中,代码如下:point = lgsvl.Vector(x, y, z) state = lgsvl.AgentState() state.transform = sim.map_point_on_lane(point) # 由 point 找到最近的车道中的点 sim.add_agent("Sedan", lgsvl.AgentType.NPC, state) # 对 Ego 和 NPC 都适用 -
follow_closest_lane()
命令让 NPC 沿当前车道行驶,如果当前车辆横跨在两条车道之间,则驶入最近的车道,代码如下:# 若为 False,则车辆停止 # 10 为最大速度 npc.follow_closest_lane(True, 10)


 5035
5035


 被折叠的 条评论
为什么被折叠?
被折叠的 条评论
为什么被折叠?
 到【灌水乐园】发言


