


论文地址:BEVFormer: Learning Bird’s-Eye-View Representation from Multi-Camera Images via Spatiotemporal Transformers
代码地址:https//github.com/fundamentalvision/BEVFormer
注:BEVformer主要是基于mmdection3D框架搭建的,环境配置起来比较麻烦。
1、前言
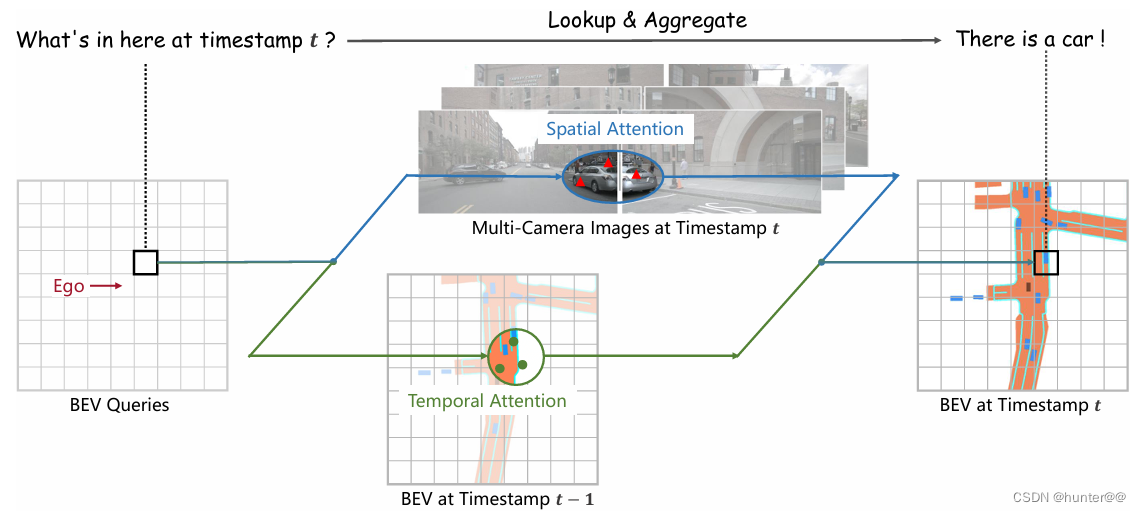
BEVformer是自动驾驶算法中的重要部分之一,由南京大学、香港大学、上海人工智能实验室与2022年提出,也是3D->2D变换的工作,和我们上次讲的LSS(2D->3D)方案截然不同。其出发点主要在于解决自驾方案中2D信息难以精确推断3D位置的问题,开创性的提出使用多相机输入来生成鸟瞰图特征的方案,在nuscene数据集上的NDS达到了56.9%,比之前最好的高出了9个点,与基于雷达的baseline性能相当。同时,BEVFormer显著提高了低可见度情况下的速度估计精度和物体召回率。
2、pipeline
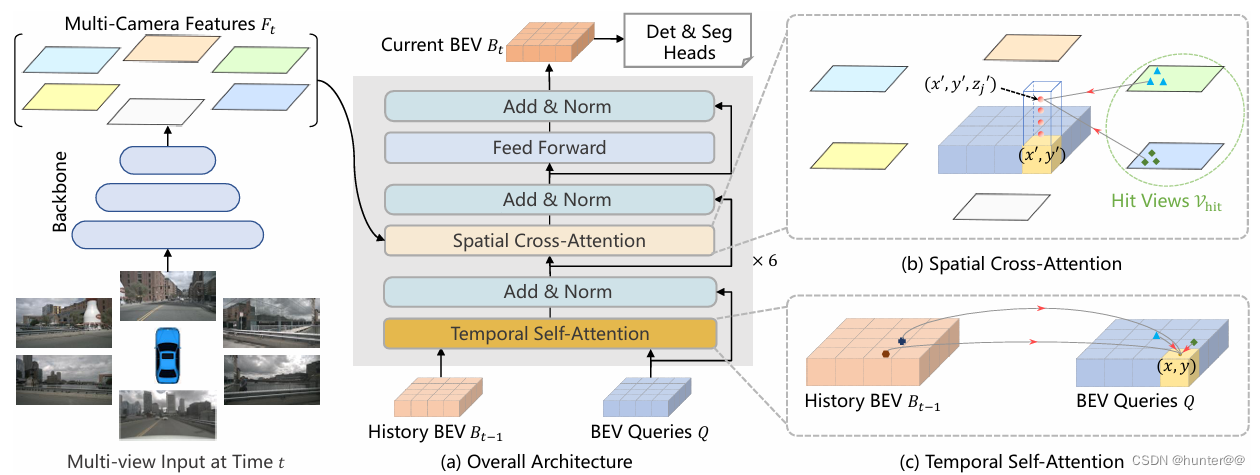
BEVformer的基本思想:
(1)首先通过img-backbone网络(文中选择的是resnet50)对不同视角相机拍摄到的照片进行特征提取,会得到一个shape为[bs,num_cams,Channel,H,W]维度的特征图,当然原始代码中还有一个历史信息的维度len_queue=3,其真实维度应该是[bs,len_queue,num_cams,Channel,H,W]之后会通过一个torch中常用的一个切分数组的操作,将其分为当前帧的图像,和历史帧的图像。历史帧的图像就用来构建History BEV特征,而当前帧的图像会送给Spatial Cross-Attention进行计算,这里就不仔细阐述了。
(2)之后,会初始化构建一个History BEV特征。shape为[bs,150*150,Channel](150是选择的bev网格大小),同时也会初始化一个BEV query、object_query_embed(decoder的时候使用)
(3)一开始,会将History BEV特征和BEV Queries特征送入时间注意力机制中进行计算,输出一个bev_embeding,shape为[1,22500,256]。
(4)之后再将多个相机的图像特征和(3)节取得的bev特征,使用空间注意力机制进行交互,得到bev_embeding特征,其shape为[1,22500,256]。
(5)在decoder阶段,使用多头注意力机制和可变形注意力机制交互(4)得到的bev_embedding和(2)的object_query_embed,得到最终的预测的boundingbox。
model = dict(
    # 网络定义
    type='BEVFormer',
    use_grid_mask=True,
    video_test_mode=True,
    ## 第一部分定义图像特征提取网络
    img_backbone=dict(
        type='ResNet',
        depth=101,
        num_stages=4,
        out_indices=(1, 2, 3),
        frozen_stages=1,
        norm_cfg=dict(type='BN2d', requires_grad=False),
        norm_eval=True,
        style='caffe',
        dcn=dict(type='DCNv2', deform_groups=1, fallback_on_stride=False), # original DCNv2 will print log when perform load_state_dict
        stage_with_dcn=(False, False, True, True)),
    ## 第二部分:定义一个多尺度融合模块
    img_neck=dict(
        type='FPN',
        in_channels=[512, 1024, 2048],
        out_channels=_dim_,
        start_level=0,
        add_extra_convs='on_output',
        num_outs=4,
        relu_before_extra_convs=True),
    ## 第三部分:定义BEVformer模块:其中包含:encoder(包含时间、空间注意力机制)、decoder模块
    pts_bbox_head=dict(
        type='BEVFormerHead',
        bev_h=bev_h_,
        bev_w=bev_w_,
        num_query=900,
        num_classes=10,
        in_channels=_dim_,
        sync_cls_avg_factor=True,
        with_box_refine=True,
        as_two_stage=False,
        transformer=dict(
            type='PerceptionTransformer',
            rotate_prev_bev=True,
            use_shift=True,
            use_can_bus=True,
            embed_dims=_dim_,
            encoder=dict(
                type='BEVFormerEncoder',
                num_layers=6,
                pc_range=point_cloud_range,
                num_points_in_pillar=4,
                return_intermediate=False,
                transformerlayers=dict(
                    type='BEVFormerLayer',
                    attn_cfgs=[
                        dict(
                            type='TemporalSelfAttention',
                            embed_dims=_dim_,
                            num_levels=1),
                        dict(
                            type='SpatialCrossAttention',
                            pc_range=point_cloud_range,
                            deformable_attention=dict(
                                type='MSDeformableAttention3D',
                                embed_dims=_dim_,
                                num_points=8,
                                num_levels=_num_levels_),
                            embed_dims=_dim_,
                        )
                    ],
                    feedforward_channels=_ffn_dim_,
                    ffn_dropout=0.1,
                    operation_order=('self_attn', 'norm', 'cross_attn', 'norm',
                                     'ffn', 'norm'))),
            decoder=dict(
                type='DetectionTransformerDecoder',
                num_layers=6,
                return_intermediate=True,
                transformerlayers=dict(
                    type='DetrTransformerDecoderLayer',
                    attn_cfgs=[
                        dict(
                            type='MultiheadAttention',
                            embed_dims=_dim_,
                            num_heads=8,
                            dropout=0.1),
                         dict(
                            type='CustomMSDeformableAttention',
                            embed_dims=_dim_,
                            num_levels=1),
                    ],

                    feedforward_channels=_ffn_dim_,
                    ffn_dropout=0.1,
                    operation_order=('self_attn', 'norm', 'cross_attn', 'norm',
                                     'ffn', 'norm')))),
        bbox_coder=dict(
            type='NMSFreeCoder',
            post_center_range=[-61.2, -61.2, -10.0, 61.2, 61.2, 10.0],
            pc_range=point_cloud_range,
            max_num=300,
            voxel_size=voxel_size,
            num_classes=10),
        positional_encoding=dict(
            type='LearnedPositionalEncoding',
            num_feats=_pos_dim_,
            row_num_embed=bev_h_,
            col_num_embed=bev_w_,
            ),
        loss_cls=dict(
            type='FocalLoss',
            use_sigmoid=True,
            gamma=2.0,
            alpha=0.25,
            loss_weight=2.0),
        loss_bbox=dict(type='L1Loss', loss_weight=0.25),
        loss_iou=dict(type='GIoULoss', loss_weight=0.0)),
    # model training and testing settings
    train_cfg=dict(pts=dict(
        grid_size=[512, 512, 1],
        voxel_size=voxel_size,
        point_cloud_range=point_cloud_range,
        out_size_factor=4,
        assigner=dict(
            type='HungarianAssigner3D',
            cls_cost=dict(type='FocalLossCost', weight=2.0),
            reg_cost=dict(type='BBox3DL1Cost', weight=0.25),
            iou_cost=dict(type='IoUCost', weight=0.0), # Fake cost. This is just to make it compatible with DETR head.
            pc_range=point_cloud_range))))
2.1 obtain_history_bev
这其实是整个bevformer的train过程的前向传播过程的一部分。放着这里其实主要是想解释一下bevformer中img的shape的问题。首先bevformer中的img.shape大概为[bs,len_queue,num_cams,Channel,H,W],它和LSS的img.shape的主要区别还是len_queue这个维度,论文的这个len_queue的参数为3,其实可以理解为它只考虑历史3帧的图像信息。但是这3帧的图像信息的作用是不一样的,前2帧的图像信息是只用于生成历史的bev特征,当前帧的图像信息是用于生成当前的bev特征,因此就需要将其split出来,这也是prev_img = img[:, :-1, ...] 和img = img[:, -1, ...]操作的由来,之后会结合prev_img和prev_img_metas(也就是历史时刻对应的一些三维车辆信息,比如旋转矩阵、车速等等),进行生成历史bev特征。
def forward_train(self,
points=None, #
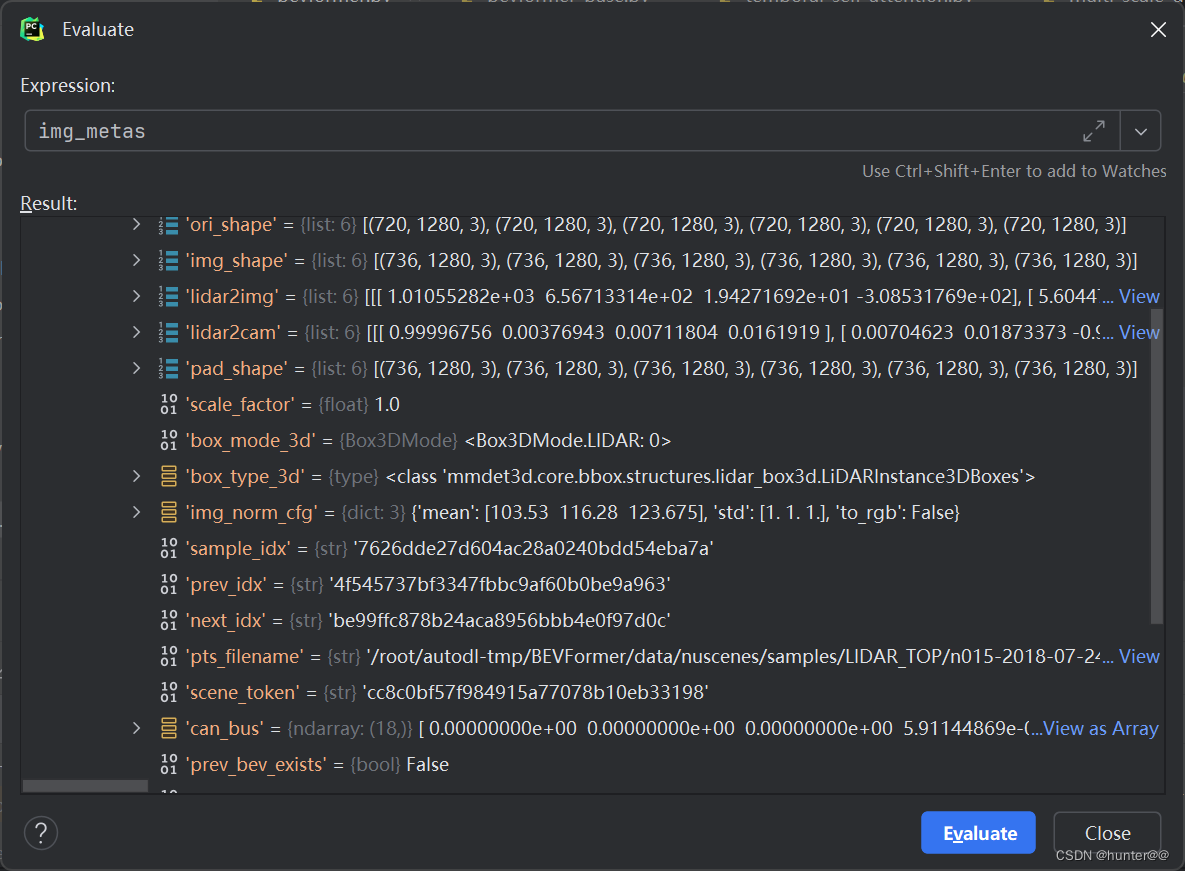
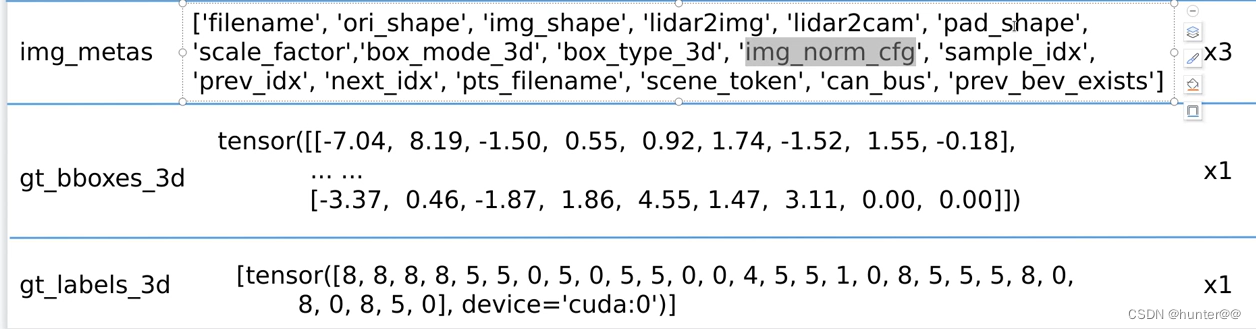
img_metas=None, # 存放的是历史的一些三维信息,img_metas中的信息是不变的
gt_bboxes_3d=None, # 真实的三维边界框数据
gt_labels_3d=None, # 与gt_bboxes_3d对应的真实标签数据与gt_bboxes_3d对应的真实标签数据
gt_labels=None, # 真实的二维边界框(在图像中)的标签数据
gt_bboxes=None, # 真实的二维边界框(在图像中)的数据
img=None, # 每个样本的图像数据
proposals=None, # 预测的候选框预测的候选框
gt_bboxes_ignore=None, # 在图像中需要被忽略的真实二维边界框数据
img_depth=None, # 图像深度
img_mask=None, # 图像掩码
):
# img的shape为[1,3,6,3,736,1280]
len_queue = img.size(1) # len_queue=3,这里的img的shape为[bs,len_queue,num_cam,C,H,W],len_queue其实表示不同时序的相机图像
# 图像分组
prev_img = img[:, :-1, ...] # 表示历史帧的图像, [1,2,6,3,736,1280]
img = img[:, -1, ...] # 表示当前帧的图像, [1,6,3,736,1280]
# 根据历史不同相机的图像信息获取历史bev特征的操作
prev_img_metas = copy.deepcopy(img_metas) # 赋值图像队列
prev_bev = self.obtain_history_bev(prev_img, prev_img_metas) # [1,22500,256]
obtain_history_bev函数的一个主要作用其实就是利用我们上面所说的prev_img和prev_img_metas迭代的获取历史鸟瞰图特征。这里,其实大家也看见,其实和我们下面要讲的backbone+neck(也就是self.extract_feat函数)和tranformer结构(self.pts_bbox_head函数)一模一样,唯一不同的区别是在提取历史鸟瞰图的前向过程,梯度是不参与更新的,也就是self.eval()
    def obtain_history_bev(self, imgs_queue, img_metas_list):
        """Obtain history BEV features iteratively. To save GPU memory, gradients are not calculated.
           迭代地获取历史鸟瞰图(Bird's Eye View, BEV)特征,为了节省GPU内存而设计的,因此在处理过程中不计算梯度
            imgs_queue: 多帧图像的数据,形状为 [bs, len_queue, num_cams, C, H, W]
            img_metas_list: 一个列表,包含了与图像队列中每帧图像相关的元数据列表。
        """
        self.eval()

        with torch.no_grad():
            prev_bev = None
            bs, len_queue, num_cams, C, H, W = imgs_queue.shape     # [1,3,6,3,400,800], len_queue表示不同的序列
            imgs_queue = imgs_queue.reshape(bs * len_queue, num_cams, C, H, W)      #

            # 使用初始的img_backbone进行图像特征提取
            img_feats_list = self.extract_feat(img = imgs_queue, len_queue = len_queue)

            for i in range(len_queue):
                img_metas = [each[i] for each in img_metas_list]
                if not img_metas[0]['prev_bev_exists']:
                    prev_bev = None
                # img_feats = self.extract_feat(img=img, img_metas=img_metas)
                img_feats = [each_scale[:, i] for each_scale in img_feats_list]

                # 使用初始的bev中的transformer结构进行之前的pre_bev特征的提取工作
                prev_bev = self.pts_bbox_head(img_feats, img_metas, prev_bev, only_bev=True) #
            self.train()
            return prev_bev
2.2 Backbone + Neck
2.2.1 GridMask数据增强操作
2.2.1.1 原理:
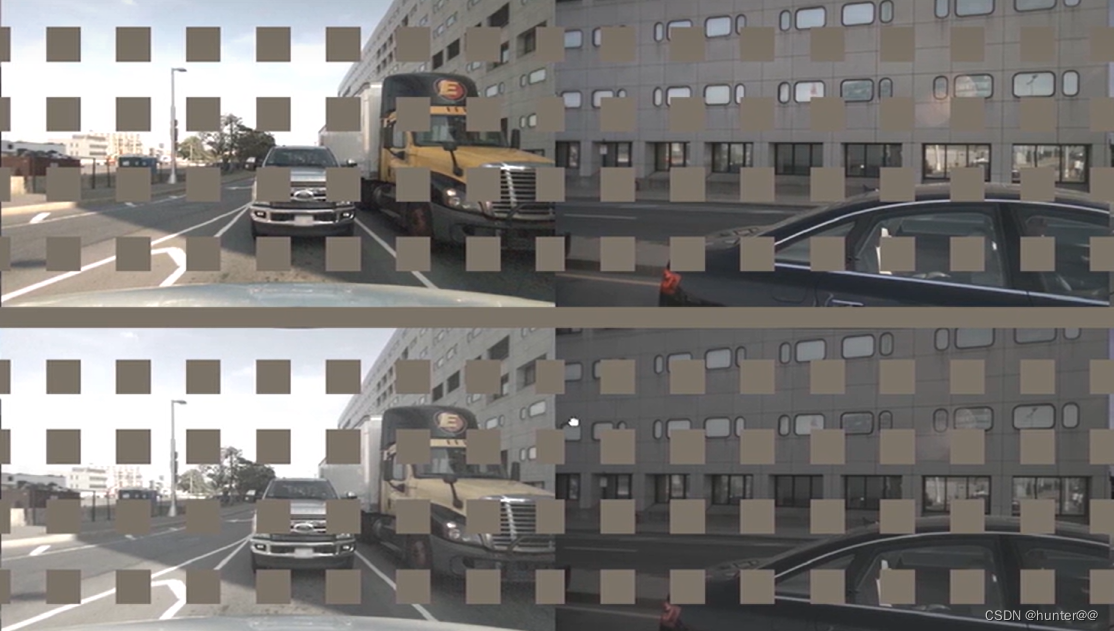
这里的GridMask操作其实可以直接理解为是一个数据增强操作,它的目的也就是和传统的数据增强方案一样,增加样本的复杂性。它的思想就是随机从(2,h)挑选一个数d,再从(0,d)中生成一个随机数作为st_h,以st_h为起点,d为间隔,生成mask,以此类推也对w进行操作,这样就会生成一个mask区域,在对其进行旋转。下图是我从b站up主那里截取的一张可视化图,比较生动地解释了这个问题。
注:这里的mask操作只针对H和W这两个维度进行。
2.2.1.2 代码:
class GridMask(nn.Module):
    def __init__(self, use_h, use_w, rotate = 1, offset=False, ratio = 0.5, mode=0, prob = 1.):
        super(GridMask, self).__init__()
        self.use_h = use_h      # 决定是否在垂直方向上应用遮挡。
        self.use_w = use_w      # 决定是否在水平方向上应用遮挡。
        self.rotate = rotate    # 随机旋转遮挡区域的次数(从0到rotate-1)。
        self.offset = offset    # 是否应用偏移(即,将遮挡区域外的像素值替换为随机的偏移值)。
        self.ratio = ratio      # 遮挡区域的长度与d(基本遮挡单位)的比例。
        self.mode = mode        # 决定遮挡区域的表示方式(0表示遮挡区域为0,1表示遮挡区域为1)
        self.st_prob = prob     # 用于控制应用GridMask的概率。
        self.prob = prob        # 用于控制应用GridMask的概率。
        self.fp16_enable = False
    def set_prob(self, epoch, max_epoch):   # 这个方法根据当前的epoch和最大epoch数来动态地调整应用GridMask的概率。
        self.prob = self.st_prob * epoch / max_epoch #+ 1.#0.5
    @auto_fp16()
    def forward(self, x):
        if np.random.rand() > self.prob or not self.training:
            return x
        n,c,h,w = x.size()  # x.shape [6,3,736,1280]
        x = x.view(-1,h,w)  #  [6*3,736,1280]
        hh = int(1.5 * h)     # 1104
        ww = int(1.5 * w)     # 1920
        d = np.random.randint(2, h)
        self.l = min(max(int(d * self.ratio + 0.5),1),d-1)
        mask = np.ones((hh, ww), np.float32)
        st_h = np.random.randint(d) # 随机选择的 h 上的起始点,用于确定在mask上创建遮挡区域的起始位置。
        st_w = np.random.randint(d) # 随机选择的 w 上的起始点,用于确定在mask上创建遮挡区域的起始位置。
        if self.use_h:
            for i in range(hh//d):
                s = d * i + st_h         # 计算第i个遮挡块的起始位置。这里st_h是一个随机起始点,用于增加遮挡的随机性。
                t = min(s + self.l, hh)  #  防止超出 hh 界限
                mask[s:t,:] *= 0
        if self.use_w:
            for i in range(ww//d):
                s = d * i + st_w         # 计算第i个遮挡块的起始位置。这里st_w是一个随机起始点,用于增加遮挡的随机性。
                t = min(s + self.l, ww)  #  防止超出 ww 界限
                mask[:,s:t] *= 0

        r = np.random.randint(self.rotate)      # 从0到self.rotate(不包括self.rotate)之间选择一个随机整数r,表示mask旋转的角度。
        mask = Image.fromarray(np.uint8(mask))  # 将mask从NumPy数组转换为PIL的Image对象,以便进行图像处理。
        mask = mask.rotate(r)                   # 将mask旋转r度。
        mask = np.asarray(mask)                 # 将旋转后的mask转换回NumPy数组。
        mask = mask[(hh-h)//2:(hh-h)//2+h, (ww-w)//2:(ww-w)//2+w]   # 将mask裁剪到指定的大小(h, w),其中(hh, ww)是mask原始的大小。裁剪操作确保了mask的中心部分被保留,且大小为(h, w)。

        mask = torch.from_numpy(mask).to(x.dtype).cuda()
        if self.mode == 1:  # 如果mode属性为1,则mask会被反转。这意味着原本被遮挡的区域现在变得可见,而原本可见的区域现在被遮挡。
            mask = 1-mask
        mask = mask.expand_as(x)
        if self.offset:     # elf.offset为True,则生成一个随机偏移量offset,其大小与mask相同,值在-1到1之间。这个偏移量仅应用于未被mask遮挡的区域(即1 - mask)
            offset = torch.from_numpy(2 * (np.random.rand(h,w) - 0.5)).to(x.dtype).cuda()
            x = x * mask + offset * (1 - mask)
        else:
            x = x * mask

        return x.view(n,c,h,w)
2.2.2 img_backbone+Neck
2.2.2.1 原理
这里主要讨论对当前帧的图像特征提取(其实对历史帧的特征提取也是一样的):
图像特征提取的模块其实和大多数的二维图像特征提取结构完全一模一样,唯一有区别的是需要注意其中shape的变换,因为我们BEV算法中相机和历史帧的信息比较多,网络处理数据的维度比较大,一般都是5维或者6维,但是torch中卷积处理的4维张量,所以这里需要关注的是shape之间的变化。比如说img = img.reshape(B * N, C, H, W) 操作,其实就是合并了B*N两个维度,送给resnet50网络进行处理,会得到了一个[B*N,2048,H/16,W/16]的张量,之后再将其reshape还原为[B,N,2048,H/16,W/16]的特征图。
代码中img_feats = self.img_backbone(img)就表示使用resnet进行特征提取的一个过程,提取后的特征为[bs,2048,23,40],之后经过一个neck层(img_feats = self.img_neck(img_feats) ),也就是reid中常用的BN层,会将特征进一步压缩之后,再做一个归一化,使得特征维度变换为[bs,256,23,40]。这个特征就是之后送给Spatial Cross-Attention模块的特征。
注意:这里的遍历img_feats列表的操作,其实也是为了reshape特征的结构,加上之前的len_queue的维度。 self.grid_mask(img) 就是我们上一节提到了数据增强方案,并不改变数据的维度信息。
2.2.2.2 代码
    def extract_img_feat(self, img, img_metas, len_queue=None):
        """Extract features of images."""
        B = img.size(0) # bs = 1,img的shape为[]
        if img is not None:

            # input_shape = img.shape[-2:]
            # # update real input shape of each single img
            # for img_meta in img_metas:
            #     img_meta.update(input_shape=input_shape)

            # 合并B 和 N两个维度
            if img.dim() == 5 and img.size(0) == 1:
                img.squeeze_()# 降低维度
            elif img.dim() == 5 and img.size(0) > 1:
                B, N, C, H, W = img.size()
                img = img.reshape(B * N, C, H, W) # 合并维度 [1*6,3,736,1280]

            if self.use_grid_mask:
                img = self.grid_mask(img)   # [1*6,3,736,1280]

            # 返回的img_feats是一个list类型
            img_feats = self.img_backbone(img)  # img_feats的shape[1*6,2048,23,40]
            if isinstance(img_feats, dict):   # 判断img_feats是不是一个dict也就是字典类型
                img_feats = list(img_feats.values())
        else:
            return None
        if self.with_img_neck:
            img_feats = self.img_neck(img_feats)    # img_feat的shape为[1*6,256,23,40]

        # 开始遍历img_feats列表
        img_feats_reshaped = []
        for img_feat in img_feats:
            BN, C, H, W = img_feat.size()
            if len_queue is not None:
                img_feats_reshaped.append(img_feat.view(int(B/len_queue), len_queue, int(BN / B), C, H, W))
            else:
                img_feats_reshaped.append(img_feat.view(B, int(BN / B), C, H, W))   # list:1,shape为[1,6,256,23,40]
        return img_feats_reshaped
2.3 Encoder
2.3.1 BEVQueries+embedding(encoder使用)和query_embedding(decoder使用)
2.3.1.1 原理:
其实这里使用的是nn.embedding定义的可学习变量,没啥好说的。
self.bev_embedding = nn.Embedding(self.bev_h * self.bev_w, self.embed_dims)
self.query_embedding = nn.Embedding(self.num_query,self.embed_dims * 2)
# 只作用在encoder-only分支上
bev_queries = self.bev_embedding.weight.to(dtype) # [22500,256] float32 类型的 bev_embedding
# 作用在encoder-only和encoder-decoder分支上
object_query_embeds = self.query_embedding.weight.to(dtype) # [900,512] float32 类型的 query_embeding
# [1,150,150] float32 类型的 bev_mask
bev_mask = torch.zeros((bs, self.bev_h, self.bev_w),device=bev_queries.device).to(dtype)
# [1,256,150,150] float32 类型的 bev_pos(对bev_mask进行位置编码)
bev_pos = self.positional_encoding(bev_mask).to(dtype)
2.3.1.2 代码:
BEVFormerHead其实是对transformer的进一步封装,走完2.1节的图像backbone之后就会经过BEVFormerHead结构(其中包含了使用transformer结构生成bev特征的过程和计算loss的过程),生成bev特征的过程可以从self.transformer函数中看到,计算loss的过程此处就对其进行了省略。
注:论文中其实走的是else分支,也就是说是使用的encoder-decoder结构去生成bev特征的,而不是像现在较多的llm,大多数是decoder-only的结构。
提取历史的bev特征其实走的是if only bev分支.
class BEVFormerHead(DETRHead):
        def __init__(self)
        .........
        def _init_layers(self):
        .........
        def _init_weights(self):
        .........
        def forward(self, mlvl_feats, img_metas, prev_bev=None,  only_bev=False):
        """Forward function.
        Args:
            mlvl_feats (tuple[Tensor]): Features from the upstream
                network, each is a 5D-tensor with shape
                (B, N, C, H, W).
            prev_bev: previous bev featues
            only_bev: only compute BEV features with encoder.
        Returns:
            all_cls_scores (Tensor): Outputs from the classification head, \
                shape [nb_dec, bs, num_query, cls_out_channels]. Note \
                cls_out_channels should includes background.
            all_bbox_preds (Tensor): Sigmoid outputs from the regression \
                head with normalized coordinate format (cx, cy, w, l, cz, h, theta, vx, vy). \
                Shape [nb_dec, bs, num_query, 9].
        """
        bs, num_cam, _, _, _ = mlvl_feats[0].shape   # mlvl_feats 的 shape 为 [1,6,256,23,40]
        dtype = mlvl_feats[0].dtype     # torch.float32
        object_query_embeds = self.query_embedding.weight.to(dtype) # [900,512]  float32 类型的 query_embeding
        bev_queries = self.bev_embedding.weight.to(dtype)           # [22500,256]  float32 类型的 bev_embedding

        bev_mask = torch.zeros((bs, self.bev_h, self.bev_w),
                               device=bev_queries.device).to(dtype) # [1,150,150]  float32 类型的 bev_mask
        bev_pos = self.positional_encoding(bev_mask).to(dtype)      # [1,256,150,150]  float32 类型的 bev_pos(对bev_mask进行位置编码)

        if only_bev:  # only use encoder to obtain BEV features, 只使用encoder去取的bev特征  TODO: refine the workaround
            return self.transformer.get_bev_features(
                mlvl_feats,                                 # [1,6,256,23,40]
                bev_queries,                                # [22500,256]
                self.bev_h,                                 # 150
                self.bev_w,                                 # 150
                grid_length=(self.real_h / self.bev_h,      #
                             self.real_w / self.bev_w),     #
                bev_pos=bev_pos,                            # [1,256,150,150]  使用LearnedPositionEncoding构建的bev_mask
                img_metas=img_metas,                        # 3D信息(相机照片地址、shape、旋转矩阵等)
                prev_bev=prev_bev,                          # [1,22500,256]  历史bev特征
            )
        else:
            outputs = self.transformer(
                mlvl_feats,                                 # [1,6,256,23,40]   相机特征
                bev_queries,                                # [22500,256]       bev_query查询向量
                object_query_embeds,                        # [900,512]         query的位置编码
                self.bev_h,                                 # 150 bev特征的高
                self.bev_w,                                 # 150 bev特征的宽
                grid_length=(self.real_h / self.bev_h,
                             self.real_w / self.bev_w),
                bev_pos=bev_pos,                            # [1,256,150,150] bev位置编码
                reg_branches=self.reg_branches if self.with_box_refine else None,  # noqa:E501
                cls_branches=self.cls_branches if self.as_two_stage else None,
                img_metas=img_metas,                        # []
                prev_bev=prev_bev                           # [1,22500,256] 历史bev特征
        )
            ....................
            ....................
            ....................
            ....................
            ....................
2.3.2 Shift操作-判断自车方向
2.3.2.1 原理:
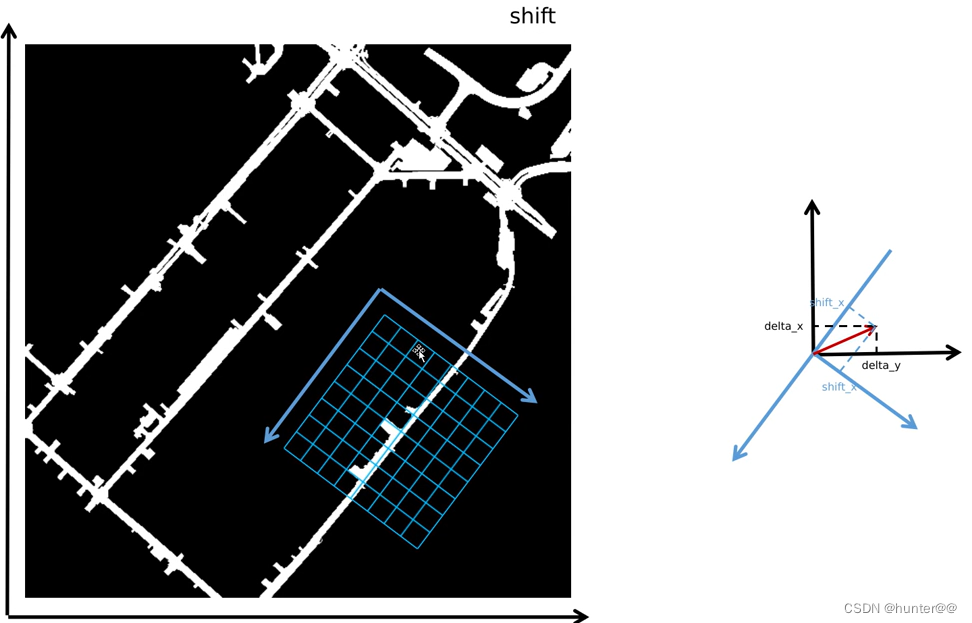
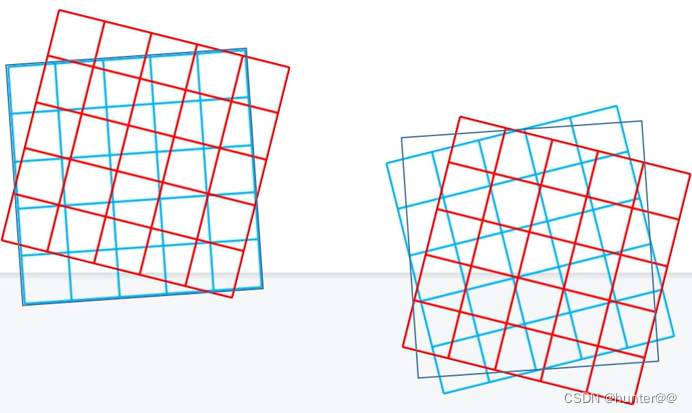
Shift操作其实就是对当前自车方向的一个判断,因为BEVformer会引入历史时刻的bev特征,那中间其实就涉及到了一个比较关键的问题就是,t-2时刻或者t-1时刻的bev特征和t时刻的bev特征的方向是否一致,这其实就是一个比较有意思的话题,大家可以看一下下方第二张图的左侧,红色的bev特征图其实就是蓝色的bev特征旋转之后的一个结果,因为车身发生了变化,bev特征方向也因此发生了变化,因此这里就主要给大家讲一下源码中的一些旋转相关操作。
delta_x和delta_y其实就代表了当前汽车的运动方向,ego_angle表示了自车的运行方向。这里可以参考一下下面第一张图的右侧。我们shift操作的目的其实就是求出x和y方向的偏移量和角度。因此进行了translation_length = np.sqrt(delta_x ** 2 + delta_y ** 2)和translation_angle = np.arctan2(delta_y, delta_x) / np.pi * 180操作,从数学角度来看,其实就是进行了一个欧式距离和三角函数反正切的计算,然后使用自我运动角度(ego_angle)减去平移角度(translation_angle)得到了bev_angle的角度,然后再进行shift_y = translation_length * np.cos(bev_angle / 180 * np.pi) / grid_length_y / bev_h和shift_x = translation_length * np.sin(bev_angle / 180 * np.pi) / grid_length_x / bev_w操作,这里怎么理解,其实就是先分别计算BEV角度的余弦值和正弦值(这里先将角度从度转换为弧度),然后,这些值乘以平移长度(translation_length),并分别除以BEV网格的长度(grid_length_y 和 grid_length_x)以及BEV网格的高度(bev_h)和宽度(bev_w),这样做是为了将平移量归一化到BEV网格的尺度上。到这里shift操作就结束了。
那self.rotate_prev_bev函数又是再干什么呢?之前不都已经进行了shift了吗?为啥又需要rotate?这里其实可以将rotate操作理解为是一个数据增强的方案,主要是bev特征进行旋转,类似于2d图像中的旋转裁剪平移等数据增强操作。这里其实是直接使用torch的rotate库来完成这个旋转操作。
2.3.2.2 代码:
    def get_bev_features(
            self,
            mlvl_feats,  # [1,6,256,23,40]  图像特征
            bev_queries, # [22500,256] bev查询向量
            bev_h,       # 150 bev特征的高
            bev_w,       # 150 bev特征的宽
            grid_length=[0.512, 0.512], #
            bev_pos=None, # [1,256,150,150] bev位置编码
            prev_bev=None,# [1,22500,256] 历史bev特征
            **kwargs):
        """
        obtain bev features.
        """

        bs = mlvl_feats[0].size(0)      # 1
        bev_queries = bev_queries.unsqueeze(1).repeat(1, bs, 1)     # [22500,256] -> [22500,1,256] 对bev查询向量进行维度变换
        bev_pos = bev_pos.flatten(2).permute(2, 0, 1)   # [1,256,150,150]->[22500,1,256] 对bev位置编码进行维度变化

        # obtain rotation angle and shift with ego motion 获得处理自动运动相关的数据
        delta_x = np.array([each['can_bus'][0]for each in kwargs['img_metas']]) # 计算为包含所有图像 x 方向位移的numpy数组  [5.66049593]
        delta_y = np.array([each['can_bus'][1]for each in kwargs['img_metas']]) # 计算为包含所有图像 y 方向位移的numpy数组  [-4.70304607]

        ego_angle = np.array([each['can_bus'][-2] / np.pi * 180 for each in kwargs['img_metas']])    # 所有图像自我运动角度(以度为单位) [320.95462083]

        grid_length_y = grid_length[0]   # 在 y 轴上的长度  [0.682666]
        grid_length_x = grid_length[1]   # 在 x 轴上的长度  [0.682666]

        translation_length = np.sqrt(delta_x ** 2 + delta_y ** 2) # 代表车辆的总平移距离。这是通过计算两个方向的位移的欧几里得距离得到的   [7.35933805]
        translation_angle = np.arctan2(delta_y, delta_x) / np.pi * 180 # 代表了车辆平移的方向。通过 np.arctan2 函数计算得到的,该函数返回的是弧度值。为了将其转换为度,我们将其除以 np.pi 并乘以180 [-39.72163513]

        bev_angle = ego_angle - translation_angle   # 是车辆的自我运动角度(ego_angle)减去平移角度(translation_angle)。这代表了在BEV视角下,车辆相对于其原始位置的方向变化。[360.67625596]

        # np.cos(bev_angle / 180 * np.pi) 和 np.sin(bev_angle / 180 * np.pi)
        # 分别计算了BEV角度的余弦值和正弦值(这里先将角度从度转换为弧度)。
        # 然后,这些值乘以平移长度(translation_length),
        # 并分别除以BEV网格的长度(grid_length_y 和 grid_length_x)以及BEV网格的高度(bev_h)和宽度(bev_w)。
        # 这样做是为了将平移量归一化到BEV网格的尺度上。
        shift_y = translation_length * np.cos(bev_angle / 180 * np.pi) / grid_length_y / bev_h # 计算了车辆在BEV网格上的y轴方向上的平移量。[0.07186353]
        shift_x = translation_length * np.sin(bev_angle / 180 * np.pi) / grid_length_x / bev_w # 计算了车辆在BEV网格上的x轴方向上的平移量。[0.00084824]

        shift_y = shift_y * self.use_shift
        shift_x = shift_x * self.use_shift

        # 偏移量,t-1时刻自车的位置相对于t时刻的位置,放在定义好的bev空间下的,使用bev_queries张量的.new_tensor()方法创建一个新的张量。.new_tensor()方法会基于bev_queries的dtype和device(数据类型和存储位置,例如是否使用GPU)来创建新张量。
        shift = bev_queries.new_tensor([shift_x, shift_y]).permute(1, 0)  # xy, bs -> bs, xy

        if prev_bev is not None:        # [1,22500,256]
            if prev_bev.shape[1] == bev_h * bev_w:
                prev_bev = prev_bev.permute(1, 0, 2)    # [22500,1,256]

            # 一系列的二维鸟瞰图(Bird's Eye View, BEV)进行旋转处理
            if self.rotate_prev_bev:        # 是否旋转之前的bev特征图
                for i in range(bs):
                    # num_prev_bev = prev_bev.size(1)
                    rotation_angle = kwargs['img_metas'][i]['can_bus'][-1]  # 获取旋转角度
                    tmp_prev_bev = prev_bev[:, i].reshape(bev_h, bev_w, -1).permute(2, 0, 1)        # 重新排列BEV
                    tmp_prev_bev = rotate(tmp_prev_bev, rotation_angle,center=self.rotate_center)   # 旋转BEV特征图
                    tmp_prev_bev = tmp_prev_bev.permute(1, 2, 0).reshape(bev_h * bev_w, 1, -1)      # 再次重新排列BEV特征图
                    prev_bev[:, i] = tmp_prev_bev[:, 0]                                             # 将旋转后的BEV放回原位置
2.3.3 图像特征:img_feat + cams_embeds + level_embeds
2.3.3.1 原理
can_bus变量保存着汽车的总线信息,其shape为[1,18],在定义初始化的bev_query时,为了将汽车的总线信息也给考虑进去了,就需要进行维度变换。但是bev_query的初始化shape为[22500,1,256],为了使得其维度匹配,使用了self.can_bus_mlp进行升维,其定义也如下所示。再经过了self.can_bus_mlp(can_bus)[None, :, :]之后,can_bus的shape也变为了[1,1,256],再和bev_query进行相加,就是实现了can_bus信息和bev_query信息的合并。
同理,也想将cams_embeds也就是不同相机的位置编码信息合并到图像特征中去,因此也是需要进行维度变换,通过遍历mlvl_feats这个list,获取图像的shape为[1,6,256,23,40],再进行一次维度合并与变换,将其转换为[6,1,920,256],其中920=23*40;之后也是一样的道理,通过feat = feat + self.cams_embeds[:, None, None, :].to(feat.dtype)进行信息整合,就将不同相机的位置编码cams_embeds整合到了img_feat中。这个feat = feat + self.level_embeds[None,None, lvl:lvl + 1, :].to(feat.dtype)怎么理解呢,其实是一样的,self.level_embeds相当于对神经网络中的每一层给了一个位置编码,相当于考虑了层级之间的位置关系,之后也将其整合到img_feat中。
self.level_embeds = nn.Parameter(torch.Tensor(self.num_feature_levels,self.embed_dims))
self.cams_embeds = nn.Parameter(torch.Tensor(self.num_cams, self.embed_dims))
self.can_bus_mlp = nn.Sequential(
nn.Linear(18, self.embed_dims // 2),
nn.ReLU(inplace=True),
nn.Linear(self.embed_dims // 2, self.embed_dims),
nn.ReLU(inplace=True),
)2.3.3.2 代码
        #  在 bev_queries 中添加汽车的总线信号(add can bus signals)
        can_bus = bev_queries.new_tensor([each['can_bus'] for each in kwargs['img_metas']])  # [:, :]
        can_bus = self.can_bus_mlp(can_bus)[None, :, :]
        bev_queries = bev_queries + can_bus * self.use_can_bus

        # 处理多级别(multi-level)或多视图(multi-view,如多个摄像头)的特征图(feature maps)
        feat_flatten = []
        spatial_shapes = []
        for lvl, feat in enumerate(mlvl_feats):     # [1,6,256,23,40]
            bs, num_cam, c, h, w = feat.shape
            spatial_shape = (h, w)
            feat = feat.flatten(3).permute(1, 0, 3, 2)  # [6,1,920,256]其中920 = 23 * 40
            if self.use_cams_embeds:       # 是否添加摄像头嵌入
                feat = feat + self.cams_embeds[:, None, None, :].to(feat.dtype)
            feat = feat + self.level_embeds[None,None, lvl:lvl + 1, :].to(feat.dtype)
            spatial_shapes.append(spatial_shape)
            feat_flatten.append(feat)

        feat_flatten = torch.cat(feat_flatten, 2)   # [6,920,1,256]

        # spatial_shapes被转换为一个与bev_pos具有相同设备和数据类型的PyTorch长整型张量。
        spatial_shapes = torch.as_tensor(spatial_shapes, dtype=torch.long, device=bev_pos.device)   # [23,40],转换为张量

        # level_start_index通常用于索引或切片操作,特别是在处理具有多级或多尺度的空间数据
        # 将不同[H,W]的平面flatten为[H*W]向量后cat在一起每个平面的起始下表
        level_start_index = torch.cat((spatial_shapes.new_zeros((1,)), spatial_shapes.prod(1).cumsum(0)[:-1]))

        feat_flatten = feat_flatten.permute(0, 2, 1, 3)  # (num_cam, H*W, bs, embed_dims) [6,920,1,256]

        bev_embed = self.encoder(
            bev_queries,                            # [22500,1,256]
            feat_flatten,                           # [6,920,1,256]  其中6表示相机个数,920为H X W 的大小,256为channel
            feat_flatten,                           # [6,920,1,256]
            bev_h=bev_h,                            # 150
            bev_w=bev_w,                            # 150
            bev_pos=bev_pos,                        # [22500,1,256]
            spatial_shapes=spatial_shapes,          # [1,2],值为[[23,40]]     使用 img 经过 backbone 之后的 H,W
            level_start_index=level_start_index,    # 0
            prev_bev=prev_bev,                      # [2,22500,256]
            shift=shift,                            # [1,2]     [[0.0008,0.0719]]
            **kwargs
        )

        return bev_embed
2.3.4 2D和3D映射关系建立(隐式构建3D空间)
2.3.4.1 原理
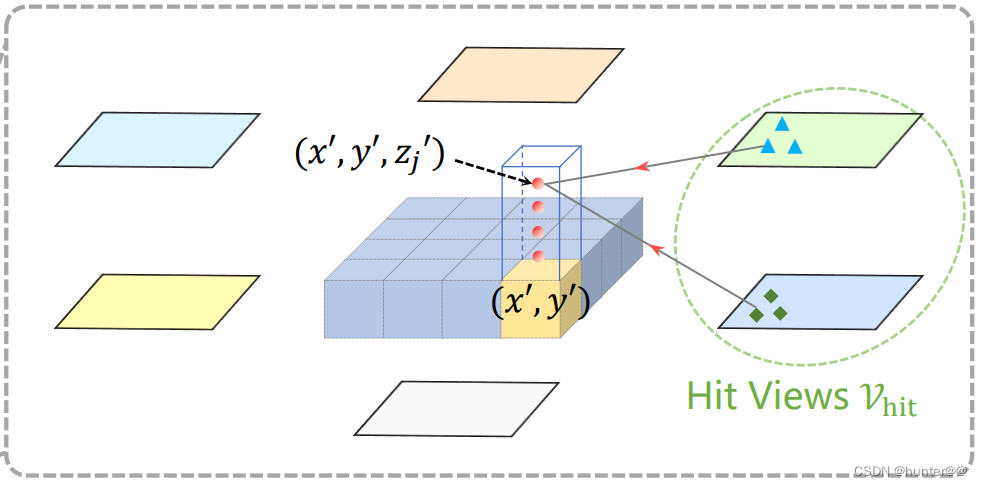
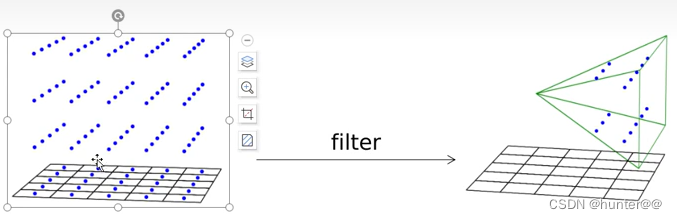
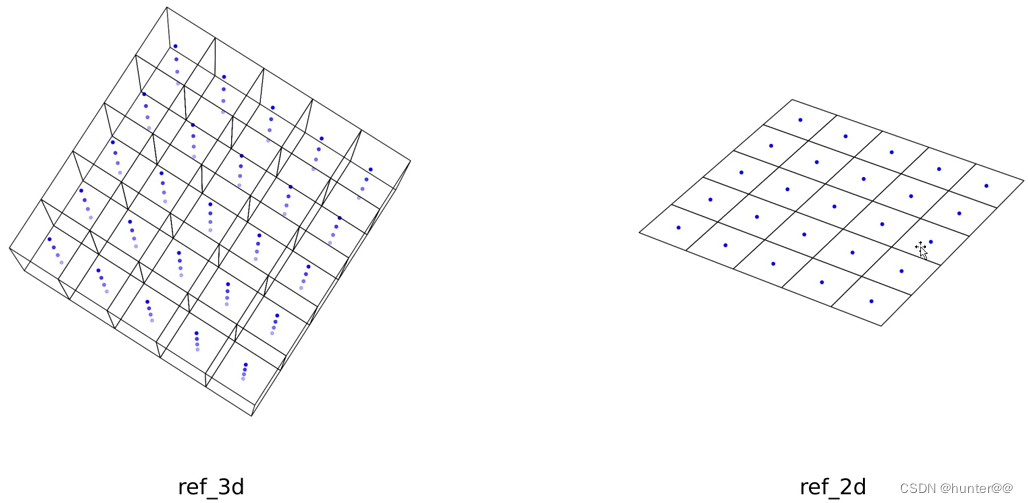
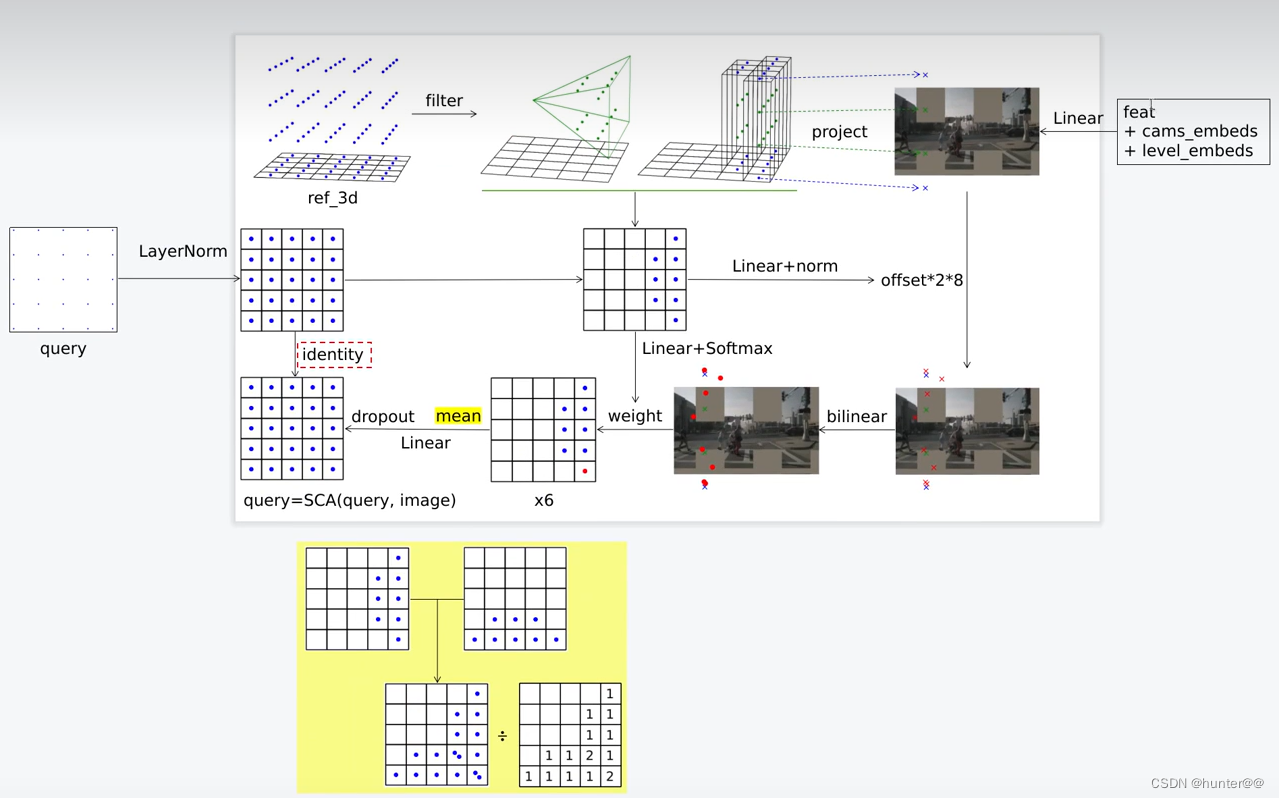
BEVformer中构建2D和3D映射的方法就和LSS完全不同,这里个人觉得可是BEVformer的核心。BEVformer构建3D点的方法是从bev特征上开始的:从其核心的get_reference_points函数可以看出,其主要是目的是在150*150的bev特征图上的每一个网格pillar上生成4个points,如从下面的第一张图和第三张图的左侧。这样其实就生成了一个[bs, num_points_in_pillar, bev_h * bev_w, xyz]的一个bev特征点空间,再通过归一化将其压缩。
之后会经过point_sampling函数,它的作用其实也就是对points进行坐标系变换和筛选。下面主要从两个方面来讲point_sampling函数:
(1)坐标系变换
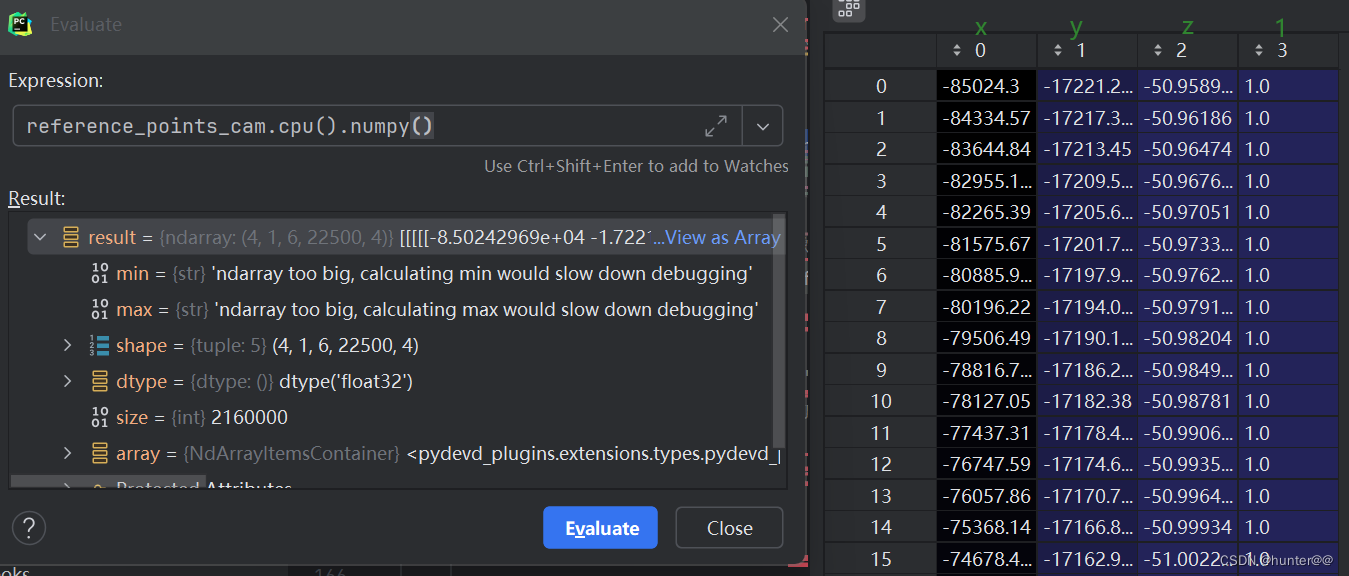
之前通过get_reference_points函数构建的bev特征点主要是激光雷达坐标系下构建的,但是我们的图像特征是在相机坐标系下提取到了,因此,这之间就会产生一个坐标系变换的问题。也就是代码中lidar2img坐标变换矩阵,它其实是一个4 X 4的变换矩阵(其中包含的相机的内外参矩阵)。在乘以变换矩阵前,需要对get_reference_point函数生成的3d参考点[1,4,22500,3]进行缩放,缩放为真实尺度,再将其变为齐次坐标[1,4,22500,4],再将维度permute为[4,1,22500,4],又因为有6个相机,还需要将3d点repeat六份,然后再view为[4,1,6,22500,4,1],最后和lidar2img矩阵[4,1,6,22500,4,4]进行矩阵相乘,得到变换后的基于相机坐标系下的3d参考点。
(2)points采样与筛选
根据我们之前得到[4,1,6,22500,4,4]个点,但其不是我们都需要的,我们需要对其进行筛选,首先通过相机的位置进行筛选,我们都知道相机的可视区域是一个视锥,那么我就需要保留相机视锥内的点即可。首先通过设置一个阈值eps过滤掉位于相机后面的点,然后会再除以z,得到齐次坐标下除以比例系数的图像平面坐标真实值,然后再进行坐标归一化,使用bev_mask去除图像意外的点,最后得到的是第二图的右侧结果图。
2.3.4.2 代码
主函数
    def forward(self,
                bev_query,              #   [22500,1,256]
                key,                    #   [6,920,1,256]
                value,                  #   [6,920,1,256]
                *args,                  #
                bev_h=None,             #   bev_h=150
                bev_w=None,             #   bev_w=150
                bev_pos=None,           #   [22500,1,256]
                spatial_shapes=None,    #   spatial_shapes=[23,40]
                level_start_index=None, #   level_start_index=[0]
                valid_ratios=None,#
                prev_bev=None,#
                shift=0.,#
                **kwargs):
        """Forward function for `TransformerDecoder`.
        Args:
            bev_query (Tensor): Input BEV query with shape
                `(num_query, bs, embed_dims)`.
            key & value (Tensor): Input multi-cameta features with shape
                (num_cam, num_value, bs, embed_dims)
            reference_points (Tensor): The reference
                points of offset. has shape
                (bs, num_query, 4) when as_two_stage,
                otherwise has shape ((bs, num_query, 2).
            valid_ratios (Tensor): The radios of valid
                points on the feature map, has shape
                (bs, num_levels, 2)
        Returns:
            Tensor: Results with shape [1, num_query, bs, embed_dims] when
                return_intermediate is `False`, otherwise it has shape
                [num_layers, num_query, bs, embed_dims].
        """

        output = bev_query
        intermediate = []
        # 获取 bev 空间上的3维点
        # 这里和 LSS 的区别是 它是在 bev 空间上定义的3D点,然后投影到2D平面上去,而LSS则相反。
        ref_3d = self.get_reference_points(        #  [1,4,22500,3]
            bev_h, bev_w, self.pc_range[5]-self.pc_range[2], self.num_points_in_pillar, dim='3d', bs=bev_query.size(1),  device=bev_query.device, dtype=bev_query.dtype)
        ref_2d = self.get_reference_points(        #  [1,22500,1,2]
            bev_h, bev_w, dim='2d', bs=bev_query.size(1), device=bev_query.device, dtype=bev_query.dtype)
        # 将激光坐标系下的点通过坐标系变换矩阵转换到相机坐标系下,再转换到图像像素坐标系
        reference_points_cam, bev_mask = self.point_sampling(
            ref_3d, self.pc_range, kwargs['img_metas'])     #

        # bug: this code should be 'shift_ref_2d = ref_2d.clone()', we keep this bug for reproducing our results in paper.
        shift_ref_2d = ref_2d.clone()       #[1,22500,1,2]
        shift_ref_2d += shift[:, None, None, :]

        # (num_query, bs, embed_dims) -> (bs, num_query, embed_dims)
        bev_query = bev_query.permute(1, 0, 2)  #[1,22500,256]
        bev_pos = bev_pos.permute(1, 0, 2)      #[1,22500,256]
        bs, len_bev, num_bev_level, _ = ref_2d.shape    # len_bev=22500,num_bev_level=1
        if prev_bev is not None:
            prev_bev = prev_bev.permute(1, 0, 2)
            prev_bev = torch.stack(
                [prev_bev, bev_query], 1).reshape(bs*2, len_bev, -1)
            hybird_ref_2d = torch.stack([shift_ref_2d, ref_2d], 1).reshape(
                bs*2, len_bev, num_bev_level, 2)
        else:
            # [2 * bs,bev_h * bev_w,None,xy]
            hybird_ref_2d = torch.stack([ref_2d, ref_2d], 1).reshape(bs*2, len_bev, num_bev_level, 2)

        for lid, layer in enumerate(self.layers):
            output = layer(
                bev_query,                                  # [1,22500,256]
                key,                                        # [6,920,1,256]
                value,                                      # [6,920,1,256]
                *args,                                      #
                bev_pos=bev_pos,                            # [1,22500,256]
                ref_2d=hybird_ref_2d,                       # [2,22500,1,2]
                ref_3d=ref_3d,                              # [1,4,22500,3]
                bev_h=bev_h,                                # bev_h = 150
                bev_w=bev_w,                                # bev_w = 150
                spatial_shapes=spatial_shapes,              # [[23,40]]
                level_start_index=level_start_index,        # 0
                reference_points_cam=reference_points_cam,  # [6,1,22500,4,2]
                bev_mask=bev_mask,                          # [6,1,22500,4]
                prev_bev=prev_bev,                          # 第一次为None
                **kwargs)

            bev_query = output
            if self.return_intermediate:
                intermediate.append(output)

        if self.return_intermediate:
            return torch.stack(intermediate)

        return output
get_reference_points函数
    def get_reference_points(H, W, Z=8, num_points_in_pillar=4, dim='3d', bs=1, device='cuda', dtype=torch.float):
        """Get the reference points used in SCA and TSA.
        Args:
            H, W: spatial shape of bev.                     鸟瞰图(BEV)的空间高度和宽度。
            Z: hight of pillar.                             柱体(pillar)的高度(仅在dim='3d'时使用)
            D: sample D points uniformly from each pillar.  参考点的维度,可以是'3d'或'2d'。
            device (obj:`device`): The device where
                reference_points should be.
        Returns:
            Tensor: reference points used in decoder, has \
                shape (bs, num_keys, num_levels, 2).
        """

        # reference points in 3D space, used in spatial cross-attention (SCA)
        # 用于生成在特定空间维度(3D 或 2D)中的参考点。这些参考点可能用于空间交叉注意力(Spatial-Cross-Attention, SCA)或时间自注意力(Temporal-Self-Attention, TSA)等机制中。
        if dim == '3d':
            # num_points_in_pillar 其实就表示每一个 pillr 上采样了 4个点
            zs = torch.linspace(0.5, Z - 0.5, num_points_in_pillar, dtype=dtype,
                                device=device).view(-1, 1, 1).expand(num_points_in_pillar, H, W) / Z    # 代表柱体高度上的采样点集
            xs = torch.linspace(0.5, W - 0.5, W, dtype=dtype,
                                device=device).view(1, 1, W).expand(num_points_in_pillar, H, W) / W     # 代表BEV宽度上的采样点集
            ys = torch.linspace(0.5, H - 0.5, H, dtype=dtype,
                                device=device).view(1, H, 1).expand(num_points_in_pillar, H, W) / H     # 代表BEV高度上的采样点集
            ref_3d = torch.stack((xs, ys, zs), -1)                                                      # 将这三个维度堆叠成一个三维坐标点集。
            ref_3d = ref_3d.permute(0, 3, 1, 2).flatten(2).permute(0, 2, 1)
            ref_3d = ref_3d[None].repeat(bs, 1, 1, 1)  # [bs, num_points_in_pillar, bev_h * bev_w, xyz] # torch.size([1, 4, 50*50, 3])

            # ref_3D   归一化
            #   zs: (0.5  ~  8-0.5)  / 8
            #   xs: (0.5  ~  50-0.5) / 50
            #   ys: (0.5  ~  50-0.5) / 50
            return ref_3d

        # reference points on 2D bev plane, used in temporal self-attention (TSA).
        # 时间注意力机制的时候使用
        elif dim == '2d':
            ref_y, ref_x = torch.meshgrid(
                torch.linspace(0.5, H - 0.5, H, dtype=dtype, device=device),
                torch.linspace(0.5, W - 0.5, W, dtype=dtype, device=device))

            ref_y = ref_y.reshape(-1)[None] / H         #
            ref_x = ref_x.reshape(-1)[None] / W         #


            ref_2d = torch.stack((ref_x, ref_y), -1)         # 堆叠为一个2维的坐标点集
            ref_2d = ref_2d.repeat(bs, 1, 1).unsqueeze(2)    # 扩展到batch
            return ref_2d
point_sampling函数
    def point_sampling(self, reference_points, pc_range,  img_metas):
        # NOTE: close tf32 here.  禁用TensorFlow 32位计算:
        allow_tf32 = torch.backends.cuda.matmul.allow_tf32
        torch.backends.cuda.matmul.allow_tf32 = False
        torch.backends.cudnn.allow_tf32 = False

        # 从img_metas中提取lidar2img转换矩阵,激光雷达坐标系到相机坐标系的一个转换
        # 因为这里认为reference_points是在激光雷达坐标系的下的,需要将其转换到相机坐标系
        lidar2img = []
        for img_meta in img_metas:
            lidar2img.append(img_meta['lidar2img'])     # lidar2img 矩阵包含了相机的 内参 和 外参
        lidar2img = np.asarray(lidar2img)       # 将 list 转换为 np
        lidar2img = reference_points.new_tensor(lidar2img)  # (B, N, 4, 4)
        reference_points = reference_points.clone()         # [1,4,22500,3]


        # 对3D点云数据中的reference_points进行线性变换,具体是将其坐标从某个归一化的空间转换到实际的物理空间
        # 平移缩放操作
        # reference_points  # normalize 0~1, # torch.size([1,4,150*150,3])
        # pc_range = [ -51.2, -51.2, -5.0, 51.2, 51.2, 3.0 ]
        # 尺度被缩放为真实尺度,不是之前归一化之后的结果
        reference_points[..., 0:1] = reference_points[..., 0:1] * \
            (pc_range[3] - pc_range[0]) + pc_range[0]       # 对x进行操作
        reference_points[..., 1:2] = reference_points[..., 1:2] * \
            (pc_range[4] - pc_range[1]) + pc_range[1]       # 对y进行操作
        reference_points[..., 2:3] = reference_points[..., 2:3] * \
            (pc_range[5] - pc_range[2]) + pc_range[2]       # 对z进行操作

        # 将非齐次坐标转换为齐次坐标的形势
        # [bs, num_points_in_pillar, bev_h * bev_w, xyz1]
        reference_points = torch.cat(
            (reference_points, torch.ones_like(reference_points[..., :1])), -1)     # [1,4,22500,4]

        #
        reference_points = reference_points.permute(1, 0, 2, 3)        # [4,1,22500,4]

        # [ num_points_in_pillar, bs, bev_h * bev_w, xyz1 ]
        D, B, num_query = reference_points.size()[:3]   # B:1,D:,num_query:22500
        num_cam = lidar2img.size(1)     # 6

        # 因为有6个相机,所以复制6份,但是方法比较冗余,也就是对每一个相机都将所有的点投影上来
        # [ num_points_in_pillar, bs, num_cam, bev_h * bev_w,xyz1, None ]
        reference_points = reference_points.view(
            D, B, 1, num_query, 4).repeat(1, 1, num_cam, 1, 1).unsqueeze(-1)    # [4,1,6,22500,4,1]

        # [num_points_in_pillar,bs,num_cam,bev_h*bev_w,xyz1,None],扩充维度,为乘积做准备
        lidar2img = lidar2img.view(
            1, B, num_cam, 1, 4, 4).repeat(D, 1, 1, num_query, 1, 1)        # [4,1,6,22500,4,4]

        # LiDAR(激光雷达)坐标系中的点(即reference_points)转换到图像坐标系
        # [4,1] 和 [4,4] 做矩阵乘法
        reference_points_cam = torch.matmul(lidar2img.to(torch.float32),
                                            reference_points.to(torch.float32)).squeeze(-1)# [4,1,6,22500,4,4]
        eps = 1e-5        # 防止除以零的错误或作为数值稳定的阈值。

        # 只保留位于相机前面的点
        bev_mask = (reference_points_cam[..., 2:3] > eps)

        # x,y分别除以z
        # 齐次坐标下除以比例系数得到图像平面的坐标真实值
        reference_points_cam = reference_points_cam[..., 0:2] / torch.maximum(
            reference_points_cam[..., 2:3], torch.ones_like(reference_points_cam[..., 2:3]) * eps)

        # img_metas[0]['img_shape'][0][1]表示图像的高度,而img_metas[0]['img_shape'][0][0表示图像的宽度。
        # 这两行代码的作用是将归一化后的x和y坐标从相机坐标系转换到图像坐标系(或称为像素坐标系)
        # 坐标归一化
        # [num_points_in_pillar, bs, num_cam, bev_h * bev_w, xys1]    s代表的比例
        reference_points_cam[..., 0] /= img_metas[0]['img_shape'][0][1]
        reference_points_cam[..., 1] /= img_metas[0]['img_shape'][0][0]

        # 去除图像意外的点
        bev_mask = (bev_mask & (reference_points_cam[..., 1:2] > 0.0)   #  检查y坐标下限
                    & (reference_points_cam[..., 1:2] < 1.0)            # 检查y坐标上限
                    & (reference_points_cam[..., 0:1] < 1.0)            # 检查x坐标上限
                    & (reference_points_cam[..., 0:1] > 0.0))           # 检查x坐标下限

        # 检查PyTorch的版本,并基于该版本决定如何处理bev_mask中的NaN(非数字)值
        if digit_version(TORCH_VERSION) >= digit_version('1.8'):      #  PyTorch 1.8及更高版本中,torch.nan_to_num是一个内置函数,可以将张量中的NaN值替换为0,无穷大值替换为有限数(默认是正无穷大替换为最大浮点数,负无穷大替换为最小非零浮点数)。
            bev_mask = torch.nan_to_num(bev_mask)
        else:
            bev_mask = bev_mask.new_tensor(
                np.nan_to_num(bev_mask.cpu().numpy()))              # 如果PyTorch版本低于1.8,那么这段代码会首先将bev_mask从GPU(如果存在的话)移动到CPU,将其转换为NumPy数组,并使用NumPy的np.nan_to_num函数来处理NaN值。然后,它将处理后的NumPy数组转换回与原始bev_mask具有相同设备类型和类型的PyTorch张量。

        # [num_cams,bs,bev_h * hev_w,num_points_in_pillows,uv]
        # 其实[num_cams,bs,bev_h * hev_w,num_points_in_pillows]代表的bev空间中的索引值,而uv代表的是图像2d空间中的uv值
        # bev 空间中的点与 2D空间中uv坐标的对应关系
        reference_points_cam = reference_points_cam.permute(2, 1, 3, 0, 4)     #[6,1,22500,4,2]
        bev_mask = bev_mask.permute(2, 1, 3, 0, 4).squeeze(-1)                 #[6,1,22500,4]

        torch.backends.cuda.matmul.allow_tf32 = allow_tf32
        torch.backends.cudnn.allow_tf32 = allow_tf32

        return reference_points_cam, bev_mask
2.3.5 Temporal Self-Attention
2.3.5.1 原理:
Temporal Self-Attention也就是论文中提到的时间注意力机制模块,从第2节的pipeline可以看出,其实主要是对query和prev_bev进行注意力机制的计算,这里的注意力采用的可变性注意力机制。这里query其实就是之前的bev_query,shape为[1,22500,256]。当epoch为1时,其就是一个初始化的一个nn.Embedding变量,定义如下图所示;当epoch>1时候,则接收到空间注意力机制传回的query值,这里的query是有位置信息的bev特征。而注意力机制的key和value为prev_bev特征,shape为[2,22500,256],这里如何取得prev_bev特征的请参考2.2小节


下面主要讲一下query(bev_query)和value(prev_bev)是如何进行交互的(key没有参与交互,但是其实key=value):
首先对query进行操作,拼接value特征query = torch.cat([value[:bs], query], -1),再使用一个self.sampling_offsets函数,其真身是一个Linear(in_features=512, out_features=128, bias=True)函数,再将结果reshape为[bs,num_query,num_head,num_bev_queue,num_levels,num_points,2],bs代表的是batch_size,num_query代表的是bev特征的长度,num_head代表的多头注意力机制的头数(个人理解分多头是一个简化计算的操作),num_queue代表的是历史bev特征的个数,num_levels代表的是层级,个人理解应该和fpn有关,num_points其实就代表4个采样点,2则代表xy坐标,最后将其重命名为sample_offset变量。
        self.sampling_offsets = nn.Linear(embed_dims * self.num_bev_queue, num_bev_queue * num_heads * num_levels * num_points * 2)
        self.attention_weights = nn.Linear(embed_dims * self.num_bev_queue,num_bev_queue*num_heads * num_levels * num_points)
然后会再构建一个attention_weight变量,它的作用主要是用来加权求和的,因为我们在sample_offset上构建的num_points个采样点,最终是需要相加的,需要进行加权求和,不是简单的相加。因此使用query经过了一个self.attention_weights函数,其实也是一个Linear(in_features=512, out_features=64, bias=True),将其shape变为[bs, num_query, num_heads, num_bev_queue, num_levels * num_points],对最后一维进行softmax进行概率求解,再将其reshape为[bs, num_query, num_heads, num_bev_queue, num_levels ,self.num_points]。
再一起对attention_weight和sample_offset进行reshape,这里用自己debug的维度数据代替
attention_weight.shape[2,22500,8,1,4],sample_offest.shape[2,22500,8,1,4,2]。
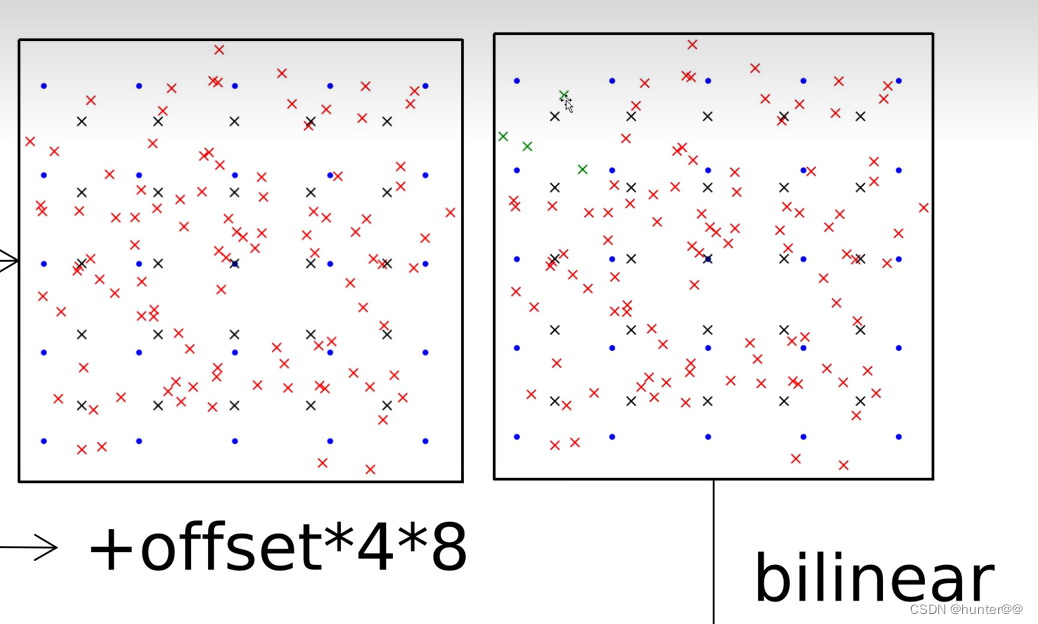
之后,会将sample_offset的特征点加上reference_points(2d)的栅格点(这里为什么要这么相加呢,我其实也不理解,希望有大佬解释一下),其中reference_points的shape为[2,22500,1,2]。也就是说这里的相加实际是[8,1,4,2]和[1,2]维度的相加,这里的[4,2]可以理解为有4个点,2表示每个点的xy坐标,8可以理解为8层,其实可以理解为一个高度,我其实就直接理解为Channel,主要是每一个num_queue上4个特征点和一个栅格点相加,这样的相加有8组,这里其实很像2d目标检测中计算boundingbox的偏移量的想法。最后将相加的结果赋值给sampling_locations,shape为[2,22500,8,1,4,2],结果如下图右上边所示。
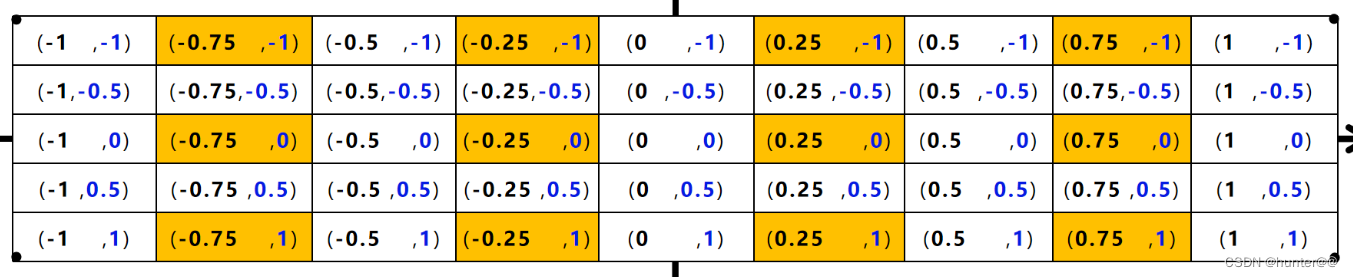
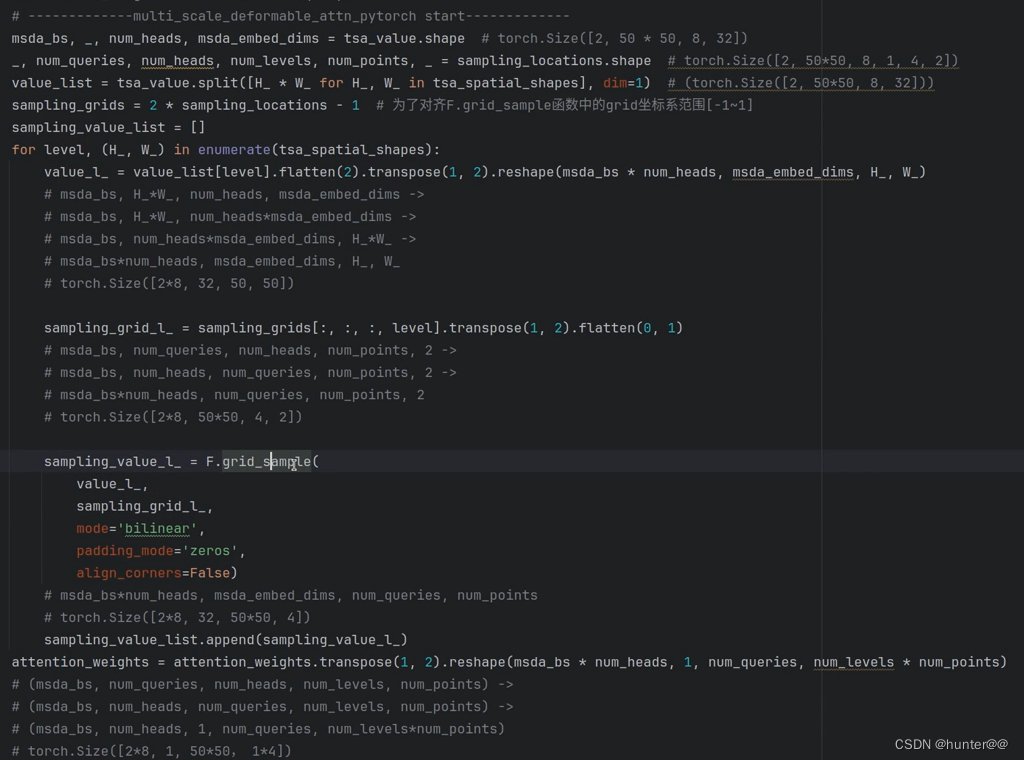
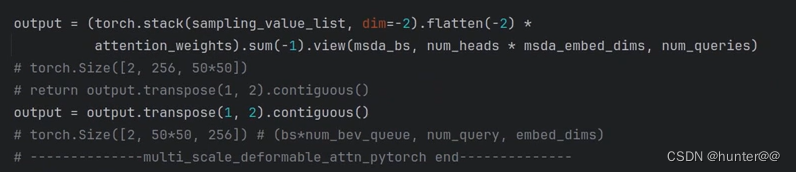
最后,会经过一个multi_scale_deformable_attn_pytorch函数,这就是可变形注意力机制的核心了。value的shape为[2,22500,8,32],sampling_locations的shape为[2,22500,8,1,4,2],再进行torch.nn.functional.grid_sample函数之前,先将value的维度reshape为[2*8,32,50,50],sampling_location的维度reshape为[2*8,22500,4,2],这里的2*8怎么理解呢,其实2就是bs,8就是num_head,其实就是多头的意思,个人理解目的的为了简化计算,32可以理解为channel,[50,50]在原来其实表示的是bev特征的高和宽,大家可以理解为需要在[50,50]的bev特征图上进行采样。sample_location的维度中2*8也是和之前一样的意思,但是这里的22500,4,2就不一样了,2其实就表示的x和y坐标,22500其实就表示有多少行,4就代表有多少列,因此这里的[22500,4,2]就可以表示为下面的表格。因此F.grid_sampling的意思就可以理解为在[50,50]的bev特征图上采样22500*4个点。最终的output的shape为[2*8,32,22500,4]。再乘以一个attention_weight,就是对这4个点进行加权求和,这里就类似自注意力机制的W矩阵(只是这个W矩阵是由k,v矩阵转置相乘的到的)。最后对4这个维度求一个sum求和,维度变为[2*8,32,22500,1],再reshape为[2*8,22500,32]。之后会再经过一个linear和残差结构(+identity),但是这个操作不改变维度。

2.3.5.2 代码:
TemporalSelfAttention函数
    def forward(self,
                query,          # 就是之前定义的 bev_query , [1,22500,256]
                key=None,       # [2,22500,256],之前的pre_bev特征, key=value
                value=None,     # [2,22500,256],之前的pre_bev特征, value=key
                identity=None,  # None
                query_pos=None, # query的位置编码 [1,22500,256]
                key_padding_mask=None,  # None
                reference_points=None,  # [2,22500,1,2] 二维参考点
                spatial_shapes=None,    # [[150,150]]
                level_start_index=None, # [0]
                flag='decoder',

                **kwargs):
        """Forward Function of MultiScaleDeformAttention.

        Args:
            query (Tensor): Query of Transformer with shape
                (num_query, bs, embed_dims).
            key (Tensor): The key tensor with shape
                `(num_key, bs, embed_dims)`.
            value (Tensor): The value tensor with shape
                `(num_key, bs, embed_dims)`.
            identity (Tensor): The tensor used for addition, with the
                same shape as `query`. Default None. If None,
                `query` will be used.
            query_pos (Tensor): The positional encoding for `query`.
                Default: None.
            key_pos (Tensor): The positional encoding for `key`. Default
                None.
            reference_points (Tensor):  The normalized reference
                points with shape (bs, num_query, num_levels, 2),
                all elements is range in [0, 1], top-left (0,0),
                bottom-right (1, 1), including padding area.
                or (N, Length_{query}, num_levels, 4), add
                additional two dimensions is (w, h) to
                form reference boxes.
            key_padding_mask (Tensor): ByteTensor for `query`, with
                shape [bs, num_key].
            spatial_shapes (Tensor): Spatial shape of features in
                different levels. With shape (num_levels, 2),
                last dimension represents (h, w).
            level_start_index (Tensor): The start index of each level.
                A tensor has shape ``(num_levels, )`` and can be represented
                as [0, h_0*w_0, h_0*w_0+h_1*w_1, ...].

        Returns:
             Tensor: forwarded results with shape [num_query, bs, embed_dims].
        """

        if value is None:# 防止value为 None
            assert self.batch_first
            bs, len_bev, c = query.shape  # c:256,len_bev:22500,bs:1   [1,22500,256]
            value = torch.stack([query, query], 1).reshape(bs*2, len_bev, c)    # [2,22500.256]

            # value = torch.cat([query, query], 0)

        if identity is None:
            identity = query        # [1,22500,256] 也就是之前的bev_query

        if query_pos is not None:   # [1,22500,256] query_pos为bev_query的位置编码
            query = query + query_pos   # [1,22500,256],合并位置编码信息

        if not self.batch_first:    # 检查是否batch为第一个维度
            # change to (bs, num_query ,embed_dims),是则进行维度交换
            query = query.permute(1, 0, 2)
            value = value.permute(1, 0, 2)

        bs,  num_query, embed_dims = query.shape    # [1,22500,256]

        _, num_value, _ = value.shape   # [2,22500,256]

        assert (spatial_shapes[:, 0] * spatial_shapes[:, 1]).sum() == num_value

        assert self.num_bev_queue == 2

        query = torch.cat([value[:bs], query], -1)  # [1,22500,512], 拼接value和query的特征,没有想明白为啥这么做

        value = self.value_proj(value)              # [2,22500,256]  Linear(in_features=256, out_features=256, bias=True)

        if key_padding_mask is not None:
            value = value.masked_fill(key_padding_mask[..., None], 0.0)

        value = value.reshape(bs * self.num_bev_queue,num_value, self.num_heads, -1)   # [2,22500,8,32]

        sampling_offsets = self.sampling_offsets(query)             # [1,22500,128]  Linear(in_features=512, out_features=128, bias=True)

        sampling_offsets = sampling_offsets.view(                   # [1,22500,8,2,1,4,2]
            bs, num_query, self.num_heads,  self.num_bev_queue, self.num_levels, self.num_points, 2)    # [1,22500,8,2,1,4,2]

        # attention_weights的作用是用来进行加权求和的
        attention_weights = self.attention_weights(query).view(     # Linear(in_features=512, out_features=64, bias=True)
            bs, num_query,  self.num_heads, self.num_bev_queue, self.num_levels * self.num_points)      # [1,22500,512] -> [1,22500,64] -> [1,22500,8,2,4]      4其实就对应4个采样点

        # softmax之后,这个4其实就是一个概率分布值,就代表加权求和的概率
        attention_weights = attention_weights.softmax(-1)   # [1,22500,8,2,4]

        attention_weights = attention_weights.view(bs, num_query,
                                                   self.num_heads,
                                                   self.num_bev_queue,
                                                   self.num_levels,
                                                   self.num_points)     # [1,22500,8,2,1,4]

        attention_weights = attention_weights.permute(0, 3, 1, 2, 4, 5)\
            .reshape(bs*self.num_bev_queue, num_query, self.num_heads, self.num_levels, self.num_points).contiguous()   # [1,22500,8,2,1,4] -> [2,22500,8,1,4]   维度交换与合并

        sampling_offsets = sampling_offsets.permute(0, 3, 1, 2, 4, 5, 6)\
            .reshape(bs*self.num_bev_queue, num_query, self.num_heads, self.num_levels, self.num_points, 2)     # [1,22500,8,2,1,4,2] -> [2,22500,8,1,4,2]

        if reference_points.shape[-1] == 2: # 维度检查
            # 这边其实就是做了一个归一化处理
            offset_normalizer = torch.stack(    #[[150,150]]
                [spatial_shapes[..., 1], spatial_shapes[..., 0]], -1)       # [[150,150]] spatial_shapes的对应维度(通常是x和y方向上的空间大小)来计算的

            # 这里的reference_points是归一化0~1之后的2d参考点,因此sampling_offsets要想和其直接相加,也需要进行归一化到0~1之间
            # 通过将reference_points扩展维度(使用[:, :, None, :, None, :]),并加上sampling_offsets(可能是一些采样点相对于参考点的偏移量),
            # 然后除以offset_normalizer来计算的。这样做的目的是将偏移量标准化到空间尺寸上。
            # reference_points 的 shape [2,22500,1,2]
            sampling_locations = reference_points[:, :, None, :, None, :] \
                + sampling_offsets \
                / offset_normalizer[None, None, None, :, None, :]       #  [2,22500,8,1,4,2],


        elif reference_points.shape[-1] == 4:
            sampling_locations = reference_points[:, :, None, :, None, :2] \
                + sampling_offsets / self.num_points \
                * reference_points[:, :, None, :, None, 2:] \
                * 0.5
        else:
            raise ValueError(
                f'Last dim of reference_points must be'
                f' 2 or 4, but get {reference_points.shape[-1]} instead.')
        if torch.cuda.is_available() and value.is_cuda:

            # using fp16 deformable attention is unstable because it performs many sum operations 使用FP16(半精度浮点数)的Deformable Attention不稳定,这主要是由于在半精度浮点数表示下执行大量求和操作导致的。
            if value.dtype == torch.float16:
                MultiScaleDeformableAttnFunction = MultiScaleDeformableAttnFunction_fp32

            else:
                MultiScaleDeformableAttnFunction = MultiScaleDeformableAttnFunction_fp32

            output = MultiScaleDeformableAttnFunction.apply(
                value, spatial_shapes, level_start_index, sampling_locations,attention_weights, self.im2col_step)
        else:
            # value:[2,22500,256]
            # spatial_shapes:[[150,150]]
            # sampling_locations:[2,22500,8,1,4,2]
            # attention_weights:[1,22500,8,2,1,4]
            output = multi_scale_deformable_attn_pytorch(value, spatial_shapes, sampling_locations, attention_weights)

        # output shape (bs*num_bev_queue, num_query, embed_dims)
        # (bs*num_bev_queue, num_query, embed_dims)-> (num_query, embed_dims, bs*num_bev_queue)
        output = output.permute(1, 2, 0)    # [2,22500,256] -> [22500,256,2]

        # fuse history value and current value 融合历史值和当前值
        # (num_query, embed_dims, bs*num_bev_queue)-> (num_query, embed_dims, bs, num_bev_queue)
        output = output.view(num_query, embed_dims, bs, self.num_bev_queue) # [22500,256,1,2]
        output = output.mean(-1)            # [22500,256,1],对最后一个历史维度的信息求解平均值

        # (num_query, embed_dims, bs)-> (bs, num_query, embed_dims)
        output = output.permute(2, 0, 1)    # [1,22500,256]

        output = self.output_proj(output)   # [1,22500,256] Linear(in_features=256, out_features=256, bias=True)

        if not self.batch_first:
            output = output.permute(1, 0, 2)

        return self.dropout(output) + identity      # Dropout(p=0.1, inplace=False),identity也就是之前的bev_query
multi_scale_deformable_attn_pytorch函数
def multi_scale_deformable_attn_pytorch(value, value_spatial_shapes,
                                        sampling_locations, attention_weights):
    """CPU version of multi-scale deformable attention.

    Args:
        value (torch.Tensor): The value has shape
            (bs, num_keys, mum_heads, embed_dims//num_heads)
        value_spatial_shapes (torch.Tensor): Spatial shape of
            each feature map, has shape (num_levels, 2),
            last dimension 2 represent (h, w)
        sampling_locations (torch.Tensor): The location of sampling points,
            has shape
            (bs ,num_queries, num_heads, num_levels, num_points, 2),
            the last dimension 2 represent (x, y).
        attention_weights (torch.Tensor): The weight of sampling points used
            when calculate the attention, has shape
            (bs ,num_queries, num_heads, num_levels, num_points),

    Returns:
        torch.Tensor: has shape (bs, num_queries, embed_dims)
    """

    bs, _, num_heads, embed_dims = value.shape
    _, num_queries, num_heads, num_levels, num_points, _ =\
        sampling_locations.shape
    # 在第一个维度上进行拆分成list:其中每个元素shape:[b,hw, num_heads, embed_dims//num_heads]
    value_list = value.split([H_ * W_ for H_, W_ in value_spatial_shapes],
                             dim=1)
    # 后续用到的F.grid_sample函数所要求坐标为[-1,1],故需要做一次映射
    sampling_grids = 2 * sampling_locations - 1
    # 用来存储采样后的坐标
    sampling_value_list = []
    for level, (H_, W_) in enumerate(value_spatial_shapes):
        # bs, H_*W_, num_heads, embed_dims ->
        # bs, H_*W_, num_heads*embed_dims ->
        # bs, num_heads*embed_dims, H_*W_ ->
        # bs*num_heads, embed_dims, H_, W_
        value_l_ = value_list[level].flatten(2).transpose(1, 2).reshape(
            bs * num_heads, embed_dims, H_, W_)
        # bs, num_queries, num_heads, num_points, 2 ->
        # bs, num_heads, num_queries, num_points, 2 ->
        # bs*num_heads, num_queries, num_points, 2
        sampling_grid_l_ = sampling_grids[:, :, :,
                                          level].transpose(1, 2).flatten(0, 1)
        # 该函数value和grid均是4D,且二者第一个维度必须相等,
        # 最终采样后的特征图第一个维度一样,第二个维度跟value一样,
        # 第三四个维度跟采样点的维度一样
        # sampling_value_l_ = [bs*num_heads, embed_dims, num_queries, num_points]
        sampling_value_l_ = F.grid_sample(
            value_l_,           # [bs*num_heads, embed_dims, H_, W_]
            sampling_grid_l_,   # [bs*num_heads, num_queries, num_points, 2]
            mode='bilinear',
            padding_mode='zeros',
            align_corners=False)
        sampling_value_list.append(sampling_value_l_)
    # (bs, num_queries, num_heads, num_levels, num_points) ->
    # (bs, num_heads, num_queries, num_levels, num_points) ->
    # (bs, num_heads, 1, num_queries, num_levels*num_points)
    attention_weights = attention_weights.transpose(1, 2).reshape(
        bs * num_heads, 1, num_queries, num_levels * num_points)
    #将list的四个元素进行了堆叠,将对应元素相乘并在最后一个维度上进行求和
    # [bs*num_heads, embed_dims, num_queries, num_levels*num_points] *
    # (bs*num_heads, 1, num_queries, num_levels*num_points)
    output = (torch.stack(sampling_value_list, dim=-2).flatten(-2) *
              attention_weights).sum(-1).view(bs, num_heads * embed_dims,
                                              num_queries)
    return output.transpose(1, 2).contiguous()
2.3.6 Spatial Cross-Attention
2.3.6.1 原理:
Spatial Cross-Attention也就是空间注意力机制,其设计的初衷主要是将图像特征feat_flatten
和历史bev特征进行交互,代码中表示为图像特征key=[6,920,1,256],value=[6,920,1,256](key=value,key在代码中没有使用),历史bev特征[1,22500,256](由时间注意力模块传递下来的)。
在将交互之前,代码中其实还由一次降维操作,其目的就是为了节省GPU空间,由2.3.4小节不是构建了一个bev_mask吗,其shape为[6,1,22500,4],为了简化计算,统计出bev_mask中22500这个维度不为0的索引,之后queries_rebatch = query.new_zeros( [bs, self.num_cams, max_len, self.embed_dims]) 构建出一个shape为 [1,6,5336,256]全0张量; reference_points_rebatch = reference_points_cam.new_zeros( [bs, self.num_cams, max_len, D, 2]) ,构建出一个shape为 [1,6,5336,4,2]的全0张量,然后遍历原来的query和reference_points,将对其索引的值插入queries_rebatch( [1,6,5336,256])和reference_points_rebatch([1,6,5336,256])中。再对key和value进行reshape,使其维度变为[6,920,256]。最后进行self.deformable_attention操作。
剩下的步奏和Temporal Self-Attention一模一样,唯一区别的是采样点是8个。
2.3.6.2 代码:
    def forward(self,
                query,          # [1,22500,256]   历史bev特征
                key,            # [6,920,1,256]   feat_flatten key = value
                value,          # [6,920,1,256]   feat_flatten value = key
                residual=None,  # None
                query_pos=None, # None
                key_padding_mask=None,      # None
                reference_points=None,      # [1,4,22500,3]
                spatial_shapes=None,        # [[23,40]]
                reference_points_cam=None,  # [6,1,22500,4,2]
                bev_mask=None,              # [6,1,22500,4]
                level_start_index=None,     # ([0])
                flag='encoder',
                **kwargs):
        """Forward Function of Detr3DCrossAtten.
        Args:
            query (Tensor): Query of Transformer with shape (Transformer)的查询张量。其中num_query是查询的数量,bs是批次大小,embed_dims是嵌入的维度。
                (num_query, bs, embed_dims).
            key (Tensor): The key tensor with shape
                `(num_key, bs, embed_dims)`. 形状: (num_key, bs, embed_dims) 描述: 键张量,用于与查询进行注意力计算。
            value (Tensor): The value tensor with shape
                `(num_key, bs, embed_dims)`. (B, N, C, H, W)
            residual (Tensor): The tensor used for addition, with the   残差连接中使用的张量。如果为None,则使用query作为残差。
                same shape as `x`. Default None. If None, `x` will be used.
            query_pos (Tensor): The positional encoding for `query`.       查询的位置编码。
                Default: None.
            key_pos (Tensor): The positional encoding for  `key`. Default  键的位置编码。
                None.
            reference_points (Tensor):  The normalized reference           标准化参考点,用于3D检测中的锚框或预测框。
                points with shape (bs, num_query, 4),
                all elements is range in [0, 1], top-left (0,0),
                bottom-right (1, 1), including padding area.
                or (N, Length_{query}, num_levels, 4), add
                additional two dimensions is (w, h) to
                form reference boxes.
            key_padding_mask (Tensor): ByteTensor for `query`, with        用于指定key中哪些位置是填充的ByteTensor。
                shape [bs, num_key].
            spatial_shapes (Tensor): Spatial shape of features in          不同级别特征的空间形状,其中最后一个维度表示(h, w)。
                different level. With shape  (num_levels, 2),
                last dimension represent (h, w).
            level_start_index (Tensor): The start index of each level.     每个级别的起始索引。
                A tensor has shape (num_levels) and can be represented
                as [0, h_0*w_0, h_0*w_0+h_1*w_1, ...].
        Returns:
             Tensor: forwarded results with shape [num_query, bs, embed_dims].  经过跨注意力机制更新后的查询张量。
        """

        if key is None:     # 判断 key 是不是 None
            key = query
        if value is None:   # 判断 value 是不是 None
            value = key

        if residual is None:    # residual 残差连接中使用的张量。如果为None,则使用query作为残差。
            inp_residual = query               # [1,22500,256]
            slots = torch.zeros_like(query)    # [1,22500,256]  全 0
        if query_pos is not None:
            query = query + query_pos

        bs, num_query, _ = query.size()        # [1,22500,256]

        D = reference_points_cam.size(3)       # [6,1,22500,4,2] D=4
        indexes = []    # 里面保存的是非零的索引
        for i, mask_per_img in enumerate(bev_mask): # [1,22500,4], 遍历6个相机
            index_query_per_img = mask_per_img[0].sum(-1).nonzero().squeeze(-1) # [3525],先对数组进行切片,然后对最后一个维度求和,并返回不为零的索引
            indexes.append(index_query_per_img)
        max_len = max([len(each) for each in indexes])#5336,返回indexes中最长的非零索引

        # each camera only interacts with its corresponding BEV queries. This step can  greatly save GPU memory.
        queries_rebatch = query.new_zeros(
            [bs, self.num_cams, max_len, self.embed_dims])  # [1,6,5336,256]
        reference_points_rebatch = reference_points_cam.new_zeros(
            [bs, self.num_cams, max_len, D, 2])             # [1,6,5336,4,2]
        # 这段代码本质上就进行对 22500 进行降维
        # 这段代码的目的是将原始的query和reference_points_cam(参考点)数据重新组织到一个新的张量中,
        # 该张量仅包含与每个相机对应的非零索引处的查询和参考点。这是通过遍历批次(batch)中的每个元素(每个图像)和每个相机来完成的。
        for j in range(bs):
            for i, reference_points_per_img in enumerate(reference_points_cam):
                index_query_per_img = indexes[i]
                queries_rebatch[j, i, :len(index_query_per_img)] = query[j, index_query_per_img]
                reference_points_rebatch[j, i, :len(index_query_per_img)] = reference_points_per_img[j, index_query_per_img]

        num_cams, l, bs, embed_dims = key.shape     # [6,920,256]

        key = key.permute(2, 0, 1, 3).reshape(      # [6,920,256]   key=value,都是图像特征
            bs * self.num_cams, l, self.embed_dims)
        value = value.permute(2, 0, 1, 3).reshape(  # [6,920,256]   value=key,都是图像特征
            bs * self.num_cams, l, self.embed_dims)
        # queries_rebatch[1,6,5336,256],reference_points_rebatch[1,6,5336,4,2]
        queries = self.deformable_attention(query=queries_rebatch.view(bs*self.num_cams, max_len, self.embed_dims), key=key, value=value,
                                            reference_points=reference_points_rebatch.view(bs*self.num_cams, max_len, D, 2), spatial_shapes=spatial_shapes,
                                            level_start_index=level_start_index).view(bs, self.num_cams, max_len, self.embed_dims)  # [1,6,5336,256]
        for j in range(bs):
            for i, index_query_per_img in enumerate(indexes):
                # 加上位置编码,并且还原从5336还原到22500
                slots[j, index_query_per_img] += queries[j, i, :len(index_query_per_img)]   # slots [1,22500,256]

        count = bev_mask.sum(-1) > 0
        count = count.permute(1, 2, 0).sum(-1)
        count = torch.clamp(count, min=1.0)
        slots = slots / count[..., None] # 归一化
        slots = self.output_proj(slots)     # [1,22500,256]   Linear(in_features=256, out_features=256, bias=True)

        return self.dropout(slots) + inp_residual
queries = self.deformable_attention函数
    def forward(self,
                query,          # [6,5336,256]
                key=None,       # [6,920, 256], key = value 都表示图像特征
                value=None,     # [6,920, 256], value = key 都表示图像特征
                identity=None,          # None
                query_pos=None,         # None
                key_padding_mask=None,  # None
                reference_points=None,  # [6,5336,4,2]
                spatial_shapes=None,    # [[23,40]]
                level_start_index=None, # [[0]]
                **kwargs):
        """Forward Function of MultiScaleDeformAttention.
        Args:
            query (Tensor): Query of Transformer with shape
                ( bs, num_query, embed_dims).
            key (Tensor): The key tensor with shape
                `(bs, num_key,  embed_dims)`.
            value (Tensor): The value tensor with shape
                `(bs, num_key,  embed_dims)`.
            identity (Tensor): The tensor used for addition, with the
                same shape as `query`. Default None. If None,
                `query` will be used.
            query_pos (Tensor): The positional encoding for `query`.
                Default: None.
            key_pos (Tensor): The positional encoding for `key`. Default
                None.
            reference_points (Tensor):  The normalized reference
                points with shape (bs, num_query, num_levels, 2),
                all elements is range in [0, 1], top-left (0,0),
                bottom-right (1, 1), including padding area.
                or (N, Length_{query}, num_levels, 4), add
                additional two dimensions is (w, h) to
                form reference boxes.
            key_padding_mask (Tensor): ByteTensor for `query`, with
                shape [bs, num_key].
            spatial_shapes (Tensor): Spatial shape of features in
                different levels. With shape (num_levels, 2),
                last dimension represents (h, w).
            level_start_index (Tensor): The start index of each level.
                A tensor has shape ``(num_levels, )`` and can be represented
                as [0, h_0*w_0, h_0*w_0+h_1*w_1, ...].
        Returns:
             Tensor: forwarded results with shape [num_query, bs, embed_dims].
        """

        if value is None:           #
            value = query
        if identity is None:        #
            identity = query
        if query_pos is not None:   #
            query = query + query_pos

        if not self.batch_first:        # 如果batch不是第一个维度,就交换维度
            # change to (bs, num_query ,embed_dims)
            query = query.permute(1, 0, 2)  # [6,5336,256]
            value = value.permute(1, 0, 2)  # [6,920 ,256]

        bs, num_query, _ = query.shape   # [6,5336,256]
        bs, num_value, _ = value.shape   # [6,920 ,256]
        assert (spatial_shapes[:, 0] * spatial_shapes[:, 1]).sum() == num_value

        value = self.value_proj(value)   # [6,920,256]   Linear(in_features=256, out_features=256, bias=True)

        if key_padding_mask is not None:
            value = value.masked_fill(key_padding_mask[..., None], 0.0)

        value = value.view(bs, num_value, self.num_heads, -1) # [6,920,8,32]

        sampling_offsets = self.sampling_offsets(query).view(   # [6,5336,8,1,8,2] Linear(in_features=256, out_features=128, bias=True)
            bs, num_query, self.num_heads, self.num_levels, self.num_points, 2)

        attention_weights = self.attention_weights(query).view( # [6,5336,8,8]     Linear(in_features=256, out_features=64, bias=True)
            bs, num_query, self.num_heads, self.num_levels * self.num_points)

        attention_weights = attention_weights.softmax(-1)       # [6,5336,8,8]

        attention_weights = attention_weights.view(bs, num_query,
                                                   self.num_heads,
                                                   self.num_levels,
                                                   self.num_points)     # [6,5336,8,1,8]

        if reference_points.shape[-1] == 2:
            """
            For each BEV query, it owns `num_Z_anchors` in 3D space that having different heights.
            After proejcting, each BEV query has `num_Z_anchors` reference points in each 2D image.
            For each referent point, we sample `num_points` sampling points.
            For `num_Z_anchors` reference points,  it has overall `num_points * num_Z_anchors` sampling points.
            """
            offset_normalizer = torch.stack(
                [spatial_shapes[..., 1], spatial_shapes[..., 0]], -1)   # [[40,23]]

            bs, num_query, num_Z_anchors, xy = reference_points.shape   # [6,5336,4,2]

            # [num_cams, num_query, 1, 1, 1, num_Z_anchors, xy]
            # num_Z_anchors == num_pillar
            reference_points = reference_points[:, :, None, None, None, :, :]   # [6,5336,1,1,1,4,2]

            sampling_offsets = sampling_offsets / \
                offset_normalizer[None, None, None, :, None, :]     # [6,5336,8,1,8,2]  在第4和第6个维度上做了一个归一化

            # TODO: num_level 和 fpn 的层数是否有关系
            bs, num_query, num_heads, num_levels, num_all_points, xy = sampling_offsets.shape  # [6,5336,8,1,8,2]
            # 6    5336        8          1              8        2

            sampling_offsets = sampling_offsets.view(
                bs, num_query, num_heads, num_levels, num_all_points // num_Z_anchors, num_Z_anchors, xy)   # [6,5336,8,1,2,4,2]
            #    6      5336        8          1                      2                      4         2

            sampling_locations = reference_points + sampling_offsets    # [6,5336,8,1,2,4,2]

            bs, num_query, num_heads, num_levels, num_points, num_Z_anchors, xy = sampling_locations.shape

            assert num_all_points == num_points * num_Z_anchors

            sampling_locations = sampling_locations.view(
                bs, num_query, num_heads, num_levels, num_all_points, xy)       # [6,5336,8,1,8,2]

        elif reference_points.shape[-1] == 4:
            assert False
        else:
            raise ValueError(
                f'Last dim of reference_points must be'
                f' 2 or 4, but get {reference_points.shape[-1]} instead.')

        #  sampling_locations.shape: bs, num_query, num_heads, num_levels, num_all_points, 2
        #  attention_weights.shape: bs, num_query, num_heads, num_levels, num_all_points
        #

        if torch.cuda.is_available() and value.is_cuda:

            if value.dtype == torch.float16:
                MultiScaleDeformableAttnFunction = MultiScaleDeformableAttnFunction_fp32

            else:
                MultiScaleDeformableAttnFunction = MultiScaleDeformableAttnFunction_fp32

            output = MultiScaleDeformableAttnFunction.apply(
                value, spatial_shapes, level_start_index, sampling_locations,
                attention_weights, self.im2col_step)

        else:
            # value:[6,920,8,32]
            # spatial_shapes:[[40,23]]
            # sampling_locations:[6,5336,8,1,8,2]   对于一个pillar来说有8个采样点
            # attention_weights:[6,5336,8,1,8]
            output = multi_scale_deformable_attn_pytorch(
                value, spatial_shapes, sampling_locations, attention_weights)   # [6,5336,256]

        if not self.batch_first:
            output = output.permute(1, 0, 2)

        return output
2.3.7 Deformable Attention Module
2.3.7.1 原理:
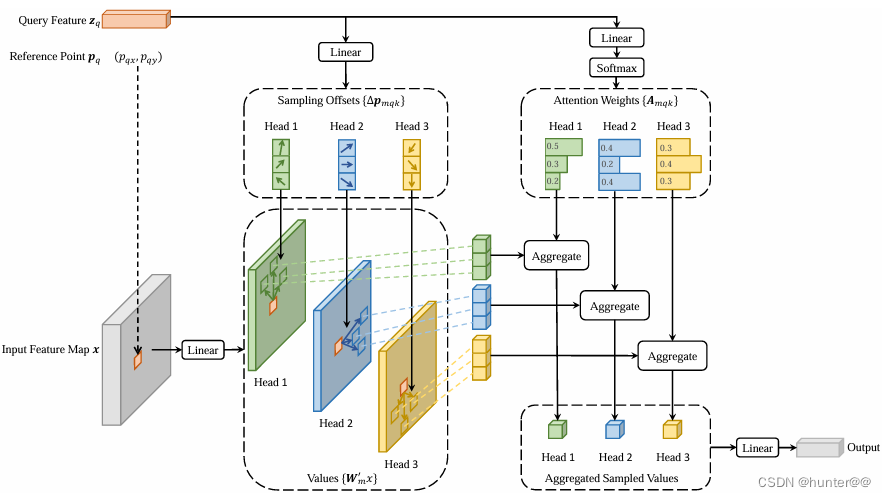
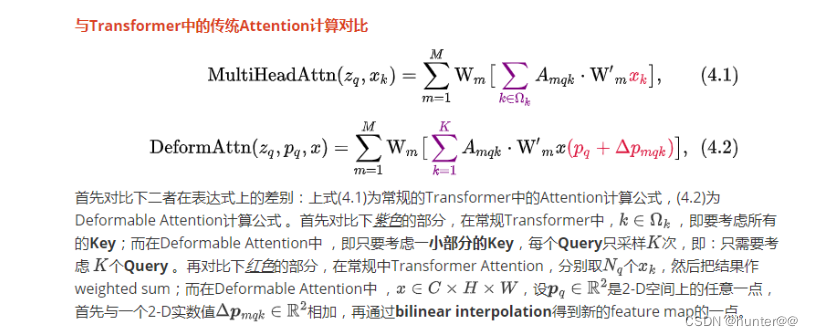
2.4 Decoder
这部分很重要,建议大家去看一下DETR3D,感觉BEVFormer的decoder结构基本和DETR3D中的decoder结构一样,但是为啥这么做值得仔细研究一下(本人也没有看,看不懂,不知道为啥这么做)。
3、其他
参考
环境配置参考:
BEV环视感知算法从环境部署开始_bev 环视感知从环境部署开始-CSDN博客
BEVFormer代码复现实践_bevformer复现-CSDN博客
论文讲解参考:
可变形注意力参考
详解可变形注意力模块(Deformable Attention Module)-CSDN博客
【通俗易懂】详解torch.nn.functional.grid_sample函数:可实现对特征图的水平/垂直翻转_gridsample-CSDN博客


 399
399

 被折叠的 条评论
为什么被折叠?
被折叠的 条评论
为什么被折叠?
 到【灌水乐园】发言


