


目录
前言
此次仅在Windows 10上进行测试,理论上其它版本Win系统以及Mac、Linux系统经可使用,本例程仅供参考。
硬件介绍
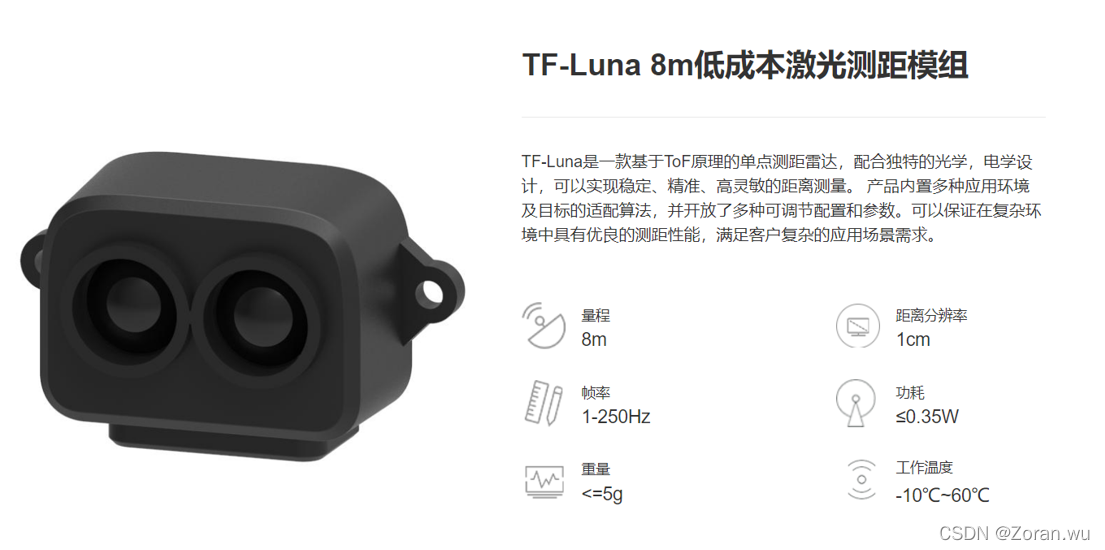
TF-Luna 简要说明
链接:https://blog.csdn.net/zoran_wu/article/details/121850480
【WiFi LoRa 32 (V2)】硬件介绍
WiFi LoRa 32 是 Heltec Automation™ 设计和生产的经典物联网开发板,它是基于 ESP32 + SX127x 的高度集成产品,具有 Wi-Fi、BLE、LoRa 功能,以及锂电池管理系统, 0.96 英寸 OLED 也包括在内。
官方资料请参考:https://heltec.org/project/wifi-lora-32/
产品图片

技术参数介绍

电气参数介绍

引脚定义介绍

【WiFi LoRa 32 (V2)】基于Arduino IDE编译环境搭建
环境编译环境可以参考官网:https://heltec-automation.readthedocs.io/zh_CN/latest/esp32/quick_start.html
实际有两种方式,官网都有比较详细的教程(推荐直接Arduino IDE安装)
- 通过Arduino IDE(推荐)
- 通过Git
前置说明
-
已经安装Arduino IDE,此部分可以参考Arduino官网说明。
链接:https://www.arduino.cc/en/software -
确定WiFi LoRa 32 (V2)与电脑已经建立串行连接(开发板已经接到电脑USB口),如下图,串行芯片使用的是CP210X,如果还未正常安装,请参考Heltec教程说明:
链接:https://heltec-automation.readthedocs.io/zh_CN/latest/general/establish_serial_connection.html#for-windows

通过Arduino IDE进行环境搭建
下载Arduino-ESP32开发环境支持
- 打开”Arduino IDE”, 依次点击File->Peferences ,在settings中修改”Board Manager URLs”。
- 输入最新的ESP32 package URL:
https://github.com/Heltec-Aaron-Lee/WiFi_Kit_series/releases/download/0.0.5/package_heltec_esp32_index.json - 依次点击Tools --> Board --> Boards Manager…,在新弹出的对话框中搜索“Heltec
ESP32”,然后选择最新版本下载。 - Heltec
ESP系列(ESP32和ESP8266)框架的源代码:https://github.com/Heltec-Aaron-Lee/WiFi_Kit_series
操作流程
下载Heltec ESP32库
- 打开”Arduino IDE”,依次点击 Sketch->Include Library->Manage
Libraries…,在新弹出的对话框中搜索“Heltec ESP32”,选择最新版本下载。 - Heltec ESP32库的源代码:https://github.com/HelTecAutomation/Heltec_ESP32
操作流程
【WiFi LoRa 32 (V2)】测试
此部分用于验证是否可以使用Arduino编程。现在,用Micro-USB数据线将Heltec ESP32开发板连接到电脑,然后选择连接到Heltec ESP32开发板的串行端口。
- 在“工具”菜单中正确选择开发板和相关选项:
- 然后选择一个例程,例如XXXXXX_FactoryTest.ino
- 编译并上传
操作流程

测试图
北醒TF-luna(TTL)协议说明
详细可参考北醒官网最新使用说明书:
http://www.benewake.com/
串口通讯协议说明
串口数据通讯协议

数据格式及编码解释

输出数据说明
- Dist(Distance):代表测量输出的距离值,默认单位为 cm
- Strength:指信号强度,默认输出值会在 0-65535 之间。当测距档位一定时,测距越远,信号强度越低;目标物反射率越低,信号强度越低。
- Temp(Temperature):表征芯片内部温度值。摄氏度 = Temp / 8 - 256
接口定义说明

注:详细请参考官方使用说明书
接线图
从机接线

注:主机直接接电脑即可
例程
从机雷达数据采集及接收例程
/******************************************************************************
     @file    main.c
     @author  zoran.wu
     @version V1.0.0
     @date    2021-02-19
     @brief   此文件包含关于ESP32从机设定和北醒TF系列雷达数据读取
******************************************************************************
     @attention
******************************************************************************
*/
/* Includes ------------------------------------------------------------------*/
#include "heltec.h"           //ESP32 LORA(V2)库文件
#define BAND    433E6         //设定无线频率 you can set band here directly,e.g. 868E6,915E6

byte localAddress = 0xFD;     //设定本机地址 address of this device
byte destination = 0xBB;      //设定主机地址 destination to send to
byte msgCount = 0;            // count of outgoing messages

/*设定雷达数据存放的结构*/
typedef struct {
  int distance;        //雷达距离值
  int strength;        //雷达的信号强度值
  int temp;            //雷达的芯片温度
  boolean receiveComplete;
} TF;

int count = 0;

TF Lidar1 = {0, 0, 0, false};

void setup() {
  /*库文件里面包含设定串口的配置,默认波特率115200,8N1数据格式*/
  Heltec.begin(true /*DisplayEnable Enable*/, true /*Heltec.LoRa Enable*/, true /*Serial Enable*/, true /*PABOOST Enable*/, BAND /*long BAND*/);

  /*Serial1.begin(unsigned long baud, uint32_t config, int8_t rxPin, int8_t txPin, bool invert)
    The txPin & rxPin can set to any output pin */
  Serial1.begin(115200, SERIAL_8N1, 22, 23);
}

void loop() {
  while (!Lidar1.receiveComplete) {
    getLidarData(&Lidar1);
    /*经过测试,速度太快主机接收异常,异常原因为发送库程序时间太长,此部分加一个获取多次数据后发一次*/
    if (Lidar1.receiveComplete) {
      count++;
      if (count > 50) {
        count = 0;
        sendMessage();
      }
      Lidar1.receiveComplete = false;
      Serial.print("Distance: ");
      Serial.println(String(Lidar1.distance, DEC) + "cm ");
    }
  }
}

void getLidarData(TF* Lidar) {
  static char i = 0;
  char j = 0;
  int checksum = 0;
  static int rx[9];

  if (Serial1.available()) {
    rx[i] = Serial1.read();
    if (rx[0] != 0x59) {
      i = 0;
    } else if (i == 1 && rx[1] != 0x59) {
      i = 0;
    } else if (i == 8) {
      for (j = 0; j < 8; j++) {
        checksum += rx[j];
      }
      if (rx[8] == (checksum % 256)) {
        Lidar->distance = rx[2] + rx[3] * 256;
        Lidar->strength = rx[4] + rx[5] * 256;
        Lidar->temp = (rx[6] + rx[7] * 256) / 8 - 256;
        Lidar->receiveComplete = true;
      }
      i = 0;
    } else {
      i++;
    }
  }
}
void sendMessage() {
  String SendMessage1 = "";
  LoRa.beginPacket();                   // start packet
  LoRa.write(destination);              // add destination address
  LoRa.write(localAddress);             // add sender address
  SendMessage1 = "Distance: " + String(Lidar1.distance);
  LoRa.write(SendMessage1.length());        // add payload length
  LoRa.print(SendMessage1);                 // add payload
  LoRa.endPacket();                     // finish packet and send it
}
从机串口打印雷达数据

主机接收例程
/******************************************************************************
     @file    main.c
     @author  zoran.wu
     @version V1.0.0
     @date    2021-02-19
     @brief   此文件包含关于ESP32主机接收部分
******************************************************************************
     @attention
******************************************************************************
*/
/* Includes ------------------------------------------------------------------*/
#include "heltec.h"

#define BAND    433E6  //you can set band here directly,e.g. 868E6,915E6

String outgoing;              // outgoing message

byte localAddress = 0xBB;     // address of this device
byte destination = 0xFD;      // destination to send to

byte msgCount = 0;            // count of outgoing messages
long lastSendTime = 0;        // last send time
int interval = 2000;          // interval between sends

void setup()
{
   //WIFI Kit series V1 not support Vext control
  Heltec.begin(true /*DisplayEnable Enable*/, true /*Heltec.LoRa Enable*/, true /*Serial Enable*/, true /*PABOOST Enable*/, BAND /*long BAND*/);

  Serial.println("Heltec.LoRa Duplex");
}

void loop()
{
  // parse for a packet, and call onReceive with the result:
  onReceive(LoRa.parsePacket());
}

void onReceive(int packetSize)
{
  if (packetSize == 0) return;          // if there's no packet, return

  // read packet header bytes:
  int recipient = LoRa.read();          // recipient address
  byte sender = LoRa.read();            // sender address
  byte incomingLength = LoRa.read();    // incoming msg length

  String incoming = "";

  while (LoRa.available())
  {
    incoming += (char)LoRa.read();
  }

  if (incomingLength != incoming.length())
  {   // check length for error
    Serial.println("error: message length does not match length");
    return;                             // skip rest of function
  }

  // if the recipient isn't this device or broadcast,
  if (recipient != localAddress && recipient != 0xFF) {
    Serial.println("This message is not for me.");
    return;                             // skip rest of function
  }

  // if message is for this device, or broadcast, print details:
  Serial.println("Received from: 0x" + String(sender, HEX));
  Serial.println("Sent to: 0x" + String(recipient, HEX));
  Serial.println("Message length: " + String(incomingLength));
  Serial.println("Message: " + incoming);
  Serial.println();
}
主机接收到从机数据后打印


 3753
3753


 被折叠的 条评论
为什么被折叠?
被折叠的 条评论
为什么被折叠?
 到【灌水乐园】发言


