


简单使用
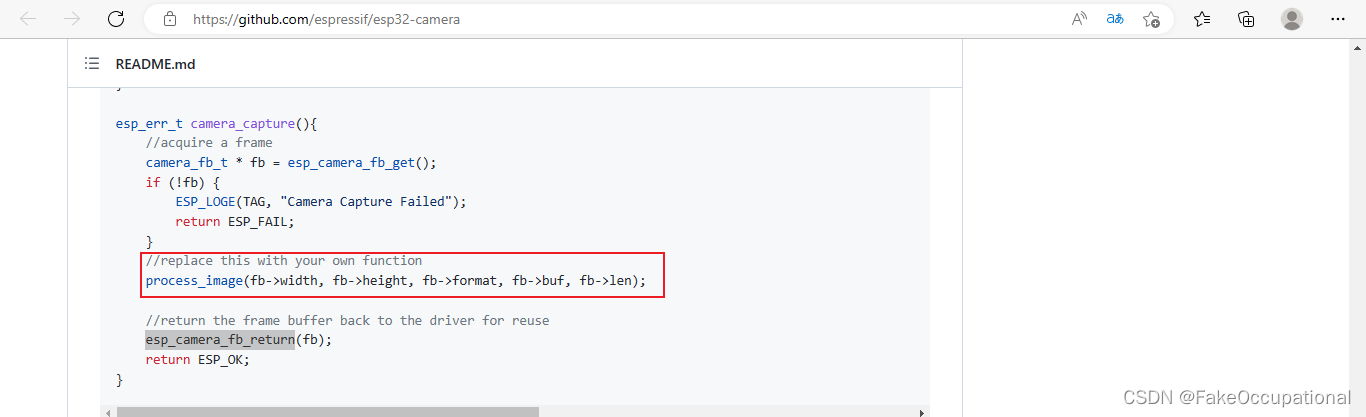
- 去github官方看看camera是如何调用的,按照官方的提示进行简单的修改
Serial.println(fb->len); //Serial.println(fb->width); Serial.println(fb->height);Serial.println(fb->format);
全部代码
#include "esp_camera.h"
#define PWDN_GPIO_NUM 32
#define RESET_GPIO_NUM -1
#define XCLK_GPIO_NUM 0
#define SIOD_GPIO_NUM 26
#define SIOC_GPIO_NUM 27
#define Y9_GPIO_NUM 35
#define Y8_GPIO_NUM 34
#define Y7_GPIO_NUM 39
#define Y6_GPIO_NUM 36
#define Y5_GPIO_NUM 21
#define Y4_GPIO_NUM 19
#define Y3_GPIO_NUM 18
#define Y2_GPIO_NUM 5
#define VSYNC_GPIO_NUM 25
#define HREF_GPIO_NUM 23
#define PCLK_GPIO_NUM 22
static camera_config_t camera_config = {
.pin_pwdn = PWDN_GPIO_NUM,
.pin_reset = RESET_GPIO_NUM,
.pin_xclk = XCLK_GPIO_NUM,
.pin_sscb_sda = SIOD_GPIO_NUM,
.pin_sscb_scl = SIOC_GPIO_NUM,
.pin_d7 = Y9_GPIO_NUM,
.pin_d6 = Y8_GPIO_NUM,
.pin_d5 = Y7_GPIO_NUM,
.pin_d4 = Y6_GPIO_NUM,
.pin_d3 = Y5_GPIO_NUM,
.pin_d2 = Y4_GPIO_NUM,
.pin_d1 = Y3_GPIO_NUM,
.pin_d0 = Y2_GPIO_NUM,
.pin_vsync = VSYNC_GPIO_NUM,
.pin_href = HREF_GPIO_NUM,
.pin_pclk = PCLK_GPIO_NUM,
//XCLK 20MHz or 10MHz for OV2640 double FPS (Experimental)
.xclk_freq_hz = 20000000,
.ledc_timer = LEDC_TIMER_0,
.ledc_channel = LEDC_CHANNEL_0,
.pixel_format = PIXFORMAT_RGB565,//YUV422,GRAYSCALE,RGB565,JPEG
.frame_size = FRAMESIZE_QQVGA,//QQVGA-QXGA Do not use sizes above QVGA when not JPEG
.jpeg_quality = 12, //0-63 lower number means higher quality
.fb_count = 1 //if more than one, i2s runs in continuous mode. Use only with JPEG
};
esp_err_t camera_init(){
//initialize the camera
esp_err_t err = esp_camera_init(&camera_config);
if (err != ESP_OK) {
Serial.print("Camera Init Failed");
return err;
}
return ESP_OK;
}
esp_err_t camera_capture(){
uint8_t * buf = NULL;
size_t buf_len = 0;
//acquire a frame
camera_fb_t * fb = esp_camera_fb_get();
if (!fb) {
Serial.print("Camera Capture Failed");
return ESP_FAIL;
}
Serial.println(fb->len); //Serial.println(fb->width); Serial.println(fb->height);Serial.println(fb->format);
esp_camera_fb_return(fb);
return ESP_OK;
}
void setup() {
Serial.begin(115200);
camera_init(); //摄像头初始化
camera_capture(); //摄像头获取图像
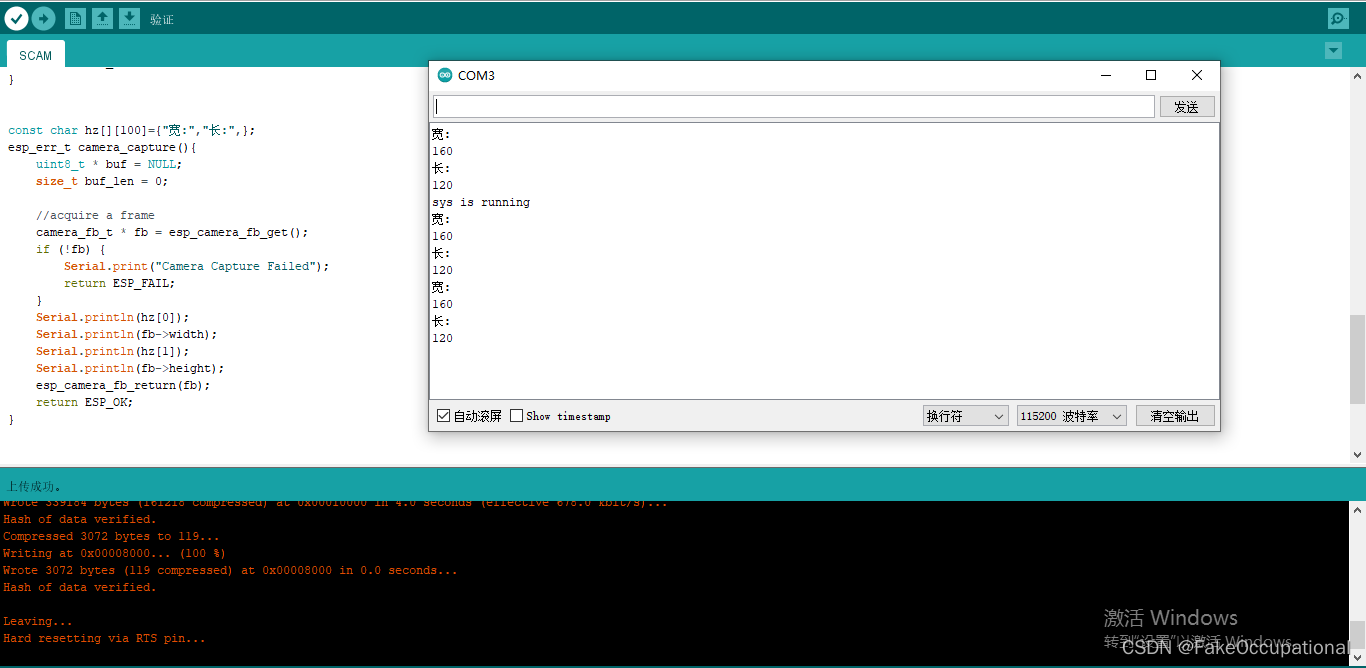
Serial.println("sys is running");
}
void loop() {
camera_capture();
}
效果
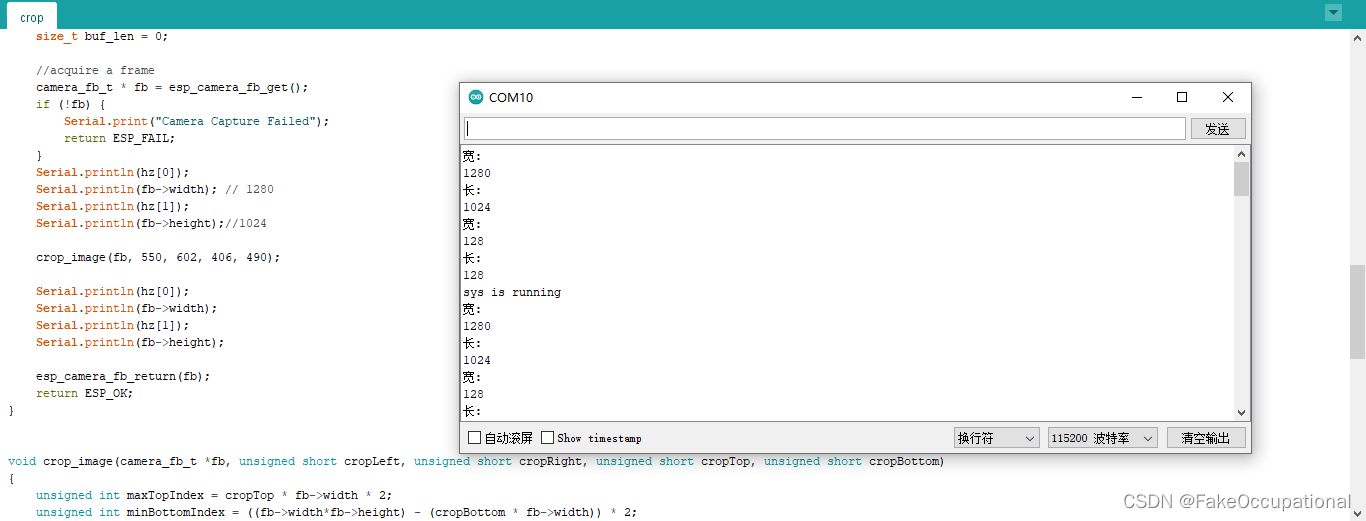
crop
#include "esp_camera.h"
#include "stream.h"

#define PWDN_GPIO_NUM     32
#define RESET_GPIO_NUM    -1
#define XCLK_GPIO_NUM      0
#define SIOD_GPIO_NUM     26
#define SIOC_GPIO_NUM     27

#define Y9_GPIO_NUM       35
#define Y8_GPIO_NUM       34
#define Y7_GPIO_NUM       39
#define Y6_GPIO_NUM       36
#define Y5_GPIO_NUM       21
#define Y4_GPIO_NUM       19
#define Y3_GPIO_NUM       18
#define Y2_GPIO_NUM        5
#define VSYNC_GPIO_NUM    25
#define HREF_GPIO_NUM     23
#define PCLK_GPIO_NUM     22


static camera_config_t camera_config = {
    .pin_pwdn  = PWDN_GPIO_NUM,
    .pin_reset = RESET_GPIO_NUM,
    .pin_xclk = XCLK_GPIO_NUM,
    .pin_sscb_sda = SIOD_GPIO_NUM,
    .pin_sscb_scl = SIOC_GPIO_NUM,

    .pin_d7 = Y9_GPIO_NUM,
    .pin_d6 = Y8_GPIO_NUM,
    .pin_d5 = Y7_GPIO_NUM,
    .pin_d4 = Y6_GPIO_NUM,
    .pin_d3 = Y5_GPIO_NUM,
    .pin_d2 = Y4_GPIO_NUM,
    .pin_d1 = Y3_GPIO_NUM,
    .pin_d0 = Y2_GPIO_NUM,
    .pin_vsync = VSYNC_GPIO_NUM,
    .pin_href = HREF_GPIO_NUM,
    .pin_pclk = PCLK_GPIO_NUM,

    //XCLK 20MHz or 10MHz for OV2640 double FPS (Experimental)
    .xclk_freq_hz = 20000000,
    .ledc_timer = LEDC_TIMER_0,
    .ledc_channel = LEDC_CHANNEL_0,

    .pixel_format = PIXFORMAT_RGB565,//YUV422,GRAYSCALE,RGB565,JPEG
    .frame_size = FRAMESIZE_SXGA,//QQVGA-QXGA Do not use sizes above QVGA when not JPEG

    .jpeg_quality = 12, //0-63 lower number means higher quality
    .fb_count = 1 //if more than one, i2s runs in continuous mode. Use only with JPEG
};

esp_err_t camera_init(){
    //initialize the camera
    esp_err_t err = esp_camera_init(&camera_config);
    if (err != ESP_OK) {
        Serial.print("Camera Init Failed");
        return err;
    }
    return ESP_OK;
}


const char hz[][100]={"宽:","长:",};
esp_err_t camera_capture(){
    uint8_t * buf = NULL;
    size_t buf_len = 0;

    //acquire a frame
    camera_fb_t * fb = esp_camera_fb_get();
    if (!fb) {
        Serial.print("Camera Capture Failed");
        return ESP_FAIL;
    }
    Serial.println(hz[0]);
    Serial.println(fb->width); // 1280
    Serial.println(hz[1]);
    Serial.println(fb->height);//1024

    crop_image(fb, 550, 602, 406, 490);

    Serial.println(hz[0]);
    Serial.println(fb->width);
    Serial.println(hz[1]);
    Serial.println(fb->height);

    esp_camera_fb_return(fb);
    return ESP_OK;
}


void crop_image(camera_fb_t *fb, unsigned short cropLeft, unsigned short cropRight, unsigned short cropTop, unsigned short cropBottom)
{
    unsigned int maxTopIndex = cropTop * fb->width * 2;
    unsigned int minBottomIndex = ((fb->width*fb->height) - (cropBottom * fb->width)) * 2;
    unsigned short maxX = fb->width - cropRight; // In pixels
    unsigned short newWidth = fb->width - cropLeft - cropRight;
    unsigned short newHeight = fb->height - cropTop - cropBottom;
    size_t newJpgSize = newWidth * newHeight *2;

    unsigned int writeIndex = 0;
    // Loop over all bytes
    for(int i = 0; i < fb->len; i+=2){
        // Calculate current X, Y pixel position
        int x = (i/2) % fb->width;

        // Crop from the top
        if(i < maxTopIndex){ continue; }

        // Crop from the bottom
        if(i > minBottomIndex){ continue; }

        // Crop from the left
        if(x <= cropLeft){ continue; }

        // Crop from the right
        if(x > maxX){ continue; }

        // If we get here, keep the pixels
        fb->buf[writeIndex++] = fb->buf[i];
        fb->buf[writeIndex++] = fb->buf[i+1];
    }

    // Set the new dimensions of the framebuffer for further use.
    fb->width = newWidth;
    fb->height = newHeight;
    fb->len = newJpgSize;
}


void setup() {
  Serial.begin(115200);
  camera_init();    //摄像头初始化
  camera_capture();  //摄像头获取图像
  Serial.println("sys is running");
}

void loop() {
  camera_capture();
}
# utf-8

import tensorflow as tf
import numpy as np
import pandas as pd
import matplotlib as mpl
import matplotlib.pyplot as plt
import os

from tensorflow import keras
import sys
import cv2


print(tf.__version__)
print(sys.version_info)
for module in mpl, pd, np, keras:
    print(module.__name__, module.__version__)

# set path
train_dir = './input/train'
valid_dir = './input/validation'
test_dir = './input/test'

# set para
height = 1280
width = 1024
channel = 3
batch_size = 64
valid_batch_size = 64
num_classes = 2
epochs = 1


# train model
def trainModel(model, train_generator, valid_generator, callbacks):
    history = model.fit(
        train_generator,
        epochs=epochs,
        validation_data = valid_generator,
        callbacks = callbacks
    )
    return history

# show the changes of loss and accuracy during training
def plot_learning_curves(history, label, epochs, min_value, max_value):
    data = {}
    data[label] = history.history[label]
    data['val_' + label] = history.history['val_' + label]
    pd.DataFrame(data).plot(figsize=(8, 5))
    plt.grid(True)
    plt.axis([0, epochs, min_value, max_value])
    plt.show()


# use the model after finish training to classify images and save them into two different folders
def predictModel(model, output_model_file):

    # load the weights of model
    model.load_weights(output_model_file)

    os.makedirs('./save', exist_ok=True)
    os.makedirs('./save/cat', exist_ok=True)
    os.makedirs('./save/dog', exist_ok=True)

    test_dir = './input/test1/'  # 1-12500.jpg
    for i in range(1, 12500):
        img_name = test_dir + '{}.jpg'.format(i)
        img = cv2.imread(img_name)
        img = cv2.resize(img, (width, height))
        img_arr = img / 255.0
        img_arr = img_arr.reshape((1, width, height, 3))
        pre = model.predict(img_arr)
        if pre[0][0] > pre[0][1]:
            cv2.imwrite('./save/cat/' + '{}.jpg'.format(i), img)
            print(img_name, ' is classified as Cat.')
        else:
            cv2.imwrite('./save/dog/' + '{}.jpg'.format(i), img)
            print(img_name, ' is classified as Dog.')


if __name__ ==  '__main__':

    print('Start importing data...')

    # import the data and make a augmentation
    train_datagen = keras.preprocessing.image.ImageDataGenerator(
        rescale=1,#. / 255, todo
        rotation_range=40,
        width_shift_range=0.2,
        height_shift_range=0.2,
        shear_range=0.2,
        zoom_range=0.2,
        horizontal_flip=True,
        fill_mode='nearest',
    )

    train_generator = train_datagen.flow_from_directory(
        train_dir,
        target_size=(width, height),
        batch_size=batch_size,
        seed=7,
        shuffle=True,
        class_mode='categorical'
    )

    valid_datagen = keras.preprocessing.image.ImageDataGenerator(
        rescale=1. / 255,
    )

    valid_generator = valid_datagen.flow_from_directory(
        valid_dir,
        target_size=(width, height),
        batch_size=valid_batch_size,
        seed=7,
        shuffle=False,
        class_mode="categorical"
    )


    train_num = train_generator.samples
    valid_num = valid_generator.samples
    # print(train_num, valid_num)

    print('Building model...')

    # Build model
    model = keras.models.Sequential([
        keras.layers.MaxPool2D(pool_size=4,
                            input_shape=[width, height, channel]),
        keras.layers.Conv2D(filters=32, kernel_size=3,
                            padding='valid', activation='relu'),
        keras.layers.MaxPool2D(pool_size=4),
        keras.layers.Conv2D(filters=32, kernel_size=3,
                            padding='valid', activation='relu'),
        keras.layers.MaxPool2D(pool_size=2),

        # keras.layers.Conv2D(filters=64, kernel_size=3,
        #                     padding='same', activation='relu'),
        # keras.layers.Conv2D(filters=64, kernel_size=3,
        #                     padding='same', activation='relu'),
        # keras.layers.MaxPool2D(pool_size=2),

        keras.layers.Conv2D(filters=12, kernel_size=3,
                            padding='same', activation='relu'),
        keras.layers.Conv2D(filters=12, kernel_size=3,
                            padding='same', activation='relu'),
        keras.layers.MaxPool2D(pool_size=2),

        keras.layers.Flatten(),
        keras.layers.Dense(4, activation='relu'),
        keras.layers.Dense(num_classes, activation='softmax')
    ])

    model.compile(loss='categorical_crossentropy',
                  optimizer='adam', metrics=['accuracy'])
    model.summary()

    # set path of saving model
    logdir = './graph_def_and_weights'
    if not os.path.exists(logdir):
        os.mkdir(logdir)

    output_model_file = os.path.join(logdir,
                                     "catDog_weights.h5")


    print('Start training ...')
    # start training

    mode = '1' #input('Select mode: 1.Train 2.Predict\nInput number: ')
    if mode == '1':
        callbacks = [
            keras.callbacks.TensorBoard(logdir),
            keras.callbacks.ModelCheckpoint(output_model_file,
                                            save_best_only=True,
                                            save_weights_only=True),
            keras.callbacks.EarlyStopping(patience=5, min_delta=1e-3)
        ]
        history = trainModel(model, train_generator, valid_generator, callbacks)
        plot_learning_curves(history, 'accuracy', epochs, 0, 1)
        plot_learning_curves(history, 'loss', epochs, 0, 5)
    elif mode == '2':
        # Only run this mode if you have already finished training your model and saved it.
        predictModel(model, output_model_file)
    else:
        print('Please input the correct number.')

    print('Finish! Exit.')

    # Convertir modelo al formato tensorflow lite
    converter = tf.lite.TFLiteConverter.from_keras_model(model)
    tflite_model = converter.convert()

    # Guardar modelo en el disco
    open("model.tflite", "wb").write(tflite_model)


    from tinymlgen import port
    # Convertir modelo en un array C
    c_code = port(model, pretty_print=True)
    print(c_code)
    with open('model.h', 'w') as f:
        f.write(c_code)
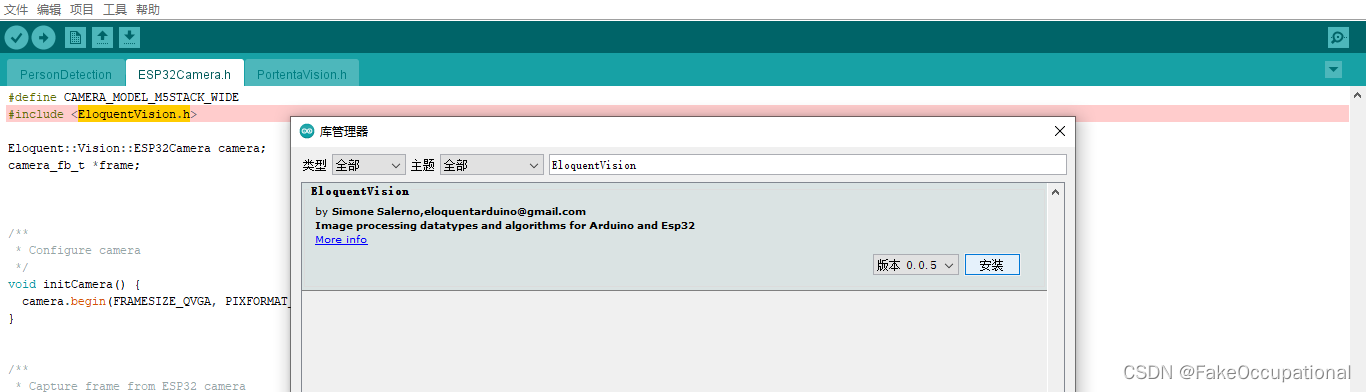
EloquentVision
- 这个例子是machine learing的例子,来自另一个包,但是没运行成功,说检测不到我的摄像头,可能是官方没有和我板子的gpio匹配
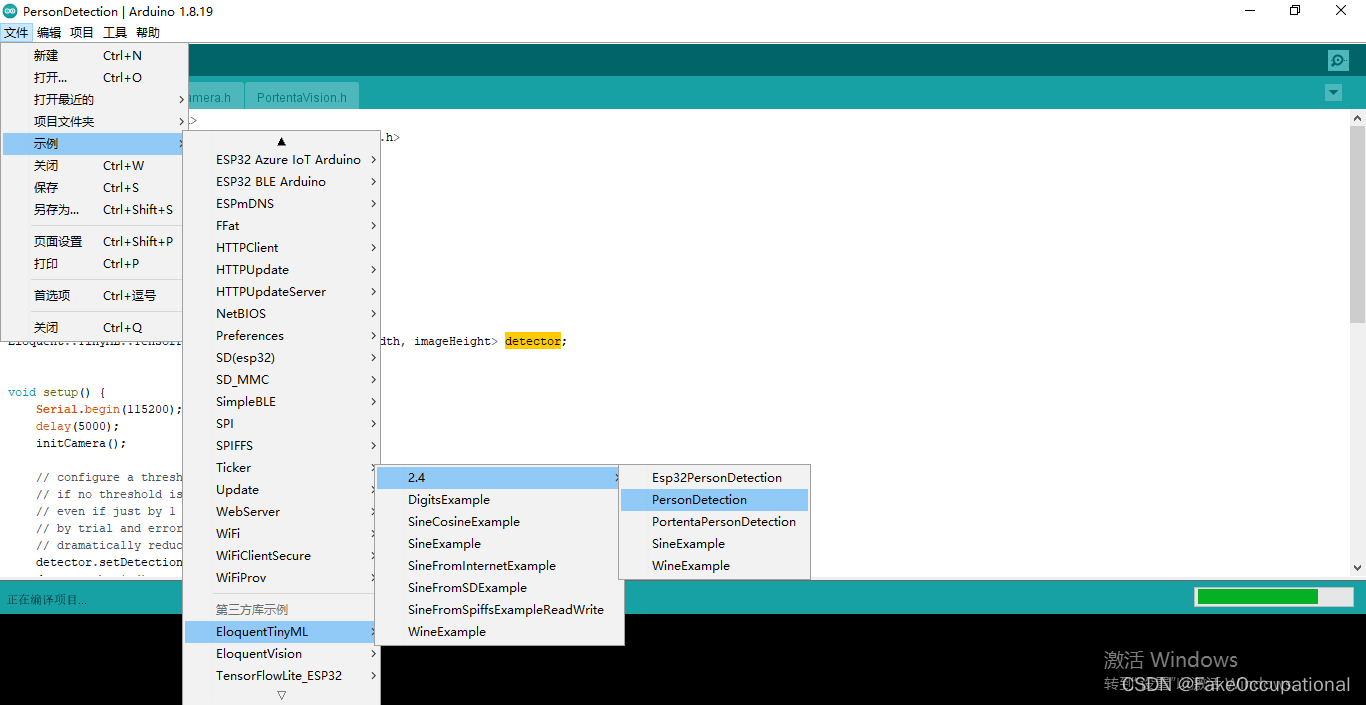
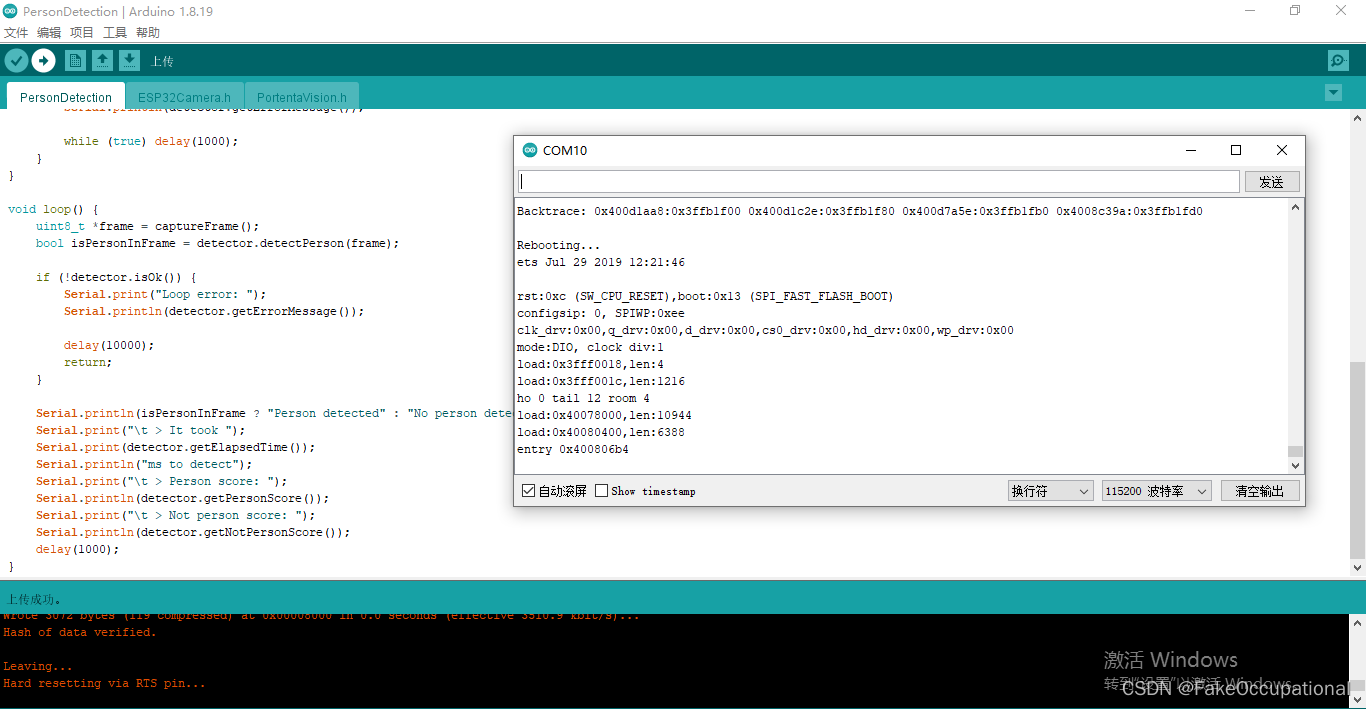
- Detected camera not supported
load:0x3fff001c,len:1216
ho 0 tail 12 room 4
load:0x40078000,len:10944
load:0x40080400,len:6388
entry 0x400806b4
[E][camera.c:1113] camera_probe(): Detected camera not supported.
[E][camera.c:1379] esp_camera_init(): Camera probe failed with error 0x20004
Guru Meditation Error: Core  1 panic'ed (LoadProhibited). Exception was unhandled.
Core 1 register dump:
PC      : 0x400d1aa8  PS      : 0x00060530  A0      : 0x800d1c31  A1      : 0x3ffb1f00
A2      : 0x00000005  A3      : 0x00000001  A4      : 0x0800001c  A5      : 0x00000003
A6      : 0x00000003  A7      : 0x00000000  A8      : 0x800d1aa6  A9      : 0x3ffb1ee0
A10     : 0x00000000  A11     : 0x00000005  A12     : 0x3ffbdc14  A13     : 0x00000003
A14     : 0x00000001  A15     : 0x00000000  SAR     : 0x00000004  EXCCAUSE: 0x0000001c
EXCVADDR: 0x00000040  LBEG    : 0x40089ded  LEND    : 0x40089dfd  LCOUNT  : 0xfffffffb
cg
- https://savjee.be/blog/esp32-cam-cropping-images-on-device/


 4142
4142


 被折叠的 条评论
为什么被折叠?
被折叠的 条评论
为什么被折叠?
 到【灌水乐园】发言


