


参考文档描述:
Camera sensors in Isaac Gym are meant to simulate cameras as they would be found either observing or attached to a robot. A camera sensor can be easily created as follows:
camera_props = gymapi.CameraProperties()
camera_props.width = 128
camera_props.height = 128
camera_handle = gym.create_camera_sensor(env, camera_props)
As with the viewer camera, a customized camera properties can also be passed in to the camera creation. A camera sensor differs from the viewer camera in that it cannot be controled through the viewer and it is connected to a specific environment. This means that when a camera sensor creates an image, it can ‘see’ only those actors in the selected environment.
The location of camera sensors can be set in one of three ways. First, a camera sensor may be placed directly using:
gym.set_camera_location(camera_handle, env, gymapi.Vec3(x,y,z), gymapi.Vec3(tx,ty,yz))
where (x,y,z) are the coordinates of the camera in the environment’s local coordinate frame and (tx, ty,tz) are the coordinates of the point the camera is looking at, again in the environments local coordinates.
A second method to place the camera is to directly specify a GymTransform which specifies the position and pose of the camera in environemnt local coordinates, such as:
transform = gymapi.Transform()
transform.p = (x,y,z)
transform.r = gymapi.Quat.from_axis_angle(gymapi.Vec3(0,1,0), np.radians(45.0))
gym.set_camera_transform(camera_handle, env, transform)
Finally, a camera can be directly attached to a rigid body. This is useful to create cameras which track a body as it moves or to simulate the camera being directly attached to a part of an actor. Cameras can be attached to a rigid body as follows:
local_transform = gymapi.Transform()
local_transform.p = (x,y,z)
local_transform.r = gymapi.Quat.from_axis_angle(gymapi.Vec3(0,1,0), np.radians(45.0))
gym.attach_camera_to_body(camera_handle, env, body_handle, local_transform, gymapi.FOLLOW_TRANSFORM)
The last argument determines the attachment behavior:
-
gymapi.FOLLOW_POSITIONmeans that the camera will maintain a fixed offset (local_transform.p) from the rigid body, but will not rotate with the body. -
gymapi.FOLLOW_TRANSFORMmeans that the camera will maintain a fixed offset and also rotate with the body.
When attached to a rigid body, the camera’s transform will be updated in step_graphics(sim).
All camera sensors are rendered together in a single API call to enable best performance:
gym.render_all_camera_sensors(sim)
本节内容将描述为一个刚体添加相机并锁定视角,同时获取相机输出,以及在multi envs中管理相机。
1. 添加相机
设定基本参数:
# create camera
camera_props = gymapi.CameraProperties()
camera_props.width = 128
camera_props.height = 128
camera_handle = gym.create_camera_sensor(env, camera_props)
camera_pos = [0, 0, 1]

local_transform = gymapi.Transform()
local_transform.p = gymapi.Vec3(*camera_pos)
local_transform.r = gymapi.Quat.from_axis_angle(gymapi.Vec3(0,1,0), np.radians(45.0))
gym.attach_camera_to_body(camera_handle, env, sphere_handle, local_transform, gymapi.FOLLOW_TRANSFORM)-
gymapi.FOLLOW_POSITION意味着相机local_transform.p将与刚体保持固定的偏移,但不会随刚体旋转。 -
gymapi.FOLLOW_TRANSFORM意味着相机将保持固定的偏移并随机身旋转。
在使用GPU时,注意:
In order to activate tensor access, a camera must be created with the enable_tensors flag set to True in the camera properties structure.:
camera_props = gymapi.CameraProperties()
camera_props.enable_tensors = True
cam_handle = gym.create_camera_sensor(env, camera_props)
其他参数:
-
width - 图像宽度(以像素为单位)
-
height - 图像高度(以像素为单位)
-
Horizontal_fov - 以弧度为单位的水平视野。垂直视野将为高度/宽度 *horizontal_fov
-
近平面- 从相机点到近剪裁平面的距离(以世界单位(米)为单位)
-
far_plane - 从相机点到远剪裁平面的距离,以世界单位(米)为单位
-
supersampling_horizontal - 超级采样的整数乘数。设置为大于 1 的值将导致渲染 width*supersampling_horizontal 像素宽的图像,并重新采样到输出分辨率
-
supersampling_vertical - 超级采样的整数乘数。设置为大于 1 的值将导致渲染高度为高度 * supersampling_vertical 像素的图像并重新采样到输出分辨率
-
use_collision_geometry - 如果设置为
True,相机将渲染碰撞几何体 -
enable_tensors - 如果设置为
True,将为此相机启用张量访问。有关更多信息,请参阅下面的GPU 张量访问部分。
2. 获取相机信息
在CPU时,调用API
optical_flow_image = gym.get_camera_image(sim, env, camera_handle, gymapi.IMAGE_OPTICAL_FLOW)
optical_flow_in_pixels = np.zeros(np.shape(optical_flow_image))
# Horizontal (u)
optical_flow_in_pixels[0,0] = image_width*(optical_flow_image[0,0]/2**15)
# Vertical (v)
optical_flow_in_pixels[0,1] = image_height*(optical_flow_image[0,1]/2**15)
可设定rgb, depth, 语义分割 和 光流 图像。
-
IMAGE_COLOR - 4x 8 bit unsigned int - RGBA color
-
IMAGE_DEPTH - float - negative distance from camera to pixel in view direction in world coordinate units (meters)
-
IMAGE_SEGMENTATION - 32bit unsigned int - ground truth semantic segmentation of each pixel. See
-
IMAGE_OPTICAL_FLOW - 2x 16bit signed int - screen space motion vector per pixel, normalized
在GPU时,使用
camera_tensor = gym.get_camera_image_gpu_tensor(sim, env, cam_handle, gymapi.IMAGE_COLOR)
torch_camera_tensor = gymtorch.wrap_tensor(camera_tensor)
并确定使用的时间段,避免内存问题:
while True:

    gym.simulate(sim)
    gym.fetch_results(sim, True)
    gym.step_graphics(sim)
    gym.render_all_camera_sensors(sim)
    gym.start_access_image_tensors(sim)
    #
    # User code to digest tensors
    #
    gym.end_access_image_tensors(sim)
3. 实时查看图像示例
CPU:
while not gym.query_viewer_has_closed(viewer):
    # step the physics
    gym.simulate(sim)
    gym.fetch_results(sim, True)

    # refresh tensors
    gym.refresh_rigid_body_state_tensor(sim)
    gym.refresh_dof_state_tensor(sim)
    gym.refresh_jacobian_tensors(sim)
    gym.refresh_mass_matrix_tensors(sim)

    gym.render_all_camera_sensors(sim)

    color_image = gym.get_camera_image(sim, env, camera_handle, gymapi.IMAGE_COLOR)
    depth_image = gym.get_camera_image(sim, env, camera_handle, gymapi.IMAGE_DEPTH)

    # position, velocity = get_ball_state(env, sphere_handle)
    # print("pos:{} vel{} ".format(position, velocity))

    img_bgr = cv2.cvtColor(color_image, cv2.COLOR_RGBA2BGR)
    cv2.imshow('Camera Image', color_image)
    cv2.waitKey(1)

    # update viewer
    gym.step_graphics(sim)
    gym.draw_viewer(viewer, sim, True)
    gym.sync_frame_time(sim)

    # 按 'q' 键退出
    if cv2.waitKey(1) & 0xFF == ord('q'):
        break
GPU:
此处的代码背景是:multi envs,为每一个环境添加了camera,此处只调用envs[0]中的摄像头。
gym.render_all_camera_sensors(sim)
gym.start_access_image_tensors(sim)
camera_rgba_tensor = gym.get_camera_image_gpu_tensor(sim, envs[0], camera_handles[0],
gymapi.IMAGE_COLOR)
camera_depth_tensor = gym.get_camera_image_gpu_tensor(sim, envs[0], camera_handles[0],
gymapi.IMAGE_DEPTH)
torch_camera_rgba_tensor = gymtorch.wrap_tensor(camera_rgba_tensor)
torch_camera_depth_tensor = gymtorch.wrap_tensor(camera_depth_tensor)
rgba_img = torch_camera_rgba_tensor.clone().cpu().numpy()
_depth_img = torch_camera_depth_tensor.clone().cpu().numpy()
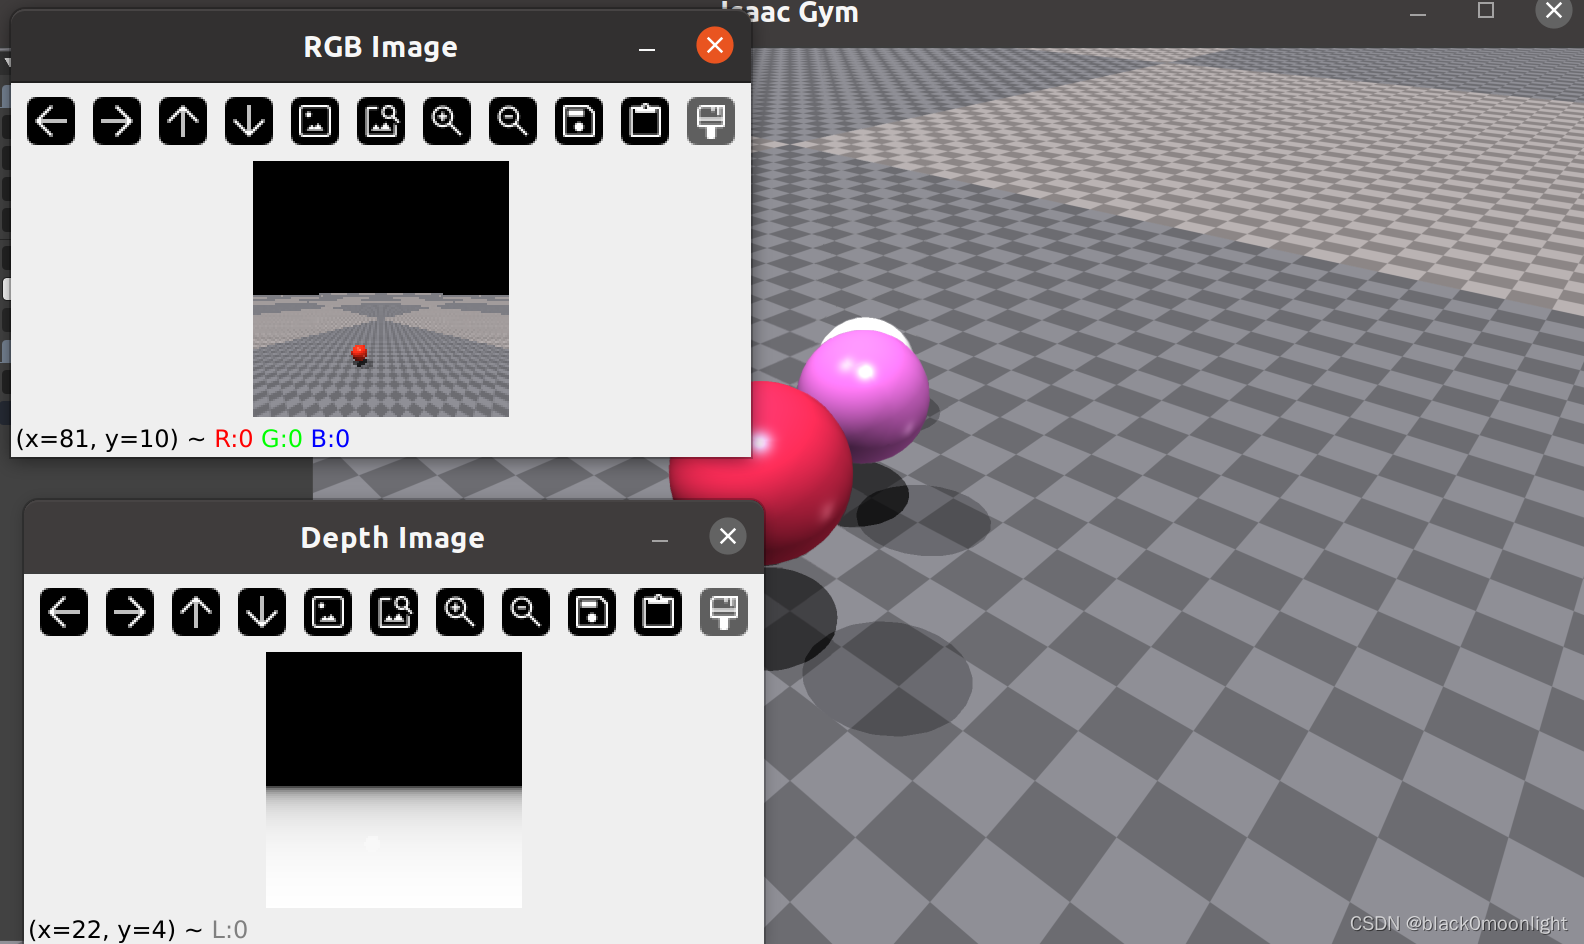
gym.end_access_image_tensors(sim)获得数据后,调用cv2进行实时显示。此处仅展示数据结果和处理,不考虑造成的delay。
rgb_img = cv2.cvtColor(rgba_img, cv2.COLOR_RGBA2BGR)
        cv2.imshow('RGB Image', rgb_img)

_depth_img[np.isinf(_depth_img)] = -256
depth_img = cv2.normalize(_depth_img, None, 0, 255, cv2.NORM_MINMAX).astype(np.uint8)
cv2.imshow('Depth Image', depth_img)
cv2.waitKey(1)
由于color模式下得到的是rgba,所以需要改为bgr图像显示。同时,处理depth中的inf数值并归一化处理。


 1220
1220

 被折叠的 条评论
为什么被折叠?
被折叠的 条评论
为什么被折叠?
 到【灌水乐园】发言


