


前一篇文章描述了GPIO输出的用法,也就是点LED灯:
【Ultrascale+ MPSOC学习记录】7、PS端的MIO使用-LED
这篇文章接着前面的步骤,把输入用起来,也是就KEY;
我们先想一下我们要实现什么功能,输入IO的检测一般可以用轮训方式,或者用中断方式来检测,轮训就是不停去查1还是0,这就不去玩了,我们直接看怎么用中断方式。
原理
先看GPIO的图:
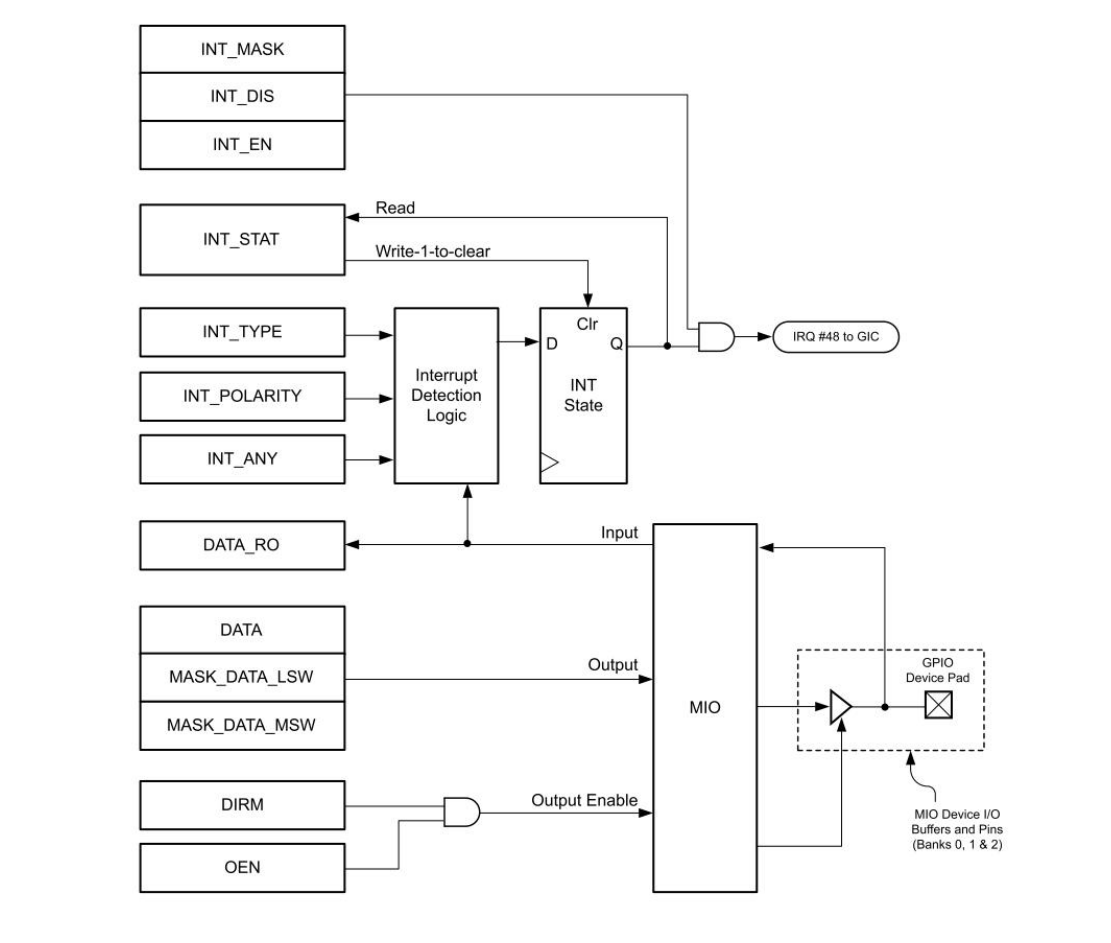
我们可以看到中断可以设置中断类型,也是就高低电平、上升沿下降沿等;还有清除中断、使能中断等。
我们直接基于前面文章的hello工程,然后增加IO中断检测代码:
#include <stdio.h>
#include "platform.h"
#include "xil_printf.h"
#include "xparameters.h"
#include "xgpiops.h"
#include "xscugic.h"
#include "xil_exception.h"

XGpioPs Gpio;	  /* The driver instance for GPIO Device. */
XScuGic INTCInst;

int key_flag ;
static u32 Output_Pin = 40; /* LED */
static u32 Input_Pin = 26; /* button */

int IntrInitFuntion(XScuGic *InstancePtr, u16 DeviceId, XGpioPs *GpioInstancePtr);
void GpioHandler(void *CallbackRef);

int main()
{
	XGpioPs_Config *ConfigPtr;
	volatile int Delay;

    init_platform();

    print("Hello World\n\r");

    ConfigPtr = XGpioPs_LookupConfig(0);
    XGpioPs_CfgInitialize(&Gpio, ConfigPtr, ConfigPtr->BaseAddr);

	XGpioPs_SetDirectionPin(&Gpio, Output_Pin, 1);
	XGpioPs_SetOutputEnablePin(&Gpio, Output_Pin, 1);

	XGpioPs_SetDirectionPin(&Gpio, Input_Pin, 0);
	XGpioPs_SetIntrTypePin(&Gpio, Input_Pin, XGPIOPS_IRQ_TYPE_EDGE_RISING);
	XGpioPs_IntrEnablePin(&Gpio, Input_Pin);

	IntrInitFuntion(&INTCInst, XPAR_XGPIOPS_0_DEVICE_ID, &Gpio) ;

	for(;;){
		XGpioPs_WritePin(&Gpio, Output_Pin, 0x0);
		for (Delay = 0; Delay < 10000000; Delay++);
		XGpioPs_WritePin(&Gpio, Output_Pin, 0x1);
		for (Delay = 0; Delay < 10000000; Delay++);
		if(key_flag){
			print("Key Press\n\r");
			key_flag = 0;
		}
	}

    cleanup_platform();
    return 0;
}

int IntrInitFuntion(XScuGic *InstancePtr, u16 DeviceId, XGpioPs *GpioInstancePtr)
{
	XScuGic_Config *IntcConfig;
	int Status ;
	/*
	 * Initialize the interrupt controller driver so that it is ready to
	 * use.
	 */
	IntcConfig = XScuGic_LookupConfig(XPAR_SCUGIC_SINGLE_DEVICE_ID);

	Status = XScuGic_CfgInitialize(InstancePtr, IntcConfig, IntcConfig->CpuBaseAddress) ;
	if (Status != XST_SUCCESS)
		return XST_FAILURE ;

	/*
	 * set priority and trigger type
	 */
	XScuGic_SetPriorityTriggerType(InstancePtr, XPAR_XGPIOPS_0_INTR,
			0xA0, 0x3);
	/*
	 * Connect the device driver handler that will be called when an
	 * interrupt for the device occurs, the handler defined above performs
	 * the specific interrupt processing for the device.
	 */
	Status = XScuGic_Connect(InstancePtr, XPAR_XGPIOPS_0_INTR,
			(Xil_ExceptionHandler)GpioHandler,
			(void *)GpioInstancePtr) ;
	if (Status != XST_SUCCESS)
		return XST_FAILURE ;

	/*
	 * Enable the interrupt for the device.
	 */
	XScuGic_Enable(InstancePtr, XPAR_XGPIOPS_0_INTR) ;

	Xil_ExceptionInit();

	Xil_ExceptionRegisterHandler(XIL_EXCEPTION_ID_INT,
			(Xil_ExceptionHandler)XScuGic_InterruptHandler,
			InstancePtr);
	Xil_ExceptionEnable();

	return XST_SUCCESS ;

}

void GpioHandler(void *CallbackRef)
{
	XGpioPs *GpioInstancePtr = (XGpioPs *)CallbackRef ;
	int Int_val ;

	Int_val = XGpioPs_IntrGetStatusPin(GpioInstancePtr, Input_Pin) ;
	/*
	 * Clear interrupt.
	 */
	XGpioPs_IntrClearPin(GpioInstancePtr, Input_Pin) ;
	if (Int_val)
		key_flag = 1 ;
}
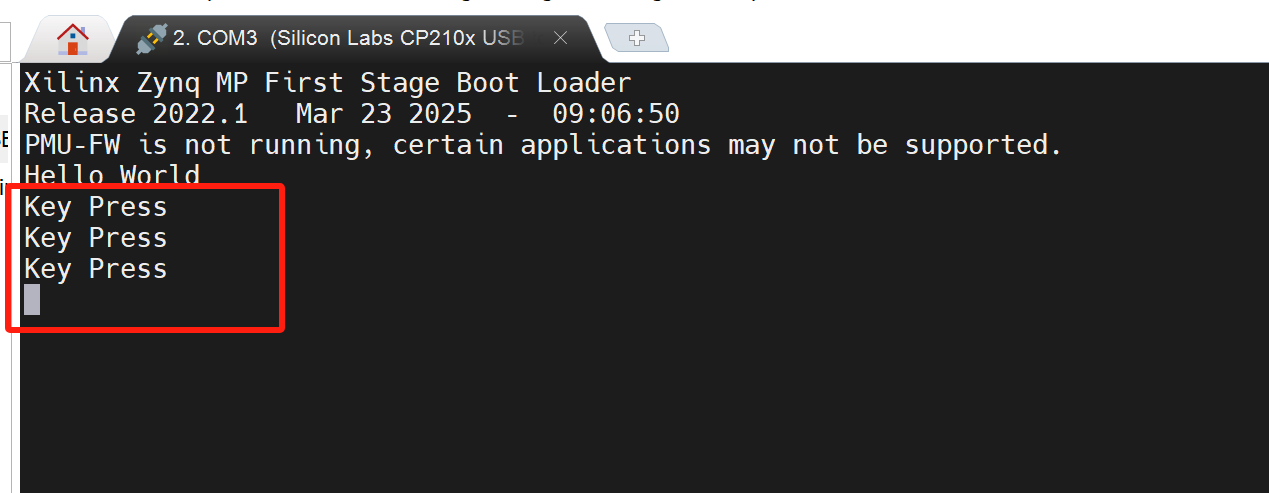
然后直接上板验证,成功实现按钮一按,打印一个提示:


 1322
1322

 被折叠的 条评论
为什么被折叠?
被折叠的 条评论
为什么被折叠?
 到【灌水乐园】发言


