


这里探讨一下八叉树建立过程的两种不同方式
1、定义包围盒
2、不定义包围盒
从建立八叉树的步骤,以及建立出来的八叉树的深度进行分析。
1、定义包围盒
八叉树是立方体结构,而且最外层八叉树是和八叉树的分辨率成倍数关系的(幂次关系),因此需要调整点云的最小包围盒,具体调整的步骤如下:
1、计算点云的最小包围盒,
2、根据点云八叉树的分辨率,计算八叉树的深度,计算八叉树根节点包围盒需要往外扩张的大小
getKeyBitSize ();
//计算深度
this->octree_depth_ = std::max ((std::min (static_cast<unsigned int>
(OctreeKey::maxDepth), static_cast<unsigned int> (ceil (this->Log2
(max_voxels)-minValue)))), static_cast<unsigned int> (0));
//计算八叉树应该的边长
 octree_side_len = static_cast<double> (1 << this->octree_depth_) * resolution_;
    octree_oversize_x = (octree_side_len - (max_x_ - min_x_)) / 2.0;
    octree_oversize_y = (octree_side_len - (max_y_ - min_y_)) / 2.0;
    octree_oversize_z = (octree_side_len - (max_z_ - min_z_)) / 2.0;
其中octree_side_len是八叉树的最大立方体的边长。
然后根据上述结果将最小包围盒进行扩张。
定义好八叉树的包围盒之后,就可以将点云中的点加入到八叉树中,此时八叉树的深度,节点ID等等信息都已经固定了,不会有新的点改变八叉树的结构(只有出现八叉树包围盒之外的点,才会更新八叉树的结构)。
将一个点加入到八叉树中的主要步骤如下;
1、根据点的坐标计算Key
  // make sure bounding box is big enough
  adoptBoundingBoxToPoint (point);

  // generate key
  genOctreeKeyforPoint (point, key);
针对已经定义包围盒的情况,adoptBoundingBoxToPoint (point);这一步是不需要的,直接跳过。
2、根据Key,生成相应的叶子节点
  LeafNode* leaf_node;
  BranchNode* parent_branch_of_leaf_node;
   unsigned int depth_mask = this->createLeafRecursive (key,
   this->depth_mask_ ,this->root_node_, leaf_node, parent_branch_of_leaf_node);
八叉树叶子节点中只存在容器,分支节点存在空容器和八个子节点
可以通过八叉树迭代器获取当前节点的信息:
    // Octree iterator state pushed on stack/list
    struct IteratorState{
        OctreeNode* node_;
        OctreeKey key_;
        unsigned char depth_;
    };
3、将点云索引加入到叶子节点容器中
(*leaf_node)->addPointIndex (point_idx_arg);
2、不定义包围盒
如果不定义包围盒,那么再将点加入到八叉树时,就需要更新包围盒。
(默认的八叉树包围盒时resolution大小的立方体)
将一个点加入到八叉树中的主要步骤如下;
1、根据点的坐标计算Key
  // make sure bounding box is big enough
  adoptBoundingBoxToPoint (point);

  // generate key
  genOctreeKeyforPoint (point, key);
针对未定义包围盒的情况,adoptBoundingBoxToPoint (point);
第一次就是以第一个点为中心,建立八个resolution大小的立方体
之后每加入一个点进行判断包围盒是否需要更新
    bool bLowerBoundViolationX = (point_idx_arg.x < min_x_);
    bool bLowerBoundViolationY = (point_idx_arg.y < min_y_);
    bool bLowerBoundViolationZ = (point_idx_arg.z < min_z_);

    bool bUpperBoundViolationX = (point_idx_arg.x >= max_x_);
    bool bUpperBoundViolationY = (point_idx_arg.y >= max_y_);
    bool bUpperBoundViolationZ = (point_idx_arg.z >= max_z_);

    // do we violate any bounds?
    if (bLowerBoundViolationX || bLowerBoundViolationY || bLowerBoundViolationZ || bUpperBoundViolationX
        || bUpperBoundViolationY || bUpperBoundViolationZ || (!bounding_box_defined_) )
如果需要更新,将当前的八叉树作为更新后的八叉树的一个子节点,八叉树的包围盒大小为原来的一倍,并且更新深度和边长。
        // octree not empty - we add another tree level and thus increase its size by a factor of 2*2*2
        child_idx = static_cast<unsigned char> (((!bUpperBoundViolationX) << 2) | ((!bUpperBoundViolationY) << 1)
            | ((!bUpperBoundViolationZ)));

        BranchNode* newRootBranch;

        newRootBranch = new BranchNode();
        this->branch_count_++;

        this->setBranchChildPtr (*newRootBranch, child_idx, this->root_node_);

        this->root_node_ = newRootBranch;

        octreeSideLen = static_cast<double> (1 << this->octree_depth_) * resolution_;

        if (!bUpperBoundViolationX)
          min_x_ -= octreeSideLen;

        if (!bUpperBoundViolationY)
          min_y_ -= octreeSideLen;

        if (!bUpperBoundViolationZ)
          min_z_ -= octreeSideLen;

        // configure tree depth of octree
        this->octree_depth_++;
        this->setTreeDepth (this->octree_depth_);

        // recalculate bounding box width
        octreeSideLen = static_cast<double> (1 << this->octree_depth_) * resolution_ - minValue;

        // increase octree bounding box
        max_x_ = min_x_ + octreeSideLen;
        max_y_ = min_y_ + octreeSideLen;
        max_z_ = min_z_ + octreeSideLen;
使用更新之后的包围盒计算Key,后面的步骤和之前一致。
2、根据Key,生成相应的叶子节点
  LeafNode* leaf_node;
  BranchNode* parent_branch_of_leaf_node;
   unsigned int depth_mask = this->createLeafRecursive (key,
   this->depth_mask_ ,this->root_node_, leaf_node, parent_branch_of_leaf_node);
八叉树叶子节点中只存在容器,分支节点存在空容器和八个子节点
可以通过八叉树迭代器获取当前节点的信息:
    // Octree iterator state pushed on stack/list
    struct IteratorState{
        OctreeNode* node_;
        OctreeKey key_;
        unsigned char depth_;
    };
3、将点云索引加入到叶子节点容器中
(*leaf_node)->addPointIndex (point_idx_arg);
3、实验测试
设计点云数据每个0.5生成一个点,范围为0-4,resolution=1,
理想情况下,点云深度应当为2层,每个节点中有一个点,总共46个点。
定义包围盒情况:
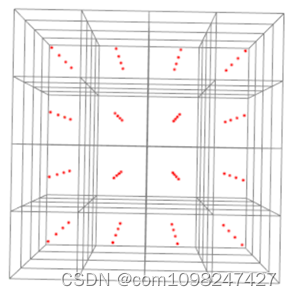
深度为2,符合最理想的情况
未定义包围盒:
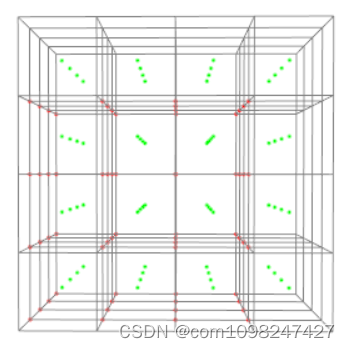
此时的八叉树深度为5,注意看上面两张图是不一样的,红色的是点云,绿色的是叶子节点的中心,这个八叉树以第一个点作为八叉树的中心,造成了八叉树结构分布不均匀,在进行遍历时,会影响计算速度。
综上所述,建立八叉树时,最好定义包围盒。
补:
八叉树的ID编码,
PCL中八叉树采用的编码应该也算是Matorn码(不确定),对八叉树节点的排序为以Z轴为第一循环轴,Y为第二循环轴,X为第三循环轴;
第一步:对Z轴进行从小打到排序
第二步:Y轴加一,接着对Z轴进行从小到大排序
第三步:Y轴加到最大,置为0,X轴加1,重复上述步骤
第四步:一直将XOY面遍历完毕。
最终的结果也是能够保证每个节点的ID是唯一的,这个和Morton码的编码类似,也是Z字形进行累加编码。
这样编码的话,深度增加,所有的大部分节点的ID都需要更改,每次都需要进行计算,这样明显浪费计算时间,如果采用Morton码,对于已编码的节点就不需要重新进行计算编码,能够在一定程度上节省计算时间。
附上2层八叉树的ID编码结构,64个节点,能够发现Key和ID的关系。
Key(3,3,3)      63
Key(3,3,2)      62
Key(3,2,3)      59
Key(3,2,2)      58
Key(2,3,3)      47
Key(2,3,2)      46
Key(2,2,3)      43
Key(2,2,2)      42
Key(3,3,1)      61
Key(3,3,0)      60
Key(3,2,1)      57
Key(3,2,0)      56
Key(2,3,1)      45
Key(2,3,0)      44
Key(2,2,1)      41
Key(2,2,0)      40
Key(3,1,3)      55
Key(3,1,2)      54
Key(3,0,3)      51
Key(3,0,2)      50
Key(2,1,3)      39
Key(2,1,2)      38
Key(2,0,3)      35
Key(2,0,2)      34
Key(3,1,1)      53
Key(3,1,0)      52
Key(3,0,1)      49
Key(3,0,0)      48
Key(2,1,1)      37
Key(2,1,0)      36
Key(2,0,1)      33
Key(2,0,0)      32
Key(1,3,3)      31
Key(1,3,2)      30
Key(1,2,3)      27
Key(1,2,2)      26
Key(0,3,3)      15
Key(0,3,2)      14
Key(0,2,3)      11
Key(0,2,2)      10
Key(1,3,1)      29
Key(1,3,0)      28
Key(1,2,1)      25
Key(1,2,0)      24
Key(0,3,1)      13
Key(0,3,0)      12
Key(0,2,1)      9
Key(0,2,0)      8
Key(1,1,3)      23
Key(1,1,2)      22
Key(1,0,3)      19
Key(1,0,2)      18
Key(0,1,3)      7
Key(0,1,2)      6
Key(0,0,3)      3
Key(0,0,2)      2
Key(1,1,1)      21
Key(1,1,0)      20
Key(1,0,1)      17
Key(1,0,0)      16
Key(0,1,1)      5
Key(0,1,0)      4
Key(0,0,1)      1
Key(0,0,0)      0
这种编码深度变化时,所有的数据都需要重新计算,Morton码应当是不需要重新计算的,往外拓展时,对原来的编码没有影响,这样对比,还是Morton更优,后面可以进行相关的实现。


 677
677


 被折叠的 条评论
为什么被折叠?
被折叠的 条评论
为什么被折叠?
 到【灌水乐园】发言


