


http://blog.csdn.net/y1196645376/article/details/52602002
之前我们介绍了老版本的AssetBundle,在文章最后我们提到了在生成AB包的时候同时生成依赖关系信息文件。这样加载的时候就能够自动加载所有依赖项。而新版的AssetBundle正是采用的这样的方式。下面我来介绍一下:
1.Unity5.x的AssetBundle的新功能。
-
为每个资源添加了AssetBundleName属性,我们可以通过Editor中的资源可视化视图下方为资源设置AssetBundleName。
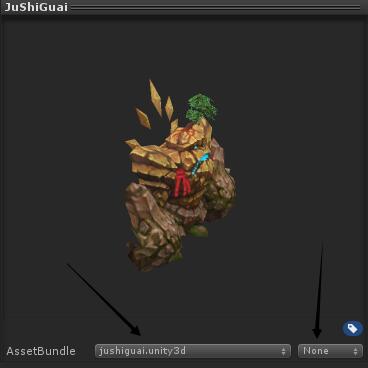
上图第一个箭头所指既是AssetBundleName,名字固定为小写,另外,每个AssetBundle都可以设置一个Variant,其实就是一个后缀,实际上AssetBundle会添加这个后缀。如果有不同分辨率的同名资源,可以使用这个来区分。
值得注意的是:
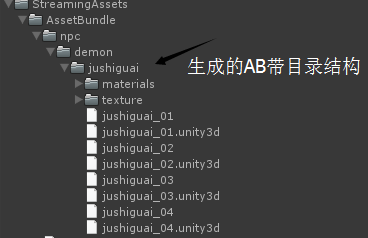
AssetBundleName是可以带’/’符号的,这是一个很好的设计,因为我们打包的资源会很多,如果打包生成的所有AssetBundle都生成在同一个文件目录里,这肯定是很难管理的。不过名称引入’/’便可以很好解决这个问题。我们通过名字中设置类似”npc/demon/jushiguai.unity3d”这样的名字。那么在生成AssetBundle的时候会自动根据名字生成文件目录。这样生成的AssetBundle有了分类就很好管理了。如下图:
-
统一了打包AssetBundle接口:BuildPipeline.BuildAssetBundles(outputPath),outputPath为AB包生成文件夹路径。
-
BuildAssetBundles打包默认开启了:CompleteAssets ,CollectDependencies,DeterministicAssetBundle。
-
打包模式新增:
ForceRebuildAssetBundle : 强制重新打包所有AssetBundle文件,一般情况只做增量打包。
IgnoreTypeTreeChanges : 用于判断AssetBundle更新时,是否忽略TypeTree的变化。
AppendHashToAssetBundleName : 将Hash值添加在AB包文件名之后,开启后可通过文件名来判断哪些AB进行了更新。
-
打包生成manifest文件,包含CRC,Hash,ID,AssetPath以及Dependencies等AssetBundle信息。新版的AssetBundle打包会自动帮你处理依赖关系。
-
加载AssetBundle的API被替换,如下:
4.x版本中的AssetBundle.CreateFromFile方法,在5.x版本中变成了AssetBundle.LoadFromFile方法。
4.x版本中的AssetBundle.CreateFromMemory方法,在5.x版本中变成了LoadFromMemoryAsync方法。
4.x版本中的AssetBundle.CreateFromMemoryImmediate方法,在5.x版本中变成了LoadFromMemory方法。
2.实战演练
-
在这里我准备了一个实例工程,在Prefab文件夹放了一些素材。
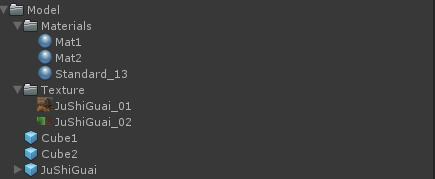
简单介绍下,Cube1,Cube2是上篇文章使用的两个预制体。JuShiGuai是一个怪物模型的Prefab,使用了Mat1,Mat2两个材质,而Mat1,Mat2两个材质分别使用了JuShiGuai_01,JuShiGuai_02两个贴图。
-
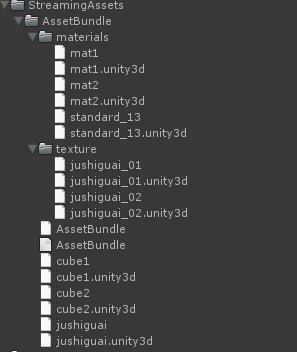
接下来我分别给这几个Prefab和Material,Texture设置AssetBundle。
Mat1 : materials/mat1.unity3d
Mat2 : materials/mat2.unity3d
JuShiGuai_01 : texture/jushiguai_01.unity3d
JuShiGuai_02 : texture/jushiguai_02.unity3d
Cube1 : cube1.unity3d
Cube2 : cube2.unity3d
JuShiGuai : jushiguai.unity3d
-
首先编写路径常量类:
- 1
- 2
- 3
- 4
- 5
- 6
- 7
- 8
- 9
- 10
- 11
- 12
- 13
- 14
- 15
- 16
- 17
- 18
- 19
- 20
- 21
- 22
- 1
- 2
- 3
- 4
- 5
- 6
- 7
- 8
- 9
- 10
- 11
- 12
- 13
- 14
- 15
- 16
- 17
- 18
- 19
- 20
- 21
- 22
- 然后编写打包代码:
- 1
- 2
- 3
- 4
- 5
- 6
- 7
- 8
- 9
- 10
- 11
- 12
- 13
- 14
- 15
- 16
- 1
- 2
- 3
- 4
- 5
- 6
- 7
- 8
- 9
- 10
- 11
- 12
- 13
- 14
- 15
- 16
-
在Unity菜单栏出现了New AB Editor,点击 Build AssetBundles。那么在StreamingAssets/AssetBundle路径下就会生成所有的AB包。
每个AssetBundle包都配有一个manifest文件记录该包的相关信息,并且在AssetBundle生成根目录下会有一个AssetBundle文件(文件名为你存放AB包的文件名,我这里是AssetBundle)。和AssetBundle.manifest记录的是整个工程的AB包的相关信息。
-
生成包完了之后就是解析加载AB包了。不过值得注意的是虽然Unity说会帮我们处理好依赖关系,但是只是说能够方便获取一个asset的依赖项,并不会帮你自动加载所有依赖项。所以我们加载的代码还是三个部分:加载依赖项和加载自身,卸载依赖项。
-
对于上面的方案,这里我提出一个相对更实用的一个方案。我们知道整个资源中,可能有的资源会被很多其他资源依赖,比如Shader,材质等。如果每次加载好资源项后,又去卸载。对于某种资源依赖次数很多的情况,这种方案就会比较耗时。所以我们可以把加载好的资源用字典存着,下次如果还需要加载这个依赖项就可以直接从字典里面读取。代码如下:
- 1
- 2
- 3
- 4
- 5
- 6
- 7
- 8
- 9
- 10
- 11
- 12
- 13
- 14
- 15
- 16
- 17
- 18
- 19
- 20
- 21
- 22
- 23
- 24
- 25
- 26
- 27
- 28
- 29
- 30
- 31
- 32
- 33
- 34
- 35
- 36
- 37
- 38
- 39
- 40
- 41
- 42
- 43
- 44
- 45
- 46
- 47
- 48
- 49
- 50
- 51
- 52
- 53
- 54
- 55
- 1
- 2
- 3
- 4
- 5
- 6
- 7
- 8
- 9
- 10
- 11
- 12
- 13
- 14
- 15
- 16
- 17
- 18
- 19
- 20
- 21
- 22
- 23
- 24
- 25
- 26
- 27
- 28
- 29
- 30
- 31
- 32
- 33
- 34
- 35
- 36
- 37
- 38
- 39
- 40
- 41
- 42
- 43
- 44
- 45
- 46
- 47
- 48
- 49
- 50
- 51
- 52
- 53
- 54
- 55
- 不过值得注意的是以上加载方法是同步的,也就是说如果资源太大可能会导致阻塞。可以考虑用协程或者多线程解决。
3.批量命名
-
新版的AssetBundle虽然提出了AssetBundleName这样一个新的方法。但是在实际工程中,如果对于每个资源都手动添加设置Name。一来会十分麻烦,二来容易出错,三来不方便管理。所以在实际项目中,我们需要一个方法对于一些资源进行批量命名。
-
这里我给出了一个方式。我们把资源的Path作为资源的AssetBundleName,这样在AssetBundle中的文件分类也是和资源文件夹的分类一样的,方便管理。当然,你也可以不按照这个规定来,只要适合项目实际情况就好了。
- 1
- 2
- 3
- 4
- 5
- 6
- 7
- 8
- 9
- 10
- 11
- 12
- 13
- 14
- 15
- 16
- 17
- 18
- 19
- 20
- 21
- 22
- 23
- 24
- 25
- 26
- 27
- 28
- 29
- 30
- 31
- 32
- 33
- 34
- 35
- 36
- 37
- 38
- 39
- 40
- 41
- 42
- 43
- 44
- 45
- 46
- 47
- 48
- 49
- 50
- 51
- 52
- 53
- 54
- 55
- 56
- 57
- 58
- 59
- 60
- 61
- 62
- 63
- 64
- 65
- 66
- 67
- 68
- 69
- 70
- 71
- 72
- 73
- 74
- 75
- 76
- 77
- 78
- 79
- 80
- 81
- 82
- 83
- 84
- 85
- 86
- 87
- 88
- 89
- 90
- 91
- 92
- 93
- 94
- 95
- 96
- 97
- 98
- 99
- 100
- 101
- 102
- 103
- 104
- 105
- 106
- 107
-
具体使用方法:
选中资源视图中的某个文件夹,然后点击New AB Editor,选中对应的选项:
SetAssetBundleName : 自动设置该文件夹所有资源的AssetBunldName。
GetAssetBundleName : 控制台输出所有设置过AssetBundleName的资源的Name。
ClearAssetBundleName : 清除该文件夹所有资源的AssetBunldName。
基本上新版的AssetBundle使用方法就介绍到这里了。如果你有疑惑或者以上文章有什么错误还望你在下面评论区指出。本人致以万分感谢!
最后附上以上Demo源码地址:http://download.csdn.net/detail/e295166319/9704729
http://blog.csdn.net/y1196645376/article/details/52602002
| 之前我们介绍了老版本的AssetBundle,在文章最后我们提到了在生成AB包的时候同时生成依赖关系信息文件。这样加载的时候就能够自动加载所有依赖项。而新版的AssetBundle正是采用的这样的方式。下面我来介绍一下: |
1.Unity5.x的AssetBundle的新功能。
-
为每个资源添加了AssetBundleName属性,我们可以通过Editor中的资源可视化视图下方为资源设置AssetBundleName。
上图第一个箭头所指既是AssetBundleName,名字固定为小写,另外,每个AssetBundle都可以设置一个Variant,其实就是一个后缀,实际上AssetBundle会添加这个后缀。如果有不同分辨率的同名资源,可以使用这个来区分。
值得注意的是:
AssetBundleName是可以带’/’符号的,这是一个很好的设计,因为我们打包的资源会很多,如果打包生成的所有AssetBundle都生成在同一个文件目录里,这肯定是很难管理的。不过名称引入’/’便可以很好解决这个问题。我们通过名字中设置类似”npc/demon/jushiguai.unity3d”这样的名字。那么在生成AssetBundle的时候会自动根据名字生成文件目录。这样生成的AssetBundle有了分类就很好管理了。如下图:
-
统一了打包AssetBundle接口:BuildPipeline.BuildAssetBundles(outputPath),outputPath为AB包生成文件夹路径。
-
BuildAssetBundles打包默认开启了:CompleteAssets ,CollectDependencies,DeterministicAssetBundle。
-
打包模式新增:
ForceRebuildAssetBundle : 强制重新打包所有AssetBundle文件,一般情况只做增量打包。
IgnoreTypeTreeChanges : 用于判断AssetBundle更新时,是否忽略TypeTree的变化。
AppendHashToAssetBundleName : 将Hash值添加在AB包文件名之后,开启后可通过文件名来判断哪些AB进行了更新。
-
打包生成manifest文件,包含CRC,Hash,ID,AssetPath以及Dependencies等AssetBundle信息。新版的AssetBundle打包会自动帮你处理依赖关系。
-
加载AssetBundle的API被替换,如下:
4.x版本中的AssetBundle.CreateFromFile方法,在5.x版本中变成了AssetBundle.LoadFromFile方法。
4.x版本中的AssetBundle.CreateFromMemory方法,在5.x版本中变成了LoadFromMemoryAsync方法。
4.x版本中的AssetBundle.CreateFromMemoryImmediate方法,在5.x版本中变成了LoadFromMemory方法。
2.实战演练
-
在这里我准备了一个实例工程,在Prefab文件夹放了一些素材。
简单介绍下,Cube1,Cube2是上篇文章使用的两个预制体。JuShiGuai是一个怪物模型的Prefab,使用了Mat1,Mat2两个材质,而Mat1,Mat2两个材质分别使用了JuShiGuai_01,JuShiGuai_02两个贴图。
-
接下来我分别给这几个Prefab和Material,Texture设置AssetBundle。
Mat1 : materials/mat1.unity3d
Mat2 : materials/mat2.unity3d
JuShiGuai_01 : texture/jushiguai_01.unity3d
JuShiGuai_02 : texture/jushiguai_02.unity3d
Cube1 : cube1.unity3d
Cube2 : cube2.unity3d
JuShiGuai : jushiguai.unity3d
-
首先编写路径常量类:
- 1
- 2
- 3
- 4
- 5
- 6
- 7
- 8
- 9
- 10
- 11
- 12
- 13
- 14
- 15
- 16
- 17
- 18
- 19
- 20
- 21
- 22
- 1
- 2
- 3
- 4
- 5
- 6
- 7
- 8
- 9
- 10
- 11
- 12
- 13
- 14
- 15
- 16
- 17
- 18
- 19
- 20
- 21
- 22
- 然后编写打包代码:
- 1
- 2
- 3
- 4
- 5
- 6
- 7
- 8
- 9
- 10
- 11
- 12
- 13
- 14
- 15
- 16
- 1
- 2
- 3
- 4
- 5
- 6
- 7
- 8
- 9
- 10
- 11
- 12
- 13
- 14
- 15
- 16
-
在Unity菜单栏出现了New AB Editor,点击 Build AssetBundles。那么在StreamingAssets/AssetBundle路径下就会生成所有的AB包。
每个AssetBundle包都配有一个manifest文件记录该包的相关信息,并且在AssetBundle生成根目录下会有一个AssetBundle文件(文件名为你存放AB包的文件名,我这里是AssetBundle)。和AssetBundle.manifest记录的是整个工程的AB包的相关信息。
-
生成包完了之后就是解析加载AB包了。不过值得注意的是虽然Unity说会帮我们处理好依赖关系,但是只是说能够方便获取一个asset的依赖项,并不会帮你自动加载所有依赖项。所以我们加载的代码还是三个部分:加载依赖项和加载自身,卸载依赖项。
-
对于上面的方案,这里我提出一个相对更实用的一个方案。我们知道整个资源中,可能有的资源会被很多其他资源依赖,比如Shader,材质等。如果每次加载好资源项后,又去卸载。对于某种资源依赖次数很多的情况,这种方案就会比较耗时。所以我们可以把加载好的资源用字典存着,下次如果还需要加载这个依赖项就可以直接从字典里面读取。代码如下:
- 1
- 2
- 3
- 4
- 5
- 6
- 7
- 8
- 9
- 10
- 11
- 12
- 13
- 14
- 15
- 16
- 17
- 18
- 19
- 20
- 21
- 22
- 23
- 24
- 25
- 26
- 27
- 28
- 29
- 30
- 31
- 32
- 33
- 34
- 35
- 36
- 37
- 38
- 39
- 40
- 41
- 42
- 43
- 44
- 45
- 46
- 47
- 48
- 49
- 50
- 51
- 52
- 53
- 54
- 55
- 1
- 2
- 3
- 4
- 5
- 6
- 7
- 8
- 9
- 10
- 11
- 12
- 13
- 14
- 15
- 16
- 17
- 18
- 19
- 20
- 21
- 22
- 23
- 24
- 25
- 26
- 27
- 28
- 29
- 30
- 31
- 32
- 33
- 34
- 35
- 36
- 37
- 38
- 39
- 40
- 41
- 42
- 43
- 44
- 45
- 46
- 47
- 48
- 49
- 50
- 51
- 52
- 53
- 54
- 55
- 不过值得注意的是以上加载方法是同步的,也就是说如果资源太大可能会导致阻塞。可以考虑用协程或者多线程解决。
3.批量命名
-
新版的AssetBundle虽然提出了AssetBundleName这样一个新的方法。但是在实际工程中,如果对于每个资源都手动添加设置Name。一来会十分麻烦,二来容易出错,三来不方便管理。所以在实际项目中,我们需要一个方法对于一些资源进行批量命名。
-
这里我给出了一个方式。我们把资源的Path作为资源的AssetBundleName,这样在AssetBundle中的文件分类也是和资源文件夹的分类一样的,方便管理。当然,你也可以不按照这个规定来,只要适合项目实际情况就好了。
- 1
- 2
- 3
- 4
- 5
- 6
- 7
- 8
- 9
- 10
- 11
- 12
- 13
- 14
- 15
- 16
- 17
- 18
- 19
- 20
- 21
- 22
- 23
- 24
- 25
- 26
- 27
- 28
- 29
- 30
- 31
- 32
- 33
- 34
- 35
- 36
- 37
- 38
- 39
- 40
- 41
- 42
- 43
- 44
- 45
- 46
- 47
- 48
- 49
- 50
- 51
- 52
- 53
- 54
- 55
- 56
- 57
- 58
- 59
- 60
- 61
- 62
- 63
- 64
- 65
- 66
- 67
- 68
- 69
- 70
- 71
- 72
- 73
- 74
- 75
- 76
- 77
- 78
- 79
- 80
- 81
- 82
- 83
- 84
- 85
- 86
- 87
- 88
- 89
- 90
- 91
- 92
- 93
- 94
- 95
- 96
- 97
- 98
- 99
- 100
- 101
- 102
- 103
- 104
- 105
- 106
- 107
- 1
- 2
- 3
- 4
- 5
- 6
- 7
- 8
- 9
- 10
- 11
- 12
- 13
- 14
- 15
- 16
- 17
- 18
- 19
- 20
- 21
- 22
- 23
- 24
- 25
- 26
- 27
- 28
- 29
- 30
- 31
- 32
- 33
- 34
- 35
- 36
- 37
- 38
- 39
- 40
- 41
- 42
- 43
- 44
- 45
- 46
- 47
- 48
- 49
- 50
- 51
- 52
- 53
- 54
- 55
- 56
- 57
- 58
- 59
- 60
- 61
- 62
- 63
- 64
- 65
- 66
- 67
- 68
- 69
- 70
- 71
- 72
- 73
- 74
- 75
- 76
- 77
- 78
- 79
- 80
- 81
- 82
- 83
- 84
- 85
- 86
- 87
- 88
- 89
- 90
- 91
- 92
- 93
- 94
- 95
- 96
- 97
- 98
- 99
- 100
- 101
- 102
- 103
- 104
- 105
- 106
- 107
-
具体使用方法:
选中资源视图中的某个文件夹,然后点击New AB Editor,选中对应的选项:
SetAssetBundleName : 自动设置该文件夹所有资源的AssetBunldName。
GetAssetBundleName : 控制台输出所有设置过AssetBundleName的资源的Name。
ClearAssetBundleName : 清除该文件夹所有资源的AssetBunldName。
基本上新版的AssetBundle使用方法就介绍到这里了。如果你有疑惑或者以上文章有什么错误还望你在下面评论区指出。本人致以万分感谢!
最后附上以上Demo源码地址:http://download.csdn.net/detail/e295166319/9704729


 1425
1425

 被折叠的 条评论
为什么被折叠?
被折叠的 条评论
为什么被折叠?
 到【灌水乐园】发言


