


系列文章目录
Behavoir Tree(BT树)–基本概念
Behavoir Tree(BT树)–c++实现
Behavoir Tree(BT树)–c++实现第二节
本片文章接着上一篇接着讲述BT树的C++实现以及有关的注意事项。
目录
使用Subtree组合BT树
我们可以将更小且可重用的BT树组合成大规模BT树。换句话说,我们想要创建分层行为树。
这可以很容易地在 XML 中定义多个树,包括一个到另一个。
CrossDoor behavior
这个例子使用了装饰器和选择器。
<root main_tree_to_execute = "MainTree">

    <BehaviorTree ID="DoorClosed">
        <Sequence name="door_closed_sequence">
            <Inverter>
                <IsDoorOpen/>
            </Inverter>
            <RetryUntilSuccessful num_attempts="4">
                <OpenDoor/>
            </RetryUntilSuccessful>
            <PassThroughDoor/>
        </Sequence>
    </BehaviorTree>

    <BehaviorTree ID="MainTree">
        <Fallback name="root_Fallback">
            <Sequence name="door_open_sequence">
                <IsDoorOpen/>
                <PassThroughDoor/>
            </Sequence>
            <SubTree ID="DoorClosed"/>
            <PassThroughWindow/>
        </Fallback>
    </BehaviorTree>

</root>
可以注意到,我们将树的一个非常复杂的分支(在门关闭时执行的分支)封装到一个名为 DoorClosed 的单独树中。
这个BT树实现了:
- 如果门是开的,”PassThroughDoor“
- 如果门是关的,尝试4次"OpenDoor".然后"PassThroughDoor"
- 如果不能打开门,“PassThroughWindow”
Loggers
在 C++ 方面,我们不需要做任何事情来构建可重用的子树。
因此,我们借此机会介绍 BehaviorTree.CPP 的另一个简洁功能:记录器Loggers。
Logger是一种显示、记录和/或发布树中任何状态变化的机制。
int main()
{
    using namespace BT;
    BehaviorTreeFactory factory;

    // register all the actions into the factory
    // We don't show how these actions are implemented, since most of the
    // times they just print a message on screen and return SUCCESS.
    // See the code on Github for more details.
    factory.registerSimpleCondition("IsDoorOpen", std::bind(IsDoorOpen));
    factory.registerSimpleAction("PassThroughDoor", std::bind(PassThroughDoor));
    factory.registerSimpleAction("PassThroughWindow", std::bind(PassThroughWindow));
    factory.registerSimpleAction("OpenDoor", std::bind(OpenDoor));
    factory.registerSimpleAction("CloseDoor", std::bind(CloseDoor));
    factory.registerSimpleCondition("IsDoorLocked", std::bind(IsDoorLocked));
    factory.registerSimpleAction("UnlockDoor", std::bind(UnlockDoor));

    // Load from text or file...
    auto tree = factory.createTreeFromText(xml_text);

    // This logger prints state changes on console
    StdCoutLogger logger_cout(tree);

    // This logger saves state changes on file
    FileLogger logger_file(tree, "bt_trace.fbl");

    // This logger stores the execution time of each node
    MinitraceLogger logger_minitrace(tree, "bt_trace.json");

#ifdef ZMQ_FOUND
    // This logger publish status changes using ZeroMQ. Used by Groot
    PublisherZMQ publisher_zmq(tree);
#endif

    printTreeRecursively(tree.rootNode());

    //while (1)
    {
        NodeStatus status = NodeStatus::RUNNING;
        // Keep on ticking until you get either a SUCCESS or FAILURE state
        while( status == NodeStatus::RUNNING)
        {
            status = tree.tickRoot();
            CrossDoor::SleepMS(1);   // optional sleep to avoid "busy loops"
        }
        CrossDoor::SleepMS(2000);
    }
    return 0;
}
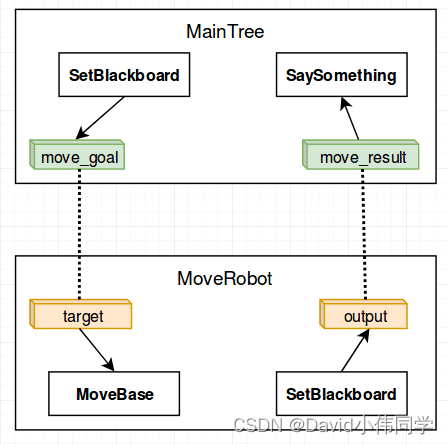
在树和子树中重映射接口
在 CrossDoor 示例中,我们看到从父节点(示例中为 MainTree)的角度来看,子树看起来像单个叶节点。
此外,为避免在非常大的树中出现名称冲突,任何树和子树都使用不同的 Blackboard 实例。
出于这个原因,我们需要将树的端口显式连接到其子树的端口。不需要修改 C++ 实现,因为重映射完全在 XML 定义中完成。
例子
<root main_tree_to_execute = "MainTree">

    <BehaviorTree ID="MainTree">

        <Sequence name="main_sequence">
            <SetBlackboard output_key="move_goal" value="1;2;3" />
            <SubTree ID="MoveRobot" target="move_goal" output="move_result" />
            <SaySomething message="{move_result}"/>
        </Sequence>

    </BehaviorTree>

    <BehaviorTree ID="MoveRobot">
        <Fallback name="move_robot_main">
            <SequenceStar>
                <MoveBase       goal="{target}"/>
                <SetBlackboard output_key="output" value="mission accomplished" />
            </SequenceStar>
            <ForceFailure>
                <SetBlackboard output_key="output" value="mission failed" />
            </ForceFailure>
        </Fallback>
    </BehaviorTree>

</root>
注意:
- 我们有一个"MainTreee",它包含一个子树叫"MoveRobot"
- 我们想要链接(重映射)MoveRobot和MainTree的接口
- 我们用关键词"internal/external"表示子树和主树
- 下图表示了两个树的映射关系。
在 C++ 方面,我们不需要做太多事情。出于调试目的,我们可以使用 debugMessage() 方法显示有关balckboard当前状态的一些信息。
int main()
{
    BT::BehaviorTreeFactory factory;

    factory.registerNodeType<SaySomething>("SaySomething");
    factory.registerNodeType<MoveBaseAction>("MoveBase");

    auto tree = factory.createTreeFromText(xml_text);

    NodeStatus status = NodeStatus::RUNNING;
    // Keep on ticking until you get either a SUCCESS or FAILURE state
    while( status == NodeStatus::RUNNING)
    {
        status = tree.tickRoot();
        SleepMS(1);   // optional sleep to avoid "busy loops"
    }

    // let's visualize some information about the current state of the blackboards.
    std::cout << "--------------" << std::endl;
    tree.blackboard_stack[0]->debugMessage();
    std::cout << "--------------" << std::endl;
    tree.blackboard_stack[1]->debugMessage();
    std::cout << "--------------" << std::endl;

    return 0;
}

/* Expected output:

    [ MoveBase: STARTED ]. goal: x=1 y=2.0 theta=3.00
    [ MoveBase: FINISHED ]
    Robot says: mission accomplished
    --------------
    move_result (std::string) -> full
    move_goal (Pose2D) -> full
    --------------
    output (std::string) -> remapped to parent [move_result]
    target (Pose2D) -> remapped to parent [move_goal]
    --------------
*/
如何使用多个 XML 文件来存储子树
在前面的例子中,我们总是从单个 XML 文件创建一整棵树。如果使用了多个子树,它们都将包含在同一个 XML 中。在最新版本的 BT.CPP (3.7+) 中,用户可以更轻松地从多个文件加载树。
使用"include"加载文件
考虑调用 2 个不同子树的主树。
main_tree.xml
<root main_tree_to_execute = "MainTree">
    <include path="./subtree_A.xml" />
    <include path="./subtree_B.xml" />
    <BehaviorTree ID="MainTree">
        <Sequence>
            <SaySomething message="starting MainTree" />
            <SubTree ID="SubTreeA" />
            <SubTree ID="SubTreeB" />
        </Sequence>
    </BehaviorTree>
<root>
subtree_A.xml
<root>
    <BehaviorTree ID="SubTreeA">
        <SaySomething message="Executing Sub_A" />
    </BehaviorTree>
</root>
subtree_B.xml:
<root>
    <BehaviorTree ID="SubTreeB">
        <SaySomething message="Executing Sub_B" />
    </BehaviorTree>
</root>
注意到,我们在 main_tree.xml 中包含了两个相对路径,它们告诉 BehaviorTreeFactory 在哪里可以找到所需的依赖项。
接着我们需要像往常一样创建树就行了:
factory.createTreeFromFile("main_tree.xml")
手动加载多文件
如果我们不想将相对路径和硬编码路径添加到我们的 XML 中,或者如果我们想实例化一个子树而不是主树,那么自 BT.CPP 3.7+ 起就有一种新方法。
<root>
    <BehaviorTree ID="MainTree">
        <Sequence>
            <SaySomething message="starting MainTree" />
            <SubTree ID="SubTreeA" />
            <SubTree ID="SubTreeB" />
        </Sequence>
    </BehaviorTree>
<root>
接下来手动加载多个文件
int main()
{
    BT::BehaviorTreeFactory factory;
    factory.registerNodeType<DummyNodes::SaySomething>("SaySomething");

    // Register the behavior tree definitions, but don't instantiate them, yet.
    // Order is not important.
    factory.registerBehaviorTreeFromText("main_tree.xml");
    factory.registerBehaviorTreeFromText("subtree_A.xml");
    factory.registerBehaviorTreeFromText("subtree_B.xml");

    //Check that the BTs have been registered correctly
    std::cout << "Registered BehaviorTrees:" << std::endl;
    for(const std::string& bt_name: factory.registeredBehaviorTrees())
    {
        std::cout << " - " << bt_name << std::endl;
    }

    // You can create the MainTree and the subtrees will be added automatically.
    std::cout << "----- MainTree tick ----" << std::endl;
    auto main_tree = factory.createTree("MainTree");
    main_tree.tickRoot();

    // ... or you can create only one of the subtree
    std::cout << "----- SubA tick ----" << std::endl;
    auto subA_tree = factory.createTree("SubTreeA");
    subA_tree.tickRoot();

    return 0;
}
/* Expected output:

Registered BehaviorTrees:
 - MainTree
 - SubTreeA
 - SubTreeB
----- MainTree tick ----
Robot says: starting MainTree
Robot says: Executing Sub_A
Robot says: Executing Sub_B
----- SubA tick ----
Robot says: Executing Sub_A
在初始化和/或构造期间传递额外的参数
在前面的简单例子中,我们都“被迫”提供具有以下签名的构造函数
MyCustomNode(const std::string& name, const NodeConfiguration& config);
有时需要向我们的类的构造函数传递额外的参数、指针、引用等。许多人使用blackboard来做到这一点:但是这是不推荐的。
接下来,我们将只使用“参数”这个词。即使理论上可以使用输入端口传递这些参数,但如果出现以下情况,那将是错误的方法:
- 这些参数在部署时是已知的。
- 参数在运行时不会改变。
- 不需要从 XML 设置参数。
如果所有这些条件都满足,那么使用blackboard会很麻烦并且非常不鼓励使用。
方法一 注册自定义builder
考虑下面这个自定义节点Action_A。我们想传递三个额外的参数;它们可以是任意复杂的对象,您不限于内置类型。
// Action_A has a different constructor than the default one.
class Action_A: public SyncActionNode
{

public:
    // additional arguments passed to the constructor
    Action_A(const std::string& name, const NodeConfiguration& config,
             int arg1, double arg2, std::string arg3 ):
        SyncActionNode(name, config),
        _arg1(arg1),
        _arg2(arg2),
        _arg3(arg3) {}

    // this example doesn't require any port
    static PortsList providedPorts() { return {}; }

    // tick() can access the private members
    NodeStatus tick() override;

private:
    int _arg1;
    double _arg2;
    std::string _arg3;
};
这个节点接下来应该这样被注册:
BehaviorTreeFactory factory;

// A node builder is a functor that creates a std::unique_ptr<TreeNode>.
// Using lambdas or std::bind, we can easily "inject" additional arguments.
NodeBuilder builder_A =
   [](const std::string& name, const NodeConfiguration& config)
{
    return std::make_unique<Action_A>( name, config, 42, 3.14, "hello world" );
};

// BehaviorTreeFactory::registerBuilder is a more general way to
// register a custom node.
factory.registerBuilder<Action_A>( "Action_A", builder_A);

// Register more custom nodes, if needed.
// ....

// The rest of your code, where you create and tick the tree, goes here.
// ....
方法2:使用init方法
我们还可以在触发树之前调用init方法:
class Action_B: public SyncActionNode
{

public:
    // The constructor looks as usual.
    Action_B(const std::string& name, const NodeConfiguration& config):
        SyncActionNode(name, config) {}

    // We want this method to be called ONCE and BEFORE the first tick()
    void init( int arg1, double arg2, const std::string& arg3 )
    {
        _arg1 = (arg1);
        _arg2 = (arg2);
        _arg3 = (arg3);
    }

    // this example doesn't require any port
    static PortsList providedPorts() { return {}; }

    // tick() can access the private members
    NodeStatus tick() override;

private:
    int _arg1;
    double _arg2;
    std::string _arg3;
};
我们注册和初始化 Action_B 的方式略有不同:
BehaviorTreeFactory factory;

// The regitration of  Action_B is done as usual, but remember
// that we still need to call Action_B::init()
factory.registerNodeType<Action_B>( "Action_B" );

// Register more custom nodes, if needed.
// ....

// Create the whole tree
auto tree = factory.createTreeFromText(xml_text);

// Iterate through all the nodes and call init() if it is an Action_B
for( auto& node: tree.nodes )
{
    // Not a typo: it is "=", not "=="
    if( auto action_B = dynamic_cast<Action_B*>( node.get() ))
    {
        action_B->init( 42, 3.14, "hello world");
    }
}

// The rest of your code, where you tick the tree, goes here.
// ....
使用协程(Coroutines)的异步操作
BehaviorTree.CPP 提供了两个易于使用的abstraction来创建异步操作.
异步操作比如说:
- 需要很长时间才能得出结果。
- 可能返回“正在运行”。
- 可以暂停。
第一个类是 AsyncActionNode,它在单独的线程中执行 tick() 方法。
接着我们介绍第二种:CoroActionNode,这是一种使用协程实现类似结果的不同操作。协程不会产生新线程并且效率更高。此外,您无需担心代码中的线程安全…
在 Coroutines 中,当用户希望暂停执行 Action 时,应显式调用 yield 方法。CoroActionNode 将此 yield 函数包装到一个方便的方法 setStatusRunningAndYield() 中。
C++例子
typedef std::chrono::milliseconds Milliseconds;

class MyAsyncAction: public CoroActionNode
{
  public:
    MyAsyncAction(const std::string& name):
        CoroActionNode(name, {})
    {}

  private:
    // This is the ideal skeleton/template of an async action:
    //  - A request to a remote service provider.
    //  - A loop where we check if the reply has been received.
    //  - You may call setStatusRunningAndYield() to "pause".
    //  - Code to execute after the reply.
    //  - A simple way to handle halt().
    NodeStatus tick() override
    {
        std::cout << name() <<": Started. Send Request to server." << std::endl;

        TimePoint initial_time = Now();
        TimePoint time_before_reply = initial_time + Milliseconds(100);

        int count = 0;
        bool reply_received = false;

        while( !reply_received )
        {
            if( count++ == 0)
            {
                // call this only once
                std::cout << name() <<": Waiting Reply..." << std::endl;
            }
            // pretend that we received a reply
            if( Now() >= time_before_reply )
            {
                reply_received = true;
            }

            if( !reply_received )
            {
                // set status to RUNNING and "pause/sleep"
                // If halt() is called, we will NOT resume execution
                setStatusRunningAndYield();
            }
        }

        // This part of the code is never reached if halt() is invoked,
        // only if reply_received == true;
        std::cout << name() <<": Done. 'Waiting Reply' loop repeated "
                  << count << " times" << std::endl;
        cleanup(false);
        return NodeStatus::SUCCESS;
    }

    // you might want to cleanup differently if it was halted or successful
    void cleanup(bool halted)
    {
        if( halted )
        {
            std::cout << name() <<": cleaning up after an halt()\n" << std::endl;
        }
        else{
            std::cout << name() <<": cleaning up after SUCCESS\n" << std::endl;
        }
    }

    void halt() override
    {
        std::cout << name() <<": Halted." << std::endl;
        cleanup(true);
        // Do not forget to call this at the end.
        CoroActionNode::halt();
    }

    TimePoint Now()
    {
        return std::chrono::high_resolution_clock::now();
    };
};
您可能已经注意到,该操作“假装”等待请求消息;后者将在 100 毫秒后到达。
为了增加趣味,我们创建了一个包含两个动作的序列,但整个序列将在 150 毫秒后因超时而暂停。
 <root >
     <BehaviorTree>
        <Timeout msec="150">
            <SequenceStar name="sequence">
                <MyAsyncAction name="action_A"/>
                <MyAsyncAction name="action_B"/>
            </SequenceStar>
        </Timeout>
     </BehaviorTree>
 </root>
int main()
{
    // Simple tree: a sequence of two asycnhronous actions,
    // but the second will be halted because of the timeout.

    BehaviorTreeFactory factory;
    factory.registerNodeType<MyAsyncAction>("MyAsyncAction");

    auto tree = factory.createTreeFromText(xml_text);

    //---------------------------------------
    // keep executin tick until it returns etiher SUCCESS or FAILURE
    while( tree.tickRoot() == NodeStatus::RUNNING)
    {
        std::this_thread::sleep_for( Milliseconds(10) );
    }
    return 0;
}

/* Expected output:

action_A: Started. Send Request to server.
action_A: Waiting Reply...
action_A: Done. 'Waiting Reply' loop repeated 11 times
action_A: cleaning up after SUCCESS

action_B: Started. Send Request to server.
action_B: Waiting Reply...
action_B: Halted.
action_B: cleaning up after an halt()

*/


 4260
4260


 被折叠的 条评论
为什么被折叠?
被折叠的 条评论
为什么被折叠?
 到【灌水乐园】发言


