


写在前面
1、openmvg是一个用于实现structure from motion的开源库,实现了完整的sfm pipeline,并有说明文档:
https://openmvg.readthedocs.io/en/latest/
2、本文内容
openmvg v1.6的编译
openmvg v1.6的使用
3、平台
windows10, visual studio 2019
4、转载请注明出处:
https://blog.csdn.net/qq_41102371/article/details/123031709
获取代码
mkdir openmvg
cd openmvg
git clone --recursive https://github.com/openMVG/openMVG.git
clone下来的OpenMVG文件夹复制并将副本重命名为openMVG_v16
v1.6编译
cd openMVG_v16
# 将版本切换至v1.6
git checkout v1.6
cd ..
修改代码
使用vs2019编译会报错,issue里面已经解决,需要将v1.6的代码改一下
https://github.com/openMVG/openMVG/issues/1765
在src/openMVG/matching/kvld/algorithm.h里面,将anglefrom函数改成
inline bool anglefrom( const float& x, const float& y, float& angle )
{
  float ang = 0.f;
  if (x != 0 )
    ang = atan( y / x );
  else if (y > 0 )
    ang = PI_ / 2;
  else if (y < 0 )
    ang =- PI_ / 2;
  else return false;

  if (x < 0 )
    ang += PI_;
  while (ang < 0)
    ang += 2 * PI_;
  while (ang >= 2 * PI_)
    ang -= 2 * PI_;
  angle = ang;
  assert( angle >= 0 && angle < 2 * PI_ );
  return true;
}
编译Debug
cmake -DCMAKE_BUILD_TYPE=Debug -DCMAKE_INSTALL_PREFIX="./install_v16d" -S .\openMVG_v16\src\ -B .\build_v16d
如果出现了下面的warning
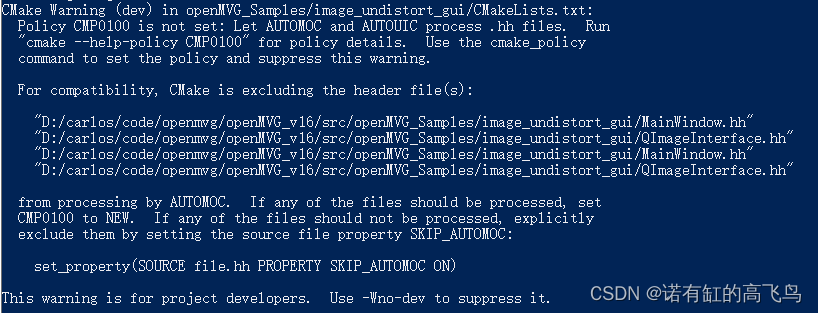
请换成
cmake -DCMAKE_BUILD_TYPE=Debug -DCMAKE_INSTALL_PREFIX="./install_v16d" -DOpenMVG_BUILD_GUI_SOFTWARES=OFF -S .\openMVG_v16\src\ -B .\build_v16d
不然后面会编译不通过
开始编译
可以使用以下命令编译,也可以用visual studio打开sln进行编译
cmake --build .\build_v16d --config Debug --target install
可能出现的问题:
error C1128: 节数超过对象文件格式限制: 请使用 /bigobj 进行编译,参考
https://www.cnblogs.com/YouLing0809/p/6735731.html
Release
cmake -DCMAKE_BUILD_TYPE=Release -DCMAKE_INSTALL_PREFIX="./install_v16r" -DOpenMVG_BUILD_GUI_SOFTWARES=OFF -S .\openMVG_v16\src\ -B .\build_v16r
cmake --build .\build_v16r --config Release --target install
v1.6使用
官方教程
https://openmvg.readthedocs.io/en/latest/software/SfM/SfM/
下面提供两种方式
1、命令行逐步执行
新建文件夹
mkdir test
下载图像数据
https://github.com/openMVG/ImageDataset_SceauxCastle
将数据的image文件夹放在test目录下
初始化图像
mkdir .\test\matches
.\install_v16r\bin\openMVG_main_SfMInit_ImageListing.exe -i .\test\images -d .\openMVG_v16\src\openMVG\exif\sensor_width_database\sensor_width_camera_database.txt -o .\test\matches
计算特征
.\install_v16r\bin\openMVG_main_ComputeFeatures.exe -i .\test\matches\sfm_data.json -o .\test\matches
特征匹配
.\install_v16r\bin\openMVG_main_ComputeMatches.exe -i .\test\matches\sfm_data.json -o .\test\matches
增量式重建
mkdir .\test\output
.\install_v16r\bin\openMVG_main_IncrementalSfM.exe -i .\test\matches\sfm_data.json -m .\test\matches -o .\test\output
生成带颜色的点云
.\install_v16r\bin\openMVG_main_ComputeSfM_DataColor.exe -i .\test\output\sfm_data.bin -o .\test\output\sfm_data_color.ply
从已知位姿恢复结构
.\install_v16r\bin\openMVG_main_ComputeStructureFromKnownPoses.exe -i .\test\output\sfm_data.bin -m .\test\matches -o .\test\output\robustFitting.json
从已知的相机参数导出未失真的图像
.\install_v16r\bin\openMVG_main_ExportUndistortedImages -i .\test\output\sfm_data.bin -o .\test\undistortedImages
导出至openmvs进行稠密重建
https://openmvg.readthedocs.io/en/latest/software/MVS/OpenMVS/
mkdir .\test\mvs
.\install_v16r\bin\openMVG_main_openMVG2openMVS.exe -i .\test\output\robustFitting.json -d .\test\undistortedImages -o .\test\mvs\scene.mvs
2、用python
新建test_py文件夹,把images放在test_py下
python .\build_v16r\software\SfM\SfM_SequentialPipeline.py ./test_py/images ./test_py/reconstruction
mkdir .\test_py\mvs
.\install_v16r\bin\openMVG_main_openMVG2openMVS.exe -i .\test_py\reconstruction\reconstruction_sequential\sfm_data.bin -d .\test_py\undistortedImages -o .\test_py\mvs\scene.mvs
稠密重建
见:
openmvs编译与使用 https://blog.csdn.net/qq_41102371/article/details/123054992
参考
https://github.com/openMVG/openMVG/blob/develop/BUILD.md
https://www.cnblogs.com/YouLing0809/p/6735731.html
完
如有错漏,敬请指正
--------------------------------------------------------------------------------------------诺有缸的高飞鸟202202


 2498
2498

 被折叠的 条评论
为什么被折叠?
被折叠的 条评论
为什么被折叠?
 到【灌水乐园】发言


