


一、Altitude 和 Position 模式
PX4 通过视觉进入 Altitude 和 Position 模式的核心就是向 /mavros/vision_posion/pose 话题发送里程计信息,本节通过 VINS-Fusion 的里程计信息为 PX4 提供视觉信息,从而达到无人机 视觉定高和定点 的目的,主要工作为创建一个将 vins 里程计信息发布给 /mavros/vision_pose/pose 话题的功能包。
1.1 创建 vision_to_mavros 功能包
首先创建一个工作空间
mkdir -p ~/catkin_ws/src/px4ctrl/src/
cd ~/catkin_ws/src/px4ctrl/src/
然后创建一个名为 vision_to_mavros 的功能包
catkin_create_pkg vision_to_mavros roscpp std_msgs geometry_msgs mavros_msgs nav_msgs tf2_eigen tf在 ~/catkin_ws/src/px4ctrl/src/vision_to_mavros/src/ 目录下创建一个 vision_to_mavros 节点,其主要功能是将 VINS-Fusion 的 body 坐标系在 world 坐标系下为位姿转化为 base_link 在 map 坐标系中的位姿,并将转化后的位姿信息发布给 /mavros/vision_pose/pose 话题,详情参考
https://blog.csdn.net/qq_44998513/article/details/133877790
如果你使用的是 Realsense D435i 相机,并且使用 Realsense D435i 相机的 IMU 数据作为 VINS-Fuison 的 IMU 数据,则可以使用如下代码进行坐标变换。如果不是 Realsense D435i,也可以发布这个数据,从而切入定高和定点(因为切入定高和定点的条件是向 mavros 发布定位数据),但是在实际飞行中会由于坐标不对应而出现很多问题。
#include <ros/ros.h>
#include <geometry_msgs/PoseStamped.h>
#include <nav_msgs/Odometry.h>
#include <Eigen/Eigen>


Eigen::Vector3d p_mav;
Eigen::Quaterniond q_mav;


void vins_callback(const nav_msgs::Odometry::ConstPtr &msg)
{
    if(msg->header.frame_id == "world")
    {
        p_mav = Eigen::Vector3d(msg->pose.pose.position.y, -msg->pose.pose.position.x, msg->pose.pose.position.z);

        q_mav = Eigen::Quaterniond(msg->pose.pose.orientation.w, msg->pose.pose.orientation.x, msg->pose.pose.orientation.y, msg->pose.pose.orientation.z);
        Eigen::AngleAxisd roll(M_PI/2,Eigen::Vector3d::UnitX()); // 绕 x 轴旋转 pi / 2
        Eigen::AngleAxisd pitch(0,Eigen::Vector3d::UnitY());
        Eigen::AngleAxisd yaw(0,Eigen::Vector3d::UnitZ());

        Eigen::Quaterniond _q_mav = roll * pitch * yaw;
        q_mav = q_mav * _q_mav;

        Eigen::Vector3d ypr;
        ypr(2) = atan2(2 * (q_mav.w() * q_mav.x() + q_mav.y() * q_mav.z()), 1 - 2 * (q_mav.x() * q_mav.x() + q_mav.y() * q_mav.y()));
        ypr(1) = asin(2 * (q_mav.w() * q_mav.y() - q_mav.z() * q_mav.x()));
        ypr(0) = atan2(2 * (q_mav.w() * q_mav.z() + q_mav.x() * q_mav.y()), 1 - 2 * (q_mav.y() * q_mav.y() + q_mav.z() * q_mav.z()));

        q_mav = Eigen::AngleAxisd(ypr(0), Eigen::Vector3d::UnitZ())
            * Eigen::AngleAxisd(-ypr(2), Eigen::Vector3d::UnitY())
            * Eigen::AngleAxisd(ypr(1), Eigen::Vector3d::UnitX());
    }
}


int main(int argc, char **argv)
{
    ros::init(argc, argv, "vins_to_mavros");
    ros::NodeHandle nh("~");

    ros::Subscriber slam_sub = nh.subscribe<nav_msgs::Odometry>("odom", 100, vins_callback);

    ros::Publisher vision_pub = nh.advertise<geometry_msgs::PoseStamped>("vision_pose", 10);


    // the setpoint publishing rate MUST be faster than 2Hz
    ros::Rate rate(20.0);

    ros::Time last_request = ros::Time::now();

    while(ros::ok()){
        geometry_msgs::PoseStamped vision;

        vision.pose.position.x = p_mav[0];
        vision.pose.position.y = p_mav[1];
        vision.pose.position.z = p_mav[2];

        vision.pose.orientation.x = q_mav.x();
        vision.pose.orientation.y = q_mav.y();
        vision.pose.orientation.z = q_mav.z();
        vision.pose.orientation.w = q_mav.w();

        vision.header.stamp = ros::Time::now();
        vision_pub.publish(vision);

        ROS_INFO("\nposition:\n   x: %.18f\n   y: %.18f\n   z: %.18f\norientation:\n   x: %.18f\n   y: %.18f\n   z: %.18f\n   w: %.18f", \
        p_mav[0],p_mav[1],p_mav[2],q_mav.x(),q_mav.y(),q_mav.z(),q_mav.w());

        ros::spinOnce();
        rate.sleep();
    }

    return 0;
}
如果采用了飞控的 imu,则不需要作坐标变换,上面的代码需要作修改,代码如下
#include <ros/ros.h>
#include <geometry_msgs/PoseStamped.h>
#include <nav_msgs/Odometry.h>
#include <Eigen/Eigen>


Eigen::Vector3d p_mav;
Eigen::Quaterniond q_mav;


void vins_callback(const nav_msgs::Odometry::ConstPtr &msg)
{
    if(msg->header.frame_id == "world")
    {
        p_mav = Eigen::Vector3d(msg->pose.pose.position.x, msg->pose.pose.position.y, msg->pose.pose.position.z);

        q_mav = Eigen::Quaterniond(msg->pose.pose.orientation.w, msg->pose.pose.orientation.x, msg->pose.pose.orientation.y, msg->pose.pose.orientation.z);
    }
}


int main(int argc, char **argv)
{
    ros::init(argc, argv, "vins_to_mavros");
    ros::NodeHandle nh("~");

    ros::Subscriber slam_sub = nh.subscribe<nav_msgs::Odometry>("odom", 100, vins_callback);

    ros::Publisher vision_pub = nh.advertise<geometry_msgs::PoseStamped>("vision_pose", 10);


    // the setpoint publishing rate MUST be faster than 2Hz
    ros::Rate rate(20.0);

    ros::Time last_request = ros::Time::now();

    while(ros::ok()){
        geometry_msgs::PoseStamped vision;

        vision.pose.position.x = p_mav[0];
        vision.pose.position.y = p_mav[1];
        vision.pose.position.z = p_mav[2];

        vision.pose.orientation.x = q_mav.x();
        vision.pose.orientation.y = q_mav.y();
        vision.pose.orientation.z = q_mav.z();
        vision.pose.orientation.w = q_mav.w();

        vision.header.stamp = ros::Time::now();
        vision_pub.publish(vision);

        ROS_INFO("\nposition:\n   x: %.18f\n   y: %.18f\n   z: %.18f\norientation:\n   x: %.18f\n   y: %.18f\n   z: %.18f\n   w: %.18f", \
        p_mav[0],p_mav[1],p_mav[2],q_mav.x(),q_mav.y(),q_mav.z(),q_mav.w());

        ros::spinOnce();
        rate.sleep();
    }

    return 0;
}
上述代码根据自己需求二选一即可!
接下来配置 CMakeList.txt 文件,在相应位置添加两行
add_executable(vins_to_mavros_node src/vins_to_mavros.cpp)
target_link_libraries(vins_to_mavros_node
  ${catkin_LIBRARIES}
)
然后在 ~/catkin_ws/src/px4ctrl/src/vision_to_mavros/launch/ 下创建一个 launch 文件用于启动该节点,其内容如下
<launch>
    <node pkg="vision_to_mavros"  type="vins_to_mavros_node" name="vins_to_mavros" output="screen">
        <remap from="~vision_pose" to="/mavros/vision_pose/pose" />
        <remap from="~odom" to="/vins_estimator/odometry" />
    </node>
</launch>
完成后编译该功能包
cd ~/catkin_ws/src/px4ctrl/
catkin_make
1.2. 启动 VINS-Fusion 提供里程计信息
接下来需要启动 d435i 相机和 vins 节点,参考
Ubuntu 20.04 配置 realsense-CSDN博客
Ubuntu 20.04 配置 VINS-Fusion-gpu + OpenCV 4.6.0-CSDN博客
以及刚刚编译好的 vision_to_mavros 功能包
source ~/catkin_ws/src/px4ctrl/devel/setup.bash
roslaunch vision_to_mavros vins_to_mavros.launch
以下是输出结果


注意到 vision_to_mavros 节点已经开始打印位置信息了,说明 mavros 已经能够收到视觉里程计信息了,输入 rostopic list 打印当前话题
lilabws001@lilabws001:~$ rostopic list
/camera/accel/imu_info
/camera/gyro/imu_info
/camera/imu
/camera/infra1/camera_info
/camera/infra1/image_rect_raw
/camera/infra1/image_rect_raw/compressed
/camera/infra1/image_rect_raw/compressed/parameter_descriptions
/camera/infra1/image_rect_raw/compressed/parameter_updates
/camera/infra1/image_rect_raw/compressedDepth
/camera/infra1/image_rect_raw/compressedDepth/parameter_descriptions
/camera/infra1/image_rect_raw/compressedDepth/parameter_updates
/camera/infra1/image_rect_raw/theora
/camera/infra1/image_rect_raw/theora/parameter_descriptions
/camera/infra1/image_rect_raw/theora/parameter_updates
/camera/infra1/metadata
/camera/infra2/camera_info
/camera/infra2/image_rect_raw
/camera/infra2/image_rect_raw/compressed
/camera/infra2/image_rect_raw/compressed/parameter_descriptions
/camera/infra2/image_rect_raw/compressed/parameter_updates
/camera/infra2/image_rect_raw/compressedDepth
/camera/infra2/image_rect_raw/compressedDepth/parameter_descriptions
/camera/infra2/image_rect_raw/compressedDepth/parameter_updates
/camera/infra2/image_rect_raw/theora
/camera/infra2/image_rect_raw/theora/parameter_descriptions
/camera/infra2/image_rect_raw/theora/parameter_updates
/camera/infra2/metadata
/camera/motion_module/parameter_descriptions
/camera/motion_module/parameter_updates
/camera/realsense2_camera_manager/bond
/camera/rgb_camera/parameter_descriptions
/camera/rgb_camera/parameter_updates
/camera/stereo_module/auto_exposure_roi/parameter_descriptions
/camera/stereo_module/auto_exposure_roi/parameter_updates
/camera/stereo_module/parameter_descriptions
/camera/stereo_module/parameter_updates
/diagnostics
/feature_tracker/feature
/mavros/vision_pose/pose
/rosout
/rosout_agg
/tf
/tf_static
/vins_estimator/camera_pose
/vins_estimator/camera_pose_right
/vins_estimator/camera_pose_visual
/vins_estimator/extrinsic
/vins_estimator/image_track
/vins_estimator/imu_propagate
/vins_estimator/key_poses
/vins_estimator/keyframe_point
/vins_estimator/keyframe_pose
/vins_estimator/margin_cloud
/vins_estimator/odometry
/vins_estimator/path
/vins_estimator/point_cloud
/vins_estimator/rectify_pose_left
/vins_estimator/rectify_pose_right
我们发现已经有 /mavros/vision_pose/pose 这个话题了,
1.3 设置 PX4 通过 Vision 定位
然后我们打开 QGroundControl,打开参数设置,搜索 EKF2_HGT_MODE,将其对应的值修改为 Vision

然后搜索 EKF2_AID_MASK,将其值修改为 24

1.4 切换 Altitude 和 Position 模式
接下来,只需要将飞控与机载电脑连接,然后启动 mavros 节点
roslaunch mavros px4.launch具体的配置可以参考
Ubuntu 安装并配置 mavros (USB 连接)_ubuntu安装mavros_想要个小姑娘的博客-CSDN博客
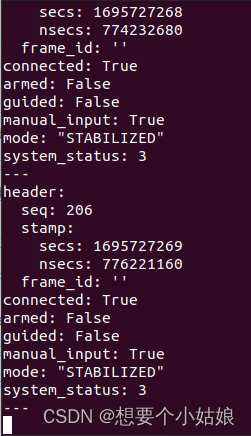
接下来订阅 /mavros/state 话题,
rostopic echo /mavros/state并查看节点状态,终端输入 rqt_graph

并且 /mavros/state 话题打印结果为
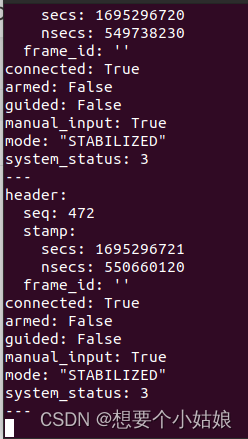
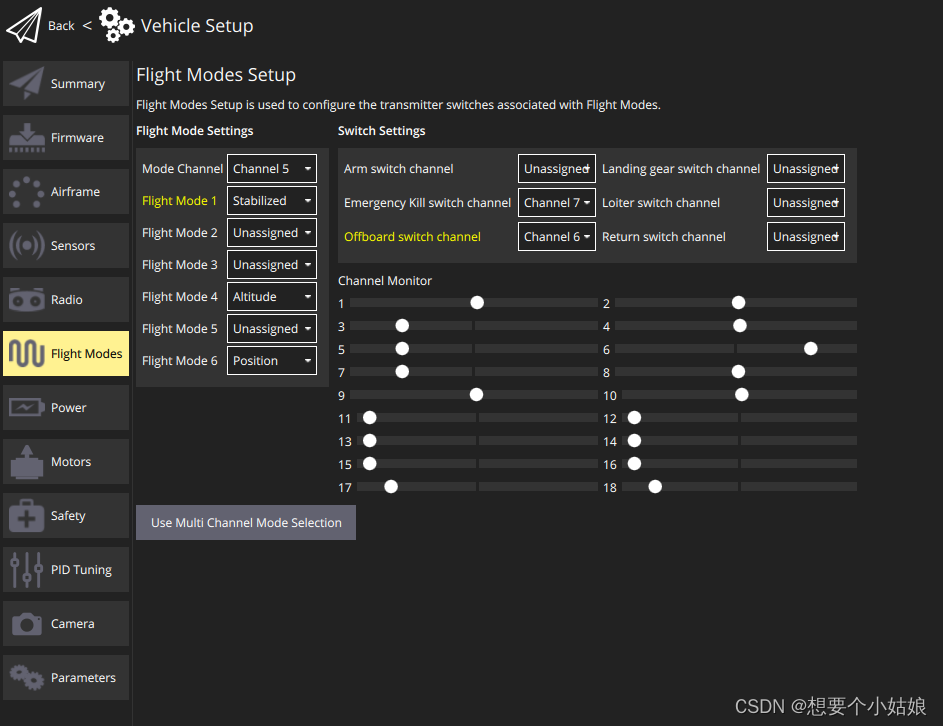
然后将遥控器连接上飞控,在 QGroundControl 中设置遥控器通道
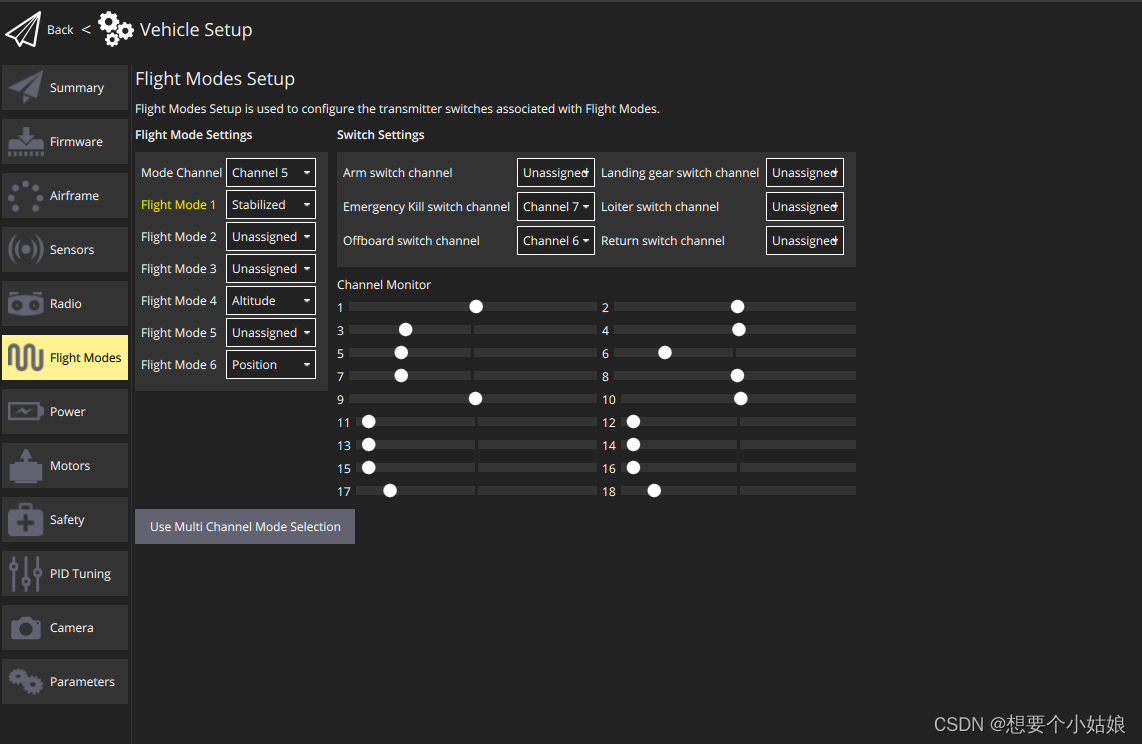
将通道五设置为 模式切换通道,并且设置飞行模式 1 为 自稳模式,飞行模式 4 为高度模式,飞行模式 6 设置为位置模式,设置完成后退出 QGroundControl(启动QGroundControl 会中断 mavros 节点的运行),然后重新启用 mavros 节点
roslaunch mavros px4.launch并打印输出 /mavros/state 话题信息
rostopic echo /mavros/state此时将 通道五 拨动到中位,我们发现 模式切换为了 ALTCTL,也就是 Altitude 模式(注意此时 VINS-Fusion 已经启动)
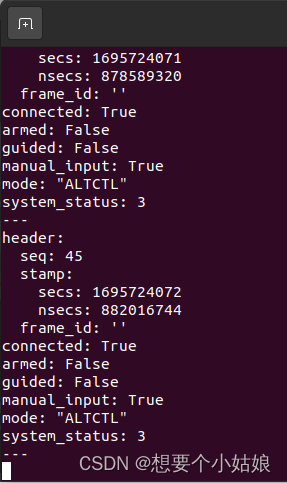
继续将 通道五 波动到上位,我们发现模式切换为了 POSCTL,也就是 Position 模式
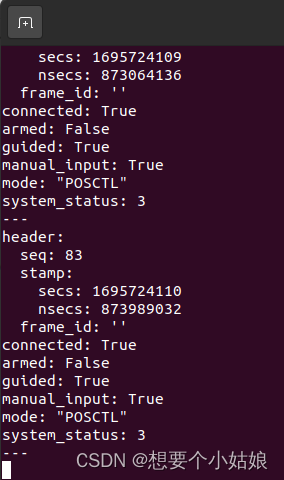
至此就通过 VINS-Fusion 的里程计数据实现了 PX4 的视觉定点和定高功能。
二、Offboard 模式
PX4 通过进入 offboard 模式的核心就是向 /mavros/setpoint_position/local 话题发送位置信息,本节主要工作为创建一个向 /mavros/setpoint_position/local 话题发布消息的功能包。
2.1 创建 offboard 功能包
在当前工作空间下创建一个名为 offboard 的功能包
cd ~/catkin_ws/src/px4ctrl/src/
catkin_create_pkg offboard roscpp std_msgs geometry_msgs mavros_msgs
然后在 ~/catkin_ws/src/px4ctrl/src/offboard/src 下创建一个 offboard 节点,其内容如下
/**
 * @file offb_node.cpp
 * @brief Offboard control example node, written with MAVROS version 0.19.x, PX4 Pro Flight
 * Stack and tested in Gazebo SITL
 */

#include <ros/ros.h>
#include <geometry_msgs/PoseStamped.h>
#include <mavros_msgs/CommandBool.h>
#include <mavros_msgs/SetMode.h>
#include <mavros_msgs/State.h>

mavros_msgs::State current_state;
void state_callback(const mavros_msgs::State::ConstPtr& msg){
    current_state = *msg;
}

int main(int argc, char **argv)
{
    ros::init(argc, argv, "offb_node");
    ros::NodeHandle nh;

    ros::Subscriber state_sub = nh.subscribe<mavros_msgs::State>
            ("mavros/state", 10, state_callback);
    ros::Publisher local_pos_pub = nh.advertise<geometry_msgs::PoseStamped>
            ("mavros/setpoint_position/local", 10);
    ros::ServiceClient arming_client = nh.serviceClient<mavros_msgs::CommandBool>
            ("mavros/cmd/arming");
    ros::ServiceClient set_mode_client = nh.serviceClient<mavros_msgs::SetMode>
            ("mavros/set_mode");

    //the setpoint publishing rate MUST be faster than 2Hz
    ros::Rate rate(20.0);

    // wait for FCU connection
    while(ros::ok() && !current_state.connected){
        ros::spinOnce();
        rate.sleep();
    }

    geometry_msgs::PoseStamped pose;
    pose.pose.position.x = 0;
    pose.pose.position.y = 0;
    pose.pose.position.z = 2;

    //send a few setpoints before starting
    for(int i = 100; ros::ok() && i > 0; --i){
        local_pos_pub.publish(pose);
        ros::spinOnce();
        rate.sleep();
    }

    // mavros_msgs::SetMode offb_set_mode;
    // offb_set_mode.request.custom_mode = "OFFBOARD";

    // mavros_msgs::CommandBool arm_cmd;
    // arm_cmd.request.value = true;

    // ros::Time last_request = ros::Time::now();

    while(ros::ok()){
        // if( current_state.mode != "OFFBOARD" &&
        //     (ros::Time::now() - last_request > ros::Duration(5.0))){
        //     if( set_mode_client.call(offb_set_mode) &&
        //         offb_set_mode.response.mode_sent){
        //         ROS_INFO("Offboard enabled");
        //     }
        //     last_request = ros::Time::now();
        // } else {
        //     if( !current_state.armed &&
        //         (ros::Time::now() - last_request > ros::Duration(5.0))){
        //         if( arming_client.call(arm_cmd) &&
        //             arm_cmd.response.success){
        //             ROS_INFO("Vehicle armed");
        //         }
        //         last_request = ros::Time::now();
        //     }
        // }

        local_pos_pub.publish(pose);

        ros::spinOnce();
        rate.sleep();
    }

    return 0;
}
配置 CMakeList.txt 文件,在相应位置添加两行
add_executable(offboard_node src/offboard.cpp)
target_link_libraries(offboard_node
  ${catkin_LIBRARIES}
)
然后在 ~/catkin_ws/src/px4ctrl/src/offboard/launch/ 下创建一个 launch 文件用于启动该节点,其内容如下
<launch>
    <node pkg="offboard"  type="offboard_node" name="offboard" output="screen">
        <remap from="~vision_pose" to="/mavros/vision_pose/pose" />
        <remap from="~odom" to="/vins_estimator/odometry" />
    </node>
</launch>
最后编译该功能包
cd ~/catkin_ws/src/px4ctrl/
catkin_make
2.2 切换 Offboard 模式
接下来,将飞控与机载电脑连接,然后启动 mavros 节点
roslaunch mavros px4.launch具体的配置可以参考
Ubuntu 安装并配置 mavros (USB 连接)_ubuntu安装mavros_想要个小姑娘的博客-CSDN博客
启动 offboard 节点
roslaunch offboard offboard.launch接下来订阅 /mavros/state 话题,
rostopic echo /mavros/state并查看节点状态,终端输入 rqt_graph
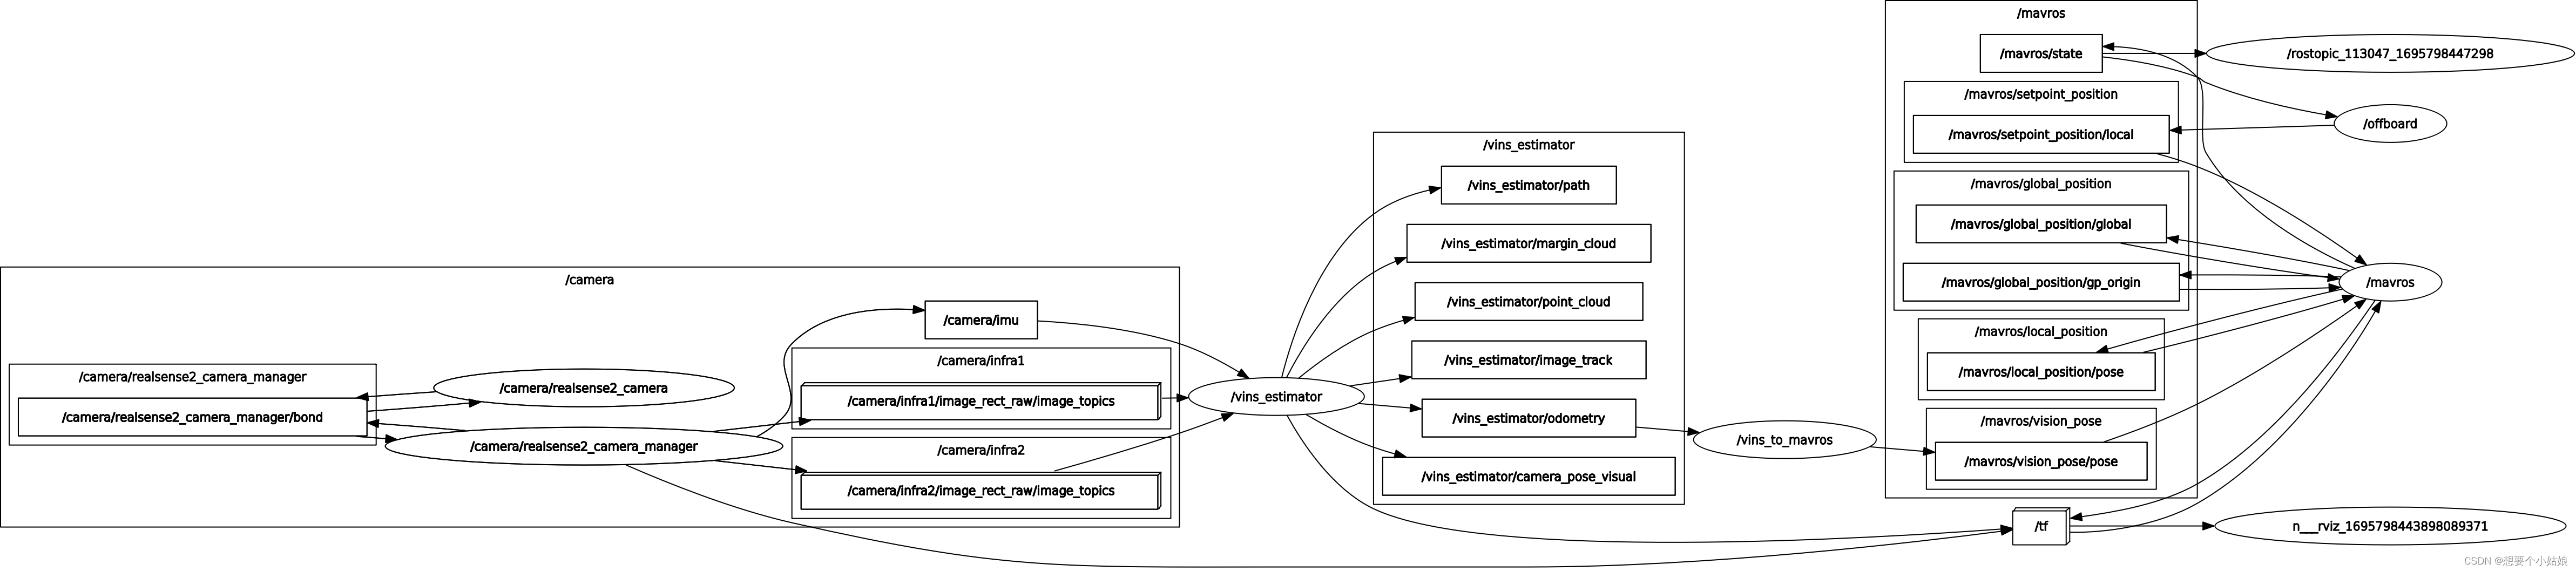
并且 /mavros/state 话题打印结果为
然后将遥控器连接上飞控,在 QGroundControl 中设置遥控器通道
将 Offboard switch channel 设置为通道六,设置完成后退出 QGroundControl(启动QGroundControl 会中断 mavros 节点的运行),然后重新启用 mavros 节点
此时将 通道六 拨动到上位,我们发现 模式切换为了 OFFBOARD,也就是 Offboard 模式,

需要注意的是,如果无法切入 OFFBARD 模式,需要设置 ROS_MASTER_URI 和 ROS_IP,然后再运行 offboard 节点,终端输入
export ROS_MASTER_URI=http://$home_ip:11311
export ROS_IP=$home_ip

source ~/catkin_ws/src/px4ctrl/devel/setup.bash
roslaunch offboard offboard.launch
至此就进入了 PX4 的 Offboard 模式,通过机载计算机编程向飞控发送指令,从而实现机载计算机对无人机的控制。


 3688
3688

 被折叠的 条评论
为什么被折叠?
被折叠的 条评论
为什么被折叠?
 到【灌水乐园】发言


