


1.概述
ros_control将机器人执行器编码器的关节状态数据,和输入设定点,作为输入。它使用一个通用的控制回路反馈机制,通常是一个PID控制器,来控制发送到执行器的输出,通常是力。
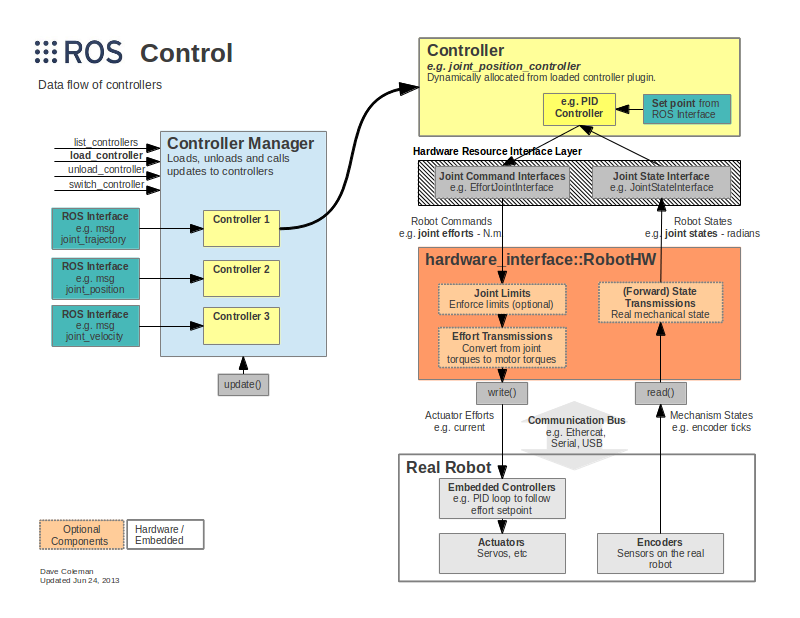
上图是ros_control的总体框架:
Controller Manager:控制器管理器;每个机器人可能有多个controller,所以这里有一个控制器管理器的概念,提供一种通用的接口来管理不同的controller。controller manager的输入就是ROS上层应用的输出。
Controller:joint控制器;controller可以完成每个joint的控制,请求下层的硬件资源,并且提供了PID控制器,读取硬件资源接口中的状态,在发布控制命令。
Hardware Resource Interface Lyayer:硬件资源接口层;为上下两层提供硬件资源的接口,是controller和RobotHw沟通的接口。
Hardware Interface:RobotHW:硬件抽象层;和硬件直接打交道,通过write和read方法来完成硬件的操作,这一层也包含关节限位、力矩转换、状态转换等功能。
Real Robot:实际的机器人;需要有自己的嵌入式控制器,接收到命令后需要反映到执行器上,比如接收到位置1的命令后,那就需要让执行器快速、稳定的到达位置1。
2.Controllers
ros_controllers这个功能包提供了已有的一些controllers:
-
effort_controllers - Command a desired force/torque to joints.
-
joint_effort_controller
-
joint_position_controller
-
joint_velocity_controller
-
-
joint_state_controller - Read all joint positions.
-
joint_state_controller
-
-
position_controllers - Set one or multiple joint positions at once.
-
joint_position_controller
-
joint_group_position_controller
-
-
velocity_controllers - Set one or multiple joint velocities at once.
-
joint_velocity_controller
-
joint_group_velocity_controller
-
-
joint_trajectory_controllers - Extra functionality for splining an entire trajectory.
-
position_controller
-
velocity_controller
-
effort_controller
-
position_velocity_controller
-
position_velocity_acceleration_controller
-
当然,您可以创建自己的,并且不限于下面的列表。可以参考
https://github.com/ros-controls/ros_control/wiki/controller_interface
3.Hardware Interfaces
Hardware Interface是controller和RobotHw沟通的接口,基本上和controllers的种类是对应的。
-
Joint Command Interfaces
-
Effort Joint Interface
-
Velocity Joint Interface
-
Position Joint Interface
-
-
Joint State Interfaces
-
Actuator State Interfaces
-
Actuator Command Interfaces
-
Effort Actuator Interface
-
Velocity Actuator Interface
-
Position Actuator Interface
-
-
Force-torque sensor Interface
-
IMU sensor Interface
同样可以自己创建需要的接口,可以参考:
https://github.com/ros-controls/ros_control/wiki/hardware_interface
4.Transmissions
Transmissions就是机器人的传动系统,机器人每个需要运动的关节都需要配置相应的Transmission。
可以通过代码完成
https://github.com/ros-controls/ros_control/wiki/transmission_interface
但大部分情况下,都会在URDF文件中直接添加
http://ros.org/wiki/urdf/XML/Transmission
<transmission name="simple_trans">
  <type>transmission_interface/SimpleTransmission</type>
  <joint name="foo_joint">
    <hardwareInterface>EffortJointInterface</hardwareInterface>
  </joint>
  <actuator name="foo_motor">
    <mechanicalReduction>50</mechanicalReduction>
    <hardwareInterface>EffortJointInterface</hardwareInterface>
  </actuator>
</transmission>
5.Joint Limits
Joint Limits是硬件抽象层中的一块,维护一个关节限位的数据结构,这些限位数据可以从机器人的URDF文件中加载,也可以ROS的参数服务器上加载(先用YAML配置文件导入ROS parameter server),这些限位数据不仅包含关节速度、位置、加速度、加加速度、力矩等方面的限位,还包含安全作用的位置软限位、速度边界(k_v)和位置边界(k_p)等等。
我们来看一个URDF中设置Joint Limits的例子:
<joint name="$foo_joint" type="revolute">
  <!-- other joint description elements -->

  <!-- Joint limits -->
  <limit lower="0.0"
         upper="1.0"
         effort="10.0"
         velocity="5.0" />

  <!-- Soft limits -->
  <safety_controller k_position="100"
                     k_velocity="10"
                     soft_lower_limit="0.1"
                     soft_upper_limit="0.9" />
</joint>还有一些参数需要通过YAML配置文件先加载到参数服务器中,YAML文件的格式如下:
joint_limits:
  foo_joint:
    has_position_limits: true
    min_position: 0.0
    max_position: 1.0
    has_velocity_limits: true
    max_velocity: 2.0
    has_acceleration_limits: true
    max_acceleration: 5.0
    has_jerk_limits: true
    max_jerk: 100.0
    has_effort_limits: true
    max_effort: 5.0
  bar_joint:
    has_position_limits: false # Continuous joint
    has_velocity_limits: true
max_velocity: 4.0另外,我们还可以在代码中使用joint_limits_interface来加载和设置关节的限位参数,可以参考:https://github.com/ros-controls/ros_control/wiki/joint_limits_interface
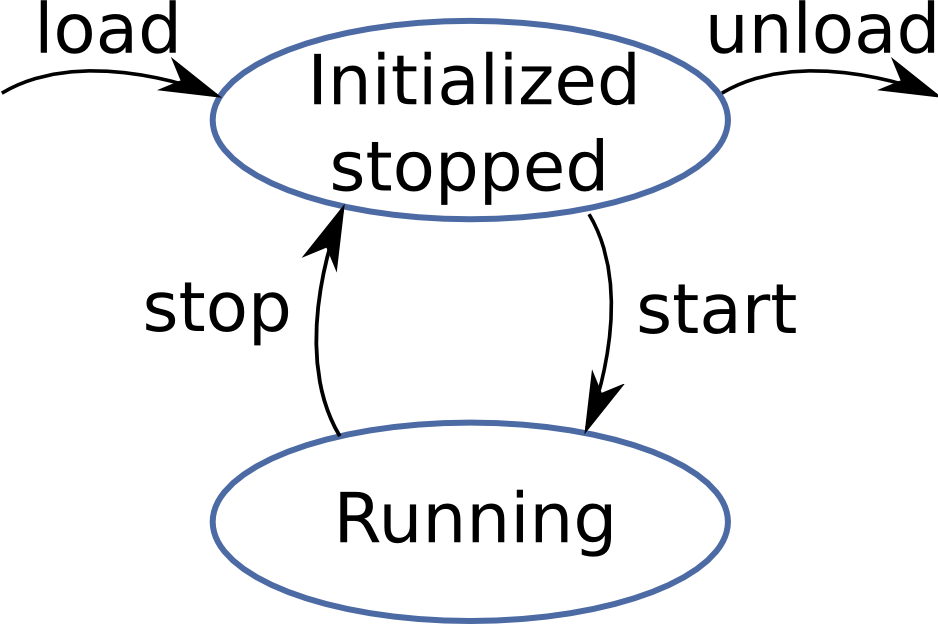
6.controller manager
controller_manager提供了一个硬实时兼容循环来控制机器人,控制器管理器提供加载、卸载、启动和停止不同的controller。
控制器管理器提供与控制器交互的基础结构。
根据您是从启动文件、命令行还是从ROS节点运行控制器,控制器管理器提供了不同的工具来运行控制器。
6.1 命令行工具
你可以使用控制器管理器脚本,在命令行与控制器管理器交互。
命令行的格式为:
rosrun controller_manager controller_manager <command> <name1> <name2> ...支持的<command> :
-
load: load controllers (construct and initialize)
-
unload: unload controllers (destruct)
-
start: start controllers
-
stop: stop controllers
-
spawn: load and start controllers
-
kill: stop and unload controllers
如果想要查看某个controller的状态,可以使用下边的命令:
rosrun controller_manager controller_manager <command>支持的<command> :
-
list: list all the controllers in the order they are executed, and give the state of each controller.
-
list-types: list all the controller types the controller manager knows about. If your controller is not in this list, you won't be able to spawn it.
-
reload-libraries: Reloads all the controller libraries that are available as plugins. This is convenient when you are developing a controller and you want to test your new controller code, without restarting the robot every time. This does not restart controllers which were running before.
-
reload-libraries --restore: Reloads all the controller libraries that are available as plugins and restores all controllers to their original state.
但是很多时候我们需要控制的controller有很多,比如六轴机器人,至少有六个controller,这时也可以使用“spawner ”这个命令来一次控制多个controller:
rosrun controller_manager spawner [--stopped] <name1> <name2> ...当运行 spawner 时,列出的控制器将被加载并启动(除非指定--stopped, contrller则只会被加载,但是并不会开始运行)。
当停止 spawner(ctrl-c)时,它将自动停止并卸载最初启动的所有控制器。
如果想要停止一系列controller,但是不需要卸载,还需要运行的话,可以使用下边的命令:
rosrun controller_manager unspawner <name1> <name2> ...
6.2 Creating launch files
在launch文件中,同样可以通过运行controller_manager包的命令,来加载和启动一系列controller:
 <launch>
   <node pkg="controller_manager"
         type="spawner"
         args="controller_name1 controller_name2" />
 </launch>
上边的launch文件会加载并启动controllers,如果只需要加载:
 <launch>
   <node pkg="controller_manager"
         type="spawner"
         args="--stopped controller_name1 controller_name2" />
 </launch>
6.3 可视化工具 --- rqt_controller_manager
controller_manager 还提供了可视化工具 rqt_controller_manager,允许以图形方式加载、卸载、启动和停止控制器,以及显示有关已加载控制器的信息。
它可以从 rqt 的插件菜单启动,也可以作为一个独立的可执行文件启动:
rosrun rqt_controller_manager rqt_controller_manager
7.Examples
在Gazebo中模拟机器人控制器可以使用 ros_control 和一个简单的Gazebo插件适配器来完成。仿真、硬件、控制器和传输之间的关系概述如下:
![]()
源码可以在这找到:
https://github.com/ros-simulation/gazebo_ros_demos
用法:
Add transmission elements to a URDF:
要在机器人上使用 ros_control ,您需要在URDF中添加一些附加元素。<transmission>元素用于将执行器链接到关节:
  <transmission name="tran1">
    <type>transmission_interface/SimpleTransmission</type>
    <joint name="joint1">
      <hardwareInterface>hardware_interface/EffortJointInterface</hardwareInterface>
    </joint>
    <actuator name="motor1">
      <hardwareInterface>hardware_interface/EffortJointInterface</hardwareInterface>
      <mechanicalReduction>1</mechanicalReduction>
    </actuator>
  </transmission>

  <transmission name="tran2">
    <type>transmission_interface/SimpleTransmission</type>
    <joint name="joint2">
      <hardwareInterface>hardware_interface/EffortJointInterface</hardwareInterface>
    </joint>
    <actuator name="motor2">
      <hardwareInterface>hardware_interface/EffortJointInterface</hardwareInterface>
      <mechanicalReduction>1</mechanicalReduction>
    </actuator>
  </transmission>
比较重要的是:
-
<joint name="">- the name must correspond to a joint else where in your URDF -
<type>- the type of transmission. Currently only "transmission_interface/SimpleTransmission" is implemented. (feel free to add more) -
<hardwareInterface>- within the<actuator>and<joint>tags, this tells the gazebo_ros_control plugin what hardware interface to load (position, velocity or effort interfaces). Currently only effort interfaces are implemented. (feel free to add more)
gazebo_ros_control plugin:
除了 transmission 标签之外,还需要在URDF中添加Gazebo插件,该插件实际解析transmission标签并加载适当的硬件接口和控制器管理器。
默认情况下,Gazebo-Ros-Control插件非常简单,尽管它还可以通过附加的插件架构进行扩展,以允许超级用户在Ros-Control和Gazebo之间创建自己的自定义机器人硬件接口。
默认插件XML应添加到您的URDF中,rrbot.gazebo中的gazebo los_control插件,它读取所有<transmission>标记:
  <!-- ros_control plugin -->
  <gazebo>
    <plugin name="gazebo_ros_control" filename="libgazebo_ros_control.so">
      <robotNamespace>/rrbot</robotNamespace>
      <robotSimType>gazebo_ros_control/DefaultRobotHWSim</robotSimType>
    </plugin>
  </gazebo>
controller和controller_manager
通过一个YAML文件rrbot_control.yaml来声明我们所需要的controller,以及对应的参数:
PID增益 和 控制器设置 必须保存在 yaml 文件中,然后通过 roslaunch 文件加载到param服务器上:
rrbot:
  # Publish all joint states -----------------------------------
  joint_state_controller:
    type: joint_state_controller/JointStateController
    publish_rate: 50

  # Position Controllers ---------------------------------------
  joint1_position_controller:
    type: effort_controllers/JointPositionController
    joint: joint1
    pid: {p: 100.0, i: 0.01, d: 10.0}
  joint2_position_controller:
    type: effort_controllers/JointPositionController
    joint: joint2
    pid: {p: 100.0, i: 0.01, d: 10.0}
创建一个 rosLaunch 文件以启动 ros_control controllers,使用launch文件rrbot_control.launch,运行controller_manager中的spawner,加载并运行这些上边这些controller:
<launch>

  <!-- Load joint controller configurations from YAML file to parameter server -->
  <rosparam file="$(find rrbot_control)/config/rrbot_control.yaml" command="load"/>

  <!-- load the controllers -->
  <node name="controller_spawner" pkg="controller_manager" type="spawner" respawn="false"
    output="screen" ns="/rrbot" args="joint1_position_controller joint2_position_controller joint_state_controller"/>

  <!-- convert joint states to TF transforms for rviz, etc -->
  <node name="robot_state_publisher" pkg="robot_state_publisher" type="robot_state_publisher"
    respawn="false" output="screen">
    <remap from="/joint_states" to="/rrbot/joint_states" />
  </node>

</launch>- 第一行“rosparam”通过加载yaml配置文件将控制器设置加载到参数服务器。
- controller_spawner 节点通过运行一个python脚本来启动RRbot的两个联合位置控制器,该脚本 ros_control controller manage进行服务调用。服务调用告诉 ros_control controller manage 你想要哪个控制器。
- 最后一行启动一个 robot_state_publisher 节点,该节点简单地监听来自 joint_state_controller 的/joint_states 消息,然后将转换发布到/tf。这可以让你在RVIZ中看到你的模拟机器人,也可以完成其他任务。
Start the controllers using roslaunch:
通过运行以下程序,测试由ROS_control控制的rrbot:
开始rrbot模拟:
roslaunch rrbot_gazebo rrbot_world.launch通过运行第二个启动文件加载两个关节的控制器:
roslaunch rrbot_control rrbot_control.launch也可以手动调用完成controller的加载:
rosservice call /rrbot/controller_manager/load_controller "name: 'joint1_position_controller'"rosservice call /rrbot/controller_manager/load_controller "name: 'joint2_position_controller'"Start the controllers:
rosservice call /rrbot/controller_manager/switch_controller "{start_controllers: ['joint1_position_controller','joint2_position_controller'], stop_controllers: [], strictness: 2}"Stop the controllers:
rosservice call /rrbot/controller_manager/switch_controller "{start_controllers: [], stop_controllers: ['joint1_position_controller','joint2_position_controller'], strictness: 2}"使用下边的命令就可以让机器人动起来:
rostopic pub -1 /rrbot/joint1_position_controller/command std_msgs/Float64 "data: 1.5"rostopic pub -1 /rrbot/joint2_position_controller/command std_msgs/Float64 "data: 1.0"
Manually send example commands:
Use RQT To Send Commands:
Connect Rviz to Gazebo Simulation


 3184
3184


 被折叠的 条评论
为什么被折叠?
被折叠的 条评论
为什么被折叠?
 到【灌水乐园】发言


