


【FOC控制】英飞凌TC264无刷驱动方案simplefoc移植(6)- foc速度闭环控制
一、电机选择
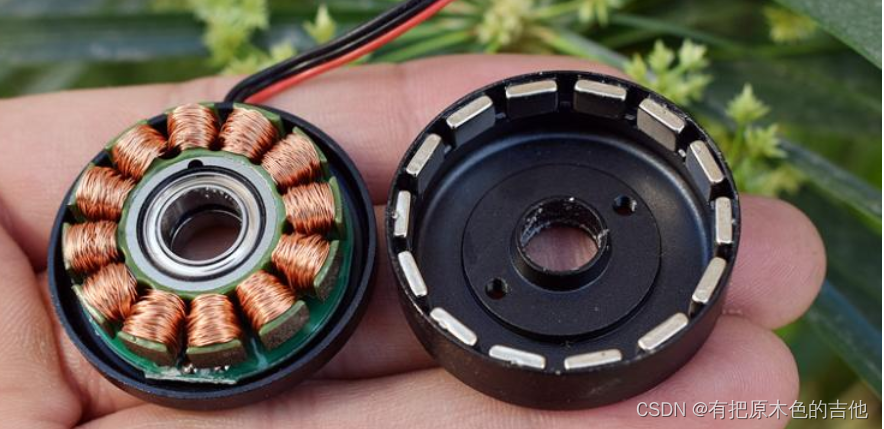
FOC可以实现电机在低速的时候,可以稳定的转动,为了适应编码器,我这里选择一款全新的三相无刷电机,云台电机,型号2804 ,无限位,可以360度连续运转,不带驱动板,运转时低功耗,DC24V时电流才60MA,转速是5050转,扭力还挺好的,静音,低功耗,适合长时间运转。
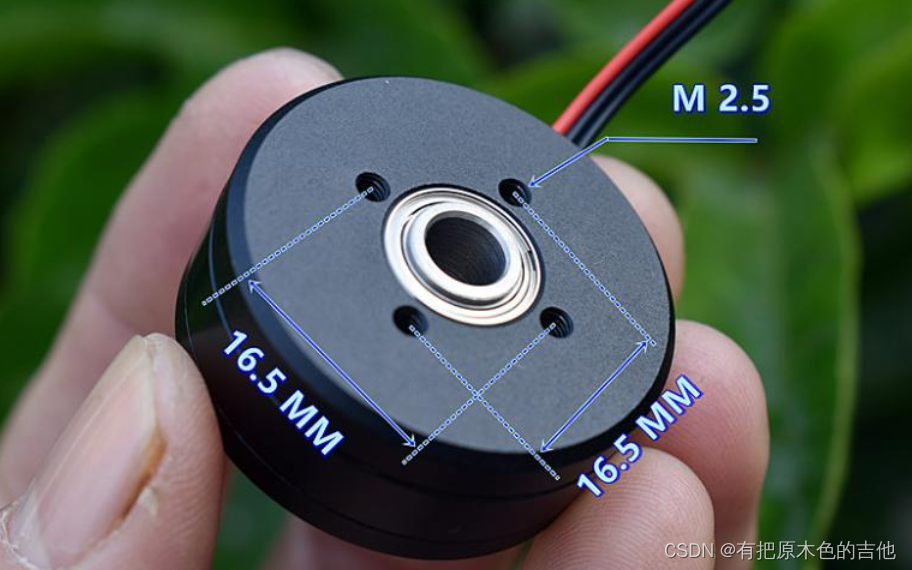 极对数是7
极对数是7
二、电机参数初始化
首先设置必要的参数,供电电压12v,电压模式,速度模式
    voltage_power_supply=12;   //V
    voltage_limit=6;           //V,最大值需小于12/1.732=6.9
    velocity_limit=20;         //rad/s angleOpenloop() and PID_angle() use it
    voltage_sensor_align=1;    //V     alignSensor() and driverAlign() use it,大功率电机0.5-1,小功率电机2-3
    torque_controller=Type_voltage;  //当前只有电压模式
    controller=Type_velocity;  //Type_angle; //Type_torque;    //
    target=1;
电机初始化函数,配置电机极对数,我选用的电机极对数7,电机旋转的方向为不确定。
/******************************************************************************/
void Motor_init(void)
{
	printf("MOT: Init\r\n");

//	new_voltage_limit = current_limit * phase_resistance;
//	voltage_limit = new_voltage_limit < voltage_limit ? new_voltage_limit : voltage_limit;
	if(voltage_sensor_align > voltage_limit) voltage_sensor_align = voltage_limit;

	pole_pairs=7;
	sensor_direction=UNKNOWN;

	//M1_Enable;
	printf("MOT: Enable driver.\r\n");
}
/******************************************************************************/
三、FOC初始化
这是整个步骤最关键的一步,往往很多时候,错误都是卡在了这里 alignSensor();
/******************************************************************************/
void Motor_initFOC(void)
{
    alignSensor();    //检测零点偏移量和极对数

    //added the shaft_angle update
    angle_prev=as5600_getAngle();  //as5600_getVelocity(),make sure velocity=0 after power on
    systick_delay_ms(STM0,5);

    shaft_velocity = shaftVelocity();  //必须调用一次,进入主循环后速度为0
    systick_delay_ms(STM0,5);
    shaft_angle = shaftAngle();// shaft angle
    if(controller==Type_angle)target=shaft_angle;//角度模式,以当前的角度为目标角度,进入主循环后电机静止

    systick_delay_ms(STM0,200);
}
首先执行的函数为alignSensor( )
先使得,电机按照正弦规律转一定角度,记录中值角度
然后,电机按照正弦规律反方向转一定角度,记录终值角度
然后计算两次角度的差值,判断电机运动,进而判断电机方向和检测电机极对数
最后计算一次零点偏移角度,以后的角度都从当前角度开始算,
关闭电机。
/******************************************************************************/
int alignSensor(void)
{
    long i;
    float angle;
    float mid_angle,end_angle;
    float moved;

    printf("MOT: Align sensor.\r\n");

    // find natural direction
    // move one electrical revolution forward

    for(i=0; i<=500; i++)
    {
        angle = _3PI_2 + _2PI * i / 500.0;
        setPhaseVoltage(voltage_sensor_align, 0,  angle);
        systick_delay_ms(STM0,2);
    }

    mid_angle = (float)as5600_getAngle();

    for(i=500; i>=0; i--)
    {
        angle = _3PI_2 + _2PI * i / 500.0 ;
        setPhaseVoltage(voltage_sensor_align, 0,  angle);
        systick_delay_ms(STM0,2);
    }

    end_angle = (float)as5600_getAngle();
    setPhaseVoltage(0, 0, 0);
    systick_delay_ms(STM0,200);

    printf("mid_angle=%f\r\n",mid_angle);
    printf("end_angle=%f\r\n",end_angle);


    systick_delay_ms(STM0,200);

    moved =  fabs(mid_angle - end_angle);
    if((mid_angle == end_angle)||(moved < 0.02))  //相等或者几乎没有动
    {
        printf("MOT: Failed to notice movement loop222.\r\n");
        IfxCcu6_setT12CompareValue(ccu6SFR, IfxCcu6_T12Channel_0, 0);
        IfxCcu6_setT12CompareValue(ccu6SFR, IfxCcu6_T12Channel_1, 0);
        IfxCcu6_setT12CompareValue(ccu6SFR, IfxCcu6_T12Channel_2, 0);
        IfxCcu6_enableShadowTransfer(ccu6SFR, TRUE, FALSE);
         //电机检测不正常,关闭驱动
        return 0;
    }
    else if(mid_angle < end_angle)
    {
        printf("MOT: sensor_direction==CCW\r\n");
        sensor_direction=CCW;
    }
    else
    {
        printf("MOT: sensor_direction==CW\r\n");
        sensor_direction=CW;
    }


    printf("MOT: PP check: ");    //计算Pole_Pairs
    if( fabs(moved*pole_pairs - _2PI) > 0.5 )  // 0.5 is arbitrary number it can be lower or higher!
    {
        printf("fail - estimated pp:");
        pole_pairs=_2PI/moved+0.5;     //浮点数转整形,四舍五入
        printf("%d\r\n",pole_pairs);
  }
    else
        printf("OK!\r\n");


    setPhaseVoltage(voltage_sensor_align, 0,  _3PI_2);  //计算零点偏移角度
    systick_delay_ms(STM0,700);
    zero_electric_angle = _normalizeAngle(_electricalAngle(sensor_direction*as5600_getAngle(), pole_pairs));
    systick_delay_ms(STM0,20);
    printf("MOT: Zero elec. angle:");
    printf("%.4f\r\n",zero_electric_angle);


    sensor_offset = zero_electric_angle;

    setPhaseVoltage(0, 0, 0);
    systick_delay_ms(STM0,200);
    return 1;
}
/******************************************************************************/
四、PID初始化
这里有两个pid,分别是角度pid和速度pid,速度pid嵌套在角度pid中
如果设置模式为速度控制,则值调用速度pid
如果为角度模式,则调用角度pid内嵌套速度pid
并初始化pid参数,pid参数需要调整,不同的电机使用的不同
/******************************************************************************/
float pid_vel_P, pid_ang_P,pid_vel_D;
float pid_vel_I, pid_ang_D;
float integral_vel_prev;
float error_vel_prev, error_ang_prev;
float output_vel_ramp;
float output_vel_prev;
unsigned long pid_vel_timestamp, pid_ang_timestamp;
/******************************************************************************/
void PID_init(void)
{
	pid_vel_P=0.08;  //0.1
	pid_vel_I=4;    //2
	output_vel_ramp=100;       //output derivative limit [volts/second]
	integral_vel_prev=0;
	error_vel_prev=0;
	output_vel_prev=0;
	pid_vel_timestamp=systick_getval_us(STM0);

	pid_ang_P=1;
	pid_ang_D=0.5;
	error_ang_prev=0;
	pid_ang_timestamp=systick_getval_us(STM0);
}
/******************************************************************************/
//just P&I is enough,no need D
float PID_velocity(float error)
{
	unsigned long now_us;
	float Ts;
	float proportional,integral,output;
	float output_rate;
	float derivative;

	now_us = systick_getval_us(STM0);
//	if(now_us<pid_vel_timestamp)Ts = (float)(pid_vel_timestamp - now_us)/9*1e-6f;
//	else
//		Ts = (float)(0xFFFFFF - now_us + pid_vel_timestamp)/9*1e-6f;
	Ts = (now_us - pid_vel_timestamp) * 1e-6;


	if(Ts == 0 || Ts > 0.5) Ts = 1e-3f;

	// u(s) = (P + I/s + Ds)e(s)
	// Discrete implementations
	// proportional part
	// u_p  = P *e(k)
	proportional = pid_vel_P * error;
	// Tustin transform of the integral part
	// u_ik = u_ik_1  + I*Ts/2*(ek + ek_1)
	integral = integral_vel_prev + pid_vel_I*Ts*0.5*(error + error_vel_prev);
	// antiwindup - limit the output
	integral = _constrain(integral, -voltage_limit, voltage_limit);

	derivative = pid_vel_D*(error - error_vel_prev)/Ts;

	// sum all the components
	output = proportional + integral + derivative;

	// antiwindup - limit the output variable
	output = _constrain(output, -voltage_limit, voltage_limit);

	// limit the acceleration by ramping the output
	output_rate = (output - output_vel_prev)/Ts;
	if(output_rate > output_vel_ramp)output = output_vel_prev + output_vel_ramp*Ts;
	else if(output_rate < -output_vel_ramp)output = output_vel_prev - output_vel_ramp*Ts;

	// saving for the next pass
	integral_vel_prev = integral;
	output_vel_prev = output;
	error_vel_prev = error;
	pid_vel_timestamp = now_us;

	return output;
}
/******************************************************************************/
//P&D for angle_PID
float PID_angle(float error)
{
	unsigned long now_us;
	float Ts;
	float proportional,derivative,output;
	//float output_rate;

	now_us = systick_getval_us(STM0);
	if(now_us<pid_ang_timestamp)Ts = (float)(pid_ang_timestamp - now_us)/9*1e-6f;
	else
		Ts = (float)(0xFFFFFF - now_us + pid_ang_timestamp)/9*1e-6f;
	pid_ang_timestamp = now_us;
	if(Ts == 0 || Ts > 0.5) Ts = 1e-3f;

	// u(s) = (P + I/s + Ds)e(s)
	// Discrete implementations
	// proportional part
	// u_p  = P *e(k)
	proportional = pid_ang_P * error;
	// u_dk = D(ek - ek_1)/Ts
	derivative = pid_ang_D*(error - error_ang_prev)/Ts;

	output = proportional + derivative;
	output = _constrain(output, -velocity_limit, velocity_limit);

	// limit the acceleration by ramping the output
//	output_rate = (output - output_ang_prev)/Ts;
//	if(output_rate > output_ang_ramp)output = output_ang_prev + output_ang_ramp*Ts;
//	else if(output_rate < -output_ang_ramp)output = output_ang_prev - output_ang_ramp*Ts;

	// saving for the next pass
//	output_ang_prev = output;
	error_ang_prev = error;

	return output;
}
/******************************************************************************/
五、主函数调用 move(target);
电机运行函数,如果是速度模式就是期望的速度,角度模式就是期望的角度
然后通过switch函数,选择你所在的函数,这里是速度模式,
然后进入pid速度控制函数,得到输出,赋值到voltage结构体
voltage.q = current_sp;  // use voltage if phase-resistance not provided
        voltage.d = 0;
/******************************************************************************/
void move(float new_target)
{
	shaft_velocity = shaftVelocity();
//	printf("test:%.4f,%.4f\n",shaft_velocity,shaft_angle);
	switch(controller)
	{
		case Type_torque:
			if(torque_controller==Type_voltage)voltage.q = new_target;  // if voltage torque control
		  else
				current_sp = new_target; // if current/foc_current torque control
			break;
		case Type_angle:
			// angle set point
          shaft_angle_sp = new_target;
          // calculate velocity set point
          shaft_velocity_sp = PID_angle( shaft_angle_sp - shaft_angle );
          // calculate the torque command
          current_sp = PID_velocity(shaft_velocity_sp - shaft_velocity); // if voltage torque control
          // if torque controlled through voltage
          if(torque_controller == Type_voltage)
                {
                    voltage.q = current_sp;
            voltage.d = 0;
          }
                break;
		case Type_velocity:
			// velocity set point
          shaft_velocity_sp = new_target;
          // calculate the torque command
          current_sp = PID_velocity(shaft_velocity_sp - shaft_velocity); // if current/foc_current torque control
          // if torque controlled through voltage control
          if(torque_controller == Type_voltage)
                {
            voltage.q = current_sp;  // use voltage if phase-resistance not provided
            voltage.d = 0;
          }
			break;
		case Type_velocity_openloop:
			// velocity control in open loop
          shaft_velocity_sp = new_target;
          voltage.q = velocityOpenloop(shaft_velocity_sp); // returns the voltage that is set to the motor
          voltage.d = 0;
                break;
		case Type_angle_openloop:
			// angle control in open loop
          shaft_angle_sp = new_target;
          voltage.q = angleOpenloop(shaft_angle_sp); // returns the voltage that is set to the motor
          voltage.d = 0;
			break;
	}
}
/******************************************************************************/
六、主函数调用loopFOC();
loopFOC()函数的功能是读取当前角度,以及计算机械角度,所谓机械角度就是,减去初始化完成的时候最后终值角度。
然后将move函数的输出赋值到svpwm输出函数
/******************************************************************************/
void loopFOC(void)
{
	if( controller==Type_angle_openloop || controller==Type_velocity_openloop ) return;

	shaft_angle = shaftAngle();// shaft angle
	electrical_angle = electricalAngle();// electrical angle - need shaftAngle to be called first
//	printf("%.4f, %.4f, %d, %d, %d\r\n",shaft_angle,electrical_angle,Hall.Ta,Hall.Tb,Hall.Tc);
	switch(torque_controller)
	{
		case Type_voltage:  // no need to do anything really
			break;
		case Type_dc_current:
			break;
		case Type_foc_current:
			break;
		default:
			printf("MOT: no torque control selected!");
			break;
	}
	// set the phase voltage - FOC heart function :)
  setPhaseVoltage(voltage.q, voltage.d, electrical_angle);
//  setPhaseVoltage(10, voltage.d, electrical_angle);
}
/******************************************************************************/
这一段就是svpwm变换的函数,这个函数在我之前的博客有过详细介绍
【FOC控制】英飞凌TC264无刷驱动方案simplefoc移植(2)-SVPWM波实现
/******************************************************************************/
void setPhaseVoltage(float Uq, float Ud, float angle_el)
{
	float Uout;
	uint32_t sector;
	float T0,T1,T2;
	float Ta,Tb,Tc;

	if(Ud) // only if Ud and Uq set
	{// _sqrt is an approx of sqrt (3-4% error)
		Uout = _sqrt(Ud*Ud + Uq*Uq) / voltage_power_supply;
		// angle normalisation in between 0 and 2pi
		// only necessary if using _sin and _cos - approximation functions
		angle_el = _normalizeAngle(angle_el + atan2(Uq, Ud));
	}
	else
	{// only Uq available - no need for atan2 and sqrt
		Uout = Uq / voltage_power_supply;
		// angle normalisation in between 0 and 2pi
		// only necessary if using _sin and _cos - approximation functions
		angle_el = _normalizeAngle(angle_el + _PI_2);
	}
	if(Uout> 0.577)Uout= 0.577;
	if(Uout<-0.577)Uout=-0.577;

	sector = (angle_el / _PI_3) + 1;
	T1 = _SQRT3*_sin(sector*_PI_3 - angle_el) * Uout;
	T2 = _SQRT3*_sin(angle_el - (sector-1.0)*_PI_3) * Uout;
	T0 = 1 - T1 - T2;

	// calculate the duty cycles(times)
	switch(sector)
	{
		case 1:
			Ta = T1 + T2 + T0/2;
			Tb = T2 + T0/2;
			Tc = T0/2;
			break;
		case 2:
			Ta = T1 +  T0/2;
			Tb = T1 + T2 + T0/2;
			Tc = T0/2;
			break;
		case 3:
			Ta = T0/2;
			Tb = T1 + T2 + T0/2;
			Tc = T2 + T0/2;
			break;
		case 4:
			Ta = T0/2;
			Tb = T1+ T0/2;
			Tc = T1 + T2 + T0/2;
			break;
		case 5:
			Ta = T2 + T0/2;
			Tb = T0/2;
			Tc = T1 + T2 + T0/2;
			break;
		case 6:
			Ta = T1 + T2 + T0/2;
			Tb = T0/2;
			Tc = T1 + T0/2;
			break;
		default:  // possible error state
			Ta = 0;
			Tb = 0;
			Tc = 0;

	}
	Hall.Ta = (uint16)(Ta*2500);
	Hall.Tb = (uint16)(Tb*2500);
	Hall.Tc = (uint16)(Tc*2500);

	/*
	 * 三通道互补pwm输出,
	 * IfxCcu6_setT12CompareValue() 时钟来源,通道选择,占空比设置,最大占空比值2500,50%占空比1250
	 * IfxCcu6_enableShadowTransfer(ccu6SFR, TRUE, FALSE); 设置输出互补pwm波形
	 * */
    IfxCcu6_setT12CompareValue(ccu6SFR, IfxCcu6_T12Channel_0, Hall.Ta);
    IfxCcu6_setT12CompareValue(ccu6SFR, IfxCcu6_T12Channel_1, Hall.Tb);
    IfxCcu6_setT12CompareValue(ccu6SFR, IfxCcu6_T12Channel_2, Hall.Tc);
    IfxCcu6_enableShadowTransfer(ccu6SFR, TRUE, FALSE);

}
/******************************************************************************/
七、 主函数及完整代码
主函数:
#pragma section all "cpu0_dsram"

//将本语句与#pragma section all restore语句之间的全局变量都放在CPU0的RAM中

#include <BLDCMotor.h>
#include <Bsp.h>
#include <common.h>
#include <FOCMotor.h>
#include <gtm_pwm.h>
#include <IfxCpu.h>
#include <magnetic_sensor.h>
#include <pid.h>
#include <zf_uart.h>

int core0_main(void)
{
	get_clk();//获取系统时钟频率

	uart_init(UART_0,115200,UART0_TX_P14_0, UART0_RX_P14_1);

	AS5600_Init();

    voltage_power_supply=12;   //V
    voltage_limit=6;           //V,最大值需小于12/1.732=6.9
    velocity_limit=20;         //rad/s angleOpenloop() and PID_angle() use it
    voltage_sensor_align=1;    //V     alignSensor() and driverAlign() use it,大功率电机0.5-1,小功率电机2-3
    torque_controller=Type_voltage;  //当前只有电压模式
    controller=Type_velocity;  //Type_angle; //Type_torque;    //
    target=1;

    ccu6_pwm_init();


    //等待所有核心初始化完毕
	IfxCpu_emitEvent(&g_cpuSyncEvent);
	IfxCpu_waitEvent(&g_cpuSyncEvent, 0xFFFF);
	enableInterrupts();


    Motor_init();

    Motor_initFOC();

    PID_init();

	while (TRUE)
	{
        move(target);
        loopFOC();
	}
}

#pragma section all restore
八、总结
最后碍于字数的限制,我将完整代码上传到了百度网盘,链接:https://pan.baidu.com/s/1Ei5ZRqXGlGEufVWMjXXr5Q
提取码:8mok
最后的测试结果,在低速的时候可以运行流畅,但是速度无法在上去,最高速有限制,解决的方案就是,电源供电尝试4s或者是6s,速度和力矩都有增加


 5625
5625


 被折叠的 条评论
为什么被折叠?
被折叠的 条评论
为什么被折叠?
 到【灌水乐园】发言


