


1.Rigidbody.velocity速度
var velocity : Vector3
Description描述
The velocity vector of the rigidbody.
刚体的速度向量。
在大多数情况下,你不应该直接修改速度,因为这会导致不真实的行为。在每个物理步,不要再每个物体的速度,这将导致不真实的物理模拟。一个典型的例子,当你在第一人称射击游戏中使用跳跃的时候改变速度,因为你想立即改变速度。
using UnityEngine;
using System.Collections;

public class example : MonoBehaviour {
	void FixedUpdate() {
		if (Input.GetButtonDown("Jump"))
			rigidbody.velocity = new Vector3(0, 10, 0);

	}
}
2.鼠标滑轮滑动的值
Input.GetAxis("Mouse ScrollWheel")
鼠标滑轮滑动的值
3.StreamWriter的覆盖问题
StreamWriter(String path,Boolean append, Encoding encoding);第一个参数 path 文件路径与文件名;
第二个参数 append false覆盖,true追加;
第三个参数 encoding 要使用的字符编码
4.动态设置分辨率
SetResolution ( int width, int height, bool fullscreen, intpreferredRefreshRate)
width, height 分辨率bool fullscreen 是否全屏
int preferredRefreshRate 刷新率(赫兹)
如果erredRefreshRate为0(默认),Unity将切换到显示器支持的最高刷新率。如果preferredRefreshRate不是0,如果显示器支持,Unity将使用它,否则将选择支持的最高的一个。
5.获取系统时间
DateTime.Now.ToString(
"yyyy-MM-dd HH:mm"
);
// C# 日期格式

DateTime dt = DateTime.Now;

dt.ToString();//2005-11-5 13:21:25

dt.ToFileTime().ToString();//127756416859912816

dt.ToFileTimeUtc().ToString();//127756704859912816

dt.ToLocalTime().ToString();//2005-11-5 21:21:25

dt.ToLongDateString().ToString();//2005年11月5日

dt.ToLongTimeString().ToString();//13:21:25

dt.ToOADate().ToString();//38661.5565508218

dt.ToShortDateString().ToString();//2005-11-5

dt.ToShortTimeString().ToString();//13:21

dt.ToUniversalTime().ToString();//2005-11-5 5:21:25

dt.Year.ToString();//2005

dt.Date.ToString();//2005-11-5 0:00:00

dt.DayOfWeek.ToString();//Saturday

dt.DayOfYear.ToString();//309

dt.Hour.ToString();//13

dt.Millisecond.ToString();//441

dt.Minute.ToString();//30

dt.Month.ToString();//11

dt.Second.ToString();//28

dt.Ticks.ToString();//632667942284412864

dt.TimeOfDay.ToString();//13:30:28.4412864

dt.ToString();//2005-11-5 13:47:04

dt.AddYears(1).ToString();//2006-11-5 13:47:04

dt.AddDays(1.1).ToString();//2005-11-6 16:11:04

dt.AddHours(1.1).ToString();//2005-11-5 14:53:04

dt.AddMilliseconds(1.1).ToString();//2005-11-5 13:47:04

dt.AddMonths(1).ToString();//2005-12-5 13:47:04

dt.AddSeconds(1.1).ToString();//2005-11-5 13:47:05

dt.AddMinutes(1.1).ToString();//2005-11-5 13:48:10

dt.AddTicks(1000).ToString();//2005-11-5 13:47:04

dt.CompareTo(dt).ToString();//0

dt.Add(?).ToString();//问号为一个时间段

dt.Equals("2005-11-6 16:11:04").ToString();//False

dt.Equals(dt).ToString();//True

dt.GetHashCode().ToString();//1474088234

dt.GetType().ToString();//System.DateTime

dt.GetTypeCode().ToString();//DateTime


dt.GetDateTimeFormats('s')[0].ToString();//2005-11-05T14:06:25

dt.GetDateTimeFormats('t')[0].ToString();//14:06

dt.GetDateTimeFormats('y')[0].ToString();//2005年11月

dt.GetDateTimeFormats('D')[0].ToString();//2005年11月5日

dt.GetDateTimeFormats('D')[1].ToString();//2005 11 05

dt.GetDateTimeFormats('D')[2].ToString();//星期六 2005 11 05

dt.GetDateTimeFormats('D')[3].ToString();//星期六 2005年11月5日

dt.GetDateTimeFormats('M')[0].ToString();//11月5日

dt.GetDateTimeFormats('f')[0].ToString();//2005年11月5日 14:06

dt.GetDateTimeFormats('g')[0].ToString();//2005-11-5 14:06

dt.GetDateTimeFormats('r')[0].ToString();//Sat, 05 Nov 2005 14:06:25 GMT

string.Format("{0:d}",dt);//2005-11-5

string.Format("{0:D}",dt);//2005年11月5日

string.Format("{0:f}",dt);//2005年11月5日 14:23

string.Format("{0:F}",dt);//2005年11月5日 14:23:23

string.Format("{0:g}",dt);//2005-11-5 14:23

string.Format("{0:G}",dt);//2005-11-5 14:23:23

string.Format("{0:M}",dt);//11月5日

string.Format("{0:R}",dt);//Sat, 05 Nov 2005 14:23:23 GMT

string.Format("{0:s}",dt);//2005-11-05T14:23:23

string.Format("{0:t}",dt);//14:23

string.Format("{0:T}",dt);//14:23:23

string.Format("{0:u}",dt);//2005-11-05 14:23:23Z

string.Format("{0:U}",dt);//2005年11月5日 6:23:23

string.Format("{0:Y}",dt);//2005年11月

string.Format("{0}",dt);//2005-11-5 14:23:23

string.Format("{0:yyyyMMddHHmmssffff}",dt);

// 计算2个日期之间的天数差

DateTime dt1 = Convert.DateTime("2007-8-1");

DateTime dt2 = Convert.DateTime("2007-8-15");

TimeSpan span = dt2.Subtract(dt1);

int dayDiff = span.Days + 1;

// 计算某年某月的天数

int days = DateTime.DaysInMonth(2007, 8);

days = 31;

// 给日期增加一天、减少一天

DateTime dt =DateTime.Now;

dt.AddDays(1); //增加一天

dt.AddDays(-1);//减少一天

有时候我们要对时间进行转换,达到不同的显示效果
 默认格式为:2005-6-6 14:33:34
 如果要换成成200506,06-2005,2005-6-6或更多的该怎么办呢
 我们要用到:DateTime.ToString的方法(String, IFormatProvider)

 using System;
 using System.Globalization;
 String format="D";
 DateTime date=DataTime,Now;
 Response.Write(date.ToString(format, DateTimeFormatInfo.InvariantInfo));
 结果输出
 Thursday, June 16, 2005

 参数format格式详细用法
 格式字符 关联属性/说明
 d ShortDatePattern
 D LongDatePattern
 f 完整日期和时间(长日期和短时间)
 F FullDateTimePattern(长日期和长时间)
 g 常规(短日期和短时间)
 G 常规(短日期和长时间)
 m、M MonthDayPattern
 r、R RFC1123Pattern
 s 使用当地时间的 SortableDateTimePattern(基于 ISO 8601)
 t ShortTimePattern
 T LongTimePattern
 u UniversalSortableDateTimePattern 用于显示通用时间的格式
 U 使用通用时间的完整日期和时间(长日期和长时间)
 y、Y YearMonthPattern

 下表列出了可被合并以构造自定义模式的模式。这些模式是区分大小写的;例如,识别“MM”,但不识别“mm”。如果自定义模式包含空白字符或用单引号括起来的字符,则输出字符串页也将包含这些字符。未定义为格式模式的一部分或未定义为格式字符的字符按其原义复制。

日期格式模式 说明

d 月中的某一天。一位数的日期没有前导零。

dd 月中的某一天。一位数的日期有一个前导零。

ddd 周中某天的缩写名称,在 AbbreviatedDayNames 中定义。

dddd 周中某天的完整名称,在 DayNames 中定义。

M 月份数字。一位数的月份没有前导零。

MM 月份数字。一位数的月份有一个前导零。

MMM 月份的缩写名称,在 AbbreviatedMonthNames 中定义。

MMMM 月份的完整名称,在 MonthNames 中定义。

y 不包含纪元的年份。如果不包含纪元的年份小于 10,则显示不具有前导零的年份。

yy 不包含纪元的年份。如果不包含纪元的年份小于 10,则显示具有前导零的年份。

yyyy 包括纪元的四位数的年份。

gg 时期或纪元。如果要设置格式的日期不具有关联的时期或纪元字符串,则忽略该模式。

h 12 小时制的小时。一位数的小时数没有前导零。

hh 12 小时制的小时。一位数的小时数有前导零。

H 24 小时制的小时。一位数的小时数没有前导零。

HH 24 小时制的小时。一位数的小时数有前导零。

m 分钟。一位数的分钟数没有前导零。

mm 分钟。一位数的分钟数有一个前导零。

s 秒。一位数的秒数没有前导零。

ss 秒。一位数的秒数有一个前导零。

f 秒的小数精度为一位。其余数字被截断。

ff 秒的小数精度为两位。其余数字被截断。

fff 秒的小数精度为三位。其余数字被截断。

ffff 秒的小数精度为四位。其余数字被截断。

fffff 秒的小数精度为五位。其余数字被截断。

ffffff 秒的小数精度为六位。其余数字被截断。

fffffff 秒的小数精度为七位。其余数字被截断。

t 在 AMDesignator 或 PMDesignator 中定义的 AM/PM 指示项的第一个字符(如果存在)。

tt 在 AMDesignator 或 PMDesignator 中定义的 AM/PM 指示项(如果存在)。

z 时区偏移量(“+”或“-”后面仅跟小时)。一位数的小时数没有前导零。例如,太平洋标准时间是“-8”。

zz 时区偏移量(“+”或“-”后面仅跟小时)。一位数的小时数有前导零。例如,太平洋标准时间是“-08”。

zzz 完整时区偏移量(“+”或“-”后面跟有小时和分钟)。一位数的小时数和分钟数有前导零。例如,太平洋标准时间是“-08:00”。

: 在 TimeSeparator 中定义的默认时间分隔符。

/ 在 DateSeparator 中定义的默认日期分隔符。

% c 其中 c 是格式模式(如果单独使用)。如果格式模式与原义字符或其他格式模式合并,则可以省略“%”字符。

\ c 其中 c 是任意字符。照原义显示字符。若要显示反斜杠字符,请使用“\\”。

只有上面第二个表中列出的格式模式才能用于创建自定义模式;在第一个表中列出的标准格式字符不能用于创建自定义模式。

自定义模式的长度至少为两个字符;例如,

DateTime.ToString( "d"); // 返回 DateTime 值;“d”是标准短日期模式。

DateTime.ToString( "%d"); // 返回月中的某天;“%d”是自定义模式。

DateTime.ToString( "d "); // 返回后面跟有一个空白字符的月中的某天;“d”是自定义模式。

比较方便的是,上面的参数可以随意组合,并且不会出错,多试试,肯定会找到你要的时间格式
 如要得到2005年06月 这样格式的时间
 可以这样写:
 date.ToString("yyyy年MM月", DateTimeFormatInfo.InvariantInfo)
6.震动效果
/// <summary>
/// 摄像机震动
/// </summary>
/// <param name="shakeStrength">震动幅度</param>
/// <param name="rate">震动频率</param>
/// <param name="shakeTime">震动时长</param>
/// <returns></returns>
IEnumerator ShakeCamera(float shakeStrength = 0.2f, float rate = 14, float shakeTime = 0.4f){
float t = 0;
float speed = 1 / shakeTime;
Vector3 orgPosition = transform.localPosition;
while (t < 1 && !cancelShake){
t += Time.deltaTime * speed;
transform.position = orgPosition + new Vector3(Mathf.Sin(rate * t), Mathf.Cos(rate * t), 0) * Mathf.Lerp(shakeStrength, 0, t);
yield return null;
}
cancelShake = false;
transform.position = orgPosition;
}
7.Mathf.Lerp()
float Lerp (float from , float to , float t);
基于浮点数t返回a到b之间的插值,t限制在0~1之间。
当t = 0返回from,当t = 1 返回to。当t = 0.5 返回from和to的平均值。
8.FixedUpdate()
9.Lateupdate()
所有Update()之后调用10.renderer.material和renderer.sharedMaterial
在脚本里通过改变renderer.material的值,只改变此游戏物体网格使用的渲染材质,改变renderer.sharedMaterial的值,所有正在使用该材质的物体都会一起变
11在球面上生成一层 随机平均分布的GameObject点
Vector3 newpos = Random. insideUnitSphere*R+SpherePos;其中:newpos为要生成物体的坐标,R为球半径,SpherePos为球的球心坐标12._MainTex_TexelSize.xy
unity shader 内置变量,图片像素长宽像素数
13.unity获得模型大小
14.NGUI之自适应
只要改成手机形式就可以了

15.获得音乐波形?
AudioListener.GetOutputData 获取输出数据
static function GetOutputData (samples : float[], channel : int) : void
Description描述
Returns a block of the listener (master)'s output data
返回该侦听器的输出数据块。
AudioListener.GetSpectrumData 获取声谱数据
static function GetSpectrumData (samples : float[], channel : int,window :FFTWindow) : void
Description描述
Returns a block of the listener (master)'s spectrum data
返回侦听器的声谱数据块。
Number of values (numSamples) must be a power of 2. (ie 128/256/512 etc). Min = 64. Max = 8192. Usewindow to reduce leakage between frequency bins/bands. Note, the more complex window type, the better the quality, but reduced speed.
Samples的值必须是2的幂次方(128/256/512等)。最小值=64,最大值=8192。使用FFTWindow以减少bins/bands之间频率泄漏。注意,更复杂的窗口类型,质量越好,但减小速度。
16.基于物理的Diffuse Oren Nayar Diffuse
half OrenNayarDiffuse( half3 light, half3 view, half3 norm, half roughness )
{    half VdotN = dot( view, norm );
  half LdotN = dot( light, norm );
   half cos_theta_i = LdotN;
half theta_r = acos( VdotN );
 half theta_i = acos( cos_theta_i );
 half cos_phi_diff = dot( normalize( view - norm * VdotN ),
                             normalize( light - norm * LdotN ) );
 half alpha = max( theta_i, theta_r ) ;
   half beta = min( theta_i, theta_r ) ;
  half sigma2 = roughness * roughness;
   half A = 1.0 - 0.5 * sigma2 / (sigma2 + 0.33);
 half B = 0.45 * sigma2 / (sigma2 + 0.09);
   return saturate( cos_theta_i ) *(A + (B * saturate( cos_phi_diff ) * sin(alpha) * tan(beta)));
}

17.Poisson Disc
float3 SiGrowablePoissonDisc13FilterRGB
(sampler tSource, float2 texCoord, float2 pixelSize, float discRadius)
{
float3 cOut;
float2 poisson[12] = {float2(-0.326212f, -0.40581f),
float2(-0.840144f, -0.07358f),
float2(-0.695914f, 0.457137f),
float2(-0.203345f, 0.620716f),
float2(0.96234f, -0.194983f),
float2(0.473434f, -0.480026f),
float2(0.519456f, 0.767022f),
float2(0.185461f, -0.893124f),
float2(0.507431f, 0.064425f),
float2(0.89642f, 0.412458f),
float2(-0.32194f, -0.932615f),
float2(-0.791559f, -0.59771f)};
// Center tap
cOut = tex2D (tSource, texCoord);
for (int tap = 0; tap < 12; tap++)
{
float2 coord = texCoord.xy + (pixelSize * poisson[tap] * discRadius);
// Sample pixel
cOut += tex2D (tSource, coord);
}
return (cOut / 13.0f);
}
18.shader中的内部值
_WorldSpaceCameraPos
_WorldSpaceLightPos0
19.当前物体播放的动画
public static string GetCurrentPlayingAnimationClip(GameObject go)

    {

        if (go == null)
        {
            return string.Empty;
        }
        foreach (AnimationState anim in go.animation)
        {
            if (go.animation.IsPlaying(anim.name))
            {
                return anim.name;
            }
        }
        return string.Empty;
    }
20. UV
Physical UV is calculated according to the mip in the entry
Code snippet in terrain pixel shader
 scale = (virtual texture size / physical texture size) >> mip
    bias = physical page offset – virtual page offset * scale
    physical uv = virtual uv * scale + bias
Physical page offset and mip are the entry content

21.aabb平截头体

22.获取贴图像素长宽大小
2.uniform float4 _MainTex_TexelSize 分别对应 Vector4(1 / width, 1 / height, width, height),Unity自动设置
23.在屏幕空间获取position for post process
http://forum.unity3d.com/threads/world-position-from-depth.151466/
//Returns World Position of a pixel from clipspace depth map
float4 SamplePositionMap (float2 uvCoord) {
float depth = tex2D(_CameraDepthTexture, uvCoord);
// H is the viewport position at this pixel in the range -1 to 1.
float4 H = float4((uvCoord.x) * 2 - 1, (uvCoord.y) * 2 - 1, depth, 1.0);
float4 D = mul(_ViewProjectInverse, H);
return D / D.w;
}
_ViewProjectInverse calculated in a script:
//ViewProjectInverse matrix
Matrix4x4 mat = (camera.projectionMatrix * camera.worldToCameraMatrix).inverse;
base.material.SetMatrix("_ViewProjectInverse", mat);
1. Frustum corner method. Store a ray pointing to the four corners of the frustum near plane as vertex attributes of a fullscreen quad. In the fragment shader sample the depth buffer (linear view space depth) with the fragment coordinates and multiply the depth with the interpolated frustum corner ray. The result is the reconstructed position in view space. Multiplying with the inverse view matrix (_CameraToWorld) yields the world position. Check.
2. World position by unprojecting. Again sample depth based on the fragment coordinates. Remap uv's to [-1, 1] and set depth as z. This is the projected viewport position. Multiplying with the inverse viewProjection matrix yields the world position. Check.
Shader "Custom/RenderWorldPos"
{
  SubShader
  {
    Pass {
    CGPROGRAM
    #pragma vertex vert
    #pragma fragment frag

    #include "UnityCG.cginc"

    struct v2f {
      float4 pos : SV_POSITION;
      float4 uv : TEXCOORD0;
    };

    float4 _CameraDepthTexture_ST;
    sampler2D _CameraDepthTexture;

    float4x4 _ViewProjectInverse;

    v2f vert (appdata_img v)
    {
      v2f o;

        o.pos = mul (UNITY_MATRIX_MVP, v.vertex);
        o.uv.xy = ComputeScreenPos (o.pos);

      return o;
    }

    float4 frag (v2f i) : COLOR
    {
        float2 uv = i.uv.xy;
      uv.y = 1 - uv.y;

      float z = tex2D (_CameraDepthTexture, uv);
      if(z > 0.99) discard;

      float2 xy = uv * 2 - 1;
      float4 posProjected = float4(xy, z, 1);
      float4 posWS = mul(_ViewProjectInverse, posProjected);

      posWS = posWS/posWS.w;

      return float4(posWS.xyz, 1.0);
    }
    ENDCG
    }
  }
  Fallback off
}
using UnityEngine;
using System.Collections;
public class CamScript : MonoBehaviour
{
private Material m_material;
private Camera m_cam;
// Use this for initialization
void Start ()
{
m_material = new Material(Shader.Find("Custom/RenderWorldPos"));
m_cam = gameObject.GetComponent<Camera>();
m_cam.depthTextureMode = DepthTextureMode.DepthNormals;
}
void OnRenderImage(RenderTexture src, RenderTexture dst)
{
Matrix4x4 viewProjInverse = (m_cam.projectionMatrix * m_cam.worldToCameraMatrix).inverse;
m_material.SetMatrix("_ViewProjectInverse", viewProjInverse);
Graphics.Blit(src, dst, m_material);
}
}24.Geometric Specular Aliasing(保留细节部分高光)
float3 vNormalWsDdx = ddx( vGeometricNormalWs.xyz );
float3 vNormalWsDdy = ddy( vGeometricNormalWs.xyz );
float flGeometricRoughnessFactor = pow( saturate( max( dot( vNormalWsDdx.xyz, vNormalWsDdx.xyz ), dot( vNormalWsDdy.xyz, vNormalWsDdy.xyz ) ) ), 0.333 );
vRoughness.xy = max( vRoughness.xy, flGeometricRoughnessFactor.xx ); // Ensure we don’t double-count roughness if normal map encodes geometric roughness 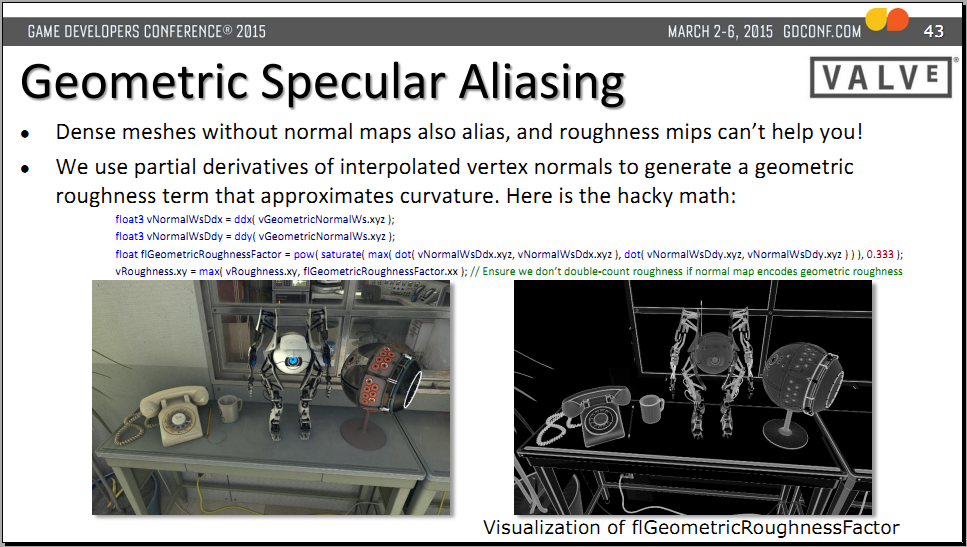
使用前

使用后
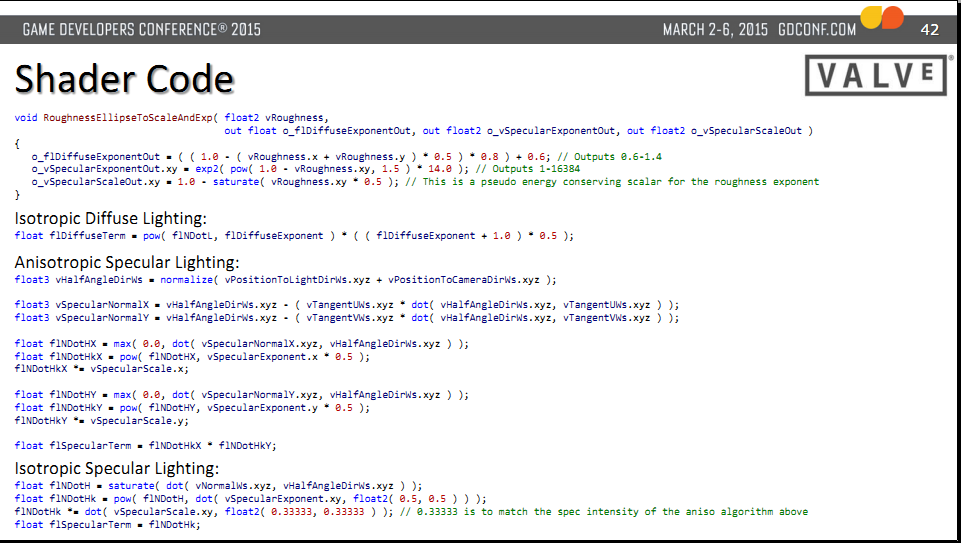
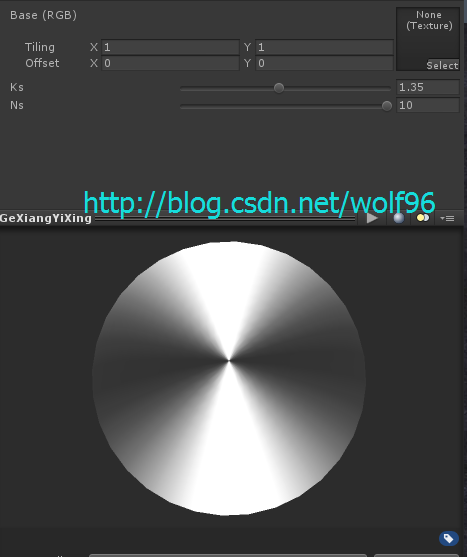
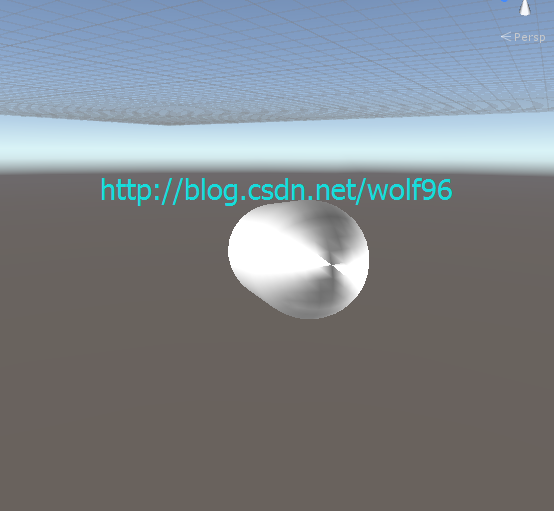
25.各向异性与各向同性
Anisotropic Specular Lighting:
float3 vHalfAngleDirWs = normalize( vPositionToLightDirWs.xyz + vPositionToCameraDirWs.xyz );
float3 vSpecularNormalX = vHalfAngleDirWs.xyz - ( vTangentUWs.xyz * dot( vHalfAngleDirWs.xyz, vTangentUWs.xyz ) );
float3 vSpecularNormalY = vHalfAngleDirWs.xyz - ( vTangentVWs.xyz * dot( vHalfAngleDirWs.xyz, vTangentVWs.xyz ) );
float flNDotHX = max( 0.0, dot( vSpecularNormalX.xyz, vHalfAngleDirWs.xyz ) );
float flNDotHkX = pow( flNDotHX, vSpecularExponent.x * 0.5 );
flNDotHkX *= vSpecularScale.x;
float flNDotHY = max( 0.0, dot( vSpecularNormalY.xyz, vHalfAngleDirWs.xyz ) );
float flNDotHkY = pow( flNDotHY, vSpecularExponent.y * 0.5 );
flNDotHkY *= vSpecularScale.y;
float flSpecularTerm = flNDotHkX * flNDotHkY;
Isotropic Diffuse Lighting:
float flDiffuseTerm = pow( flNDotL, flDiffuseExponent ) * ( ( flDiffuseExponent + 1.0 ) * 0.5 );
Isotropic Specular Lighting:
float flNDotH = saturate( dot( vNormalWs.xyz, vHalfAngleDirWs.xyz ) );
float flNDotHk = pow( flNDotH, dot( vSpecularExponent.xy, float2( 0.5, 0.5 ) ) );
flNDotHk *= dot( vSpecularScale.xy, float2( 0.33333, 0.33333 ) ); // 0.33333 is to match the spec intensity of the aniso algorithm above
float flSpecularTerm = flNDotHk;
void RoughnessEllipseToScaleAndExp( float2 vRoughness,
out float o_flDiffuseExponentOut, out float2 o_vSpecularExponentOut, out float2 o_vSpecularScaleOut )
{
o_flDiffuseExponentOut = ( ( 1.0 - ( vRoughness.x + vRoughness.y ) * 0.5 ) * 0.8 ) + 0.6; // Outputs 0.6-1.4
o_vSpecularExponentOut.xy = exp2( pow( 1.0 - vRoughness.xy, 1.5 ) * 14.0 ); // Outputs 1-16384
o_vSpecularScaleOut.xy = 1.0 - saturate( vRoughness.xy * 0.5 ); // This is a pseudo energy conserving scalar for the roughness exponent
}
26. 副法线binormal求法
half3 binormal =cross(p_normal.xyz,p_tangent.xyz) * i.tangent.w;27.回调
http://www.cnblogs.com/sevenmoons/p/4178369.html
//引用
using System;
void Start () {
TestMain (test);
}
void TestMain(Action<int> tt){
Debug.Log("testMain");
//如果工作完成
tt (0);
}
void test(int x){
Debug.Log("test");
}
封装的方法必须与此委托定义的方法签名相对应。 也就是说,封装的方法必须具有一个通过值传递给它的参数,并且不能返回值。 也就是说Action<T>必须与test(T)对应,至少有一个参数,test必须为void。
28.正反面都正确接受光源的双面材质
Shader "Transparent/Diffuse DoubleSided" {


Properties {

     _Color ("Main Color", Color) = (1,1,1,1)

     _MainTex ("Base (RGB) Trans (A)", 2D) = "white" {}

}


SubShader {

         Tags { "RenderType"="Opaque" }

         LOD 300


        Pass {

             Tags { "LightMode" = "Vertex" }


             Cull Back

             ZWrite On

             Lighting On


             CGPROGRAM


             #pragma vertex vert

             #pragma fragment frag


             #include "UnityCG.cginc"


             sampler _MainTex;

             float4 _MainTex_ST;

             float4 _Color;


             struct a2v {

                 float4 vertex : POSITION;

                 float3 normal : NORMAL;

                 float4 texcoord : TEXCOORD0;

             };


             struct v2f {

                 float4 pos : POSITION;

                 float2 uv : TEXCOORD0;

                 float3 color : TEXCOORD1;

             };


             v2f vert(a2v v) {

                 v2f o;o.pos = mul(UNITY_MATRIX_MVP, v.vertex);

                 o.uv = TRANSFORM_TEX(v.texcoord, _MainTex);

                 o.color = ShadeVertexLights(v.vertex, v.normal);

                 return o;

             }


             float4 frag(v2f i) : COLOR {

                 float4 c = tex2D(_MainTex, i.uv)*_Color;

                 clip(c.a-0.9);

                 c.rgb = c.rgb * i.color * 2;

                 return c;

             }


             ENDCG

         }


         Pass {

             Tags { "LightMode" = "Vertex" }


             Cull Front

             ZWrite On

             Lighting On


             CGPROGRAM


             #pragma vertex vert

             #pragma fragment frag


             #include "UnityCG.cginc"


             sampler _MainTex;

             float4 _MainTex_ST;

             float4 _Color;


             struct a2v {

                 float4 vertex : POSITION;

                 float3 normal : NORMAL;

                 float4 texcoord : TEXCOORD0;

             };


             struct v2f {

                 float4 pos : POSITION;

                 float2 uv : TEXCOORD0;

                 float3 color : TEXCOORD1;

             };


             v2f vert(a2v v) {

                 v2f o;o.pos = mul(UNITY_MATRIX_MVP, v.vertex);

                 o.uv = TRANSFORM_TEX(v.texcoord, _MainTex);

                 o.color = ShadeVertexLights(v.vertex, -v.normal);

                 return o;

             }


             float4 frag(v2f i) : COLOR {

                 float4 c = tex2D(_MainTex, i.uv)*_Color;

                 clip(c.a-0.9);

                 c.rgb = c.rgb * i.color * 2;

                 return c;

             }


             ENDCG

         }

     }

     FallBack "Diffuse"

}
29.多态c#
Virtual方法(虚方法)
virtual 关键字用于在基类中修饰方法。virtual的使用会有两种情况:
情况1:在基类中定义了virtual方法,但在派生类中没有重写该虚方法。那么在对派生类实例的调用中,该虚方法使用的是基类定义的方法。
情况2:在基类中定义了virtual方法,然后在派生类中使用override重写该方法。那么在对派生类实例的调用中,该虚方法使用的是派生重写的方法。
首先
using System;

public class DrawingObject
{
    public virtual void Draw()
    {
        Console.WriteLine("I'm just a generic drawing object.");
    }
}

跟着
using System;

public class Line : DrawingObject
{
    public override void Draw()
    {
        Console.WriteLine("I'm a Line.");
    }
}

public class Circle : DrawingObject
{
    public override void Draw()
    {
        Console.WriteLine("I'm a Circle.");
    }
}

public class Square : DrawingObject
{
    public override void Draw()
    {
        Console.WriteLine("I'm a Square.");
    }
}
最后测试
using System;

public class DrawDemo
{
    public static int Main( )
    {
        DrawingObject[] dObj = new DrawingObject[4];

        dObj[0] = new Line();
        dObj[1] = new Circle();
        dObj[2] = new Square();
        dObj[3] = new DrawingObject();

        foreach (DrawingObject drawObj in dObj)
        {
            drawObj.Draw();
        }

        return 0;
    }
}

输出的结果:

I'm a Line.
I'm a Circle.
I'm a Square.
I'm just a generic drawing object.
30.炸飞力
http://game.ceeger.com/Script/Rigidbody/Rigidbody.AddExplosionForce.html
Rigidbody.AddExplosionForce 添加爆炸力
function AddExplosionForce (explosionForce : float, explosionPosition :Vector3,explosionRadius : float,upwardsModifier : float = 0.0F, mode :ForceMode =ForceMode.Force) : void
Description描述
Applies a force to the rigidbody that simulates explosion effects. The explosion force will fall off linearly with distance to the rigidbody.
应用一个力到刚体来模拟爆炸效果。爆炸力将随着到刚体的距离线形衰减。
The function also plays nicely with ragdolls. If radius is 0, the full force will be applied no matter how far away position is from the rigidbody. upwardsModifier applies the force as if it was applied from beneath the object. This is useful since explosions that throw things up instead of pushing things to the side look cooler. A value of 2 will apply a force as if it is applied from 2 meters below while not changing the actual explosion position. explosionPosition is the position from which the explosion force is to be applied. explosionRadius is the radius of the explosion. Rigidbodies further away than explosionRadius will not be affected.
这个函数也对布娃娃有很好的作用。如果radius为0,将应用全部的力不论position距离刚体多远。upwardModifier就像从物体下方施加力力。这个是非常有用的,因为爆炸将向上抛物体而不是将它们推向一边,这个看起来非常的酷。为2的值将应用一个力就好象在物体2米以下施加力,然而不会改变实际的爆炸位置。 explosionPositon是爆炸力被应用的位置。explosionRadius是爆炸的半径,超过explosionRadius距离的刚体将不会受到影响。
using UnityEngine;
using System.Collections;

public class example : MonoBehaviour {
	public float radius = 5.0F;
	public float power = 10.0F;
	void Start() {
		Vector3 explosionPos = transform.position;
		Collider[] colliders = Physics.OverlapSphere(explosionPos, radius);
		foreach (Collider hit in colliders) {
			if (!hit)
				continue;
			if (hit.rigidbody)
				hit.rigidbody.AddExplosionForce(power, explosionPos, radius, 3.0F);

		}
	}
}
31.vertex shader中获取纹理信息Vertex Texture Fetch
Just use tex2Dlod!!!!
tex2Dlod!!!!!
其实是一种Vertex Texture Fetch顶点纹理拾取技术!
32.使用multi_compile编译Shader的多个版本:
有时候我们希望保留一个shader的大多数实现,而只是做一些细节的修改,此时我们就可以通过该方式来生成shader的多个版本,然后在代码中控制使用哪个版本。
命令:
#pragma multi_compile FANCY_STUFF_OFF FANCY_STUFF_ON
控制:
Material.EnableKeyword(keyword: string)/DisableKeyword(keyword: string)
Shader.EnableKeyword(keyword: string)/DisableKeyword(keyword: string)
在shader中根据定义好的关键字处理具体显示方案:

  float4 frag(vertOut i):COLOR
  {
    float4 c = float4(0, 0, 0, 0);
    #ifdef MY_multi_1
      c = float4(0, 1, 0, 0);
    #endif
    #ifdef MY_multi_2
      c = float4(0, 0, 1, 0);
    #endif
    return c;
}
注意不要在shader中大量使用此命令,因为关键字的个数是有上限的,而多条multi_complie会交叉匹配产生很多种结果。
GLSL shader编程
在Shader中,除了Cg/HLSL以外,GLSL(OpenGL Shading Languate)也可以直接使用。
一般不建议使用GLSL,除非你确定你的目标平台只有Max OS X或兼容OpenGL ES 2.0的移动设备。
Unity默认都会将Cg/HLSL交叉编译出优化过得GLSL,以此来支持多平台。在desktop平台下可以通过打开#pragma glsl选项来支持。
平台特性相关的渲染差异:
Unity封装了大多数的平台问题,但有些时候还是需要自己处理一下的。
纹理坐标:
Direct3D里面是左上角为原点;
OpenGL和OpenGL ES是左下角为原点。
多数时候都ok,除了在Render To Texture时。但是在RTT时,Unity对于D3D平台会自动将渲染的贴图上下翻转一下,以此隐藏了各平台的差异。
D3D平台下,有一种情况不需要Unity自动翻转渲染贴图,那就是使用Image Effects和Anti-Aliasing时,因为直接渲染到Screen了,
需要手动处理的情况:但同时使用screen texture和RenderTexture时,有可能会得到不一致的坐标朝向,此时就需要在shader里面通过代码处理了:
// On D3D when AA is used, the main texture and scene depth texture
// will come out in different vertical orientations.
// So flip sampling of the texture when that is the case (main texture
// texel size will have negative Y).

#if UNITY_UV_STARTS_AT_TOP
if (_MainTex_TexelSize.y < 0)
        uv.y = 1-uv.y;

#endif
AlphaTest:
在OpenGL ES 2.0和Direct3D 11中,没有alpha testing的固定函数。所以在编写programmable shader时,建议在pixel shader中使用CG/HLSL clip()函数来替代。
D3D 11 shader编译器比较挑剔:
D3D 9和OpenGL使用NVIDIA的Cg来编译shader,但D3D 11使用微软的HLSL来编译,此时就会产生一些差异化。
OpenGL ES 2.0只支持部分GLSL原生的东西,所以Unity实现了一些内置的参数,让其以OpenGL的方式工作,但是也有一些参数是没有的。
33.Texture.mipMapBias 多级纹理偏移量
var mipMapBias : float
Description描述
Mip map bias of the texture.
MipMap贴图偏移量。
MipMap可以翻译为多级纹理。
A positive bias makes a texture appear extra blurry, while a negative bias sharpens the texture. Note that using large negative bias can reduce performance, so it's not recommended to use more than -0.5 negative bias. In most cases better sharpening of the texture can be achieved by using anisotropic filtering.
正的偏移量使贴图显的格外模糊,而负的偏移量则会锐化贴图的纹理。注意 使用大的负偏移量时,会降低系统效能,因此不建议使用小于-0.5 的负偏偏移量。在大多数情况下,实现更好地锐化纹理的方法是可以利用各向异性过滤。
MipMap的名词解释:
MIP来源于拉丁文中的multum in parvo,意为在一个小空间里的多数。MIP map(有时候拼写成mipmap)是一种电脑图形图像技术,用于在三维图像的二维代替物中达到立体感效应。MIP map技术与材质帖图技术结合,根据距观看者远近距离的不同,以不同的分辨率将单一的材质帖图以多重图像的形式表现出来并代表平面纹理:尺寸最大的图像放 在前面显著的位置,而相对较小的图像则后退到背景区域。每一个不同的尺寸等级定义成一个MIP map水平。MIP map技术帮助避免了不想要的锯齿边缘(称为锯齿状图形)在图像中出现,这种锯齿状图形可能是由于在不同分辨率下使用bit map图像产生的。
MipMap纹理技术简介
在三维世界中,显示一张图的大小与摄象机的位置有关,近的地方,图片实际象素就大一些,远的地方图片实际象素就会小一些,就要进行一些压缩,例如一张64*64的图,在近处,显示出来可能是50*50,在远处可能显示出来是20*20.
如果只限于简单的支掉某些像素,将会使缩小后的图片损失很多细节,图片变得很粗糙,因此,图形学有很多复杂的方法来处理缩小图片的问题,使得缩小后的图片依然清晰,然而,这些计算都会耗费一定的时间.
Mipmap纹理技术是目前解决纹理分辨率与视点距离关系的最有效途径,它会先将图片压缩成很多逐渐缩小的图片,例如一张64*64的图片,会产生 64*64,32*32,16*16,8*8,4*4,2*2,1*1的7张图片,当屏幕上需要绘制像素点为20*20 时,程序只是利用 32*32 和 16*16 这两张图片来计算出即将显示为 20*20 大小的一个图片,这比单独利用 32*32 的那张原始片计算出来的图片效果要好得多,速度也更快.
using UnityEngine;
using System.Collections;

public class example : MonoBehaviour {
	public void Awake() {
		renderer.material.mainTexture.mipMapBias = 0.5F;
	}
}34.MaterialPropertyBlock
http://docs.unity3d.com/ScriptReference/MaterialPropertyBlock.html
docs.unity3d.com/ScriptReference/MaterialPropertyBlock.SetColor.html
35.实现镜头随人物移动
3中方法。
1.就是把摄像机放在人物中,当成人物的子物体,这样就把人物当着父物体,也即是相当于设置相机的参照物吧,这样不管人物移动到那里,它和摄像机保持的距离还是一致的。不会因为人物移动,摄像机就离人物远了。
2.就是导入我们伟大的unity中自带的哪个跟随物体的脚本, 名字是 SmoothFollow。然后设置一下距离啊 高度啊,直到自己满意。
3,就是自己用自己写的脚本控制。 我直接上脚本吧
using UnityEngine;
using System.Collections;
public class FllowTarget : MonoBehaviour {
    public Transform character;   //摄像机要跟随的人物
    public float smoothTime = 0.01f;  //摄像机平滑移动的时间     private Vector3 cameraVelocity = Vector3.zero;     private Camera mainCamera;  //主摄像机(有时候会在工程中有多个摄像机,但是只能有一个主摄像机吧)
    void  Awake ()      {
     mainCamera = Camera.main;     }
    void  Update()     {
        transform.position = Vector3.SmoothDamp(transform.position, character.position + new Vector3(0, 0, -5), ref cameraVelocity, smoothTime);     }    }
我们讲这段代码拖动给摄像机,然后记得添加character 。好了 现在你就能看见效果了。我觉得这3个方法中就属这个方法好点(个人看法,当然还有牛人写更好的代码) 现在我来解释下代码。
character.position + new Vector3(0, 0, -5)这个就是相当于摄像机的位置,也就是摄像机隔离人物往后5个单位长度。总不可能和人物坐标是一样吧。
主要就是Vector3.SmoothDamp() 这个函数。里面的第一个参数就是当前的位置。 第二个参数就是要接近的位置。 第三个参数就是 当前速度,这个值由你每次调用这个函数时被修改。 第四个参数就是完成这个位移移动所花费的时间。
36.各向异性
Ward BRDF ,用于各向异性表面的经验模型有些复杂,并且需要从实际物体表面来获取
BRDF 数据。
有一个实现简单,速度快的Bank BRDF模型,它能模拟各向异性光照效果,其镜面反射部分的计算公式是:

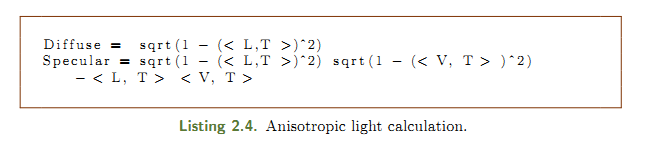
ks 、ns 分别表示镜面反射系数和高光系数;L 表示入射光线方向、V 表示视线方向,T 表示顶点的切向量。计算T的一种方法是用N和V叉乘得到。
37.灰度
白光的亮度用Y表示,它和红绿蓝三色光的关系:
Y = 0.299R+0.587G+0.114B NTSC美制电视制式亮度公式
Y = 0.222R+0.707G+0.071B PAL(相位逐行交变)电视制式
ppsspp使用的是NTSC美制,Unity中的Luminance函数使用的是PAL制式
38.z值depth的一些计算
Some math I did ... (not 100% verified, but looks like it works)

n = near
f = far
z = depth buffer Z-value
EZ  = eye Z value
LZ  = depth buffer Z-value remapped to a linear [0..1] range (near plane to far plane)
LZ2 = depth buffer Z-value remapped to a linear [0..1] range (eye to far plane)


DX:
EZ  = (n * f) / (f - z * (f - n))
LZ  = (eyeZ - n) / (f - n) = z / (f - z * (f - n))
LZ2 = eyeZ / f = n / (f - z * (f - n))


GL:
EZ  = (2 * n * f) / (f + n - z * (f - n))
LZ  = (eyeZ - n) / (f - n) = n * (z + 1.0) / (f + n - z * (f - n))
LZ2 = eyeZ / f = (2 * n) / (f + n - z * (f - n))


LZ2 in two instructions:
LZ2 = 1.0 / (c0 * z + c1)

DX:
  c1 = f / n
  c0 = 1.0 - c1

GL:
  c0 = (1 - f / n) / 2
  c1 = (1 + f / n) / 2
http://www.humus.name/temp/Linearize%20depth.txt
39.Rigidbody.collisionDetectionMode 碰撞检测模式
The Rigidbody's collision detection mode.
刚体的碰撞检测模式。
Use this to set up a Rigidbody's for continuous collision detection, which is used to prevent fast moving objects from passing through other objects without detecting collisions. For best results, set this value toCollisionDetectionMode.ContinuousDynamic for fast moving objects, and for other objects which these need to collide with, set it toCollisionDetectionMode.Continuous. This has a big impact on physics performance, so just leave it set to the default value ofCollisionDetectionMode.Discrete, if you don't have any issues with collisions of fast objects. Continuous Collision Detection is only supported for Rigidbodies with Sphere-, Capusle- or BoxColliders.
使用这个创建一个刚体的连续碰撞检测,从没有碰撞检测的其他物体传递,用来防止快速移动的物体,为了获得最佳效果,为快速移动的物体设置这个值为CollisionDetectionMode.ContinuousDynamic,以及为其他与之需要碰撞的物体设置这个值,为CollisionDetectionMode.Continuous。这个对物理性能有很大影响,所以只要给它设置为默认值CollisionDetectionMode.Discrete,假如快速物体的碰撞没有任何问题。连续碰撞检测只支持刚体的球体、胶囊或盒子碰撞器。
he collision detection mode constants used for Rigidbody.collisionDetectionMode.碰撞检测模式常量用于Rigidbody.collisionDetectionMode。
Values值
-
Continuous collision detection is off for this Rigidbody.
用于这个刚体的连续碰撞检测被关闭。 -
Continuous collision detection is on for colliding with static mesh geometry.
连续碰撞检测是基于网格几何体的静态碰撞。 -
Continuous collision detection is on for colliding with static and dynamic geometry.
连续碰撞检测是基于静态和动态几何体碰撞。
今天有空就仔细研究了一下Collision Detection的问题,以前总是弄不明白Continuous和Continuous Dynamic到底有什么区别,今天算是彻底弄明白了,官方文档说的太晦涩了不太容易解释.于是我自己做了一张图,各位基本上一看就懂,
需要知道的唯一一点就是Continuous类型的检测比Discrete更加消耗性能.
这是官方文档的原文,不便于理解更不便于记忆.
我对这段话的理解如下:
Continuous---对Discrete以及Continuous类的刚体使用Discrete检测(但除了Continuous Dynamic,因为Continuous Dynamic只对Discrete的刚体使用Discrete检测,那么就会对Continuous使用Continuous检测,反之亦然.) 除此之外还对静态物体使用Continuous检测
Continuous Dynamic---只对Discrete的刚体使用Discrete检测,对其他任何刚体或者静态物体都使用Continuous检测.
要点:Continuous和Continuous Dynamic都会对静态物体使用Continuous检测.
在使用的时候,一般对高速运动的刚体使用Continuous Dynamic,这时只需要记住,要将其他的刚体设置为非Discrete才会让高速运动的物体以及其他刚体之间产生Continuous检测,可以将其他刚体设置为Continuous或者Continuous Dynamic,但是不会进行高速运动的其他物体不必设置为Continuous Dynamic,因为Continuous Dynamic比Continuous更消耗性能.
怎么样是不是很繁琐,如果非要用一句话来概括重要知识点,那么就是下面这句:
Continuous和Continuous Dynamic的区别在于对Continuous使用何种检测,Continuous使用Discrete,而Continuous Dynamic使用Continuous!
两种检测模式 离散、连续 四种标记:静态、离散、连续、动态连续,然后是四种标记之间两两的检测模式
40.vert frag shader接受阴影,投射阴影,亲测强大!!!
Shader "Custom/SolidColor" {
    SubShader {
        Pass {

            // 1.) This will be the base forward rendering pass in which ambient, vertex, and
            // main directional light will be applied. Additional lights will need additional passes
            // using the "ForwardAdd" lightmode.
            // see: http://docs.unity3d.com/Manual/SL-PassTags.html
            Tags { "LightMode" = "ForwardBase" }

            CGPROGRAM

            #pragma vertex vert
            #pragma fragment frag
            #include "UnityCG.cginc"

            // 2.) This matches the "forward base" of the LightMode tag to ensure the shader compiles
            // properly for the forward bass pass. As with the LightMode tag, for any additional lights
            // this would be changed from _fwdbase to _fwdadd.
            #pragma multi_compile_fwdbase

            // 3.) Reference the Unity library that includes all the lighting shadow macros
            #include "AutoLight.cginc"


            struct v2f
            {
                float4 pos : SV_POSITION;

                // 4.) The LIGHTING_COORDS macro (defined in AutoLight.cginc) defines the parameters needed to sample
                // the shadow map. The (0,1) specifies which unused TEXCOORD semantics to hold the sampled values -
                // As I'm not using any texcoords in this shader, I can use TEXCOORD0 and TEXCOORD1 for the shadow
                // sampling. If I was already using TEXCOORD for UV coordinates, say, I could specify
                // LIGHTING_COORDS(1,2) instead to use TEXCOORD1 and TEXCOORD2.
                LIGHTING_COORDS(0,1)
            };


            v2f vert(appdata_base v) {
                v2f o;
                o.pos = mul (UNITY_MATRIX_MVP, v.vertex);

                // 5.) The TRANSFER_VERTEX_TO_FRAGMENT macro populates the chosen LIGHTING_COORDS in the v2f structure
                // with appropriate values to sample from the shadow/lighting map
                TRANSFER_VERTEX_TO_FRAGMENT(o);

                return o;
            }

            fixed4 frag(v2f i) : COLOR {

                // 6.) The LIGHT_ATTENUATION samples the shadowmap (using the coordinates calculated by TRANSFER_VERTEX_TO_FRAGMENT
                // and stored in the structure defined by LIGHTING_COORDS), and returns the value as a float.
                float attenuation = LIGHT_ATTENUATION(i);
                return fixed4(1.0,0.0,0.0,1.0) * attenuation;
            }

            ENDCG
        }
    }

    // 7.) To receive or cast a shadow, shaders must implement the appropriate "Shadow Collector" or "Shadow Caster" pass.
    // Although we haven't explicitly done so in this shader, if these passes are missing they will be read from a fallback
    // shader instead, so specify one here to import the collector/caster passes used in that fallback.
    Fallback "VertexLit"
}
附博主测试一张:
41.camera のCullingMask消隐遮罩
官方文档对CullingMask的注释只是说了通过位移运算符,可以添加选中层。
假设要摄像机只显示第10层,11层,12层。写成:
|
|
camera.cullingMask = 1<<10 + 1<<11 + 1<<12;
|
当cullingMask为Nothing时,值是0。
当cullingMask设置为everything时,值是-1。这时如果有层要关闭,就减去这个层的值。
比如第8层的值是 256。那关闭第8层后的值是 -257
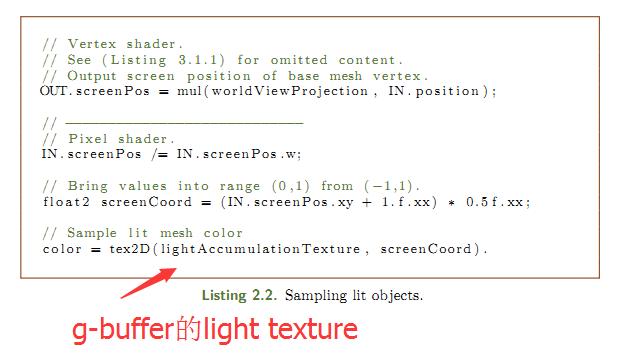
42.untiyに G-bufferで使用します!!post-process
博主闲的蛋疼决定之后的标题都用日语。。。不一定对的日语。。
RT0, ARGB32 格式: Diffuse color (RGB), 不使用(A).
RT1, ARGB32格式: Specular color (RGB), roughness (A).
RT2, ARGB2101010格式: World space normal (RGB), 不使用(A).
RT3, ARGB32 (non-HDR) 或 ARGBHalf (HDR) 格式: Emission + lighting + lightmaps + reflection probes buffer.
使用前要先声明 sampler2D _CameraGBufferTexture。。。;
这是原图

_CameraGBufferTexture0
_CameraGBufferTexture1的specular,roughness在a通道
_CameraGBufferTexture2
_CameraGBufferTexture3
有了g-buffer就能做好多事情啦!哈哈哈,博主の気持ちがいい!とても、楽しい!
43.object material に G-bufferで使用します!!
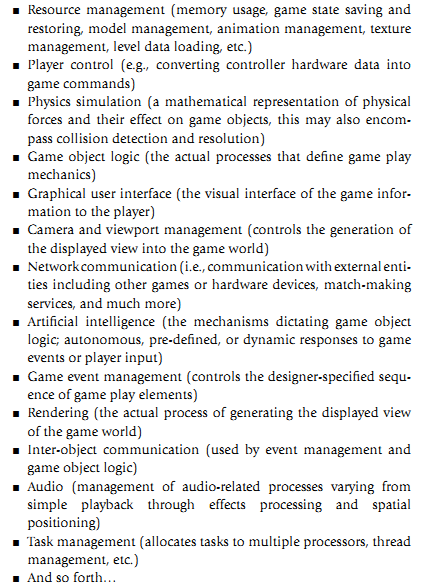
44.游戏开发的各个系统
45.camera系统的建议
来自:The Full Spectrum Warrior Camera SystemJohn Giors
When aesthetics and usability are in conflict, always choose usability. The camera system is too important to fundamental
gameplay to allow a cool effect to take precedence over the user’s ability to understand and interact with the game. Once the
system is stable and functions acceptably for users, then you can experiment with aesthetics. Of course, you can pretty much
go wild during cut scenes, so it would be wise to concentrate aesthetic concerns there.
Keep motions smooth, e.g., use the MPC described above.
Don't pan the camera quickly except under user control, since it can disorient the user.
Keep user-control separated from programmatic control as much as possible. When the camera is under user control, give the
user as much freedom of motion as possible. Restricting motion feels very unnatural and can make players feel that
something has gone wrong.
Use a layered design and multiple cameras.
Provide visual feedback, tuning, and debugging aids.
Always look for alternative solutions to problems. Often, issues with the camera can be resolved by means outside of the
camera system itself, such as using translucency to prevent camera obstruction rather than colliding with characters.
Sometimes, these alternate solutions are preferred by design, since they are straightforward and provide more information for
players (e.g., players will see a translucent character whereas a collision system may move the camera in a way that the user
does not understand, since he cannot see the character causing the collision).
46.获取物体前后左右方向
transform.forward.normalized
transform.right.normalized
47.GetMipLevel
float GetMipLevel ( float2 iUV, float2 iTextureSize )
{
float2 dx= ddx( iUV * iTextureSize.x);
float2 dy= ddy( iUV * iTextureSize.y);
float d= max(dot(dx , dx ),dot(dy , dy ));
return 0.5 * log2 (d) ;
}48.升降采样
Graphics.Blit(sourceTexture, tempRtA, material);material2.SetTexture("_EdgeTex", tempRtA);
Graphics.Blit(sourceTexture, destTexture, material2);
tempRtA = new RenderTexture(Screen.width , Screen.height, 0);
tempRtA = new RenderTexture(Screen.width/4 , Screen.height/4, 0);
tempRtA = new RenderTexture(Screen.width*4 , Screen.height*4, 0);
49.计算screen position
				o.pos = mul (UNITY_MATRIX_MVP, float4(v,1));
o.screenUV = ComputeScreenPos (o.pos);50.在post processing中计算world position的一种方法


51.shader小细节(时更)
1.Added "#pragma exclude_renderers nomrt" for platforms not supporting multiple render targets (MRTs).
在Shader "Decal/DecalShader"官方DecalShader示例。。中发现
52.转置算法inverse
float4x4 inverse(float4x4 input)
 {
     #define minor(a,b,c) determinant(float3x3(input.a, input.b, input.c))
     //determinant(float3x3(input._22_23_23, input._32_33_34, input._42_43_44))

     float4x4 cofactors = float4x4(
          minor(_22_23_24, _32_33_34, _42_43_44),
         -minor(_21_23_24, _31_33_34, _41_43_44),
          minor(_21_22_24, _31_32_34, _41_42_44),
         -minor(_21_22_23, _31_32_33, _41_42_43),

         -minor(_12_13_14, _32_33_34, _42_43_44),
          minor(_11_13_14, _31_33_34, _41_43_44),
         -minor(_11_12_14, _31_32_34, _41_42_44),
          minor(_11_12_13, _31_32_33, _41_42_43),

          minor(_12_13_14, _22_23_24, _42_43_44),
         -minor(_11_13_14, _21_23_24, _41_43_44),
          minor(_11_12_14, _21_22_24, _41_42_44),
         -minor(_11_12_13, _21_22_23, _41_42_43),

         -minor(_12_13_14, _22_23_24, _32_33_34),
          minor(_11_13_14, _21_23_24, _31_33_34),
         -minor(_11_12_14, _21_22_24, _31_32_34),
          minor(_11_12_13, _21_22_23, _31_32_33)
     );
     #undef minor
     return transpose(cofactors) / determinant(input);
}来自:http://answers.unity3d.com/questions/218333/shader-inversefloat4x4-function.html
53.screen space to world space(decal 用)
Here's how to do it exactly, step by step.
0) Obtain your mouse coordinates within the client area
1) Get your Projection matrix and View matrix if no Model matrix required.
2) Multiply View * Projection
3) Inverse the results of multiplication
4) Construct a vector4 consisting of
x = mouseposition.x within a range of window x - transform to values between -1 and 1
y = mouseposition.y within a range of window y - transform to values between -1 and 1 - remember to invert mouseposition.y if needed
z = the depth value ( this can be obtained with glReadPixel) - you can manually go from -1 to 1 ( zNear, zFar )
w = 1.0
5) Multiply the vector by inversed matrix created before 6) Divide result vector by it's w component after matrix multiplication ( perspective division )
        POINT mousePos;
        GetCursorPos(&mousePos);
        ScreenToClient( this->GetWindowHWND(), &mousePos );

        CMatrix4x4 matProjection = m_pCamera->getViewMatrix() *  m_pCamera->getProjectionMatrix() ;

        CMatrix4x4 matInverse =  matProjection.inverse();


        float in[4];
        float winZ = 1.0;


        in[0]=(2.0f*((float)(mousePos.x-0)/(this->GetResolution().x-0)))-1.0f,
        in[1]=1.0f-(2.0f*((float)(mousePos.y-0)/(this->GetResolution().y-0)));
        in[2]=2.0* winZ -1.0;
        in[3]=1.0;

        CVector4 vIn = CVector4(in[0],in[1],in[2],in[3]);
        pos = vIn * matInverse;

        pos.w = 1.0 / pos.w;

        pos.x *= pos.w;
        pos.y *= pos.w;
        pos.z *= pos.w;


        sprintf(strTitle,"%f %f %f / %f,%f,%f ",m_pCamera->m_vPosition.x,m_pCamera->m_vPosition.y,m_pCamera->m_vPosition.z,pos.x,pos.y,pos.z);

SetWindowText(this->GetWindowHWND(),strTitle);来自:http://stackoverflow.com/questions/7692988/opengl-math-projecting-screen-space-to-world-space-coords-solved
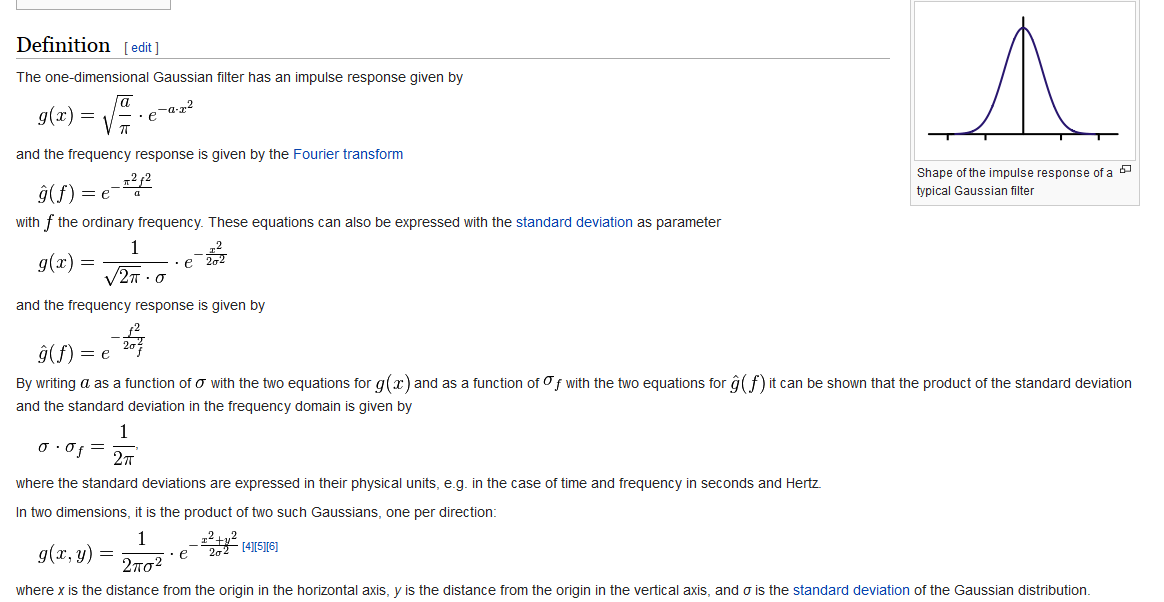
54.高斯滤波Gaussian filter
55.区域填色FloodFill
http://stackoverflow.com/questions/11041079/flood-fill-algorithm-memory-leak
http://wiki.unity3d.com/index.php/TextureFloodFill
http://answers.unity3d.com/questions/223013/flood-fill-algorithm-for-colour-fill-paint-bucket.html
http://stackoverflow.com/questions/367226/flood-fill-algorithms
56.回调函数
http://www.cnblogs.com/sevenmoons/p/4178369.html
C#里准确的说法应该叫委托,委托的方法有多种,下面介绍Action<T>,可以做为一个函数参数递。
//引用
using System;
void Start () {
TestMain (test);
}
void TestMain(Action<int> tt){
Debug.Log("testMain");
//如果工作完成
tt (0);
}
void test(int x){
Debug.Log("test");
}
封装的方法必须与此委托定义的方法签名相对应。 也就是说,封装的方法必须具有一个通过值传递给它的参数,并且不能返回值。 也就是说Action<T>必须与test(T)对应,至少有一个参数,test必须为void。
57.c#声明变量只读只写
public String Text {get; private set;} // readonly
public String Text {private get; set;} // writeonly
public String Text {private get; private set;} //
58.c# 泛型类
Generic是Framework 2.0的新元素,中文名字称之为“泛型” ,特征是一个带有尖括号的类,比如List< T>
C#自定义泛型类用得最广泛,就是集合(Collection)中。实际上,泛型的产生其中一个原因就是为了解决原来集合类中元素的装箱和拆箱问题(如果对装箱和拆箱概念不明,请百度搜索)。由于泛型的使用,使得集合内所有元素都属于同一类,这就把类型不同的隐患消灭在编译阶段——如果类型不对,则编译错误。
这里只讨论C#自定义泛型类。基本自定义如下:
- public class MyGeneric < T>
- ...{
- private T member;
- public void Method (T obj)
- ...{
- }
- }
这里,定义了一个泛型类,其中的T作为一个类,可以在定义的类中使用。当然,要定义多个泛型类,也没有问题。
- public class MyGeneric < TKey, TValue>
- ...{
- private TKey key;
- private TValue value;
- public void Method (TKey k, TValue v)
- ...{
- }
- }
泛型的初始化:泛型是需要进行初始化的。使用T doc = default(T)以后,系统会自动为泛型进行初始化。
限制:如果我们知道,这个将要传入的泛型类T,必定具有某些的属性,那么我们就可以在MyGeneric< T>中使用T的这些属性。这一点,是通过interface来实现的。
- // 先定义一个interface
- public interface IDocument
- ...{
- string Title ...{get;}
- string Content ...{get;}
- }
- // 让范型类T实现这个interface
- public class MyGeneric < T>
- where T : IDocument
- ...{
- public void Method(T v)
- ...{
- Console.WriteLine(v.Title);
- }
- }
- // 传入的类也必须实现interface
- public class Document : IDocument
- ...{
- ......
- }
- // 使用这个泛型
- MyGeneric< Document> doc = new MyGeneric< Document>();
泛型方法:我们同样可以定义泛型的方法
- void Swap< T> (ref T x, ref T y)
- ...{
- T temp = x;
- x = y;
- y = temp;
- }
泛型代理(Generic Delegate):既然能够定义泛型方法,自然也可以定义泛型代理
- public delegate void delegateSample < T> (ref T x, ref T y)
- private void Swap (ref T x, ref T y)
- ...{
- T temp = x;
- x = y;
- y = temp;
- }
- // 调用
- public void Run()
- ...{
- int i,j;
- i = 3;
- j = 5;
- delegateSample< int> sample = new delegateSample< int> (Swap);
- sample(i, j);
- }
设置可空值类型:一般来说,值类型的变量是非空的。但是,Nullable< T>可以解决这个问题。
- Nullable< int> x; // 这样就设置了一个可空的整数变量x
- x = 4;
- x += 3;
- if (x.HasValue) // 使用HasValue属性来检查x是否为空
- ...{ Console.WriteLine ("x="+x.ToString());
- }
- x = null; // 可设空值
使用ArraySegment< T>来获得数组的一部分。如果要使用一个数组的部分元素,直接使用ArraySegment来圈定不失为一个不错的办法。
- int[] arr = ...{1, 2, 3, 4, 5, 6, 7, 8, 9};
- // 第一个参数是传递数组,第二个参数是起始段在数组内的偏移,第三个参数是要取连续多少个数
- ArraySegment< int> segment = new ArraySegment< int>(arr, 2, 3); // (array, offset, count)
- for (int i = segment.Offset; i< = segment.Offset + segment.Count; i++)
- ...{
- Console.WriteLine(segment.Array[i]); // 使用Array属性来访问传递的数组
- }
在例子中,通过将Offset属性和Count属性设置为不同的值,可以达到访问不同段的目的。
以上就是C#自定义泛型类的用法介绍。
59.C#深复制与浅复制
C#中对于数据的复制机制虽然简单但是容易让人误解。C#数据类型大体分为值类型(valuetype)与引用类型(referencetype)。对于值类型数据,复制的时候直接将数据复制给另外的变量,而对于引用型变量而言,复制时,其实只是复制了其引用。复制引用的方式叫浅复制,而逐一复制被复制对象的数据成员的方式称为深复制。例如
Person p1=new Person{
},
Age=20
};//初始化一个Person对象
如果现在有如下语句,
Person p2=p1;
P2.Address=newAddressInfo{PostCode=100878,District=”shanghai”};
那么,此时p1.Address.PostCode=?
因为Person的Address属性为引用类型,因此,NET默认其复制方式为浅复制,即是说在P2=P1时,将P1.Address的引用传给了P2.Adrress,即是P1.Address与P2.Address指向相同的内存空间。当改变P2的Address属性时,P1.Address属性也会相应改变。因此最后p1.Address.PostCode=100878。
NET中Object类提供了一个MemberwiseClone方法实现的就是上述机制。
要对对象实现深复制。我们可以通过实现ICloneable接口。
ICloneable接口只提供了一个Clone()抽象方法。只要在类中实现它即可。比如现在我要实现Person类的深复制。则可以如下
Public class Person :ICloneable
{
{
Person newPerson =(Person)this.MemberwiseClone();//先调用默认的复制机制
AddressInfo address=newAddressInfo{PostCode=this.Address.PostCode,District=this.Address.District};
return newPerson;
}
}
这样就实现对象的深复制。
可以这样调用(续上面的代码),p2=(Person)p1.Clone();此时再
P2.Address=newAddressInfo{PostCode=100878,District=”shanghai”};
P1的Address不再改变。
60.unity的Instantiate是深拷贝(for gameobject)
unity的Instantiate是深拷贝(for gameobject)
61.Debug.Break中止
暂停编辑器。
This is useful when you want to check certain values on the inspector and you are not able to pause it manually.
当你想要检查在检视面板的某些值并且你不可能手动暂停它时这个函数非常有用的。
using UnityEngine;
using System.Collections;

public class example : MonoBehaviour {
	public void Awake() {
		Debug.Break();
	}
}Debug.Break();62.c#抽象的重写重载
virtual abstract override
63.每帧经过时间(秒)
Time.timeScale / Time.deltaTime
64.判断物体方向
在做rpg类游戏的过程中,经常遇到要判断周围怪物相对自身的方位
1.判断目标在自己的前后方位可以使用下面的方法:
Vector3.Dot(transform.forward, target.position)
返回值为正时,目标在自己的前方,反之在自己的后方
2.判断目标在机子的左右方位可以使用下面的方法:
Vector3.Cross(transform.forward, target.position).y
返回值为正时,目标在自己的右方,反之在自己的左方
3.在这里顺便解说下关于空间向量的点积和叉积:
A.点积
点积的计算方式为: a·b=|a|·|b|cos<a,b> 其中|a|和|b|表示向量的模,<a,b>表示两个向量的夹角。另外在 点积 中,<a,b>和<b,a> 夹角是不分顺序的。
所以通过点积,我们其实是可以计算两个向量的夹角的。
另外通过点积的计算我们可以简单粗略的判断当前物体是否朝向另外一个物体: 只需要计算当前物体的transform.forward向量与 otherObj.transform.position 的点积即可, 大于0则在前方,否则在后方。
B.叉积
叉积的定义: c =a x b 其中a,b,c均为向量。即两个向量的叉积得到的还是向量!
性质1: c⊥a,c⊥b,即向量c垂直与向量a,b所在的平面 。
性质2: 模长|c|=|a||b|sin<a,b>
性质3: 满足右手法则 。从这点我们有axb ≠ bxa,而axb = – bxa。所以我们可以使用叉积的正负值来判断向量a,b的相对位置,即向量b是处于向量a的顺时针方向还是逆时针方向
65.Texture.anisoLevel
Description
Anisotropic filtering level of the texture.
Anisotropic filtering makes textures look better when viewed at a shallow angle, but comes at a performance cost in the graphics hardware. Usually you use it on floor, ground or road textures to make them look better.
The value range of this variable goes from 1 to 9, where 1 equals no filtering applied and 9 equals full filtering applied. As the value gets bigger, the texture is clearer at shallow angles. Lower values mean the texture will be more blurry at shallow angles.
See Also: texture assets.
No anisotropy (left) / Maximum anisotropy (right) used on the ground texture
无各向异性(左)/(右)最大各向异性应用于地面纹理。
66.LUT Look-Up-Table 显示查找表
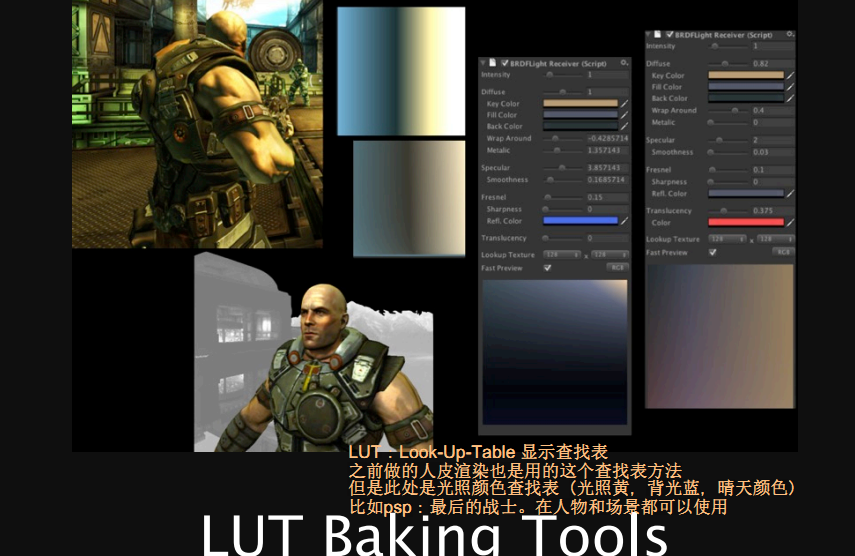
LUT:Look-Up-Table 显示查找表
之前做的人皮渲染也是用的这个查找表方法
也可以是光照颜色查找表(光照黄,背光蓝,晴天颜色)
比如psp:最后的战士。在人物和场景都可以使用
色调映射tone mapping?
67.DXT压缩
DDS文件可以通过 nVidia 公司提供的 Photoshop 插件直接打开编辑和保存, 请可以http://wotcn.duowan.com/page/736.html 在这下载
DDS文件格式要追述到S3(Silicon & Software Systems)公司提出的一种纹理压缩格式S3TC(S3 Texture Compression), 其目的是通过对纹理的压缩, 以达到节约系统带宽并提高效能的目的. S3TC就是通过压缩方式, 利用有限的纹理缓存空间来存储更多的纹理, 因为它支持6:1的压缩比例, 所以6M的纹理可以被压缩为1M存放在材质缓存中, 从而在节约了缓存的同时也提高了显示性能. 后来的DXTC和FXT1都是与S3TC类似的技术, 它们分别是微软和3dfx开发的纹理压缩标准, FXT1能提供比S3TC更高的压缩比, 达到8:1, 同时它也在3DFX新版本的Glide中得到支持. DXTC是1999年微软从S3公司取得S3TC的授权后更名而来的, 并在DirectX6中提供了支持, 即使用户的图形硬件不能支持S3TC, DirectX API会自动解码压缩后的纹理贴图. 压缩纹理贴图可以使用高品质的离线压缩器, 不会造成加载程序时有很多延时, 而DDS文件就可以使用DXTC方式压缩或是存储未压缩的像素格式.
注: S3TC是一种有损压缩方式, 纹理被压缩到每单元4点(不透明纹理或简单透明纹理)或每单元8点(复杂透明纹理), 压缩后的纹理品质保持良好.
DDS(DirectDraw Surface)文件格式是微软为DirectX开发的一种图片格式, 它是可以使用类似S3TC标准提供的一种压缩纹理格式. DDS文件可以有很多不同的格式, 可以含有 Mipmap 或不保存 Mipmap 信息, 可以使用压缩或非压缩的像素格式, 常见的压缩数据方式有 DXTn(DXT1~DXT5), DDS文件的结构见MSDN:DDS File Reference.
DXT1压缩格式可以提供高达8:1的压缩比例, 它可以支持1 bit 的 Alpha 通道, 每个 4x4 的块可以根据需要有或没有这个透明通道. 不需要 alpha 通道时, 每个块可以有四种颜色(其中两个是插值得到的). 需要 alpha 通道时, 只能有三种颜色, 另一个被保留用来描述是否透明, 因为只有一位 Alpha 信息, 所以只能表示透明或不透明, 因此DXT1的透明其实是一种镂空, 利用网孔达到的透明效果. 我们一般对画面质量要求不高并且不需要透明信息的图片使用这种格式.
DXT3压缩格式可以提供4:1的压缩比例, 可以支持4 bit 的 Alpha 通道, 主要用于Alpha通道较锐利, 对比强烈的材质, 比如镂空, 以及部分半透材质等.
DXT5压缩格式也可以提供4:1的压缩比例, 支持4 bit 的 Alpha 通道, 保存的上插值Alpha信息. 主要用于Alpha通道比较柔和的材质. 如用作镜面光屏蔽材质等.
至于 DXT2 和 DXT4 压缩格式并不常用, 与 DXT3 和 DXT5 压缩格式很相似, DXT2 与 DXT3 的区别在于 DXT2 使用带有预乘 Alpha 的压缩格式, DXT3 使用无预乘 Alpha 的压缩格式, DXT4 与 DXT5 的区别在于 DXT4 使用带有预乘插补 Alpha 的压缩格式, DXT5 使用插补 Alpha 的压缩格式, 无预乘. 关于压缩信息见MSDN:Textures with Alpha.
DDS文件可以通过 nVidia 公司提供的 Photoshop 插件直接打开编辑和保存, 请可以http://wotcn.duowan.com/page/736.html 在这下载,另一个方法是先在用 Photoshop 编辑图片将图片保存为有 Alpha 通道的 TGA 格式文件, 再使用转换工具生成DDS文件, 转换和查看DDS文件的工具可以安装DXSDK后获得, 也可以使用本站简化版的转换和查看工具, 请点击此处 打开下载页面.

DXT1
DXT1格式主要适用于不具透明度的贴图或仅具一位Alpha的贴图(非完全透明则即完全不透明),对于完全RGB565格式的贴图,DXT1具有4:1的压缩比,即平均每个像素颜色占4位,虽然压缩比并不是很好,但是DXT的特性使得它更适合用于实时游戏之中。
DXT1将每4×4个像素块视为一个压缩单位,压缩后的4×4个像素块占用64位,其中有2个16位的RGB颜色和16个2位索引,格式描绘如下图所示:
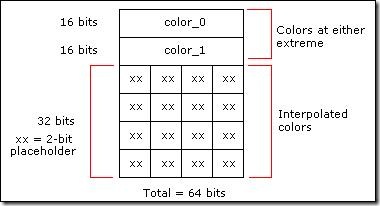
DXT1中的两个RGB颜色负责表示所在压缩的4×4像素块中颜色的两个极端值,然后通过线性插值我们可以再计算出两个中间颜色值,而16个2位索引则表明了这4×4个像素块所在像素的颜色值,2位可以表示4种状态,刚好可以完整表示color_0,color_1以及我们通过插值计算出的中间颜色值color_2和color_3,而对于具有一位Alpha的贴图,则只计算一个中间颜色值,color_3用来表示完全透明。
对于如何判断DXT1格式是表示不透明还是具有1位alpha的贴图,则是通过两个颜色值color_0和color_1来实现的,如果color_0的数值大于color_1则表示贴图是完全不透明的,反之则表示具有一位透明信息。
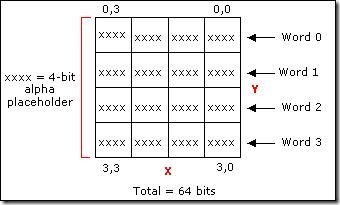
DXT2、DXT3
DXT2和DXT3可以表示具有更复杂的透明信息的贴图,这两种格式采用的是显式的Alpha表示,我们知道了在DXT1中,我们使用64位数据来描述4*4的像素块的颜色信息,在DXT2和DXT3中,这部分颜色信息是不变的,而是通过另附加64位数据也就是每个像素4位来表示他们的Alpha透明信息,而这4位的Alpha的信息通常情况下我们可以采用直接编码的方式来表示即可。
这样每个4×4像素块占用128位也就是8个字,0~3字表示透明信息;4~7表示前面描述的颜色的信息。
DXT2和DXT3的不同之处在于,DXT2中颜色是已经完成了Premultiplied by alpha操作(已完成颜色与alpha的混合,当透明度发生改变时,直接改变整体颜色值,不必再单独复合),DXT3的Alpha信息则是相对独立的,之所以要区分开了则是为了适应不同的需要,因为有些场合需要独立的Alpha信息。
DXT4、DXT5
DXT4、DXT5也是用于表示具有复杂的透明信息的贴图,与2和3不同的是4和5的Alpha信息是通过线性插值计算所得,类似于DXT1的颜色信息。同样的,每4×4的像素块的透明信息占用64位,所不同的是,64位中采用了2个8位的alpha值和16个3位的索引值,既然每个像素的索引占3位,那么可以表示8种不同的透明状态。
在这里插值的方法有两种,一种用于表示具有完全透明和完全不透明的状态,另一种则是仅在给出的极端值alpha_0和alpha_1中进行插值。区分的方法也是通过比较alpha_0和alpha_1的大小来实现的,如果alpha_0大于alpha_1,则通过插值计算剩下的6个中间alpha值;否则,只通过插值计算4个中间alpha值,alpha_6直接赋值0,alpha_7直接赋值255。
DXT4和DXT5的区别同DXT2和DXT3的区别相同,DXT4的颜色值是理解为已经完成Premultiplied by alpha操作的。
另外需要注意的是,所有的压缩纹理格式都是2的幂,因为纹理压缩的单位是4×4像素,所以如果贴图的大小位16×2或者8×1这样的比例,系统会同样采用4×4的单位进行压缩,会造成一定的空间浪费,同样的大小会被占用,只是不会参与使用而已。
68.foreach的对象不能赋值
是一个“foreach 迭代变量”,无法为它赋值


 3404
3404

 被折叠的 条评论
为什么被折叠?
被折叠的 条评论
为什么被折叠?
 到【灌水乐园】发言


