


- 定义:一个节点发布消息,另一个节点订阅该消息
- 应用场景:
- 更新频繁、少逻辑处理的数据传输场景
- 对于实时性、周期性的消息,使用topic来传输是最佳的选择。
- 不适应用临时消息,否则消耗大量不必要的系统资源,造成系统的低效率高功耗。这种消息应该用service(服务)通信
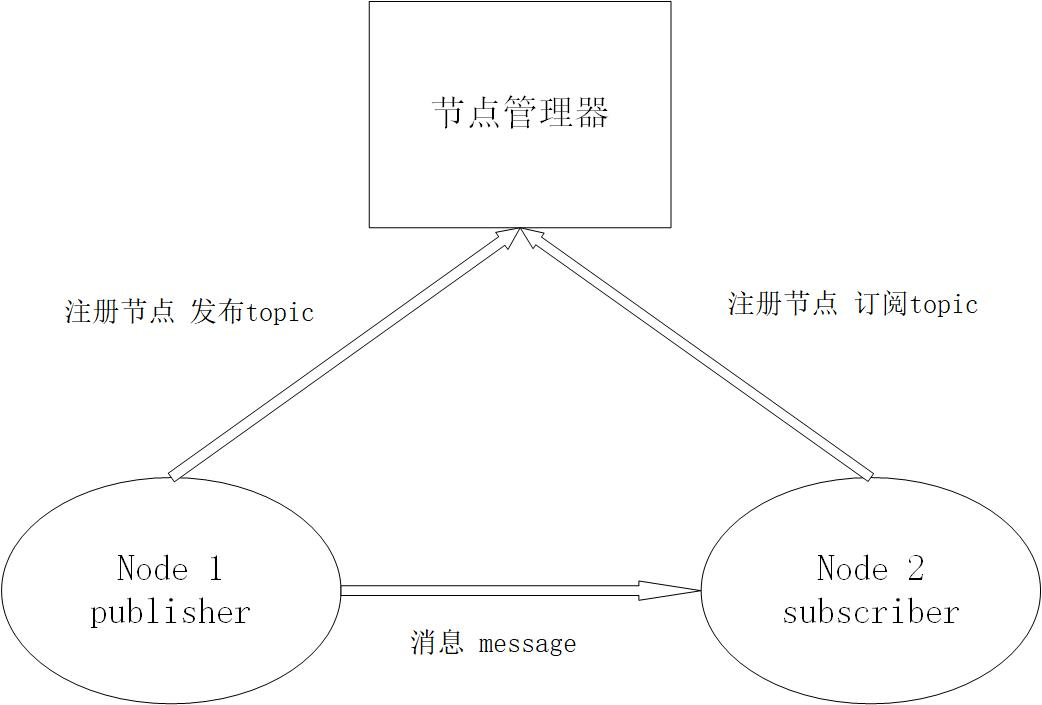
订阅发布模型
topic是一种点对点的单向异步通信方式,这里的“点”指的是node,也就是说node之间可以通过topic方式来传递信息。一个节点发布数据到某个话题上,另外一个节点就可以通过订阅话题拿到数据。
topic要经历下面几步的初始化过程:
- 首先,publisher节点和subscriber节点都要到节点管理器进行注册,然后publisher会发布topic,subscriber在master的指挥下会订阅该topic,从而建立起sub-pub之间的通信。注意整个过程是单向的。
- Subscriber接收消息会进行处理,一般这个过程叫做回调(Callback)。所谓回调就是提前定义好了一个处理函数(写在代码中),当有消息来就会触发这个处理函数,函数会对消息进行处理。
其结构示意图如下:
怎么理解异步
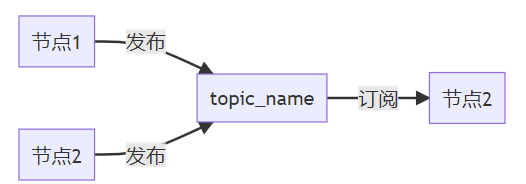
参考下图,我们以摄像头画面的发布、处理、显示为例讲讲topic通信的流程。在机器人上的摄像头拍摄程序是一个node(圆圈表示,我们记作node1),当node1运行启动之后,它作为一个Publisher就开始发布topic。比如它发布了一个topic(方框表示),叫做/camera_rgb,是rgb颜色信息,即采集到的彩色图像。同时,node2假如是图像处理程序,它订阅了/camera_rgb这个topic,经过节点管理器的介绍,它就能建立和摄像头节点(node1)的连接。
那么怎么样来理解“异步”这个概念呢?在node1每发布一次消息之后,就会继续执行下一个动作,至于消息是什么状态、被怎样处理,它不需要了解;而对于node2图像处理程序,它只管接收和处理/camera_rgb上的消息,至于是谁发来的,它不会关心。所以node1、node2两者都是各司其责,不存在协同工作,我们称这样的通信方式是异步的。

如何理解node-to-node
ROS是一种分布式的架构,一个topic可以被多个节点同时发布,也可以同时被多个节点接收。
- 1 VS 1

- 1对n

- n对1(同一个话题可以有多个发布者)
- n对n
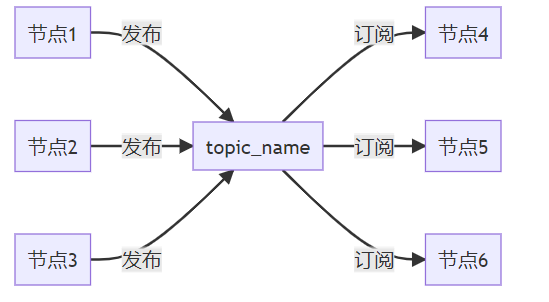
- 还有一种就是ROS2节点可以订阅本身发布的话题
小结
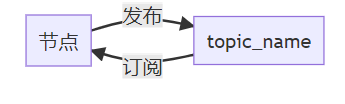
- topic通信方式是异步的,发送时调用publish()方法,发送完成立即返回,不用等待反馈。
- subscriber通过回调函数的方式来处理消息。
- topic可以同时有多个subscribers,也可以同时有多个publishers。
Message
-
topic有很严格的格式要求,比如上节的摄像头进程中的rgb图像topic,它就必然要遵循ROS中定义好的rgb图像格式。这种数据格式就是Message。
-
Message按照定义解释就是topic内容的数据类型,也称之为topic的格式标准。
-
或者可以理解msg是一个“类”,那么我们每次发布的内容可以理解为“对象”。 通常说Message既指的是类,也是指它的对象。而msg文件则相当于类的定义了。
-
ROS是如何做到跨编程语言、跨平台和跨设备之间的数据收发呢?
- 这就得益于通过定义消息接口文件了。
- 当我们定义好消息接口后,ROS2会根据消息接口内容生成不同语言的接口类,在不同编程语言中调用相同的类即可实现无感的消息序列化和反序列化。
- 同一个话题,所有的发布者和接收者必须使用相同消息接口。
基本的msg包括bool、int8、int16、int32、int64(以及uint)、float、float64、string、time、duration、header、可变长数组array[]、固定长度数组array[C]。那么具体的一个msg是怎么组成的呢?举个例子:
std_msg/Header header
    uint32    seq
    time    stamp
    string    frame_id
uint32    height
uint32    width
string    encoding
uint8    is_bigendian
uint32    step
uint8[]    data
观察上面msg的定义,是不是很类似C语言中的结构体呢?通常说Message既指的是类,也是指它的对象。而msg文件则相当于类的定义了。
工具
GUI工具
rqt_graph
依次打开三个终端,分别输入下面三个命令。
ros2 run demo_nodes_py listener
ros2 run demo_nodes_cpp talker
rqt_graph
你将看到下面这张

它可以帮我们搞清楚一个节点的输入和输出是什么。
操作命令
| ROS1:topic命令 | 说明 |
|---|---|
| rostopic help | |
| rostopic list | 列出当前所有的topic |
| rostopic info topic_name | 显示某个topic的属性信息 |
| rostopic echo topic_name | 显示某个topic的内容 |
| rostopic pub topic_name … | 向某个topic发布内容 |
| rostopic bw topic_name | 查看某个topic的带宽 |
| rostopic hz topic_name | 查看某个topic的频率 |
| rostopic find topic_type | 查找某个类型的topic |
| rostopic type topic_name | 查看某个topic的类型(msg) |
| ROS1:rosmsg命令 | 说明 |
| rosmsg list | 列出系统上所有的msg |
| rosmsg show msg_name | 显示某个msg的内容 |
| ROS2:topic命令 | 说明 |
| ros2 topic -h | |
| ros2 topic list | 返回系统中当前活动的所有主题的列表命令 |
| ros2 topic list -t | 增加消息类型 |
| ros2 topic echo /chatter | 打印实时话题内容 |
| ros2 topic info /chatter | 查看主题信息 |

- 查看消息类型
- 上面一个指令告诉大家这个消息是std_msgs/msg/String,那String里面有什么呢?不妨来试一试。
ros2 interface show std_msgs/msg/String
- 手动发布命令
ros2 topic pub /chatter std_msgs/msg/String 'data: "123"'
代码实现
RCLCPP实现
创建节点
目标:创建一个控制节点和被控节点
- 控制节点创建一个话题发布者,发布控制命令(command)话题,接口类型为字符串(string),控制接点通过发布者发布控制命令(前进、后退、左转、右转、停止)。
- 被控节点创建一个订阅者,订阅控制命令,收到控制命令后根据命令内容打印对应速度出来。
依次输入下面的命令,创建chapt3_ws工作空间、example_topic_rclcpp功能包和topic_publisher_01.cpp。
cd d2lros2/
mkdir -p chapt3/chapt3_ws/src
cd chapt3/chapt3_ws/src
ros2 pkg create example_topic_rclcpp --build-type ament_cmake --dependencies rclcpp
touch example_topic_rclcpp/src/topic_publisher_01.cpp
完成后目录结构
.
└── src
    └── example_topic_rclcpp
        ├── CMakeLists.txt
        ├── include
        │   └── example_topic_rclcpp
        ├── package.xml
        └── src
            └── topic_publisher_01.cpp

5 directories, 3 files
接着采用面向对象方式写一个最简单的节点。
#include "rclcpp/rclcpp.hpp"

class TopicPublisher01 : public rclcpp::Node
{
public:
    // 构造函数,有一个参数为节点名称
    TopicPublisher01(std::string name) : Node(name)
    {
        RCLCPP_INFO(this->get_logger(), "大家好,我是%s.", name.c_str());
    }

private:
    // 声明节点
};

int main(int argc, char **argv)
{
    rclcpp::init(argc, argv);
    /*产生一个的节点*/
    auto node = std::make_shared<TopicPublisher01>("topic_publisher_01");
    /* 运行节点,并检测退出信号*/
    rclcpp::spin(node);
    rclcpp::shutdown();
    return 0;
}
修改CMakeLists.txt
add_executable(topic_publisher_01 src/topic_publisher_01.cpp)
ament_target_dependencies(topic_publisher_01 rclcpp)

install(TARGETS
  topic_publisher_01
  DESTINATION lib/${PROJECT_NAME}
)
接着可以编译测试下,注意运行colcon的目录。
cd chapt3/chapt3_ws/
colcon build --packages-select example_topic_rclcpp
source install/setup.bash
ros2 run example_topic_rclcpp topic_publisher_01
最终效果:
$ ros2 run example_topic_rclcpp topic_publisher_01
[INFO] [1666016430.634475310] [topic_publisher_01]: 大家好,我是topic_publisher_01.
编写发布者
学习使用API文档
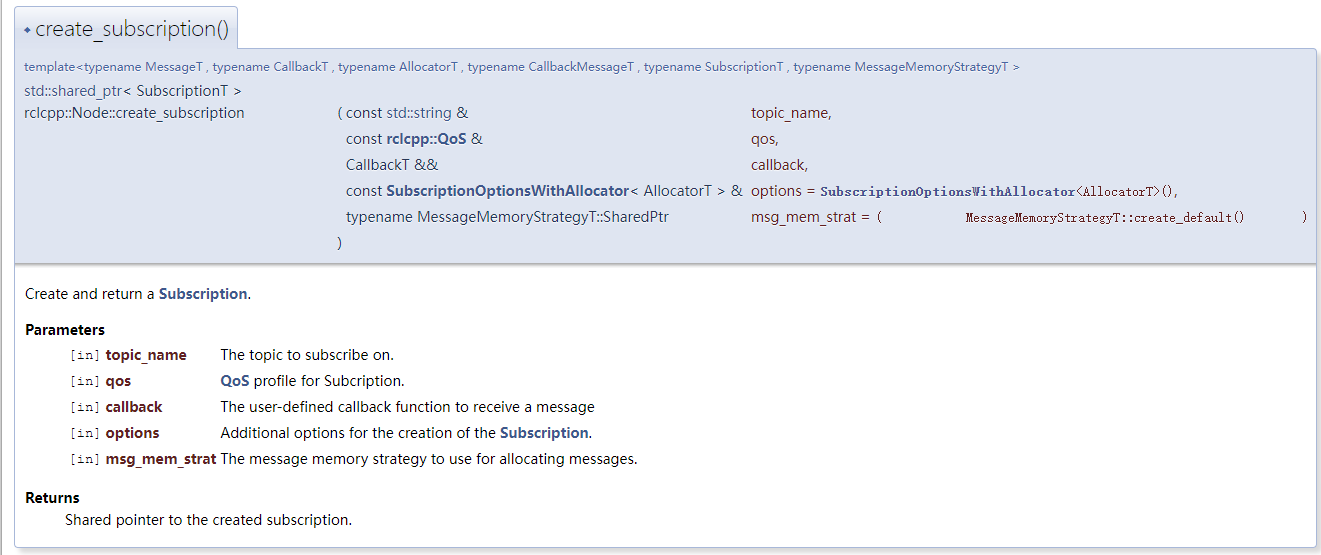
想要创建发布者,只需要调用node的成员函数create_publisher并传入对应的参数即可。
有关API文档详细内容可以访问:rclcpp: rclcpp: ROS Client Library for C++ (ros2.org)

导入消息接口
消息接口是ROS2通信时必须的一部分,通过消息接口ROS2才能完成消息的序列化和反序列化。ROS2为我们定义好了常用的消息接口,并生成了C++和Python的依赖文件,我们可以直接在程序中进行导入。
ament_cmake类型功能包导入消息接口分为三步:
- 在CMakeLists.txt中导入,具体是先find_packages再ament_target_dependencies。
find_package(rclcpp REQUIRED)
find_package(std_msgs REQUIRED)

add_executable(topic_publisher_01 src/topic_publisher_01.cpp)
ament_target_dependencies(topic_publisher_01 rclcpp std_msgs)
- 在packages.xml中导入,具体是添加depend标签并将消息接口写入。
  <buildtool_depend>ament_cmake</buildtool_depend>

  <depend>rclcpp</depend>
  <depend>std_msgs</depend>

  <test_depend>ament_lint_auto</test_depend>
  <test_depend>ament_lint_common</test_depend>
- 在代码中导入,C++中是#include"消息功能包/xxx/xxx.hpp"。比如在代码文件topic_publisher_01.cpp
#include "rclcpp/rclcpp.hpp"
#include "std_msgs/msg/string.hpp"
class TopicPublisher01 : public rclcpp::Node
创建发布者
根据ROS2的RCLCPPAPI文档可以看出,我们需要提供消息接口、话题名称和服务质量Qos。
- 消息接口上面我们已经导入了,是std_msgs/msg/string.h。
- 话题名称(topic_name),我们就用control_command。
- Qos,Qos支持直接指定一个数字,这个数字对应的是KeepLast队列长度。一般设置成10,即如果一次性有100条消息,默认保留最新的10个(90-100)其余的都扔掉。
#include "rclcpp/rclcpp.hpp"
#include "std_msgs/msg/string.hpp"

class TopicPublisher01 : public rclcpp::Node
{
public:
    // 构造函数,有一个参数为节点名称
    TopicPublisher01(std::string name) : Node(name)
    {
        RCLCPP_INFO(this->get_logger(), "大家好,我是%s.", name.c_str());
        // 创建发布者
        command_publisher_ = this->create_publisher<std_msgs::msg::String>("command", 10);
    }

private:
    // 声明话题发布者
    rclcpp::Publisher<std_msgs::msg::String>::SharedPtr command_publisher_;
};
使用定时器定时发布数据
虽然编写好了发布者,但是我们还没有发布数据,我们需要通过ROS2中的定时器来设置指定的周期调用回调函数,在回调函数里实现发布数据功能。
再次找到RCLCPP文档,找到创建定时器函数,观察参数

- period,回调函数调用周期。
- callback,回调函数。
- group,调用回调函数所在的回调组,默认为nullptr。
因此,代码如下:
#include "rclcpp/rclcpp.hpp"
#include "std_msgs/msg/string.hpp"

class TopicPublisher01 : public rclcpp::Node
{
public:
    // 构造函数,有一个参数为节点名称
    TopicPublisher01(std::string name) : Node(name)
    {
        RCLCPP_INFO(this->get_logger(), "大家好,我是%s.", name.c_str());
        // 创建发布者
        command_publisher_ = this->create_publisher<std_msgs::msg::String>("command", 10);
        // 创建定时器,500ms为周期,定时发布
        timer_ = this->create_wall_timer(std::chrono::milliseconds(500), std::bind(&TopicPublisher01::timer_callback, this));
    }

private:
    void timer_callback()
    {
        // 创建消息
        std_msgs::msg::String message;
        message.data = "forward";
        // 日志打印
        RCLCPP_INFO(this->get_logger(), "Publishing: '%s'", message.data.c_str());
        // 发布消息
        command_publisher_->publish(message);
    }
    // 声名定时器指针
    rclcpp::TimerBase::SharedPtr timer_;
    // 声明话题发布者指针
    rclcpp::Publisher<std_msgs::msg::String>::SharedPtr command_publisher_;
};
定时器:
- 定时器对应的类是 rclcpp::TimerBase,调用create_wall_timer将返回其共享指针。
- 创建定时器时传入了两个参数,这两个参数都利用了C++11的新特性。
- std::chrono::milliseconds(500),代表500ms,chrono是c++ 11中的时间库,提供计时,时钟等功能。
- std::bind(&TopicPublisher01::timer_callback, this),bind() 函数的意义就像它的函数名一样,是用来绑定函数调用的某些参数的。
创建发布消息:
- std_msgs::msg::String是通过ROS2的消息文件自动生成的类,其原始消息文件内容可以通过命令行查询
$ ros2 interface show std_msgs/msg/String

# This was originally provided as an example message.
# It is deprecated as of Foxy
# It is recommended to create your own semantically meaningful message.
# However if you would like to continue using this please use the equivalent in example_msgs.

string data
- 可以看到其内部包含了一个string data,ROS2会将消息文件转换成一个类,并把其中的定义转换成类的成员函数。
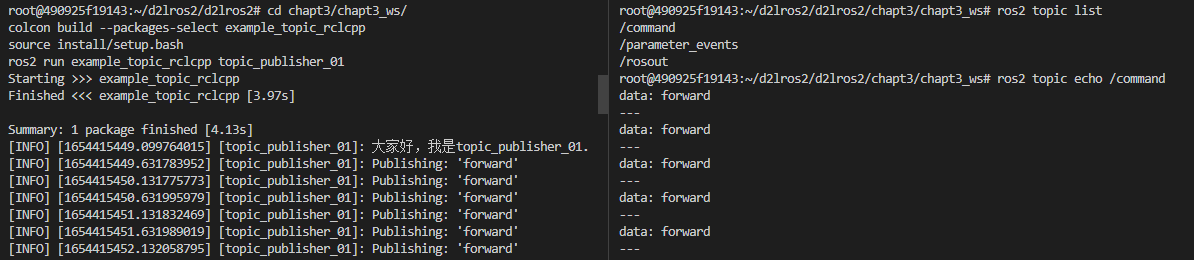
运行测试
编译运行:
cd chapt3/chapt3_ws/
colcon build --packages-select example_topic_rclcpp
source install/setup.bash
ros2 run example_topic_rclcpp topic_publisher_01
测试:
# 查看列表
ros2 topic list
# 输出内容
ros2 topic echo /command
编写订阅者
之所以我们可以用命令行看到数据,原因在于CLI创建了一个订阅者来订阅/command指令。接下来我们将要手动创建一个节点订阅并处理数据。
创建订阅节点
cd chapt3_ws/src/example_topic_rclcpp
touch src/topic_subscribe_01.cpp
编写代码:
#include "rclcpp/rclcpp.hpp"

class TopicSubscribe01 : public rclcpp::Node
{
public:
    // 构造函数,有一个参数为节点名称
    TopicSubscribe01(std::string name) : Node(name)
    {
        RCLCPP_INFO(this->get_logger(), "大家好,我是%s.", name.c_str());
    }

private:
    // 声明节点
};

int main(int argc, char **argv)
{
    rclcpp::init(argc, argv);
    /*产生一个的节点*/
    auto node = std::make_shared<TopicSubscribe01>("topic_subscribe_01");
    /* 运行节点,并检测退出信号*/
    rclcpp::spin(node);
    rclcpp::shutdown();
    return 0;
}
CMakeLists.txt:
add_executable(topic_subscribe_01 src/topic_subscribe_01.cpp)
ament_target_dependencies(topic_subscribe_01 rclcpp)

install(TARGETS
topic_subscribe_01
  DESTINATION lib/${PROJECT_NAME}
)
编译测试:
cd chapt3/chapt3_ws/
colcon build --packages-select example_topic_rclcpp
source install/setup.bash
ros2 run example_topic_rclcpp topic_subscribe_01
查看订阅者API文档
看API文档或者看头文件中关于函数的定义这是一个好习惯。
五个参数,但后面两个都是默认的参数,我们只需要有话题名称、Qos和回调函数即可。
编写代码
#include "rclcpp/rclcpp.hpp"
#include "std_msgs/msg/string.hpp"

class TopicSubscribe01 : public rclcpp::Node
{
public:
    TopicSubscribe01(std::string name) : Node(name)
    {
        RCLCPP_INFO(this->get_logger(), "大家好,我是%s.", name.c_str());
          // 创建一个订阅者订阅话题
        command_subscribe_ = this->create_subscription<std_msgs::msg::String>("command", 10, std::bind(&TopicSubscribe01::command_callback, this, std::placeholders::_1));
    }

private:
     // 声明一个订阅者
    rclcpp::Subscription<std_msgs::msg::String>::SharedPtr command_subscribe_;
     // 收到话题数据的回调函数
    void command_callback(const std_msgs::msg::String::SharedPtr msg)
    {
        double speed = 0.0f;
        if(msg->data == "forward")
        {
            speed = 0.2f;
        }
        RCLCPP_INFO(this->get_logger(), "收到[%s]指令,发送速度 %f", msg->data.c_str(),speed);
    };
};
依然的需要在CMakeLists.txt添加下std_msgs依赖
ament_target_dependencies(topic_subscribe_01 rclcpp std_msgs)
packages.xml就不需要了,同一个功能包,已经添加了。
运行测试
编译运行订阅节点
cd chapt3/chapt3_ws/
colcon build --packages-select example_topic_rclcpp
source install/setup.bash
ros2 run example_topic_rclcpp topic_subscribe_01
手动发布数据测试订阅者
ros2 topic pub /command std_msgs/msg/String "{data: forward}"

订阅发布测试
关闭上面启动的终端,重新运行指令
cd chapt3/chapt3_ws/
source install/setup.bash
ros2 run example_topic_rclcpp topic_subscribe_01
运行发布节点
cd chapt3/chapt3_ws/
source install/setup.bash
ros2 run example_topic_rclcpp topic_publisher_01
运行结果

打开RQT、选择Node Graph、点击刷新下


 947
947


 被折叠的 条评论
为什么被折叠?
被折叠的 条评论
为什么被折叠?
 到【灌水乐园】发言


