


–参考方案:
找到了关于p3-dx的一些关于ROS的资料
https://github.com/ManolisCh/pioneer_p3dx
https://github.com/SeRViCE-Lab/p3-dx
http://wiki.ros.org/demo_pioneer
先锋机器人ROS的教程:
https://www.youtube.com/watch?v=-9NHupBPC6Y
首先是首页
http://wiki.ros.org/Robots/AMR_Pioneer_Compatible
前提准备:
使用的ROSARIA 和p2os对先锋机器人的速度进行控制
使用ros-arnl使用它来进行定位和导航
安装ROSAria
http://wiki.ros.org/ROSARIA 的ROSwiki主页
http://wiki.ros.org/ROSARIA/Tutorials/Video%20Walkthroughs 视频教程、
http://wiki.ros.org/ROSARIA/Tutorials/How%20to%20use%20ROSARIA感觉好累的,下班,明天继续
https://github.com/danimtb/pioneer3at_ETSIDI这个教程也是很详细的
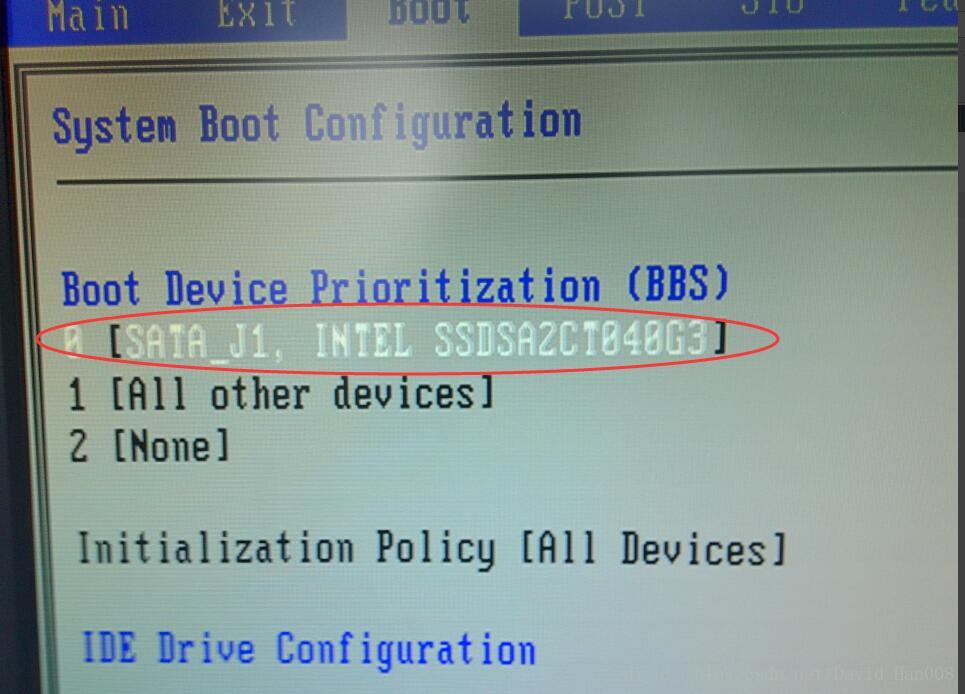
先锋机器人安装linux
重装系统

修改从USB驱动
将这个地方改成:
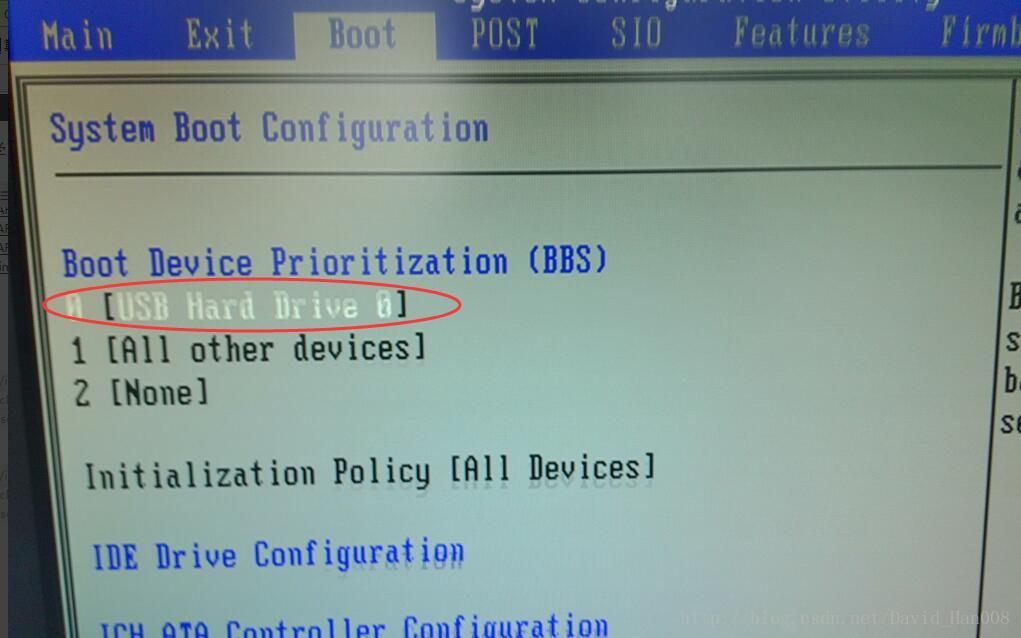
连接上移动硬盘
右键,然后将移动硬盘接挂
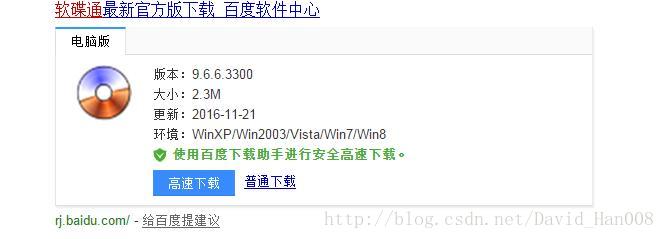
用U盘做启动盘
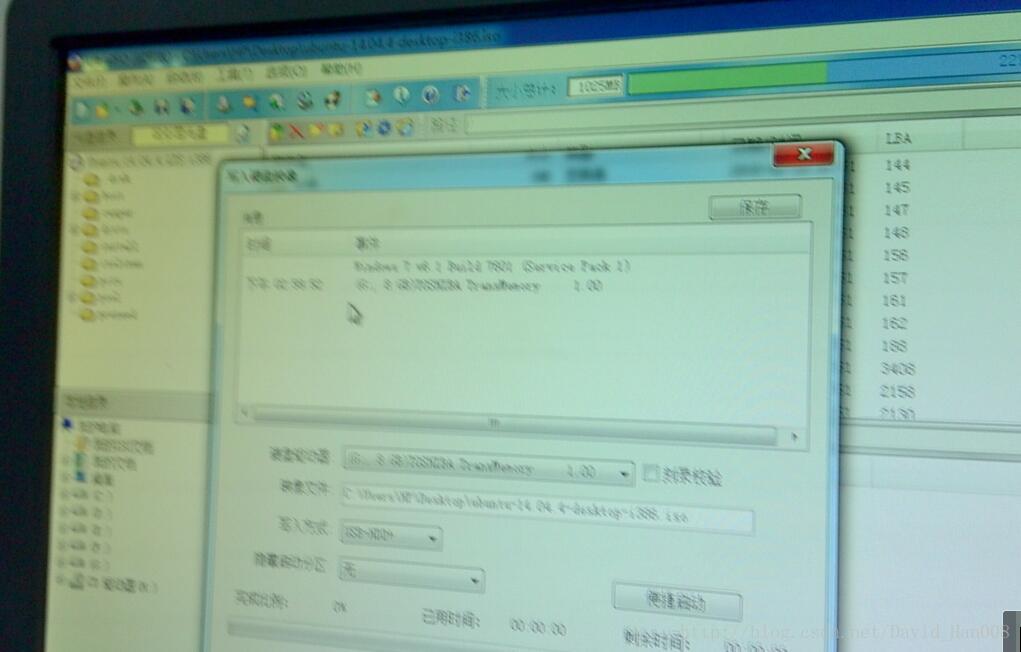
选择好相应的光盘镜像,然后写入硬盘
接下来重启
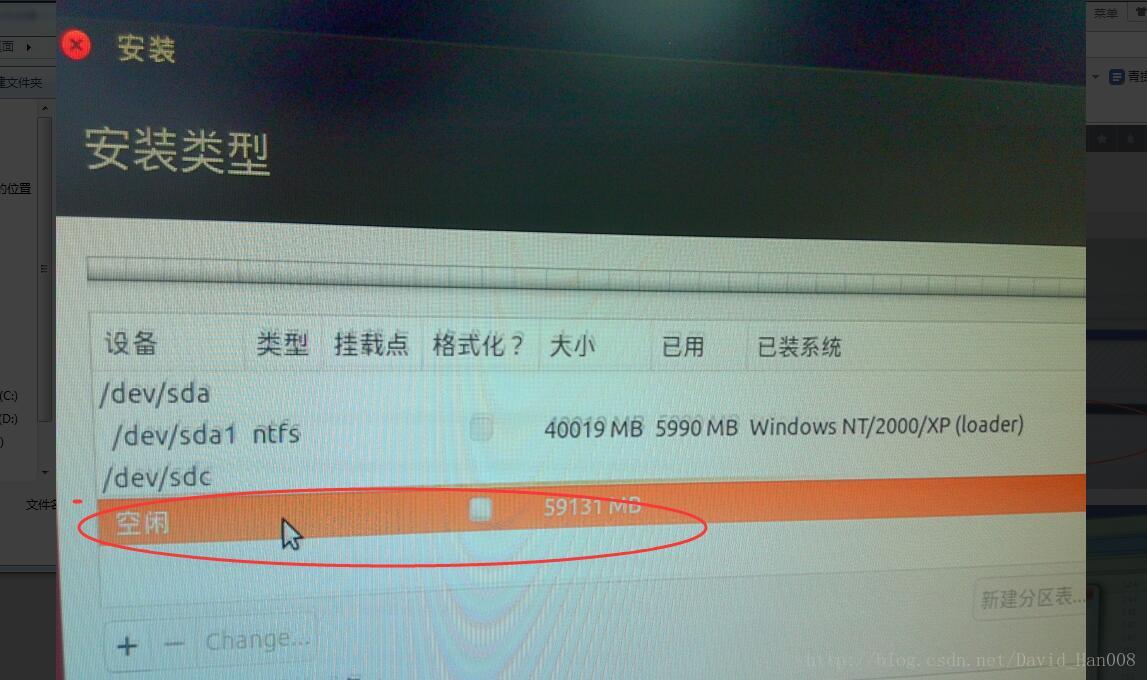
选择好对应的挂载点
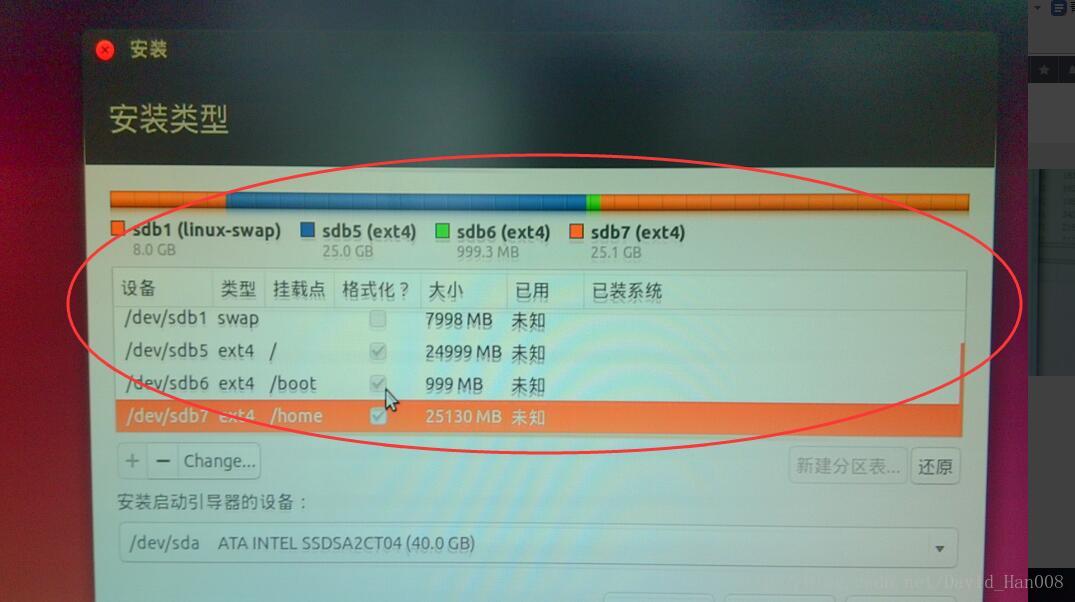
然后就安装成功了
先锋机器人安装ROS
参考原来跑orb的安装过程
先锋机器人安装ssh
参考这个目的是为了能够让两台计算机之间能够相互通信,我的目标是用我的笔记本当显示画面,然后然让先锋机器人的来显示他的运动的路径,因此需要两个笔记本之间的通信,如果这么说的话,那么安装的事情,最好还是安装在另外的先锋机器人的工控机上面。
导师要求安装一个Ubuntu的服务器端,但是怎么配置,我现在心里还没有数。
关于软件的安装:
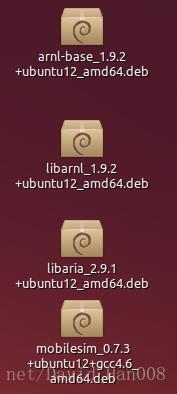
从官网上吧这几软件都下载好
然后用 sudo dpkg -i 命令安装
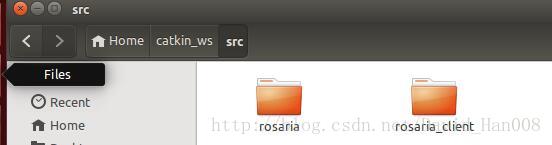
进入你的ros的工作区间,
git clone https://github.com/amor-ros-pkg/rosaria.git官网上海提供了一些实例程序
git clone https://github.com/pengtang/rosaria_client然后对这些代码进行catkin_make
首次运行示范:
首先打开mobilesim
然后roscore
然后 rosrun rosaria Rosaria

然后rosrun rosaria_client interface
然后就出在终端出现一个界面来选择你的运动模式
选择4
就可以自由的控制小车了
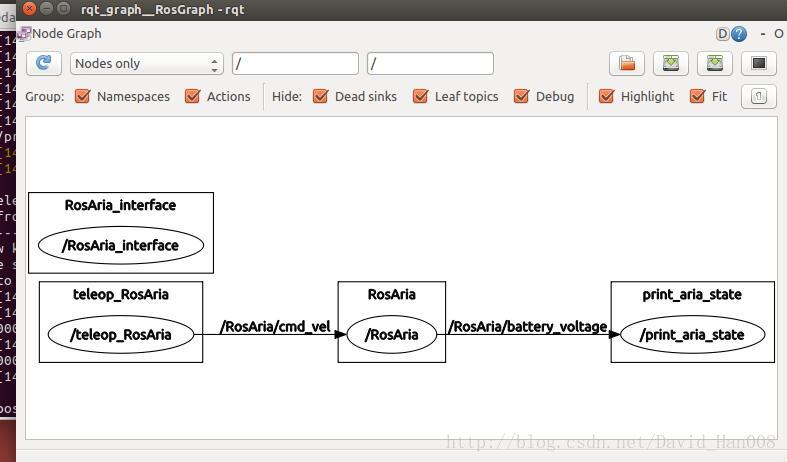
可以看到运行的节点的情况
安装rosarnl
git clone http://github.com/MobileRobots/ros-arnl然后同样去编译
安装这个软件可以使用激光雷达了,
arnl 的节点和话题我在后面会继续介绍
遇到的问题:就是在嘴上面一行有一个感叹号
由于包依赖项没有满足的关系,我卸载了一个libaria-dev的包
不然,什么软件都没有办法安装
使用的命令是 sudo dpkg -r libarira-dev
在ROSaria当中能够运行的节点和消息有:
节点就是 rosaria
能够订阅的主题是:cmd_vel能够接受到一些新的速度的指令,是改变速度而不是维持速度
能够发布的话题:
pose 能够发布里程计的信息,通常是10HZ更新一次
bumper_state能够发布?碰撞的状态
sonar能够读出声呐的状态,出来的数据是二维的x,y,Z始终是0
battery_state_of_charge 电池的状态的百分比(取值范围0~1)
battery_voltage 电压
battery_recharge_state充电的状态
参考视频教程:http://wiki.ros.org/ROSARIA/Tutorials/Video%20Walkthroughs
参考博客:http://blog.csdn.net/autorobot410/article/details/53289643
值得注意的地方:有两点
1、参考博客的第5步,应该是:
sudo usermod -a -G dialout $USER
sudo su
cd
cd /dev
ls -l | grep tty
然后在下拉的列表当中,找到
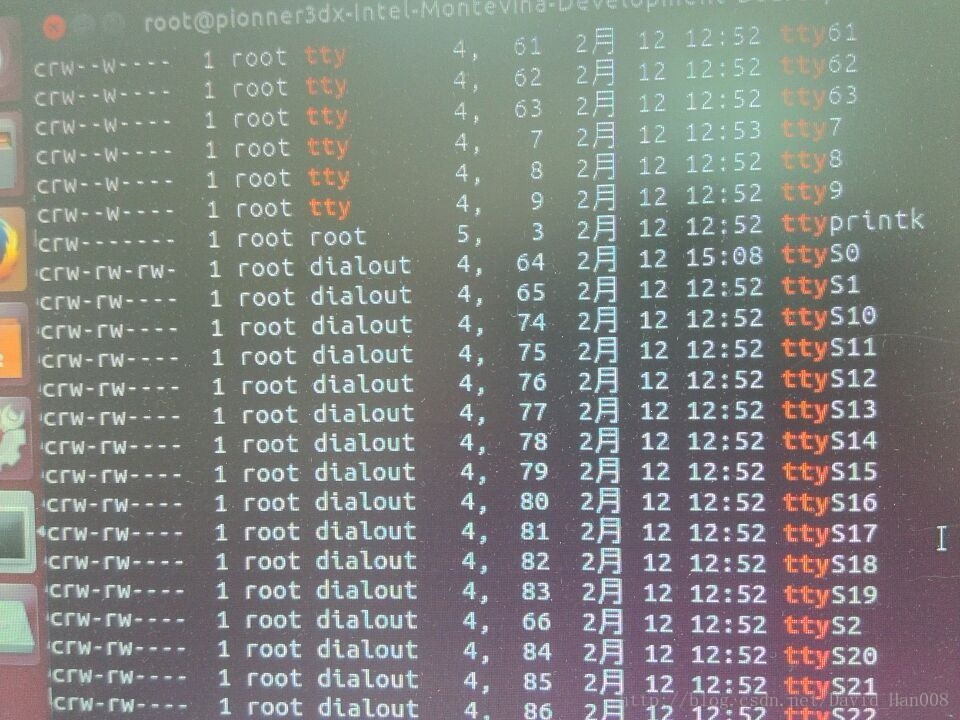
就说明已经正确了
source ~/catkin_ws/devel/setup.bash
rosrun rosaria RosAria _port:=/dev/ttyS0
这里要和说明的一点就是:/dev/ttyS0这是pioner2,3系列,如果是pionnerLX系列的花,就是ttyUSB0…
2、参考博客的第9步有问题。
如果直接运行launch文件,会发生同名的两个节点运行,程序崩溃,如果只是运行launch文件,由于端口没有进行配置,同样不可以,因此
应该运行节点
rosrun rosaria_client telepot就可以进行遥控了。
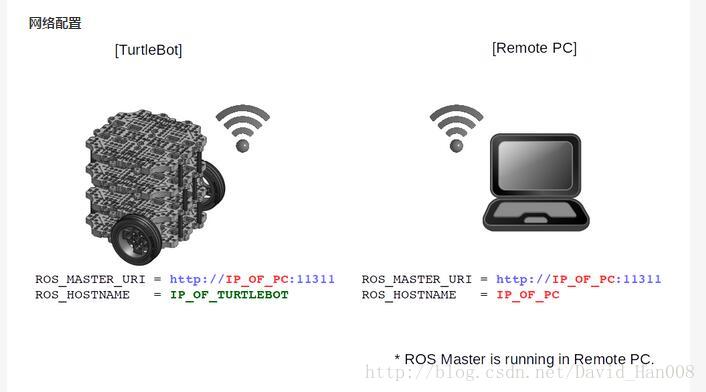
工作站和先锋机器人同步时间网络
1、在工作站和机器人都要同步时钟
sudo apt-get install openssh-server
sudo apt-get install chrony
sudo ntpdate ntp.ubuntu.com
2、获取工作站和机器人的IP
ifconfig3、在同一个wifi下可以远程登录
例如:
ssh davidhan@192.168.1.103注意:如果不是在同一个WIFI下提示:No route to host
可以参考博客:http://blog.csdn.net/bisal/article/details/44731431
4、机器人参数设置
echo export ROS_MASTER_URI=http://localhost:11311 >> ~/.bashrc
echo export ROS_HOSTNAME=机器人的IP地址 >> ~/.bashrc
5、工作站的参数设置
echo export ROS_MASTER_URI=http://机器人的IP地址 >> ~/.bashrc
echo export ROS_HOSTNAME=工作站的IP地址 >> ~/.bashrc
自己的笔记本连接先锋遇到的USB转串口的问题
就是下载一个软件
sudo apt-get install minicom注意: 默认情况下ubuntu已经安装了USB转串口驱动(pl2303)。
1、# lsmod | grep usbserial
如果有 usbserial,说明系统支持USB转串口。
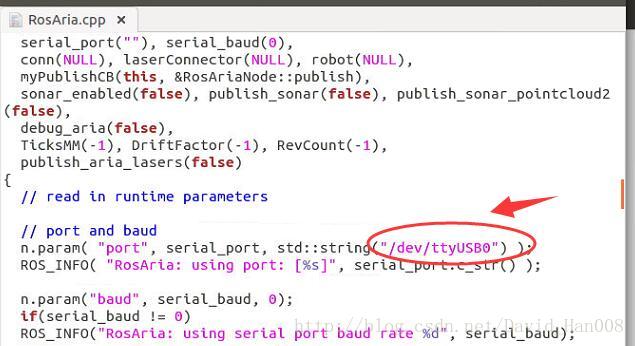
2、插上USB转串口,在终端输入命令#dmesg | grep ttyUSB0,如果出现连接成功信息,则说明ubuntu系统已经识别该设备了。
然后如果这样的话,那么rosaria的USB0 而不是 S0.
工作站和先锋机器人IP设置
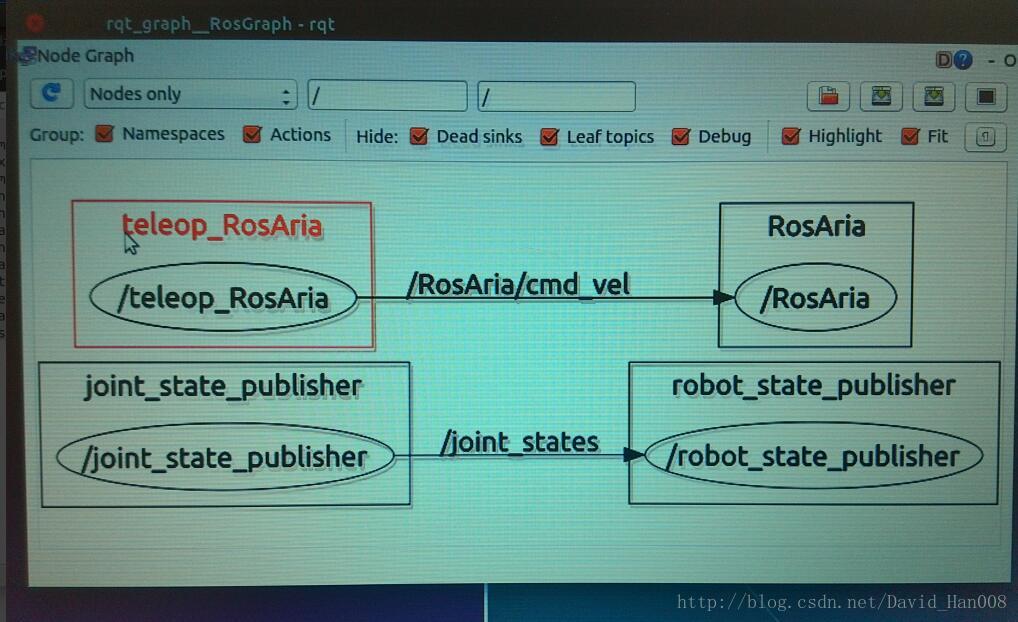
将先锋机器人和rviz当中的先锋机器人同步显示
注意:这个小的tip里面有些东西,再别的电脑上可能用不了,但是希望大家能够理解这里面的逻辑
首先启动rosaria这里,我改过源码,由于使用的usb转串口,因此ttyUSB0
然后运行该节点,并且启动遥控器
roscore
rosrun rosraia Rosaria
rosrun rosaria_client teleop
然后运行一个launch文件
rviz.launch
<launch>
  <arg name="model" default="$(find p3dx_description)/urdf/pioneer3dx.xml"/>
  <arg name="gui" default="False" />
  <param name="robot_description" textfile="$(arg model)" />
  <param name="use_gui" value="$(arg gui)"/>
  <node name="joint_state_publisher" pkg="joint_state_publisher" type="joint_state_publisher" ></node>
  <node name="robot_state_publisher" pkg="robot_state_publisher" type="state_publisher" />
  <node name="rviz" pkg="rviz" type="rviz" args="-d $(find amr_robots_launchfiles)/rosaria.rviz" />
</launch>
这个文件需要当amr_robots_launchfile这个里面找rosaria.rviz
并且启动两个重要的节点:joint_state_publisher robot_state_publisher
最后的效果图:
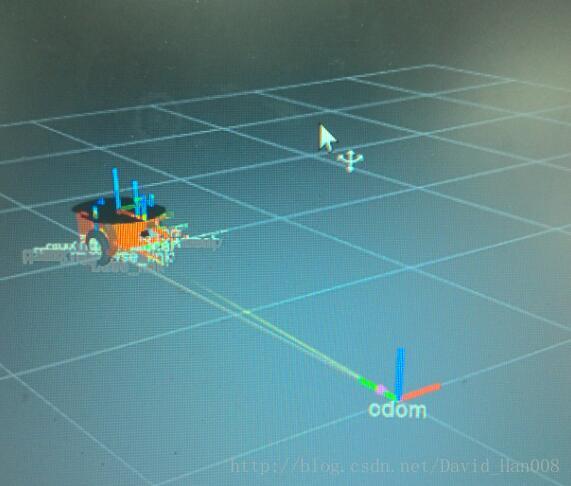
最后值得注意的地方是:类型选择是odom
这里想要推荐一个大神的博客:
http://blog.csdn.net/crazyquhezheng/article/details/49124115
感触很深
使用kinect发布激光数据
kinect1+depthimage_to_laserscan
参看博客:http://blog.csdn.net/zqxf123456789/article/details/52484239
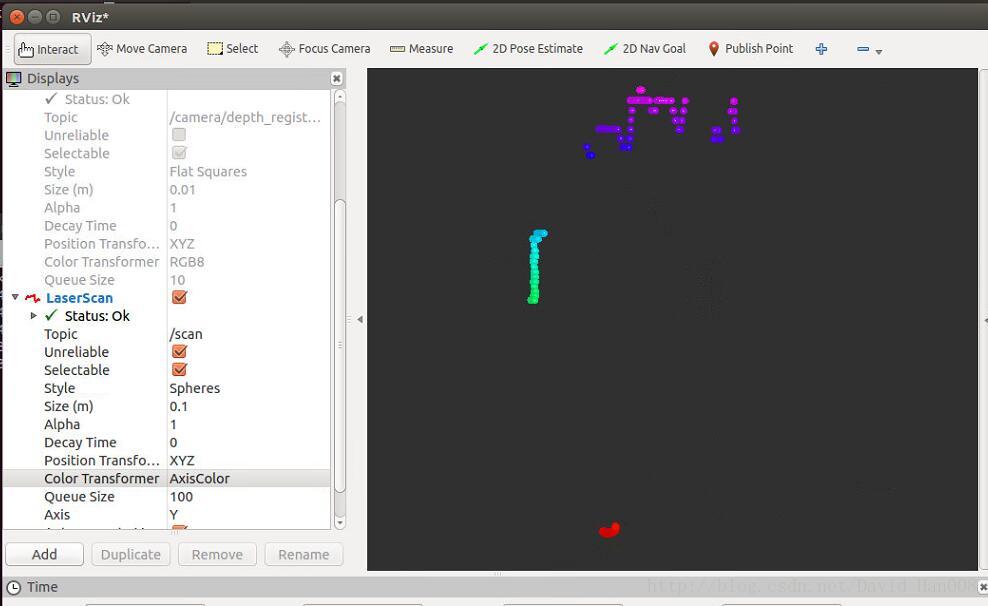
建议topic改成/camera/rgb…因为这样的激光雷达建图才是水平的,现在这个情况是竖直
使用kinect进行建图
使用hectorslam:参考博客:http://www.cnblogs.com/zxouxuewei/p/5307736.html
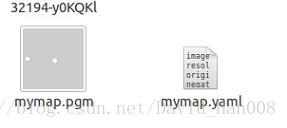
保存地图:
sudoapt-get install ros-indigo-map-server
rosrun map_server map_save -f /tmp/mymap
会生成两个文件、
最后生成地图:
参考博客:http://blog.csdn.net/nhtang222/article/details/52396413
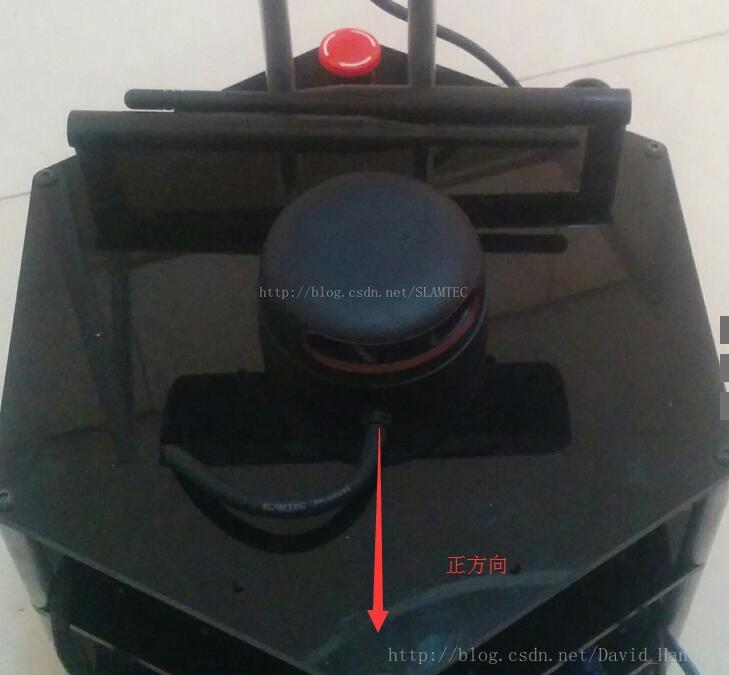
使用rplidar A2 进行hector slam建图
参考博客:http://blog.csdn.net/slamtec/article/details/53940920
思岚家的博客很好
sudo apt-get install ros-indigo-hector-slam在rplidar_ros/launch/目录下添加 hector_mapping_demo.launch文件
<launch>


  <node pkg="hector_mapping" type="hector_mapping" name="hector_mapping" output="screen">
    <!-- Frame names -->
    <param name="pub_map_odom_transform" value="true"/>
    <param name="map_frame" value="map" />
    <param name="base_frame" value="base_link" />
    <param name="odom_frame" value="base_link" />


    <!-- Tf use -->
    <param name="use_tf_scan_transformation" value="true"/>
    <param name="use_tf_pose_start_estimate" value="false"/>


    <!-- Map size / start point -->
    <param name="map_resolution" value="0.05"/>
    <param name="map_size" value="2048"/>
    <param name="map_start_x" value="0.5"/>
    <param name="map_start_y" value="0.5" />
    <param name="laser_z_min_value" value = "-1.0" />
    <param name="laser_z_max_value" value = "1.0" />
    <param name="map_multi_res_levels" value="2" />


    <param name="map_pub_period" value="2" />
    <param name="laser_min_dist" value="0.4" />
    <param name="laser_max_dist" value="5.5" />
    <param name="output_timing" value="false" />
    <param name="pub_map_scanmatch_transform" value="true" />
    <!--<param name="tf_map_scanmatch_transform_frame_name" value="scanmatcher_frame" />-->


    <!-- Map update parameters -->
    <param name="update_factor_free" value="0.4"/>
    <param name="update_factor_occupied" value="0.7" />
    <param name="map_update_distance_thresh" value="0.2"/>
    <param name="map_update_angle_thresh" value="0.06" />


    <!-- Advertising config -->
    <param name="advertise_map_service" value="true"/>
    <param name="scan_subscriber_queue_size" value="5"/>
    <param name="scan_topic" value="scan"/>
  </node>


  <node pkg="rplidar_ros" type="rplidarNode" name="rplidarNode" output="screen">
    <param name="serial_port"         type="string" value="/dev/ttyUSB0"/>
    <param name="serial_baudrate"     type="int"    value="115200"/>
    <param name="frame_id"            type="string" value="laser"/>
    <param name="inverted"            type="bool"   value="false"/>
    <param name="angle_compensate"    type="bool"   value="true"/>
  </node>


  <node pkg="tf" type="static_transform_publisher" name="base_to_laser_broadcaster" args="0 0 0 0 0 0 /base_link /laser 100"/>
  <node pkg="rviz" type="rviz" name="rviz" args="-d $(find hector_slam_launch)/rviz_cfg/mapping_demo.rviz"/>


</launch>
最后保存一下
rosrun map_server map_save -f /tmp/SIG212
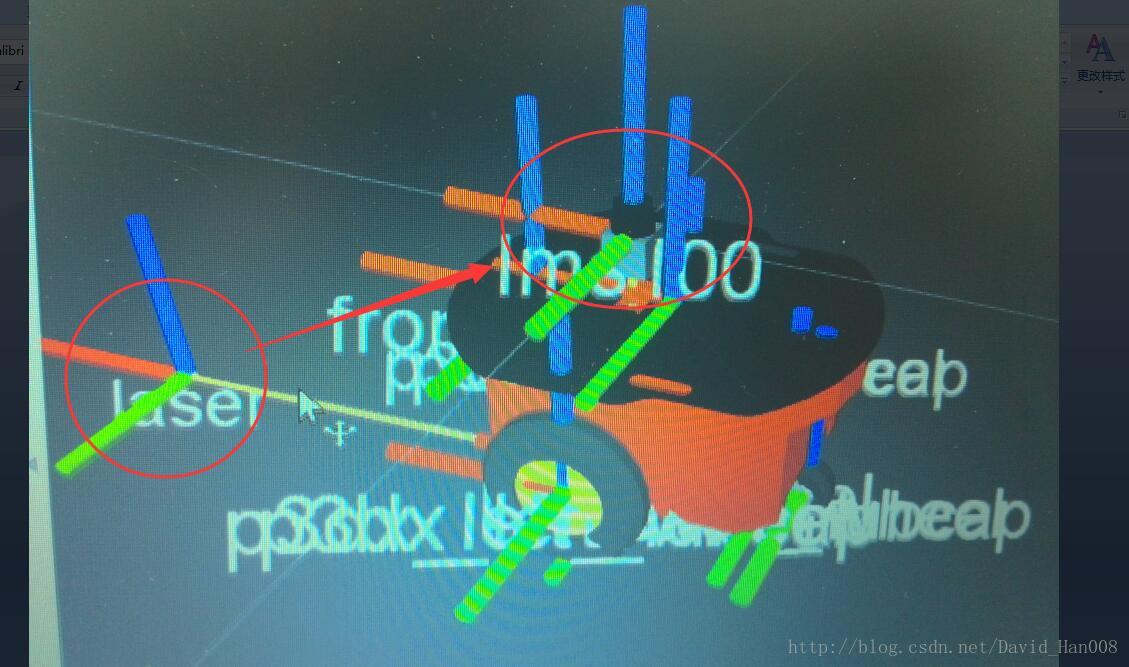
使用LMS1XX进行建图
首先参考葛大神的博客,启动LMS1XX,经历坎坷经历,总算启动,当初未正常启动的原因竟然是网线没插,这里要说明的一点是,如果你和我一样是用的USB转串口来接先锋机器人的,那么LMS1xx的网线一端连接激光雷达,一端连接笔记本电脑的网线端口,并且建议关闭WIFI,这样,当你配置正确的时候,就会有那个有线连接成功的标记符号
参考葛大神的博客:http://blog.csdn.net/autorobot410/article/details/52861223
将这个文件到lms1xx节点下面,然后
roslaunch lms1xx hector_mapping_LMS1XX.launch
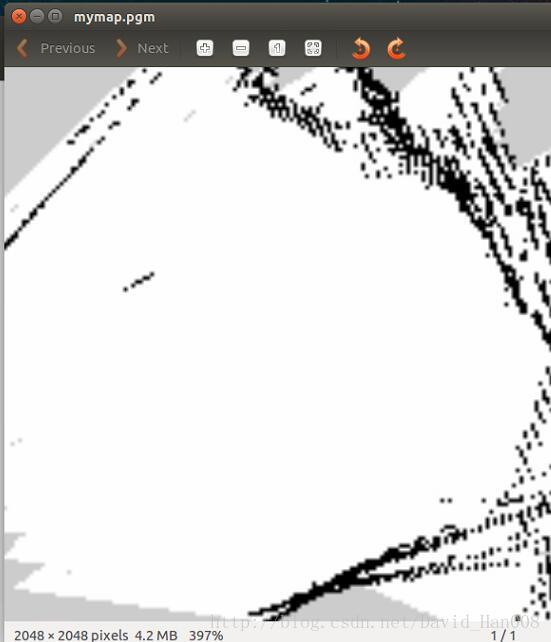
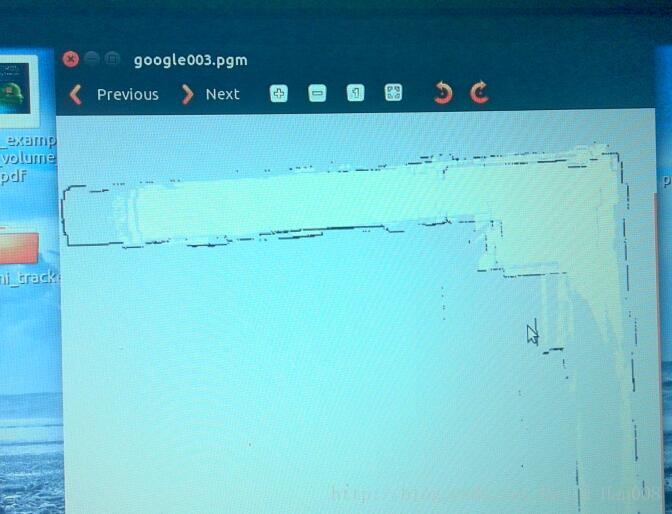
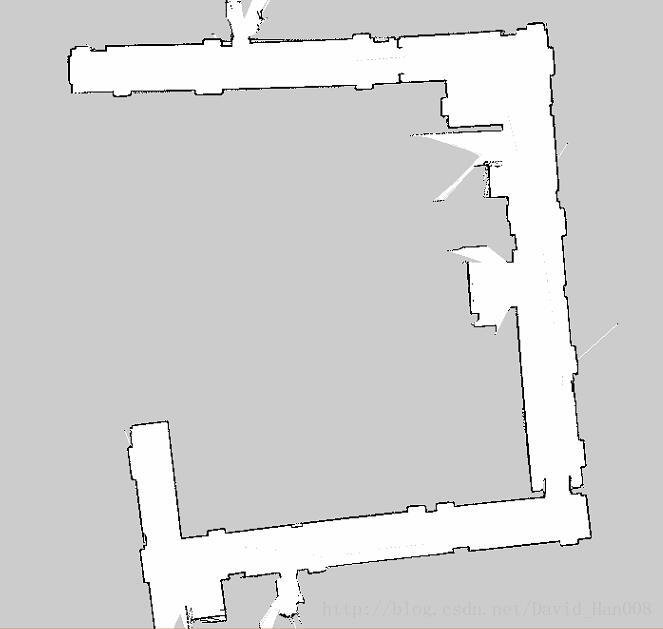
下面是我用激光雷达建立的地图:
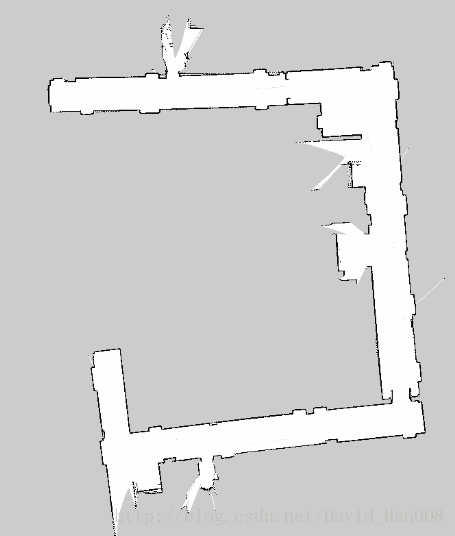
效果还是不错的,尽量建图只建一遍,先锋尽量开平稳一些
我终端的输入是:
rosrun rosaria Rosaria
rosrun rosaria_client teleop
roslaunch lms1xx hector_mapping_LMS1XX.launch
补充一点小的技巧

你可以将 publish_aria_laser后面的false改成true,这样可以直接发布激光数据,但是同时也存在问题,就是没有进行映射成scan,大家知道就行,反正我是没有用这个,哈哈!!
导航遇到的问题:
我的节点运行情况:
rosrun rosaria Rosaria
roslaunch p3dx_description fake_pionner3dx.launch
roslaunch p3dx_description fake_move_base_SIG212_map.launch 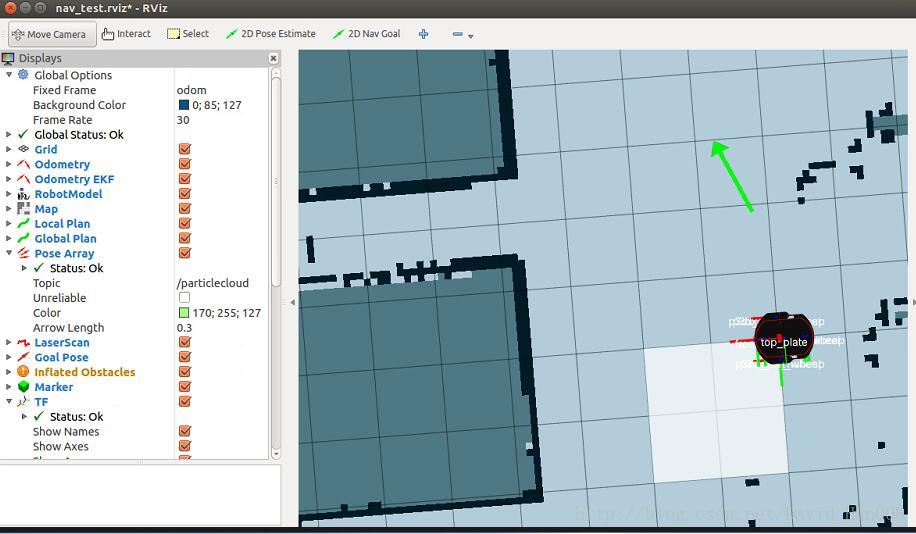
此时对应的节点图:
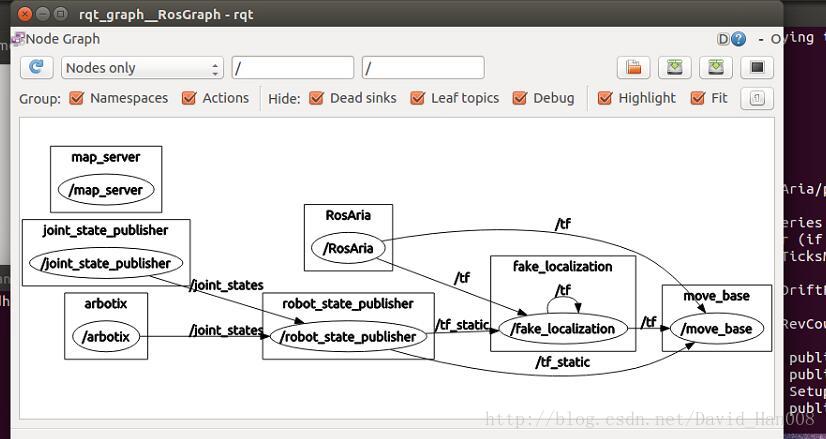
可以发现是没有cmd_vel这个发布速度的参数,需要在launch文件中将原有的RosAria/cmd_vel映射成 /cmd_vel
因此写了一个p3dx.launch文件用来启动节点
这里面remap就是产生映射关系
<launch>

<!-- Starting rosaria driver for motors and encoders -->
  <node name="rosaria" pkg="rosaria" type="RosAria" args="_port:=/dev/ttyUSB0">
  <remap from="rosaria/cmd_vel" to="cmd_vel"/>
  <remap from="rosaria/pose" to="odom"/>
  </node>

</launch>
同样,这里改了两个地方,一个是将rosaria/cmd_vel改成cmd_vel,一个是将rosaria_pose 改成odom
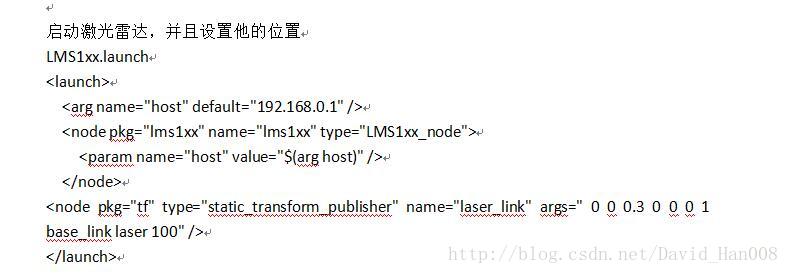
同样在启动激光雷达的地方:
lms1xx.launch
<launch>
  <arg name="host" default="192.168.0.1" />
  <node pkg="lms1xx" name="lms1xx" type="LMS1xx_node">
    <param name="host" value="$(arg host)" />
    <remap from="RosAria/lms1xx_1_laserscan" to="scan"/>
  </node>
</launch>
将原来的RosAria/lms1xx_1_lasercan映射成了scan
第二个遇到的问题:

产生这个问题是因为以下四个文件存在问题
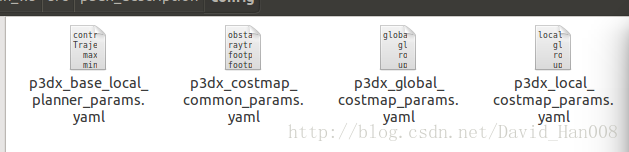
我从github上面找了个大神的,然后还是出现了一些报错,我对应这报错修改了一下,现在我把他们贴出来,可以对应着这篇博客上面讲解这几个参数进行理解
我在这个路径规划的过程中大概就遇到这两个问题,接下来就是启动的过程
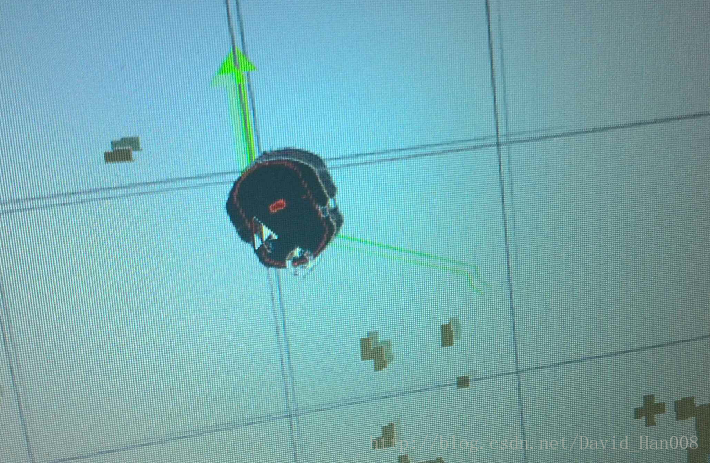
就可以成功了,然后调整初始的位姿,可以实现自动避障
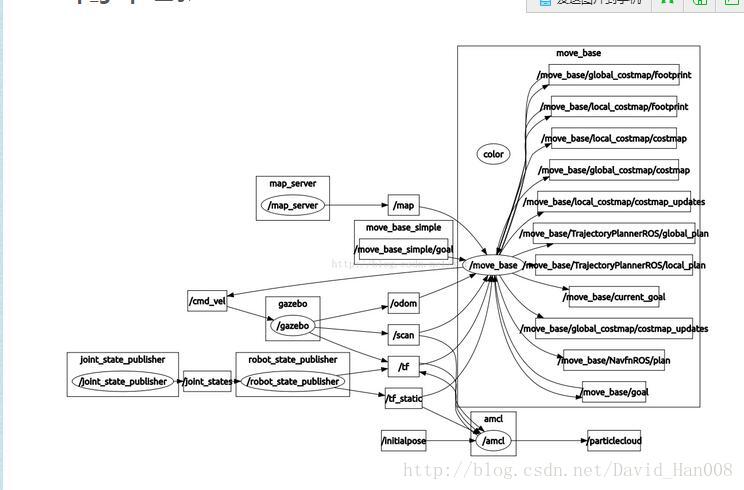
运行的节点情况
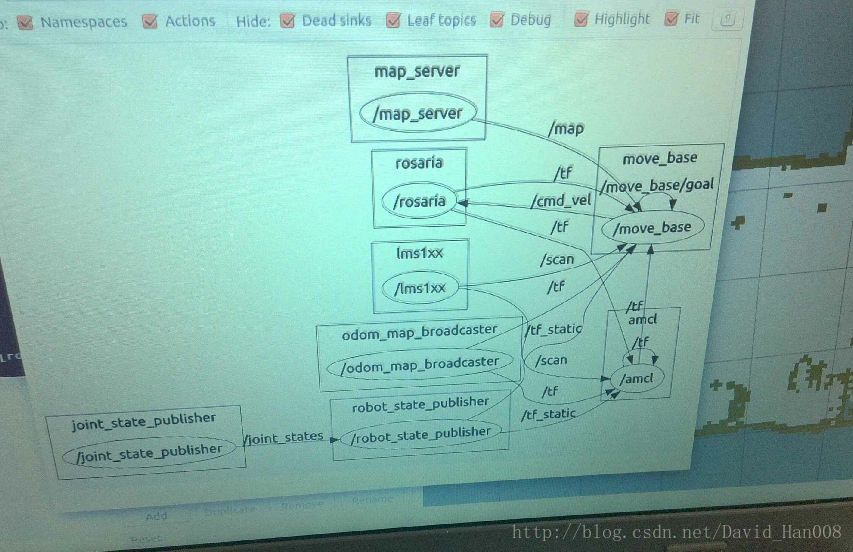
希望大家能够多看节点图,有助于你理解ROS的节点之间的规则
我在做这个过程中参考的大神的节点图是:
最后关于rviz说明一下:

这里蓝色的高亮部分,就是阻碍,可以通过让obstacle这个控件订阅话题来显示出来
动态程序控制Rviz眼睛位置和目的焦点
http://blog.csdn.net/crazyquhezheng/article/details/50493502
用程序设定导航目标点
http://blog.csdn.net/heyijia0327/article/details/43565227
由于激光雷达的tf的模型没有匹配上,导致导航的功能包没有办法使用
我遇到的问题就是:激光雷达的位置和模型的位置不匹配,导致导航功能包没法使用
原理是这样,当我们启动fake_p3dx.launch模型的时候
已经设置了这个模型的位置
当我们启动激光雷达的模型的时候,注意这个节点 tf,后面的参数的说明,可以参考这个链接
https://www.baidu.com/link?url=bLji5CMlyEwTMVnQNKYT8hqeRoH74iCb-lyyzoZyMfAGuQHuGC_NCYnYx6fOqscV&wd=&eqid=fe1abb1d00022d4d0000000358c93ee9
参数说明依次是:x,y,z然后是r p 什么的就是那些,我也搞不懂
如何在rviz设置模型的初始位置
原理跟上面的一样,在这里可以设置小车的初始位置
如何使用rviz的导航箭头,并且使用地图当中的绝对坐标
最简单的方法就是发布一个topic,然后让小车自己去动,我在这里放一个
8号桌子的位置点:
rostopic pub /move_base_simple/goal geometry_msgs/PoseStamped '{ header: { frame_id: "map" }, pose: { position: { x: 4.06, y: 0.668, z: 0 }, orientation: { x: 0, y: 0, z: 0, w: 1 } } }'
这里的frame_id如果选择base_link则是相对机器人的位置,是相对位置
如果是map则表示的绝对坐标,在地图上某个点的坐标
补充上一个小的专题,这里的坐标封装成一个节点
参考白巧克力里的博客:
http://blog.csdn.net/heyijia0327/article/details/43565227
白巧克力博客中的还是想机器人向前走1m而不是地图当中的绝对坐标,那么我现在想让先锋机器人到指定位置,转向指定的方向(位姿,其实就是位置和姿态,包含两层意思)
#include <ros/ros.h>
#include <move_base_msgs/MoveBaseAction.h>
#include <actionlib/client/simple_action_client.h>


typedef actionlib::SimpleActionClient<move_base_msgs::MoveBaseAction> MoveBaseClient;

int main(int argc, char** argv){
  ros::init(argc, argv, "simple_navigation_goals");
  //tell the action client that we want to spin a thread by default
  MoveBaseClient ac("move_base", true);

  //wait for the action server to come up
  while(!ac.waitForServer(ros::Duration(5.0))){
    ROS_INFO("Waiting for the move_base action server to come up");
  }

  move_base_msgs::MoveBaseGoal goal;

  //we'll send a goal to the robot to move 1 meter forward
  goal.target_pose.header.frame_id = "map";
  goal.target_pose.header.stamp = ros::Time::now();

  goal.target_pose.pose.position.x = 4.241;
  goal.target_pose.pose.position.y = 0.109;


  goal.target_pose.pose.orientation.x = 0.0;
  goal.target_pose.pose.orientation.y = 0.0;
  goal.target_pose.pose.orientation.z = 0.713;
  goal.target_pose.pose.orientation.w = 0.701;


  ROS_INFO("Sending goal");
  ac.sendGoal(goal);

  ac.waitForResult();

  if(ac.getState() == actionlib::SimpleClientGoalState::SUCCEEDED)
    ROS_INFO("move to 8 desk");
  else
    ROS_INFO("The base failed to move forward ");

  return 0;
}
在上面的代码中比较中重要的就是
这里的frame_id如果是 base_link,表示的是先锋机器人为参考坐标系,如果是map,那么就是地图的静止坐标系
goal.target_pose.header.frame_id = "map";这里我们来描述位姿就是
首先用x,y,z来描述位置
然后用x,y,z,w来描述转向,这里的x,y,z,w就是四元数
  goal.target_pose.pose.position.x = 4.241;
  goal.target_pose.pose.position.y = 0.109;
  goal.target_pose.pose.position.z = 0.0;

  goal.target_pose.pose.orientation.x = 0.0;
  goal.target_pose.pose.orientation.y = 0.0;
  goal.target_pose.pose.orientation.z = 0.713;
  goal.target_pose.pose.orientation.w = 0.701;
好的,那么现在知道这些之后,这个坐标从哪里来呢?
有一个不错的方式,即使使用2D nav箭头
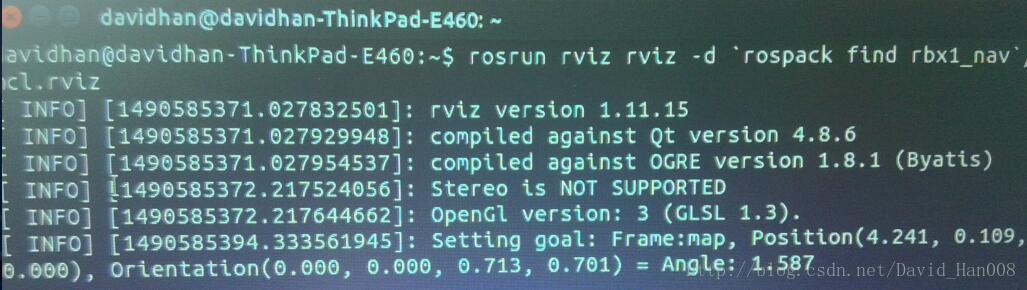
然后我来讲一个对应关系,其实现在大家已经一目了然了,就是position(x,y,z)和Orientation(x,y,z,w)
顺便这个2Dnav箭头的作者很贴心地帮大家算出了angle.
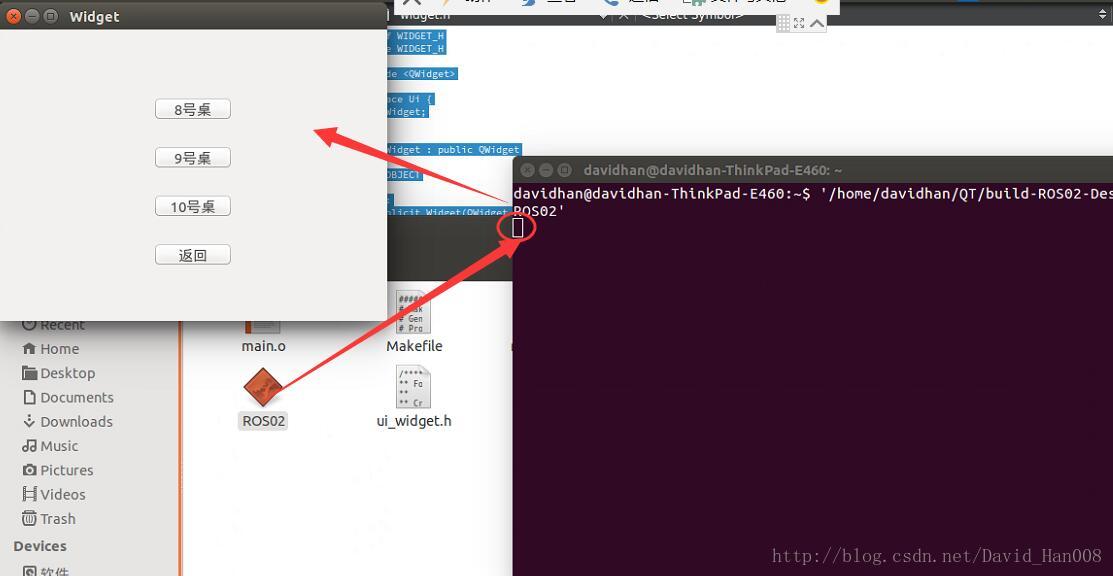
制作简易的QT界面,来运行终端的ROS程序
widget.cpp
#include "widget.h"
#include "ui_widget.h"

Widget::Widget(QWidget *parent) :
    QWidget(parent),
    ui(new Ui::Widget)
{
    ui->setupUi(this);
    QObject::connect(ui->pushButton,SIGNAL(clicked()),this,SLOT(on_pushButton_clicked()));
    QObject::connect(ui->pushButton_2,SIGNAL(clicked()),this,SLOT(on_pushButton_clicked()));
    QObject::connect(ui->pushButton_3,SIGNAL(clicked()),this,SLOT(on_pushButton_clicked()));
    QObject::connect(ui->pushButton_4,SIGNAL(clicked()),this,SLOT(on_pushButton_clicked()));

}

Widget::~Widget()
{
    delete ui;
}

void Widget::on_pushButton_clicked()
{

    QString get=this->sender()->objectName();

       if("pushButton"==get)
       {

           std::system("rosrun simple_navigation_goals send_goal08 ");

       }
       else if("pushButton_2"==get)
       {
           std::system("rosrun simple_navigation_goals send_goal09 ");

       }

       else if("pushButton_3"==get)
       {
           std::system("rosrun simple_navigation_goals send_goal10 ");

       }
       else{

           std::system("rosrun simple_navigation_goals send_goal_home");
       }

}
widget.h
#ifndef WIDGET_H
#define WIDGET_H

#include <QWidget>

namespace Ui {
class Widget;
}

class Widget : public QWidget
{
    Q_OBJECT

public:
    explicit Widget(QWidget *parent = 0);
    ~Widget();

private slots:
    void on_pushButton_clicked();

private:
    Ui::Widget *ui;
};

#endif // WIDGET_H
UI:

重要的代码解析:
widget.h文件中的,这里就是槽函数,槽函数可以一对一,一对多,多对一,
private slots:
    void on_pushButton_clicked();
我这里建立的是多对一的槽函数
    QObject::connect(ui->pushButton,SIGNAL(clicked()),this,SLOT(on_pushButton_clicked()));
    QObject::connect(ui->pushButton_2,SIGNAL(clicked()),this,SLOT(on_pushButton_clicked()));
    QObject::connect(ui->pushButton_3,SIGNAL(clicked()),this,SLOT(on_pushButton_clicked()));
    QObject::connect(ui->pushButton_4,SIGNAL(clicked()),this,SLOT(on_pushButton_clicked()));
通过不同的button的名字来区别,槽函数如下:
void Widget::on_pushButton_clicked()
{

    QString get=this->sender()->objectName();

       if("pushButton"==get)
       {

           std::system("rosrun simple_navigation_goals send_goal08 ");

       }
       else if("pushButton_2"==get)
       {
           std::system("rosrun simple_navigation_goals send_goal09 ");

       }

       else if("pushButton_3"==get)
       {
           std::system("rosrun simple_navigation_goals send_goal10 ");

       }
       else{

           std::system("rosrun simple_navigation_goals send_goal_home");
       }

}
std::system函数相当于在终端输入引号当中的内容。
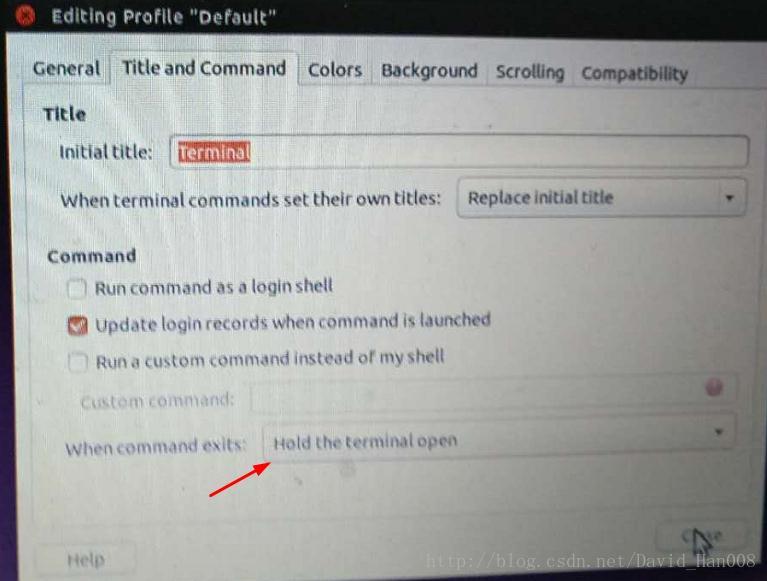
最后也是最重要的一点就是:
要把你的程序拖到终端里面,然后一定要按回车,让这个白色的方框到下面一行,才能让程序正确运行
这个信号槽机制,我真的想了好久,都不是太理解,感谢燕大的赵大神的鼎力相助,
参考博客:http://blog.csdn.net/qq_23100787/article/details/51162944
附上我在实验室运行成功的视频链接:https://v.qq.com/x/page/x0387broime.html
以及实现简单壁障功能的视频:https://v.qq.com/x/page/u03879icjrp.html
附录:
福利: launch文件共享:
p3dx.launch
<launch>

<!-- Starting rosaria driver for motors and encoders -->
  <node name="rosaria" pkg="rosaria" type="RosAria" args="_port:=/dev/ttyUSB0">
  <remap from="rosaria/cmd_vel" to="cmd_vel"/>
  <remap from="rosaria/pose" to="odom"/>
  </node>

</launch>
fake_p3dx.launch
<launch>
  <param name="/use_sim_time" value="false" />

  <!--载入先锋的模型 -->

  <arg name="model" default="$(find p3dx_description)/urdf/pioneer3dx.xml"/>
  <param name="robot_description" textfile="$(arg model)" />

   <rosparam file="$(find p3dx_control)/config/pionner3dx.yaml"/>

  <node name="joint_state_publisher" pkg="joint_state_publisher" type="joint_state_publisher" ></node>
  <node name="robot_state_publisher" pkg="robot_state_publisher" type="state_publisher">
      <param name="publish_frequency" type="double" value="20.0" />
  </node>
</launch>
LMS1XX.launch
<launch>
<arg name="host" default="192.168.0.1" />
<node pkg="lms1xx" name="lms1xx" type="LMS1xx_node">
<param name="host" value="$(arg host)" />
</node>
<node pkg="tf" type="static_transform_publisher" name="laser_link" args=" 0 0 0.3 0 0 0 1 base_link laser 100" />
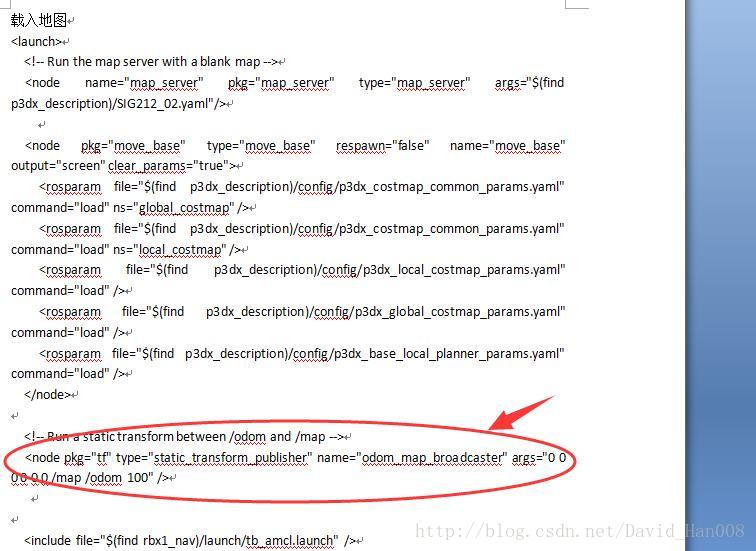
</launch>p3dx_move_base_SIG212_map.launch
<launch>
  <!-- Run the map server with a blank map -->
  <node name="map_server" pkg="map_server" type="map_server" args="$(find p3dx_description)/SIG212_02.yaml"/>

  <node pkg="move_base" type="move_base" respawn="false" name="move_base" output="screen" clear_params="true">
    <rosparam file="$(find p3dx_description)/config/p3dx_costmap_common_params.yaml" command="load" ns="global_costmap" />
    <rosparam file="$(find p3dx_description)/config/p3dx_costmap_common_params.yaml" command="load" ns="local_costmap" />
    <rosparam file="$(find p3dx_description)/config/p3dx_local_costmap_params.yaml" command="load" />
    <rosparam file="$(find p3dx_description)/config/p3dx_global_costmap_params.yaml" command="load" />
    <rosparam file="$(find p3dx_description)/config/p3dx_base_local_planner_params.yaml" command="load" />
  </node>

  <!-- Run a static transform between /odom and /map -->
  <node pkg="tf" type="static_transform_publisher" name="odom_map_broadcaster" args="0.0, 0.0 0 0 0 0 /map /odom 100" />


  <include file="$(find p3dx_description)/launch/tb_amcl.launch" />


</launch>
tb_amcl.launch
<launch>

  <arg name="use_map_topic" default="false"/>
  <arg name="scan_topic" default="scan"/>

  <node pkg="amcl" type="amcl" name="amcl" clear_params="true">
    <param name="use_map_topic" value="$(arg use_map_topic)"/>
    <!-- Publish scans from best pose at a max of 10 Hz -->
    <param name="odom_model_type" value="diff"/>
    <param name="odom_alpha5" value="0.1"/>
    <param name="gui_publish_rate" value="10.0"/>
    <param name="laser_max_beams" value="60"/>
    <param name="laser_max_range" value="12.0"/>
    <param name="min_particles" value="500"/>
    <param name="max_particles" value="2000"/>
    <param name="kld_err" value="0.05"/>
    <param name="kld_z" value="0.99"/>
    <param name="odom_alpha1" value="0.2"/>
    <param name="odom_alpha2" value="0.2"/>
    <!-- translation std dev, m -->
    <param name="odom_alpha3" value="0.2"/>
    <param name="odom_alpha4" value="0.2"/>
    <param name="laser_z_hit" value="0.5"/>
    <param name="laser_z_short" value="0.05"/>
    <param name="laser_z_max" value="0.05"/>
    <param name="laser_z_rand" value="0.5"/>
    <param name="laser_sigma_hit" value="0.2"/>
    <param name="laser_lambda_short" value="0.1"/>
    <param name="laser_model_type" value="likelihood_field"/>
    <!-- <param name="laser_model_type" value="beam"/> -->
    <param name="laser_likelihood_max_dist" value="2.0"/>
    <param name="update_min_d" value="0.25"/>
    <param name="update_min_a" value="0.2"/>
    <param name="odom_frame_id" value="odom"/>
    <param name="resample_interval" value="1"/>
    <!-- Increase tolerance because the computer can get quite busy -->
    <param name="transform_tolerance" value="1.0"/>
    <param name="recovery_alpha_slow" value="0.0"/>
    <param name="recovery_alpha_fast" value="0.0"/>
    <remap from="scan" to="$(arg scan_topic)"/>
  </node>
</launch>
一些参数列表
p3dx_base_local_planner_params.yaml
controller_frequency: 10.0
TrajectoryPlannerROS:
  max_vel_x: 0.50
  min_vel_x: 0.10
  max_rotational_vel: 1.5
  min_in_place_rotational_vel: 1.0
  acc_lim_theta: 0.75
  acc_lim_x: 0.50
  acc_lim_y: 0.50
  meter_scoring: true

  holonomic_robot: false
  yaw_goal_tolerance: 0.78
  xy_goal_tolerance: 0.15
  goal_distance_bias: 0.8
  path_distance_bias: 0.6
  sim_time: 1.5
  heading_lookahead: 0.325
  oscillation_reset_dist: 0.05

  vx_samples: 6
  vtheta_samples: 20
  dwa: false
p3dx_costmap_common_params.yaml
obstacle_range: 2.5
raytrace_range: 3.0
footprint: [[-0.17, -0.20], [-0.20, -0.10], [-0.225, 0.0], [-0.20, 0.10], [-0.17, 0.20], [0.10, 0.20], [0.17, 0.10], [0.225, 0.0], [0.17, -0.10], [0.10, -0.20]]
footprint_padding: 0.01
inflation_radius: 0.20
observation_sources: scan
scan: {data_type: LaserScan, topic: /scan, marking: true, clearing: true}
p3dx_global_costmap_params.yaml
global_costmap:
   global_frame: /map
   robot_base_frame: /base_link
   update_frequency: 3.0
   publish_frequency: 0.0
   static_map: true
   transform_tolerance: 0.5
p3dx_local_costmap_params.yaml
local_costmap:
   global_frame: /odom
   robot_base_frame: /base_link
   update_frequency: 5.0
   publish_frequency: 5.0
   static_map: false
   rolling_window: true
   width: 4.0
   height: 4.0
   resolution: 0.1
   transform_tolerance: 0.7
建图:hector_mapping_LMS1XX.launch
<launch>


  <node pkg="hector_mapping" type="hector_mapping" name="hector_mapping" output="screen">
    <!-- Frame names -->
    <param name="pub_map_odom_transform" value="true"/>
    <param name="map_frame" value="map" />
    <param name="base_frame" value="base_link" />
    <param name="odom_frame" value="base_link" />


    <!-- Tf use -->
    <param name="use_tf_scan_transformation" value="true"/>
    <param name="use_tf_pose_start_estimate" value="false"/>


    <!-- Map size / start point -->
    <param name="map_resolution" value="0.05"/>
    <param name="map_size" value="2048"/>
    <param name="map_start_x" value="0.5"/>
    <param name="map_start_y" value="0.5" />
    <param name="laser_z_min_value" value = "-1.0" />
    <param name="laser_z_max_value" value = "1.0" />
    <param name="map_multi_res_levels" value="2" />


    <param name="map_pub_period" value="2" />
    <param name="laser_min_dist" value="0.4" />
    <param name="laser_max_dist" value="5.5" />
    <param name="output_timing" value="false" />
    <param name="pub_map_scanmatch_transform" value="true" />
    <!--<param name="tf_map_scanmatch_transform_frame_name" value="scanmatcher_frame" />-->


    <!-- Map update parameters -->
    <param name="update_factor_free" value="0.4"/>
    <param name="update_factor_occupied" value="0.7" />
    <param name="map_update_distance_thresh" value="0.2"/>
    <param name="map_update_angle_thresh" value="0.06" />


    <!-- Advertising config -->
    <param name="advertise_map_service" value="true"/>
    <param name="scan_subscriber_queue_size" value="5"/>
    <param name="scan_topic" value="scan"/>
  </node>

  <arg name="host" default="192.168.0.1" />
 <node pkg="lms1xx" name="lms1xx" type="LMS1xx_node">
    <param name="host" value="$(arg host)" />
  </node>

  <node pkg="tf" type="static_transform_publisher" name="laser_link" args=" 0.58545 0 0 0 0 0 1 base_link laser 100" />


  <node pkg="rviz" type="rviz" name="rviz" args="-d $(find hector_slam_launch)/rviz_cfg/mapping_demo.rviz"/>


</launch>
再赠要给rviz模板,省的自己重新配置:
rosrun rviz rviz -d `rospack find rbx1_nav`/amcl.rviz附上github大神的链接:
https://github.com/danimtb/pioneer3at_ETSIDI
更新:由于hector_slam当中没有回环检测,激光建图的效果并不是和理想,进行会产生跑偏的现象,由于作者并没有IMU配合激光雷达,但是有里程计,那么采用gmapping进行建图。
这里我想记一下启动的顺序
roslaunch p3dx_description p3dx.launch
roslaunch p3dx_description fake_p3dx.launch
roslaunch lms1xx LMS100.launch
roslaunch p3dx_description p3dx_rviz.launch
roslaunch p3dx_description p3dx_teleop.launch
rosrun gmapping slam_gmapping
然后我把teleop里面速度订阅的话题已经改变成cmd_vel 这个只是建立地图的工程,个人感觉效果还是不错的。比hector_slam建图的效果要好。然后我发现在建图的过程中,那些栅格地图的例如占空比等参数,都是可以设置的。
给先锋机器人设定在地图当中的起始位置和朝向。
首先设置起始位置是在initialpose这个参数,然后我在roswiki上面查,发现:
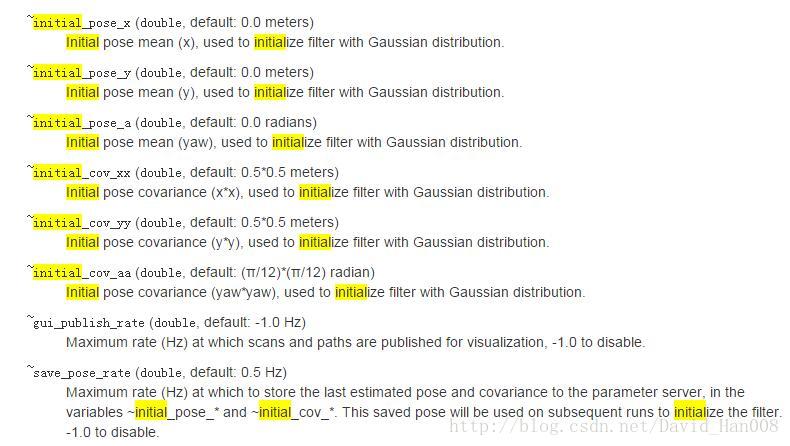
这个是在amcl的配置文件里面修改,当然你也可以修改源码 if you want

这里x,y就是建图的时候的坐标,a表示的转向 +方向是左手方向,例如0.785就是正方向45度,就是pi/4.
使用rqt_plot作出好看的图
参考链接:
http://blog.csdn.net/yaked/article/details/45534381
使用ros record 记录数据,使用rosplay进行重新回放
记录所有的数据
mkdir ~/bagfiles
cd ~/bagfiles
rosbag record -a
记录指定话题的数据
ros record -O subset /turtle1/cmd_vel /turtle1/pose先锋机器人做跟随
roslaunch p3dx_description p3dx.launch
roslaunch openni_launch openni.launch
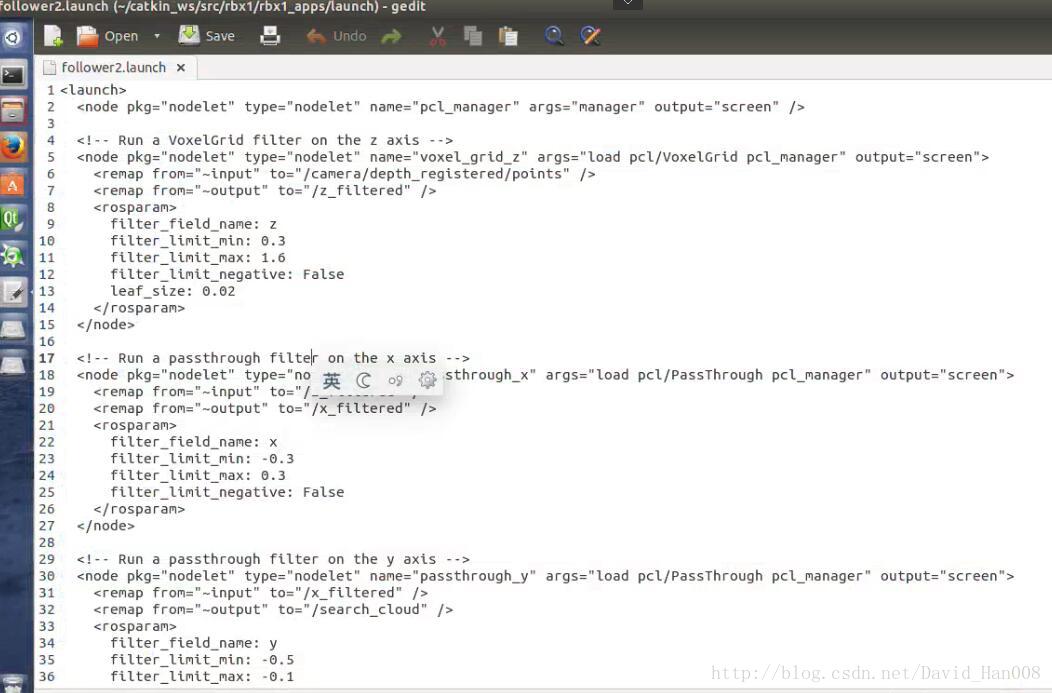
roslaunch rbx1_app follower2.launch原理在在ros by example 这本书当中有介绍。
follower2相比于follower1在原理上只是在x,y方向上对点云进行了一个passthrough滤波器,在z方向上voxel的滤波器,对滤波后的点云数据进行,然后和follower1一样,就是在摄像前面做一个框,然后,对进行框的物体进行跟随。
预期的目标是能够跟随人。
原理还是一样的,都是通过质心来跟随人。
思岚激光雷达建图
hector_mapping建图
首先参考思岚hectorslam建图:
启动顺序:roslaunch rplidar_ros hector_mapping_demo.launch
roslaunch rplidar_ros rplidar.launch
gmapping建图
gmapping订阅的scan和odom的数据
roslaunch rplidar_ros rplidar.launch
roslaunch p3dx_description p3dx.launch
roslaunch p3dx_description fake_p3dx.launch
roslaunch p3dx_description p3dx_teleop.launch
roslaunch p3dx_description p3dx_rviz.launch
rosrun gmapping slam_gmapping
注意事项:
1、
2、为原来的激光rplidar加了一个TF变换

还有每次可能都需要对USB进行修改
3、让我第一次明白有的参数是必须要设置,还有一些参数参数作为调节选项
注意这里参数的写法:
<param name="abs" value="20"/>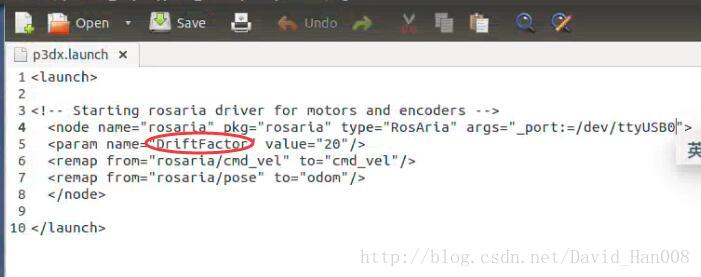
这些都是在官网上找到额参数,都是可以修改和设置的,一定要知道,每个参数到底能够影响什么东西,多看,总是没有坏处的。
4、
关于线速度校正
roslaunch p3dx_description p3dx.launch
rosrun rbx1_nav calibrate_linear.py
rosrun rqt_reconfigure rqt_reconfigure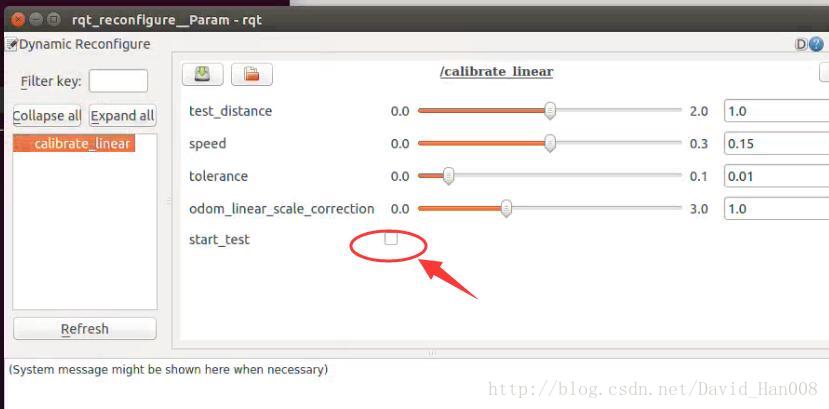
然后点这里的小勾,车才会走,哈哈,我也是想了好久,当时就在纳闷这节点有运行了,车咋不走。哈哈。
谷歌Cartographer
官网参考博客
http://blog.csdn.net/android_ruben/article/details/52760204
http://blog.csdn.net/jsgaobiao/article/details/53116042
我自己跑的大神的博客:
http://www.cnblogs.com/hitcm/p/5939507.html
注意事项:
安装依赖项
sudo apt-get install google-mock libboost-all-dev libeigen3-dev libgflags-dev libgoogle-glog-dev liblua5.2-dev libprotobuf-dev libsuitesparse-dev libwebp-dev ninja-build protobuf-compiler python-sphinx ros-indigo-tf2-eigen libatlas-base-dev libsuitesparse-dev liblapack-devceres solver,我是使用的高博的
cartographer我使用hitcm大神的github上面提供的,编译的不要太爽。很顺畅的就走完了
mkdir build
cd build
cmake ..
make -j8
sudo make install
cartographer_ros
我也是使用的hitcm大神git
编译的不要太爽,已经OK了。
使用自己的scan数据,来运行cartographer
参考博客
http://blog.csdn.net/ywj447/article/details/52922487
从这个上面来看,建立的图挺稀少的。效果不是很好。
三种主流的激光SLAM算法的比较
http://blog.csdn.net/u012700322/article/details/52953768
hectorslam是利用的高斯牛顿方法来解决scan-matching问题,对传感器的精度要求要很高。
缺点:需要激光雷达的更新频率要高,测量噪声小。在建图的过程中,机器人的必须控制在较低的情况下,建图才能比较理想,另外他没有回环检测。优点:不需要里程计数据,使得在无人机上面可以用于建图,利用高斯牛顿方法解决scan-matching 问题,将获得的激光点集映射到已有地图的的刚体变换(x,y,theta),为了避免局部最小而非全局最优,使用多分辨率地图。
gmapping算法:采用的RBPF例子滤波算法,来轨迹机器人位姿的概率,求解最优解的过程中,采用了梯度下降算法。
优点:在长廊或者低特征场景中建图效果好。
我们的目标是:能够使用激光雷达的数据,来修正里程计的数据
参看大神的github:
https://github.com/dimatura/loam_continuous
http://wiki.ros.org/loam_continuous
http://wiki.ros.org/rf2o_laser_odometry
欧拉角和四元数
http://wenda.ncnynl.com/question/33
总结一下
无论我吧小车的编码器如何修正,小车总是会走歪。然后现在我采用KINECT做跟随,我机器人跟着我在场景当中走一周,建立一个比较正的环境地图。
关于gmapping的配置,我是采用了P2O当中配置文件。
启动的launch文件的顺序
roslaunch p3dx_description p3dx.launch
roslaunch p3dx_description fake_p3dx.launch
roslaunch p2os_launch gmapping.launch
roslaunch rbx1_app follower2.launch
rosrun rviz rviz -d `rospack find amr_robots_launchfile`/rosaria.rviz
相比用键盘控制:
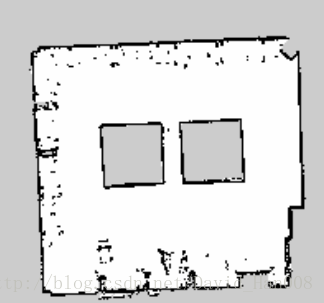
(这是hector slam建的地图)
差距还是相当大的。后者甚至不能直接用于导航。
我吧我的视频上传到
Dijkstra怎么读?
https://zh.forvo.com/word/dijkstra/
除了move_base之外的其他PKG
http://wiki.ros.org/mrpt_navigation
ROS的优点:
http://www.robot-china.com/news/201606/01/33176.html
单目摄像头的使用
https://item.taobao.com/item.htm?spm=a1z10.5-c.w4002-15602997154.20.6olXtH&id=529788718866

参考博客:
http://blog.csdn.net/u013158492/article/details/50495589
看了大神的博客,才发现自己可能都没有吧move_base的包用起来,自己基本上都是使用的默认参数。
发现这四个配置文件没有

用户调用movebase是通过传入带有TF参数move_base::MoveBase move_base( tf );来实现的
参考博客:
http://blog.csdn.net/x_r_su/article/details/53117572
关于pluginlib使用总结
利用pluginlib编写插件的方法四步:
1、创建插件基类
2、编写插件类,继承插件基类,实现统一接口
3、导出插件,并编译为动态库
4、将插件加入ROS系统,使其可识别和管理
参考博客:
http://blog.csdn.net/x_r_su/article/details/53100128
将来还是通过这个人地方实践一下actionlib
参考博客
http://blog.csdn.net/qq_29573053/article/details/70318241
在使用的过程当中move_base当中一些经验。
关于地图参数的说明

将这几天走过的坑总结一下:
首先就是gmapping的参数问题
<launch>
    <node pkg="gmapping" type="slam_gmapping" name="slam_gmapping" args="/scan">
        <param name="delta" type="double" value="0.05" />
        <param name="temporalUpdate" type="double" value="2.5" />
        <param name="xmin" type="double" value="-2" />
        <param name="xmax" type="double" value="2" />
        <param name="ymin" type="double" value="-2" />
        <param name="ymax" type="double" value="2" />
        <param name="particles" value="40"/>
        <param name="srr" value="0.01"/>
            <param name="srt" value="0.02"/>
        <param name="str" value="0.01"/>
        <param name="stt" value="0.02"/>
        <param name="linearUpdate" value="0.05"/>
            <param name="angularUpdate" value="0.0436"/>
        <param name="minimumScore" value="10"/>
    </node>
</launch>
其实,就是将minimumScore这个评分提高,似的更加相信那个激光雷达的数据,然后下面是关于gmapping参数讲解的博客。delta表示的是地图的分辨率,现在我设置是0.05.我设置过0.01,但是那个分辨率的地图,在我的本子上面没有办法正常运行。然后剩下值得注意的地方,就是关于导航全局路径规划和局部路径规划的参数。我总体的感触,就是图见的准确,很多事情都好说。其实激雷达可以不弄到下面,弄到一个看不见的的上面的最问题的。我只是用激光雷达进行定位和走定点。
http://blog.csdn.net/eaibot/article/details/51628371
另外就关于QT里面的东西
遇到的问题就是;
点击button之后,会运行两次launch文件。Qt中clicked()与clicked(bool)有什么区别?我用的clicked()函数,而没有用clicked(bool)。最后应该用clicked(bool) ,这个现象就消失了。原因不明,但是最后的功能实现了,就可以了。
然后思岚的或者其他的激光雷达的开口至少需要220度。千万要记住了。
最近入手了一款IMU–razor_imu_9dof
说是IMU其实目前之用了三轴陀螺仪。还是三轴加速度计和三轴磁力计
在淘宝卖家的照顾下,帮我线接上,原来的情况是,我当时不会焊东西,结果焊的不好,程序下载不进去。
因焊导致的问题
i have some problems, when i use arduino upload the Razor_AHRS.ino, it has some errors
as followers:

Binary sketch size: 21,538 bytes (of a 30,720 byte maximum)
avrdude: stk500_initialize(): (a) protocol error, expect=0x14, resp=0x23
avrdude: initialization failed, rc=-1
Double check connections and try again, or use -F to override
this check.

avrdude: stk500_disable(): protocol error, expect=0x14, resp=0x59
多亏了淘宝卖家,然后我在这里吧他们家的IMU的网址贴上
https://item.taobao.com/item.htm?spm=a230r.1.14.79.ebb2eb2TZky5Q&id=36406397062&ns=1&abbucket=6#detail
然后接下来的遇到的问题:
[INFO] [WallTime: 1478277847.034457] Publishing IMU data...
Traceback (most recent call last):
File "/home/catkin_imu/src/razor_imu_9dof/nodes/imu_node.py", line 228, in
yaw_deg = -float(words[0])
ValueError: could not convert string to float:
[imu_node-2] process has died [pid 8670, exit code 1, cmd /home/catkin_imu/src/razor_imu_9dof/nodes/imu_node.py __name:=imu_node __log:=/home/.ros/log/de7abd92-a2ad-11e6-ac74-000c2971e5f1/imu_node-2.log].
log file: /home/.ros/log/de7abd92-a2ad-11e6-ac74-000c2971e5f1/imu_node-2*.log`
我查看了源码,并且输出的print(words[0]),发现里面含有字母,上面的那个replace没有替换完全。是这里的问题。
产生这个问题的原因是因为 你的arduino下载到板子当中的程序和这个python文件中替换的程序不是同一个,就是说没有办法替换完全。然后我找了cpp的程序,链接:https://github.com/mik077/razor_imu_9dof
他这里需要的arduino的程序,是和他github下面的链接中的arduino的程序需要配套的。
上传代码到github
echo “# p3dx_navigation” >> README.md
git init
git add README.md
git add .
git commit -m “first commit”
git remote add origin https://github.com/DavidHan008/p3dx_navigation.git
git push -u origin master
如果遇到意外,那么就吧原来的 .git删除就可以
然后关于ROS的开机自启动参考博客:
http://blog.csdn.net/yiranhaiziqi/article/details/53640523
重要的东西:
gnome-session-properties
如果你是gnome-terminal -x your_command.sh
那么会打开一个终端,
如果是你是bash your_command.sh 那么就不会打开一个终端。
想要关闭所有的节点,那么直接在终端输入
pkill roslaunch就可以
另外需要在终端中设置
如下图所示:
在上面链接的博客中,还提到了一种,通过使用robot-upstart这个包,大家可以看一下,在上面链接中,使用的案例,我也尝试过,但是总是由于串口识别的问题,没有测试成功,也尝试过用std::system()这条,指令,也没有效果。
利用robot-upstart,可以熟悉一下这个包如何使用,就可以了。
因此最后选择最传统的gnome-terminal -x 加入指令。
开机自启后,有 两个地方要注意,第一个就是如何,不需要输入登录密码,就可以直接,进去,当时产生的现象是,只有当你输入登录密码后才运行程序。参考链接:点击这里
最重要的部分,就是:
第二个需要注意的地方:安卓设备没有办法查看图像
在launch文件启动的时候,要指定IP,就是在你的.sh文件中,在启动launch文件的那条指令前,将下面这几条设置IP的命令加上去,就好了。
export ROS_HOSTNAME=192.168.0.122
export ROS_IP=192.168.0.122
export ROS_MASTER_URI=http://192.168.0.122:11311
重磅推荐,这个大神的git
然后在编译这个package之前,你需要安装armadillo
1,安装armadillo之前所需要的库:
sudo apt-get install liblapack-dev
sudo apt-get install libblas-dev
sudo apt-get install libboost-dev
2,安装armadillo:
sudo apt-get install libarmadillo-dev
然后将这个大神的github 克隆到你的工作空间但中
https://github.com/tysik/obstacle_detector
之间编译就可以过
遇到的问题:
roscore 不执行,ros命令不响应
原因是在~/.bashrc里有export ROS_MASTER_URI=http://192.168.1.115:11311,这句话,赋值后的ROS_MASTER_URI指向的是另一个ip地址行的ROS,因此在本地无法使用ROS。注释掉ROS_MASTER_URI赋值即可在本地运行。
简单来说,就是锁定了IP,那么只要在固定的网中进行调试,就可以打开了
监听两个坐标系之间的tf变换,并且读取tf的数值,
    tf::TransformListener listener_odom;
   tf::StampedTransform transform_odom;
      try{
      listener_odom.waitForTransform("odom_link", "base_link", ros::Time(0), ros::Duration(3.0));
      listener_odom.lookupTransform("odom_link", "base_link",ros::Time(0), transform_odom);
    }
      catch (tf::TransformException &ex) {
      ROS_ERROR("%s",ex.what());
      }
     odom_trans.transform.translation.x = transform_odom.getOrigin().x();
     odom_trans.transform.translation.y = transform_odom.getOrigin().y();
     odom_trans.transform.translation.z = 0.0;

    tf::TransformListener listener_angle;
   tf::StampedTransform transform_angle;
      try{
      listener_angle.waitForTransform("base_link", "IMU", ros::Time(0), ros::Duration(3.0));
      listener_angle.lookupTransform("base_link", "IMU",ros::Time(0), transform_angle);
    }
      catch (tf::TransformException &ex) {
      ROS_ERROR("%s",ex.what());
      }


  odom_trans.transform.rotation.x=transform_angle.getRotation().getX();;
  odom_trans.transform.rotation.y=transform_angle.getRotation().getY();
  odom_trans.transform.rotation.z=transform_angle.getRotation().getZ();
  odom_trans.transform.rotation.w=transform_angle.getRotation().getW();
注意:这里必须用try 和 catch 以及waitForTransform 如果直接监听的话,就会出现内核崩溃
  try{
      listener_angle.waitForTransform("base_link", "IMU", ros::Time(0), ros::Duration(3.0));
      listener_angle.lookupTransform("base_link", "IMU",ros::Time(0), transform_angle);
    }
      catch (tf::TransformException &ex) {
      ROS_ERROR("%s",ex.what());
      }
弄了半天,还是要弄语音识别
参考链接
http://www.ncnynl.com/archives/201609/848.html
ROS中使用了CMU Sphinx和Festival开源项目中的代码,发布了独立的语音识别包,而且可以将识别出来的语音转换成文字,然后让机器人智能处理后说话。、
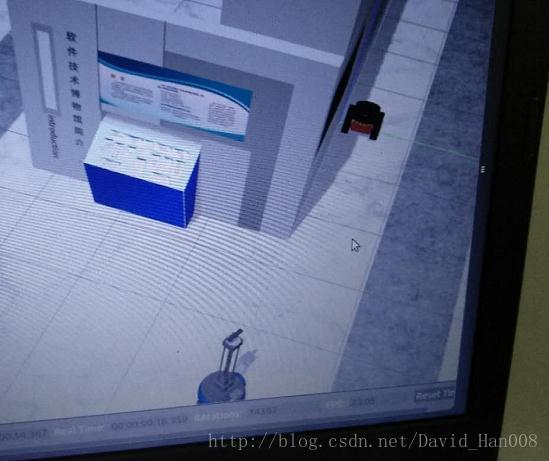
技巧:在gazebo当中显示多个机器人
现状分析:在原来的launch文件中,已经存在一个robot了。现在我想要把先锋机器人的模型添加进去。(我现在已经有先锋机器人的显示模型)
以及

解决办法:利用不同的group 的命名空间,用两个不同的命名空间,来区分这里两个机器人
如下:

参考解决方案:点击这里
最后的效果tf tree:
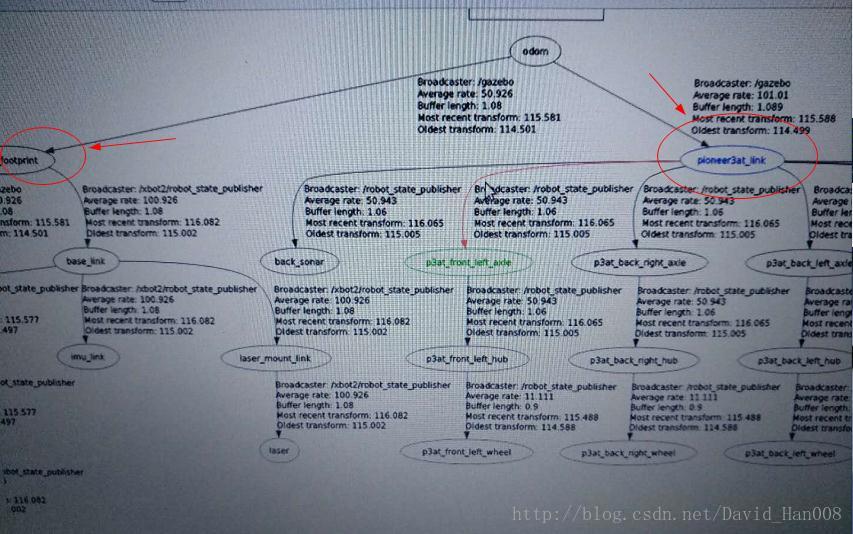
显示效果:
扩展:当tf已知的情况下,如何将一个tf跟着另一个tf
#!/usr/bin/env python
import sys
import rospy
import math
import tf
import geometry_msgs.msg

if __name__ == '__main__':
        rospy.init_node('py_tf_follower')

        listener = tf.TransformListener()

        turtle_vel = rospy.Publisher('/sim_p3at/cmd_vel', geometry_msgs.msg.Twist,queue_size=1)

        rate = rospy.Rate(10.0)
        ctrl_c = False

        follower_model_frame = "/pioneer3at_link"
        model_to_be_followed_frame = "/base_footprint"

        def shutdownhook():
            # works better than the rospy.is_shut_down()
            global ctrl_c
            print "shutdown time! Stop the robot"
            cmd = geometry_msgs.msg.Twist()
            cmd.linear.x = 0.0
            cmd.angular.z = 0.0
            turtle_vel.publish(cmd)
            ctrl_c = True

        rospy.on_shutdown(shutdownhook)

        while not ctrl_c:
            try:
                (trans,rot) = listener.lookupTransform(follower_model_frame, model_to_be_followed_frame, rospy.Time(0))
            except (tf.LookupException, tf.ConnectivityException, tf.ExtrapolationException):
                continue
            angular = 4 * math.atan2(trans[1], trans[0])
            linear = 0.5 * math.sqrt(trans[0] ** 2 + trans[1] ** 2)
            cmd = geometry_msgs.msg.Twist()
            if 2*linear>1:
                cmd.linear.x = linear*0.2
                cmd.angular.z = angular*0.1
            else:
                cmd.linear.x =0
                cmd.angular.z =0
            turtle_vel.publish(cmd)
            rate.sleep()
在上面的代码中,如果这个两个tf之间的距离是1米,就让他停止下来。
ROS 很实用的小工具
安装某个包的依赖项目
rosdep install <stacks-and-packages>...
  generate a bash script and then execute it.
举例说明:
davidhan@davidhan-ThinkPad-E460:~$ rosdep install simple_arm
executing command [sudo -H apt-get install ros-indigo-effort-controllers]
进行动态调节参数
rosrun rqt_reconfigure rqt_reconfigure 输出topic
rostopic echo /topic查看Tf
rosrun rqt_tf_tree rqt_tf_tree查看所有的话题
rostopic list查看这个节点订阅和发布何种数据
rosnode info 查看那个节点发布,那个节点接收这个话题
rostopic info查看所有图像的
rqt_image_view查看节点之见通信的图
rqt_graph关于所有的launch文件
pkill roslaunch查看某个话题的数据类型
rostopic type /topic_name查看所有topic 的信息
rosrun rqt_topic rqt_topic 所有的rqt可以支持的东西。
rqt_action           rqt_logger_level     rqt_robot_monitor
rqt_bag              rqt_moveit           rqt_robot_steering
rqt_bag_plugins      rqt_msg              rqt_runtime_monitor
rqt_console          rqt_nav_view         rqt_rviz
rqt_dep              rqt_plot             rqt_service_caller
rqt_graph            rqt_pose_view        rqt_shell
rqt_gui              rqt_publisher        rqt_srv
rqt_gui_cpp          rqt_py_common        rqt_tf_tree
rqt_gui_py           rqt_py_console       rqt_top
rqt_image_view       rqt_reconfigure      rqt_topic
rqt_launch           rqt_robot_dashboard  rqt_web
将rostopic echo输出的数据写入一个txt文档
rostopic echo /cmd_vel >> a.txt后记:
先锋机器人线速度和角速度矫正
<launch>

<!-- Starting rosaria driver for motors and encoders -->
  <node name="rosaria" pkg="rosaria" type="RosAria" args="_port:=/dev/ttyUSB0">
  <param name="DriftFactor" value="0"/>
  <param name="TicksMM" value="120"/>
  <param name="RevCount" value="16570"/>
  <remap from="rosaria/cmd_vel" to="cmd_vel"/>
  <remap from="rosaria/pose" to="odom"/>
  </node>

</launch>
重要的就是DriftFactor,TicksMM,RevCount
TicksMM现在设置的是120,如果你设置150,让先锋机器人走1米,他会走1米3左右。,这个参数,貌似是脉冲的个数。
DriftFactor:水平方面的分量。设置为0
RevCount:就设置16570就可以了。
我是利用的turtlebot的rosrun rbx1_nav calibrate_linear.py
和角度rosrun rbx1_nav calibrate_angular.py来矫正的线速度和角速度的。在矫正角速度的时候,可能出现回弹的现象。这是因为线速度的值,设置太大了。先锋机器人理想的线速度的之,我觉得是0.6米/秒。理想的角速度的为0.4米/秒
在建图方面的最重要的三个参数就是:分辨率,粒子数量和评分
<launch>
    <node pkg="gmapping" type="slam_gmapping" name="slam_gmapping" args="/scan">
        <param name="delta" type="double" value="0.05" />
        <param name="temporalUpdate" type="double" value="2.5" />
        <param name="xmin" type="double" value="-2" />
        <param name="xmax" type="double" value="2" />
        <param name="ymin" type="double" value="-2" />
        <param name="ymax" type="double" value="2" />
    </node>
</launch> <param name="particles" value="8"/>、
<param name="minimumScore" value="30"/>
<param name="delta" type="double" value="0.05" />


 1638
1638


 被折叠的 条评论
为什么被折叠?
被折叠的 条评论
为什么被折叠?
 到【灌水乐园】发言


