


Looking for a way to get started writing safe multithreaded code? Learn the principles behind our Job System and how it works together with the Entity Component System (ECS) and the Burst compiler from this brief intro!
In Unity 2017.3 we exposed our Job System to C# code. Together with our new Burst compiler and Entity Component System (ECS), the job system makes up a high-performance multithreaded system, that will make it possible for games to fully utilize the multicore processors available today.
The purpose of the Job System is to allow the game simulation to use all the available CPU cores. Almost all modern CPUs have multiple cores and the trend is increasing. Yet many games and applications rely on using just a single core. When you split your processing into multiple smaller chunks and run them across multiple cores, you are able to process simultaneously in parallel, instead of one after another. This uses the capacity of the cores more efficiently and therefore brings massive performance improvements. Or to be more specific, using all available cores makes the simulation use less wall-time (time on the clock from starting the simulation until completing it), without optimizing the thread-time (the number of CPU instructions spent computing the result).

Expand
Reducing wall-time
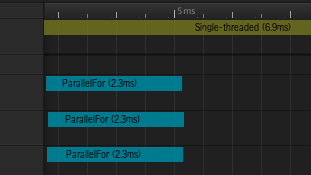
The easiest way to get started reducing wall-time with the Job System is to use ParallelFor jobs. A ParallelFor job is used when processing a large set of values in the same way. Essentially, the job system processes each item in the array individually using a job - which means all the items can be processed in parallel to each other utilizing multiple CPU cores, if available. In practice, the number of jobs is actually much lower than one per item in the array, there is one job per CPU core and they each get an even amount of items to process. Since some workers finish their work faster than others, we use something called work-stealing to even out the time spent on each core. When a worker has finished all its work, it looks at the other workers' queues and tries to process some of the items assigned to another worker.
Expand
Going beyond ParallelFor
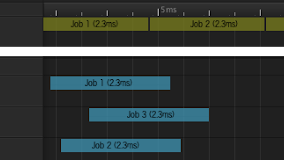
If you have some very heavy systems containing many similar items, ParallelFor works great. But even if you only have a few things of each type, you can take advantage of the Job System. On a high level, the design of a Job System is to split the entire application into small self-contained units of work called jobs. Each CPU core has its own thread executing these jobs, which makes all jobs run in parallel to each other. So as long as the different items don’t depend on each other, all you have to do is schedule jobs for them without waiting for any other jobs, and they will run in parallel to other things.
Expand
Schedule early, complete late
Something we often suggest when talking about the Job System is the concept of scheduling early and waiting late. The purpose of this pattern is to make sure the main thread doesn’t have to wait for the job to complete. By the time the main thread needs the results of a job, it should ideally already have finished executing. A very common question which does not have a simple answer is: Which update pass is "early" and "late"? What we mean when we say schedule early and wait late is that you should give the job as much time as possible to run. It doesn’t matter much in which part of the frame you schedule and wait, as long as they’re as far apart as possible. If one frame latency is acceptable, you can even wait for the job in the next frame. Any time you see a "wait" on the main thread in the profiler, you should investigate what it’s waiting for and, if you can, schedule that job earlier or complete it later to get rid of the wait.
What problem does it not solve?
A Job System is not designed to be a solution for long running low priority tasks, and it is not designed for operations waiting instead of using CPU resources, like IO. It’s still possible to do these things, but it’s not the primary purpose of the Job System, which means they come with some limitations you need to be aware of.
Cooperative multi-tasking
Each worker thread in the JobSystem is tied to a physical or a virtual CPU core. Once one of these threads start executing a job, the job will run to completion without any interruptions. If you want to share a CPU core with something else, you need to manually yield, and the only way to do that is to split your job into two jobs with dependencies between them. Since the system is never doing any context switching for you, a running job will occupy one full core of the CPU, even if you aren’t actually doing anything important.
How it works together with ECS and Burst
There are many implications for using the C# Job System, and generally speaking, this approach should lead to better performance across the board. This is particularly true as new Unity features like the Entity Component System and the Burst compiler technology come into play. The Entity Component System focuses on reducing the thread-time required to compute a result by organizing your data in a very cache-friendly way. Burst focuses on reducing the thread-time by optimizing your code better when it’s running within the job system. The goal of all these systems is to increase what is fundamentally possible in Unity in terms of performance, while still supporting existing workflows and making the transition easier.
Conclusion
Modern hardware architecture is equipped with and trending towards having multiple cores. Yet many processes rely on using just a single core. By running multiple processes across multiple cores, you’re able to run it simultaneously in parallel, instead of one after another, thus utilizing the capacity of the cores more efficiently and gaining massive performance improvements.
The new C# Job System takes advantage of multiple cores in a safe and easy way. Easy, as it’s designed to open this approach up to your scripts and allow you to write fast jobified code, and safe because it provides protection from some of the pitfalls of multi-threading, such as race conditions.
You can use the new multithreaded systems to create games that run on a variety of hardware. You can also take full advantage of the performance gains to create richer game worlds with more units and more complex simulations.
//
编写多线程代码可以提供高性能的好处。其中包括显着提高帧速率和延长移动设备的电池寿命。
C# Job System的一个重要方面是它与Unity内部使用的集成(Unity的native jobsystem)。用户编写的代码和Unity共享工作线程。这种合作避免了导致争用CPU资源的问题,并且可以创建比CPU核心更多的线程。
什么是多线程
在单线程计算机系统中,一次只能进入一条指令,并且只能得出一个结果。加载和完成程序的时间取决于CPU需要完成的工作量。
多线程是一种编程,它利用CPU在多个内核上同时处理多个线程的能力,它不是一个接一个地执行任务或指令,而是同时运行的。
默认情况下,一个线程在程序的开头运行。这是“主线程”。主线程创建新线程来处理任务。这些新线程彼此并行运行,并且通常在完成后将其结果与主线程同步。
如果您有一些运行很长时间的任务,这种多线程方法很有效。但是,游戏开发代码通常包含许多一次执行的小指令。如果为每个小指令创建一个线程,最终可能会有许多线程,每个线程的生命周期都很短。这可以推动CPU和操作系统处理能力的极限。
通过拥有一个线程池可以缓解线程生存期的问题。但是,即使您使用线程池,也可能同时激活大量线程。线程数多于CPU核心导致线程相互争用CPU资源,导致频繁的上下文切换。上下文切换是通过执行保存线程状态的过程,然后处理另一个线程,然后重新构建第一个线程,以便继续处理它。上下文切换是资源密集型的,因此您应尽可能避免使用它。
03-什么是Job System
Job System通过创建Job而不是线程来管理多线程代码。
Job System跨多个核心管理一组工作线程。它通常每个逻辑CPU核心有一个工作线程,以避免上下文切换(尽管它可能为操作系统或其他专用应用程序保留一些核心)。
Job System将Job放入作业队列中用来执行。Job System中的工作线程从作业队列中获取Job并执行它们。作业系统管理依赖关系并确保作业以适当的顺序执行。
3.1 什么是Job?
Job是完成一项特定任务的一小部分工作。Job接收参数并对数据进行操作,类似于方法调用的行为方式。Job可以是独立的,也可以是依赖的(需要等其他作业完成后,然后才能运行。)
3.2 什么是Job依赖?
在复杂的系统中,如游戏开发所需的系统,每个工作都不可能是独立的。一项工作通常是为下一份工作准备数据。作业了解并支持依赖关系以使其发挥作用。如果jobA对jobB依赖,则Job System确保在完成jobA之前不会开始执行jobB。
04-C#Job System中的安全系统
4.1 竞争条件
编写多线程代码时,总是存在竞争条件的风险。当一个操作的输出取决于其控制之外的另一个过程的时间的时候,就会发生竞争条件。
竞争条件并不总是一个Bug,但它是不确定行为的来源。当竞争条件确实导致Bug时,可能很难找到问题的根源,因为它取决于时间,因此您只能在极少数情况下重新复现问题。调试它可能会导致问题消失,因为断点和日志记录(Logging)可以改变单个线程的时间。竞争条件是编写多线程代码时最重大的挑战。
4.2 安全系统
为了更容易编写多线程代码,Unity C#作业系统可以检测所有潜在的竞争条件,并保护您免受可能导致的Bug的影响。
例如:如果C#Job System将主线程中代码中的数据引用发送到Job中,则无法验证主线程是否在作业写入数据的同时读取数据。这种情况就会创建竞争条件。
C#Job System复制数据的方式意味着作业只能访问blittable数据类型。在托管代码和本机代码之间传递时,这些类型不需要转换。
C#Job System可以使用memcpy复制blittable类型,并在Unity的托管和本机部分之间传输数据。它在调度Job时用memcpy将数据放入本机内存,并在执行作业时为托管端提供对该拷贝副本的访问权限。有关更多信息,请参阅计划作业。
05-NativeContainer
安全系统复制数据的过程的缺点是它还隔离了每个副本中Job的结果。要克服此限制,您需要将Job的结果存储在一种名为NativeContainer的共享内存中。
5.1 什么是NativeContainer?
NativeContainer是托管值类型,为本机内存提供相对安全的C#包装器。它包含指向非托管分配的指针。与Unity C#作业系统一起使用时,一个 NativeContainer允许Job访问与主线程共享的数据,而不是使用拷贝副本数据。
5.2 有哪些类型的NativeContainer?
Unity附带一个NativeContainer名为NativeArray的程序。您还可以使用NativeSlice操作一个NativeArray来获取NativeArray从指定位置到指定长度的子集。
注意:实体组件系统(ECS)包扩展了Unity.Collections命名空间以包括其他类型的NativeContainer:
NativeList- 可调整大小的NativeArray。
NativeHashMap - 键值对。
NativeMultiHashMap - 每个键有多个值。
NativeQueue- 先进先出(FIFO)队列。
5.3 NativeContainer和安全系统
安全系统内置于所有NativeContainer类型。它跟踪NativeContainer中正在阅读和写入的内容。
注意:所有NativeContainer类型的安全检查(例如越界检查,重新分配检查和竞争条件检查)仅在Unity Editor和Play模式下可用。
该安全系统的一部分是DisposeSentinel和AtomicSafetyHandle。该DisposeSentinel检测内存泄漏,如果你没有正确地释放你的内存,就会报错。内存泄漏发生后很久就会发生内存泄漏错误。
使用AtomicSafetyHandle转移NativeContainer代码的所有权。例如,如果两个调度Job写入相同NativeArray,则安全系统会抛出一个异常,并显示一条明确的错误消息,说明解决问题的原因和方法。当你调度违规Job时,安全系统会抛出此异常。
在这种情况下,您可以调度具有依赖关系的Job。第一个Job可以写入NativeContainer,一旦完成执行,下一个Job就可以安全地读取和写入上一个Job相同的NativeContainer。从主线程访问数据时,读写限制也适用。安全系统允许多个Job并行读取相同的数据。
默认情况下,当Job有权访问一个NativeContainer时,它具有读写访问权限。此配置可能会降低性能。C#Job System不允许您在一个job正在写入NativeContainer时同时调度另外一个对NativeContainer 有写入权限的Job。
如果作业不需要写入一个 NativeContainer,请使用[ReadOnly]属性标记NativeContainer,如下所示:
在上面的示例中,您可以与其他对第一个也具有只读访问权限的作业同时执行作业NativeArray。
注意:无法防止从作业中访问静态数据。访问静态数据会绕过所有安全系统,并可能导致Unity崩溃。有关更多信息,请参阅C#作业系统提示和故障排除。
5.4 NativeContainer分配器
当创建 NativeContainer时,必须指定所需的内存分配类型。分配类型取决于Job运行的时间长度。通过这种方式,您可以定制分配以在每种情况下获得最佳性能。
NativeContainer内存分配和释放有三种分配器类型。在实例化你的NativeContainer时候需要指定合适的一个类型。
1Allocator.Temp 分配的时候最快。它适用于寿命为一帧或更少的分配。您不应该使用Temp将NativeContainer分配传递给Jobs。您还需要在从方法(例如MonoBehaviour.Update,或从本机代码到托管代码的任何其他回调)调用返回之前调用该方法Dispose()。
2Allocator.TempJob 是一个比Temp慢的分配,但速度比Persistent快。它适用于四帧生命周期内的分配,并且是线程安全的。如果在四个帧内没有调用Dispose,则控制台会打印一个从本机代码生成的警告。大多数小型Jobs都使用这个NativeContainer分配类型。
3Allocator.Persistent 是最慢的分配,只要你需要它,就一直存在。并且如果有必要的话,可以持续整个应用程序的生命周期。它是直接调用malloc的包装器。较长的Jobs可以使用此NativeContainer分配类型。你不应该使用Persistent在性能至关重要的地方使用。
例如:
注意:上例中的数字1表示NativeArray的大小。在这种情况下,它只有一个数组元素(因为它只存储一个数据result)。
06-创建Jobs
要在Unity中创建作业,您需要实现IJob接口。IJob允许您调度可以与其他正在运行的Job并行运行的单个Job。
注意:“Job”是Unity中用于实现IJob接口的任何结构的集合术语。
要创建Jobs,您需要:
●创建一个继承自IJob的结构体。
●添加Jobs使用的成员变量(blittable类型或NativeContainer类型)。
●在结构体中实现一个继承自IJob接口的Execute的方法。
当执行job时,这个Execute方法在单个核心上运行一次。
注意:在设计job时,请记住它们在数据副本上运行,除非是NativeContainer。因此,从主线程中的Job访问数据的唯一方法是写入NativeContainer。
示例
// Job adding two floating point values together
publicstructMyJob : IJob
{
publicfloata;
publicfloatb;
publicNativeArray<float>result;
publicvoidExecute()
{
result[0] =a+b;
}
}
07-调度Jobs
要在主线程中调度Job,您必须:
●实例化Job。
●填充Job的数据。
●调用Schedule方法。
调用Schedule将Job放入Job队列中以便在适当的时间执行。一旦调度,你就不能打断Job的运行。
注意:您只能在主线程调用Schedule。
调度Jobs的一个例子
//This example waits for the job to complete for illustration purposes
NativeArray<float>result=newNativeArray<float>(1, Allocator.TempJob);
// Set up the job data
MyJobjobData=newMyJob();
jobData.a=10;
jobData.b=10;
jobData.result=result;
// Schedule the job
JobHandlehandle=jobData.Schedule();
// Wait for the job to complete
handle.Complete();
// All copies of the NativeArray point to the same memory, you can access the result
// in "your" copy of the NativeArray
floataPlusB=result[0];
// Free the memory allocated by the result array
result.Dispose();
08-JobHandle和依赖关系
当您调用Job的Schedule方法时,它将返回JobHandle。您可以在代码中使用JobHandle 作为其他Job的依赖关系。如果Job取决于另一个Job的结果,您可以将第一个作业JobHandle作为参数传递给第二个作业的Schedule方法,如下所示:
JobHandlefirstJobHandle=firstJob.Schedule();
secondJob.Schedule(firstJobHandle);
8.1 结合依赖关系
如果Job有许多依赖项,则可以使用JobHandle.CombineDependencies方法合并它们。CombineDependencies允许您将它们传递给Schedule方法。
NativeArray<JobHandle>handles=newNativeArray<JobHandle>(numJobs, Allocator.TempJob);
// Populate `handles` with `JobHandles` from multiple scheduled jobs...
JobHandlejh=JobHandle.CombineDependencies(handles);
8.2 在主线程中等待Job
在主线程中使用JobHandle强迫让你的代码等待您的Job执行完毕。要做到这一点,调用JobHandle的方法 Complete。此时,您知道主线程可以安全地访问正在使用job 的NativeContainer。
注意:在调度Job时,Job不会开始执行。如果您正在等待主线程中的Job,并且您需要访问正在使用Job的NativeContainer数据,则可以调用该方法JobHandle.Complete。此方法从内存高速缓存中刷新Job并启动执行过程。调用JobHandle的Complete方法将返回NativeContainer的所有权到主线程。您需要再次调用 JobHandle 的Complete方法以便于再次从主线程安全地访问这些NativeContainer类型。也可以通过从Job的依赖中的JobHandle的Complete方法调用返回主线程上的所有权。例如,你可以调用jobA的Complete方法,或者也可以调用依靠JobA的JobB上的Complete方法。两者都会在调用Complete后在主线程上安全访问时使用jobA的NativeContainer类型。
否则,如果您不需要访问数据,则需要明确刷新批处理。为此,请调用静态方法JobHandle.ScheduleBatchedJobs。请注意,调用此方法可能会对性能产生负面影响。
多个Jobs和dependencies的示例
publicstructMyJob : IJob
{
publicfloata;
publicfloatb;
publicNativeArray<float>result;
publicvoidExecute()
{
result[0] =a+b;
}
}
// Job adding one to a value
publicstructAddOneJob : IJob
{
publicNativeArray<float>result;
publicvoidExecute()
{
result[0] =result[0] +1;
}
}
主线程代码:
// Create a native array of a single float to store the result in.
//This example waits for the job to complete
NativeArray<float>result=newNativeArray<float>(1, Allocator.TempJob);
// Setup the data for job #1
MyJobjobData=newMyJob();
jobData.a=10;
jobData.b=10;
jobData.result=result;
// Schedule job #1
JobHandlefirstHandle=jobData.Schedule();
// Setup the data for job #2
AddOneJobincJobData=newAddOneJob();
incJobData.result=result;
// Schedule job #2
JobHandlesecondHandle=incJobData.Schedule(firstHandle);
// Wait for job #2 to complete
secondHandle.Complete();
// All copies of the NativeArray point to the same memory, you can access the result in "your" copy of the NativeArray
floataPlusB=result[0];
// Free the memory allocated by the result array
result.Dispose();
JobSystem的使用场景
一、JobSystem是什么
JobSystem是Unity引擎中的一种多线程并行处理技术。JobSystem能够将任务分配给多个线程并行处理,从而提高游戏的性能。JobSystem是Unity引擎中的一个重要功能,它可以用于各种场景,例如物理计算、渲染、动画、AI等等。
JobSystem的核心是Job,Job是一种轻量级的任务,它可以在多个线程间并行处理。Job可以通过JobHandle来控制执行顺序和依赖关系。JobSystem还提供了一些工具类,例如ParallelFor、ParallelForEach等,可以帮助我们更方便地使用JobSystem。
JobSystem的使用需要遵循一些规则,例如不能在Job中访问Unity对象、不能在Job中使用锁等等。但是,遵循这些规则可以帮助我们更好地使用JobSystem,提高游戏的性能。
二、JobSystem的使用场景
JobSystem可以用于各种场景,例如物理计算、渲染、动画、AI等等。下面将分别介绍JobSystem在这些场景中的使用。
- 物理计算
在游戏中,物理计算是一个非常耗费性能的操作。使用JobSystem可以将物理计算分配给多个线程并行处理,从而提高游戏的性能。例如,我们可以使用JobSystem来计算刚体的运动。
public struct MoveJob : IJobParallelFor
{
    public NativeArray<Vector3> positions;
    public NativeArray<Vector3> velocities;
    public float deltaTime;

    public void Execute(int index)
    {
        Vector3 position = positions[index];
        Vector3 velocity = velocities[index];
        position += velocity * deltaTime;
        positions[index] = position;
    }
}

public class PhysicsSystem : MonoBehaviour
{
    public NativeArray<Vector3> positions;
    public NativeArray<Vector3> velocities;
    public float deltaTime;

    private MoveJob moveJob;
    private JobHandle moveJobHandle;

    private void Update()
    {
        moveJob = new MoveJob()
        {
            positions = positions,
            velocities = velocities,
            deltaTime = deltaTime
        };
        moveJobHandle = moveJob.Schedule(positions.Length, 64);
    }

    private void LateUpdate()
    {
        moveJobHandle.Complete();
    }
}
使用JobSystem可以将物理计算分配给多个线程并行处理,提高游戏的性能。
- 渲染
在游戏中,渲染是一个非常耗费性能的操作。使用JobSystem可以将渲染分配给多个线程并行处理,从而提高游戏的性能。例如,我们可以使用JobSystem来渲染粒子效果。
public struct ParticleJob : IJobParallelFor
{
    public NativeArray<Particle> particles;
    public NativeArray<Matrix4x4> matrices;

    public void Execute(int index)
    {
        Particle particle = particles[index];
        matrices[index] = Matrix4x4.TRS(particle.position, particle.rotation, particle.scale);
    }
}

public class ParticleSystem : MonoBehaviour
{
    public Mesh mesh;
    public Material material;
    public NativeArray<Particle> particles;
    public NativeArray<Matrix4x4> matrices;

    private ParticleJob particleJob;
    private JobHandle particleJobHandle;

    private void Update()
    {
        particleJob = new ParticleJob()
        {
            particles = particles,
            matrices = matrices
        };
        particleJobHandle = particleJob.Schedule(particles.Length, 64);
    }

    private void LateUpdate()
    {
        particleJobHandle.Complete();
        Graphics.DrawMeshInstanced(mesh, 0, material, matrices);
    }
}
使用JobSystem可以将渲染分配给多个线程并行处理,提高游戏的性能。
- 动画
在游戏中,动画是一个非常耗费性能的操作。使用JobSystem可以将动画计算分配给多个线程并行处理,从而提高游戏的性能。例如,我们可以使用JobSystem来计算骨骼的变换。
public struct BoneJob : IJobParallelFor
{
    public NativeArray<Matrix4x4> bindPoses;
    public NativeArray<Matrix4x4> boneTransforms;
    public NativeArray<int> boneParents;
    public NativeArray<float> boneWeights;
    public NativeArray<Vector4> boneIndices;
    public NativeArray<Vector3> vertices;
    public NativeArray<Vector3> normals;

    public void Execute(int index)
    {
        Matrix4x4 boneTransform = Matrix4x4.identity;
        int boneIndex = (int)boneIndices[index].x;
        float boneWeight = boneWeights[index];
        while (boneIndex != -1)
        {
            Matrix4x4 bindPose = bindPoses[boneIndex];
            boneTransform = bindPose * boneTransform;
            boneIndex = boneParents[boneIndex];
        }
        boneTransforms[index] = boneTransform;
        Vector3 vertex = vertices[index];
        Vector3 normal = normals[index];
        vertex = boneTransform.MultiplyPoint3x4(vertex);
        normal = boneTransform.MultiplyVector(normal).normalized;
        vertices[index] = vertex;
        normals[index] = normal;
    }
}

public class AnimationSystem : MonoBehaviour
{
    public SkinnedMeshRenderer skinnedMeshRenderer;
    public NativeArray<Matrix4x4> bindPoses;
    public NativeArray<Matrix4x4> boneTransforms;
    public NativeArray<int> boneParents;
    public NativeArray<float> boneWeights;
    public NativeArray<Vector4> boneIndices;
    public NativeArray<Vector3> vertices;
    public NativeArray<Vector3> normals;

    private BoneJob boneJob;
    private JobHandle boneJobHandle;

    private void Update()
    {
        boneJob = new BoneJob()
        {
            bindPoses = bindPoses,
            boneTransforms = boneTransforms,
            boneParents = boneParents,
            boneWeights = boneWeights,
            boneIndices = boneIndices,
            vertices = vertices,
            normals = normals
        };
        boneJobHandle = boneJob.Schedule(vertices.Length, 64);
    }

    private void LateUpdate()
    {
        boneJobHandle.Complete();
        skinnedMeshRenderer.bones = boneTransforms.Select(x => x * skinnedMeshRenderer.transform.worldToLocalMatrix).Select(x => x * skinnedMeshRenderer.rootBone.localToWorldMatrix).ToArray();
        skinnedMeshRenderer.sharedMesh.vertices = vertices.ToArray();
        skinnedMeshRenderer.sharedMesh.normals = normals.ToArray();
    }
}
使用JobSystem可以将动画计算分配给多个线程并行处理,提高游戏的性能。
- AI
在游戏中,AI是一个非常耗费性能的操作。使用JobSystem可以将AI计算分配给多个线程并行处理,从而提高游戏的性能。例如,我们可以使用JobSystem来计算敌人的行动。
public struct EnemyJob : IJobParallelFor
{
    public NativeArray<Enemy> enemies;
    public NativeArray<Vector3> playerPositions;

    public void Execute(int index)
    {
        Enemy enemy = enemies[index];
        Vector3 playerPosition = playerPositions[enemy.targetIndex];
        Vector3 direction = playerPosition - enemy.position;
        direction = direction.normalized;
        enemy.position += direction * enemy.speed * Time.deltaTime;
        enemies[index] = enemy;
    }
}

public class AISystem : MonoBehaviour
{
    public NativeArray<Enemy> enemies;
    public NativeArray<Vector3> playerPositions;

    private EnemyJob enemyJob;
    private JobHandle enemyJobHandle;

    private void Update()
    {
        enemyJob = new EnemyJob()
        {
            enemies = enemies,
            playerPositions = playerPositions
        };
        enemyJobHandle = enemyJob.Schedule(enemies.Length, 64);
    }

    private void LateUpdate()
    {
        enemyJobHandle.Complete();
    }
}
使用JobSystem可以将AI计算分配给多个线程并行处理,提高游戏的性能。
///
什么是多线程
单线程:一次执行一条指令,产生一个结果
多线程:利用CPU的多核,多条指令同时执行,其他线程执行完成后会将结果同步给主线程。
多线程好的实践:几个运行时间很长的任务。
游戏代码的特点:大量小而短的任务。
解决方案:线程池。
context switching:线程上下文切换,性能敏感的,要尽量避免。
当激活的线程数超过CPU cores时,就会导致CPU资源争夺,从而触发频繁的context switching。
过程:先saving执行了一部分的当前线程,然后执行另外的线程,切回来的时候再reconstructing之前的线程再继续执行。
什么是Job System
简化多线程:job system通过创建jobs来实现多线程,而不是直接创建thread。
job概念:完成特定任务的一个小的工作单元。job接收参数并操作数据,类似于函数调用。job之间可以有依赖关系,也就是一个job可以等另一个job完成之后再执行。
job system管理一组worker threads,并且保证一个logical CPU core一个worker thread,避免context switching。
job system将jobs放在一个job queue里面,worker threads从job queue里面获取job然后执行。
job依赖性:job system管理job依赖关系,并保证执行时序的正确性。
C# Job System的Safety System
Race conditions:竞争条件,一个输出结果依赖于不受控制的事件出现的顺序或时机。
在写多线程代码时,race conditions是一个很大的挑战。race conditions不是bug,但它会导致不确定性行为。并且一旦出现,就很难定位,也很难调试,因为它依赖时机,打断点和加log本身都会改变各个独立线程执行的时机。
Safety system:为了写出更安全的多线程代码,C# Job System会检查所有的潜在的race conditions并保护代码不受可能会产生的bug的影响(这句话有点模糊......)。
解决办法:数据拷贝,每个job操作来自主线程数据的副本,而不是操作原数据。这样数据独立,就不会产生race conditions了。
blittable data types:job只能访问blittable的数据,这些数据在托管代码和native代码之间拷贝的时候,不需要做额外的类型转换。
拷贝方式:memcpy
NativeContainer
NativeContainer实际上是native memory的一个wrapper,包含一个指向非托管内存的指针。
不需要拷贝:使用NativeContainer可以让一个job和main thread共享数据,而不用拷贝。(copy虽然能保证Safety System,但每个job的计算结果也是分开的)。
可使用的C#类型定义:
| 数据结构 | 说明 | 来源 |
| NativeArray | 数组 | Unity |
| NativeSlice | 可以访问一个NativeArray的某一部分 | Unity |
| NativeList | 一个可变长的NativeArray | ECS |
| NativeHashMap | key value pairs | ECS |
| NativeMultiHashMap | 一个key对应多个values | ECS |
| NativeQueue | FIFO的queue | ECS |
Safety System安全策略:
Safety System内置于所有的NativeContainer,会自动跟踪NativeContainer的读写状态。
注意:所有的safety checkes都只在Editor和PlayMode模式下生效:bounds checks、deallocation checks、race condition checks。
还有一部分安全策略:
DisposeSentinel:自动检测memory leak并报错。依赖宏定义ENABLE_UNITY_COLLECTIONS_CHECKS。
AtomicSafetyHandle:用来转移NativeContainer的控制权。比如当2个jobs同时写一个NativeContainer,Safety System就会抛出一个error,并描述如何解决。异常会在产生冲突的job调度时抛出。依赖宏定义ENABLE_UNITY_COLLECTIONS_CHECKS。
这种情况下,可以使用job依赖,让其中一个job依赖另外一个job的完成。
规则:Safety System允许多个job同时read同一块数据。
规则:Safety System不允许一个job正在writing数据时,调度激活另一个“拥有write权限”的job(不是不让同时write)。
规则:手动指定job对数据的只读:(默认是可读写,会影响性能)
    [ReadOnly]
    public NativeArray<int> input;
注意:job对static data的访问没有Safety System安全保护,所以使用不当可能造成crash。
NativeContainer Allocator分配器:
(1)Allocator.Temp
最快,维持1 frame,job不能用,需要手动Dispose(),比如可以在native层的callback调用时使用。
(2)Allocator.TempJbo
稍微慢一点,最多维持4 frames,thread-safe,如果4 frames内没有Dispose(),会有warning。大多数small jobs都会使用这个类型的分配器.
(3)Allocator.Persistent
最慢,但是可持久存在,就是malloc的wrapper。Longer jobs使用这个类型,但在性能敏感的地方不应该使用。
NativeArray<float> result = new NativeArray<float>(1, Allocator.TempJob);
创建Job
三要素:
(1)创建一个struct实现接口IJob;
(2)添加数据成员:要么是blittable类型, 要么是NativeContainer;
(3)添加Execute()方法实现。
执行job时,job.Execute()方法会在一个cpu core上执行一次。
注意:job操作数据是基于拷贝的,除非是NativeContainer类型。那么,一个job访问main thread数据的唯一方式就是使用NativeContainer。
![]()
public struct TestJob : IJob
{
    public float a;
    public float b;
    public NativeArray<float> result;
    public void Execute()
    {
        result[0] = a + b;
    }
}
![]()
调度Job
三要素:
(1)实例化job;
(2)设置数据;
(3)调用job.Schedule()方法。
调用Schedule方法会将job放到job queue里面等待执行。一旦开始schedule,就没法中断job了。(疑问:这个once scheduled,是job.Schedule方法,还是从job queue里面拿出来开始执行?)
![]()
private void TestScheduleJob()
{
    // Create a native array of a single float to store the result. This example waits  for the job to complete for illustration purposes
    NativeArray<float> result = new NativeArray<float>(1, Allocator.TempJob);

    // Set up the job data
    MyJob jobData = new MyJob();
    jobData.a = 10;
    jobData.b = 10;
    jobData.result = result;

    // Schedule the job
    JobHandle handle = jobData.Schedule();

    // Wait for the job to complete
    handle.Complete();

    // All copies of the NativeArray point to the same memory, you can access the  result in "your" copy of the NativeArray
    float aPlusB = result[0];

    // Free the memory allocated by the result array
    result.Dispose();
}
![]()
JobHandle和Job依赖
设置job依赖关系:
JobHandle firstJobHandle = firstJob.Schedule();
secondJob.Schedule(firstJobHandle);
secondJob依赖firstJob的结果。
组合依赖项:
NativeArray<JobHandle> handles = new NativeArray<JobHandle>(numJobs, Allocator.TempJob);
// Populate `handles` with `JobHandles` from multiple scheduled jobs...
JobHandle jh = JobHandle.CombineDependencies(handles);
在main thread中等待jobs执行完成:
flush job:使用JobHandle.Complete()来等待job执行完成。
job只有Schedule之后才会执行,如果你想在main thread中访问job的正在使用的数据,你可以调用JohHandle.Comlete()。该方法flush job,并开始执行,然后将NativeContainer的数据权限返回给main thread。
如果你不需要访问数据,也可以调用统一static flush函数:JobHandle.ScheduleBatchedJobs(),当然该方法会影响到性能。
![]()
public struct MyJob : IJob
{
    public float a;
    public float b;
    public NativeArray<float> result;
    public void Execute()
    {
        result[0] = a + b;
    }
}
public struct AddOneJob : IJob
{
    public NativeArray<float> result;

    public void Execute()
    {
        result[0] = result[0] + 1;
    }
}


private void TestScheduleJob()
{
    NativeArray<float> result = new NativeArray<float>(1, Allocator.TempJob);
    MyJob jobData = new MyJob();
    jobData.a = 10;
    jobData.b = 10;
    jobData.result = result;
    JobHandle firstHandle = jobData.Schedule();
    AddOneJob incJobData = new AddOneJob();
    incJobData.result = result;
    JobHandle secondHandle = incJobData.Schedule(firstHandle);
    secondHandle.Complete();
    float aPlusB = result[0];
    result.Dispose();
}
![]()
ParallelFor jobs 并行job
IJob只能一次一个job执行一个任务,但游戏开发中经常需要重复执行某个动作很多次,这时候就可以用到并行任务IJobParallelFor。
ParallelFor jobs使用NativeArray作为数据源,并且运行在多个core上,还是一个job一个core,只是每个job只负责处理完整数据的一个子集。
Execute(idx)方法对于数据源NativeArray中的每个item都调用一次。
调度:
需要手动指定执行次数,表示需要分多少次独立Execute来执行,一般直接取NativeArray的数组长度作为执行次数,一次处理一个数据。

当一个native job提前完成它的batches,它会从其他的native job偷取一部分batches,然后继续执行。
颗粒度问题:分得太细会有work不断重建的开销,分得太粗又会有单核负载问题。
尝试法:所以最佳实践是从1开始逐步增加,直到性能不再提高。
![]()
public struct MyParallelJob : IJobParallelFor
{
    public NativeArray<float> a;
    public NativeArray<float> b;
    public NativeArray<float> result;
    public void Execute(int index)
    {
        result[index] = a[index] + b[index];
    }
}

private void TestScheduleParallelJob()
{
    NativeArray<float> a = new NativeArray<float>(10, Allocator.TempJob);
    NativeArray<float> b = new NativeArray<float>(10, Allocator.TempJob);
    NativeArray<float> result = new NativeArray<float>(10, Allocator.TempJob);
    for(int i = 0; i < 10; ++i)
    {
        a[i] = i * 0.3f;
        b[i] = i * 0.5f;
    }
    MyParallelJob jobData = new MyParallelJob();
    jobData.a = a;
    jobData.b = b;
    jobData.result = result;
    JobHandle handle = jobData.Schedule(10, 1);
    handle.Complete();
    for(int i = 0; i < 10; ++i)
    {
        Debug.LogError(result[i]);
    }
    a.Dispose();
    b.Dispose();
    result.Dispose();
}
![]()
ParallelForTransform jobs
![]()
public struct MyTransformParallelJob : IJobParallelForTransform
{
    public void Execute(int index, TransformAccess transform)
    {
    }
}
![]()
注意事项:
(1)不能在job中访问static数据
在job中访问static数据是没有Safety System保证的,可能会导致crash。unity后续版本会增加static analysis来阻止这种用法。
(2)Flush scheduled batchs
JobHandle.ScheduleBatchedJobs:当你想要你的job开始执行是,可以调用这个函数flush调度的batch。
不flush batch会导致调度延迟到主线程等待batch执行结果时才触发执行。
JobHandle.Complete:直接开始执行。
在ECS中,batch flush是隐式执行的,不需要手动调用JobHandle.ScheduleBatchJobs。
(3)不要试图更新NativeContainer的内容
因为缺乏ref returns机制,所以不要这样用:
![]()
    nativeArray[0]++;
    // 等同于:
    var tmp = nativeArray[0];
    tmp++;
    // 不生效!

    // 正确的写法是:
    var tmp = nativeArray[0];
    tmp++;
    nativeArray[0] = tmp;

    MyStruct temp = myNativeArray[i];
    temp.memberVariable = 0;
    myNativeArray[i] = temp;
![]()
(4)调用JobHandle.Complete来让main thread重获控制权
主线程在访问数据之前,需要依赖的job调用complete。不能只是check JobHandle.IsCompleted,而是需要手动调用JobHandle.Complete()。
此调用还会清理Safety System的状态,不调用的话会有内存泄漏。
(5)在主线程中使用Schedule和Complete
这两个函数只能在主线程中调用。不能因为一个job依赖另一个job,就在前一个job中手动schedule另一个job。
(6)在正确的时间使用Schedule和Complete
Schedule:在数据填充完毕,立马调用
Complete:只在你需要result的时候调用
(7)NativeContainer添加read-only标记
默认是可读写的,如果确定只读就标记为read-only,可以提升性能。
(8)检查数据依赖
如果在profiler里看到main thread有“WaitForJobGroup”,就表示在等待worker thread处理完成。也就是说你的代码里面在什么地方引入了一个data dependency,这时候可以通过检查JobHandle.Complete来看一下是什么依赖关系导致了main thread需要等待的情况。
(9)调试jobs
Jobs有一个Run函数,你可以用它来替换原本调用Schedule的地方,从而在main thread上立即执行这个job。可以使用这个方法来调试。
(10)不要在job里面分配托管内存managed memory
在job里面分配托管内存是非常慢的,而且会导致Burst compiler没法使用。
Burst是基于LLVM的后端编译技术,它可以利用平台特定能力将c# jobs代码编译成高度优化过的机器码。
Unity GDC 2018: C# Job System
https://www.youtube.com/playlist?list=PLX2vGYjWbI0RuXtGMYKqChoZC2b-H4tck
Unity at GDC - Job System & Entity Component System
https://www.youtube.com/watch?v=kwnb9Clh2Is&t=1s
作者:烟雨迷离半世殇
链接:https://www.zhihu.com/question/443162990/answer/1718586611
来源:知乎
著作权归作者所有。商业转载请联系作者获得授权,非商业转载请注明出处。
其次jobsystem可以用burst compiler优化,使用unity特定的数学库中的数据类型可以获取simd优化,比如vector3就可以换成float3
下面给出我的测试代码和结果
using Unity.Burst;
using Unity.Collections;
using Unity.Jobs;
using Unity.Mathematics;
using UnityEngine;
using UnityEngine.Profiling;

public class TestJob : MonoBehaviour
{
    public int DataCount;

    private NativeArray<float3> m_JobDatas;

    private NativeArray<float> m_JobResults;

    private Vector3[] m_NormalDatas;

    private float[] m_NormalResults;


// Job adding two floating point values together
    [BurstCompile]
    public struct MyParallelJob : IJobParallelFor
    {
        [ReadOnly] public NativeArray<float3> data;
        public NativeArray<float> result;

        public void Execute(int i)
        {
            Vector3 item = data[i];
            result[i] = Mathf.Sqrt(item.x * item.x + item.y * item.y + item.z * item.z);
        }
    }

    private void Awake()
    {
        m_JobDatas = new NativeArray<float3>(DataCount, Allocator.Persistent);
        m_JobResults = new NativeArray<float>(DataCount,Allocator.Persistent);

        m_NormalDatas = new Vector3[DataCount];
        m_NormalResults = new float[DataCount];

        for (int i = 0; i < DataCount; i++)
        {
            m_JobDatas[i] = new float3(1, 1, 1);
            m_NormalDatas[i] = new Vector3(1, 1, 1);
        }
    }


    // Update is called once per frame
    void Update()
    {
        //Job部分
        MyParallelJob jobData = new MyParallelJob();
        jobData.data = m_JobDatas;
        jobData.result = m_JobResults;

// Schedule the job with one Execute per index in the results array and only 1 item per processing batch
        JobHandle handle = jobData.Schedule(DataCount, 64);

// Wait for the job to complete
        handle.Complete();

        Profiler.BeginSample("NormalCalculate");

        //正常数据运算
        for(var i = 0; i < DataCount; i++)
        {
            var item = m_NormalDatas[i];
            m_NormalResults[i] = Mathf.Sqrt(item.x * item.x + item.y * item.y + item.z * item.z);
        }

        Profiler.EndSample();
    }

    public void OnDestroy()
    {
        m_JobDatas.Dispose();
        m_JobResults.Dispose();
        m_NormalDatas = null;
        m_NormalResults = null;
    }
}
之前的测试只在Start方法中计算了一次,但在Update方法中发现,前期(程序开始几帧内)的消耗较大,但之后的消耗变得极小(10^7规模下,由180ms变为7ms),猜测JobSystem开始时做了初始化。
//


 1754
1754


 被折叠的 条评论
为什么被折叠?
被折叠的 条评论
为什么被折叠?
 到【灌水乐园】发言


