


ImageUndistorted
引言
ch5.task4_2.3.
1.ImageUndistorted
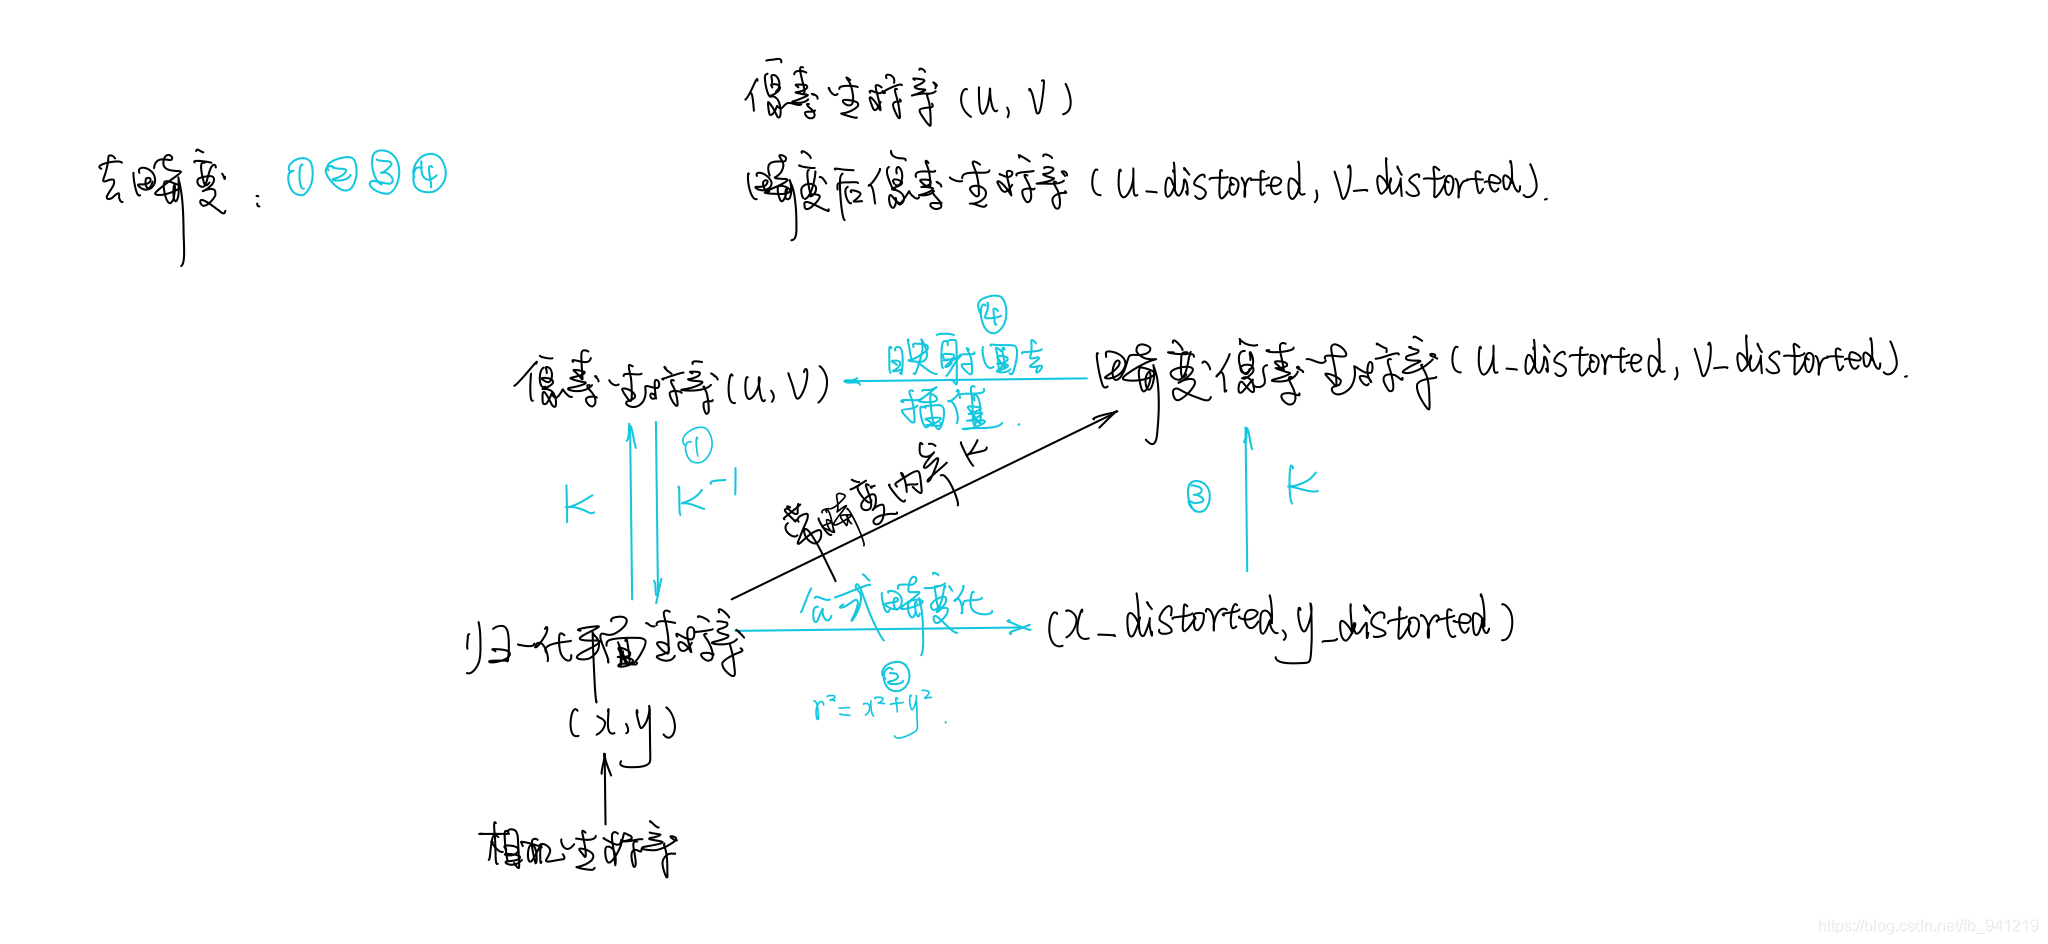
- 流程:
- code:
#include <opencv2/opencv.hpp>
#include <string>

using namespace std;

string image_file = "./../test.png";
int main(int argc, char **argv) {

    // 畸变参数
    double k1 = -0.28340811, k2 = 0.07395907, p1 = 0.00019359, p2 = 1.76187114e-05;
    // 内参
    double fx = 458.654, fy = 457.296, cx = 367.215, cy = 248.375;
    cv::Mat image = cv::imread(image_file,0);   // 图像是灰度图,CV_8UC1
    int rows = image.rows, cols = image.cols;
    cv::Mat image_undistort = cv::Mat(rows, cols, CV_8UC1);   // 去畸变以后的图

    // 计算去畸变后图像的内容:
    //去畸变后 : u,v ;
    //去畸变前 : u_distorted, v_distorted

    for (int v = 0; v < rows; v++)
        for (int u = 0; u < cols; u++) {

            double u_distorted = 0, v_distorted = 0;//去畸变前像素坐标
            // TODO 按照公式,计算点(u,v)对应到畸变图像中的坐标(u_distorted, v_distorted) (~6 lines)

            // 1. back project to normilized image coordinate (归一化坐标z=1)
            double x = (u - cx) / fx;//去畸变后的像素坐标转换到归一化坐标系
            double y = (v - cy) / fy;

            // 2. apply distortion formula, in meter scale
            double r2 = x*x + y*y;	//r表示点P离坐标系原点的距离
            double x_distorted = 0, y_distorted = 0;

			//归一化坐标系
            x_distorted = x*(1 + k1*r2 + k2*r2*r2) + 2*p1*x*y + p2*(r2 + 2*x*x);
            y_distorted = y*(1 + k1*r2 + k2*r2*r2) + p1*(r2 + 2*y*y) + 2*p2*x*y;

			//畸变后的像素坐标系
            // 3. project it back to pixel coordinates 投影回像素坐标
            u_distorted = fx*x_distorted + cx;
            v_distorted = fy*y_distorted + cy;

            // 赋值 (最近邻插值)
            if (u_distorted >= 0 && v_distorted >= 0 && u_distorted < cols && v_distorted < rows) {
                image_undistort.at<uchar>(v, u) = image.at<uchar>((int) v_distorted, (int) u_distorted);//逆向赋值
            } else {
                image_undistort.at<uchar>(v, u) = 0;//一些边缘的处理
            }
        }

    // 画图去畸变后图像
    cv::imshow("image undistorted", image_undistort);
    cv::waitKey();

    return 0;
}
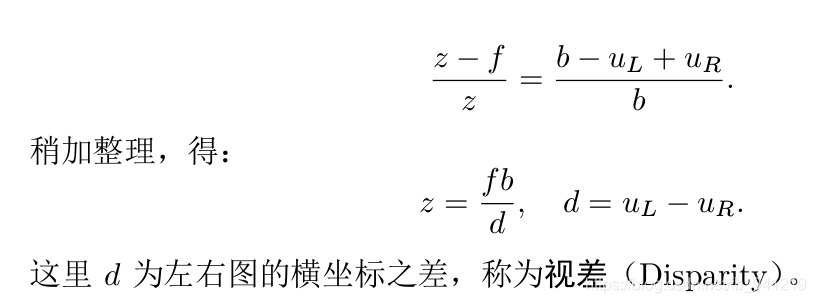
2.Disparity
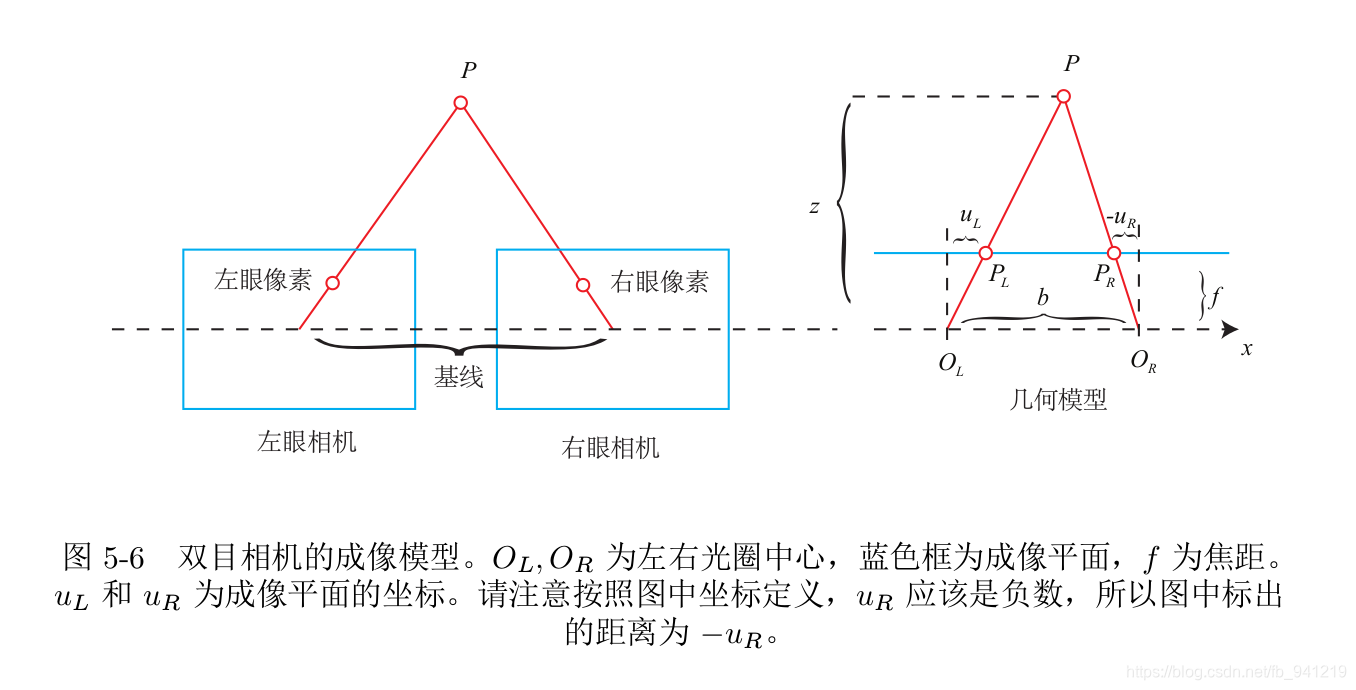
注意此处视差图,和师兄讨论得:
- 若是在像素坐标系则 d = U L − U R ; z = f x b / d d=U_L - U_R; z=f_xb/d d=UL−UR;z=fxb/d,此时 f x , d f_x,d fx,d的单位均为像素,故z的单位是由b决定.
- 若是在图像坐标系则 d = X L − X R ; z = f b / d d=X_L - X_R; z=fb/d d=XL−XR;z=fb/d,此时 f , d f,d f,d的单位均为米,故z的单位同样是由b决定.
若基线b的单位为mm(一般情况下都是毫米):
- 读取视差图值的时候注意d的单位,一般是在像素坐标系下。则d的单位为像素以
unsigned char pixel_disparity = disparity.ptr<unsigned char> (v)[u];方式读取. - 若d的单位不是像素,则需要与
f
f
f的单位统一(
f
f
f的单位一般为米),若d的单位读进来为mm,则需要尺度因子1000做转换(除以1000化为米).
unsigned int d = depth.ptr ( v )[u];
depthScale = 1000;
point[2] = double(d)/depthScale;
code:
#include <opencv2/opencv.hpp>
#include <string>
#include <Eigen/Core>
#include <pangolin/pangolin.h>
#include <unistd.h>

using namespace std;
using namespace Eigen;


string left_file = "./../left.png";
string right_file = "./../right.png";
string disparity_file = "./../disparity.png";

// 在panglin中画图
void showPointCloud(const vector<Vector4d, Eigen::aligned_allocator<Vector4d>> &pointcloud);

int main(int argc, char **argv) {

    // 内参
    double fx = 718.856, fy = 718.856, cx = 607.1928, cy = 185.2157;
    // 间距 baseline = 0.573 m
    double d = 0.573;
	//double depthScale = 1000.0;
    // 读取图像
    cv::Mat left = cv::imread(left_file, 0);
    cv::Mat right = cv::imread(right_file, 0);
    cv::Mat disparity = cv::imread(disparity_file, 0); // disparty 为CV_8U,单位为像素,这一句是关键,单位为像素,则说明在是在像素坐标系下

    // 生成点云
    vector<Vector4d, Eigen::aligned_allocator<Vector4d>> pointcloud;

    // TODO 根据双目模型计算点云
    // 如果你的机器慢,请把后面的v++和u++改成v+=2, u+=2
    for (int v = 0; v < left.rows; v++)
        for (int u = 0; u < left.cols; u++) {

            Vector4d point(0, 0, 0, left.at<uchar>(v, u) / 255.0); // 前三维为xyz,第四维为颜色

            // start your code here (~6 lines)
            // disparity map is 8-bit value

            // unsigned short: 16bit
            // unsigned char: 8bit
			//unsigned int disp = disparity.ptr<unsigned short>(v)[u];  特别注意这一句,肖使用的这一句,然后加入了尺度因子1000,也能得到深度点云,但是有误,
			//记得自己之前做的时候也是加入了尺度因子的,这里需要小心,使用uchar型读取数据!!!
            unsigned char pixel_disparity = disparity.ptr<unsigned char> (v)[u]; // 深度值,一种访问像素的方式(视差图!!)
            //Eigen::Vector3d point; 	毫米下计算
            //point[2] = fx * d / double(pixel_disparity);
            point[2] = (fx * d )/ pixel_disparity;
            point[0] = (u-cx)*point[2]/fx;
            point[1] = (v-cy)*point[2]/fy;
            pointcloud.push_back(point);
            //Vector3d pointWorld = T*point;
            //z = fx*d/ disparity.at<v,u>;
            // 根据双目模型计算 point 的位置
            // end your code here
        }
    // 画出点云
    showPointCloud(pointcloud);
    return 0;
}

void showPointCloud(const vector<Vector4d, Eigen::aligned_allocator<Vector4d>> &pointcloud) {

    if (pointcloud.empty()) {
        cerr << "Point cloud is empty!" << endl;
        return;
    }

    pangolin::CreateWindowAndBind("Point Cloud Viewer", 1024, 768);
    glEnable(GL_DEPTH_TEST);
    glEnable(GL_BLEND);
    glBlendFunc(GL_SRC_ALPHA, GL_ONE_MINUS_SRC_ALPHA);

    pangolin::OpenGlRenderState s_cam(
            pangolin::ProjectionMatrix(1024, 768, 500, 500, 512, 389, 0.1, 1000),
            pangolin::ModelViewLookAt(0, -0.1, -1.8, 0, 0, 0, 0.0, -1.0, 0.0)
    );

    pangolin::View &d_cam = pangolin::CreateDisplay()
            .SetBounds(0.0, 1.0, pangolin::Attach::Pix(175), 1.0, -1024.0f / 768.0f)
            .SetHandler(new pangolin::Handler3D(s_cam));

    while (pangolin::ShouldQuit() == false) {
        glClear(GL_COLOR_BUFFER_BIT | GL_DEPTH_BUFFER_BIT);

        d_cam.Activate(s_cam);
        glClearColor(1.0f, 1.0f, 1.0f, 1.0f);

        glPointSize(2);
        glBegin(GL_POINTS);
        for (auto &p: pointcloud) {
            glColor3f(p[3], p[3], p[3]);
            glVertex3d(p[0], p[1], p[2]);
        }
        glEnd();
        pangolin::FinishFrame();
        usleep(5000);   // sleep 5 ms
    }
    return;
}
EwenwanVersion: 没有使用已知的视差图,直接采用的左右图像使用OpenCV库里面的匹配算法进行匹配然后得到视差图,再计算RGBD图像。
#include <opencv2/opencv.hpp>
#include <string>
#include <Eigen/Core>
#include <pangolin/pangolin.h>
#include <unistd.h>

using namespace std;
using namespace Eigen;
using namespace cv;

/**************立体匹配算法**************
@@BM:Block Matching ,采用SAD方法计算匹配代价;

@@SGBM:修改自Heiko Hirschmuller的《Stereo Processing by Semi-global Matching and Mutual Information》;
  与原方法不同点: 没有实现原文中基于互信息的匹配代价计算,而是采用BT算法("Depth Discontinuities by Pixel-to-Pixel Stereo" by S. Birchfield and C. Tomasi); 默认运行单通道DP算法,只用了5个方向,而fullDP使能时则使用8个方向(可能需要占用大量内存); 增加了一些BM算法中的预处理和后处理程序;

@@GC:OpenCV3.0中没有实现,可以在OpenCV以下版本中找到。该方法效果是最好的,但是速度太慢,不能达到实时的匹配效率;

视差效果:BM < SGBM < GC;
处理速度:BM > SGBM > GC ;
************************/


// 在panglin中画图
void showPointCloud(const vector<Vector4d, Eigen::aligned_allocator<Vector4d>> &pointcloud);

int main(int argc, char **argv) {

    // 内参
    double fx = 718.856, fy = 718.856, cx = 607.1928, cy = 185.2157;
    // 间距
    double d = 0.573;
	double a = 0.00375;//像元尺寸,单位像素每米!!!
    // 读取图像
    cv::Mat left = cv::imread("./../left.png", 0);
    cv::Mat right = cv::imread("./../right.png", 0);
	cv::Mat disp;

	/SGBM双目匹配算法///
	int mindisparity = 0;
	int ndisparities = 64;
	int SADWindowSize = 11;

	//SGBM
	cv::Ptr<cv::StereoSGBM> sgbm = cv::StereoSGBM::create(mindisparity, ndisparities, SADWindowSize);
	int P1 = 8 * left.channels() * SADWindowSize* SADWindowSize;
	int P2 = 32 * left.channels() * SADWindowSize* SADWindowSize;
	sgbm->setP1(P1);
	sgbm->setP2(P2);

	sgbm->setPreFilterCap(15);
	sgbm->setUniquenessRatio(10);
	sgbm->setSpeckleRange(2);
	sgbm->setSpeckleWindowSize(100);
	sgbm->setDisp12MaxDiff(1);
	//sgbm->setMode(cv::StereoSGBM::MODE_SGBM_3WAY);
	sgbm->compute(left, right, disp);

	disp.convertTo(disp, CV_32F, 1.0 / 16);                //除以16得到真实视差值
	Mat disp8U = Mat(disp.rows, disp.cols, CV_8UC1);       //显示
	normalize(disp, disp8U, 0, 255, NORM_MINMAX, CV_8UC1);
	imwrite("../SGBM_disp.png", disp8U);


	//读入视差图,注意视差图不是深度图
	cv::Mat disparity = cv::imread("../disparity.png", 0); // disparty 为CV_8U,单位为像素!!!!!
	//cv::Mat disparity = cv::imread("../SGBM_disp.png", 0); // disparty 为CV_8U,单位为像素!!!!!

    // 生成点云
    vector<Vector4d, Eigen::aligned_allocator<Vector4d>> pointcloud;

    // TODO 根据双目模型计算点云
    for (int v = 0; v < left.rows; v++)
        for (int u = 0; u < left.cols; u++) {

            Vector4d point(0, 0, 0, left.at<uchar>(v, u) / 255.0); // 前三维为xyz,第四维为颜色
			double f = a*fx;//统一单位!!
            // start your code here (~6 lines)
	        double depth = ( f * d) / (disparity.at<uchar>(v,u));  //Z
           // double depth = disparity.at<uchar>(v,u);
           // double dis = left.at<uchar>(v, u) - right.at<uchar>(v, u);
           // double f = depth - depth*((d - dis)/d);
	        point[2] = depth;                   // 这里视差直接用的像素点间的像素差,这样对吗???
            point[0] = (u-cx)*point[2]/fx;      //对归一化后的坐标需要乘以Z也就是深度信息!!
            point[1] = (v-cy)*point[2]/fy;

            pointcloud.push_back(point);
            // end your code here
        }

    // 画出点云
    showPointCloud(pointcloud);
    return 0;
}

void showPointCloud(const vector<Vector4d, Eigen::aligned_allocator<Vector4d>> &pointcloud) {

    if (pointcloud.empty()) {
        cerr << "Point cloud is empty!" << endl;
        return;
    }

    pangolin::CreateWindowAndBind("Point Cloud Viewer", 1024, 768);
    glEnable(GL_DEPTH_TEST);
    glEnable(GL_BLEND);
    glBlendFunc(GL_SRC_ALPHA, GL_ONE_MINUS_SRC_ALPHA);

    pangolin::OpenGlRenderState s_cam(
            pangolin::ProjectionMatrix(1024, 768, 500, 500, 512, 389, 0.1, 1000),
            pangolin::ModelViewLookAt(0, -0.1, -1.8, 0, 0, 0, 0.0, -1.0, 0.0)
    );

    pangolin::View &d_cam = pangolin::CreateDisplay()
            .SetBounds(0.0, 1.0, pangolin::Attach::Pix(175), 1.0, -1024.0f / 768.0f)
            .SetHandler(new pangolin::Handler3D(s_cam));

    while (pangolin::ShouldQuit() == false) {
        glClear(GL_COLOR_BUFFER_BIT | GL_DEPTH_BUFFER_BIT);

        d_cam.Activate(s_cam);
        glClearColor(1.0f, 1.0f, 1.0f, 1.0f);

        glPointSize(2);
        glBegin(GL_POINTS);
        for (auto &p: pointcloud) {
            glColor3f(p[3], p[3], p[3]);
            glVertex3d(p[0], p[1], p[2]);
        }
        glEnd();
        pangolin::FinishFrame();
        usleep(5000);   // sleep 5 ms
    }
    return;
}


 811
811

 被折叠的 条评论
为什么被折叠?
被折叠的 条评论
为什么被折叠?
 到【灌水乐园】发言


