


Isaac Sim OmniGraph图编程
版权信息
Copyright 2023 Herman Ye@Auromix. All rights reserved.

This course and all of its associated content, including but not limited to text,
images, videos, and any other materials, are protected by copyright law.
The author holds all rights to this course and its contents.

Any unauthorized use, reproduction, distribution, or modification of this course
or its contents is strictly prohibited and may result in legal action.
This includes, but is not limited to:
Copying or distributing course materials without express written permission.
Reposting, sharing, or distributing course content on any platform without proper attribution and permission.
Creating derivative works based on this course without permission.
Permissions and Inquiries

If you wish to use or reproduce any part of this course for purposes other than personal learning,
please contact the author to request permission.

The course content is provided for educational purposes, and the author makes no warranties or representations
regarding the accuracy, completeness, or suitability of the course content for any specific purpose.
The author shall not be held liable for any damages, losses,
or other consequences resulting from the use or misuse of this course.

Please be aware that this course may contain materials or images obtained from third-party sources.
The author and course creator diligently endeavor to ensure that these materials
are used in full compliance with copyright and fair use regulations.
If you have concerns about any specific content in this regard,
please contact the author for clarification or resolution.

By enrolling in this course, you agree to abide by the terms and conditions outlined in this copyright notice.
学习目标
- 熟悉OmniGraph图编程的概念
- 熟悉OmniGraph图编程的基本操作
- 熟悉OmniGraph图编程的机器人控制
难度级别
| 初级 | 中级 | 高级 |
|---|---|---|
| √ |
预计耗时
30 mins
学习前提
| 对象 | 类型 | 状态 |
|---|---|---|
| Ubuntu22.04操作系统 | 软件 | 已确认 |
| Isaac Sim | 软件 | 已配置 |
| Isaac Sim基本概念 | 知识 | 已了解 |
| Isaac Sim基本使用 | 知识 | 已了解 |
| Isaac Sim高级使用 | 知识 | 已了解 |
OmniGraph 简介
OmniGraph 是 Omniverse 中的一种可视化脚本语言,为世界赋予了生动的行为和互动。
它能够处理多种计算任务,涵盖了各种事件,OmniGraph 将多种不同类型的图系统集成在单一框架下。
如果希望深入了解OmniGraph,可以参考OmniGraph官方文档
创建 ActionGraph
ActionGraph是OmniGraph的一种,用于事件驱动的行为,此处仅涉及ActionGraph,不讨论其他的Graph。
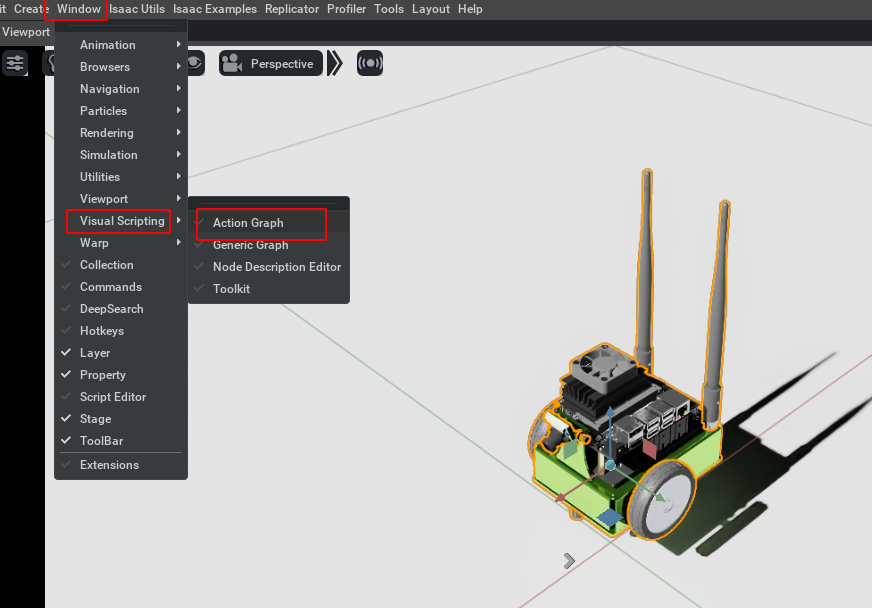
- 从编辑器顶部的下拉菜单中选择
Window -> Visual Scripting -> Action Graph。 - 图形编辑器将显示在与内容浏览器相同的窗格中。
浏览OmniGraph
区分图
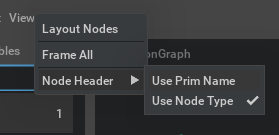
为了避免在包含多个相同组件的Graph中发生混淆的连线错误,我们可以在Stage中为不同的节点命名,并在View中的Node Header里,选择“Use Prim Name”来区分它们。
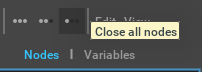
缩放图
通过点击不同的缩略图情况,可以调整图的展现程度,以便更详细地查看图中的各个部分。
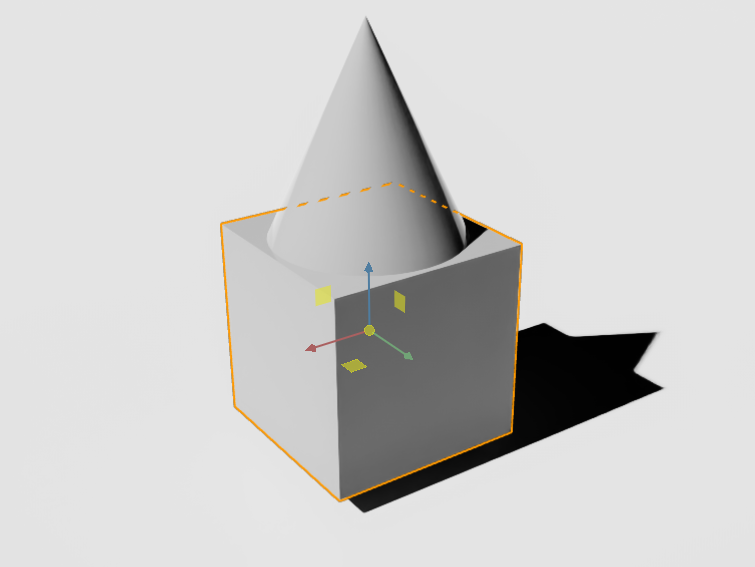
案例1:物体跟随
通过绘制ActionGraph,使得圆锥体在立方体的上方,并能够跟随立方体的移动。
创建物体
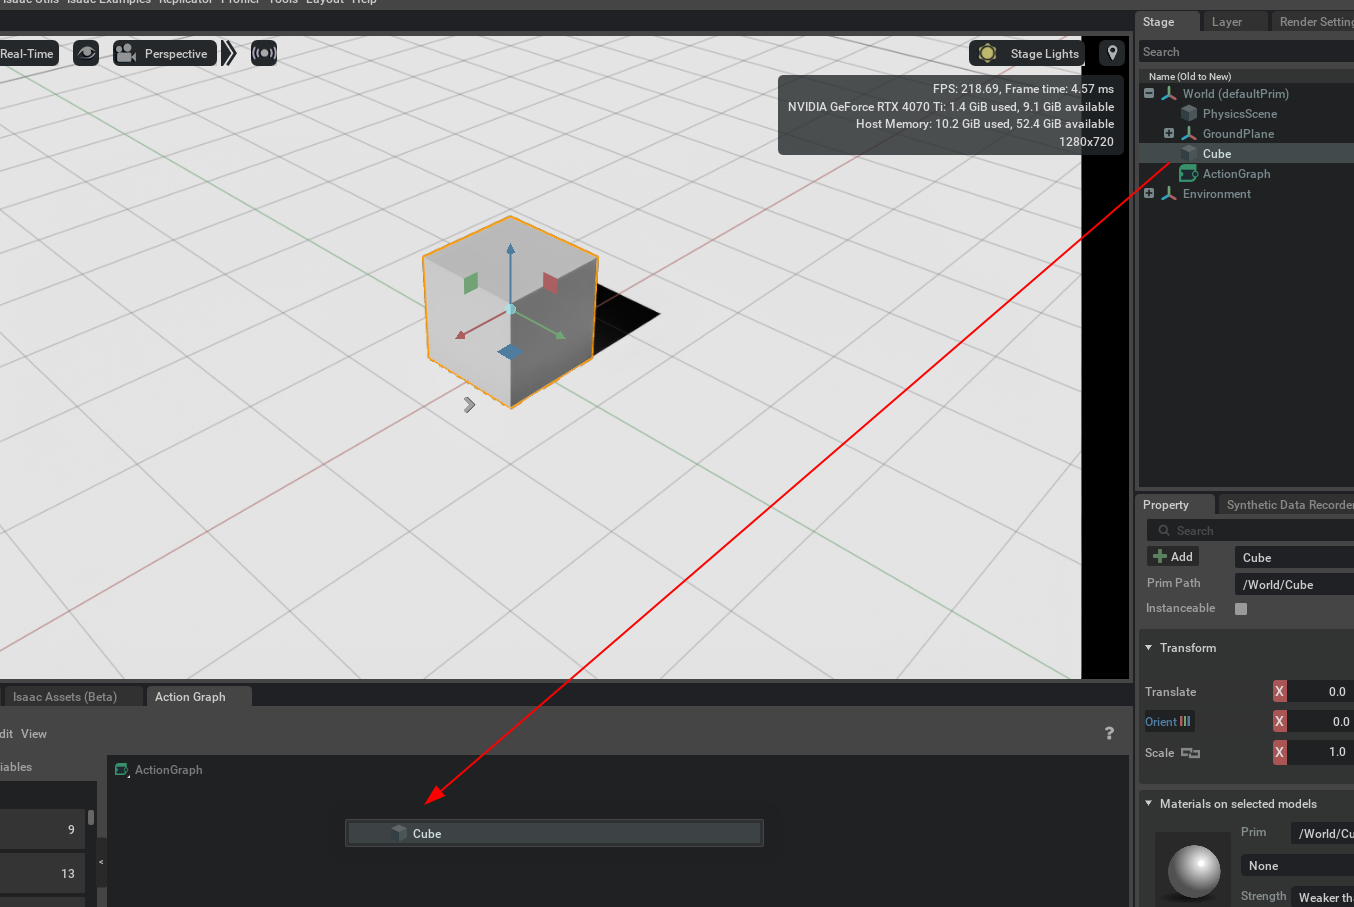
首先,按照之前教程中简单的Prim创建方法,创建一个立方体 Cube 和圆锥体 Cone。
将立方体从“舞台”面板拖放到“动作图表”面板:
读取立方体属性
在弹出的对话框中,选择Read Attribute,这将创建一个读取 Prim 属性节点,该节点可以从您拖入的 prim 中读取信息。

设置属性的名称为xfromOp:translate,这意味着它读取的参数值是立方体的位置值。

写圆锥属性
同理,将圆锥体拖入Action Graph中,设置为Write Attribute并将属性的名称为xfromOp:translate。
添加加和运算
在Action Graph的搜索栏中搜索Add,引入基本的数学运算Add。
添加常量
在Action Graph的搜索栏中搜索Point3d,引入一个类型为Point3d的常量,并在常量的属性中将其值设置为[0,0,1],代表在Z轴方向上的值为1米,x轴和y轴的值为0。

逻辑连线
将Constant Point3d的Value连接到A,将从立方体读出的位置参数值Value连接到Add的B,并将Add的Sum连接到圆锥属性的写节点的Value,此时圆锥将要写入的位置是立方体的位置与Constant Point3d位置的加和。
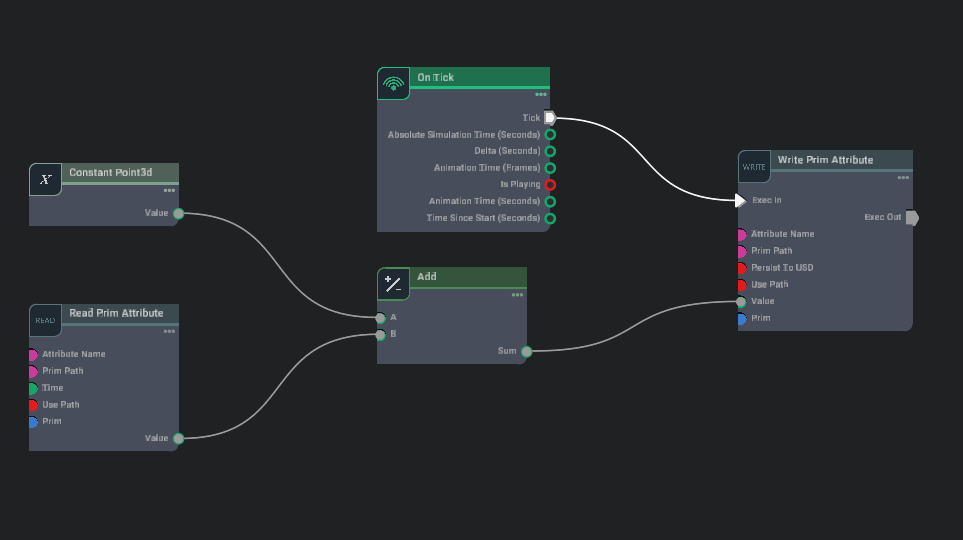
设置定期触发
On Tick: Executes an output execution pulse at a regular multiple of the refresh rate.
On Tick基于屏幕刷新率的,表示在刷新率的某个倍数时执行一次输出。这与硬件刷新和显示有关,详细可参考Omniverse: On Tick。
最后,在Action Graph的搜索栏中搜索On Tick,设置在仿真中定期触发的动作或事件,在每次屏幕刷新时触发一次写圆锥位置的行为。
测试
按下Play,并拖动立方体,查看圆锥跟随立方体的效果。
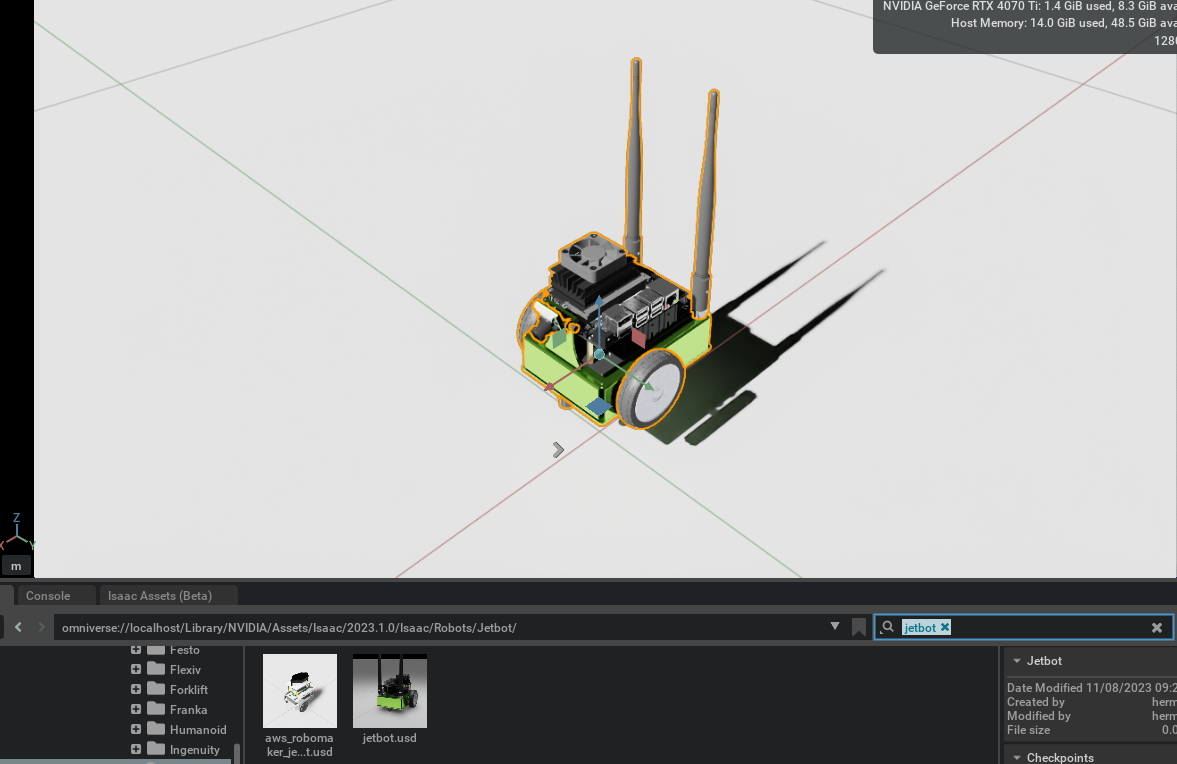
案例2:机器人控制
添加机器人
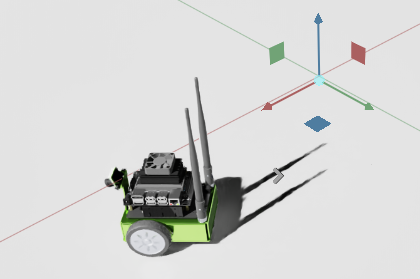
通过在GUI底部的地址栏中打开omniverse://localhost/Library/NVIDIA/Assets/Isaac/2023.1.0/Isaac/Robots/Jetbot/文件夹,导入Jetbot机器人。你只需将其拖动到舞台上即可完成导入。
添加环境
按照之前的教程,配置机器人所需的整体物理环境。
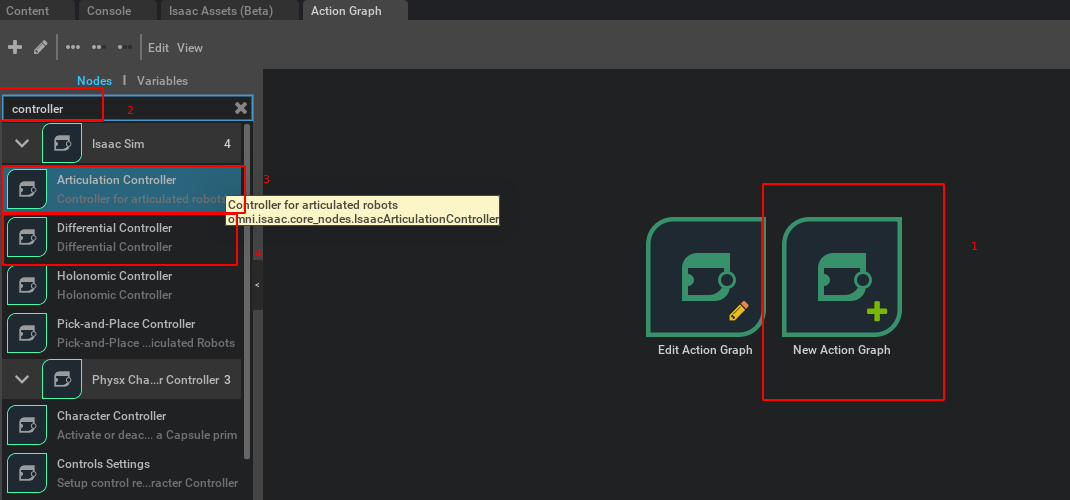
添加Articulation Controller 和 Differential Controller
-
单击“New Action Graph”以打开一个空白图表。
-
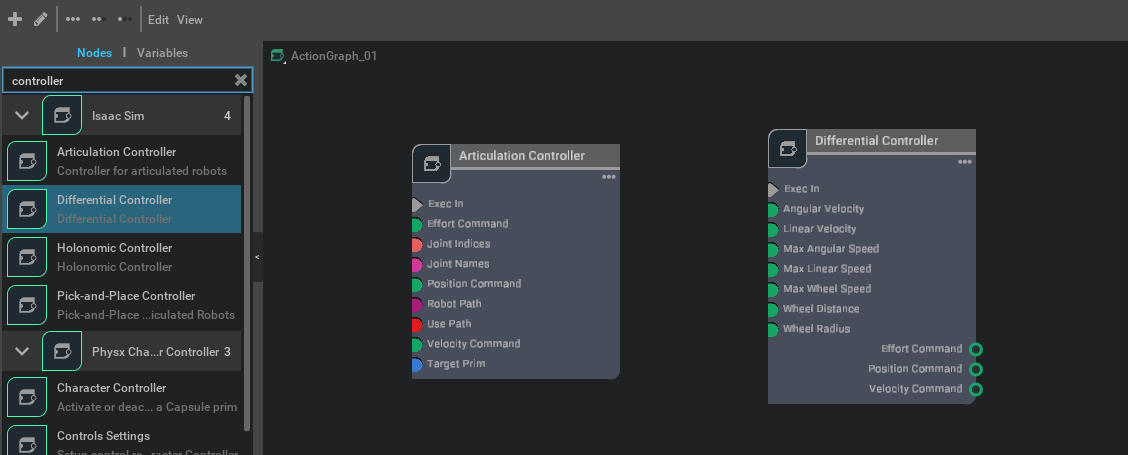
在图形编辑器的搜索栏中输入
controller,找到Articulation Controller和Differential Controller。-
Articulation Controller 用于控制关节树型机器人的关节。这包括连接机器人不同部分的关节,允许以特定的方式移动和旋转。通过将驱动程序命令(以力、位置或速度的形式)应用于具有关节根的机器人的指定关节,实现对机器人关节的精准控制。
-
Differential Controller 负责轮式机器人的差分驱动。在给定目标线速度和角速度的情况下,计算两轮机器人的驱动命令。这种控制方式允许通过独立控制两个驱动轮的速度来实现机器人的转弯和移动。
-
- 将
Articulation Controller和Differential Controller拖动到图形上。
指定需要控制的机器人
要告诉控制器要控制哪个机器人,请首先选择图形中的Articulation Controller节点并打开属性窗格。

有两种方式:
- 方式一: 选中
usePath并在robotPath中输入机器人/World/jetbot的路径。 - 方式二: 不使用路径输入,取消选中
usePath,然后单击Add Targets,在弹出窗口中选择jetbot。

设置需要控制的关节的检查
Articulation Controller还需要知道要连接哪些关节。它期望以标记或索引值列表的形式提供此信息。机器人的每个关节都有一个名称,而jetbot恰好有两个,即left_wheel_joint和right_wheel_joint。通过检查阶段上下文树中的jetbot来验证这一点。在/World/jetbot/chassis内有两个旋转物理关节,名为left_wheel_joint和right_wheel_joint。
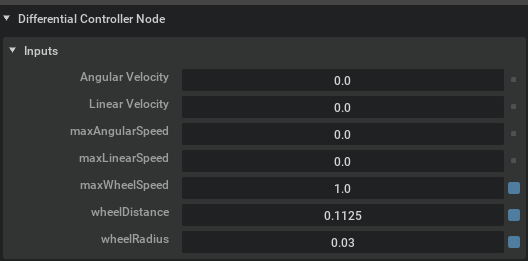
配置Differential Controller
与Articulation Controller一样,Differential Controller也需要配置。选择图表中的Differential Controller节点,然后在属性窗格中,将wheelDistance设置为0.1125,将wheelRadius设置为0.03,将maxAngularSpeed设置为1,这设置了差分驱动所需要的一些基本参数。
添加关节名称的token常量
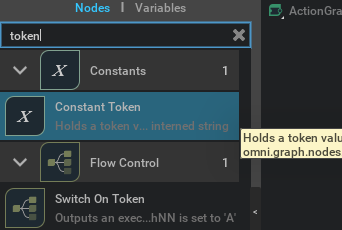
Constant token: Holds a token value, which is a 64-bit value representing an interned string
使用Constant Token节点来保存一个token值,这里指的是prim jetbot/chassis/left_wheel_joint和jetbot/chassis/right_wheel_joint两个字符串,因为Isaac Sim没有Constant String类型,目的是为了将其作为关节名称的标识。
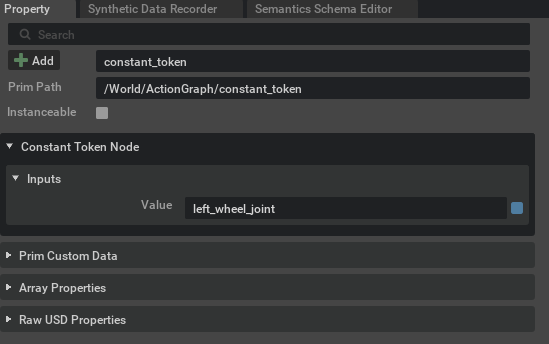
在图形编辑器的搜索栏中输入token并向图形添加两个Constant Token节点。
选择一个,然后在属性窗格中将其值设置为left_wheel_joint。对另一个常量标记节点重复此操作,但将值设置为right_wheel_joint。
将token添加到数组
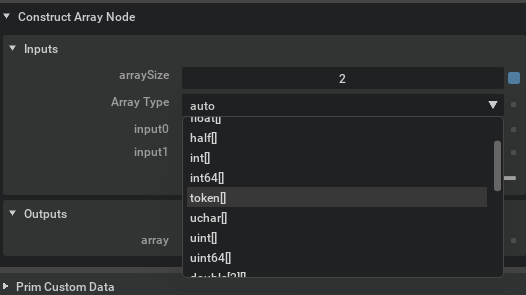
在图形编辑器的搜索栏中输入make array并向图形添加Make Array节点。

选择Make Array节点,然后单击属性窗格菜单的inputs部分中的+图标以添加第二个输入。将arraySize设置为2。

然后从同一窗格的下拉菜单中将输入类型设置为token[]。
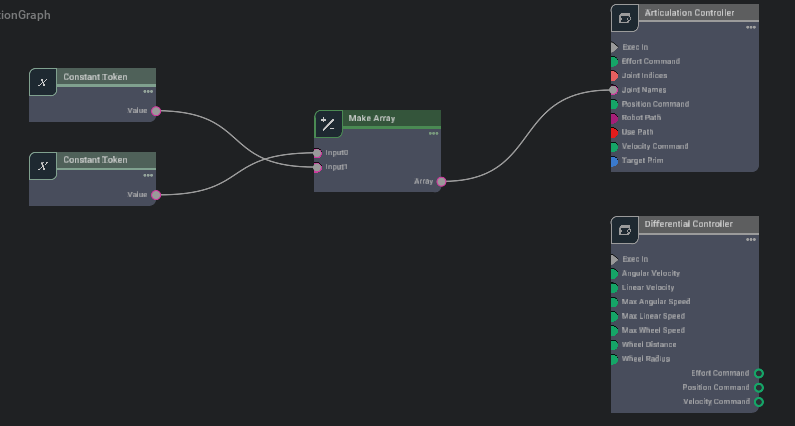
将关节传递给关节树控制器
最后,将Constant Token节点连接到Make Array节点的A和B,然后将该节点的输出连接到Articulation Controller节点的Joint Names输入。
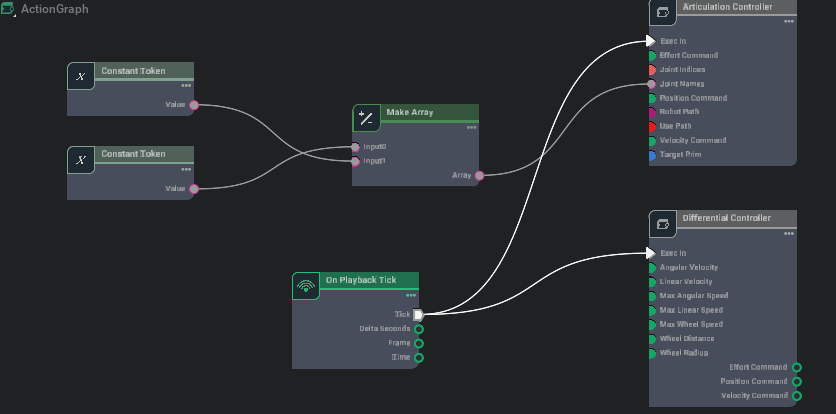
随后添加的节点事件节点。在图形编辑器的搜索栏中搜索playback并将On Playback Tick节点添加到图形中。该节点将为每一帧发出一个执行事件,但仅在仿真播放时发出。
On Playback Tick: Executes an output execution pulse during playback
区别于On Tick,On Playback Tick的触发条件是在Play过程中的每个“tick”(时刻)执行一次输出。它与播放或仿真的时间轴相关。每个“tick”可能代表仿真中的一次步进,详细可参考Omniverse: On Playback Tick。
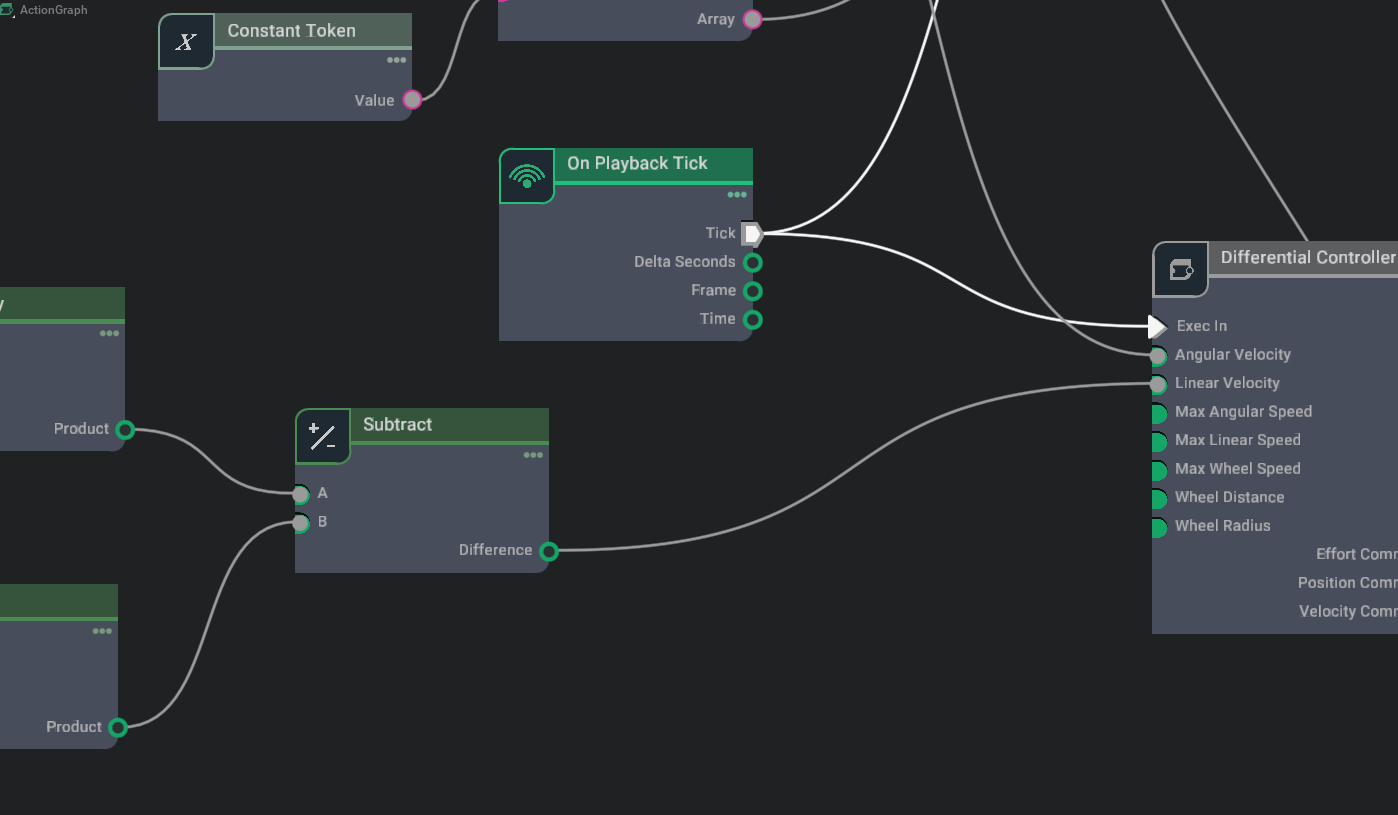
将On Playback Tick节点的Tick输出连接到两个控制器节点的Exec In输入。
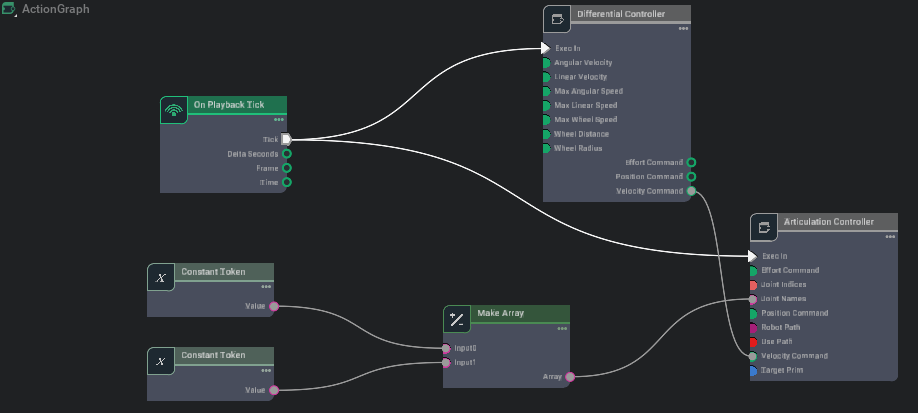
将差分控制器的指定速度传递给关节树控制器
将Differential Controller的Velocity Command输出连接到关节控制器的Velocity Command输入。完成后,图表应如下图:
测试
最终按播放按钮并选择图表中的Differential Controller节点。单击并拖动Differential Controller属性窗格中的角速度或线速度值以更改其值(或者只需单击并输入所需的值),可以发现小车在转动。

案例3: 键盘控制机器人移动练习
绘制一个通过键盘I K J L键位控制Jetbot机器人移动的OmniGraph作为练习
相关值:差分控制器的最大角速度为5 最大线速度为5,Constant Double的Value为5

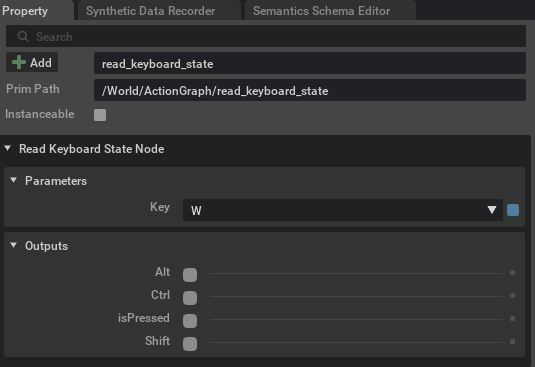
键盘状态读取
在Action Graph的搜索栏中搜索keyboard,选中Read Keyboard State,并设置它读取对应的键位,详细可参考OmniGraph: Read Keyboard State
数值转化
在Action Graph的搜索栏中搜索to double,能够将其他类型的值转化为double类型的值
例如,将键盘按下的bool状态值转化为为double类型的值

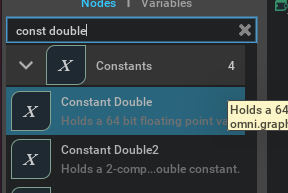
常量设置
在Action Graph的搜索栏中搜索const double,选中Constant Double来作为设置速度大小的常数
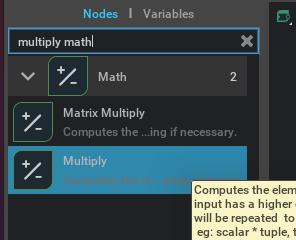
数学运算
在Action Graph的搜索栏中搜索multiply math,选中Multiply来将两同类型的变量相乘
通过将键盘按下的bool值乘以正负方向的速度系数来获得在该方向的速度
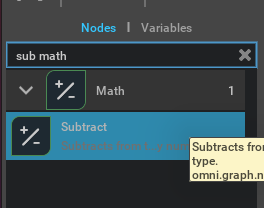
在Action Graph的搜索栏中搜索sub math,选中Subtract来进行减法运算
通过将某一方向的值减去相反方向的值,即可获得在该方向上真实的值
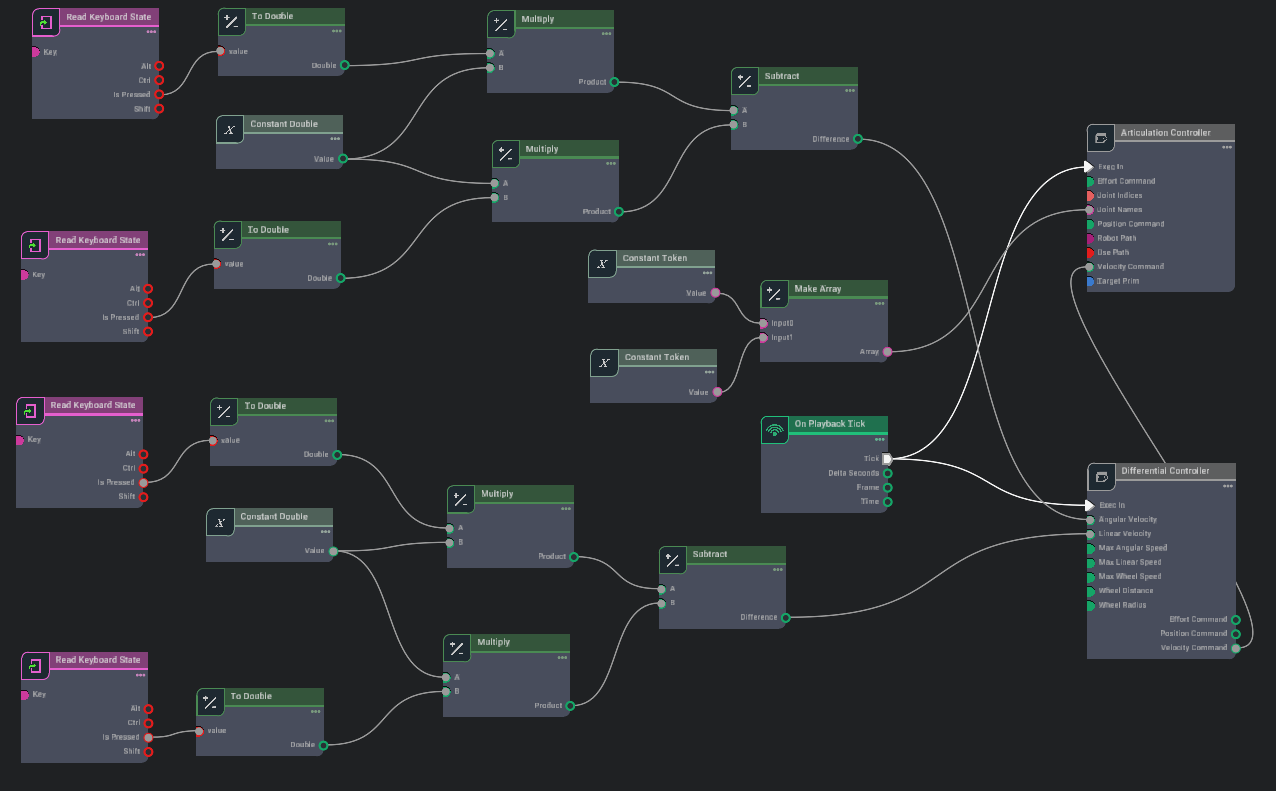
完整图
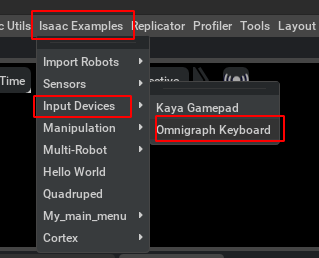
如果希望获得简单键盘控制的启发,可以参考Isaac Examples->Input Devices -> Omnigraph Keyboard:
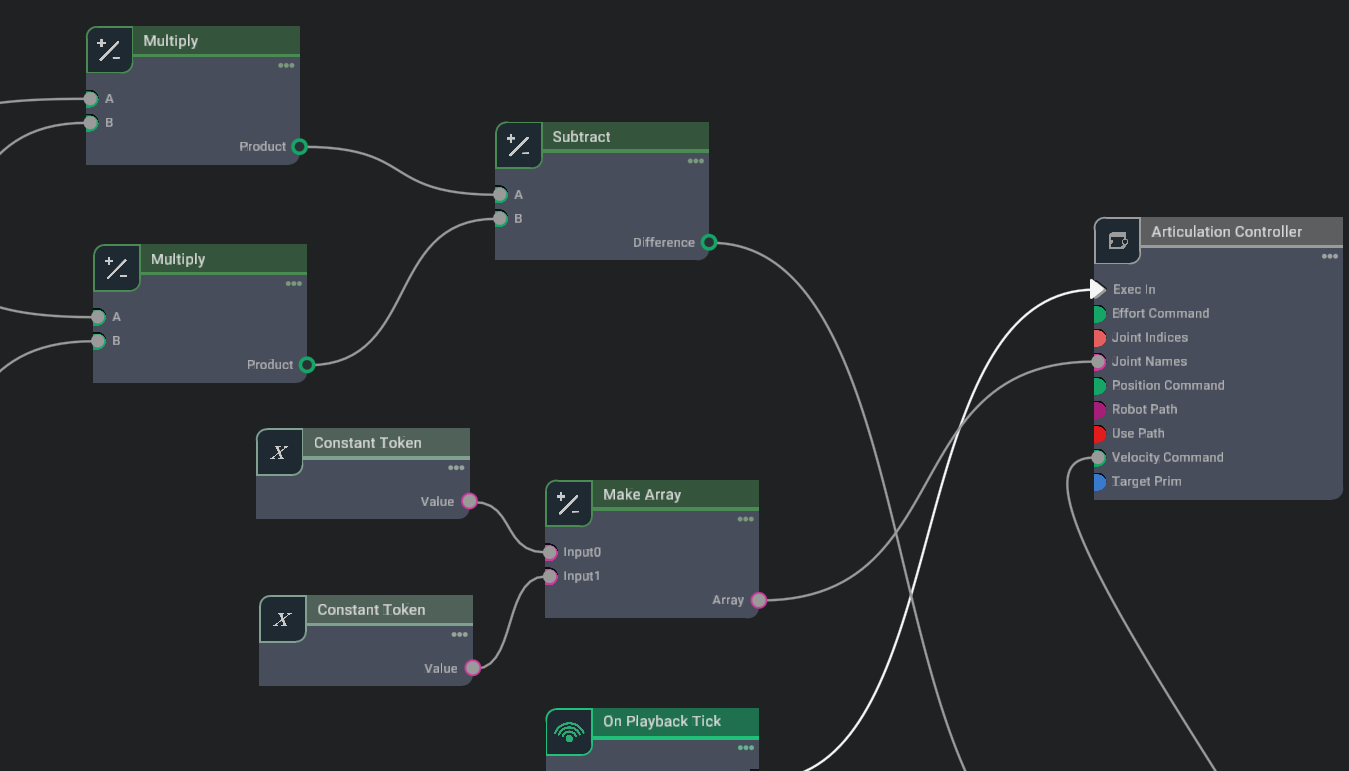
局部图

案例4: 图编程的Python接口
虽然图编程的理念就是不希望使用复杂的代码,但它确实有代码,通过代码中的简单编辑,可以融合图编程和代码编程的一部分特性,以下代码不可运行,仅供参考。
# Copyright (c) 2022-2023, NVIDIA CORPORATION. All rights reserved.
#
# NVIDIA CORPORATION and its licensors retain all intellectual property
# and proprietary rights in and to this software, related documentation
# and any modifications thereto. Any use, reproduction, disclosure or
# distribution of this software and related documentation without an express
# license agreement from NVIDIA CORPORATION is strictly prohibited.
#


import numpy as np
import omni.ext
import omni.graph.core as og
from omni.isaac.core.objects import VisualCuboid
from omni.isaac.core.utils.viewports import set_camera_view
from omni.isaac.examples.base_sample import BaseSample


class OmnigraphKeyboard(BaseSample):
    def __init__(self) -> None:
        super().__init__()
        self._gamepad_gains = (40.0, 40.0, 2.0)
        self._gamepad_deadzone = 0.15

    def setup_scene(self):
        world = self.get_world()
        world.scene.add(
            VisualCuboid(
                prim_path="/Cube",  # The prim path of the cube in the USD stage
                name="cube",  # The unique name used to retrieve the object from the scene later on
                position=np.array([0, 0, 1.0]),  # Using the current stage units which is cms by default.
                size=1.0,  # most arguments accept mainly numpy arrays.
                color=np.array([0, 1.0, 1.0]),  # RGB channels, going from 0-1
            )
        )
        world.scene.add_default_ground_plane()
        set_camera_view(eye=np.array([5, 5, 3]), target=np.array([0, 0, 0]))

        # setup graph
        keys = og.Controller.Keys
        og.Controller.edit(
            {"graph_path": "/controller_graph", "evaluator_name": "execution"},
            {
                keys.CREATE_NODES: [
                    ("OnTick", "omni.graph.action.OnTick"),
                    ("A", "omni.graph.nodes.ReadKeyboardState"),
                    ("D", "omni.graph.nodes.ReadKeyboardState"),
                    ("ToDouble1", "omni.graph.nodes.ToDouble"),
                    ("ToDouble2", "omni.graph.nodes.ToDouble"),
                    ("Negate", "omni.graph.nodes.Multiply"),
                    ("DeltaAdd", "omni.graph.nodes.Add"),
                    ("SizeAdd", "omni.graph.nodes.Add"),
                    ("NegOne", "omni.graph.nodes.ConstantInt"),
                    ("ScaleDown", "omni.graph.nodes.Multiply"),
                    ("ScaleFactor", "omni.graph.nodes.ConstantDouble"),
                    ("CubeWrite", "omni.graph.nodes.WritePrimAttribute"),  # write prim property translate
                    ("CubeRead", "omni.graph.nodes.ReadPrimAttribute"),
                ],
                keys.SET_VALUES: [
                    ("A.inputs:key", "A"),
                    ("D.inputs:key", "D"),
                    ("OnTick.inputs:onlyPlayback", True),  # only tick when simulator is playing
                    ("NegOne.inputs:value", -1),
                    ("ScaleFactor.inputs:value", 0.1),
                    ("CubeWrite.inputs:name", "size"),
                    ("CubeWrite.inputs:primPath", "/Cube"),
                    ("CubeWrite.inputs:usePath", True),
                    ("CubeRead.inputs:name", "size"),
                    ("CubeRead.inputs:primPath", "/Cube"),
                    ("CubeRead.inputs:usePath", True),
                ],
                keys.CONNECT: [
                    ("OnTick.outputs:tick", "CubeWrite.inputs:execIn"),
                    ("A.outputs:isPressed", "ToDouble1.inputs:value"),
                    ("D.outputs:isPressed", "ToDouble2.inputs:value"),
                    ("ToDouble2.outputs:converted", "Negate.inputs:a"),
                    ("NegOne.inputs:value", "Negate.inputs:b"),
                    ("ToDouble1.outputs:converted", "DeltaAdd.inputs:a"),
                    ("Negate.outputs:product", "DeltaAdd.inputs:b"),
                    ("DeltaAdd.outputs:sum", "ScaleDown.inputs:a"),
                    ("CubeRead.outputs:value", "SizeAdd.inputs:b"),
                    ("SizeAdd.outputs:sum", "CubeWrite.inputs:value"),
                    ("ScaleFactor.inputs:value", "ScaleDown.inputs:b"),
                    ("ScaleDown.outputs:product", "SizeAdd.inputs:a"),
                ],
            },
        )

    def world_cleanup(self):
        pass


 269
269


 被折叠的 条评论
为什么被折叠?
被折叠的 条评论
为什么被折叠?
 到【灌水乐园】发言


