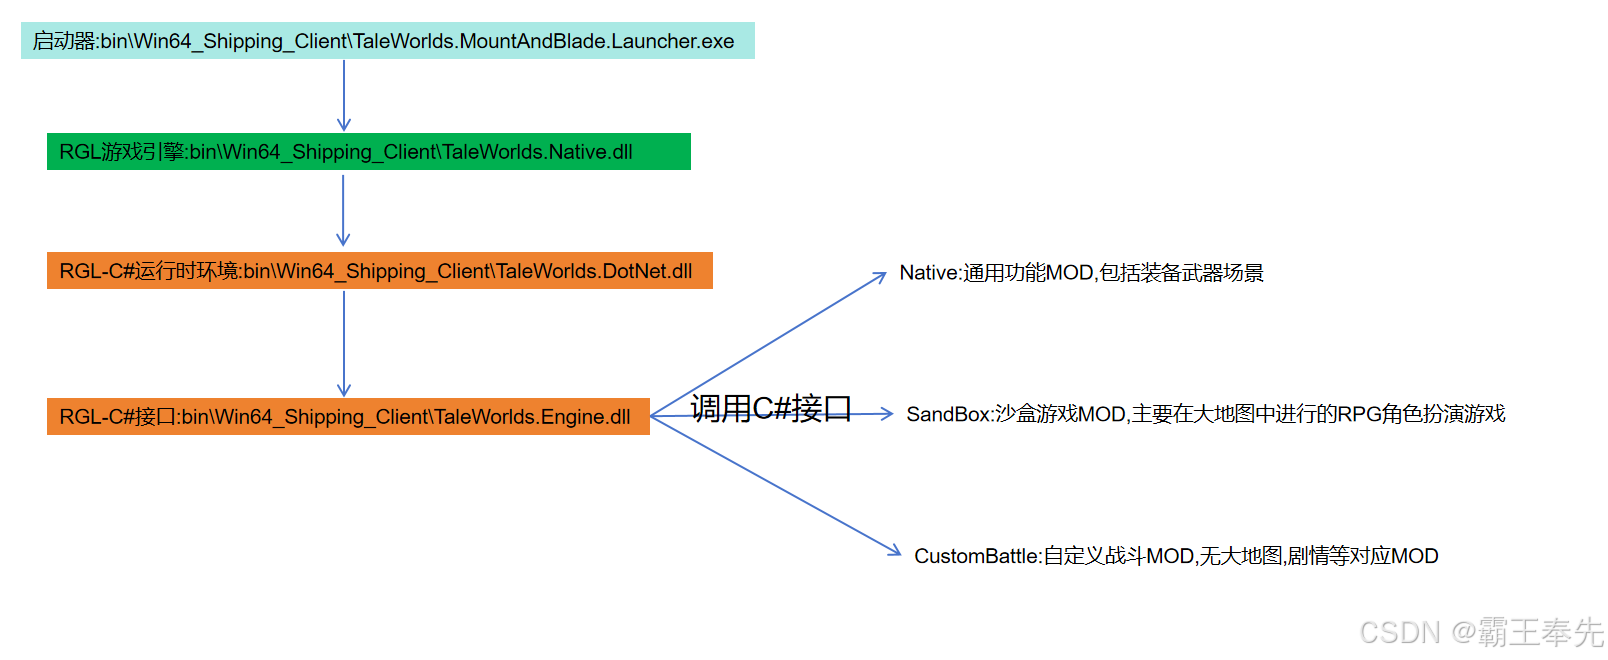
骑砍2霸主MOD开发(2)-基础开发环境搭建

一.骑砍2霸主程序架构

二.骑砍2霸主C#接口层代码查看

     1.C#反编译工具dnspy下载,文件/添加选择依赖的Taleworlds*.dll,可搜索关键类和函数:

     2.骑砍2霸主游戏引擎接口查看:

     以EngineMethod标识的为调用Taleworlds.Native.dll中的方法,例如关于Agent相关接口:

#调用TaleWorlds.Native.dll中的函数
[EngineMethod("get_movement_flags", false)]
uint GetMovementFlags(UIntPtr agentPointer);

// Token: 0x060015BE RID: 5566
[EngineMethod("set_movement_flags", false)]
void SetMovementFlags(UIntPtr agentPointer, Agent.MovementControlFlag value);

// Token: 0x060015BF RID: 5567
[EngineMethod("get_movement_input_vector", false)]
Vec2 GetMovementInputVector(UIntPtr agentPointer);

// Token: 0x060015C0 RID: 5568
[EngineMethod("set_movement_input_vector", false)]
void SetMovementInputVector(UIntPtr agentPointer, Vec2 value);

// Token: 0x060015C1 RID: 5569
[EngineMethod("get_collision_capsule", false)]
void GetCollisionCapsule(UIntPtr agentPointer, ref CapsuleData value);

     3.查看当前游戏中dll对应.Net版本,后续中C#使用.Net版本与本体保持一致:

三.MOD下C#代码编译调试

     1.VisualStudio下载并创建csproj配置文件:

<Project Sdk="Microsoft.NET.Sdk">

  <PropertyGroup>
    <Version>0.0.1</Version>

    <!--指定VS编译依赖.net2框架, 与本体保持一致-->
	<TargetFramework>netstandard2.0</TargetFramework>
	<Platforms>x64</Platforms>

    <!--指定游戏安装目录-->
    <GameFolder>D:\work\Steam\steamapps\common\Mount &amp; Blade II Bannerlord</GameFolder>
    <GameBinariesFolder Condition="Exists('$(GameFolder)\bin\Win64_Shipping_Client\Bannerlord.exe')">Win64_Shipping_Client</GameBinariesFolder>
    <GameBinariesFolder Condition="Exists('$(GameFolder)\bin\Gaming.Desktop.x64_Shipping_Client\Bannerlord.exe')">Gaming.Desktop.x64_Shipping_Client</GameBinariesFolder>

    <!--指定输出dll名称,输出dll路径-->
	<AppendTargetFrameworkToOutputPath>false</AppendTargetFrameworkToOutputPath>
	<AppendRuntimeIdentifierToOutputPath>false</AppendRuntimeIdentifierToOutputPath>
	<AssemblyName>NativeTest</AssemblyName>
	<OutputPath>D:\work\Steam\steamapps\common\Mount &amp; Blade II Bannerlord\Modules\NativeTest\bin\Win64_Shipping_Client</OutputPath>
  </PropertyGroup>

  <!--指定使用C#接口-->
  <ItemGroup>
    <Reference Include="$(GameFolder)\bin\$(GameBinariesFolder)\Newtonsoft.Json.dll">
      <HintPath>%(Identity)</HintPath>
      <Private>False</Private>
    </Reference>
    <Reference Include="$(GameFolder)\bin\$(GameBinariesFolder)\TaleWorlds.*.dll" Exclude="$(GameFolder)\bin\$(GameBinariesFolder)\TaleWorlds.Native.dll">
      <HintPath>%(Identity)</HintPath>
      <Private>False</Private>
    </Reference>
    <Reference Include="$(GameFolder)\Modules\Native\bin\$(GameBinariesFolder)\*.dll">
      <HintPath>%(Identity)</HintPath>
      <Private>False</Private>
      <!--选择是否输出到对应目录-->
      <!--<CopyToOutputDirectory>Never</CopyToOutputDirectory>-->
    </Reference>
    <Reference Include="$(GameFolder)\Modules\SandBox\bin\$(GameBinariesFolder)\*.dll">
      <HintPath>%(Identity)</HintPath>
      <Private>False</Private>
    </Reference>
    <Reference Include="$(GameFolder)\Modules\SandBoxCore\bin\$(GameBinariesFolder)\*.dll">
      <HintPath>%(Identity)</HintPath>
      <Private>False</Private>
    </Reference>
    <Reference Include="$(GameFolder)\Modules\StoryMode\bin\$(GameBinariesFolder)\*.dll">
      <HintPath>%(Identity)</HintPath>
      <Private>False</Private>
    </Reference>
    <Reference Include="$(GameFolder)\Modules\CustomBattle\bin\$(GameBinariesFolder)\*.dll">
      <HintPath>%(Identity)</HintPath>
      <Private>False</Private>
    </Reference>
    <Reference Include="$(GameFolder)\Modules\BirthAndDeath\bin\$(GameBinariesFolder)\*.dll">
      <HintPath>%(Identity)</HintPath>
      <Private>False</Private>
    </Reference>
  </ItemGroup>
</Project>

     2.创建主程序文件NativeTest.cs

using System;
using System.Diagnostics;
using System.IO;
using System.Runtime.InteropServices;
using TaleWorlds.Core;
using TaleWorlds.Engine;
using TaleWorlds.InputSystem;
using TaleWorlds.Library;
using TaleWorlds.MountAndBlade;
using TaleWorlds.MountAndBlade.Source.Missions.Handlers;


namespace NativeTest
{
    public class NativeTest : MBSubModuleBase
    {
        <!--调用windows弹框MessageBox-->
        [DllImport("user32.dll", EntryPoint = "MessageBoxA")]
        public static extern int MsgBox(int hWnd, string msg, string caption, int type);

        protected override void OnSubModuleLoad()
        {
            base.OnSubModuleLoad();
            MsgBox(0, "OnSubModuleLoad", "msg box", 0x30);
        }

        public override void OnGameLoaded(Game game, object initializerObject)
        {
            base.OnGameLoaded(game, initializerObject);
            MsgBox(0, "OnGameLoaded", "msg box", 0x30);
        }

        public override void OnNewGameCreated(Game game, object initializerObject)
        {
            base.OnNewGameCreated(game, initializerObject);
            MsgBox(0, "OnNewGameCreated", "msg box", 0x30);
        }

        public override void OnBeforeMissionBehaviorInitialize(Mission mission)
        {
            base.OnBeforeMissionBehaviorInitialize(mission);
            try
            {
                var val = 0;
                var rst = 8 / val;
                throw new Exception("Dummy exception for stack trace");
                InformationManager.DisplayMessage(new InformationMessage("on mission behavior initialize"));
                mission.AddMissionBehavior(new FlyMissionTimer());
            }
            catch (Exception ex)
            {
                string stackTrace = new StackTrace(ex, true).ToString();
                File.AppendAllLines("../../Modules/NativeTest/crash_log.txt", new string[] {ex.ToString(), ex.Message, ex.StackTrace});
            }
        }
    }

     3.点击生成/生成解决方案后编译cs文件为dll,根据csproj文件路径输出至MOD对应目录

四.MOD文件目录结构

    1.sub_module.xml,MOD启动配置文件,配置XML路径,DLL路径,XmlNode会加载ModuleData下对应路径的XML文件.

<?xml version="1.0" encoding="utf-8"?>
<Module>
  <!--对应MOD启动器下显示MOD的版本和名称-->
  <Id value = "NativeTest"/>
  <Name value = "NativeTest"/>
  <Version value = "v1.2.9.36960"/>
  <DependedModules>
	<DependedModule Id="Native" DependentVersion="v1.2.9" Optional="false"/>
	<DependedModule Id="SandBoxCore" DependentVersion="v1.2.9" Optional="false"/>
  </DependedModules>

  <!--对应module_data下武器装备,军团属性的xml文件-->
  <Xmls>
	<XmlNode>                
		<XmlName id="Items" path="items"/>
		<IncludedGameTypes>
			<GameType value = "Campaign"/>
			<GameType value = "CampaignStoryMode"/>
			<GameType value = "CustomGame"/>
			<GameType value = "EditorGame"/>
		</IncludedGameTypes>
	</XmlNode>
  </Xmls>

  <!--对应bin\Win64_Shipping_Client下的MOD自定义DLL-->
  <SubModules>
	<SubModule>
      <Name value="NativeTestSubModule" />
      <DLLName value="NativeTest.dll" />
      <SubModuleClassType value="NativeTest.NativeTest" />		
	  <Tags>
		<Tag key="DedicatedServerType" value ="none" />
	  </Tags>
      <!-- 是否依赖其他自定义功能的库,若将工程编译为多个dll,需要进行加载 -->
      <Assemblies>
      </Assemblies>
	</SubModule>
  </SubModules>
</Module>

    2.module_data/project.mbproj,配置声音,骨骼动画等相关配置文件路径.

<?xml version="1.0" encoding="utf-8"?>
<base xmlns:xsi="http://www.w3.org/2001/XMLSchema-instance" xmlns:xsd="http://www.w3.org/2001/XMLSchema" type="solution">
  <outputDirectory>../MBModule/MBModule/</outputDirectory>
  <XMLDirectory>../WOTS/Modules/NativeTest/</XMLDirectory>
  <ModuleAssemblyDirectory>../WOTS/bin/</ModuleAssemblyDirectory>
  <file id="soln_module_sound" name="ModuleData/module_sounds.xml" type="module_sound" />
</base>

    3.bin/Win64_Shipping_Client/放置游戏程序dll文件,bin/Win64_Shipping_wEditor放置编辑器启动下游戏程序dll文件

  • 2
    点赞
  • 2
    收藏
    觉得还不错? 一键收藏
  • 打赏
    打赏
  • 2
    评论
评论 2
添加红包

请填写红包祝福语或标题

红包个数最小为10个

红包金额最低5元

当前余额3.43前往充值 >
需支付:10.00
成就一亿技术人!
领取后你会自动成为博主和红包主的粉丝 规则
hope_wisdom
发出的红包

打赏作者

霸王•吕布

你的鼓励将是我创作的最大动力

¥1 ¥2 ¥4 ¥6 ¥10 ¥20
扫码支付:¥1
获取中
扫码支付

您的余额不足,请更换扫码支付或充值

打赏作者

实付
使用余额支付
点击重新获取
扫码支付
钱包余额 0

抵扣说明:

1.余额是钱包充值的虚拟货币,按照1:1的比例进行支付金额的抵扣。
2.余额无法直接购买下载,可以购买VIP、付费专栏及课程。

余额充值