


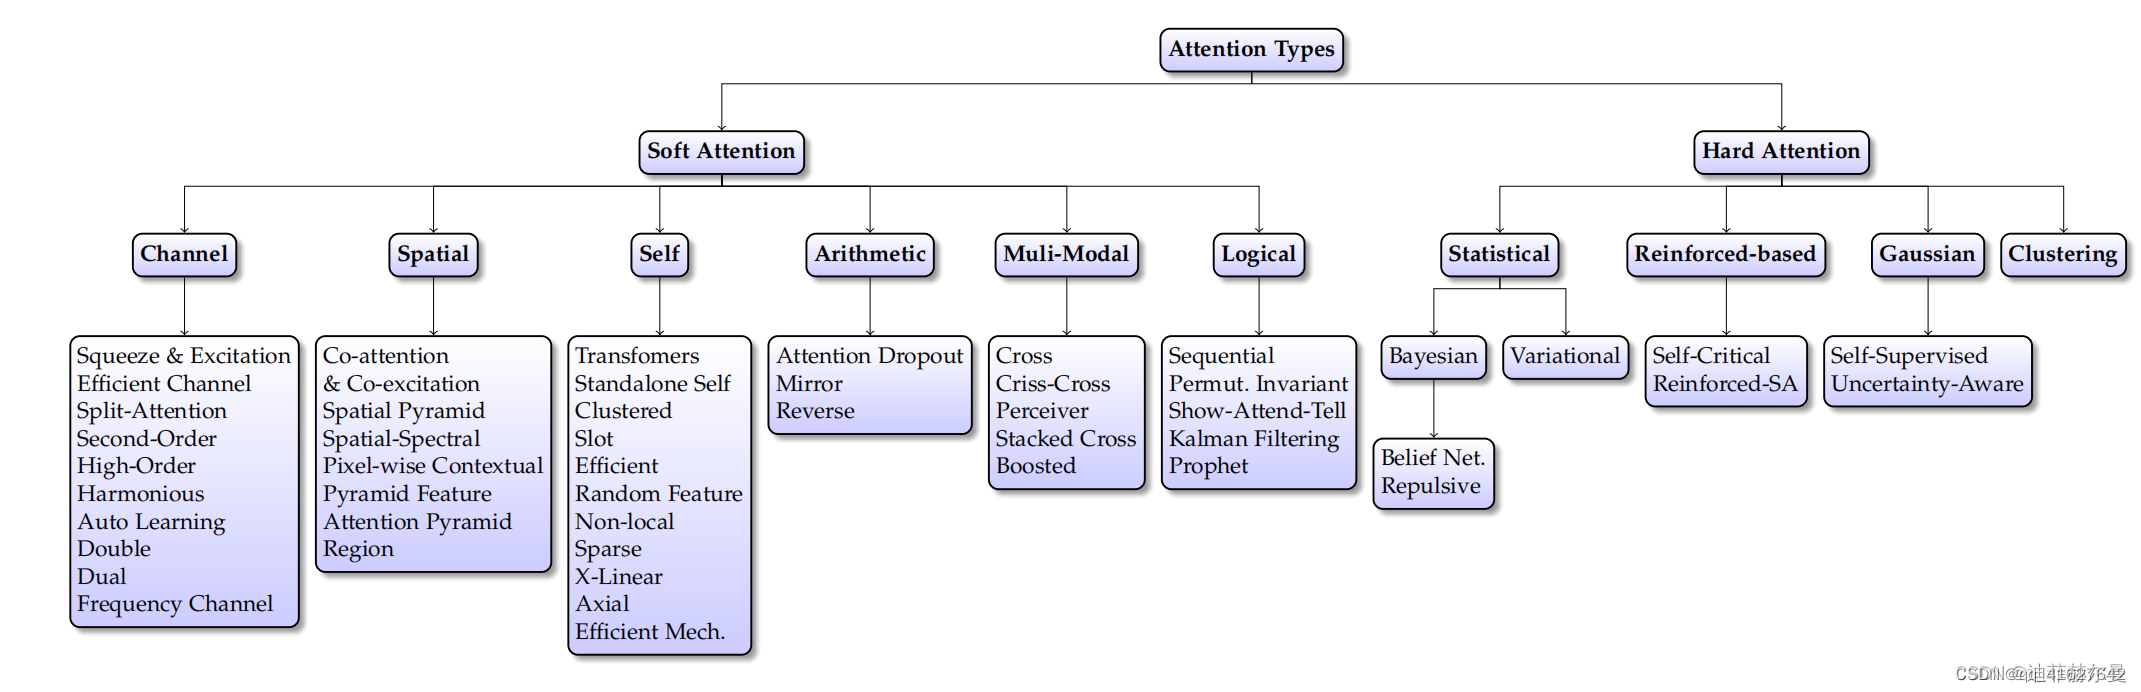
注意力机制分类图
1、SE🍀(通道维度)
论文名称:Squeeze-and-Excitation Networks
论文链接:https://arxiv.org/pdf/1709.01507.pdf
论文代码: https://github.com/hujie-frank/SENet
PyTorch代码地址:
SEnet(Squeeze-and-Excitation Network)考虑了特征通道之间的关系,在特征通道上加入了注意力机制。
SEnet通过学习的方式自动获取每个特征通道的重要程度,并且利用得到的重要程度来提升特征并抑制对当前任务不重要的特征。SEnet通过Squeeze模块和Exciation模块实现所述功能。
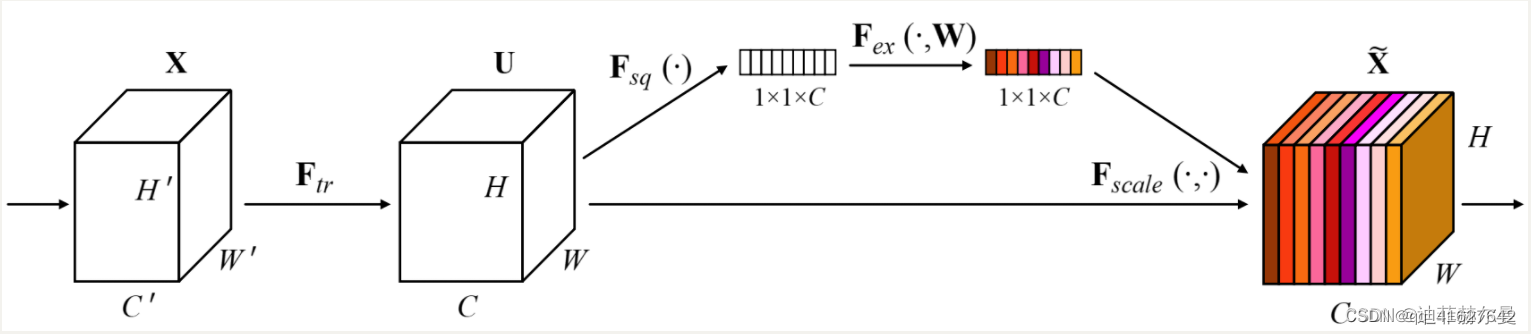
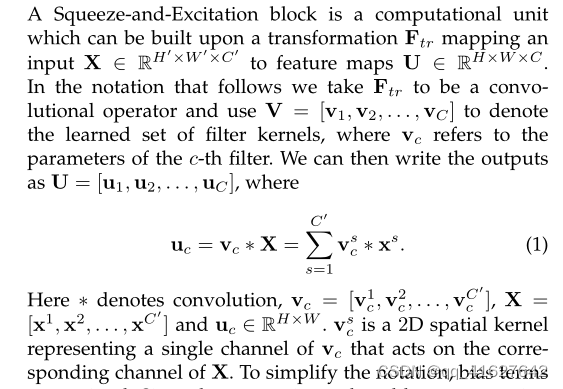
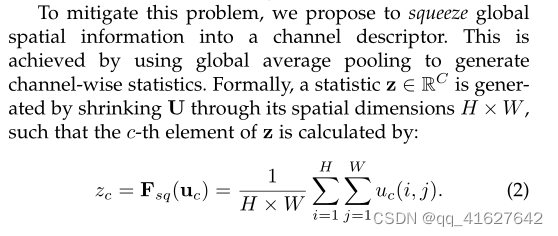
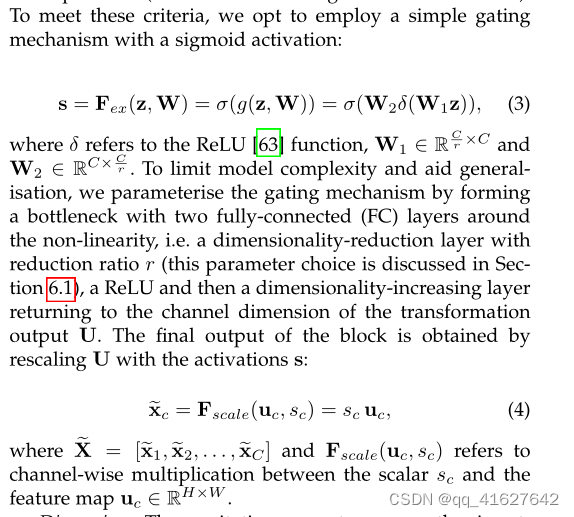
如图所示,首先作者通过squeeze操作,对空间维度进行压缩,直白的说就是对每个特征图做全局池化,平均成一个实数值。该实数从某种程度上来说具有全局感受野。作者提到该操作能够使得靠近数据输入的特征也可以具有全局感受野,这一点在很多的任务中是非常有用的。紧接着就是excitaton操作,由于经过squeeze操作后,网络输出了11C大小的特征图,作者利用权重w来学习C个通道直接的相关性。在实际应用时有的框架使用全连接,有的框架使用11的卷积实现,从参数计算角度我更加推荐使用11卷积,也就是下面代码中的fc2操作。该过程中作者先对C个通道降维再扩展回C通道。好处就是一方面降低了网络计算量,一方面增加了网络的非线性能力。最后一个操作时将exciation的输出看作是经过特征选择后的每个通道的重要性,通过乘法加权的方式乘到先前的特征上,从而实现提升重要特征,抑制不重要特征这个功能。
1、A Squeeze-and-Excitation block
1、Squeeze: Global Information Embedding
2、 Excitation: Adaptive Recalibration
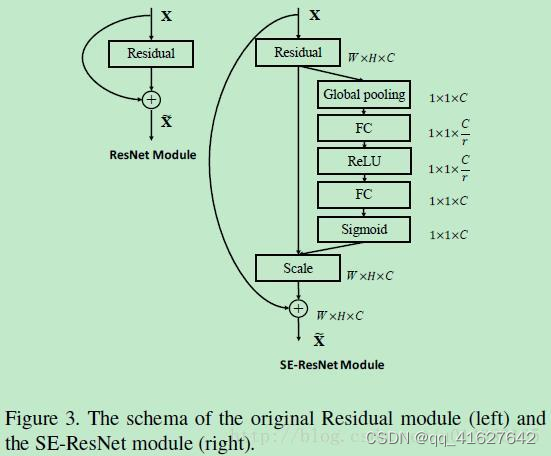
3、ResNet中添加SE block的情况与代码解析。
import torch.nn as nn

class SENet(nn.Module):
    '''
    input:(batch_size, chs, h, w)
    output:(batch_size, chs, h, w)
    '''
    def __init__(self, chs, reduction=4):
        super(SENet, self).__init__()
        #Fsq
        self.average_pooling = nn.AdaptiveAvgPool2d(output_size=(1, 1))
        # (batch_size, chs, h, w) -> (batch, chs, 1, 1)
        #Fex
        self.fc = nn.Sequential(
            # First reduce dimension, then raise dimension.
            # Add nonlinear processing to fit the correlation between channels
            nn.Linear(chs, chs // reduction),
            nn.ReLU(inplace=True),
            nn.Linear(chs // reduction, chs)
        )
        self.activation = nn.Sigmoid()  # Get the weight of each channel

    def forward(self, x):
        tmp = x
        batch_size, chs, h, w = x.shape
        x = self.average_pooling(x).view(batch_size, chs)
        # (batch_size, chs, h, w) -> (batch, chs, 1, 1) -> (batch, chs)
        x = self.fc(x).view(batch_size, chs, 1, 1)
        # (batch, chs) -> (batch, chs, 1, 1)
        # x = torch.clamp(x, min=0, max=1)
        # if min =< elem <= max, new_elem = elem, if elem > max, new_elem = max, if elem < min, new_elem = min
        x = self.activation(x)
        return x * tmp  # x: (batch_size, chs, 1, 1), tmp: (batch_size, chs, h, w)
2、在主干网络里添加单独的注意力层
4、匹配YOLOV5的SE代码
class SELayer(nn.Module):
    def __init__(self, c1, c2, r=16):
        super(SELayer, self).__init__()
        self.avgpool = nn.AdaptiveAvgPool2d(1)
        self.l1 = nn.Linear(c1, c1 // r, bias=False)
        self.relu = nn.ReLU(inplace=True)
        self.l2 = nn.Linear(c1 // r, c1, bias=False)
        self.sig = nn.Sigmoid()
    def forward(self, x):
        print(x.size())
        b, c, _, _ = x.size()
        y = self.avgpool(x).view(b, c)
        y = self.l1(y)
        y = self.relu(y)
        y = self.l2(y)
        y = self.sig(y)
        y = y.view(b, c, 1, 1)
5、在yolo.py中做改动,添加注意力模块名称
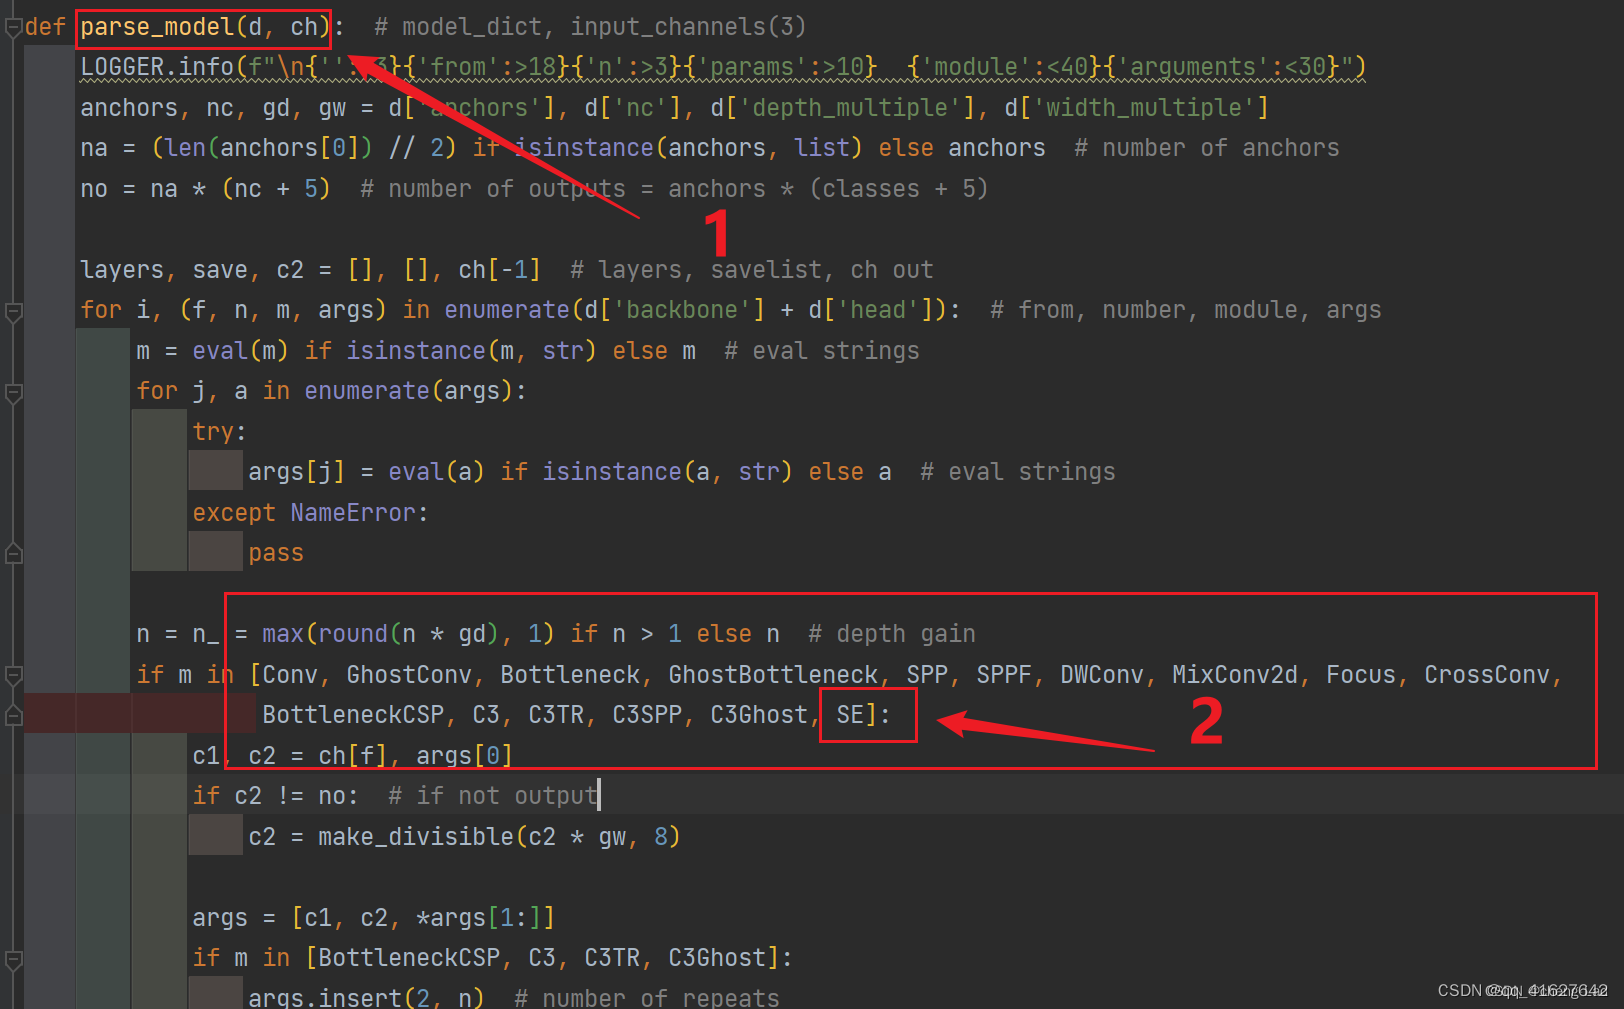
def parse_model(d, ch):  # model_dict, input_channels(3)
    logger.info('\n%3s%18s%3s%10s  %-40s%-30s' % ('', 'from', 'n', 'params', 'module', 'arguments'))
    anchors, nc, gd, gw = d['anchors'], d['nc'], d['depth_multiple'], d['width_multiple']
    na = (len(anchors[0]) // 2) if isinstance(anchors, list) else anchors  # number of anchors
    no = na * (nc + 5)  # number of outputs = anchors * (classes + 5)

    layers, save, c2 = [], [], ch[-1]  # layers, savelist, ch out
    for i, (f, n, m, args) in enumerate(d['backbone'] + d['head']):  # from, number, module, args
        m = eval(m) if isinstance(m, str) else m  # eval strings
        for j, a in enumerate(args):
            try:
                args[j] = eval(a) if isinstance(a, str) else a  # eval strings
            except:
                pass

        n = max(round(n * gd), 1) if n > 1 else n  # depth gain
        #在此处添加名称
        if m in [Conv, GhostConv, Bottleneck, GhostBottleneck, SPP, DWConv, MixConv2d, Focus, CrossConv, BottleneckCSP,
                 C3, C3TR, CoordAtt, SELayer, eca_layer, CBAM]:
            c1, c2 = ch[f], args[0]
            if c2 != no:  # if not output
                c2 = make_divisible(c2 * gw, 8)

            args = [c1, c2, *args[1:]]
            #在此处添加名称
            if m in [BottleneckCSP, C3, C3TR,SELayer]:
                args.insert(2, n)  # number of repeats
                n = 1
        elif m is nn.BatchNorm2d:
            args = [ch[f]]
        elif m is Concat:
            c2 = sum([ch[x] for x in f])
        elif m is Detect:
            args.append([ch[x] for x in f])
            if isinstance(args[1], int):  # number of anchors
                args[1] = [list(range(args[1] * 2))] * len(f)
        elif m is Contract:
            c2 = ch[f] * args[0] ** 2
        elif m is Expand:
            c2 = ch[f] // args[0] ** 2
        else:
            c2 = ch[f]
6、修改配置文件,添加到最后一层,(我这里拿yolov5s.yaml举例子),将注意力层加到你想加入的位置
yolov5s.yaml原来的配置文件
# YOLOv5 🚀 by Ultralytics, GPL-3.0 license

# Parameters
nc: 20  # number of classes
depth_multiple: 0.33  # model depth multiple
width_multiple: 0.50  # layer channel multiple
anchors:
  - [10,13, 16,30, 33,23]  # P3/8
  - [30,61, 62,45, 59,119]  # P4/16
  - [116,90, 156,198, 373,326]  # P5/32

# YOLOv5 v6.0 backbone
backbone:
  # [from, number, module, args]
  [[-1, 1, Conv, [64, 6, 2, 2]],  # 0-P1/2
   [-1, 1, Conv, [128, 3, 2]],  # 1-P2/4
   [-1, 3, C3, [128]],
   [-1, 1, Conv, [256, 3, 2]],  # 3-P3/8
   [-1, 6, C3, [256]],
   [-1, 1, Conv, [512, 3, 2]],  # 5-P4/16
   [-1, 9, C3, [512]],
   [-1, 1, Conv, [1024, 3, 2]],  # 7-P5/32
   [-1, 3, C3, [1024]],
   [-1, 1, SPPF, [1024, 5]],  # 9
  ]

# YOLOv5 v6.0 head
head:
  [[-1, 1, Conv, [512, 1, 1]],
   [-1, 1, nn.Upsample, [None, 2, 'nearest']],
   [[-1, 6], 1, Concat, [1]],  # cat backbone P4
   [-1, 3, C3, [512, False]],  # 13

   [-1, 1, Conv, [256, 1, 1]],
   [-1, 1, nn.Upsample, [None, 2, 'nearest']],
   [[-1, 4], 1, Concat, [1]],  # cat backbone P3
   [-1, 3, C3, [256, False]],  # 17 (P3/8-small)

   [-1, 1, Conv, [256, 3, 2]],
   [[-1, 14], 1, Concat, [1]],  # cat head P4
   [-1, 3, C3, [512, False]],  # 20 (P4/16-medium)

   [-1, 1, Conv, [512, 3, 2]],
   [[-1, 10], 1, Concat, [1]],  # cat head P5
   [-1, 3, C3, [1024, False]],  # 23 (P5/32-large)

   [[17, 20, 23], 1, Detect, [nc, anchors]],  # Detect(P3, P4, P5)
  ]
常用的一般是添加到backbone的最后一层,或者C3里面,这里是加在了最后一层。
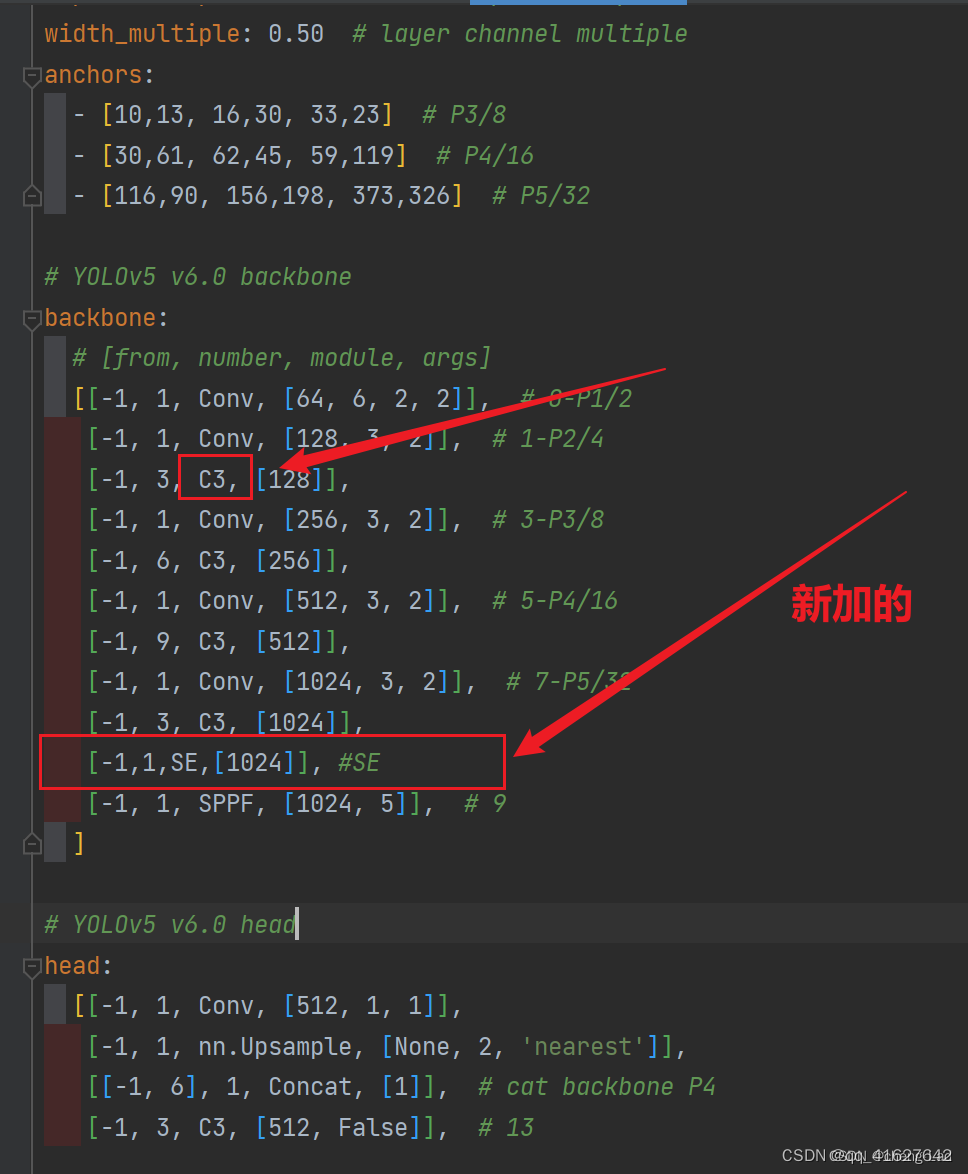
#在末尾添加了SElayer注意力模块的配置文件。


# Parameters
nc: 80  # number of classes
depth_multiple: 0.33  # model depth multiple
width_multiple: 0.50  # layer channel multiple
anchors:
  - [10,13, 16,30, 33,23]  # P3/8
  - [30,61, 62,45, 59,119]  # P4/16
  - [116,90, 156,198, 373,326]  # P5/32

# YOLOv5 v6.0 backbone+SE
backbone:
  # [from, number, module, args]
  [[-1, 1, Conv, [64, 6, 2, 2]],  # 0-P1/2
   [-1, 1, Conv, [128, 3, 2]],  # 1-P2/4
   [-1, 3, C3, [128]],
   [-1, 1, Conv, [256, 3, 2]],  # 3-P3/8
   [-1, 6, C3, [256]],
   [-1, 1, Conv, [512, 3, 2]],  # 5-P4/16
   [-1, 9, C3, [512]],
   [-1, 1, Conv, [1024, 3, 2]],  # 7-P5/32
   [-1, 3, C3, [1024]],
   [-1,1,SELayer,[1024]], #添加的SElayer
   [-1, 1, SPPF, [1024, 5]],  # 10
  ]

# YOLOv5+SE v6.0 head
head:
  [[-1, 1, Conv, [512, 1, 1]],
   [-1, 1, nn.Upsample, [None, 2, 'nearest']],
   [[-1, 6], 1, Concat, [1]],  # cat backbone P4
   [-1, 3, C3, [512, False]],  # 14

   [-1, 1, Conv, [256, 1, 1]],
   [-1, 1, nn.Upsample, [None, 2, 'nearest']],
   [[-1, 4], 1, Concat, [1]],  # cat backbone P3
   [-1, 3, C3, [256, False]],  # 18 (P3/8-small)

   [-1, 1, Conv, [256, 3, 2]],
   [[-1, 15], 1, Concat, [1]],  # cat head P4
   [-1, 3, C3, [512, False]],  # 21 (P4/16-medium)

   [-1, 1, Conv, [512, 3, 2]],
   [[-1, 11], 1, Concat, [1]],  # cat head P5
   [-1, 3, C3, [1024, False]],  # 24 (P5/32-large)

   [[18, 21, 24], 1, Detect, [nc, anchors]],  # Detect(P3, P4, P5)
  ]
3、在C3模块中加入注意力机制(C3模块和注意力融合)
第一步;要把注意力结构代码放到common.py文件中,以C3SE举例,将这段代码粘贴到common.py文件中
class SEBottleneck(nn.Module):
    # Standard bottleneck
    def __init__(self, c1, c2, shortcut=True, g=1, e=0.5, ratio=16):  # ch_in, ch_out, shortcut, groups, expansion
        super().__init__()
        c_ = int(c2 * e)  # hidden channels
        self.cv1 = Conv(c1, c_, 1, 1)
        self.cv2 = Conv(c_, c2, 3, 1, g=g)
        self.add = shortcut and c1 == c2
        # self.se=SE(c1,c2,ratio)
        self.avgpool = nn.AdaptiveAvgPool2d(1)
        self.l1 = nn.Linear(c1, c1 // ratio, bias=False)
        self.relu = nn.ReLU(inplace=True)
        self.l2 = nn.Linear(c1 // ratio, c1, bias=False)
        self.sig = nn.Sigmoid()

    def forward(self, x):
        x1 = self.cv2(self.cv1(x))
        b, c, _, _ = x.size()
        y = self.avgpool(x1).view(b, c)
        y = self.l1(y)
        y = self.relu(y)
        y = self.l2(y)
        y = self.sig(y)
        y = y.view(b, c, 1, 1)
        out = x1 * y.expand_as(x1)

        # out=self.se(x1)*x1
        return x + out if self.add else out


class C3SE(C3):
    # C3 module with SEBottleneck()
    def __init__(self, c1, c2, n=1, shortcut=True, g=1, e=0.5):
        super().__init__(c1, c2, n, shortcut, g, e)
        c_ = int(c2 * e)  # hidden channels
        self.m = nn.Sequential(*(SEBottleneck(c_, c_, shortcut, g, e=1.0) for _ in range(n)))
2.修改backbone主干网络中的4个C3模块改为C3SE,如下图所示
nc: 20  # number of classes
depth_multiple: 0.33  # model depth multiple
width_multiple: 0.50  # layer channel multiple
anchors:
  - [10,13, 16,30, 33,23]  # P3/8
  - [30,61, 62,45, 59,119]  # P4/16
  - [116,90, 156,198, 373,326]  # P5/32

# YOLOv5 v6.0 backbone
backbone:
  # [from, number, module, args]
  [[-1, 1, Conv, [64, 6, 2, 2]],  # 0-P1/2
   [-1, 1, Conv, [128, 3, 2]],  # 1-P2/4
   [-1, 3, C3SE, [128]],
   [-1, 1, Conv, [256, 3, 2]],  # 3-P3/8
   [-1, 6, C3SE, [256]],
   [-1, 1, Conv, [512, 3, 2]],  # 5-P4/16
   [-1, 9, C3SE, [512]],
   [-1, 1, Conv, [1024, 3, 2]],  # 7-P5/32
   [-1, 3, C3SE, [1024]],
   [-1, 1, SPPF, [1024, 5]],  # 9
  ]

# YOLOv5 v6.0 head
head:
  [[-1, 1, Conv, [512, 1, 1]],
   [-1, 1, nn.Upsample, [None, 2, 'nearest']],
   [[-1, 6], 1, Concat, [1]],  # cat backbone P4
   [-1, 3, C3, [512, False]],  # 13

   [-1, 1, Conv, [256, 1, 1]],
   [-1, 1, nn.Upsample, [None, 2, 'nearest']],
   [[-1, 4], 1, Concat, [1]],  # cat backbone P3
   [-1, 3, C3, [256, False]],  # 17 (P3/8-small)

   [-1, 1, Conv, [256, 3, 2]],
   [[-1, 14], 1, Concat, [1]],  # cat head P4
   [-1, 3, C3, [512, False]],  # 20 (P4/16-medium)

   [-1, 1, Conv, [512, 3, 2]],
   [[-1, 10], 1, Concat, [1]],  # cat head P5
   [-1, 3, C3, [1024, False]],  # 23 (P5/32-large)

   [[17, 20, 23], 1, Detect, [nc, anchors]],  # Detect(P3, P4, P5)
  ]
2、CBAM🍀(通道维度)
论文题目:《CBAM: Convolutional Block Attention Module》
论文地址:https://arxiv.org/pdf/1807.06521.pdf
CBAM(Convolutional Block Attention Module)结合了特征通道和特征空间两个维度的注意力机制。
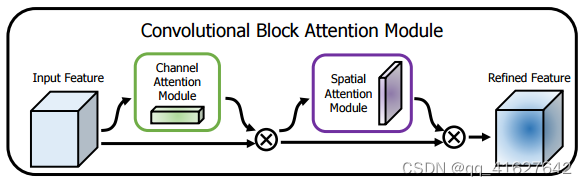
CBAM通过学习的方式自动获取每个特征通道的重要程度,和SEnet类似。此外还通过类似的学习方式自动获取每个特征空间的重要程度。并且利用得到的重要程度来提升特征并抑制对当前任务不重要的特征。
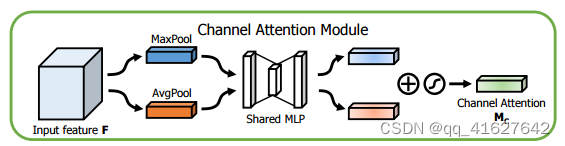
CBAM提取特征通道注意力的方式基本和SEnet类似,如下ChannelAttention中的代码所示,其在SEnet的基础上增加了max_pool的特征提取方式,其余步骤是一样的。将通道注意力提取厚的特征作为空间注意力模块的输入。
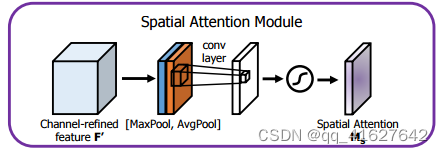
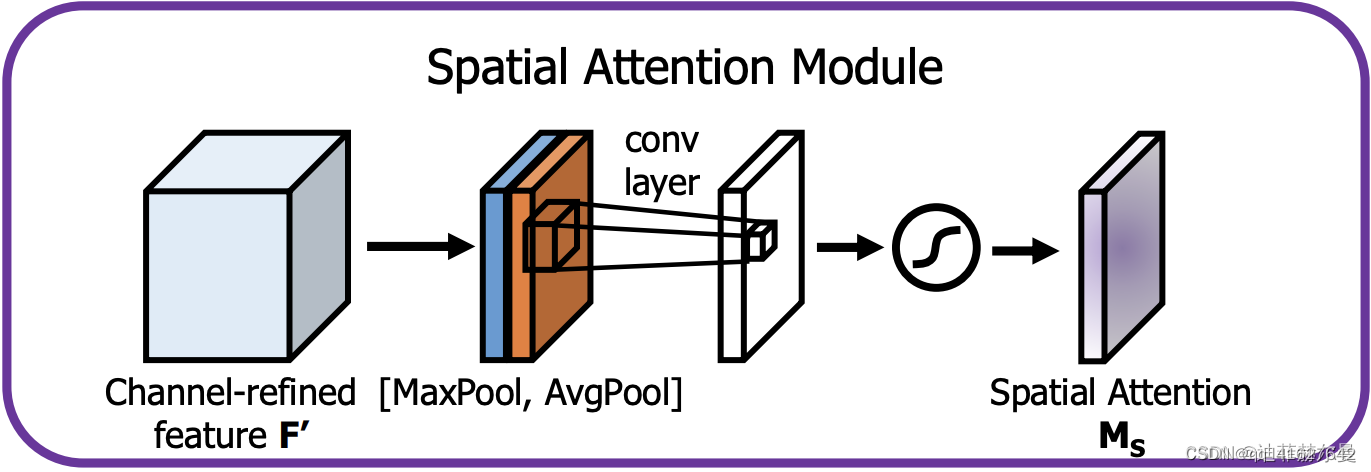
CBAM提取特征空间注意力的方式:经过ChannelAttention后,最终将经过通道重要性选择后的特征图送入特征空间注意力模块,和通道注意力模块类似,空间注意力是以通道为单位进行最大和平均迟化,并将两者的结果进行concat,之后再一个卷积降成1wh的特征图空间权重,再将该权重和输入特征进行点积,从而实现空间注意力机制。
# CBAM
class ChannelAttention(nn.Module):
    def __init__(self, in_planes, ratio=16):
        super(ChannelAttention, self).__init__()
        self.avg_pool = nn.AdaptiveAvgPool2d(1)
        self.max_pool = nn.AdaptiveMaxPool2d(1)
        self.f1 = nn.Conv2d(in_planes, in_planes // ratio, 1, bias=False)
        self.relu = nn.ReLU()
        self.f2 = nn.Conv2d(in_planes // ratio, in_planes, 1, bias=False)
        self.sigmoid = nn.Sigmoid()
    def forward(self, x):
        avg_out = self.f2(self.relu(self.f1(self.avg_pool(x))))
        max_out = self.f2(self.relu(self.f1(self.max_pool(x))))
        out = self.sigmoid(avg_out + max_out)
        return out

class SpatialAttention(nn.Module):
    def __init__(self, kernel_size=7):
        super(SpatialAttention, self).__init__()
        assert kernel_size in (3, 7), 'kernel size must be 3 or 7'
        padding = 3 if kernel_size == 7 else 1
        # (特征图的大小-算子的size+2*padding)/步长+1
        self.conv = nn.Conv2d(2, 1, kernel_size, padding=padding, bias=False)
        self.sigmoid = nn.Sigmoid()
    def forward(self, x):
        # 1*h*w
        avg_out = torch.mean(x, dim=1, keepdim=True)
        max_out, _ = torch.max(x, dim=1, keepdim=True)
        x = torch.cat([avg_out, max_out], dim=1)
        #2*h*w
        x = self.conv(x)
        #1*h*w
        return self.sigmoid(x)

class CBAM(nn.Module):
    # CSP Bottleneck with 3 convolutions
    def __init__(self, c1, c2, ratio=16, kernel_size=7):  # ch_in, ch_out, number, shortcut, groups, expansion
        super(CBAM, self).__init__()
        self.channel_attention = ChannelAttention(c1, ratio)
        self.spatial_attention = SpatialAttention(kernel_size)
    def forward(self, x):
        out = self.channel_attention(x) * x
        # c*h*w
        # c*h*w * 1*h*w
        out = self.spatial_attention(out) * out
        return out
3、ECA🍀
论文名称:ECA-Net: Efficient Channel Attention for Deep Convolutional Neural Networks
论文地址:https://arxiv.org/abs/1910.03151
代码: https://github.com/BangguWu/ECANet
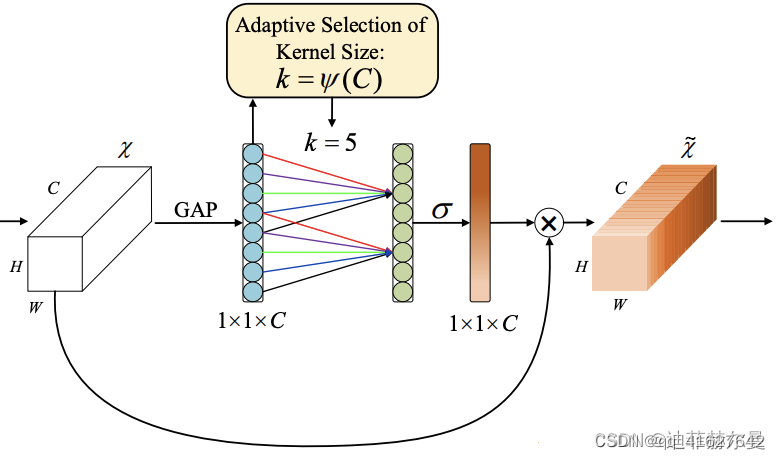
class ECA(nn.Module):
    """Constructs a ECA module.
    Args:
        channel: Number of channels of the input feature map
        k_size: Adaptive selection of kernel size
    """

    def __init__(self, c1,c2, k_size=3):
        super(ECA, self).__init__()
        self.avg_pool = nn.AdaptiveAvgPool2d(1)
        self.conv = nn.Conv1d(1, 1, kernel_size=k_size, padding=(k_size - 1) // 2, bias=False)
        self.sigmoid = nn.Sigmoid()

    def forward(self, x):
        # feature descriptor on the global spatial information
        y = self.avg_pool(x)

        # print(y.shape,y.squeeze(-1).shape,y.squeeze(-1).transpose(-1, -2).shape)
        # Two different branches of ECA module
        # 50*C*1*1
        #50*C*1
        #50*1*C
        y = self.conv(y.squeeze(-1).transpose(-1, -2)).transpose(-1, -2).unsqueeze(-1)

        # Multi-scale information fusion
        y = self.sigmoid(y)

        return x * y.expand_as(x)
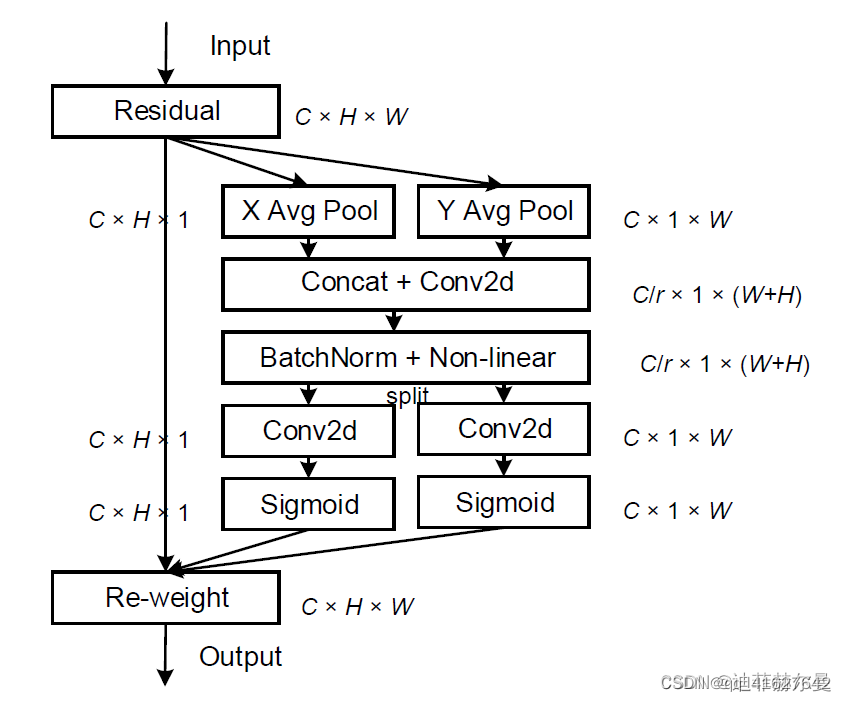
4、CA🍀
#CA
class h_sigmoid(nn.Module):
    def __init__(self, inplace=True):
        super(h_sigmoid, self).__init__()
        self.relu = nn.ReLU6(inplace=inplace)
    def forward(self, x):
        return self.relu(x + 3) / 6
class h_swish(nn.Module):
    def __init__(self, inplace=True):
        super(h_swish, self).__init__()
        self.sigmoid = h_sigmoid(inplace=inplace)
    def forward(self, x):
        return x * self.sigmoid(x)

class CoordAtt(nn.Module):
    def __init__(self, inp, oup, reduction=32):
        super(CoordAtt, self).__init__()
        self.pool_h = nn.AdaptiveAvgPool2d((None, 1))
        self.pool_w = nn.AdaptiveAvgPool2d((1, None))
        mip = max(8, inp // reduction)
        self.conv1 = nn.Conv2d(inp, mip, kernel_size=1, stride=1, padding=0)
        self.bn1 = nn.BatchNorm2d(mip)
        self.act = h_swish()
        self.conv_h = nn.Conv2d(mip, oup, kernel_size=1, stride=1, padding=0)
        self.conv_w = nn.Conv2d(mip, oup, kernel_size=1, stride=1, padding=0)
    def forward(self, x):
        identity = x
        n, c, h, w = x.size()
        #c*1*W
        x_h = self.pool_h(x)
        #c*H*1
        #C*1*h
        x_w = self.pool_w(x).permute(0, 1, 3, 2)
        y = torch.cat([x_h, x_w], dim=2)
        #C*1*(h+w)
        y = self.conv1(y)
        y = self.bn1(y)
        y = self.act(y)
        x_h, x_w = torch.split(y, [h, w], dim=2)
        x_w = x_w.permute(0, 1, 3, 2)
        a_h = self.conv_h(x_h).sigmoid()
        a_w = self.conv_w(x_w).sigmoid()
        out = identity * a_w * a_h
        return out
5、SOCA

6、A2-Net
7、 DANPositional
.8 DANChannel
1.2.9 RESNest
1.2.10 Harmonious
1.2.11 SpatialAttention
1.2.12 RANet
1.2.13 Co-excite
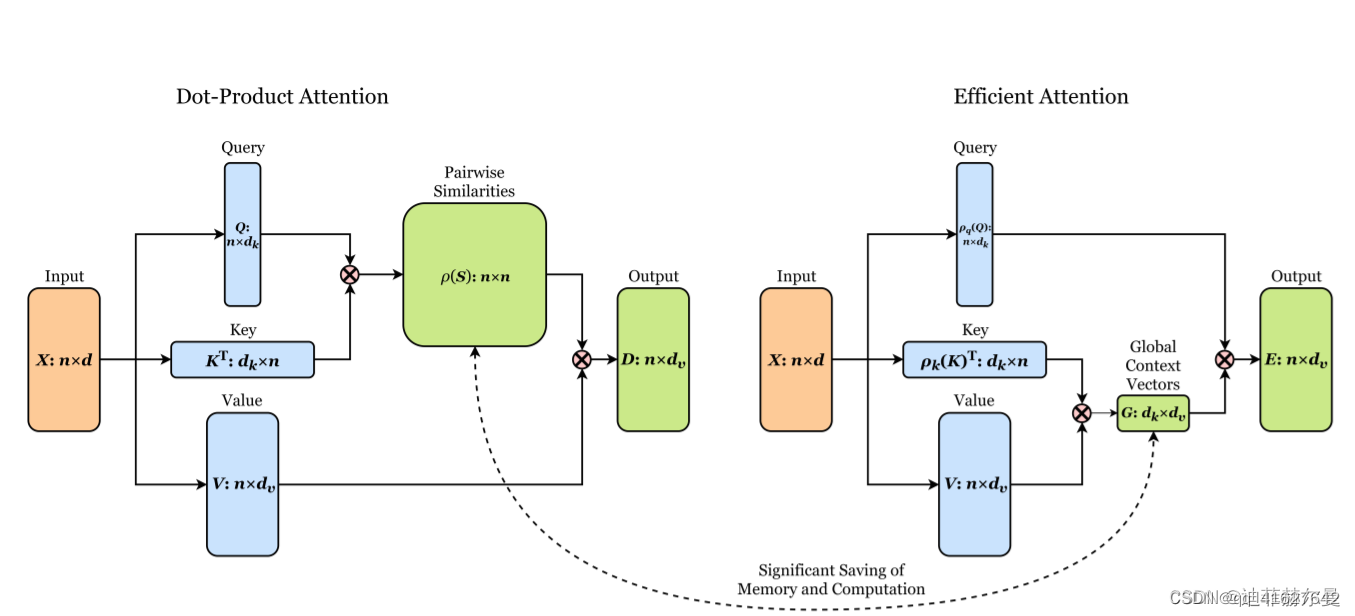
1.2.14 EfficientAttention
1.2.15 X-Linear
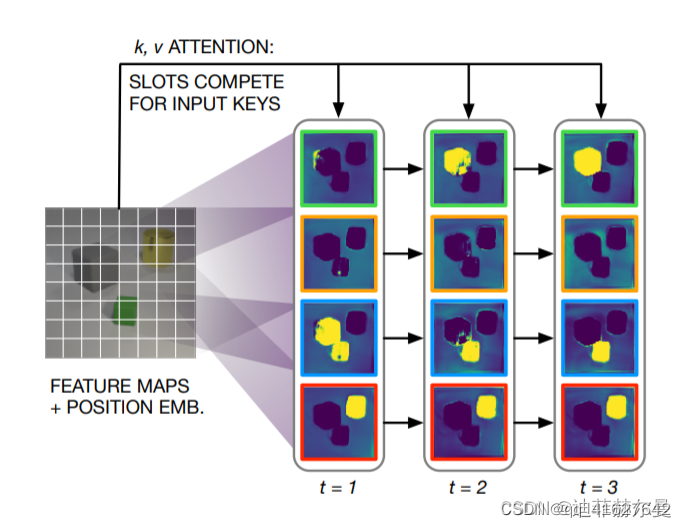
1.2.16 SlotAttention
1.2.17 Axial
1.2.18 RFA
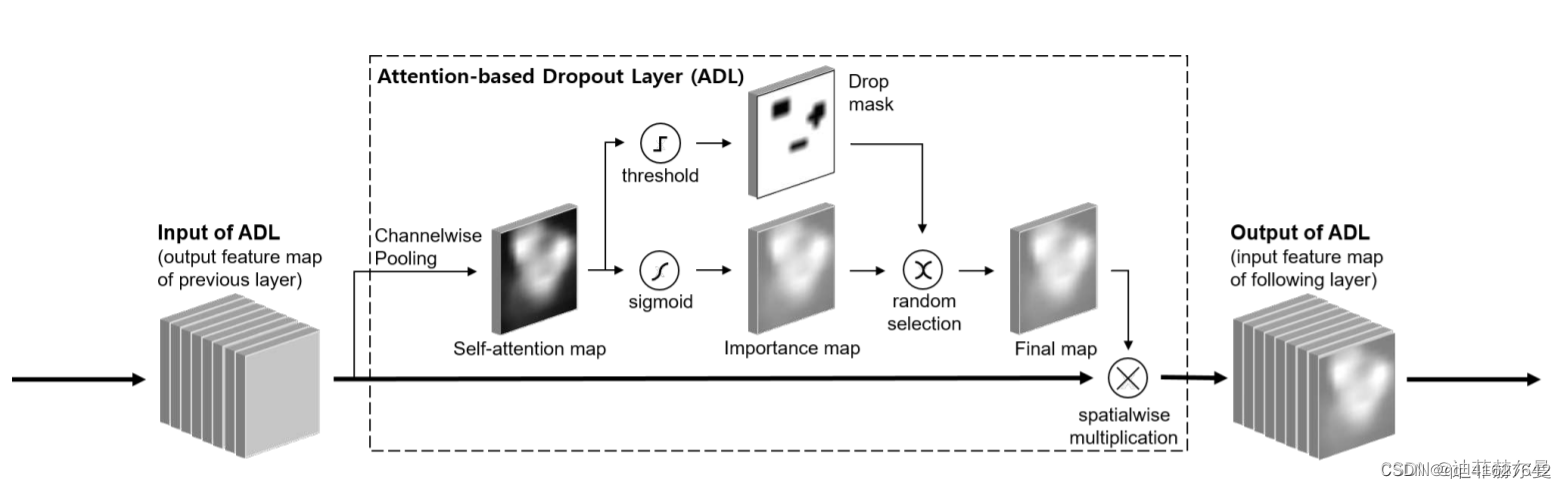
1.2.19 Attention-BasedDropout
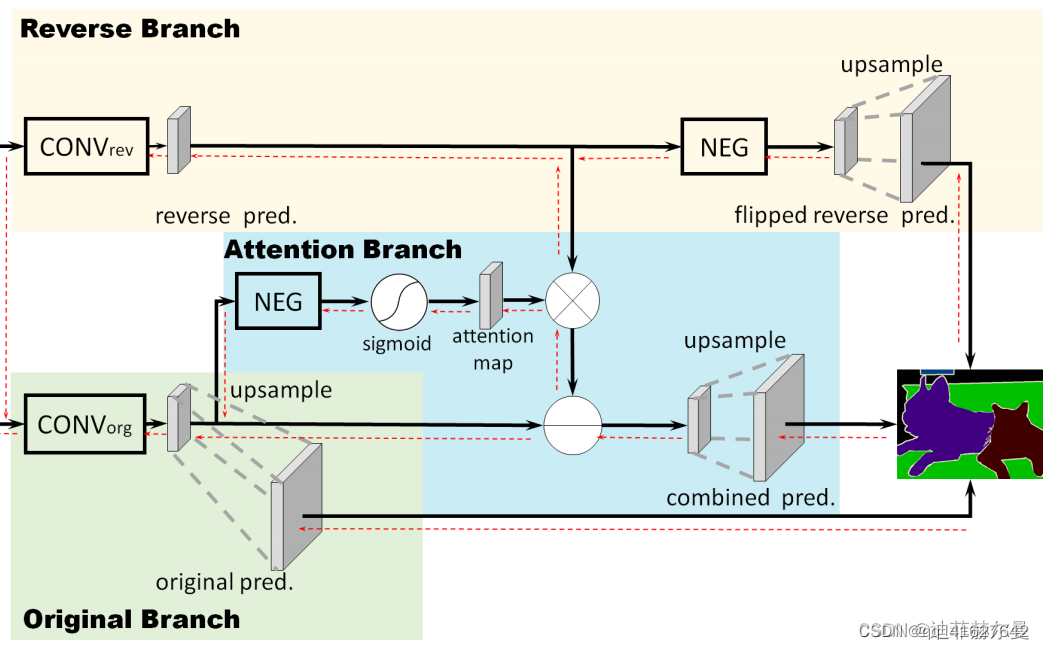
1.2.20 ReverseAttention
1.2.21 CrossAttention
1.2.22 Perceiver
1.2.23 Criss-CrossAttention
1.2.24 BoostedAttention
1.2.25 Prophet
1.2.26 S3TA
1.2.27 Self-CriticAttention
1.2.28 BayesianAttentionBeliefNetworks
1.2.29 Expectation-MaximizationAttention
1.2.30 GaussianAttention


 2912
2912

 被折叠的 条评论
为什么被折叠?
被折叠的 条评论
为什么被折叠?
 到【灌水乐园】发言


