


foundationpose环境搭建数据集制作
注:本教程为在未知明确方法的探索步骤记录,由于时间原因未做整理,可能有不必要步骤,建议先看完整篇文章理清思路在动手制作
创建数据集
- 保存RGB和Depth图像: 使用
data_collect.py脚本来保存RGB和深度图像。在(foundationpose) robot@robot-System-Product-Name:~/Foundationpose_ws$目录下运行python /home/robot/Foundationpose_ws/src/FoundationPose-main/data_collect.py。 - 生成Mask: 使用
rgb_get_mask.py脚本通过Deepseek生成图像mask。在(foundationpose) robot@robot-System-Product-Name:~/Foundationpose_ws$目录下运行python /home/robot/Foundationpose_ws/src/FoundationPose-main/rgb_get_mask.py。
参考与配置
参考CSDN博客: https://blog.csdn.net/qq_53186375/article/details/146321017
- 启动RealSense相机节点:
(base) robot@robot-System-Product-Name:~/elfin_embodied_grasping$ roslaunch '/home/robot/elfin_embodied_grasping/src/realsense2_control/realsense2_camera/launch/rs_camera.launch' - 查看图像:
(base) robot@robot-System-Product-Name:~/elfin_embodied_grasping$ rqt_image_view - 下载权重: 从教程链接下载5个权重文件,并放置到项目根目录(与
grounded_sem_demo.py同级目录下)。 - 修改程序: 将博主的程序修改为通过ROS输入’r’保存图像,输入’q’退出,每次保存的图片名字从
0000001开始递增。这将会在执行文件目录下生成对应的图像:(base) robot@robot-System-Product-Name:~/elfin_embodied_grasping$ conda deactivate robot@robot-System-Product-Name:~/elfin_embodied_grasping$ python '/home/robot/elfin_embodied_grasping/src/realsense2_control/realsense2_camera/scripts/fd_data_collect_手动采集.py'
Grounded-Segment-Anything 配置与运行
-
安装依赖:
(foundationpose) robot@robot-System-Product-Name:~/Grounded-Segment-Anything$ pip install -r requirements.txt -i https://pypi.tuna.tsinghua.edu.cn/simple- 报错处理: 如果遇到
OSError: We couldn't connect to 'https://huggingface.co',请检查网络连接或配置离线模式。
- 报错处理: 如果遇到
-
重新配置环境:
- 创建并激活新的conda环境:
conda create -n env_grounded_segment_anything python==3.8.10 conda activate env_grounded_segment_anything - 安装PyTorch:
pip install torch==1.10.0+cu113 torchvision==0.11.0+cu113 torchaudio==0.10.0 -f https://download.pytorch.org/whl/torch_stable.html - 安装其他依赖:
pip install -r requirements.txt
- 创建并激活新的conda环境:
-
运行
grounded_sam_demo.py:(foundationpose) robot@robot-System-Product-Name:~/Grounded-Segment-Anything$ python grounded_sam_demo.py --config GroundingDINO/groundingdino/config/GroundingDINO_SwinT_OGC.py \ --grounded_checkpoint groundingdino_swint_ogc.pth \ --sam_checkpoint sam_vit_h_4b8939.pth \ --input_image assets/demo1.jpg \ --output_dir "outputs" \ --box_threshold 0.3 \ --text_threshold 0.25 \ --text_prompt "bear"- 报错处理: 如果遇到
RuntimeError: Failed to import transformers.models.bert.modeling_bert,请执行pip install protobuf==3.20.3。 - 结果: 成功运行后,结果图片将保存在
outputs文件夹中。此过程需全程翻墙连接日本节点.
- 报错处理: 如果遇到
-
运行
grounded_sam_inpainting_demo.py:python grounded_sam_inpainting_demo.py --config GroundingDINO/groundingdino/config/GroundingDINO_SwinT_OGC.py \ --grounded_checkpoint groundingdino_swint_ogc.pth \ --sam_checkpoint sam_vit_h_4b8939.pth \ --input_image assets/inpaint_demo.jpg \ --output_dir "outputs" \ --box_threshold 0.3 \ --text_threshold 0.25 \ --det_prompt "bench" \ --inpaint_prompt "A sofa, high quality, detailed"- 报错处理: 如果遇到
ModuleNotFoundError: No module named 'groundingdino',需要修改相关文件的导入路径,例如在groundingdino/datasets/transforms.py中将from groundingdino.util.box_ops import box_xyxy_to_cxcywh改为from ..util.box_ops import box_xyxy_to_cxcywh. 类似地,groundingdino/models/GroundingDINO/groundingdino.py、groundingdino/util/utils.py、groundingdino/models/GroundingDINO/backbone/backbone.py、groundingdino/models/GroundingDINO/backbone/position_encoding.py、groundingdino/models/GroundingDINO/backbone/swin_transformer.py和groundingdino/models/GroundingDINO/transformer.py等文件中的groundingdino模块导入路径都需要进行类似修改,在其前面加上GroundingDINO.. - 如果遇到
ModuleNotFoundError: No module named 'GroundingDINO.segment_anything',请运行pip install git+https://github.com/facebookresearch/segment-anything.git. - 如果遇到
RuntimeError: Failed to import diffusers.pipelines.stable_diffusion.pipeline_stable_diffusion_inpaint或module 'torch' has no attribute 'float8_e4m3fn',请执行pip uninstall -y diffusers && pip install diffusers==0.11.1. - 如果遇到
ImportError: cannot import name 'cached_download' from 'huggingface_hub',请执行pip uninstall -y huggingface-hub && pip install huggingface-hub==0.23.2. - 成功运行后,会下载大量模型文件(可能达一二十GB),并生成修复后的图片.
- 报错处理: 如果遇到
-
运行
automatic_label_ram_demo.py或automatic_label_demo.py:python automatic_label_ram_demo.py --ram_checkpoint ram_swin_large_14m.pth \ --grounded_checkpoint groundingdino_swint_ogc.pth \ --sam_checkpoint sam_vit_h_4b8939.pth \ --input_image assets/demo9.jpg \ --output_dir "outputs" \ --box_threshold 0.25 \ --text_threshold 0.2 \ --iou_threshold 0.5或
python automatic_label_demo.py --config GroundingDINO/groundingdino/config/GroundingDINO_SwinT_OGC.py \ --grounded_checkpoint groundingdino_swint_ogc.pth \ --sam_checkpoint sam_vit_h_4b8939.pth \ --input_image assets/demo9.jpg \ --output_dir "outputs" \ --box_threshold 0.25 \ --text_threshold 0.2 \ --iou_threshold 0.5- 报错处理: 如果遇到
ValueError: Unknown scheme for proxy URL URL('socks://127.0.0.1:7981/'),说明代理配置存在问题.
- 报错处理: 如果遇到
-
foundationpose_grounded_sam_csdn.py报错处理:- 如果遇到
RuntimeError: "sigmoid_cpu" not implemented for 'Half',需要修改代码,确保所有相关操作都在文件中用todo标记. - 运行脚本:
(env_grounded_segment_anything) robot@robot-System-Product-Name:~/Grounded-Segment-Anything$ python foundationpose_grounded_sam_csdn.py
(env_grounded_segment_anything) robot@robot-System-Product-Name:~/Grounded-Segment-Anything$ python foundationpose_sam_mask_gray.py
- 如果遇到
使用步骤
- 采集图像: 参考本文件前面的说明.
- 图像分割Mask: 使用
sem进行图像分割:(env_grounded_segment_anything) robot@robot-System-Product-Name:~/Grounded-Segment-Anything$ python /home/robot/Grounded-Segment-Anything/foundationpose_grounded_sam_my.py - Mask标准化: 对上一步生成的mask进行标准化:
(env_grounded_segment_anything) robot@robot-System-Product-Name:~/Grounded-Segment-Anything$ python /home/robot/Grounded-Segment-Anything/foundationpose_sam_mask_gray.py- 会保存调整后的PNG图片,例如
outputs/mask_out.png. - 将生成的
1742097201894254684.png复制到/home/robot/Foundationpose_ws/src/FoundationPose-main/demo_data/lvlian_box/masks/0000001.png. - 另一种获取Mask的方法:
输入图像路径,例如(foundationpose) robot@robot-System-Product-Name:~/Foundationpose_ws$ python /home/robot/Foundationpose_ws/src/FoundationPose-main/rgb_get_mask.py/home/robot/Foundationpose_ws/src/FoundationPose-main/demo_data/lvlian_box/rgb/0000001.png,Mask将保存为object_mask.png.
- 会保存调整后的PNG图片,例如
- 使用数据集进行检测: 对前面拍摄的RGB图片文件夹进行检测.
(foundationpose) robot@robot-System-Product-Name:~/Foundationpose_ws$ python /home/robot/Foundationpose_ws/src/FoundationPose-main/run_demo_csdn.py- 修改文件中的
debug为2可以保存检测结果图片.
- 修改文件中的
模型验证与OBJ可视化
-
验证模型: 导出选定对象,确保物体和空间坐标对齐,Unix导出,目标材质为PNG。路径改为
./。导出obj后相关文件名不能改变,因为存在路径关联.- 相关文件示例:
/home/robot/Foundationpose_ws/src/FoundationPose-main/demo_data/lvlian_box/mesh/lvlian.mtl/home/robot/Foundationpose_ws/src/FoundationPose-main/demo_data/lvlian_box/mesh/lvlian.obj/home/robot/Foundationpose_ws/src/FoundationPose-main/demo_data/lvlian_box/mesh/pm-ps2.png
- 使用MeshLab打开
lvlian.obj:(base) robot@robot-System-Product-Name:~/Foundationpose_ws/src/FoundationPose-main/demo_data/lvlian_box/mesh$ meshlab lvlian.obj
- 相关文件示例:
-
Open3D 点云加载与可视化:
- 加载OBJ文件并可视化,但可能出现可视化为空(0个点)的情况.
import open3d as o3d mesh = o3d.io.read_triangle_mesh("./src/FoundationPose-main/demo_data/lvlian_box/mesh/lvlian.obj",enable_post_processing=False) print("顶点数:", len(mesh.vertices)) print("面片数:", len(mesh.triangles)) o3d.visualization.draw_geometries([mesh]) - MeshLab打开
lvlian.obj需要.mtl和.png文件. - 从3ds Max制作后用MeshLab加载并导出OBJ,Open3D可以加载OBJ但没有颜色.
- 加载PLY文件:
mesh = o3d.io.read_triangle_mesh("/home/robot/Foundationpose_ws/src/FoundationPose-main/demo_data/lvlian_box/mesh/lvlian.ply")
- 加载OBJ文件并可视化,但可能出现可视化为空(0个点)的情况.
-
Open3D 加载OBJ和纹理:
- 代码示例:
import open3d as o3d import os # 定义文件路径 obj_path = "/home/robot/Foundationpose_ws/src/FoundationPose-main/demo_data/lvlian_box/mesh/lvlian.obj" texture_path = "/home/robot/Foundationpose_ws/src/FoundationPose-main/demo_data/lvlian_box/mesh/pm-ps2.png" # 检查文件是否存在 if not os.path.exists(obj_path): print(f"错误:OBJ文件 {obj_path} 不存在。") exit() if not os.path.exists(texture_path): print(f"错误:纹理文件 {texture_path} 不存在。") exit() # 加载三角网格 mesh = o3d.io.read_triangle_mesh(obj_path, enable_post_processing=True) if mesh.is_empty(): print("错误:无法加载OBJ文件。") exit() else: print("成功加载OBJ文件。") # 检查纹理坐标 if not mesh.has_triangle_uvs(): print("警告:网格缺少纹理坐标。") else: print("纹理坐标存在。") # 加载纹理图像 try: texture_image = o3d.io.read_image(texture_path) print("成功加载纹理图像。") except Exception as e: print(f"错误:无法加载纹理图像 - {e}") texture_image = None # 应用纹理 if texture_image is not None and mesh.has_triangle_uvs(): mesh.textures = [texture_image] print("纹理已应用。") else: print("无法应用纹理。") # 可视化模型 o3d.visualization.draw_geometries([mesh], mesh_show_back_face=True) - 问题: Open3D默认以左下角为原点,可能需要垂直翻转纹理图像.
- 成功贴图: 翻转后可以成功贴图:
(foundationpose) robot@robot-System-Product-Name:~/Foundationpose_ws$ python /home/robot/Foundationpose_ws/src/FoundationPose-main/demo_data/lvlian_box/mesh/o3d可视化obj.py
- 代码示例:
-
Trimesh 加载 Open3D 可视化:
- 使用Trimesh加载OBJ并进行可视化,不需要翻转:
import open3d as o3d import trimesh mesh = trimesh.load(mesh_file) # 读取 3D 物体网格文件 mesh_o3d = o3d.geometry.TriangleMesh() mesh_o3d.vertices = o3d.utility.Vector3dVector(mesh.vertices) mesh_o3d.triangles = o3d.utility.Vector3iVector(mesh.faces) # 如果有纹理,加载并应用 if hasattr(mesh.visual, 'uv') and hasattr(mesh.visual, 'material'): texture_path = f'{code_dir}/demo_data/lvlian_box/mesh/pm-ps2.png' # 假设纹理文件路径 texture_image = o3d.io.read_image(texture_path) mesh_o3d.triangle_uvs = o3d.utility.Vector2dVector(mesh.visual.uv) mesh_o3d.textures = [texture_image] o3d.visualization.draw_geometries([mesh_o3d]) # 显示网格 - 运行脚本:
(foundationpose) robot@robot-System-Product-Name:~/Foundationpose_ws$ python /home/robot/Foundationpose_ws/src/FoundationPose-main/run_demo_csdn_trimesh_test.py
- 使用Trimesh加载OBJ并进行可视化,不需要翻转:
-
进行检测:
(foundationpose) robot@robot-System-Product-Name:~/Foundationpose_ws$ python /home/robot/Foundationpose_ws/src/FoundationPose-main/run_demo_csdn_copy.py- 日志显示成功加载OBJ文件,顶点数和面数正确.
寻求原因与模型调整
-
机械臂轨迹采集:
- 通过平板编写机械臂两点之间移动程序,速度和加速度均设置为10,保存为
fd_data_collect.json. - 采集缓慢移动序列,以便更好地分析问题.
robot@robot-System-Product-Name:~/elfin_embodied_grasping$ python '/home/robot/elfin_embodied_grasping/src/realsense2_control/realsense2_camera/scripts/fd_data_collect_csdn序列.py' - 通过平板编写机械臂两点之间移动程序,速度和加速度均设置为10,保存为
-
Seg提取Mask与检测:
- Seg提取mask并进行检测时,发现模型移动存在规律,怀疑模型的初始旋转角度不对(结合trimesh打开后的模型角度).
- 通过MeshLab查看坐标轴,可能需要绕X轴逆时针旋转90度.
- 旋转后可视化效果改变,但检测结果方向仍不对.
- MeshLab打开后发现初始姿态也不对,正面朝上应为Z轴,但实际是侧面.
-
MeshLab旋转操作:
- 导入模型: 通过
File > Import Mesh...导入模型文件. - 显示坐标轴:
Render > Show Axis. (红色X轴,绿色Y轴,蓝色Z轴). - 访问旋转滤镜:
Filters > Normals, Curvatures and Orientation > Transform: Rotate. - 绕X轴旋转90度,导出OBJ模型,发现检测会从正面缓慢转到反面.
- 重新采集正面数据集:
robot@robot-System-Product-Name:~/elfin_embodied_grasping$ python '/home/robot/elfin_embodied_grasping/src/realsense2_control/realsense2_camera/scripts/fd_data_collect_采集编号序列.py' - 使用Seg生成Mask:
foundationpose_grounded_sam_my.py与foundationpose_grounded_sam_csdn.py的区别在于my版本使用自己的图片路径.(env_grounded_segment_anything) robot@robot-System-Product-Name:~/Grounded-Segment-Anything$ python /home/robot/Grounded-Segment-Anything/foundationpose_grounded_sam_my.py - 生成标准Mask:
输出(env_grounded_segment_anything) robot@robot-System-Product-Name:~/Grounded-Segment-Anything$ python /home/robot/Grounded-Segment-Anything/foundationpose_sam_mask_gray.py已保存调整后的 PNG 图片: outputs/mask_out.png.
将1742097201894254684.png复制到/home/robot/Foundationpose_ws/src/FoundationPose-main/demo_data/lvlian_box/masks/0000001.png.
- 导入模型: 通过
-
MeshLab其他操作:
- 加偏移:
filters->normals->transform:translate沿Z轴移动到原点到模型底部,但可能不可行. - 1024材质粗糙检测不出.
- MeshLab参考资料:
https://www.bilibili.com/video/BV1Ur4y1N7VMhttps://www.bilibili.com/video/BV13V4y1R731/
- 包装平面图: 绿联.
- B站搜索: 如何制作三维物体贴图.
- 加偏移:
-
Blender 相关:
- 只有新建长方体时可以调整尺寸.
- 中心与坐标系原点重合.
- 新建
/home/robot/Foundationpose_ws/src/FoundationPose-main/demo_data/cube并放入木块数据集,可以成功检测,效果较好. 该OBJ文件由Blender制作. - Ubuntu 20.04 应用商店安装Blender (约400多MB).
- Blender是免费开源的3D创作套件,功能多且支持中文.
- Blender导出后如果全部勾选,可以可视化.
- MeshLab导出的模型虽然可以可视化,但程序可能提示
WARNING - 网格似乎没有UV坐标,或者MeshLab和Blender底层贴图格式不同. (Blender中模型在纹理着色下有颜色,MeshLab打开的模型也有颜色).
-
Blender 教程参考:
- 关键词: 贴图 导出 纹理坐标 渲染 烘培 camera视角.
- 链接示例:
https://jingyan.baidu.com/article/6525d4b1347b1eed7d2e94ae.htmlhttps://zhuanlan.zhihu.com/p/658676826https://blog.csdn.net/qq_22328011/article/details/130051296https://blog.csdn.net/qq_41835314/article/details/128649015https://blog.csdn.net/qq_44695769/article/details/131616993https://blog.csdn.net/qq_44324007/article/details/131499010https://blog.csdn.net/qq_22328011/article/details/130051296https://www.cnblogs.com/domefy/p/14878961.htmlhttps://www.bilibili.com/video/BV1UGmAYEEmA/- Blender视频教程:
https://www.bilibili.com/video/BV14u41147YH/
-
Blender 操作快捷键:
Alt+Ctrl+E.A,U, 展开.
最终调试
-
大尺寸模型在视频中可以检测,但物体旋转方向不变,在图片上偏大. 这是由于导出问题未能正确加载UV,可视化为黑色,贴图为1024k.
-
小尺寸模型在图片上可以检测,但在视频中检测不出1024k.
-
新差异: 贴图来源不同,有些是PS制作,有些是Blender不同阶段导出.
-
数据集来源: D455 ROS控制,机械臂拖拽变为控制,Mask由Grounded-Segment-Anything提取,内参由
data_collect.py提取. -
最终版流程:
- 在Blender的UV编辑页展开,导出UV布局图2048,勾选UV,得到
Cube.png. - 在PS中处理
Cube.png为Cube_new.png. - 在Blender中,将UV编辑页、纹理绘制页、着色页(底部拖拽栏两个)、图片加载的地方的图片都替换为
Cube_new.png. - 选中右上角
Collection中的Cube,导出OBJ(导出当前选中). - 按截图图片中所有参数全部勾选,得到
test.blender.
- 在Blender的UV编辑页展开,导出UV布局图2048,勾选UV,得到
-
检测:
- 第一帧需要检测到物体,然后才能进行跟随.
(foundationpose) robot@robot-System-Product-Name:~/Foundationpose_ws$ python /home/robot/Foundationpose_ws/src/FoundationPose-main/run_demo_csdn_copy_copy.py (foundationpose) robot@robot-System-Product-Name:~/Foundationpose_ws$ python /home/robot/Foundationpose_ws/src/FoundationPose-main/run_demo_csdn_camera.py- 尺寸仿真和真实不一致与高度(物体和相机距离)有关.
- 检测效果与背景、停留时间有关.
- 操作系统: Ubuntu 20.04.
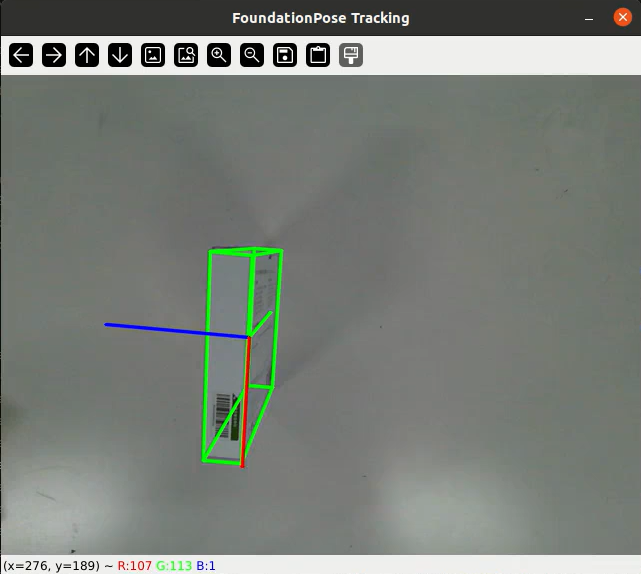
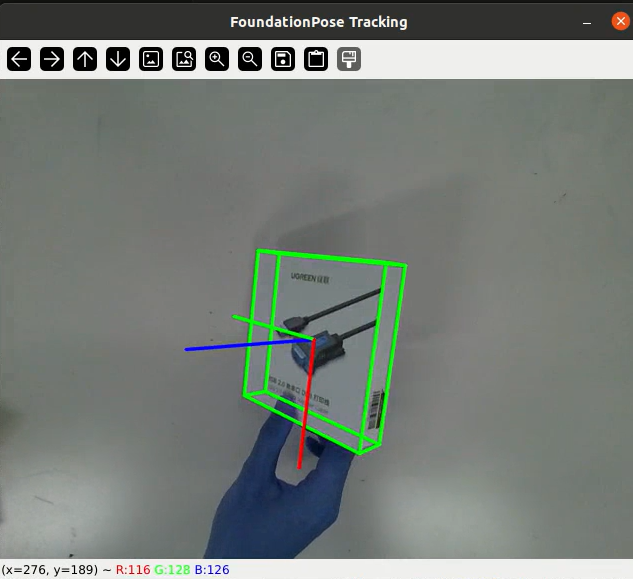
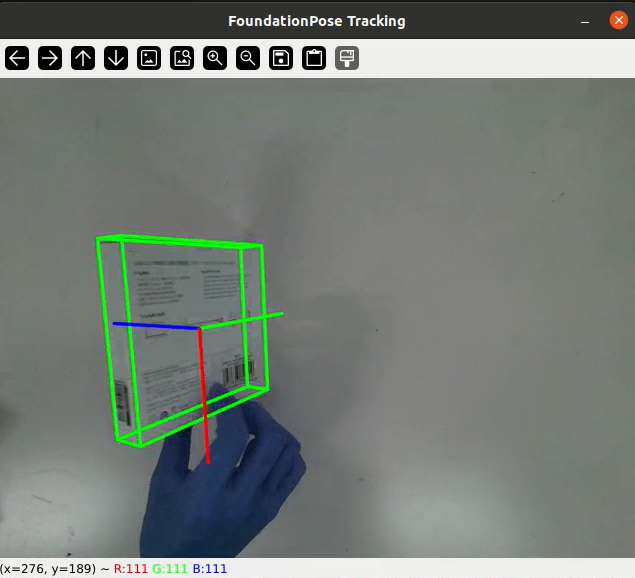
效果图
详细视频教程
有幸能用内容陪伴您学习 / 进步,若觉得教程实用,不妨点击关注收藏吧~您的关注是我持续输出干货的动力引擎,期待成为您成长路上的长期伙伴!


 1666
1666

 被折叠的 条评论
为什么被折叠?
被折叠的 条评论
为什么被折叠?
 到【灌水乐园】发言


