


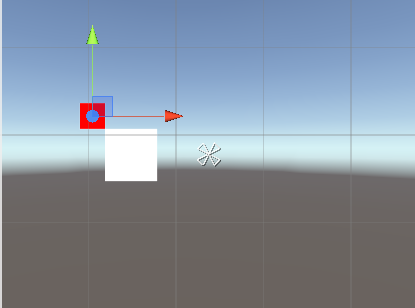
今天写关于ui位置的计算,举个例子:在我之前做的项目中背包的物品都可以点出一个属性面板,这个属性面板的左上角最齐图标的右下角,如图(红是物品图标,白是属性面板)
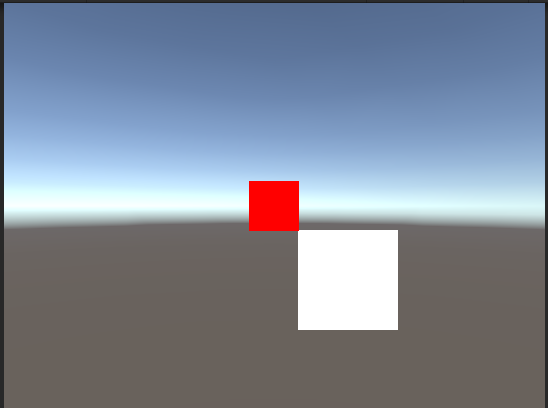
原理:计算出两个ui的包围盒就可以算出【白image】相对于【红image】的偏差多少坐标,然后用【红image】的position+偏差的坐标赋值给【白image】的世界坐标
如上图的方式,我这边举个例子(【红】的右下角对齐【白】的左上角)
【白】position.x =【红】position.x +【红】包围盒extents.x+【白】包围盒extents.x
【白】position.y =【红】position.x -【红】包围盒extents.y -【白】包围盒extents.y
这样就可以求出【白】的position,这里只给出一种情况,其他情况可以看下面代码
//枚举8个方向
public enum UGUISide
{
    Bottom,
    BottomLeft,
    BottomRight,
    Left,
    Right,
    Top,
    TopLeft,
    TopRight,
}
public class MathEx
{
    /// <summary>
    /// src用描点对齐tar的描点,tar确定src的位置
    /// </summary>
    /// <param name="src"></param>
    /// <param name="srcSide"></param>
    /// <param name="tar"></param>
    /// <param name="tarSide"></param>
    /// <param name="area"></param>
    public static void AnchorTo(RectTransform src,
                                UGUISide srcSide,
                                RectTransform tar,
                                UGUISide tarSide,
                                Transform canvas)
    {
        if (null == tar || tar == src)
        {
            return;
        }
        //计算src的包围盒
        Bounds srcBounds =
                RectTransformUtility.CalculateRelativeRectTransformBounds(canvas, src);
        //计算tar的包围盒
        Bounds tarBounds =
                RectTransformUtility.CalculateRelativeRectTransformBounds(canvas, tar);

        Vector2 srcOffset = GetBoundsOffset(srcBounds, srcSide);//计算描点的偏移量
        Vector2 tarOffset = GetBoundsOffset(tarBounds, tarSide);//计算描点的偏移量
        Vector2 tarCenter = tarBounds.center;

        //计算src相对于tar的位置
        src.anchoredPosition = (tarCenter - tarOffset + srcOffset);
    }
    }

   //8个方向偏移值的计算
    public static Vector2 GetBoundsOffset(Bounds bounds, UGUISide side)
    {
        Vector2 offset = Vector2.zero;

        switch (side)
        {
            case UGUISide.Bottom:
                offset.y = bounds.extents.y;
                break;
            case UGUISide.BottomLeft:
                offset.x = bounds.extents.x;
                offset.y = bounds.extents.y;
                break;
            case UGUISide.BottomRight:
                offset.x = -bounds.extents.x;
                offset.y = bounds.extents.y;
                break;
            case UGUISide.Left:
                offset.x = bounds.extents.x;
                break;
            case UGUISide.Right:
                offset.x = -bounds.extents.x;
                break;
            case UGUISide.Top:
                offset.y = -bounds.extents.y;
                break;
            case UGUISide.TopLeft:
                offset.x = bounds.extents.x;
                offset.y = -bounds.extents.y;
                break;
            case UGUISide.TopRight:
                offset.x = -bounds.extents.x;
                offset.y = -bounds.extents.y;
                break;
        }

        return offset;
    }
包围盒计算:RectTransformUtility.CalculateRelativeRectTransformBounds(canvas, ui)两个参数都是Transform。【包围盒的中心点是从屏幕中心作为原点计算出来的】
位置计算比较简单我觉得看看代码就知道,不过如果物品图标右边对齐屏幕右边,这样计算就会超出屏幕,不过我想要的效果就如下图
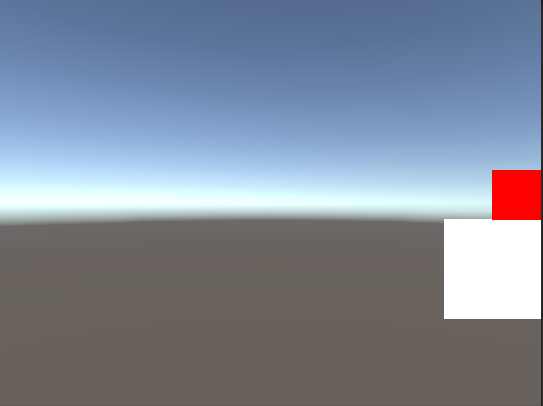
这里就涉及到ugui的屏幕大小,知道ugui屏幕大小就知道它是否超出屏幕。如果超出屏幕,可以计算靠边位置。
ugui的屏幕大小与屏幕大小有点区别,不同的ui缩放模式就有ugui屏幕大小不同
现在讲解一下不同ui缩放模式,怎么计算ugui屏幕大小
二、在不同Ui Scale Mode下屏幕的rect的计算,以【屏幕中心为原点】(上面说了ui包围盒按照屏幕中心作为原点计算的)
1.Constant Pixel Size
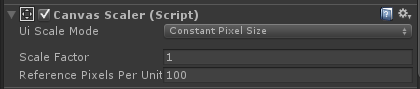
这种模式下屏幕分辨率多大,ugui屏幕就多大
rect = new Rect(-Screen.width / 2, -Screen.height / 2, Screen.width , Screen.height);2.Scale With Screen Size
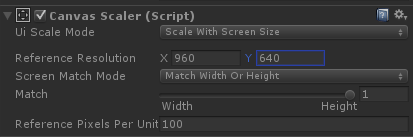
match为1,就是高度适应,
Reference Resolution设置为960*640,因为美术出图都是按照这个分辨率
这样设置无论那种分辨率,ugui屏幕的高度都是640,所以根据屏幕Height和ugui屏幕的Height算出比例,来计算ugui屏幕的Width
rect = new Rect(-Screen.width / 2,
                -Screen.height / 2,
                Screen.width ,
                Screen.height);

 float scale = CanvasScaler.matchWidthOrHeight == 1 ?
                 CanvaScaler.referenceResolution.y / (float)Screen.height :
                 CanvaScaler.referenceResolution.x / (float)Screen.width;

rect = new Rect(rect.x * scale,
                rect.y * scale,
                rect.width * scale,
                rect.height * scale);
第三种就不算,重点是第二种,用得最多还是第二种
三、区域比较
直接上代码,第一个参数就是【白】,第二个参数就是ugui屏幕的rect,第三个是画布
代码比较简单,我就不一一说明。
  public static bool SetUIArea(RectTransform target, Rect area, Transform canvas)
    {
        Bounds bounds = RectTransformUtility.CalculateRelativeRectTransformBounds(canvas, target);

        if (null == area)
        {
            return false;
        }

        Vector2 delta = default(Vector2);
        if (bounds.center.x - bounds.extents.x < area.x)//target超出area的左边框
        {
            delta.x += Mathf.Abs(bounds.center.x - bounds.extents.x - area.x);
        }
        else if (bounds.center.x + bounds.extents.x > area.width / 2)//target超出area的右边框
        {
            delta.x -= Mathf.Abs(bounds.center.x + bounds.extents.x - area.width / 2);
        }

        if (bounds.center.y - bounds.extents.y < area.y)//target超出area上边框
        {
            delta.y += Mathf.Abs(bounds.center.y - bounds.extents.y - area.y);
        }
        else if (bounds.center.y + bounds.extents.y > area.height / 2)//target超出area的下边框
        {
            delta.y -= Mathf.Abs(bounds.center.y + bounds.extents.y - area.height / 2);
        }

        //加上偏移位置算出在屏幕内的坐标
        target.anchoredPosition += delta;

        return delta != default(Vector2);
    }
最后我这边上完整代码
using UnityEngine;
using System.Collections;

public enum UGUISide
{
    Bottom,
    BottomLeft,
    BottomRight,
    Left,
    Right,
    Top,
    TopLeft,
    TopRight,
}

public class MathEx
{
    /// <summary>
    /// src用描点对齐tar的描点,tar确定src的位置
    /// </summary>
    /// <param name="src"></param>
    /// <param name="srcSide"></param>
    /// <param name="tar"></param>
    /// <param name="tarSide"></param>
    /// <param name="area"></param>
    public static void AnchorTo(RectTransform src, UGUISide srcSide, RectTransform tar, UGUISide tarSide,Transform canvas)
    {
        if (null == tar || tar == src)
        {
            return;
        }
        Bounds srcBounds = RectTransformUtility.CalculateRelativeRectTransformBounds(canvas, src);//计算src的包围盒
        Bounds tarBounds = RectTransformUtility.CalculateRelativeRectTransformBounds(canvas, tar);//计算tar的包围盒

        Vector2 srcOffset = GetBoundsOffset(srcBounds, srcSide);//计算描点的偏移量
        Vector2 tarOffset = GetBoundsOffset(tarBounds, tarSide);//计算描点的偏移量
        Vector2 tarCenter = tarBounds.center;

        //计算src相对于tar的位置
        src.anchoredPosition = (tarCenter - tarOffset + srcOffset);
    }

    /// <summary>
    /// 注意rect中心点在中间
    /// </summary>
    /// <param name="target"></param>
    /// <param name="area"></param>
    /// <returns></returns>
    public static bool SetUIArea(RectTransform target, Rect area, Transform canvas)
    {
        Bounds bounds = RectTransformUtility.CalculateRelativeRectTransformBounds(canvas, target);

        if (null == area)
        {
            return false;
        }

        Vector2 delta = default(Vector2);
        if (bounds.center.x - bounds.extents.x < area.x)//target超出area的左边框
        {
            delta.x += Mathf.Abs(bounds.center.x - bounds.extents.x - area.x);
        }
        else if (bounds.center.x + bounds.extents.x > area.width / 2)//target超出area的右边框
        {
            delta.x -= Mathf.Abs(bounds.center.x + bounds.extents.x - area.width / 2);
        }

        if (bounds.center.y - bounds.extents.y < area.y)//target超出area上边框
        {
            delta.y += Mathf.Abs(bounds.center.y - bounds.extents.y - area.y);
        }
        else if (bounds.center.y + bounds.extents.y > area.height / 2)//target超出area的下边框
        {
            delta.y -= Mathf.Abs(bounds.center.y + bounds.extents.y - area.height / 2);
        }

        //加上偏移位置算出在屏幕内的坐标
        target.anchoredPosition += delta;

        return delta != default(Vector2);
    }

    public static Vector2 GetBoundsOffset(Bounds bounds, UGUISide side)
    {
        Vector2 offset = Vector2.zero;

        switch (side)
        {
            case UGUISide.Bottom:
                offset.y = bounds.extents.y;
                break;
            case UGUISide.BottomLeft:
                offset.x = bounds.extents.x;
                offset.y = bounds.extents.y;
                break;
            case UGUISide.BottomRight:
                offset.x = -bounds.extents.x;
                offset.y = bounds.extents.y;
                break;
            case UGUISide.Left:
                offset.x = bounds.extents.x;
                break;
            case UGUISide.Right:
                offset.x = -bounds.extents.x;
                break;
            case UGUISide.Top:
                offset.y = -bounds.extents.y;
                break;
            case UGUISide.TopLeft:
                offset.x = bounds.extents.x;
                offset.y = -bounds.extents.y;
                break;
            case UGUISide.TopRight:
                offset.x = -bounds.extents.x;
                offset.y = -bounds.extents.y;
                break;
        }

        return offset;
    }
测试脚本
using UnityEngine;
using System.Collections;
using System.Data;
using Mono.Data.Sqlite;
using UnityEngine.UI;
using DG.Tweening;

public class Test : MonoBehaviour
{
    public RectTransform rt1;
    public RectTransform rt2;

    private Rect rect;
    CanvasScaler canvaScaler;

    void Awake()
    {
        canvaScaler = GetComponent<CanvasScaler>();
        rect = new Rect(-Screen.width / 2, -Screen.height / 2, Screen.width , Screen.height);
        float scale = canvaScaler.matchWidthOrHeight == 1 ? canvaScaler.referenceResolution.y / (float)Screen.height : canvaScaler.referenceResolution.x / (float)Screen.width;
        rect = new Rect(rect.x * scale, rect.y * scale, rect.width * scale, rect.height * scale);
    }


    void Update()
    {
        if (null == rt1 || null == rt2) { return; }
        MathEx.AnchorTo(rt1, UGUISide.TopLeft, rt2, UGUISide.BottomRight, transform);
        MathEx.SetUIArea(rt1, rect, transform);
    }
}
测试结构
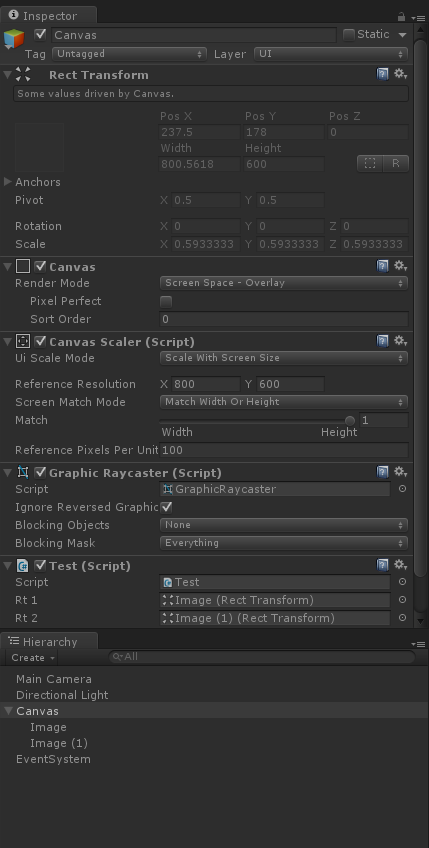
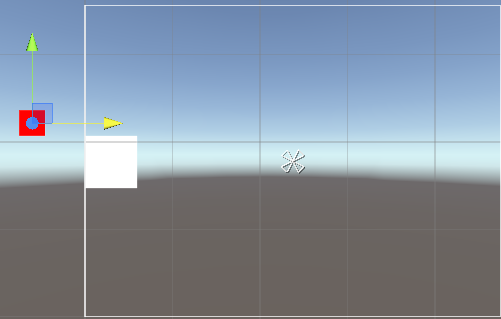
这样子就可以把ui限制在某个区域内。
下一期分享,世界坐标转屏幕坐标,不用设置描点为左下角,也可以做。以及拖拽坐标的计算


 621
621

 被折叠的 条评论
为什么被折叠?
被折叠的 条评论
为什么被折叠?
 到【灌水乐园】发言


