


介绍
这个组件能帮助你快速创建动画,所支持的Unity版本为2018.3
Adobe Photoshop PSB format
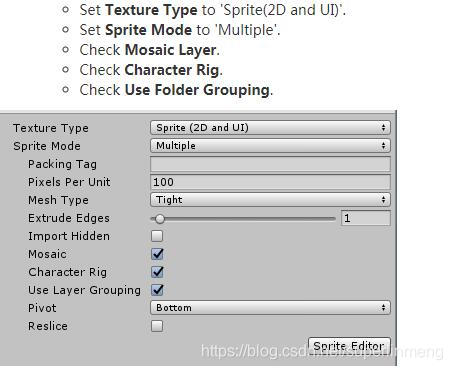
要使用【2D Animation V2 package】这个组件做动画,还有一个组件【PSD Importer package】也必须安装,这个组件只能支持PS的【xxx.PSB格式】,不支持【xxx.PSD格式】,PSB格式支持更大的图像大小,并且支持更多功能。
准备导入素材
…
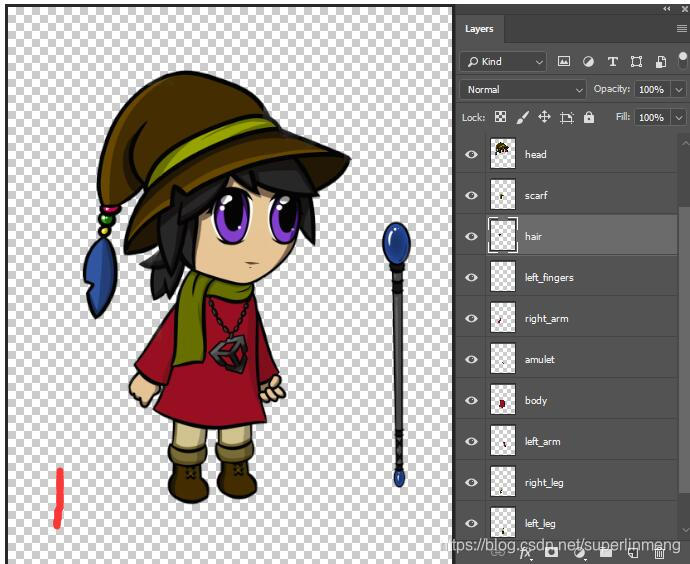
导入素材时,PSB格式图层在Unity里面会分别自动分割成为单独的精灵-文件是一个Sprite,多个图的,
1.Arrange/Mosiac the layers into a Sprite Sheet layout.
—>Arrange/Mosiac图层在一个Sprite里面.
2.Generate a Sprite from each layer’s graphic data,
—>每个图层生成一个精灵Sprite.
When an artist designs a character for animation (see Example 1), they would usually manually separate and arrange the different parts of the character (see Example 2). The PSD Importer can generate a Prefab that reassembles the Sprites in their original positions as arranged in the PSB source file automatically (see Example 3), making it more convenient for the artist to begin animating the character.
一个完整角色素材–如下图1所示,通常她的手脚头部各个部位分离–如图2所示,PSB格式文件导入能够自动生成一个prefab,将生成独立的Sprite自动在各个部位分离创建,这样方便用户自行进行编辑制作动画。


导入设置
Skinning Editor module皮肤编辑器??
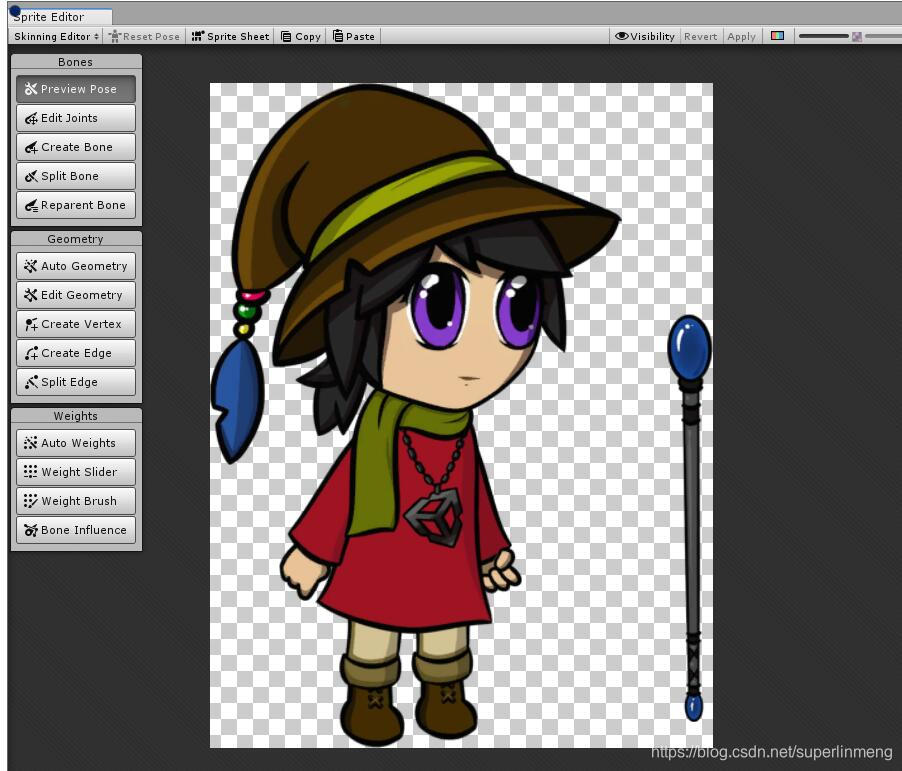
1.Select the imported Asset and select the Sprite Editor.
选中一个导入的prefab资源,打开Windows菜单下面的Sprite Editor.
2.Select the Skinning Editor module from the dropdown menu in the Sprite Editor window. The following options and tools then appear.
在Sprite Editor左上角的下拉菜单中选择切换为Skinning Editor module,然后就会看到下面的界面。
一些参数说明


Sprite选中操作
1.Double-click a Sprite to select it.双击一个Sprite选中
2.If there are multiple Sprites that overlay each other, double-click to cycle through all Sprites at the cursor location.
如果是多个类型的Sprites并且相互叠加了,双击循环通过所有的Sprite位置进行切换选中
3.Double-click on a blank area to deselect all Sprites.
双击空白区域,取消并取消选中任何精灵,回到没有选中任何的状态。
骨骼和片面顶点线的选择操作
1.Click a bone or mesh vertex to select it.
单击一个骨骼或片、顶点来选中.
2.Click and drag a selection box over multiple bones or vertices to select them at once.
单击或拖动一个方形区域包含多个骨骼或片、顶点来选中他们。
3.Right click to deselect any selected bone or mesh vertices.
右键单击取消选中任意的骨骼或网格顶点等,返回未选中状态。
该工具的设置
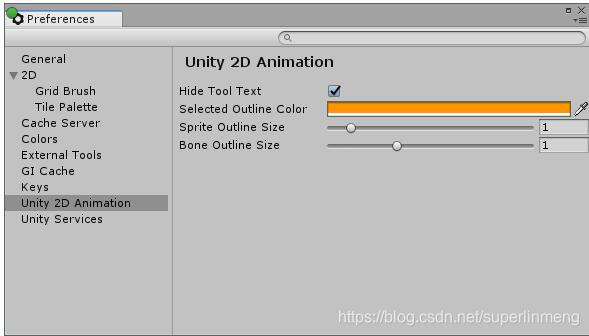
依次打开Edit > Preferences > Unity 2D Animation来打开该工具的设置页面


角色的操作
Select theicon_small_CreateBoneCreate Bone tool to begin creating the bones of the character skeleton.
1.选中创建骨骼按钮,开始给角色创建骨骼骨架。
With the tool selected, click in the **Sprite Editor **window to define the start-point of the bone. Move the cursor to where the bone should end, and click again to set the bone’s end-point.
2.在该工具被选中状态,在SpriteEditor窗口内点击选择骨骼开始点,移动到另外一个位置作为骨骼结束点(下一个骨骼开始点),再次点击设置下一个骨骼结束点
To create a continuous chain of bones, select the icon_small_CreateBoneCreate Bone tool and click the end-point of an existing bone. The new bone is started from the end-point, creating a chain.
3.如果想要创建一个连续的骨骼链,首先确认【创建骨骼】工具被选中状态,然后选中一个已经存在的A骨骼的结束点,它将作为一个新骨骼的起点,然后再选中一个位置作为这块骨骼B的终点,然后A骨骼和新创建的B骨骼将连接在一起。
Once all bones are created, generate the mesh geometry for the Sprites. It is recommended to use the icon_small_GenGeoAuto Geometry tool to autogenerate the Sprites’s geometry mesh. Then refine the geometry with the icon_small_CreateVertexCreate Vertex and icon_small_CreateEdgeCreate Edge tools.
4.一但所有的骨骼都创建完成了,建议使用Auto Geometry tool 【自动生成网格片面工具】来生成Sprite的完整网格片面,然后进一步可以使用【创建顶点】和【创建边】的工具进行进一步的编辑。
To edit the bones that influence a Sprite, select the icon_small_BoneInfluenceBone Influence tool and double-click a Sprite to select it. A list of bones currently influencing the Sprite appears.
5.如果想要编辑修改骨骼影响到的Sprite的权重,选中Bone Influence tool【骨骼影响权重】工具,然后双击一个Sprite选中它,一个列表显示它被骨骼所影响的区域就会显示出来。
a-To remove any of the listed bones, select it in the list and click ‘-’ to remove them.
想要删除任何Sprite下面的骨骼,在List列表里面选中,然后点击 - 减号来删除。
b-To add a bone, select it in the Sprite Window and click + to add it to the list.
想要添加骨骼的话,选中Sprite Window面板,然后点击+加号来将骨骼添加到List列表里面.
The weight attached to vertices affects the influence between bones and the Sprites’ geometry. Select the icon_small_GenWeightAuto Weights tool to autogenerate the weight of a selected Sprites. To generate weights for all Sprites at once, deselect all Sprites before selecting the tool. Refine the weights of the vertices with the icon_small_WeightPainterWeight Brush and icon_small_WeightSliderWeight Slider tools.
6.中心和面片的顶点、边会影响骨骼和精灵的有关数据。选中【自动权重工具】来自动为Sprite生成一个权重,生成权重为所有的精灵,这一操作会自动取消选择该工具之前的其它权重操作–因为重新自动生成的新权重信息。可以再次使用【滑动权重修改工具】和【顶点权重修改工具】对权重进行更细致的修改。
Test the skeleton rig previewing poses with the icon_small_PreviewPosePreview Pose tool. Move and rotate the different bones to check their influence on the geometry mesh. Previewing poses can also be done while using the following tools: the icon_small_ReparentBoneReparent Bone, icon_small_WeightPainterWeight Brush, icon_small_WeightSliderWeight Slider, icon_small_BoneInfluenceBone Influence, icon_small_GenWeightAuto Weights, and icon_small_VisibilityVisibility tools.
7.测试骨骼的权重作用,可以使用PreviewPosePreview Pose tool工具,预览姿势,移动或者旋转不同的骨骼来查看他们对几何网格片面的影响。预览姿势同时也可以使用以下工具:【Rparent Bone骨骼父子关系工具】, 【WeightPainter权重修改】【Weight Brush权重修改】,【 Weight Slider权重修改】, 【Bone Influence骨骼影响工具】,【GenWeightAuto Weights权重自动生成】, and 【Visibility切换显示工具】
To restore a skeleton rig to its original pose, select icon_small_RestoreBindReset Pose. The default pose can be edited with the icon_small_EditJointsEdit Joints tool.
如果想要恢复一个骨骼骨架到默认的姿势,可以选中 Reset Pose工具,默认的骨骼骨架姿势可以通过Edit Joints 工具进行编辑。
Animation动画
打开动画面板,将prefab拖动到面板内,可以对各个骨骼进行分别的操作,以便于制作动画。它将包含类似GameObject的多个层次结构的GameObject.


 2万+
2万+


 被折叠的 条评论
为什么被折叠?
被折叠的 条评论
为什么被折叠?
 到【灌水乐园】发言


