


专栏系列文章如下:
一.路径规划---二维路径规划仿真实现-gmapping+amcl+map_server+move_base_goldqiu的博客-CSDN博客
本次实验是利用gmapping只使用二维点云进行建图,利用move_base进行规划。
后期需要写一个三维点云实时转换栅格地图包(包可以实现选择性转换输出三维栅格和2.5-D高程栅格、二维栅格地图),进行gmapping的功能替换就行,里程计就不用改,3D-SLAM的里程计直接可以拿来用,接口一样的。
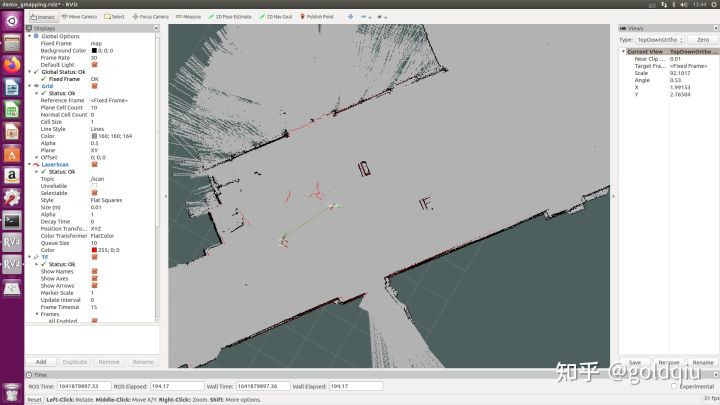
1.先实现gmapping建图:
a.开启速腾聚创 rs_lidar_16雷达驱动(跟之前一样)
b.使用pointcloud_to_laserscan包实现三维转二维(编写pointcloudtoscan.launch)
<?xml version="1.0"?>
<launch>
<!-- run pointcloud_to_laserscan node -->
<include file="$(find rslidar_sdk)/launch/start.launch" />
<node pkg="pointcloud_to_laserscan" type="pointcloud_to_laserscan_node" name="pointcloud_to_laserscan">
<remap from="cloud_in" to="/rslidar_points"/>
<rosparam>
# target_frame: rslidar # Leave disabled to output scan in pointcloud frame
transform_tolerance: 0.01
min_height: -0.4
max_height: 1.0
angle_min: -3.1415926 # -M_PI
angle_max: 3.1415926 # M_PI
angle_increment: 0.003 # 0.17degree
scan_time: 0.1
range_min: 0.2
range_max: 100
use_inf: true
inf_epsilon: 1.0
# Concurrency level, affects number of pointclouds queued for processing and number of threads used
# 0 : Detect number of cores
# 1 : Single threaded
# 2->inf : Parallelism level
concurrency_level: 1
</rosparam>
</node>
</launch>
c.源码下载gmapping包,这里不要用apt去下载,因为要修改源码(gmapping源码不支持2048以上的点,需要修改下)
git clone https://github.com/ros-perception/openslam_gmapping.git
git clone https://github.com/ros-perception/slam_gmapping.git
在文件目录openslam_gmapping/include/gmapping/scanmatcher/scanmatcher.h文件中
#define LASER_MAXBEAMS 2048 设置为20480(比较大就行)
d.调用gmapping包和laser_scan_matcher包,并用tf包的static_transform_publisher进行gmapping需要的tf信息提供,又因为gmapping必须要里程计信息,而laser_scan_matcher包实现的是二维雷达前端里程计odom输出。编写demo_gmapping.launch:
<!--
Example launch file: uses laser_scan_matcher together with
slam_gmapping
-->
<launch>
#### set up data playback from bag #############################
<param name="/use_sim_time" value="true"/>
#### publish an example base_link -> laser transform ###########
<include file="$(find mapping)/launch/pointcloudtoscan.launch" />
<node pkg="tf" type="static_transform_publisher" name="base_link_to_laser"
args="0.0 0.0 0.0 0.0 0.0 0.0 /base_link /rslidar 40" />
#### start rviz ################################################
<node pkg="rviz" type="rviz" name="rviz"
args="-d $(find laser_scan_matcher)/demo/demo_gmapping.rviz"/>
#### start the laser scan_matcher ##############################
<node pkg="laser_scan_matcher" type="laser_scan_matcher_node"
name="laser_scan_matcher_node" output="screen">
<param name="fixed_frame" value = "odom"/>
<param name="max_iterations" value="10"/>
</node>
#### start gmapping ############################################
<node pkg="gmapping" type="slam_gmapping" name="slam_gmapping" output="screen">
<param name="map_udpate_interval" value="1.0"/>
<param name="maxUrange" value="5.0"/>
<param name="sigma" value="0.1"/>
<param name="kernelSize" value="1"/>
<param name="lstep" value="0.15"/>
<param name="astep" value="0.15"/>
<param name="iterations" value="1"/>
<param name="lsigma" value="0.1"/>
<param name="ogain" value="3.0"/>
<param name="lskip" value="1"/>
<param name="srr" value="0.1"/>
<param name="srt" value="0.2"/>
<param name="str" value="0.1"/>
<param name="stt" value="0.2"/>
<param name="linearUpdate" value="1.0"/>
<param name="angularUpdate" value="0.5"/>
<param name="temporalUpdate" value="0.4"/>
<param name="resampleThreshold" value="0.5"/>
<param name="particles" value="10"/>
<param name="xmin" value="-5.0"/>
<param name="ymin" value="-5.0"/>
<param name="xmax" value="5.0"/>
<param name="ymax" value="5.0"/>
<param name="delta" value="0.02"/>
<param name="llsamplerange" value="0.01"/>
<param name="llsamplestep" value="0.05"/>
<param name="lasamplerange" value="0.05"/>
<param name="lasamplestep" value="0.05"/>
</node>
</launch>这里要注意:
<param name="/use_sim_time" value="true"/>跑bag这个标志为true,实物跑这个标志为false
实车效果:
2.再实现move_base路径规划
move_base的框图如下:
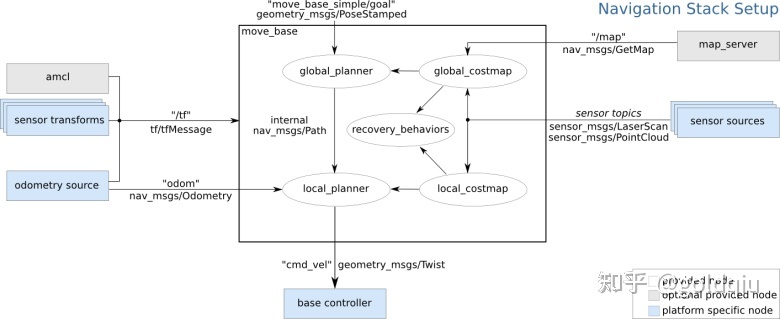
拷贝gmapping建图功能下面的功能包,包括雷达驱动、gmapping功能包到src。
github下载scout2小车驱动包:https://github.com/agilexrobotics/scout_ros.git
https://github.com/agilexrobotics/ugv_sdk.git
安装小车驱动依赖:
sudo apt install -y libasio-dev
sudo apt install -y ros-$ROS_DISTRO-teleop-twist-keyboard
设置CAN-To-USB模块
sudo modprobe gs_usb第一次用小车驱动包则执行:
rosrun scout_bringup setup_can2usb.bash不是第一次则执行:
rosrun scout_bringup bringup_can2usb.bash键盘测试下小车运动,没问题则进行下一步:
github下载move_base包(集成在navigation):
https://github.com/ros-planning/navigation.git
将之前仿真的robot_sim包拷贝到src。
因为用laser_scan_matcher功能包生成的雷达odom没有数据(不知原因),所以用了小车自带的里程计。
更改demo_mapping.launch如下:
<!--
Example launch file: uses laser_scan_matcher together with
slam_gmapping
-->
<launch>
#### set up data playback from bag #############################
<param name="/use_sim_time" value="flase"/>
<include file="$(find mapping)/launch/pointcloudtoscan.launch" />
#### publish an example base_link -> laser transform ###########
<node pkg="tf" type="static_transform_publisher" name="base_link_to_laser"
    args="0.0 0.0 0.0 -1.57 0.0 0.0 /base_link /rslidar 40" />
#### start rviz ################################################
<node pkg="rviz" type="rviz" name="rviz"
args="-d $(find mapping)/config/demo_gmapping.rviz"/>
<include file="$(find scout_bringup)/launch/scout_mini_robot_base.launch" />
#### start gmapping ############################################
<node pkg="gmapping" type="slam_gmapping" name="slam_gmapping" output="screen">
<param name="base_frame" value="/base_link"/>
<param name="odom_frame" value="/odom" />
<param name="map_frame" value="/map" />
<param name="map_udpate_interval" value="1.0"/>
<param name="maxUrange" value="5.0"/>
<param name="sigma" value="0.1"/>
<param name="kernelSize" value="1"/>
<param name="lstep" value="0.15"/>
<param name="astep" value="0.15"/>
<param name="iterations" value="1"/>
<param name="lsigma" value="0.1"/>
<param name="ogain" value="3.0"/>
<param name="lskip" value="1"/>
<param name="srr" value="0.1"/>
<param name="srt" value="0.2"/>
<param name="str" value="0.1"/>
<param name="stt" value="0.2"/>
<param name="linearUpdate" value="1.0"/>
<param name="angularUpdate" value="0.5"/>
<param name="temporalUpdate" value="0.4"/>
<param name="resampleThreshold" value="0.5"/>
<param name="particles" value="10"/>
<param name="xmin" value="-5.0"/>
<param name="ymin" value="-5.0"/>
<param name="xmax" value="5.0"/>
<param name="ymax" value="5.0"/>
<param name="delta" value="0.02"/>
<param name="llsamplerange" value="0.01"/>
<param name="llsamplestep" value="0.05"/>
<param name="lasamplerange" value="0.05"/>
<param name="lasamplestep" value="0.05"/>
</node>
</launch>这里要注意:
<node pkg="tf" type="static_transform_publisher" name="base_link_to_laser"
args="0.0 0.0 0.0 -1.57 0.0 0.0 /base_link /rslidar 40" />需要调整base_link到rslidar的旋转变换(小车坐标系和雷达坐标系),由于这边是Z轴转了90度,所有要更改参数为 args="0.0 0.0 0.0 -1.57 0.0 0.0 /base_link /rslidar 40"
调好的现象是odom的箭头跟小车运动方向一致。
先实现局部路径规划(局部路径规划调用了gmapping和move_base):
编写path_planning.launch
<launch>
<node pkg="move_base" type="move_base" respawn="false" name="move_base" output="screen" clear_params="true">
<rosparam file="$(find robot_sim)/config/costmap_common_params.yaml" command="load" ns="global_costmap" />
<rosparam file="$(find robot_sim)/config/costmap_common_params.yaml" command="load" ns="local_costmap" />
<rosparam file="$(find robot_sim)/config/local_costmap_params.yaml" command="load" />
<rosparam file="$(find robot_sim)/config/global_costmap_params.yaml" command="load" />
<rosparam file="$(find robot_sim)/config/base_local_planner_params.yaml" command="load" />
</node>
</launch>更改costmap_common_params.yaml
#机器人几何参数,如果机器人是圆形,设置 robot_radius,如果是其他形状设置 footprint
# footprint: [[-0.12, -0.12], [-0.12, 0.12], [0.12, 0.12], [0.12, -0.12]] #其他形状
obstacle_range: 3.0 # 用于障碍物探测,比如: 值为 3.0,意味着检测到距离小于 3 米的障碍物时,就会引入代价地图
raytrace_range: 3.5 # 用于清除障碍物,比如:值为 3.5,意味着清除代价地图中 3.5 米以外的障碍物
footprint: [[-0.350, -0.465], [-0.350, 0.465], [0.350, 0.465], [0.350, -0.465]]
#膨胀半径,扩展在碰撞区域以外的代价区域,使得机器人规划路径避开障碍物
inflation_radius: 0.2
#代价比例系数,越大则代价值越小
cost_scaling_factor: 3.0
map_type: costmap
observation_sources: scan
scan: {sensor_frame: rslidar, data_type: LaserScan, topic: scan, marking: true, clearing: true}主要要更改无人车的尺寸、膨胀半径、话题消息名称、类型、frame等。
更改global_costmap_params.yaml:
global_costmap:
global_frame: map
robot_base_frame: base_link
update_frequency: 10.0
publish_frequency: 10.0
transform_tolerance: 0.5
static_map: true主要更改frame
更改local_costmap_params.yaml:
local_costmap:
global_frame: odom
robot_base_frame: base_link
update_frequency: 10.0
publish_frequency: 10.0
transform_tolerance: 0.5
static_map: false
rolling_window: true
width: 3
height: 3
resolution: 0.05主要更改frame
编写local_navigation.launch
<launch>
     <include file="$(find mapping)/launch/demo_mapping.launch" />
    <!-- 运行move_base节点 -->
    <include file="$(find robot_sim)/launch/path_planning.launch" />
</launch>
测试局部路径规划,在局部代价地图中,点击目标点,小车会运动过去,同时局部代价地图中进行障碍的感知,小车会绕过突然出现的障碍。
然后实现全局路径规划(需要读取录制好的地图,开启amcl、move_base):
编写amcl.launch
<launch>

    <node pkg="amcl" type="amcl" name="amcl" output="screen">
      <!-- Publish scans from best pose at a max of 10 Hz -->
      <param name="odom_model_type" value="diff"/><!-- 里程计模式为差分 -->
      <param name="odom_alpha5" value="0.1"/>
      <param name="transform_tolerance" value="0.2" />
      <param name="gui_publish_rate" value="10.0"/>
      <param name="laser_max_beams" value="30"/>
      <param name="min_particles" value="500"/>
      <param name="max_particles" value="5000"/>
      <param name="kld_err" value="0.05"/>
      <param name="kld_z" value="0.99"/>
      <param name="odom_alpha1" value="0.2"/>
      <param name="odom_alpha2" value="0.2"/>
      <!-- translation std dev, m -->
      <param name="odom_alpha3" value="0.8"/>
      <param name="odom_alpha4" value="0.2"/>
      <param name="laser_z_hit" value="0.5"/>
      <param name="laser_z_short" value="0.05"/>
      <param name="laser_z_max" value="0.05"/>
      <param name="laser_z_rand" value="0.5"/>
      <param name="laser_sigma_hit" value="0.2"/>
      <param name="laser_lambda_short" value="0.1"/>
      <param name="laser_lambda_short" value="0.1"/>
      <param name="laser_model_type" value="likelihood_field"/>
      <!-- <param name="laser_model_type" value="beam"/> -->
      <param name="laser_likelihood_max_dist" value="2.0"/>
      <param name="update_min_d" value="0.2"/>
      <param name="update_min_a" value="0.5"/>

      <param name="odom_frame_id" value="odom"/><!-- 里程计坐标系 -->
      <param name="base_frame_id" value="base_link"/><!-- 添加机器人基坐标系 -->
      <param name="global_frame_id" value="map"/><!-- 添加地图坐标系 -->

      <param name="resample_interval" value="1"/>
      <param name="transform_tolerance" value="0.1"/>
      <param name="recovery_alpha_slow" value="0.0"/>
      <param name="recovery_alpha_fast" value="0.0"/>
    </node>
    </launch>
编写map_save.launch
<launch>
    <arg name="filename" value="$(find robot_sim)/map/nav" />
    <node name="map_save" pkg="map_server" type="map_saver" args="-f $(arg filename)" />
</launch>
先运行建图,建好图后运行map_save.launch,进行地图保存。
编写global_navigation.launch
<launch>
<param name="/use_sim_time" value="flase"/>
<include file="$(find mapping)/launch/pointcloudtoscan.launch" />
#### publish an example base_link -> laser transform ###########
<node pkg="tf" type="static_transform_publisher" name="base_link_to_laser"
args="0.0 0.0 0.0 -1.573 0.0 0.0 /base_link /rslidar 40" />
#### start rviz ################################################
<node pkg="rviz" type="rviz" name="rviz"
args="-d $(find mapping)/config/demo_gmapping.rviz"/>
<!-- 设置地图的配置文件 -->
<arg name="map" default="nav.yaml" />
<!-- 运行地图服务器,并且加载设置的地图-->
<node name="map_server" pkg="map_server" type="map_server" args="$(find robot_sim)/map/$(arg map)"/>
<!-- 启动AMCL节点 -->
<include file="$(find robot_sim)/launch/amcl.launch" />
<!-- 运行move_base节点 -->
<include file="$(find robot_sim)/launch/path_planning.launch" />
<!-- <node pkg="rviz" type="rviz" name="rviz" args="-d $(find robot_sim)/config/robot_mapping.rviz" /> -->
<include file="$(find scout_bringup)/launch/scout_mini_robot_base.launch" />
</launch>
运行后效果如下:
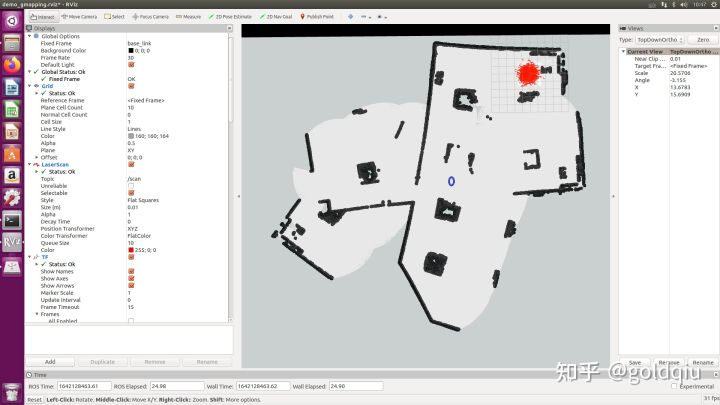
全局路径规划下,小车起始位置为红色,终点为蓝色,经过10分钟左右能到达终点。
暴露出的问题点:
- 由于使用的是小车自带里程计,所以建出的图会漂,后续要迭代的功能是用多传感器融合SLAM下的三维点云地图转换成二维栅格地图,且多传感器融合后能给出高精度里程计,保证图不漂。
- 全局路径规划下小车运动缓慢且前进时不断左右转甚至转圈,运动不够平滑,需要根据小车运动学优化规划算法。(或者还可能是小车运动控制的问题)
- 目前使用的ros包比较多且杂,传感器底层驱动和小车底层驱动包无须更改,SLAM、感知和规划都是用的开源包,但后续需要将SLAM、感知和规划部分重新写框架代码并整合成不同的三个功能包,接口之间方便互相调用,能够迭代升级不同算法,不断迭代升级小车的智能化水平。


 300
300

 被折叠的 条评论
为什么被折叠?
被折叠的 条评论
为什么被折叠?
 到【灌水乐园】发言


