


ROS探索总结(四)——简单的机器人仿真
前边我们已经介绍了ROS的基本情况,以及新手入门ROS的初级教程,现在就要真正的使用ROS进入机器人世界了。接下来我们涉及到的很多例程都是《ROS by Example》这本书的内容,我是和群里的几个人一起从国外的亚马逊上买到的,还是很有参考价值的,不过前提是你已经熟悉之前的新手教程了。
一、ROS by Example
这本书是关于国外关于ROS出版的第一本书,主要针对Electric和Fuerte版本,使用机器人主要是TurtleBot。书中详细讲解了关于机器人的基本仿真、导航、路径规划、图像处理、语音识别等等,而且在google的svn上发布了所有代码,可以通过以下命令下载、编译:
- svn checkout http://ros-by-example.googlecode.com/svn/trunk/rbx_vol_1
- rosmake rbx_vol_1
- rospack profile //加入ROS package路径
二、rviz简单机器人模拟
1、安装机器人模拟器
rviz是一个显示机器人实体的工具,本身不具有模拟的功能,需要安装一个模拟器arbotix。
- svn checkout http://vanadium-ros-pkg.googlecode.com/svn/trunk/arbotix
- rosmake arbotix
2、TurtleBot机器人的模拟
在书中的rbx_vol_1包里已经为我们写好了模拟的代码,我们先进行实验,完成后再仔细研究代码。
机器人模拟运行:
机器人模拟运行:
- roscore
- roslaunch rbx1_bringup fake_pi_robot.launch
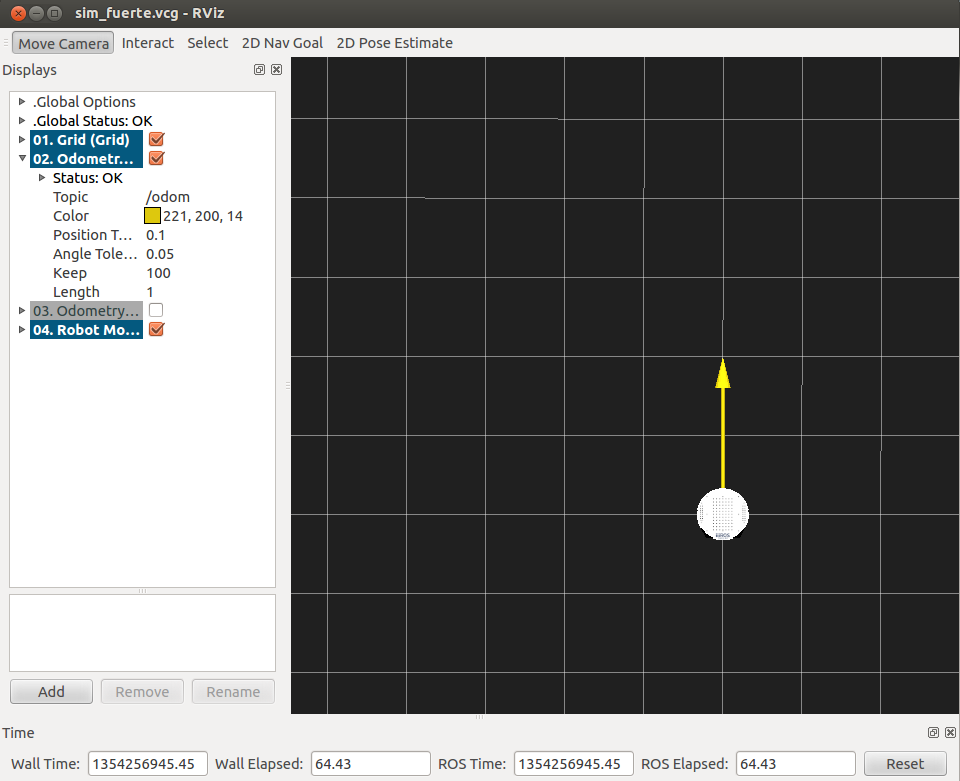
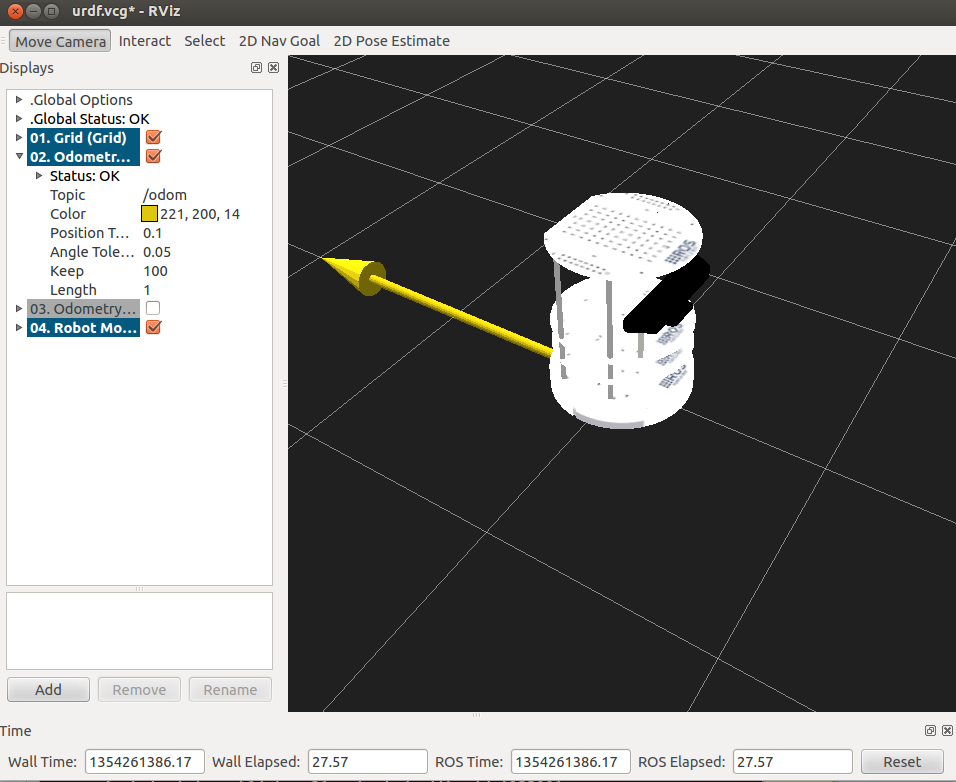
然后在终端中可以看到,机器人已经开始运行了,打开rviz界面,才能看到机器人实体。
- rosrun rviz rviz -d `rospack find rbx1_nav`/sim_fuerte.vcg
后面的参数是加载了rviz的配置文件sim_fuerte.vcg。效果如下:
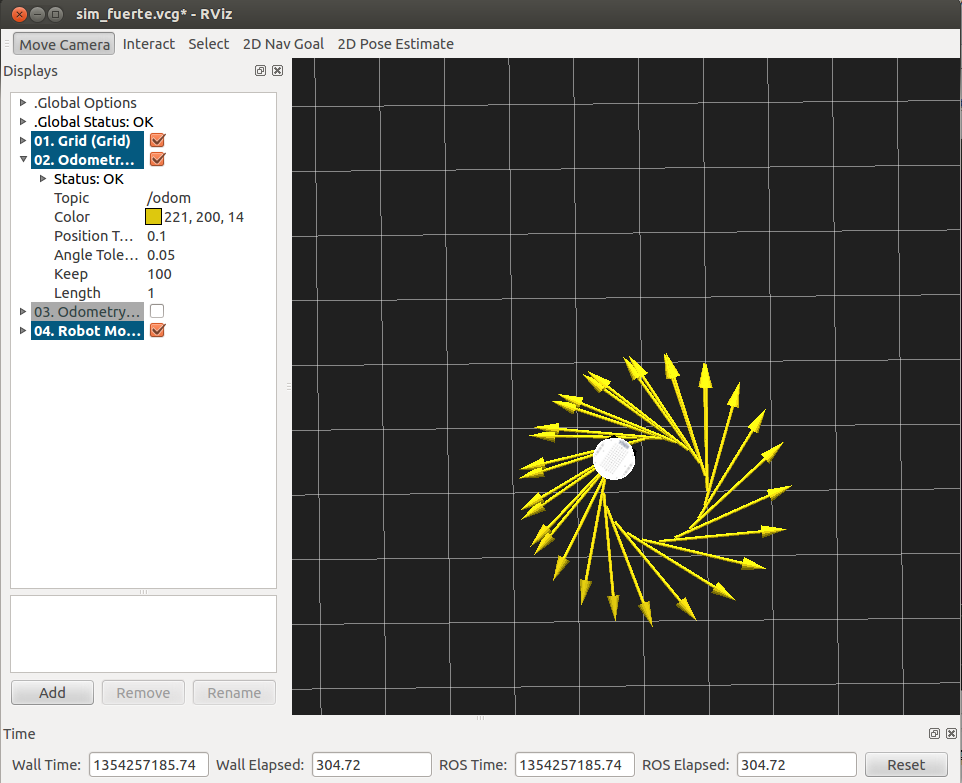
- rostopic pub -r 10 /cmd_vel geometry_msgs/Twist '{linear: {x: 0.2, y: 0, z: 0}, angular: {x: 0, y: 0, z: 0.5}}'
如果要让机器人停下来,需要在中断中按下“Ctrl+c”,然后输入:
- rostopic pub -1 /cmd_vel geometry_msgs/Twist '{}'
也可以改变发送的topic信息,使机器人走出不同的轨迹。
三、实现分析
按照上面的仿真过程,我们详细分析每一步的代码实现。
1、TurtleBot机器人运行
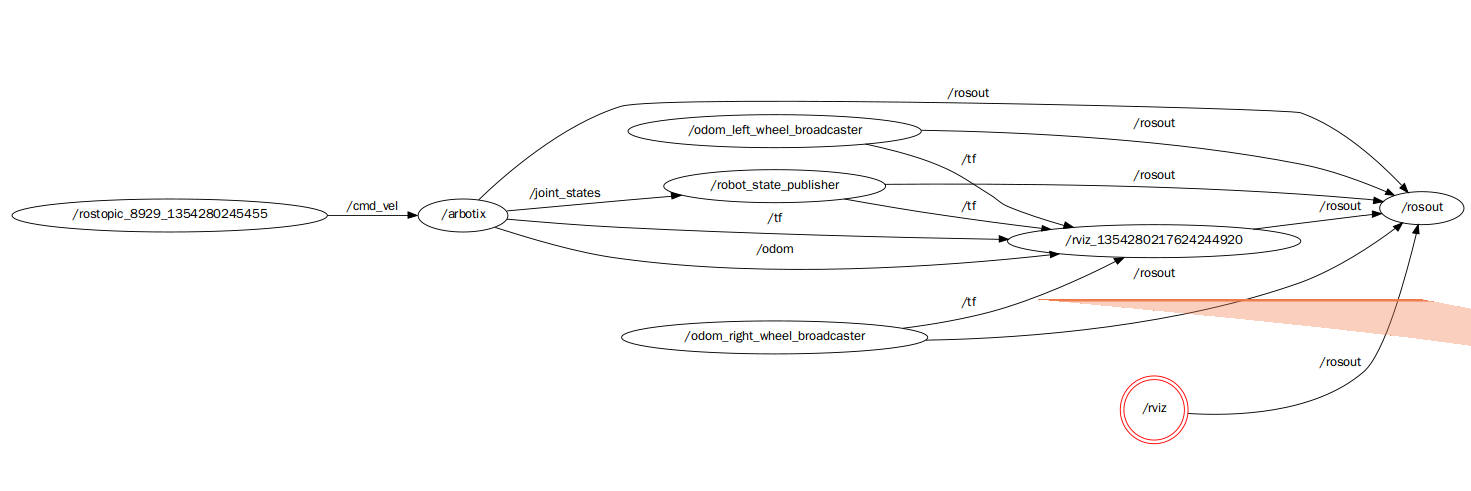
机器人运行使用的是launch文件,首先打开fake_turtlebot.launch文件。
- <launch>
- <param name="/use_sim_time" value="false" />
- <!-- Load the URDF/Xacro model of our robot -->
- <arg name="urdf_file" default="$(find xacro)/xacro.py '$(find turtlebot_description)/urdf/turtlebot.urdf.xacro'" />
- <param name="robot_description" command="$(arg urdf_file)" />
- <node name="arbotix" pkg="arbotix_python" type="driver.py" output="screen">
- <rosparam file="$(find rbx1_bringup)/config/fake_turtlebot_arbotix.yaml" command="load" />
- <param name="sim" value="true"/>
- </node>
- <node name="robot_state_publisher" pkg="robot_state_publisher" type="state_publisher">
- <param name="publish_frequency" type="double" value="20.0" />
- </node>
- <!-- We need a static transforms for the wheels -->
- <node pkg="tf" type="static_transform_publisher" name="odom_left_wheel_broadcaster" args="0 0 0 0 0 0 /base_link /left_wheel_link 100" />
- <node pkg="tf" type="static_transform_publisher" name="odom_right_wheel_broadcaster" args="0 0 0 0 0 0 /base_link /right_wheel_link 100" />
- </launch>
文件可以大概分为四个部分:
(1) 从指定的包中加载urdf文件
(2) 启动arbotix模拟器
(3) 启动状态发布节点
(4) tf坐标系配置
(1) 从指定的包中加载urdf文件
(2) 启动arbotix模拟器
(3) 启动状态发布节点
(4) tf坐标系配置
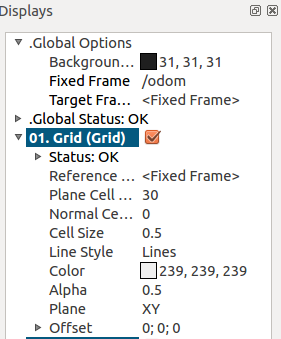
2、rviz配置文件
在打开rviz的时候需要加载一个.vcg的配置文件,主要对rviz中的插件选项进行默认的配置。这里打开的是sim_fuerte.vcg文件,由于文件比较长,这里只列举重点的部分。
- Background\ ColorB=0.12549
- Background\ ColorG=0.12549
- Background\ ColorR=0.12549
- Camera\ Config=158.108 0.814789 0.619682 -1.57034
- Camera\ Type=rviz::FixedOrientationOrthoViewController
- Fixed\ Frame=/odom
- Grid.Alpha=0.5
- Grid.Cell\ Size=0.5
- Grid.ColorB=0.941176
- Grid.ColorG=0.941176
- Grid.ColorR=0.941176
- Grid.Enabled=1
- Grid.Line\ Style=0
- Grid.Line\ Width=0.03
- Grid.Normal\ Cell\ Count=0
- Grid.OffsetX=0
- Grid.OffsetY=0
- Grid.OffsetZ=0
- Grid.Plane=0
3、发布topic
要让机器人动起来,还需要给他一些运动需要的信息,这些信息都是通过topic的方式发布的。
这里的topic就是速度命令,针对这个topic,我们需要发布速度的信息,在ROS中已经为我们写好了一些可用的数据结构,这里用的是Twist信息的数据结构。在终端中可以看到Twist的结构如下:
这里的topic就是速度命令,针对这个topic,我们需要发布速度的信息,在ROS中已经为我们写好了一些可用的数据结构,这里用的是Twist信息的数据结构。在终端中可以看到Twist的结构如下:
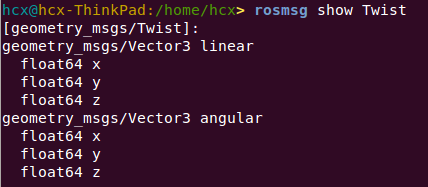
用下面的命令进行消息的发布,其中主要包括力的大小和方向。
- Background\ ColorB=0.12549
- Background\ ColorG=0.12549
- Background\ ColorR=0.12549
- Camera\ Config=158.108 0.814789 0.619682 -1.57034
- Camera\ Type=rviz::FixedOrientationOrthoViewController
- Fixed\ Frame=/odom
- Grid.Alpha=0.5
- Grid.Cell\ Size=0.5
- Grid.ColorB=0.941176
- Grid.ColorG=0.941176
- Grid.ColorR=0.941176
- Grid.Enabled=1
- Grid.Line\ Style=0
- Grid.Line\ Width=0.03
- Grid.Normal\ Cell\ Count=0
- Grid.OffsetX=0
- Grid.OffsetY=0
- Grid.OffsetZ=0
- Grid.Plane=0
----------------------------------------------------------------
ROS探索总结(五)——创建简单的机器人模型smartcar
前面我们使用的是已有的机器人模型进行仿真,这一节我们将建立一个简单的智能车机器人smartcar,为后面建立复杂机器人打下基础。
一、创建硬件描述包
- roscreat-pkg smartcar_description urdf
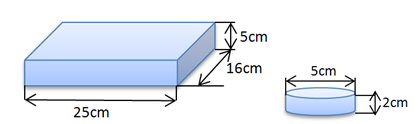
因为建立的是一个非常简单的机器人,所以我们尽量使用简单的元素:使用长方体代替车模,使用圆柱代替车轮,具体尺寸如下:
三、建立urdf文件
在smartcar_description文件夹下建立urdf文件夹,创建智能车的描述文件smartcar.urdf,描述代码如下:
- <?xml version="1.0"?>
- <robot name="smartcar">
- <link name="base_link">
- <visual>
- <geometry>
- <box size="0.25 .16 .05"/>
- </geometry>
- <origin rpy="0 0 1.57075" xyz="0 0 0"/>
- <material name="blue">
- <color rgba="0 0 .8 1"/>
- </material>
- </visual>
- </link>
- <link name="right_front_wheel">
- <visual>
- <geometry>
- <cylinder length=".02" radius="0.025"/>
- </geometry>
- <material name="black">
- <color rgba="0 0 0 1"/>
- </material>
- </visual>
- </link>
- <joint name="right_front_wheel_joint" type="continuous">
- <axis xyz="0 0 1"/>
- <parent link="base_link"/>
- <child link="right_front_wheel"/>
- <origin rpy="0 1.57075 0" xyz="0.08 0.1 -0.03"/>
- <limit effort="100" velocity="100"/>
- <joint_properties damping="0.0" friction="0.0"/>
- </joint>
- <link name="right_back_wheel">
- <visual>
- <geometry>
- <cylinder length=".02" radius="0.025"/>
- </geometry>
- <material name="black">
- <color rgba="0 0 0 1"/>
- </material>
- </visual>
- </link>
- <joint name="right_back_wheel_joint" type="continuous">
- <axis xyz="0 0 1"/>
- <parent link="base_link"/>
- <child link="right_back_wheel"/>
- <origin rpy="0 1.57075 0" xyz="0.08 -0.1 -0.03"/>
- <limit effort="100" velocity="100"/>
- <joint_properties damping="0.0" friction="0.0"/>
- </joint>
- <link name="left_front_wheel">
- <visual>
- <geometry>
- <cylinder length=".02" radius="0.025"/>
- </geometry>
- <material name="black">
- <color rgba="0 0 0 1"/>
- </material>
- </visual>
- </link>
- <joint name="left_front_wheel_joint" type="continuous">
- <axis xyz="0 0 1"/>
- <parent link="base_link"/>
- <child link="left_front_wheel"/>
- <origin rpy="0 1.57075 0" xyz="-0.08 0.1 -0.03"/>
- <limit effort="100" velocity="100"/>
- <joint_properties damping="0.0" friction="0.0"/>
- </joint>
- <link name="left_back_wheel">
- <visual>
- <geometry>
- <cylinder length=".02" radius="0.025"/>
- </geometry>
- <material name="black">
- <color rgba="0 0 0 1"/>
- </material>
- </visual>
- </link>
- <joint name="left_back_wheel_joint" type="continuous">
- <axis xyz="0 0 1"/>
- <parent link="base_link"/>
- <child link="left_back_wheel"/>
- <origin rpy="0 1.57075 0" xyz="-0.08 -0.1 -0.03"/>
- <limit effort="100" velocity="100"/>
- <joint_properties damping="0.0" friction="0.0"/>
- </joint>
- <link name="head">
- <visual>
- <geometry>
- <box size=".02 .03 .03"/>
- </geometry>
- <material name="white">
- <color rgba="1 1 1 1"/>
- </material>
- </visual>
- </link>
- <joint name="tobox" type="fixed">
- <parent link="base_link"/>
- <child link="head"/>
- <origin xyz="0 0.08 0.025"/>
- </joint>
- </robot>
在smartcar_description文件夹下建立launch文件夹,创建智能车的描述文件 base.urdf.rviz.launch,描述代码如下:
- <launch>
- <arg name="model" />
- <arg name="gui" default="False" />
- <param name="robot_description" textfile="$(find smartcar_description)/urdf/smartcar.urdf" />
- <param name="use_gui" value="$(arg gui)"/>
- <node name="joint_state_publisher" pkg="joint_state_publisher" type="joint_state_publisher" ></node>
- <node name="robot_state_publisher" pkg="robot_state_publisher" type="state_publisher" />
- <node name="rviz" pkg="rviz" type="rviz" args="-d $(find urdf_tutorial)/urdf.vcg" />
- </launch>
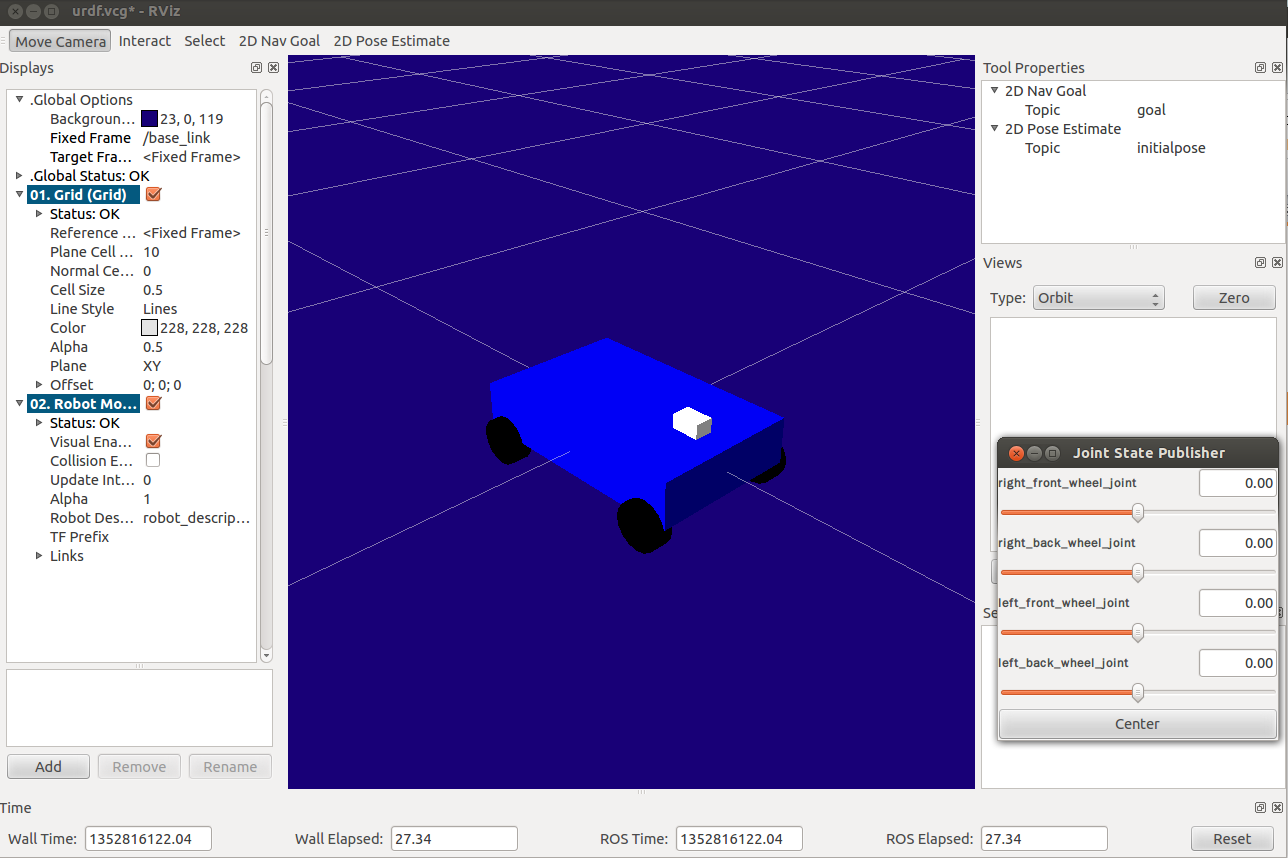
在终端中输入显示命令:
- roslaunch smartcar_description base.urdf.rviz.launch gui:=true
显示效果如下图所示,使用gui中的控制bar可以控制四个轮子单独旋转。
----------------------------------------------------------------
ROS探索总结(六)——使用smartcar进行仿真
之前的博客中,我们使用rviz进行了TurtleBot的仿真,而且使用urdf文件建立了自己的机器人smartcar,本篇博客是将两者进行结合,使用smartcar机器人在rviz中进行仿真。
一、模型完善
之前我们使用的都是urdf文件格式的模型,在很多情况下,ROS对urdf文件的支持并不是很好,使用宏定义的.xacro文件兼容性更好,扩展性也更好。所以我们把之前的urdf文件重新整理编写成.xacro文件。
.xacro文件主要分为三部分:
.xacro文件主要分为三部分:
1、机器人主体
- <?xml version="1.0"?>
- <robot name="smartcar" xmlns:xacro="http://ros.org/wiki/xacro">
- <property name="M_PI" value="3.14159"/>
- <!-- Macro for SmartCar body. Including Gazebo extensions, but does not include Kinect -->
- <include filename="$(find smartcar_description)/urdf/gazebo.urdf.xacro"/>
- <property name="base_x" value="0.33" />
- <property name="base_y" value="0.33" />
- <xacro:macro name="smartcar_body">
- <link name="base_link">
- <inertial>
- <origin xyz="0 0 0.055"/>
- <mass value="1.0" />
- <inertia ixx="1.0" ixy="0.0" ixz="0.0" iyy="1.0" iyz="0.0" izz="1.0"/>
- </inertial>
- <visual>
- <geometry>
- <box size="0.25 .16 .05"/>
- </geometry>
- <origin rpy="0 0 0" xyz="0 0 0.055"/>
- <material name="blue">
- <color rgba="0 0 .8 1"/>
- </material>
- </visual>
- <collision>
- <origin rpy="0 0 0" xyz="0 0 0.055"/>
- <geometry>
- <box size="0.25 .16 .05" />
- </geometry>
- </collision>
- </link>
- <link name="left_front_wheel">
- <inertial>
- <origin xyz="0.08 0.08 0.025"/>
- <mass value="0.1" />
- <inertia ixx="1.0" ixy="0.0" ixz="0.0" iyy="1.0" iyz="0.0" izz="1.0"/>
- </inertial>
- <visual>
- <geometry>
- <cylinder length=".02" radius="0.025"/>
- </geometry>
- <material name="black">
- <color rgba="0 0 0 1"/>
- </material>
- </visual>
- <collision>
- <origin rpy="0 1.57075 1.57075" xyz="0.08 0.08 0.025"/>
- <geometry>
- <cylinder length=".02" radius="0.025"/>
- </geometry>
- </collision>
- </link>
- <joint name="left_front_wheel_joint" type="continuous">
- <axis xyz="0 0 1"/>
- <parent link="base_link"/>
- <child link="left_front_wheel"/>
- <origin rpy="0 1.57075 1.57075" xyz="0.08 0.08 0.025"/>
- <limit effort="100" velocity="100"/>
- <joint_properties damping="0.0" friction="0.0"/>
- </joint>
- <link name="right_front_wheel">
- <inertial>
- <origin xyz="0.08 -0.08 0.025"/>
- <mass value="0.1" />
- <inertia ixx="1.0" ixy="0.0" ixz="0.0" iyy="1.0" iyz="0.0" izz="1.0"/>
- </inertial>
- <visual>
- <geometry>
- <cylinder length=".02" radius="0.025"/>
- </geometry>
- <material name="black">
- <color rgba="0 0 0 1"/>
- </material>
- </visual>
- <collision>
- <origin rpy="0 1.57075 1.57075" xyz="0.08 -0.08 0.025"/>
- <geometry>
- <cylinder length=".02" radius="0.025"/>
- </geometry>
- </collision>
- </link>
- <joint name="right_front_wheel_joint" type="continuous">
- <axis xyz="0 0 1"/>
- <parent link="base_link"/>
- <child link="right_front_wheel"/>
- <origin rpy="0 1.57075 1.57075" xyz="0.08 -0.08 0.025"/>
- <limit effort="100" velocity="100"/>
- <joint_properties damping="0.0" friction="0.0"/>
- </joint>
- <link name="left_back_wheel">
- <inertial>
- <origin xyz="-0.08 0.08 0.025"/>
- <mass value="0.1" />
- <inertia ixx="1.0" ixy="0.0" ixz="0.0" iyy="1.0" iyz="0.0" izz="1.0"/>
- </inertial>
- <visual>
- <geometry>
- <cylinder length=".02" radius="0.025"/>
- </geometry>
- <material name="black">
- <color rgba="0 0 0 1"/>
- </material>
- </visual>
- <collision>
- <origin rpy="0 1.57075 1.57075" xyz="-0.08 0.08 0.025"/>
- <geometry>
- <cylinder length=".02" radius="0.025"/>
- </geometry>
- </collision>
- </link>
- <joint name="left_back_wheel_joint" type="continuous">
- <axis xyz="0 0 1"/>
- <parent link="base_link"/>
- <child link="left_back_wheel"/>
- <origin rpy="0 1.57075 1.57075" xyz="-0.08 0.08 0.025"/>
- <limit effort="100" velocity="100"/>
- <joint_properties damping="0.0" friction="0.0"/>
- </joint>
- <link name="right_back_wheel">
- <inertial>
- <origin xyz="-0.08 -0.08 0.025"/>
- <mass value="0.1" />
- <inertia ixx="1.0" ixy="0.0" ixz="0.0" iyy="1.0" iyz="0.0" izz="1.0"/>
- </inertial>
- <visual>
- <geometry>
- <cylinder length=".02" radius="0.025"/>
- </geometry>
- <material name="black">
- <color rgba="0 0 0 1"/>
- </material>
- </visual>
- <collision>
- <origin rpy="0 1.57075 1.57075" xyz="-0.08 -0.08 0.025"/>
- <geometry>
- <cylinder length=".02" radius="0.025"/>
- </geometry>
- </collision>
- </link>
- <joint name="right_back_wheel_joint" type="continuous">
- <axis xyz="0 0 1"/>
- <parent link="base_link"/>
- <child link="right_back_wheel"/>
- <origin rpy="0 1.57075 1.57075" xyz="-0.08 -0.08 0.025"/>
- <limit effort="100" velocity="100"/>
- <joint_properties damping="0.0" friction="0.0"/>
- </joint>
- <link name="head">
- <inertial>
- <origin xyz="0.08 0 0.08"/>
- <mass value="0.1" />
- <inertia ixx="1.0" ixy="0.0" ixz="0.0" iyy="1.0" iyz="0.0" izz="1.0"/>
- </inertial>
- <visual>
- <geometry>
- <box size=".02 .03 .03"/>
- </geometry>
- <material name="white">
- <color rgba="1 1 1 1"/>
- </material>
- </visual>
- <collision>
- <origin xyz="0.08 0 0.08"/>
- <geometry>
- <cylinder length=".02" radius="0.025"/>
- </geometry>
- </collision>
- </link>
- <joint name="tobox" type="fixed">
- <parent link="base_link"/>
- <child link="head"/>
- <origin xyz="0.08 0 0.08"/>
- </joint>
- </xacro:macro>
- </robot>
2、gazebo属性部分
- <?xml version="1.0"?>
- <robot xmlns:controller="http://playerstage.sourceforge.net/gazebo/xmlschema/#controller"
- xmlns:interface="http://playerstage.sourceforge.net/gazebo/xmlschema/#interface"
- xmlns:sensor="http://playerstage.sourceforge.net/gazebo/xmlschema/#sensor"
- xmlns:xacro="http://ros.org/wiki/xacro"
- name="smartcar_gazebo">
- <!-- ASUS Xtion PRO camera for simulation -->
- <!-- gazebo_ros_wge100 plugin is in kt2_gazebo_plugins package -->
- <xacro:macro name="smartcar_sim">
- <gazebo reference="base_link">
- <material>Gazebo/Blue</material>
- </gazebo>
- <gazebo reference="right_front_wheel">
- <material>Gazebo/FlatBlack</material>
- </gazebo>
- <gazebo reference="right_back_wheel">
- <material>Gazebo/FlatBlack</material>
- </gazebo>
- <gazebo reference="left_front_wheel">
- <material>Gazebo/FlatBlack</material>
- </gazebo>
- <gazebo reference="left_back_wheel">
- <material>Gazebo/FlatBlack</material>
- </gazebo>
- <gazebo reference="head">
- <material>Gazebo/White</material>
- </gazebo>
- </xacro:macro>
- </robot>
3、主文件
- <span style="font-size:14px;"><?xml version="1.0"?>
- <robot name="smartcar"
- xmlns:xi="http://www.w3.org/2001/XInclude"
- xmlns:gazebo="http://playerstage.sourceforge.net/gazebo/xmlschema/#gz"
- xmlns:model="http://playerstage.sourceforge.net/gazebo/xmlschema/#model"
- xmlns:sensor="http://playerstage.sourceforge.net/gazebo/xmlschema/#sensor"
- xmlns:body="http://playerstage.sourceforge.net/gazebo/xmlschema/#body"
- xmlns:geom="http://playerstage.sourceforge.net/gazebo/xmlschema/#geom"
- xmlns:joint="http://playerstage.sourceforge.net/gazebo/xmlschema/#joint"
- xmlns:controller="http://playerstage.sourceforge.net/gazebo/xmlschema/#controller"
- xmlns:interface="http://playerstage.sourceforge.net/gazebo/xmlschema/#interface"
- xmlns:rendering="http://playerstage.sourceforge.net/gazebo/xmlschema/#rendering"
- xmlns:renderable="http://playerstage.sourceforge.net/gazebo/xmlschema/#renderable"
- xmlns:physics="http://playerstage.sourceforge.net/gazebo/xmlschema/#physics"
- xmlns:xacro="http://ros.org/wiki/xacro">
- <include filename="$(find smartcar_description)/urdf/smartcar_body.urdf.xacro" />
- <!-- Body of SmartCar, with plates, standoffs and Create (including sim sensors) -->
- <smartcar_body/>
- <smartcar_sim/>
- </robot></span>
在launch文件中要启动节点和模拟器。
- <launch>
- <param name="/use_sim_time" value="false" />
- <!-- Load the URDF/Xacro model of our robot -->
- <arg name="urdf_file" default="$(find xacro)/xacro.py '$(find smartcar_description)/urdf/smartcar.urdf.xacro'" />
- <arg name="gui" default="false" />
- <param name="robot_description" command="$(arg urdf_file)" />
- <param name="use_gui" value="$(arg gui)"/>
- <node name="arbotix" pkg="arbotix_python" type="driver.py" output="screen">
- <rosparam file="$(find smartcar_description)/config/smartcar_arbotix.yaml" command="load" />
- <param name="sim" value="true"/>
- </node>
- <node name="joint_state_publisher" pkg="joint_state_publisher" type="joint_state_publisher" >
- </node>
- <node name="robot_state_publisher" pkg="robot_state_publisher" type="state_publisher">
- <param name="publish_frequency" type="double" value="20.0" />
- </node>
- <!-- We need a static transforms for the wheels -->
- <node pkg="tf" type="static_transform_publisher" name="odom_left_wheel_broadcaster" args="0 0 0 0 0 0 /base_link /left_front_link 100" />
- <node pkg="tf" type="static_transform_publisher" name="odom_right_wheel_broadcaster" args="0 0 0 0 0 0 /base_link /right_front_link 100" />
- <node name="rviz" pkg="rviz" type="rviz" args="-d $(find smartcar_description)/urdf.vcg" />
- </launch>
三、仿真测试
首先运行lanuch,既可以看到rviz中的机器人:
- roslaunch smartcar_description smartcar_display.rviz.launch
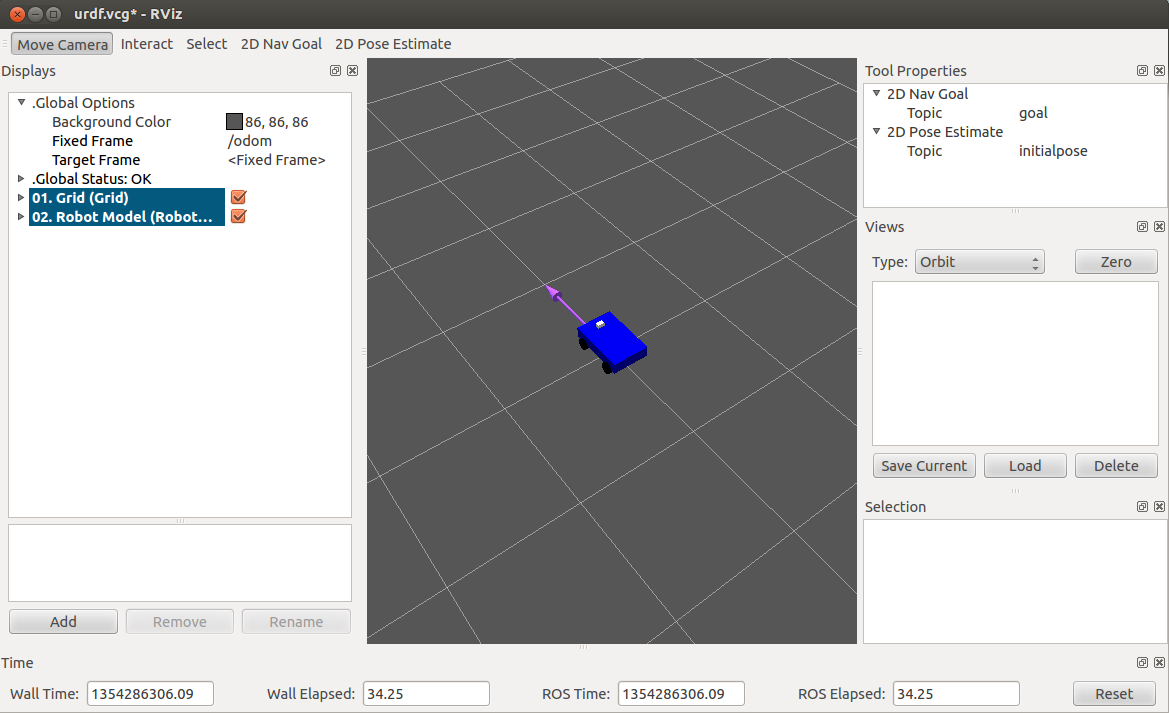
发布一条动作的消息。
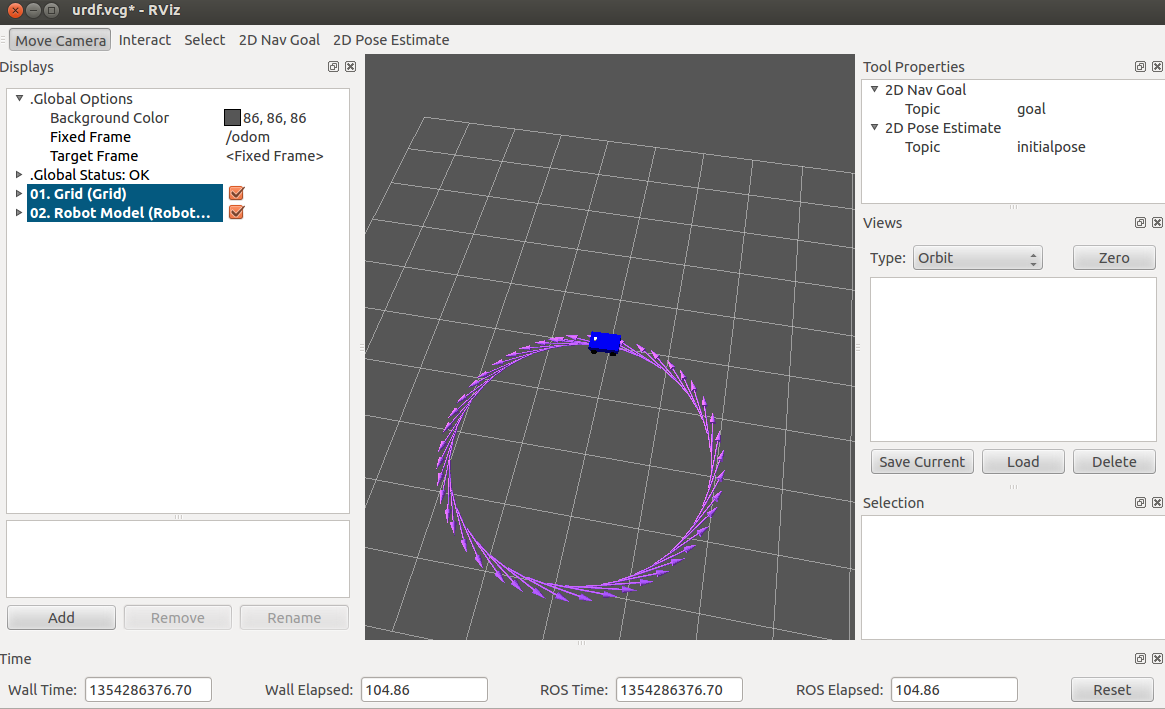
欢迎大家转载我的文章。
转载请注明:转自古-月


 1402
1402

 被折叠的 条评论
为什么被折叠?
被折叠的 条评论
为什么被折叠?
 到【灌水乐园】发言


