


原文链接 Trajectory following with MAVROS OFFBOARD on Raspberry Pi——Jaeyoung Lim / August 10, 2016
    </div>

    <nav id="site-navigation" class="navigation-main" role="navigation">
        <h1 class="menu-toggle">Menu</h1>
        <div class="screen-reader-text skip-link"><a href="#content" title="Skip to content">Skip to content</a></div>

        <div class="menu-about-container"><ul id="menu-about" class="menu"><li id="menu-item-191" class="menu-item menu-item-type-custom menu-item-object-custom menu-item-191"><a href="https://404warehouse.wordpress.com/">Home</a></li>
<div id="main" class="site-main">

<div id="primary" class="content-area">
    <div id="content" class="site-content" role="main">
Trajectory following with MAVROS OFFBOARD on Raspberry Pi
    <div class="entry-meta">
        <a class="author" rel="author" href="https://404warehouse.net/author/gokoreas/">Jaeyoung Lim</a> / <a class="entry-date" href="https://404warehouse.net/2016/08/10/trajectory-following-with-mavros-on-raspberry-pi/">August 10, 2016</a>       </div><!-- .entry-meta -->
</header><!-- .entry-header -->

<div class="entry-content">
    <blockquote><p>Jaeyoung Lim<br>
This post is written with the work done with Modulabs DCU Lab
Introduction
Implementing a onboard computer on a small UAS can have many benefits such as being able to use ROS onboard the system. This can speed up the development process and enable to use various sensors and actuators that are supported by the ROS community. I have recently written articles on how to use MAVROS to fly a PX4 based quadrotor. However the articles do not cover operating such a system outdoors. Operating outdoors can have many issues as configuring a network or the change of localization performances and the presence of the environment. This article describes my experience on the implementation and operation of a ROS controlled MAV outdoors so that the reader can avoid the mistakes that I have made. Raspberry Pi 2 B+ was used for the onboard computer running ROS.
Results
A simple trajectory generation node was implemented to generate a circular trajectory for the quadrotor to follow. The radius was 6 m at a 15m altitude with the angular rate of 0.4 rad/s.
class="youtube-player" type="text/html" width="840" height="400" src="https://www.youtube.com/embed/9pOydoNeV_U?version=3&rel=1&fs=1&autohide=2&showsearch=0&showinfo=1&iv_load_policy=1&wmode=transparent" allowfullscreen="true">
The video shows the comparison of the real flight with the gazebo SITL simulation. The video shows that the SITL is pretty accurate with the real flight.
Hardware Setup
Quadrotor Hardware

The quadrotor is a custom built quadrotor based on the PX4 flight stack. The quadrotor has a 8X4.5 inch props with a 1200kv motor running on a 3S Lipo. Pixhawk was used for the flight controller and the quadrotor is capable of flying and basic waypoint based autonomous missions without the existence of the companion computer.
Companion Computer
Raspberry Pi 2 B+ was used for the companion computer with the pixhawk flight controller. It is not specificly a good choice to use the Raspberry Pi as a companion computer. Raspberry Pis are cheap and fun to use but using raspbian may cause build problems in some packages in ROS.
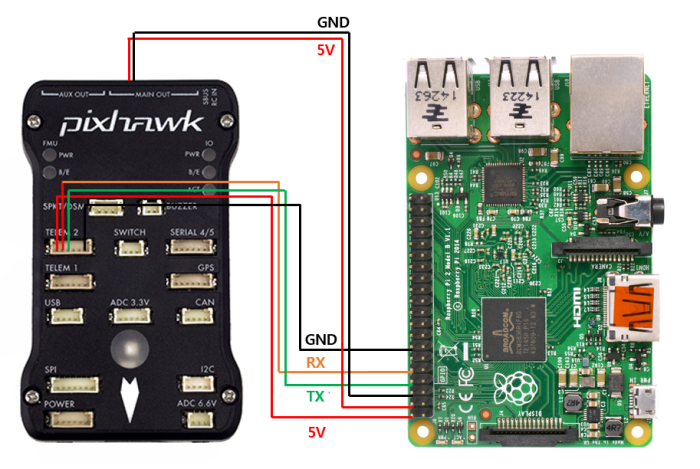
The companion computer is stacked on top of the flight controller. The TX/RX pins are connected to the TELEM2 port on Pixhawk. From the guide Raspberry Pi is getting power from the TELEM2 port but the Raspberry Pi was keep turning off as the 5V bus on the TELEM2 port was not providing enough current. Thus, the power is provided from the 5V bus on the servo rail which is powered by a UBEC from the ESC. Powering Raspberry Pi through GPIO is not recommended as there are no regulator or backward protection. However, As I am powering the Raspberry Pi through a UBEC, it is safer.
A 5.4 wifi dongle was used for network connections.
Software configuration

PX4 configuration
As the Raspberry Pi UART port only supports upto 57600 bps, the baudrate of the SYS_COMPANION parameter should be set accordingly. This is different with using the FTDI. This degrades the performance of the OFFBOARD control capabilities, but as the example on this article covers only setpoint position messages, 57600bps is enough to do the job.
SYS_COMPANION 57600
ROS configuration
Ubuntu 14.04 was used for the OS as there were some build issues using Raspbian Jessie. Ubuntu officially supports raspberry Pi, so the image was used on the raspberry Pi.
ROS indigo was used in this project. This was a decision made from the fact that ubuntu 14.04 and ROS indigo on raspberry pi was tested in a previous example.
MAVROS configuration
The name of the UART port on Raspberry Pi 2 is ttyAMA0. This should be configured in the launch file.
fcu_ur:=/dev/ttyAMA0:57600
To test run a mavros node without making a launch file you can use:
ronrun mavros mavros_node _fcu_url:="/dev/ttyAMA0:57600"
You can check if the connection with the flight controller is properly done using rostopic tools such as:
rostopic echo /mavros/imu/data
This command echos the imu data from the flight controller and prints it on the screen.
Trajectory Publisher node

The node is a simple publisher publishing position setpoints to the quadrotor.
#include
include “math.h”
double r;
double theta;
double count=0.0;
double wn;
mavros_msgs::State current_state;
void state_cb(const mavros_msgs::State::ConstPtr& msg){
current_state = *msg;
}
int main(int argc, char **argv)
{
ros::init(argc, argv, “offb_node”);
ros::NodeHandle nh;
ros::Subscriber state_sub = nh.subscribe
("mavros/state", 10, state_cb);
ros::Publisher local_pos_pub = nh.advertise
("mavros/setpoint_position/local", 10);
//the setpoint publishing rate MUST be faster than 2Hz
ros::Rate rate(20.0);
<span class="skimlinks-unlinked">nh.param("pub_setpoints_traj/wn</span>, 1.0);
<span class="skimlinks-unlinked">nh.param("pub_setpoints_traj/r</span> 1.0);
// wait for FCU connection
while(ros::ok() && current_state.connected){
ros::spinOnce();
<span class="skimlinks-unlinked">rate.sleep</span>();
}
geometry_msgs::PoseStamped pose;
<span class="skimlinks-unlinked">pose.pose.position.x</span> = 0;
<span class="skimlinks-unlinked">pose.pose.position.y</span> = 0;
<span class="skimlinks-unlinked">pose.pose.position.z</span> = 2;
//send a few setpoints before starting
for(int i = 100; ros::ok() && i > 0; --i){
local_pos_pub.publish(pose);
ros::spinOnce();
<span class="skimlinks-unlinked">rate.sleep</span>();
}
ros::Time last_request = ros::Time::now();
while(ros::ok()){
theta = wn*count*0.05;
<span class="skimlinks-unlinked">pose.pose.position.x</span> = r*sin(theta);
<span class="skimlinks-unlinked">pose.pose.position.y</span> = r*cos(theta);
<span class="skimlinks-unlinked">pose.pose.position.z</span> = 15;
count++;
local_pos_pub.publish(pose);
ros::spinOnce();
<span class="skimlinks-unlinked">rate.sleep</span>();
}
return 0;
There are two parameters in the launch file which are the radius and the angular rate of the quadrotor. This can be configured from the launch file.
Operatimg the quadrotor
A field box is essential to take all the necessary equipment without forgetting something. The photo below is my go-to toolbox for field tests.

For operating a flight controller and a companion computer outdoors, it is convinient to configure a wifi network on the field. A wifi router is used to build a wifi network around a field which is powered by a 3S battery. A connector was built to connect the battery to the DCIn port to power a Wifi router.

I used putty for the ssh client for the Raspberry Pi. The basic operation procedures in running ROS is as follows.

First, the laptop should be connected to the same network as the raspberry pi is connected. Then, open a ssh session and run roscore:
roscore
Start a new session and run the launch file that has been configured. In this case:
rosrun modudculab_ros ctrl_traj_test.launch
For longer range applications, a more powerful router or antenna should be used. Using an ordinary wifi router outdoors seems to work well and simplify the operation process to make the system work.
        <style type="text/css">
        div.wpmrec2x{max-width:610px;}
        div.wpmrec2x div.u > div{float:left;margin-right:10px;}
        div.wpmrec2x div.u > div:nth-child(3n){margin-right:0px;}
        </style>        <div class="wpcnt">
        <div class="wpa wpmrec wpmrec2x" style="display: inline-block !important;">
            <span class="wpa-about">Advertisements</span>
            <div class="u">
                                    <script type="text/javascript" id="s26942">
                    (function(g,$){if("undefined"!=typeof g.__ATA){
                        g.__ATA.initAd({collapseEmpty:'after', sectionId:26942, width:300, height:250});
                        g.__ATA.initAd({collapseEmpty:'after', sectionId:114160, width:300, height:250});
                    }})(window,jQuery);
                </script><div id="adtags-1"


 3130
3130


 被折叠的 条评论
为什么被折叠?
被折叠的 条评论
为什么被折叠?
 到【灌水乐园】发言


