


 本文介绍如何使用ROS和URDF建立四轮驱动小车的机器人模型,并讲解了如何利用RViz进行模型可视化及调整。此外,还介绍了如何在Android设备上实时观测由Roomba和Xtion Pro组成的机器人所构建的地图。
未来,该语言会从ROS独立出来,集成到Ubuntu官方包发布。必须承认,URDF 是个很难懂的语言,但有RViz的强大仿真功能,我们很容易调试它。今天我们就以经常见到智能四轮驱动小车为例介绍它的使用。
1. 软件环境
OS: Ubuntu 14.04
ROS: Indigo Full package
2. 小车形状与尺寸

具体实际的物理小车的建立请看我的文章树莓派搭建 ROS 系统下四论驱动车,并用 IPad, 手机控制。该车有两层,4个轮子,头部还有一个hc-sr04超声波和舵机。
基座(base_link): 长 27cm 宽 15cm 每层板厚度3mm 下层高度4.5cm 上层高度7.8cm
轮子 直径6.8cm 这个尺寸必须非常精确,影响测速和轨迹运算。厚度2.5cm
该车名字 SP1S (顺跑1 Smart)
3. 创建Ros package
- <span style="font-size:18px;">$ catkin_create_pkg sp1s std_msgs rospy roscpp urdf
- $ cd sp1s/
- $ mkdir urdf</span>
<span style="font-size:18px;">$ catkin_create_pkg sp1s std_msgs rospy roscpp urdf
$ cd sp1s/
$ mkdir urdf</span>**必须已经创建好了一个workspace的情况下,使用该命令创建package.
4. 创建lauch文件启动Rviz
创建目录launch并新建文件dispaly.launch 建立好urdf文件后就使用该文件launch
- <launch>
- <arg name="model" />
- <arg name="gui" default="False" />
- <param name="robot_description" textfile="$(arg model)" />
- <param name="use_gui" value="$(arg gui)"/>
- <node name="joint_state_publisher" pkg="joint_state_publisher" type="joint_state_publisher" />
- <node name="robot_state_publisher" pkg="robot_state_publisher" type="state_publisher" />
- <node name="rviz" pkg="rviz" type="rviz" args="-d $(find urdf_tutorial)/urdf.rviz" required="true" />
- </launch>
<launch>
	<arg name="model" />
	<arg name="gui" default="False" />
	<param name="robot_description" textfile="$(arg model)" />
	<param name="use_gui" value="$(arg gui)"/>
	<node name="joint_state_publisher" pkg="joint_state_publisher" type="joint_state_publisher" />
	<node name="robot_state_publisher" pkg="robot_state_publisher" type="state_publisher" />
	<node name="rviz" pkg="rviz" type="rviz" args="-d $(find urdf_tutorial)/urdf.rviz" required="true" />
</launch>第一个输入参数 model 就是要启动的urdf文件路径。
第二个输入参数 gui 指定是否启用关节转动控制面板窗口。
5. 创建基座base_link
ROS里面把每个零件称为link,作为基座的link统一称为base_link.在官方的所有事例文章里面到处可以看到base_link,所以最好也延续该名称。其它的link都要依附到base_link上。这里我们把下层的板作为base_link. 新建一个文件sp1s.urdf,描述代码如下:
- <pre name="code" class="html"><span style="font-size:18px;"><?xml version="1.0"?>
- <robot name="sp1s">
- <link name="base_link">
- <visual>
- <geometry>
- <box size="0.27 .15 .003"/>
- </geometry>
- <material name="white">
- <color rgba="1 1 1 .5"/>
- </material>
- </visual>
- </link>
- </robot></span>
<pre name="code" class="html"><span style="font-size:18px;"><?xml version="1.0"?>
<robot name="sp1s">
  <link name="base_link">
    <visual>
      <geometry>
        <box size="0.27 .15 .003"/>
      </geometry>
      <material name="white">
         <color rgba="1 1 1 .5"/>
      </material>
    </visual>
  </link>
</robot></span>
link可以指定许多属性:
- <inertial> 定义惯性
- <visual> 定义一个link的外观,大小,颜色和材质纹理贴图
- <collision>定义碰撞检测属性
我们详细看一下<visual>的定义:
- <geometry> 定义了几何形状为一个立方体,三个参数分别为长宽高,单位是米(m). 这里我们指定下层小车板子的板的尺寸。<geometry>可以有好几个选项:<box> 立方体 <cylinder>圆柱体 <sphere>球体
- <material> 指定颜色rgb和透明度a. 它们取值范围都是[0,1] 区间。
使用下面命令启动RViz来查看我们刚刚完成的机器人模型:
- roslaunch sp1s display.launch model:=urdf/sp1s.urdf
roslaunch sp1s display.launch model:=urdf/sp1s.urdf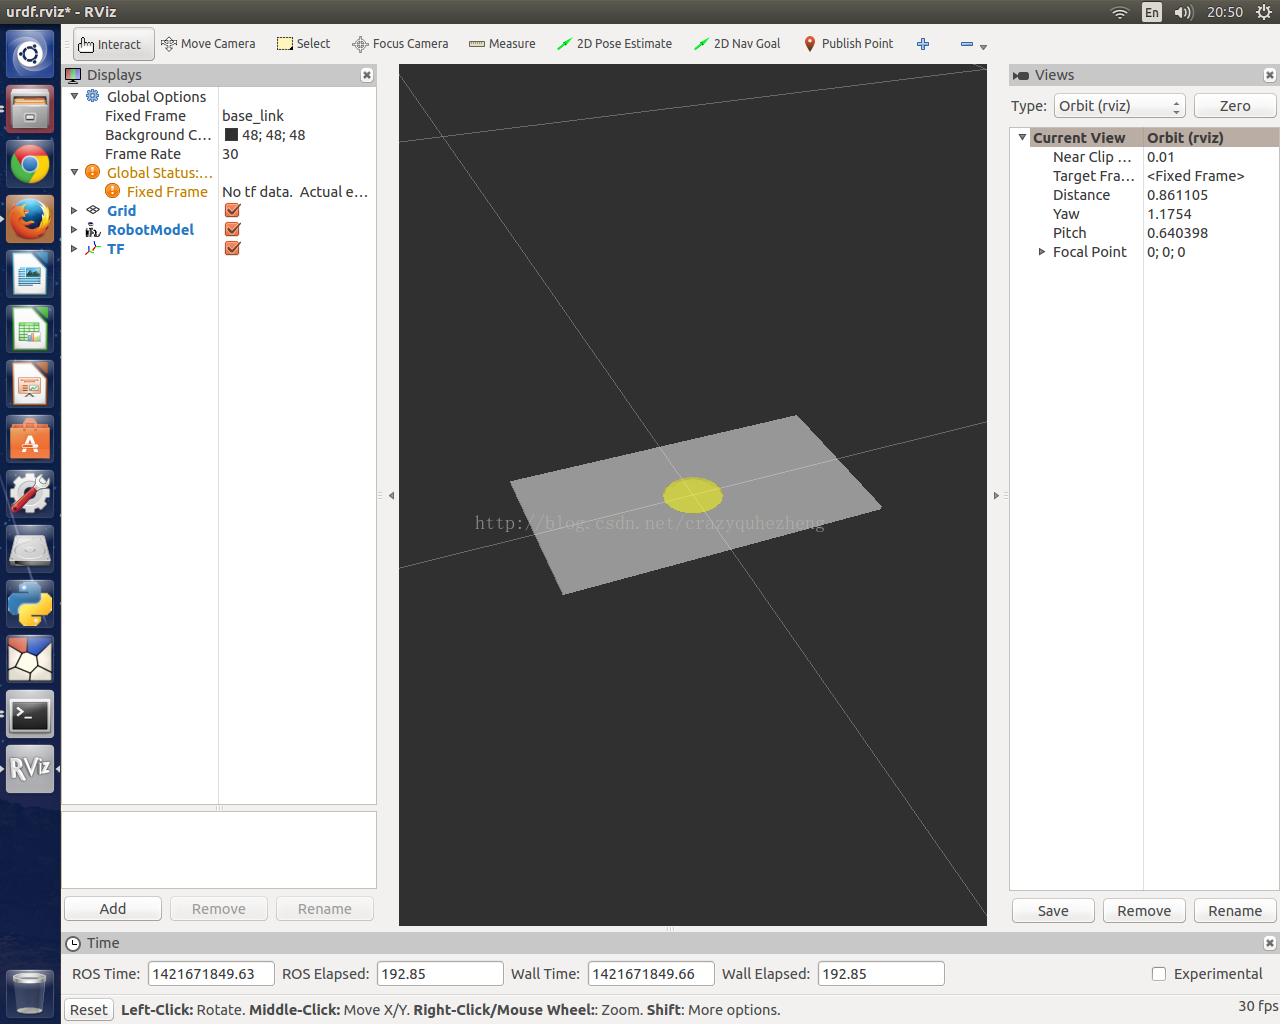
这时只是显示了一个半透明的长方体,就是我们的主体部分。中间的黄色点代表了base_link的原点,也是整个RViz世界的原点。
6. 创建轮子
下面我们开始创建四个轮子,它们的名字分别为tyer_front_left, tyer_front_right, tyer_back_left, tyer_back_right. 尺寸大小直径6.8cm 厚度2.5cm. 先以一个轮子为例:
- <span style="font-size:18px;"><?xml version="1.0"?>
- <robot name="sp1s">
- <link name="base_link">
- <visual>
- <geometry>
- <box size="0.27 .15 .003"/>
- </geometry>
- <material name="white">
- <color rgba="1 1 1 .5"/>
- </material>
- </visual>
- </link>
- <link name="tyer_front_left">
- <visual>
- <geometry>
- <cylinder length=".025" radius="0.034"></cylinder>
- </geometry>
- <material name="yellow">
- <color rgba="1 1 0 1"/>
- </material>
- </visual>
- </link>
- <joint name="base_to_front_left" type="fixed">
- <parent link="base_link"/>
- <child link="tyer_front_left"/>
- </joint>
- </robot>
- </span>
<span style="font-size:18px;"><?xml version="1.0"?>
<robot name="sp1s">
  <link name="base_link">
    <visual>
      <geometry>
        <box size="0.27 .15 .003"/>
      </geometry>
      <material name="white">
         <color rgba="1 1 1 .5"/>
    </material>
    </visual>
  </link>

  <link name="tyer_front_left">
    <visual>
      <geometry>
       <cylinder length=".025" radius="0.034"></cylinder>
      </geometry>
      <material name="yellow">
          <color rgba="1 1 0 1"/>
      </material>
    </visual>
  </link>

  <joint name="base_to_front_left" type="fixed">
    <parent link="base_link"/>
    <child link="tyer_front_left"/>
  </joint>
</robot>
</span>- 定义黄色的轮子tyer_front_left
- 添加了一个关节 joint将base_link和tyer_front_left关联在一起,为了简单将joint定义为fixed类型。下一篇文章里将会改成continuous,并详细解释joint的作用
- 两个及以上的link定义到一个文件里必须使用joint关联,否则出错
- <span style="font-size:18px;">roslaunch sp1s display.launch model:=urdf/sp1s.urdf</span>
<span style="font-size:18px;">roslaunch sp1s display.launch model:=urdf/sp1s.urdf</span>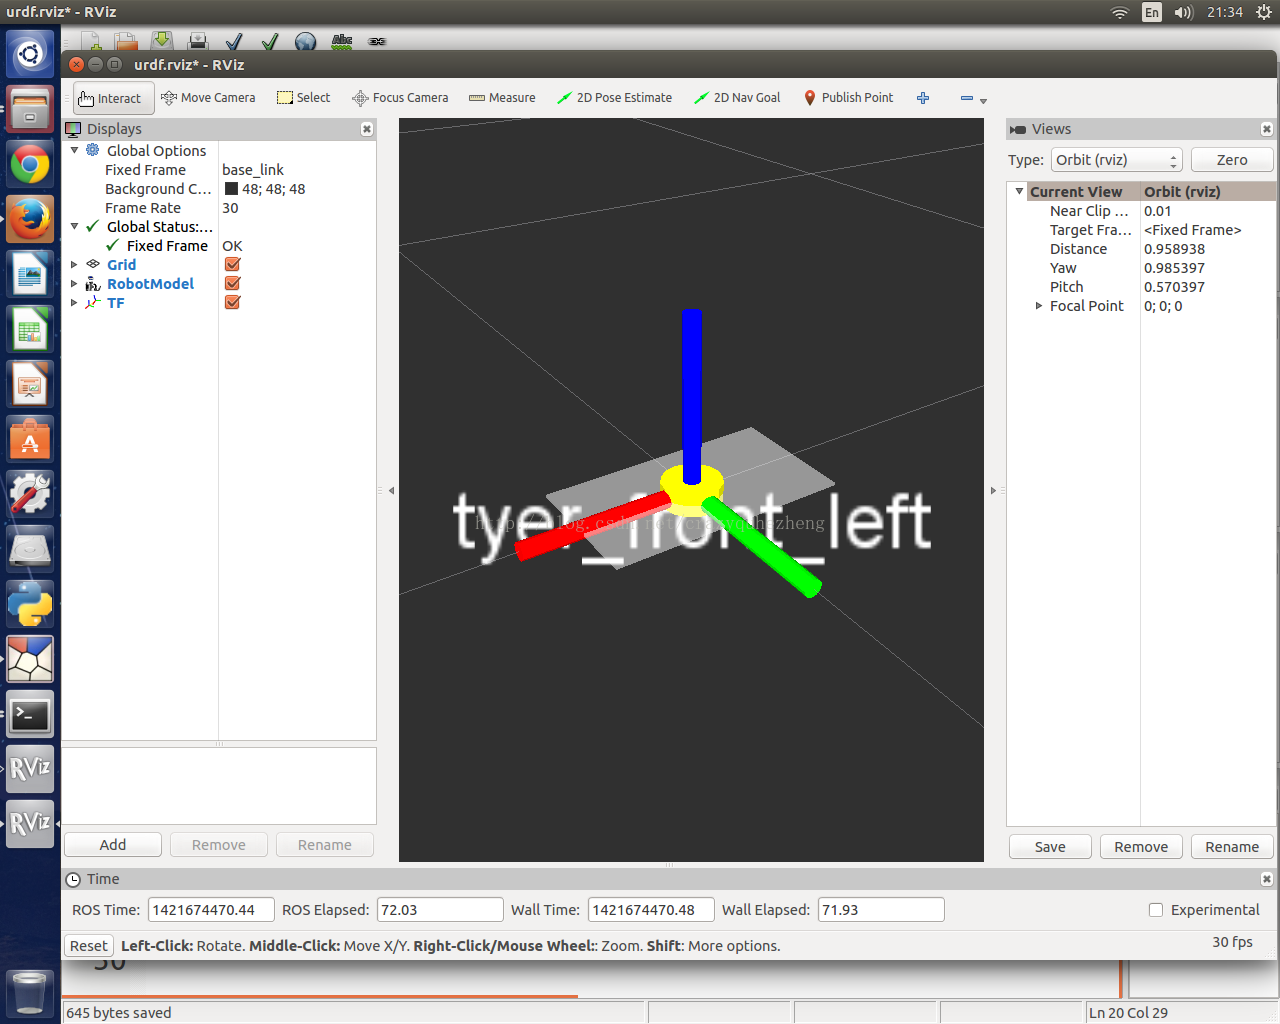
可以看到黄色的轮子显示到了车身的中央,因为它的原点origin和base_link的origin重合. 选中TFcheckbox,就会显示出XYZ坐标轴,红色为X, 绿色为Y,蓝色为Z。
下一篇文章将讲述如何使用joint将轮子平移到左上方并旋转。
ROS 学习系列 -- 程序发送点云PointCloud2到Rviz显示
方法1 直接加载PCD文件:
- #include <ros/ros.h>
- // PCL specific includes
- #include <sensor_msgs/PointCloud2.h>
- #include <pcl_conversions/pcl_conversions.h>
- #include <pcl/point_cloud.h>
- #include <pcl/point_types.h>
- // Create a ROS publisher for the output point cloud
- pub = nh.advertise<sensor_msgs::PointCloud2> ("filtered_plane", 1);
- pcl::PCLPointCloud2::Ptr cloud2(new pcl::PCLPointCloud2);
- pcl::io::loadPCDFile (argv[1], *cloud2);
- // Convert to ROS data type
- sensor_msgs::PointCloud2 output;
- pcl_conversions::fromPCL(*cloud2, output);
- output.header.frame_id = std::string("base_link");
- // Publish the data
- pub.publish (output);
#include <ros/ros.h>
// PCL specific includes
#include <sensor_msgs/PointCloud2.h>
#include <pcl_conversions/pcl_conversions.h>
#include <pcl/point_cloud.h>
#include <pcl/point_types.h>

// Create a ROS publisher for the output point cloud
pub = nh.advertise<sensor_msgs::PointCloud2> ("filtered_plane", 1);

pcl::PCLPointCloud2::Ptr cloud2(new pcl::PCLPointCloud2);
pcl::io::loadPCDFile (argv[1], *cloud2);
// Convert to ROS data type
sensor_msgs::PointCloud2 output;
pcl_conversions::fromPCL(*cloud2, output);
output.header.frame_id = std::string("base_link");

// Publish the data
pub.publish (output);
方法2 代码组织点云数据
- #include <sensor_msgs/PointCloud2.h>
- #include <pcl/io/pcd_io.h>
- #include <pcl/impl/point_types.hpp>
- #include <pcl_ros/point_cloud.h>
- #include <vector>
- #include <pcl_conversions/pcl_conversions.h>
- typedef pcl::PointCloud<pcl::PointXYZ> pclPointCloudXYZ;
- typedef boost::shared_ptr<pclPointCloudXYZ> pclPointCloudXYZPtr;
- void main() {
- pclPointCloudXYZPtr pcl_cloud( new pclPointCloudXYZ );
- BuildPclPointCloud( pcl_cloud );
- sensor_msgs::PointCloud2Ptr pROSCloud(new sensor_msgs::PointCloud2);
- pcl::toROSMsg( *pcl_cloud, *pROSCloud );
- pROSCloud->header.frame_id = frame;
- pROSCloud->header.stamp = ros::Time::now();
- }
- template<typename PointCloudType > void
- BuildPclPointCloud( boost::shared_ptr<pcl::PointCloud<PointCloudType>> pCloud )
- {
- PointCloudType target_pt;
- int j = 0;
- for( int u = 0; u < width; u++ )
- {
- for(int v = 0; v < height; v++ )
- {
- target_pt.x = x;
- target_pt.y = y;
- target_pt.z = z;
- pCloud->points.push_back( target_pt );
- }
- }
- pCloud->width = pCloud->points.size();
- pCloud->header.stamp = pcl_conversions::toPCL( ros::Time::now());
- pCloud->height = 1;
- }
#include <sensor_msgs/PointCloud2.h>
#include <pcl/io/pcd_io.h>
#include <pcl/impl/point_types.hpp>
#include <pcl_ros/point_cloud.h>
#include <vector>
#include <pcl_conversions/pcl_conversions.h>

typedef pcl::PointCloud<pcl::PointXYZ> pclPointCloudXYZ;
typedef boost::shared_ptr<pclPointCloudXYZ> pclPointCloudXYZPtr;

void main() {
    pclPointCloudXYZPtr pcl_cloud( new pclPointCloudXYZ );
    BuildPclPointCloud( pcl_cloud );
    sensor_msgs::PointCloud2Ptr  pROSCloud(new sensor_msgs::PointCloud2);
    pcl::toROSMsg( *pcl_cloud, *pROSCloud );
    pROSCloud->header.frame_id = frame;
    pROSCloud->header.stamp = ros::Time::now();
}

template<typename PointCloudType > void
    BuildPclPointCloud( boost::shared_ptr<pcl::PointCloud<PointCloudType>> pCloud )
    {
        PointCloudType target_pt;
        int j = 0;
        for( int u = 0; u < width; u++ )
        {
            for(int v = 0; v < height; v++ )
            {

                target_pt.x =  x;
                target_pt.y =  y;
                target_pt.z =  z;
                pCloud->points.push_back( target_pt );
            }
        }
        pCloud->width = pCloud->points.size();
        pCloud->header.stamp = pcl_conversions::toPCL( ros::Time::now());
        pCloud->height = 1;
    }
ROS 学习系列 -- 执行turtlebot navigation的方法
我们讲一下如何使用现有的turtlebot launch文件来启动navigation,并在PC上使用rviz指挥。
1. 网络环境布置
turtlebot单片机我们使用的是firefly,rviz运行在PC上,它们使用wifi通讯。master ros运行在firefly上,PC需要指向firefly。在PC修改IP到firefly主机的映射,修改/etc/hosts 文件,如:
- sudo nano /etc/hosts
sudo nano /etc/hosts
打开hosts后,我们从前面几行开始插入firefly单片机的ip地址和hostname,形式如下:
- 127.0.0.1 localhost
- 127.0.1.1 pc_hostname
- 192.168.1.16 firefly
- # The following lines are desirable for IPv6 capable hosts
- ::1 ip6-localhost ip6-loopback
- fe00::0 ip6-localnet
- ff00::0 ip6-mcastprefix
- ff02::1 ip6-allnodes
- ff02::2 ip6-allrouters
127.0.0.1       localhost
127.0.1.1       pc_hostname
192.168.1.16    firefly

# The following lines are desirable for IPv6 capable hosts
::1     ip6-localhost ip6-loopback
fe00::0 ip6-localnet
ff00::0 ip6-mcastprefix
ff02::1 ip6-allnodes
ff02::2 ip6-allrouters
完毕后保存并确认可以在PC上ping通firefly名字本身。
在firefly单片机上source下面的脚本内容,设定turtlebot为master ROS节点:
- export TURTLEBOT_BASE=roomba
- export TURTLEBOT_STACKS=circles
- export TURTLEBOT_3D_SENSOR=asus_xtion_pro
- export TURTLEBOT_SIMULATION=false
- export TURTLEBOT_SERIAL_PORT=/dev/ttyUSB0
- export ROS_IP=192.168.1.16
- export TURTLEBOT_MAP_FILE=/home/firefly/room323.yaml
export TURTLEBOT_BASE=roomba
export TURTLEBOT_STACKS=circles
export TURTLEBOT_3D_SENSOR=asus_xtion_pro
export TURTLEBOT_SIMULATION=false
export TURTLEBOT_SERIAL_PORT=/dev/ttyUSB0
export ROS_IP=192.168.1.16
export TURTLEBOT_MAP_FILE=/home/firefly/room323.yaml
在PC上source下面的脚本内容,指向turtlebot为master ROS节点:
- export ROS_MASTER_URI=http://firefly:11311
- export ROS_HOSTNAME=<span style="font-family:SimSun;">pc_hostname</span>
export ROS_MASTER_URI=http://firefly:11311
export ROS_HOSTNAME=<span style="font-family:SimSun;">pc_hostname</span>
2. 安装必要软件包
在firefly单片机上执行下面的脚本安装:
- sudo apt-get install ros-indigo-turtlebot ros-indigo-rocon-app-platform ros-indigo-rocon-multimaster ros-indigo-rocon-msgs ros-indigo-rocon-qt-gui ros-indigo-rocon-tools ros-indigo-std-capabilities ros-indigo-rqt-capabilities ros-indigo-rocon-remocon ros-indigo-rocon-apps ros-indigo-turtlebot-rapps
sudo apt-get install ros-indigo-turtlebot ros-indigo-rocon-app-platform ros-indigo-rocon-multimaster ros-indigo-rocon-msgs ros-indigo-rocon-qt-gui ros-indigo-rocon-tools ros-indigo-std-capabilities ros-indigo-rqt-capabilities ros-indigo-rocon-remocon ros-indigo-rocon-apps ros-indigo-turtlebot-rapps
在PC上执行下面的脚本安装:
- sudo apt-get install ros-indigo-turtlebot-rviz-launchers
sudo apt-get install ros-indigo-turtlebot-rviz-launchers当然RVIZ 是必须已经安装完了
3. 启动turtlebot和rviz
在firefly单片机上打开一个终端执行下面脚本:
- roslaunch turtlebot_bringup minimal.launch
roslaunch turtlebot_bringup minimal.launch
在firefly单片机上打开第二个终端执行下面脚本:
- roslaunch turtlebot_app nav_map.launch
roslaunch turtlebot_app nav_map.launch
注意这里一定要设置环境变量 TURTLEBOT_MAP_FILE 注明地图yaml文件的位置。这个时候,turtlebot已经可以使用了,准备接受命令移动。
执行下面脚本在PC上执行脚本:
- roslaunch turtlebot_rviz_launchers view_navigation.launch --screen
roslaunch turtlebot_rviz_launchers view_navigation.launch --screen这时候就可以看到rviz上显示如下画面,点击按钮'2D Pose Estimate' '2D Nav Goal'就可以导航了:

4. 简化后的turtlebot启动脚本
在firefly单片机上只执行一个简化后的launch脚本也可以,脚本内容如下:
- <!--
- Right now, the android app is hard coded to look for /cmd_vel as the input
- topic.
- -->
- <launch>
- <!-- Turtlebot -->
- <arg name="base" default="$(env TURTLEBOT_BASE)" doc="mobile base type [create, roomba]"/>
- <arg name="battery" default="$(env TURTLEBOT_BATTERY)" doc="kernel provided locatio for battery info, use /proc/acpi/battery/BAT0 in 2.6 or earlier kernels." />
- <arg name="stacks" default="$(env TURTLEBOT_STACKS)" doc="stack type displayed in visualisation/simulation [circles, hexagons]"/>
- <arg name="3d_sensor" default="$(env TURTLEBOT_3D_SENSOR)" doc="3d sensor types [kinect, asux_xtion_pro]"/>
- <arg name="simulation" default="$(env TURTLEBOT_SIMULATION)" doc="set flags to indicate this turtle is run in simulation mode."/>
- <arg name="serialport" default="$(env TURTLEBOT_SERIAL_PORT)" doc="used by create to configure the port it is connected on [/dev/ttyUSB0, /dev/ttyS0]"/>
- <arg name="robot_name" default="$(env TURTLEBOT_NAME)" doc="used as a unique identifier and occasionally to preconfigure root namespaces, gateway/zeroconf ids etc."/>
- <arg name="robot_type" default="$(env TURTLEBOT_TYPE)" doc="just in case you are considering a 'variant' and want to make use of this."/>
- <param name="/use_sim_time" value="$(arg simulation)"/>
- <include file="$(find turtlebot_bringup)/launch/includes/robot.launch.xml">
- <arg name="base" value="$(arg base)" />
- <arg name="stacks" value="$(arg stacks)" />
- <arg name="3d_sensor" value="$(arg 3d_sensor)" />
- </include>
- <include file="$(find turtlebot_bringup)/launch/includes/mobile_base.launch.xml">
- <arg name="base" value="$(arg base)" />
- <arg name="serialport" value="$(arg serialport)" />
- </include>
- <arg name="scan_topic" default="scan"/>
- <arg name="cmd_vel_topic" default="/teleop/cmd_vel"/>
- <arg name="compressed_image_topic" default="/teleop/compressed_image"/>
- <include file="$(find turtlebot_bringup)/launch/3dsensor.launch">
- <arg name="rgb_processing" value="false" />
- <arg name="depth_registration" value="false" />
- <arg name="depth_processing" value="false" />
- </include>
- <!-- Make a slower camera feed available. -->
- <!-- *********************** Teleoperation ********************** -->
- <param name="camera/rgb/image_color/compressed/jpeg_quality" value="22"/>
- <!--
- <node pkg="topic_tools" type="throttle" name="camera_throttle" args="messages camera/rgb/image_rect_color/compressed 5"/>
- -->
- <node pkg="nodelet" type="nodelet" name="teleop_velocity_smoother"
- args="load yocs_velocity_smoother/VelocitySmootherNodelet /mobile_base_nodelet_manager">
- <rosparam file="$(find turtlebot_bringup)/param/defaults/smoother.yaml" command="load"/>
- <remap from="teleop_velocity_smoother/raw_cmd_vel" to="$(arg cmd_vel_topic)"/>
- <remap from="teleop_velocity_smoother/smooth_cmd_vel" to="/cmd_vel_mux/input/teleop"/>
- <!-- Robot velocity feedbacks; use the one configured as base default -->
- <remap from="teleop_velocity_smoother/odometry" to="/odom"/>
- <remap from="teleop_velocity_smoother/robot_cmd_vel" to="/mobile_base/commands/velocity"/>
- </node>
- <!-- *********************** Optimisation *********************** -->
- <node pkg="tf" type="tf_change_notifier" name="tf_throttle_for_android_gui">
- <param name="polling_frequency" value="5"/>
- <param name="translational_update_distance" value="-1"/>
- <param name="angular_update_distance" value="-1"/>
- <rosparam param="frame_pairs">
- - {source_frame: base_footprint, target_frame: map}
- - {source_frame: camera_depth_frame, target_frame: map}
- </rosparam>
- </node>
- <!-- *************************** Navi *************************** -->
- <include file="$(find turtlebot_navigation)/launch/includes/move_base.launch.xml">
- <arg name="odom_topic" value ="/odom" />
- </include>
- <include file="$(find turtlebot_navigation)/launch/includes/amcl.launch.xml">
- <arg name="use_map_topic" value ="true"/>
- </include>
- <!--
- <node pkg="topic_tools" type="throttle" name="relay_compressed_throttle_image" args="messages camera/rgb/image_rect_color/compressed_throttle 5 $(arg compressed_image_topic)" required="true">
- <param name="lazy" value="false"/>
- </node>
- -->
- <node pkg="topic_tools" type="throttle" name="relay_scan" args="messages scan 5 $(arg scan_topic)" required="true">
- <param name="lazy" value="false"/>
- </node>
- <!-- Maps -->
- <arg name="map_file" default=" $(env TURTLEBOT_MAP_FILE)" />
- <node name="map_server" pkg="map_server" type="map_server" args="$(arg map_file)" />
- <!-- <node pkg="map_store" type="map_manager" name="map_manager" output="screen"/>-->
- <!-- World Canvas -->
- <arg name="debug" default="false"/>
- <node pkg="world_canvas_server" type="world_canvas_server" name="world_canvas_server" args="$(arg debug)" output="screen">
- <param name="start_map_manager" value="true"/>
- <param name="auto_save_map" value="false"/>
- </node>
- </launch>
<!--
  Right now, the android app is hard coded to look for /cmd_vel as the input
  topic.
 -->
<launch>

<!-- Turtlebot -->
  <arg name="base"              default="$(env TURTLEBOT_BASE)"         doc="mobile base type [create, roomba]"/>
  <arg name="battery"           default="$(env TURTLEBOT_BATTERY)"      doc="kernel provided locatio for battery info, use /proc/acpi/battery/BAT0 in 2.6 or earlier kernels." />
  <arg name="stacks"            default="$(env TURTLEBOT_STACKS)"       doc="stack type displayed in visualisation/simulation [circles, hexagons]"/>
  <arg name="3d_sensor"         default="$(env TURTLEBOT_3D_SENSOR)"    doc="3d sensor types [kinect, asux_xtion_pro]"/>
  <arg name="simulation"        default="$(env TURTLEBOT_SIMULATION)"   doc="set flags to indicate this turtle is run in simulation mode."/>
  <arg name="serialport"        default="$(env TURTLEBOT_SERIAL_PORT)"  doc="used by create to configure the port it is connected on [/dev/ttyUSB0, /dev/ttyS0]"/>
  <arg name="robot_name"        default="$(env TURTLEBOT_NAME)"         doc="used as a unique identifier and occasionally to preconfigure root namespaces, gateway/zeroconf ids etc."/>
  <arg name="robot_type"        default="$(env TURTLEBOT_TYPE)"         doc="just in case you are considering a 'variant' and want to make use of this."/>

  <param name="/use_sim_time" value="$(arg simulation)"/>

  <include file="$(find turtlebot_bringup)/launch/includes/robot.launch.xml">
    <arg name="base" value="$(arg base)" />
    <arg name="stacks" value="$(arg stacks)" />
    <arg name="3d_sensor" value="$(arg 3d_sensor)" />
  </include>
  <include file="$(find turtlebot_bringup)/launch/includes/mobile_base.launch.xml">
    <arg name="base" value="$(arg base)" />
    <arg name="serialport" value="$(arg serialport)" />
  </include>

  <arg name="scan_topic"              default="scan"/>
  <arg name="cmd_vel_topic"           default="/teleop/cmd_vel"/>
  <arg name="compressed_image_topic"  default="/teleop/compressed_image"/>

  <include file="$(find turtlebot_bringup)/launch/3dsensor.launch">
    <arg name="rgb_processing" value="false" />
    <arg name="depth_registration" value="false" />
    <arg name="depth_processing" value="false" />
  </include>

  <!-- Make a slower camera feed available. -->
  <!-- *********************** Teleoperation ********************** -->
  <param name="camera/rgb/image_color/compressed/jpeg_quality" value="22"/>
  <!--
  <node pkg="topic_tools" type="throttle" name="camera_throttle" args="messages camera/rgb/image_rect_color/compressed 5"/>
  -->

  <node pkg="nodelet" type="nodelet" name="teleop_velocity_smoother"
        args="load yocs_velocity_smoother/VelocitySmootherNodelet /mobile_base_nodelet_manager">
    <rosparam file="$(find turtlebot_bringup)/param/defaults/smoother.yaml" command="load"/>
    <remap from="teleop_velocity_smoother/raw_cmd_vel" to="$(arg cmd_vel_topic)"/>
    <remap from="teleop_velocity_smoother/smooth_cmd_vel" to="/cmd_vel_mux/input/teleop"/>

    <!-- Robot velocity feedbacks; use the one configured as base default -->
    <remap from="teleop_velocity_smoother/odometry"       to="/odom"/>
    <remap from="teleop_velocity_smoother/robot_cmd_vel"  to="/mobile_base/commands/velocity"/>
  </node>

  <!-- *********************** Optimisation *********************** -->
  <node pkg="tf" type="tf_change_notifier" name="tf_throttle_for_android_gui">
    <param name="polling_frequency"             value="5"/>
    <param name="translational_update_distance" value="-1"/>
    <param name="angular_update_distance"       value="-1"/>
    <rosparam param="frame_pairs">
      - {source_frame: base_footprint, target_frame: map}
      - {source_frame: camera_depth_frame, target_frame: map}
    </rosparam>
  </node>


  <!-- *************************** Navi *************************** -->
  <include file="$(find turtlebot_navigation)/launch/includes/move_base.launch.xml">
    <arg name="odom_topic" value ="/odom" />
  </include>
  <include file="$(find turtlebot_navigation)/launch/includes/amcl.launch.xml">
    <arg name="use_map_topic" value ="true"/>
  </include>

  <!--
  <node pkg="topic_tools" type="throttle" name="relay_compressed_throttle_image" args="messages camera/rgb/image_rect_color/compressed_throttle 5 $(arg compressed_image_topic)" required="true">
    <param name="lazy" value="false"/>
  </node>
  -->

  <node pkg="topic_tools" type="throttle" name="relay_scan" args="messages scan 5 $(arg scan_topic)" required="true">
    <param name="lazy" value="false"/>
  </node>

  <!-- Maps -->
  <arg name="map_file" default=" $(env TURTLEBOT_MAP_FILE)" />
  <node name="map_server" pkg="map_server" type="map_server" args="$(arg map_file)" />


<!--  <node pkg="map_store" type="map_manager" name="map_manager" output="screen"/>-->

  <!-- World Canvas -->
  <arg name="debug" default="false"/>
  <node pkg="world_canvas_server" type="world_canvas_server" name="world_canvas_server" args="$(arg debug)" output="screen">
    <param name="start_map_manager" value="true"/>
    <param name="auto_save_map" value="false"/>
  </node>
</launch>
ROS代码经验系列-- tf进行位置查询变换
include文件:
- </pre><pre name="code" class="cpp">// For transform support
- #include "tf/transform_broadcaster.h"
- #include "tf/transform_listener.h"
- #include "tf/message_filter.h"
- #include "tf/tf.h"
- #include "message_filters/subscriber.h"
</pre><pre name="code" class="cpp">// For transform support
#include "tf/transform_broadcaster.h"
#include "tf/transform_listener.h"
#include "tf/message_filter.h"
#include "tf/tf.h"
#include "message_filters/subscriber.h"
某时刻机器人在地图上的位置:
当机器人在移动过程中,tf会不断接收 base_link->odom 的位置关系信息,这些信息是根据时间不断变化并被记录下来的。当其它节点需要获取某个时间点上的 base_link的位置时就可以通过下面的方法查询:
x, y, yaw 就是base_link 在t 时刻在地图上的位置:
- bool getOdomPose(tf::Stamped<tf::Pose>& odom_pose,
- double& x, double& y, double& yaw,
- const ros::Time& t, const std::string& base_link)
- {
- // Get the robot's pose
- tf::Stamped<tf::Pose> ident (tf::Transform(tf::createIdentityQuaternion(),
- tf::Vector3(0,0,0)), t, base_link );
- try
- {
- tf_ = new tf::TransformListener();
bool getOdomPose(tf::Stamped<tf::Pose>& odom_pose,
                      double& x, double& y, double& yaw,
                      const ros::Time& t, const std::string& base_link)
{
  // Get the robot's pose
  tf::Stamped<tf::Pose> ident (tf::Transform(tf::createIdentityQuaternion(),
                                           tf::Vector3(0,0,0)), t, base_link );
  try
  {
tf_ = new tf::TransformListener();- tf_->transformPose(odom_frame_id_, ident, odom_pose);
- }
- catch(tf::TransformException e)
- {
- ROS_WARN("Failed to compute odom pose, skipping scan (%s)", e.what());
- return false;
- }
- x = odom_pose.getOrigin().x();
- y = odom_pose.getOrigin().y();
- double pitch,roll;
- odom_pose.getBasis().getEulerYPR(yaw, pitch, roll);
- return true;
- }
    tf_->transformPose(odom_frame_id_, ident, odom_pose);
  }
  catch(tf::TransformException e)
  {
    ROS_WARN("Failed to compute odom pose, skipping scan (%s)", e.what());
    return false;
  }
  x = odom_pose.getOrigin().x();
  y = odom_pose.getOrigin().y();
  double pitch,roll;
  odom_pose.getBasis().getEulerYPR(yaw, pitch, roll);

  return true;
}
机器人是矩形,四个角儿相对中心的位置已知,获取四个角相对map的位置
- tf::Stamped<tf::Pose> corner1(
- tf::Pose(tf::Quaternion(0, 0, 0, 1), tf::Vector3(0.30, -0.45, 0.0)),
- ros::Time(0), "base_link");
- tf::Stamped<tf::Pose> corner2(
- tf::Pose(tf::Quaternion(0, 0, 0, 1), tf::Vector3(0.30, 0.45, 0.0)),
- ros::Time(0), "base_link");
- tf::Stamped<tf::Pose> corner3(
- tf::Pose(tf::Quaternion(0, 0, 0, 1), tf::Vector3(-0.30, -0.45, 0.0)),
- ros::Time(0), "base_link");
- tf::Stamped<tf::Pose> corner4(
- tf::Pose(tf::Quaternion(0, 0, 0, 1), tf::Vector3(-0.30, 0.45, 0.0)),
- ros::Time(0), "base_link");
- transform_listener = new tf::TransformListener();
- tf::Stamped<tf::Pose> transformed_corner_1;
- transform_listener.transformPose("map", corner_1, transformed_corner_1);
- tf::Stamped<tf::Pose> transformed_corner_2;
- transform_listener.transformPose("map", corner_2, transformed_corner_2);
- tf::Stamped<tf::Pose> transformed_corner_3;
- transform_listener.transformPose("map", corner_3, transformed_corner_3);
- tf::Stamped<tf::Pose> transformed_corner_1;
- transform_listener.transformPose("map", corner_4, transformed_corner_4);
tf::Stamped<tf::Pose> corner1(
    tf::Pose(tf::Quaternion(0, 0, 0, 1), tf::Vector3(0.30, -0.45, 0.0)),
    ros::Time(0), "base_link");
tf::Stamped<tf::Pose> corner2(
    tf::Pose(tf::Quaternion(0, 0, 0, 1), tf::Vector3(0.30, 0.45, 0.0)),
    ros::Time(0), "base_link");
tf::Stamped<tf::Pose> corner3(
    tf::Pose(tf::Quaternion(0, 0, 0, 1), tf::Vector3(-0.30, -0.45, 0.0)),
    ros::Time(0), "base_link");
tf::Stamped<tf::Pose> corner4(
    tf::Pose(tf::Quaternion(0, 0, 0, 1), tf::Vector3(-0.30, 0.45, 0.0)),
    ros::Time(0), "base_link");
transform_listener = new tf::TransformListener();
tf::Stamped<tf::Pose> transformed_corner_1;
transform_listener.transformPose("map", corner_1, transformed_corner_1);
tf::Stamped<tf::Pose> transformed_corner_2;
transform_listener.transformPose("map", corner_2, transformed_corner_2);
tf::Stamped<tf::Pose> transformed_corner_3;
transform_listener.transformPose("map", corner_3, transformed_corner_3);
tf::Stamped<tf::Pose> transformed_corner_1;
transform_listener.transformPose("map", corner_4, transformed_corner_4);
随机器人移动点在t+1时刻的位置
已知 t 时刻的位置是 pose_old,求t+1 时刻的位置 pose_new
- tf_ = new tf::TransformListener();
- tf::StampedTransform tx_odom;
- try
- {
- tf_->lookupTransform(base_frame_id_, ros::Time::now(),
- base_frame_id_, msg.header.stamp,
- global_frame_id_, tx_odom);
- }
- catch(tf::TransformException e)
- {
- ROS_WARN("Failed to transform initial pose in time (%s)", e.what());
- tx_odom.setIdentity();
- }
- tf::Pose pose_old, pose_new;
- tf::poseMsgToTF(msg.pose.pose, pose_old);
- pose_new = tx_odom.inverse() * pose_old;
- // Transform into the global frame
- ROS_INFO("Setting pose (%.6f): %.3f %.3f %.3f",
- ros::Time::now().toSec(),
- pose_new.getOrigin().x(),
- pose_new.getOrigin().y(),
- getYaw(pose_new));
  tf_ = new tf::TransformListener();
  tf::StampedTransform tx_odom;
  try
  {
    tf_->lookupTransform(base_frame_id_, ros::Time::now(),
                         base_frame_id_, msg.header.stamp,
                         global_frame_id_, tx_odom);
  }
  catch(tf::TransformException e)
  {
    ROS_WARN("Failed to transform initial pose in time (%s)", e.what());
    tx_odom.setIdentity();
  }

  tf::Pose pose_old, pose_new;
  tf::poseMsgToTF(msg.pose.pose, pose_old);
  pose_new = tx_odom.inverse() * pose_old;


  // Transform into the global frame
  ROS_INFO("Setting pose (%.6f): %.3f %.3f %.3f",
           ros::Time::now().toSec(),
           pose_new.getOrigin().x(),
           pose_new.getOrigin().y(),
           getYaw(pose_new));
这里认为global_frame_id是不动的,pose_old和pose_new都是在global_frame_id坐标系下的坐标。但是pose_old描述的物体是随着base_frame_id同步移动的
关于fixed frame的解释:2.3 Transforms in Time
相对角度的转换Quaternion
当base_link代表机器人时,激光扫描仪laser_scan安装的角度与base_link不平行,即激光数据的零度不对应机器人的正前方零度。已知 laser_scan->angle_min 和 laser_scan->angle_increment 为激光数据信息,转换角度到base_link的位置代码如下,该算法可以考虑到激光器上下颠倒安装的情况导致angle_increment为负:
- tf::Quaternion q;
- q.setRPY(0.0, 0.0, laser_scan->angle_min);
- tf::Stamped<tf::Quaternion> min_q(q, laser_scan->header.stamp,
- laser_scan->header.frame_id);
- q.setRPY(0.0, 0.0, laser_scan->angle_min + laser_scan->angle_increment);
- tf::Stamped<tf::Quaternion> inc_q(q, laser_scan->header.stamp,
- laser_scan->header.frame_id);
- try
- {
- tf_->transformQuaternion(base_frame_id_, min_q, min_q);
- tf_->transformQuaternion(base_frame_id_, inc_q, inc_q);
- }
- catch(tf::TransformException& e)
- {
- ROS_WARN("Unable to transform min/max laser angles into base frame: %s",
- e.what());
- return;
- }
- double angle_min = tf::getYaw(min_q);
- double angle_increment = tf::getYaw(inc_q) - angle_min; //考虑到了激光器上下颠倒安装的情况导致为负数
    tf::Quaternion q;
    q.setRPY(0.0, 0.0, laser_scan->angle_min);
    tf::Stamped<tf::Quaternion> min_q(q, laser_scan->header.stamp,
                                      laser_scan->header.frame_id);
    q.setRPY(0.0, 0.0, laser_scan->angle_min + laser_scan->angle_increment);
    tf::Stamped<tf::Quaternion> inc_q(q, laser_scan->header.stamp,
                                      laser_scan->header.frame_id);
    try
    {
      tf_->transformQuaternion(base_frame_id_, min_q, min_q);
      tf_->transformQuaternion(base_frame_id_, inc_q, inc_q);
    }
    catch(tf::TransformException& e)
    {
      ROS_WARN("Unable to transform min/max laser angles into base frame: %s",
               e.what());
      return;
    }

    double angle_min = tf::getYaw(min_q);
    double angle_increment = tf::getYaw(inc_q) - angle_min; //考虑到了激光器上下颠倒安装的情况导致为负数
已知 W->B 和B->A的坐标转换,求W->A的坐标转换
ROS 主动蒙特卡罗粒子滤波定位算法 AMCL 解析-- map与odom坐标转换的方法
有时间差的lookupTransform
turtle1和turtle2都是 world 的child frame. turtle1->world 和turtle2->world 的tf都不断发布的,现在需要知道这样的一个transform转换关系:
5秒中之前turtle1相对与现在的turtle2的位置关系
- try{
- ros::Time now = ros::Time::now();
- ros::Time past = now - ros::Duration(5.0);
- listener.waitForTransform("/turtle2", now,
- "/turtle1", past,
- "/world", ros::Duration(1.0));
- listener.lookupTransform("/turtle2", now,
- "/turtle1", past,
- "/world", transform);
try{
    ros::Time now = ros::Time::now();
    ros::Time past = now - ros::Duration(5.0);
    listener.waitForTransform("/turtle2", now,
                              "/turtle1", past,
                              "/world", ros::Duration(1.0));
    listener.lookupTransform("/turtle2", now,
                             "/turtle1", past,
                             "/world", transform);
得到的转换结果可以这样理解, ( transform.getOrigin().x(), transform.getOrigin().y() ) 是以turtle2为原点的XY平面上turtle1的坐标。
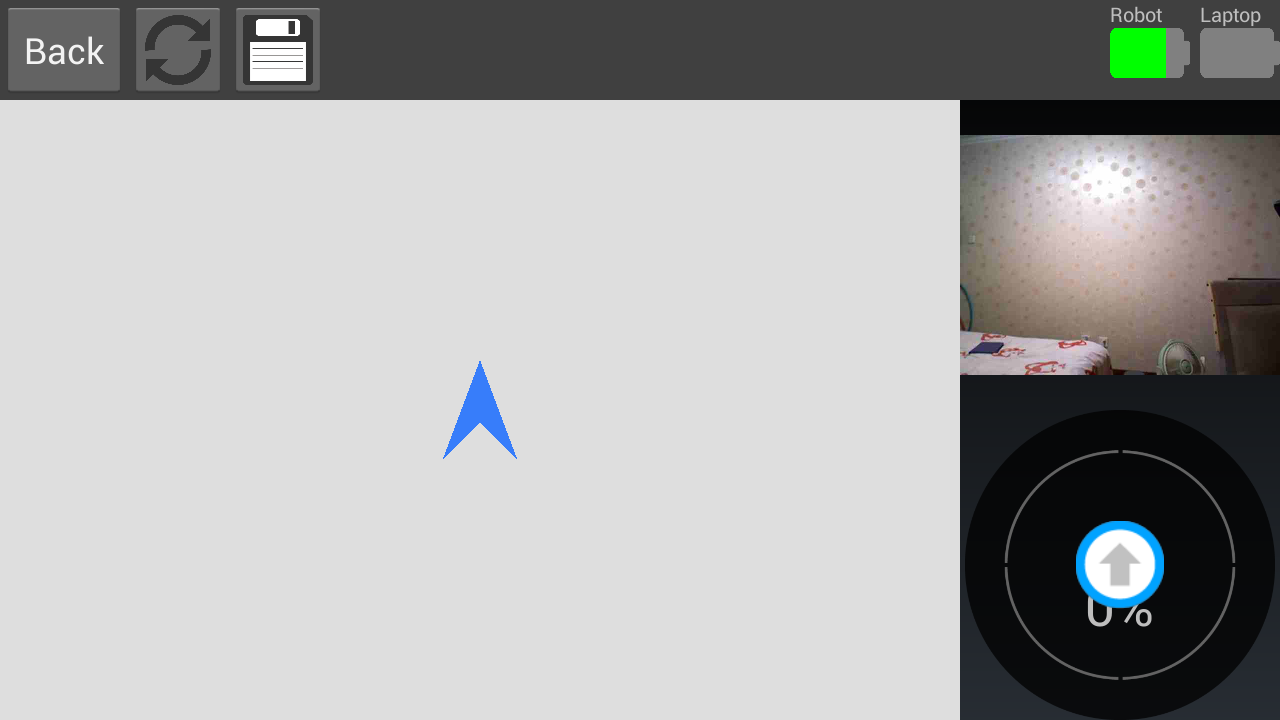
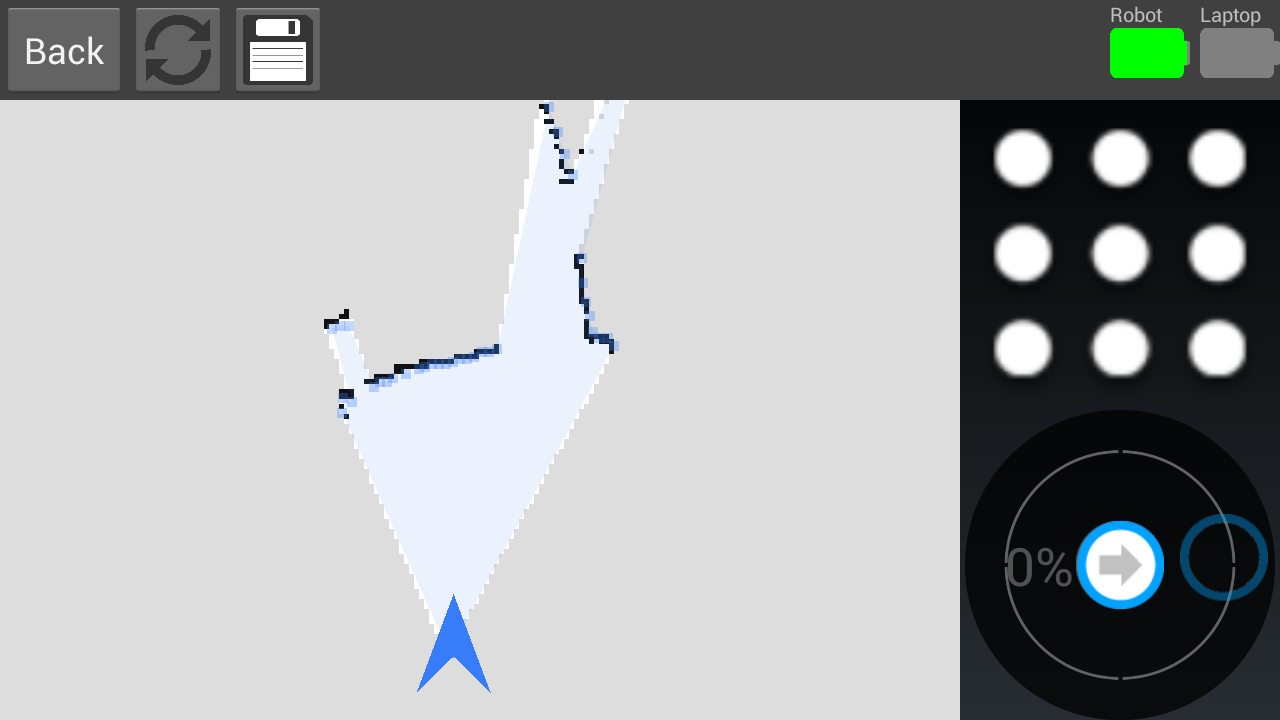
ROS 学习系列 -- Roomba, Xtion Pro机器人制作地图在Android手机无法实时观测地图
turtlebot 配合Android应用 Make a Map可以允许用户通过手机操纵机器人扫描室内地图并在手机上显示出来,效果图如下:
ROS机器人与安卓设备的通讯协作是通过rocon实现的,细节这里不作描述。本文适合已经对该技术非常熟悉的人阅读。
1. 问题描述
下载安卓rocon remocon和Make a map并安装,在turtlebot上启动机器人:
<code class="hljs ruby has-numbering"><span class="hljs-variable">$ </span>roslaunch turtlebot_bringup minimal.launch </code><ul class="pre-numbering"><li>1</li></ul><ul class="pre-numbering"><li>1</li></ul>
该命令可以启动turtlebot的轮子驱动并加在Android interaction 应用rapps. 该命令可以成功启动的前提条件是正确配置的硬件环境变量,把roomba和XTion pro Live指定给ROS.
接下来在安卓终端打开Rocon remocon应用,添加一个master URI,把turtlebot的IP输入,这时就可以看到该节点信息了,点击进入后选择角色”Android pair”. 就可以看到大量的应用,启动”Make a map”就可以看到操作界面了,摇控行走可以看到室内图片信息显示出来了,但是地图上一片空白。
2. 问题分析
首先查看地图数据到底生产没有,地图应该是由 /map 主题发布出来的,这时候我们看一些该主题:
<code class="hljs bash has-numbering">$ rostopic <span class="hljs-built_in">echo</span> /map</code><ul class="pre-numbering"><li>1</li></ul><ul class="pre-numbering"><li>1</li></ul>
发现居然没有任何数据,不甘心--列出所有主题:
<code class="hljs ruby has-numbering"><span class="hljs-variable">$ </span>rostopic list</code><ul class="pre-numbering"><li>1</li></ul><ul class="pre-numbering"><li>1</li></ul>
诡异的结果出现了,你会发现大部分的topic都被加了一个前缀:”turtlebot”. 地图数据很可能发布到了”/turtlebot/map”上了:
<code class="hljs bash has-numbering">rostopic <span class="hljs-built_in">echo</span> /turtlebot/map</code><ul class="pre-numbering"><li>1</li></ul><ul class="pre-numbering"><li>1</li></ul>
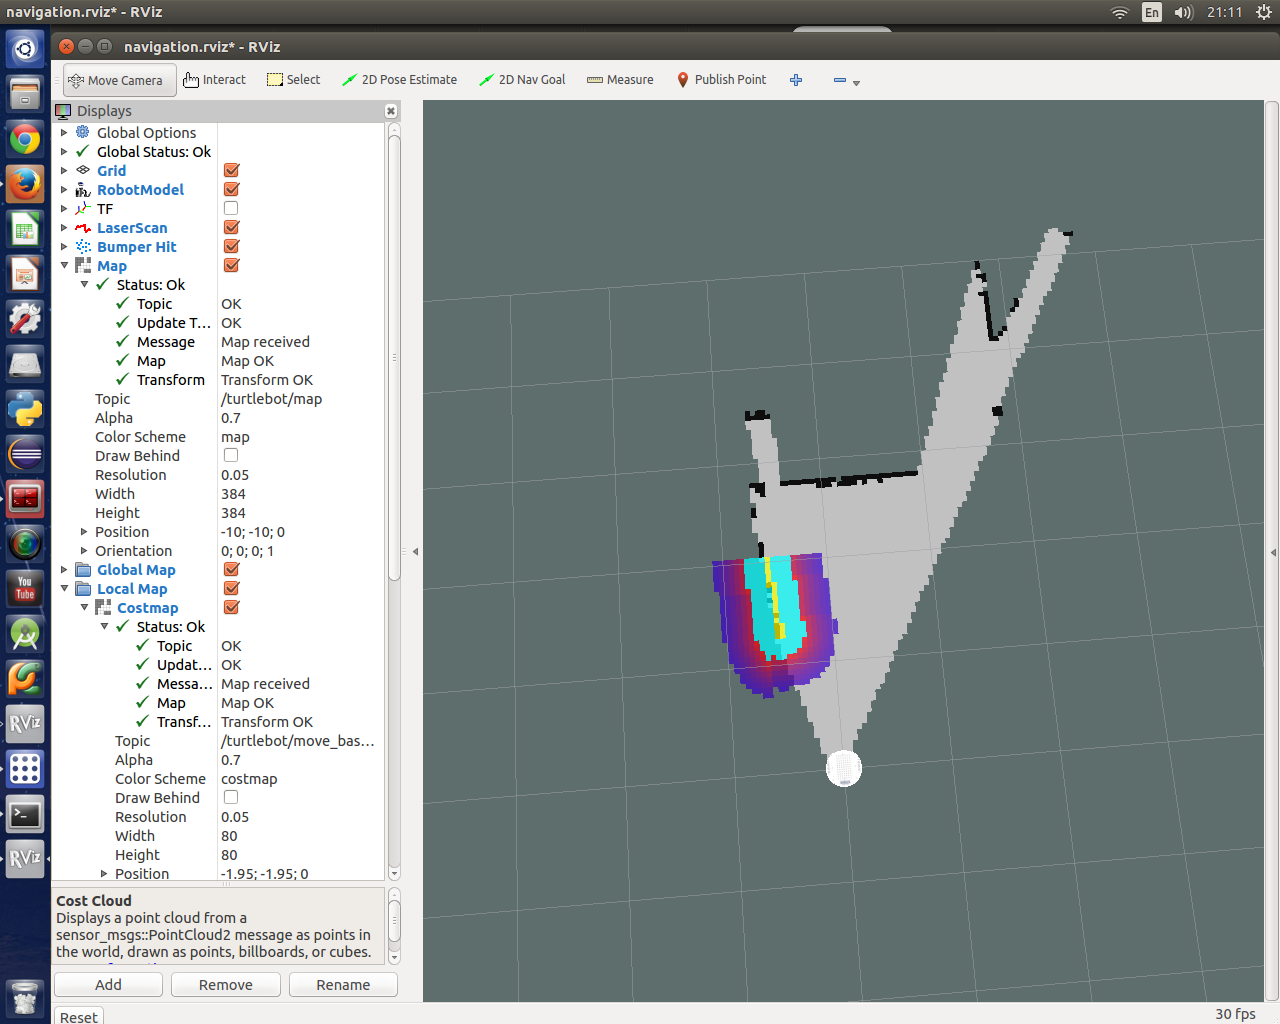
数据哗哗的不停的更新了,我的眼泪也哗哗的流啊,NND这是毛情况?先不管这个,我们要验证一下地图数据到底对不对,使用rviz:
<code class="hljs ruby has-numbering"><span class="hljs-variable">$ </span>roslaunch turtlebot_rviz_launchers view_navigation.launch</code><ul class="pre-numbering"><li>1</li></ul><ul class="pre-numbering"><li>1</li></ul>
上来就看到warning: No map received, 点击topic下拉框,看到/turtlebot/map被自动列出来了,选中后就看到地图确实正确显示出来了。
3. 问题确认
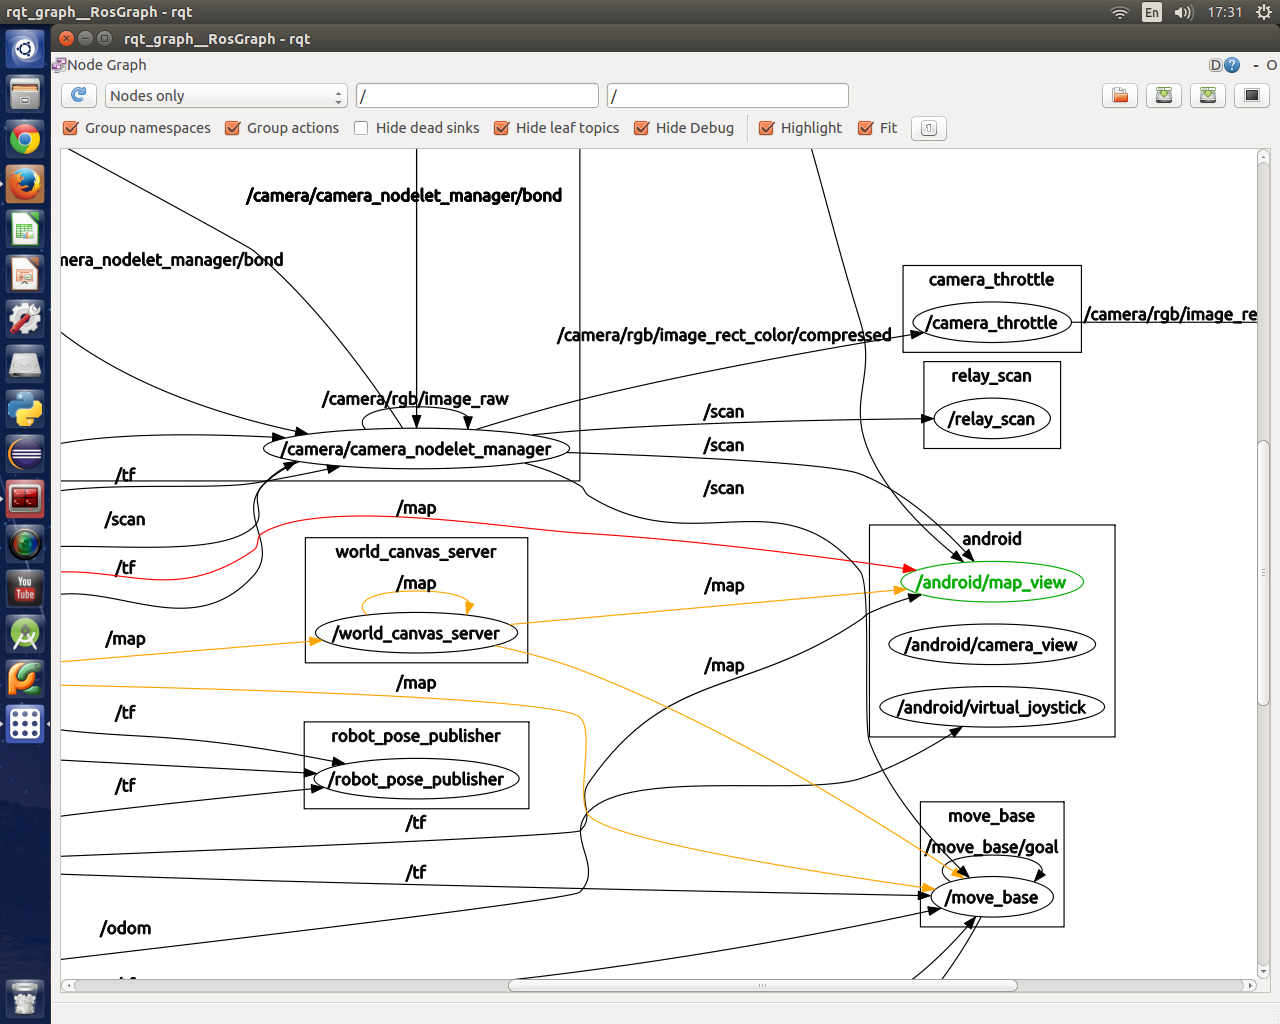
安卓的Make a map到底订阅了那个主题?我们可以通过rqt_graph来查看究竟:

我们可以看出来,android那边只使用了一个主题”/teleop/compressed_image”,也就是图像数据,没有map数据被订阅的痕迹,看来就是这个”/turtlebot”前缀搞的鬼了。
怀疑是rocon通过 .rapp启动一个.launch文件的时候,这个缀搞被自动加上了,试一下手工启动. 这需要禁止ros在点击安卓应用后启动.launch文件。
<code class="hljs ruby has-numbering"><span class="hljs-variable">$ </span>roscd turtlebot_rapps
<span class="hljs-variable">$ </span>sudo gedit rapps/make_a_map/make_a_map.rapp</code><ul class="pre-numbering"><li>1</li><li>2</li></ul><ul class="pre-numbering"><li>1</li><li>2</li></ul>
把launch项去掉后,保存退出:
<code class="hljs http has-numbering"><span class="hljs-attribute">display</span>: <span class="hljs-string">         Make A Map</span>
<span class="hljs-attribute">description</span>: <span class="hljs-string">     Make a map by driving a TurtleBot from an Android device.</span>
<span class="hljs-attribute">compatibility</span>: <span class="hljs-string">   rocon:/turtlebot</span>
<span class="hljs-attribute">public_interface</span>: <span class="hljs-string">make_a_map.interface</span>
<span class="hljs-attribute">icon</span>: <span class="hljs-string">            make_a_map_bubble_icon.png</span></code><ul class="pre-numbering"><li>1</li><li>2</li><li>3</li><li>4</li><li>5</li></ul><ul class="pre-numbering"><li>1</li><li>2</li><li>3</li><li>4</li><li>5</li></ul>
将安卓终端的Make a map点击”back”退出,在rocon中点击’leave’离开该Master节点, 关闭turtlebot上的Master,并重新启动:
<code class="hljs ruby has-numbering"><span class="hljs-variable">$ </span>roslaunch turtlebot_bringup minimal.launch </code><ul class="pre-numbering"><li>1</li></ul><ul class="pre-numbering"><li>1</li></ul>
在另外一个terminal手工启动make a map:
<code class="hljs ruby has-numbering"><span class="hljs-variable">$ </span>roslaunch turtlebot_rapps make_a_map.launch </code><ul class="pre-numbering"><li>1</li></ul><ul class="pre-numbering"><li>1</li></ul>
这个时候在安卓终端打开rocon remocon启动Map a map,地图出来了,房间图像不见了!
再次使用rqt_graph,可以看到 /map被Android节点成功订阅到了,而且不止一个主题,还有/scan
4. 结论
安卓应用Make a map 需要订阅的主题为:
图像数据:/teleop/compressed_image
地图数据:/map
激光扫描: /scan
而通过remocon启动程序后真正的数据主题为:
图像数据:/teleop/compressed_image
地图数据:/turtlebot/map
激光扫描: /turtlebot/scan
5. 解决方案
需要完成下面的主题映射:
/turtlebot/map –> /map
/turtlebot/scan –> /scan
在 turtlebot_rapp 的make_a_map.launch 文件里面添加映射命令. 先找到该文件nano编辑
<code class="hljs autohotkey has-numbering">roscd turtlebot_rapps/rapps/make_<span class="hljs-built_in">a_map</span>/
sudo nano make_<span class="hljs-built_in">a_map</span>.launch </code><ul class="pre-numbering"><li>1</li><li>2</li></ul><ul class="pre-numbering"><li>1</li><li>2</li></ul>
加入以下两个指令:
<code class="hljs rust has-numbering"> <node pkg=<span class="hljs-string">"topic_tools"</span> name=<span class="hljs-string">"map_relay"</span> <span class="hljs-keyword">type</span>=<span class="hljs-string">"relay"</span> args=<span class="hljs-string">"map /map"</span> />
    <node pkg=<span class="hljs-string">"topic_tools"</span> name=<span class="hljs-string">"scan_relay"</span> <span class="hljs-keyword">type</span>=<span class="hljs-string">"relay"</span> args=<span class="hljs-string">"scan /scan"</span> />
</code><ul class="pre-numbering"><li>1</li><li>2</li><li>3</li></ul><ul class="pre-numbering"><li>1</li><li>2</li><li>3</li></ul>
注意这里的参数千万不要带前缀’turtlebot’,而是使用相对路径’map’ ‘scan’ ,而映射目标主题要写明绝对路径’/map’ ‘/sacn’.
因为这个launch文件就被放到了’turtlebot’命名空间里面了,相对路径会被自动补全--前面加上命名空间
6. 后记--’turtlebot’命名空间哪里来的?
ROS默认就有一个环境变量 TURTLEBOT N AME=turtlebot.该环境变量被经由minimal.launch−−>standalone.launch−−> (find rocon_app_manager)/launch/includes/_app_manager.xml 一直传递进 rapp_manager.py 里面。该程序负责启动romocon对应的rapp launch文件,查看函数_process_start_app(self, req)
<code class="hljs ruby has-numbering">rospy.loginfo(<span class="hljs-string">"Rapp Manager : starting app '"</span> + req.name + <span class="hljs-string">"' underneath "</span> + <span class="hljs-keyword">self</span>._application_namespace)
        resp.started, resp.message, subscribers, publishers, services, action_clients, action_servers = \
            rapp.start(<span class="hljs-keyword">self</span>._application_namespace,
                       <span class="hljs-keyword">self</span>._gateway_name,
                       <span class="hljs-keyword">self</span>._rocon_uri,
                       req.remappings,
                       req.parameters,
                       <span class="hljs-keyword">self</span>._param[<span class="hljs-string">'app_output_to_screen'</span>],
                       <span class="hljs-keyword">self</span>._param[<span class="hljs-string">'simulation'</span>],
                       <span class="hljs-keyword">self</span>.caps_list)</code><ul class="pre-numbering"><li>1</li><li>2</li><li>3</li><li>4</li><li>5</li><li>6</li><li>7</li><li>8</li><li>9</li><li>10</li></ul><ul class="pre-numbering"><li>1</li><li>2</li><li>3</li><li>4</li><li>5</li><li>6</li><li>7</li><li>8</li><li>9</li><li>10</li></ul>
每次启动的所有程序都被放到了命名空间里面,这里的self._application_namespace就是robot_name参数的值。
rospy.loginfo()的内容可以通过查看 /rosout 这个主题观察,验证每次启动rapp所用的命名空间.
版权声明:本文为博主原创文章,未经博主允许不得转载。


 1622
1622

 被折叠的 条评论
为什么被折叠?
被折叠的 条评论
为什么被折叠?
 到【灌水乐园】发言


