


前言:安装配置lsd_slam的方式请参考我的上一篇博客 https://blog.csdn.net/LOVE1055259415/article/details/79874231
一、标定你的摄像头
刚开始用的是ROS下的标定脚本文件。当然也可以用matlab的toolbox工具箱,这里有文档:http://wenku.baidu.com/link?url=UhysNXTFL9UiHEA-XbXoh83tffm5PzCn5psDSO194cuiqoUbm5eMiAOs4uYAaEBtqvlX9G-RoEw8v7sJYq7TS4VH5qnxURqJ6uMYVvjw4em ,需要注意的是,lsd-slam对标定的文件格式和数据格式是有要求的,可以参考github上的说明https://github.com/tum-vision/lsd_slam,(3.1.3 Camera Calibration)切记文件格式和数据格式!
按照lsd_slam项目网站上的说明,标定使用PTAM标定方式
3.1.3 Camera Calibration
LSD-SLAM operates on a pinhole camera model, however we give the option to undistort images before they are being used. You can find some sample calib files inlsd_slam_core/calib.
Calibration File for FOV camera model:
fx/width fy/height cx/width cy/height d
in_width in_height
"crop" / "full" / "none" / "e1 e2 e3 e4 0"
out_width out_height
Here, the values in the first line are the camera intrinsics and radial distortion parameter as given by the PTAM cameracalibrator, in_width and in_height is the input image size, and out_width out_height is the desired undistorted image size. The latter can be chosen freely, however 640x480 is recommended as explained in section 3.1.6. The third line specifies how the image is distorted, either by specifying a desired camera matrix in the same format as the first four intrinsic parameters, or by specifying "crop", which crops the image to maximal size while including only valid image pixels.
Calibration File for Pre-Rectified Images
This one is without radial distortion correction, as a special case of ATAN camera model but without the computational cost:
fx/width fy/height cx/width cy/height 0
width height
none
width height
Calibration File for OpenCV camera model:
fx fy cx cy k1 k2 p1 p2
inputWidth inputHeight
"crop" / "full" / "none" / "e1 e2 e3 e4 0"
outputWidth outputHeight
二、安装PTAM工具,标定相机
Calibration File for FOV camera model:
fx/width fy/height cx/width cy/height d
in_width in_height
"crop" / "full" / "none" / "e1 e2 e3 e4 0"
out_width out_height
Here, the values in the first line are the camera intrinsics and radial distortion parameter as given by the PTAM cameracalibrator, in_width and in_height is the input image size, and out_width out_height is the desired undistorted image size. The latter can be chosen freely, however 640x480 is recommended as explained in section 3.1.6. The third line specifies how the image is distorted, either by specifying a desired camera matrix in the same format as the first four intrinsic parameters, or by specifying "crop", which crops the image to maximal size while including only valid image pixels.
这种标定方式是使用ROS下的PTAM 标定工具来对相机参数进行标定,与ROS下自带的单目或者双目标定方式不同,标定完后生成的标定文件的格式也不太一样。ROS下的PTAM介绍:http://wiki.ros.org/ptam/cameracalibrator。具体PTAM代码http://www.robots.ox.ac.uk/~gk/PTAM/usage.html及相机标定。具体PTAM的安装方法如下:
基本按照这个博客:
https://blog.csdn.net/zhuquan945/article/details/72865769
但是存在一些问题,安装opencv的时候缺少几步:make、sudo make install。修改后比较完善的安装方式为:
1 环境搭建
配置:ubuntu14.04.
1.1 前期准备
First. 更新软件源
sudo apt-get update(更新软件列表)
sudo apt-get upgrade(更新已安装的软件)
Second. 安装build工具
sudo apt-get install build-essential cmake pkg-config
Third. 安装C++库
sudo apt-get install libboost-dev libboost-doc
Fourth. 安装图像IO和摄像机驱动
sudo apt-get install libjpeg-dev libpng-dev libtiff-dev libdc1394-22-dev libv4l-dev
Fifth. 安装视频IO,编解码和视频显示库
sudo apt-get install libavcodec-dev libavformat-dev libavutil-dev libpostproc-dev libswscale-dev libavdevice-dev libsdl-dev
sudo apt-get install libgtk2.0-dev libgstreamer0.10-dev libgstreamer-plugins-base0.10-dev
Sixth. 安装OpenGL(Open Graphics Library)
sudo apt-get install mesa-common-dev libgl1-mesa-dev libglu1-mesa-dev freeglut3-dev
1.2 安装OpenCV(Open Source Computer Vision Library)
First. 卸载任何以前安装的ffmpeg和x264软件。Ffmpeg是一套可以用来记录、转换数字音频、视频,并能将其转化为流的开源计算机程序。
sudo mkdir Opencv
cd Opencv
sudo apt-get -qq remove ffmpeg x264 libx264-dev
Second. 安装依赖文件
sudo apt-get install libopencv-dev build-essential checkinstall cmake pkg-config yasm libjpeg-dev libjasper-dev libavcodec-dev libavformat-dev libswscale-dev libdc1394-22-dev libxine-dev libgstreamer0.10-dev libgstreamer-plugins-base0.10-dev libv4l-dev python-dev python-numpy libtbb-dev libqt4-dev libgtk2.0-dev libfaac-dev libmp3lame-dev libopencore-amrnb-dev libopencore-amrwb-dev libtheora-dev libvorbis-dev libxvidcore-dev x264 v4l-utils
Third. 安装ffmpeg
sudo add-apt-repository ppa:mc3man/trusty-media
sudo apt-get update
sudo apt-get install ffmpeg gstreamer0.10-ffmpeg
Fourth. 下载和解压提取OpenCV
sudo wget http://sourceforge.net/projects/opencvlibrary/files/opencv-unix/2.4.9/opencv-2.4.9.zip
unzip OpenCV-2.4.9.zip
cd opencv-2.4.9
Fifth. 开始编译安装
mkdir build
cd build
如果安装了cuda,运行包含以下参数的cmake命令:
cmake -D CMAKE_BUILD_TYPE=RELEASE -D CMAKE_INSTALL_PREFIX=/usr/local -D WITH_TBB=ON -D BUILD_NEW_PYTHON_SUPPORT=ON -D WITH_V4L=ON -D INSTALL_C_EXAMPLES=ON -D INSTALL_PYTHON_EXAMPLES=ON -D BUILD_EXAMPLES=ON -D WITH_QT=ON -D WITH_OPENGL=ON ..
如果没有安装cuda,添加参数-D WITH_CUDA=OFF
cmake -D CMAKE_BUILD_TYPE=RELEASE -D CMAKE_INSTALL_PREFIX=/usr/local -D WITH_TBB=ON -D WITH_CUDA=OFF -D BUILD_NEW_PYTHON_SUPPORT=ON -D WITH_V4L=ON -D INSTALL_C_EXAMPLES=ON -D INSTALL_PYTHON_EXAMPLES=ON -D BUILD_EXAMPLES=ON -D WITH_QT=ON -D WITH_OPENGL=ON ..
Sixth. 重启,运行OpenCV的测试程序
cd OpenCV/samples/c
sudo ./build_all.sh
./facedetect "/usr/share/opencv/haarcascades/haarcascade_frontalface_alt.xml" lena.jpg
运行结果如下:

用sudo gedit /etc/ld.so.conf打开文件,在其中添加以下lib目录:
include /home/weixinyu/LearnAndWork/gaoyanyuan/Opencv/opencv-2.4.9/build/lib
ld.so.conf记录了编译时使用的动态链接库的路径,把opencv库的路径添加到ld.so.conf,这样以后程序在运行时如果需要调用opencv的库,系统会自己找到而不用手动指定。
Ps.一般在更改ld.so.conf文件后需要运行ldconfig命令,此命令把所有的库文件都被缓存到ld.so.cache中,如果不运行这个命令,即使写入了ld.so.conf,系统也可能找不到相关库)
附参考链接:
http://sysads.co.uk/2014/05/install-opencv-2-4-9-ubuntu-14-04-13-10/
http://www.linuxidc.com/Linux/2014-12/110045.htm
1.3 安装 TooN && libCVD && Gvars3
TooN:与线性代数有关的头文件库。
libCVD:一个与图像处理、视频获取和计算机视觉有关的库。
Gvars3:一个libCVD的子项目。
libCVD是需要TooN库的,所以安装顺序为TooN->libCVD->Gvars3
**********这里有坑,装到这里先暂停******
由于TooN 、libCVD、Gvars3和PTAM源码的版本兼容问题,推荐采用以下的版本搭配:TooN 、libCVD、Gvars3:在https://github.com/slowlythinking/PTAM 中获得(其中也包含PTAM的源码,但是存在问题);版本选择问题在下面介绍,可以往下拉
在这里下载https://github.com/slowlythinking/PTAM,只用这里面的TooN && libCVD && Gvars3包,不用这里面的PTAM,PTAM在其官网http://www.robots.ox.ac.uk/~gk/PTAM/download.html中获得。
First. 安装TooN
cd TooN
make clean
./configure
make
sudo make install
sudo ldconfig
Second. 安装libcvd
cdlibcvd
make
export CXXFLAGS=-D_REENTRANT
./configure --without-ffmpeg
make
sudo make install
sudo ldconfig
Third. 安装gvars3
make clean
./configure --disable-widgets
make
sudo make install
sudo ldconfig
Fourth. 运行ldconfig让动态链接库为系统所共享
cd ..
sudo ldconfig
2 安装PTAM
2.1 将PTAM/Build/Linux所有文件拷到 PTAM目录下。2.2 更改makefile和Tracker.cc文件
在makefile文件中更改
COMPILEFLAGS、LINKFLAGS和VIDEOSOURCE如下:
COMPILEFLAGS = -I /usr/include -I /usr/local/include -D_LINUX -D_REENTRANT -Wall -O3 -march=nocona -msse3
LINKFLAGS = -L /usr/local/lib -lGVars3 -lcvd -lopencv_legacy -lopencv_core -lopencv_video -lopencv_highgui -lGLU -lGL -llapack -lblas -lgfortran
# Edit this line to change video source
VIDEOSOURCE = VideoSource_Linux_V4L.o
在Tracker.cc的头文件中添加:
#include<unistd.h>
然后sudo make

error: cannot convert ‘CVD::ImageRef’ to ‘GLdouble {aka double}’ for argument ‘1’ to ‘void glOrtho(GLdouble, GLdouble, GLdouble, GLdouble, GLdouble, GLdouble)’
版本兼容问题无法解决
官方FAQ,参考链接:https://ewokrampage.wordpress.com/troubleshooting-faq/
Q: I get the compile error
GLWindow2.cc:117: error: cannot convert ‘CVD::ImageRef’ to ‘GLdouble’ for argument ‘1’ to‘void glOrtho(GLdouble, GLdouble, GLdouble, GLdouble, GLdouble, GLdouble)’
A: You didn’t install TooN before libCVD. Re- ./configure and re-build libCVD.
按照这样操作,卸载、重装还是不行
参考博客:
https://blog.csdn.net/jinghouxiang/article/details/46998235
http://blog.sina.com.cn/s/blog_7b83134b0102wabk.html
*******************2018.4.10我是分割线***************************
******************2018.4.10我是分割线****************************
三、一些弯路,避免你踩坑
上述方法走了很多弯路,现在我们使用另一种方式
https://blog.csdn.net/jinghouxiang/article/details/46998235
在配置libcvd的时候,出现以下错误

configure: error: "No C++14 support. Please add to CXXFLAGS"
能否使用cmake来编译呢?./configure与cmake有什么区别呢?
./configure与cmake的区别与联系
/configure就是执行你当前目录下一个名叫configure的脚本,由它生成Makefile,有了Makefile之后,一般来说就可以通过make进行编译,make install进行安装

cmake就是一个与make同级别的编译工具,只不过它依靠的不是Makefile作为编译规则,而是根据CMakeLists.txt来编译的。
解决好久,Makefile中添加CXXFLAGS+=-std=c++14或者CXXFLAGS=c++14、终端输入export CXXFLAGS=/usr/bin/gcc-4.9还是没用。后来发现是git下载的是最新版,版本更新,下面是说明

好了,此路不通,另寻他路。找到官网
PS:其实多亏了这篇良心教程https://blog.csdn.net/vivian187/article/details/51747345?locationNum=9在安装libcvd的时候给了个提示:

才使得博主网上找官网,找源码,通过 git clone git://github.com/edrosten/libcvd.git,在网站 git://github.com/edrosten/
****************2018.4.11我还是分割线*********************
****************2018.4.11我还是分割线*********************
四、终极靠谱安装方法
按照自己下载的包,然后按照上述安装方法安装(自己下的历史版本的包才是教程中git到的包)
一个隐形的问题在于:我们一般按照百度得到的教程,直接按照教程里面的git地址下载源码安装,但是殊不知你现在下载的源码和参考博客博主配置时候的git下来的代码已经不一样(由于git上软件版本的更新,任何时候直接git clone下载得到的是最新版,导致在按照参考教程配置的时候出现和博主不一样的奇葩问题)。
对于这一类问题的解决方法是:直接到相关官方网站或者git上去找历史提交版本及其修改更新说明,尤其注意看更新说明!
也提示我们在git的时候要注意这个问题,同时还需要学会git 的使用!这里可以用git checkout直接在终端查看历史版本的SHA及其修改更新说明。
总的来说,前面的依赖项、opencv的配置方法不变,后面的配置安装方法基本也相同。关键在于源码包的版本的选择!
下面是靠谱配置安装方法:
看了下官网,最新更新的版本放弃了对c++14以下版本编译器的支持,而网上找的教程基本都是在2017年以前的,直接从github上下载是没有问题的,而现在github上的最新版已经不支持4以下的编译器。所以,需要在官网上下载历史版本。附地址:http://www.edwardrosten.com/cvd/toon.html
这里附上下载地址,我将这几个文件已经打包上传到CSDN,地址为:
https://download.csdn.net/download/love1055259415/10340970
几个包的安装方法及PTAM的安装配置方法为:
First. 安装TooN
cd TooN
make clean
./configure
make
sudo make install
sudo ldconfig
Second. 安装libcvd
cdlibcvd
make
export CXXFLAGS=-D_REENTRANT
./configure --without-ffmpeg
make
sudo make install
sudo ldconfig
Third. 安装gvars3
make clean
./configure --disable-widgets
make
sudo make install
sudo ldconfig
Fourth. 运行ldconfig让动态链接库为系统所共享
cd ..
sudo ldconfig
2 安装PTAM
2.1 获取源码
将PTAM/Build/Linux所有文件拷到 PTAM目录下。
附源码链接:http://www.robots.ox.ac.uk/~gk/PTAM/download.html
2.2 更改makefile和Tracker.cc文件
在makefile文件中更改COMPILEFLAGS、LINKFLAGS和VIDEOSOURCE如下:
COMPILEFLAGS = -I /usr/include -I /usr/local/include -D_LINUX -D_REENTRANT -Wall -O3 -march=nocona -msse3
LINKFLAGS = -L /usr/local/lib -lGVars3 -lcvd -lopencv_legacy -lopencv_core -lopencv_video -lopencv_highgui -lGLU -lGL -llapack -lblas -lgfortran
# Edit this line to change video source
VIDEOSOURCE = VideoSource_Linux_V4L.o
在Tracker.cc的头文件中添加:
#include<unistd.h>
2.3 编译运行
编译:在PTAM所在的目录中直接运行make命令,运行成功后会得到两个可执行文件CameraCalibrator和PTAM(这两个可执行文件依然在PTAM目录中)。
运行make时,我还遇到如下问题:

经过在网上查找资料及自己分析原因后,发现是libgfortran.so没有链接好。通过搜索可以查找到在/usr/lib/x86_64-linux-gnu中libgfortran.so.3,通过cd命令进入该目录,并运行:
sudo ln -s libgfortran.so.3 libgfortran.so
将其进行链接,运行过程如下图所示:

然后运行make进行编译。
编译好PTAM源代码之后进入PTAM目录,运行
./CameraCalibrator,进行相机标定:
使用下图右上角的CapFrame取帧,至少取不同角度的4帧以上,取帧结束以后,按下Optimize,计算相机本质矩阵(焦距等相机参数)。


点击save保存

结合之前的三种标定文件类型,PTAM属于第一种Calibration File for FOV camera model:
fx/width fy/height cx/width cy/height d in_width in_height "crop" / "full" / "none" / "e1 e2 e3 e4 0" out_width out_heightHere, the values in the first line are the camera intrinsics and radial distortion parameter as given by the PTAM cameracalibrator, in_width and in_height is the input image size, and out_width out_height is the desired undistorted image size. The latter can be chosen freely, however 640x480 is recommended as explained in section 3.1.6. The third line specifies how the image is distorted, either by specifying a desired camera matrix in the same format as the first four intrinsic parameters, or by specifying "crop", which crops the image to maximal size while including only valid image pixels.
PTAM标定得到的一组数据为:3.43903 5.4619 2.22492 -0.463232 -0.00771494对应表示的相机参数含义为:fx/width fy/height cx/width cy/height d
注意:这里我使用的是笔记本自带的相机,想要使用不同的相机需要做一些修改。
修改PTAM/PTAM/Makefile中的
# Edit this line to change video source
VIDEOSOURCE = VideoSource_Linux_V4L.o
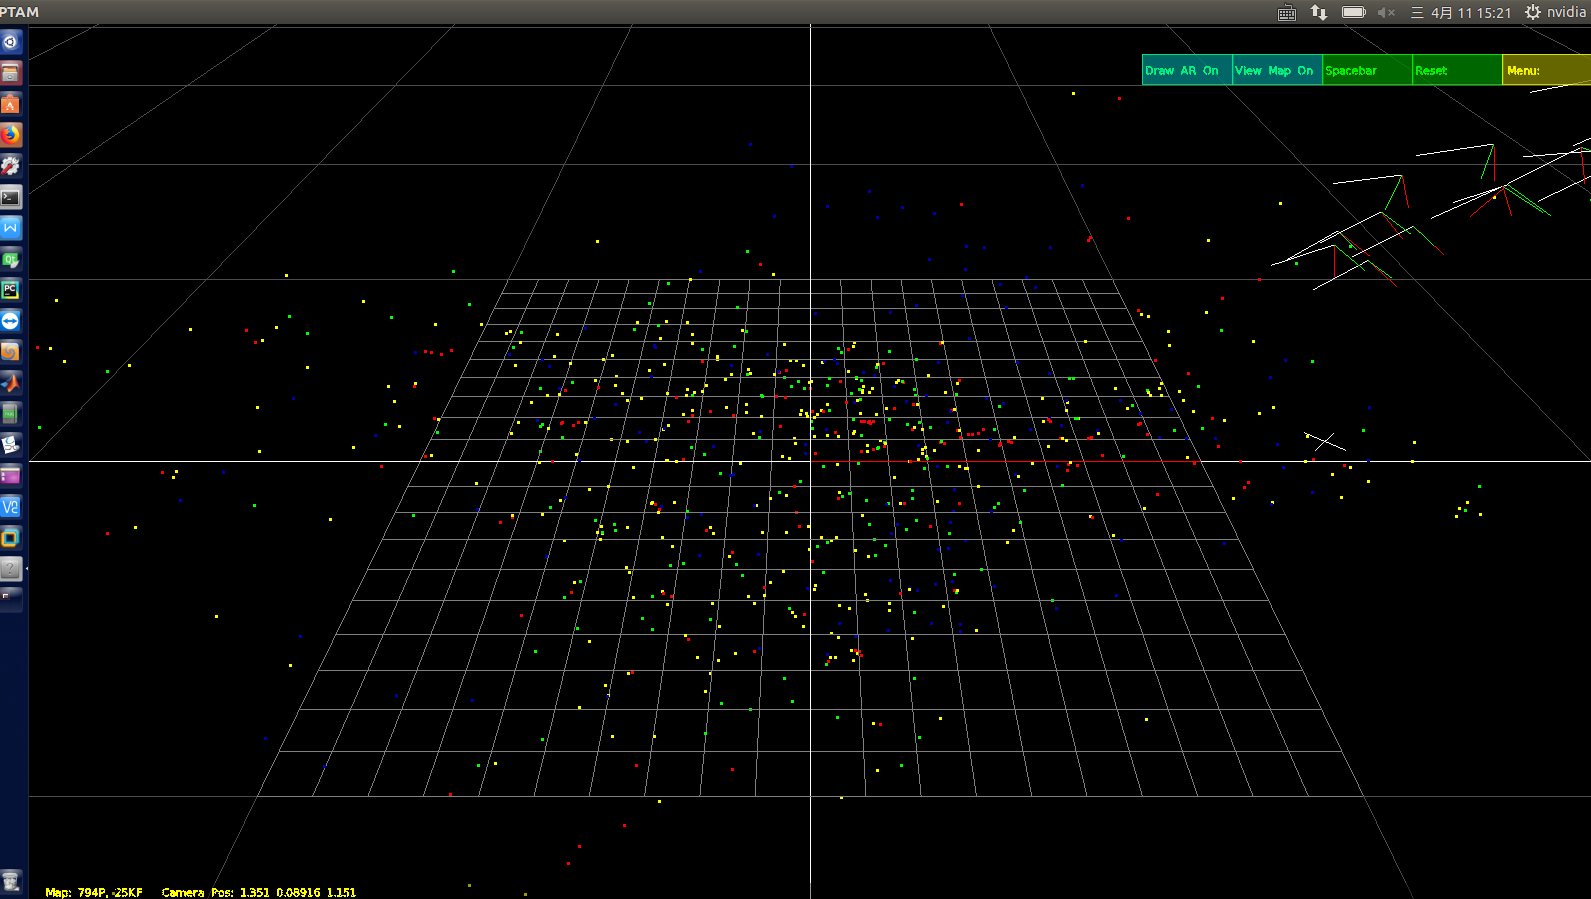
CameraCalibrator运行完毕之后运行./PTAM,开始运行时由于需要初始化地图,需要用户选取两帧作为初始化的数据输入,具体操作步骤为按下空格键,程序会计算出这一帧的FAST角点显示在图像上,然后做轻微平移,再次按下空格键,初始化完毕。界面右上方有Draw AR off和View Map on,作用分别是把虚拟物品(此处为四只眼睛)显示到平面上和显示软件所建地图信息。以下为运行截图(由于实验时相机问题,标定和识别结果不够精确,所以四只眼睛并未准确显示到相应平面):


3 安装经验
如果之前安装的TooN、libcvd、gvars3有问题,因为三个包的makefile文件中均无uninstall命令,可做如下清理(注意:删除之前请查看以下两个文件夹中的文件的名字及生成时间以免误删):
重新sudo make insgall,查看安装路径,跳转到相应路径去删除
如果安装PTAM时出错,出错信息可能被缓冲掉很多,可用script -f screen.log和exit输出make时的所有信息以查看错误信息。


 2510
2510

 被折叠的 条评论
为什么被折叠?
被折叠的 条评论
为什么被折叠?
 到【灌水乐园】发言


