上一篇博客我们使用PTAM标定了相机,那么究竟PTAM是个什么东西呢?据说还有ROS下的标定包??来来来,带上小板凳,我们一起来瞅瞅~~
一、PTAM入门
PTAM是增强现实相关的一个库,与SLAM框架类似,兼容ROS。
PTAM 没有用特征,和 SVO 一样,用的是 patch(8x8 方块),PTAM 在地图点和当前帧 patch 匹配的时候,由于地图点所在的帧和当前帧间距或者旋转可能较大,当前帧的 patch 相对于地图点的可能形变较大(尺度,旋转,拉伸),所以地图点的 patch 在当前帧寻找匹配的 patch 时,先计算一个 affine warp matrix 变换,将地图点的 patch 变换到和当前帧的相似,再在当前帧中用 SSD 算法找匹配的 patch
以下是关于PTAM相关的一些网页:
PTAM (Parallel Tracking and Mapping) is a camera tracking system for augmented reality. It requires no markers, pre-made maps, known templates, or inertial sensors. If you're unfamiliar with PTAM have a look at some videos made with PTAM.http://www.robots.ox.ac.uk/~gk/youtube.html
2.ROS下的PTAM包 http://wiki.ros.org/ptam
3.http://www.cvchina.info/tag/ptam/
4.创客智造:https://www.ncnynl.com/tag/ptam/
5、知乎问答:PTAM地图初始化?https://www.zhihu.com/question/39877257?sort=created
二、ROS下的安装PTAM标定包
第一步当然是查wiki资料啦:地址我都给你准备好了http://wiki.ros.org/ptam,ROS下PTAM的源代码在
Source: git clone https://github.com/ethz-asl/ethzasl_ptam.git (branch: None)
cd catkin_ws/src找到你的工作空间下的源码src目录
git clone https://github.com/ethz-asl/ethzasl_ptam.git ptam
然后回到工作目录cd ..
编译catkin_make
...
...
漫长的等待,中间可能会有一些小警告,但是不要紧,编译完成后我们就可以看到这个了:

三、ROS下PTAM标定
3.1开启相机、打开标定程序
安装好之后我们就开始标定啦!但是,我们从哪个话题获取图像呢?标定指令怎么执行呢?
3.1.1 打开相机
我们找到catkin_ws/src/ptam/ptam,打开launch目录,发现存在cameracalibrator.launch和ptam.launch文件。结合之前我们使用非ROS下的PTAM经验,发现,我们只需要这两个launch文件就够了。
原来自带的launch文件会水土不服,我们修改好的launch文件为(重点在于相机发布的消息节点一定要对,通过remap重映射到相机图像话题上,从/camera/image/raw接收图像)
<launch>

    <node name="cameracalibrator" pkg="ptam" type="cameracalibrator" clear_params="true" output="screen">
        <!--remap from="image" to="bluefox_ros_node/image_raw" /-->

        <remap from="image" to="/camera/image_raw" /> <!--   相机发布图像消息的节点,可单独启动相机查看发布图像的节点 -->
            <remap from="pose" to="pose"/>
        <rosparam file="$(find ptam)/PtamFixParams.yaml"/>
    </node>
</launch>
好了搞定了输入数据,下面需要对配置参数进行修改:进入catkin_ws/src/ptam/ptam/下的PtamFixParams.yaml文件第2、3行修改xtion_pro_live的图像分辨率为:
ImageSizeX: 640
ImageSizeY: 480
做完了这些,你还需要把ptam中的calib_pattern.pdf打印出来作为标定棋盘,你就可以运行校准程序了,
先启动相机(根据不同的相机比如笔记本比如自带USB相机等开开不同的launch文件)
比如我现在使用IDS的相机:roslaunch ueye_cam rgb8.launch
3.1.2开始标定
在终端中输入以下命令
roslaunch ptam cameracalibrator.launch
但是我们得到的情况却是这样的:

我们可以明显的看到相机图像显示不正常了,正常的相机图像应该是这样的:

那么,我们怎么去解决这个问题呢?
//除了这个问题,我还遇到一个其他问题就是rosrun rviz rviz打不开了

百度了一下,发现解决方式在:https://github.com/ros-visualization/rviz/issues/696
It looks like rviz is using Qt4 and trying to load some plugin which is linked against Qt5.
ldd /opt/ros/indigo/lib//libcompressed_depth_image_transport.so | grep Qt
    libQt5Core.so.5 => /usr/lib/x86_64-linux-gnu/libQt5Core.so.5 (0x00007f837e31b000)
    libQt5Gui.so.5 => /usr/lib/x86_64-linux-gnu/libQt5Gui.so.5 (0x00007f837dcce000)
    libQt5Widgets.so.5 => /usr/lib/x86_64-linux-gnu/libQt5Widgets.so.5 (0x00007f837d4a4000)
    libQt5Test.so.5 => /usr/lib/x86_64-linux-gnu/libQt5Test.so.5 (0x00007f837d27b000)
    libQt5OpenGL.so.5 => /usr/lib/x86_64-linux-gnu/libQt5OpenGL.so.5 (0x00007f837d017000)
And rviz:
ldd /opt/ros/indigo/bin/rviz | grep Qt
    libQtGui.so.4 => /usr/lib/x86_64-linux-gnu/libQtGui.so.4 (0x00007f72adc78000)
    libQtCore.so.4 => /usr/lib/x86_64-linux-gnu/libQtCore.so.4 (0x00007f72a9ca4000)

却是如此,rviz依赖qt5,相机依赖qt4
解决办法摘抄出来就是:
I have solved the problem(at least on my machine). I am running Ubuntu 14.04 and ROS Indigo on a x64 machine. In my case, I had built Qt5.3.2 from source and OpenCV 2.4.9 from source with Qt support onAND the OpenCV libraries were built against Qt5. Here is what I did:
- Removed Qt5
I actually didn't remove it. I did asudo apt-get install qt4-default. Then checkedqmake -vto make sure it used the Qt4 binaries that come with trusty. - Re-built OpenCV from source with Qt4 support.
I built OpenCV 2.4.8 this time as this is the same version that is available on the Trusty official repositories and Indigo is known to work with it for sure. I had to build it from source to install the non-free libraries (SIFT,SURF).
Then I tried adding views for camera, depthmap and pointcloud2 (with kinect) it all worked fine! No segfaults.
ldd /opt/ros/indigo/lib//libcompressed_depth_image_transport.so | grep Qt did not have any result andldd /opt/ros/indigo/bin/rviz | grep Qt gave
libQtGui.so.4 => /usr/lib/x86_64-linux-gnu/libQtGui.so.4 (0x00007f649cc04000) libQtCore.so.4 => /usr/lib/x86_64-linux-gnu/libQtCore.so.4 (0x00007f6498b4a000)
I am not totally sure if rviz uses OpenCV libraries for the Camera interface. It could be possible to solve this problem by just uninstalling Qt5 (and building ROS again if it was built from source) as@wjwwood suggested.
Hope this helps.
这个方法对我来说么偶用,然后我加上 cmake -DWITH_QT=4,那么就是:
先卸载安装好的opencv
sudo make uninstall

再重新cmake
cmake -D WITH_QT=4 -D CMAKE_BUILD_TYPE=RELEASE -D CMAKE_INSTALL_PREFIX=/usr/local -D WITH_TBB=ON -D BUILD_NEW_PYTHON_SUPPORT=ON -D WITH_V4L=ON -D INSTALL_C_EXAMPLES=ON -D INSTALL_PYTHON_EXAMPLES=ON -D BUILD_EXAMPLES=ON -D WITH_QT=ON -D WITH_OPENGL=ON ..
ccmake .
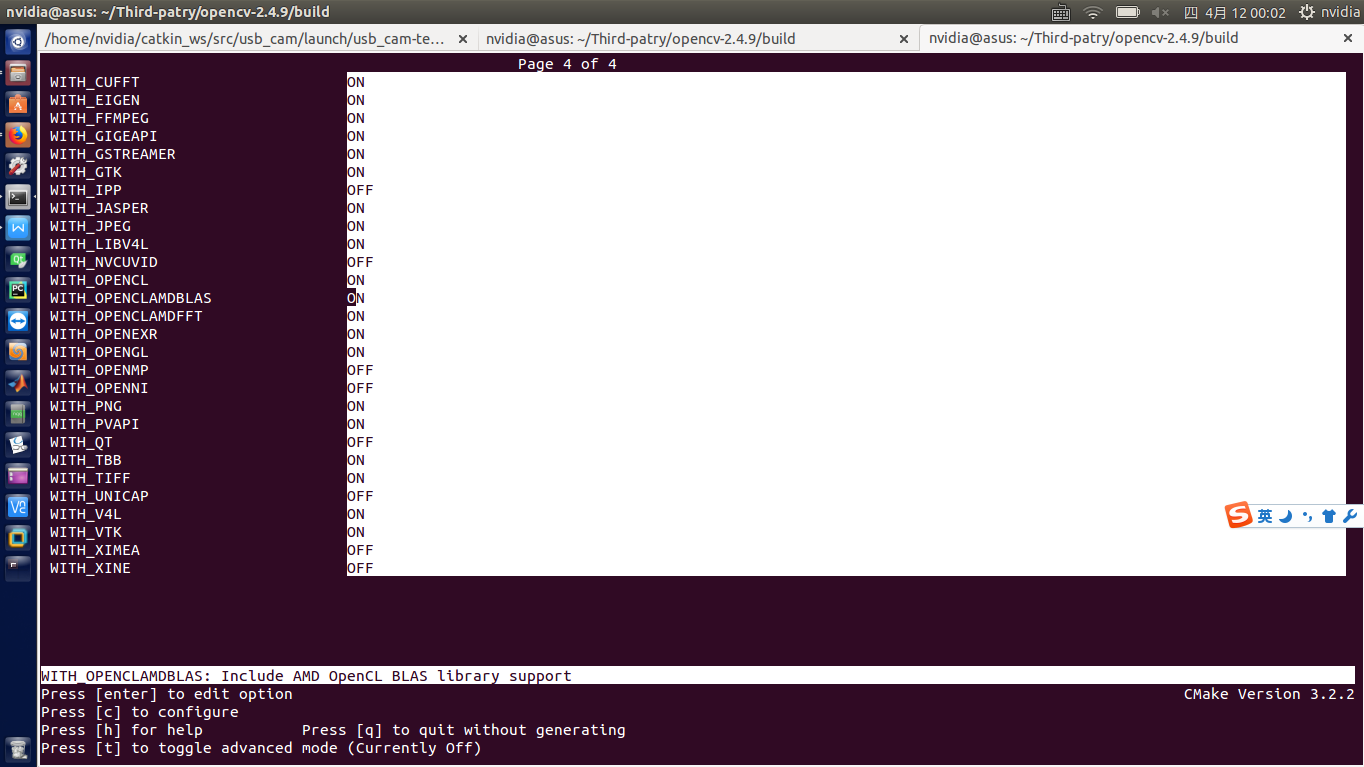
gui界面选择编译所依赖的项,对照上面的设置,此外,把WITH_QT关掉,=OFF,把前面的QT5相关的也设置成OFF
make
sudo make install
sudo ldconfig
重新查看:
ldd /opt/ros/indigo/lib//libcompressed_depth_image_transport.so | grep Qt
为空
ldd /opt/ros/indigo/bin/rviz | grep Qt
    libQtGui.so.4 => /usr/lib/x86_64-linux-gnu/libQtGui.so.4 (0x00007f1e2db5d000)
    libQtCore.so.4 => /usr/lib/x86_64-linux-gnu/libQtCore.so.4 (0x00007f1e29b97000)
打开摄像头:rosrun usb
问题解决!
打开摄像头自动显示图像:

打开rviz,add图像话题

3.2 灰度图转彩色图
这里我们需要注意,ptam的cameracalibrator需要的图像是单通道的灰度图像,如果是普通相机就好说,直接从相机节点发布的话题订阅图像就好了,但如果是向kinect、xtion_pro_live这种RGB相机的话,其提供的/camera/rgb/image_raw是3通道的rgb图像,所以需要转换格式:/camera/rgb/image_raw –>/mono_image。所以/mono_image就是转换后的单通道灰度图像。
转换代码如下:
  //rgb图像转换为灰度图像的程序
    #include <ros/ros.h>
    #include <opencv2/opencv.hpp>
    #include <opencv/cv.h>
    #include <opencv/highgui.h>
    #include <image_transport/image_transport.h>
    #include <cv_bridge/cv_bridge.h>
    #include <sensor_msgs/image_encodings.h>
    #include "ros/ros.h"
    #include "std_msgs/String.h"

    ros::Publisher image_pub ;

    void chatterCallback(const sensor_msgs::ImageConstPtr& msg)
    {
        cv_bridge::CvImagePtr  cv_ptr;
        cv_ptr = cv_bridge::toCvCopy(msg,sensor_msgs::image_encodings::BGR8);
        cv::Mat image_gray;
        cv::cvtColor(cv_ptr->image, image_gray,CV_BGR2GRAY);//灰度化

        cv_bridge::CvImage  cvi;
        sensor_msgs::Image  ros_img;
        ros::Time time=ros::Time::now();
        cvi.header.stamp = time;
        cvi.header.frame_id = "image";
        cvi.encoding = "mono8";
        cvi.image = image_gray;
        cvi.toImageMsg(ros_img);
        image_pub.publish(cvi.toImageMsg());
    }

    int main(int argc, char **argv)
    {
      ros::init(argc, argv, "img_tran");
      ros::NodeHandle n;

      ros::Subscriber sub = n.subscribe("/camera/rgb/image_raw", 1000, chatterCallback);
      image_pub = n.advertise<sensor_msgs::Image>("/mono_image", 1000);

      ros::spin();
      return 0;
    }
我们可以把上述程序打包成一个ROS节点,放在工作空间下,方便调用。我放到了自己的workspace空间下的imu_dep_fusion包中来编译,生成节点convertimage。
你可能会说,好麻烦啊,我不想编译代码,可以啊。来个现成的,在launch中加入这句,就ok了:
   <node name="image_proc" pkg="image_proc" type="image_proc" ns="camera">
       <remap from="camera_info" to="/camera/rgb/image_info" />
       <remap from="image_raw" to="/camera/rgb/image_raw" />
   </node>
//TODO
//此问题没有解决,运行一会后会自己崩溃。错误如下:

3.3 最终将彩色图转换成为灰度图之后的标定时候的情况:

PTAM标定得到的一组数据为:
3.43903 5.4619 2.22492 -0.463232 -0.00771494
对应表示的相机参数含义为:
fx/width fy/height cx/width cy/height d
校准的具体过程见Tutorials:
http://wiki.ros.org/ethzasl_ptam/Tutorials/camera_calibration
得到校准参数后,在 ptam_ros 下的新建param/camera_xtion.yaml文件,将参数写如其中:
Calibration File for FOV camera model:
cam_width: 640
cam_height: 480
cam_fx: 3.43903
cam_fy: 5.4619
cam_cx: 2.22492
cam_cy: -0.463232
cam_d0: -0.0771494
参考博客:
[1]https://blog.csdn.net/u013004597/article/details/51965940
[2]http://wiki.ros.org/ptam
[3]https://blog.csdn.net/taily_duan/article/details/53199268


 本文介绍如何在ROS环境下使用PTAM库进行相机标定的过程,包括安装配置、图像预处理及标定流程等内容。


 5918
5918

 被折叠的 条评论
为什么被折叠?


