


 本博客介绍了在Unity 2017.2中利用Tilemaps创建2D关卡的完整工作流程,从导入图像文件开始,包括精灵制作、瓷砖资产创建、瓷砖调色板窗口的使用、网格和图块的布局,以及在图块上绘画和设置碰撞器。通过实例详细解释了如何将图像切割为精灵,转换为瓷砖,并在Tilemap上进行绘制,以构建2D Platformer级别的过程。
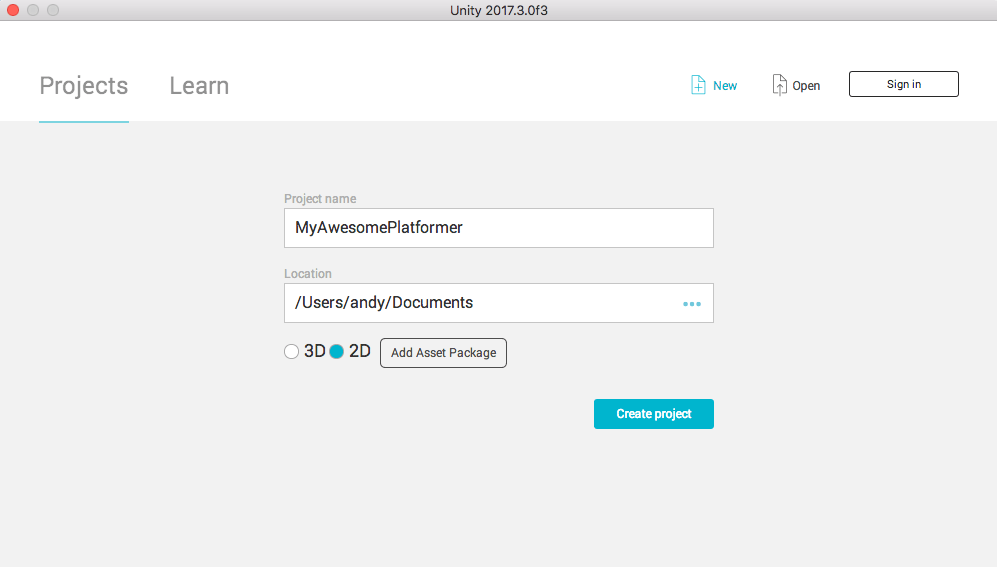
In Unity 2017.2, we introduced a new addition to the 2D Feature Set: Tilemaps! Using Tilemaps, you can quickly layout and create 2D levels using a combination of Sprites and GameObjects, and have control over properties such as layer ordering, tilemap colliders, animated tiles and more! In this blogpost, I will explain the full workflow beginning at importing your image file into Unity all the way through to a laid out level for a 2D Platformer!
在Unity 2017.2中,我们为2D功能集引入了新功能:Tilemaps! 使用Tilemaps,您可以结合使用Sprite和GameObjects快速布局和创建2D关卡,并可以控制诸如图层顺序,tilemap碰撞器,动画tile等属性! 在此博客文章中,我将说明完整的工作流程,从将图像文件一直导入到2D Platformer的布局级别开始!
As a TL;DR overview; the workflow can be summarised like this, with each element relating to an Asset or a Component in the Unity Editor:
作为TL; DR概述; 可以像这样总结工作流程,其中每个元素与Unity编辑器中的资产或组件有关:
Sprite -> Tile -> Palette -> Brush -> Tilemap
Sprite-> Tile-> Palette-> Brush-> Tilemap
From a Non-Unity point of view, these terms could seem a little abstract. Just imagine the process for a real-life painting on a real-life canvas:
从非统一的角度来看,这些术语似乎有点抽象。 想象一下在真实画布上进行真实绘画的过程:
Color -> Paint -> Tile Palette -> Paint Brush -> Canvas
颜色->油漆->瓷砖调色板->油漆刷->画布
There is similar logic to each step of the process and even similar names for each step!
该过程的每个步骤都有相似的逻辑,甚至每个步骤都有相似的名称!
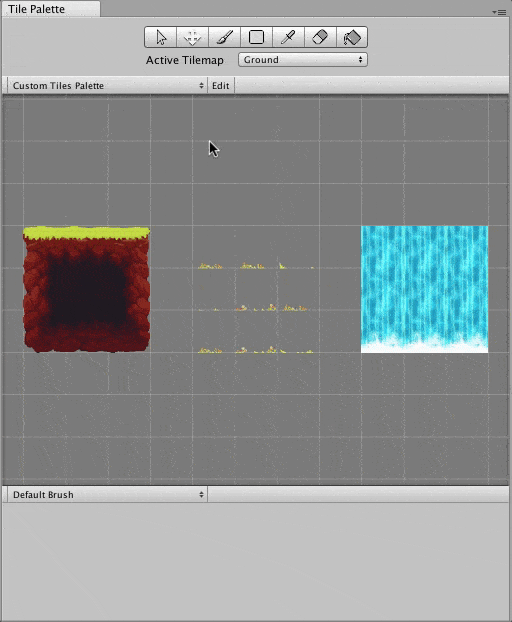
For this post, I will use this ‘GrassPlatform_TileSet’ Image as the main example:
对于本文,我将使用此“ GrassPlatform_TileSet”图像作为主要示例:

With the end result being a level constructed of these pieces that a 2D character can run on as a ‘level’:
最终结果是由这些片段构成的级别,一个2D角色可以作为“级别”运行:

1)精灵 (1) Sprites)
Importing an Image into Unity can be done in a variety of ways: – Saving the desired Image file into the project’s ‘Assets’ folder. – From the top menu, selecting ‘Assets -> Import New Asset’ and then selecting the desired file. – Dragging the Image File from your File Browser into the ‘Project Window’ in the Unity Editor (This is probably the easiest way!)
可以通过多种方式将图像导入Unity:–将所需的图像文件保存到项目的“资产”文件夹中。 –从顶部菜单中,选择“资产->导入新资产”,然后选择所需的文件。 –将图像文件从文件浏览器拖到Unity编辑器的“项目窗口”中(这可能是最简单的方法!)
Once the image is imported into your project, its default Texture Type import settings are defined by which behaviour mode your project is currently set to: 2D or 3D.
将图像导入项目后,其默认的“纹理类型”导入设置由您的项目当前设置为2D或3D的行为模式定义。
This mode is originally set when a new project is created:
创建新项目时最初设置此模式:
Or can be changed from in Editor Settings:
或者可以在“编辑器设置”中更改:
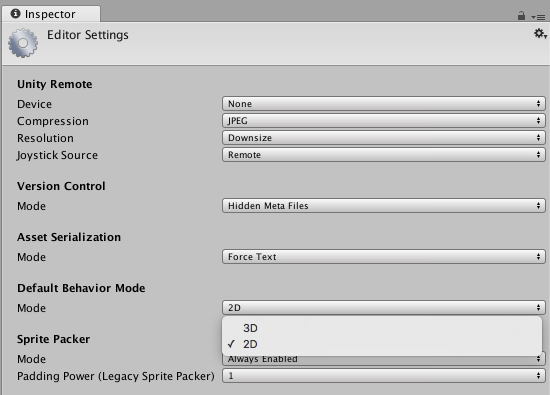
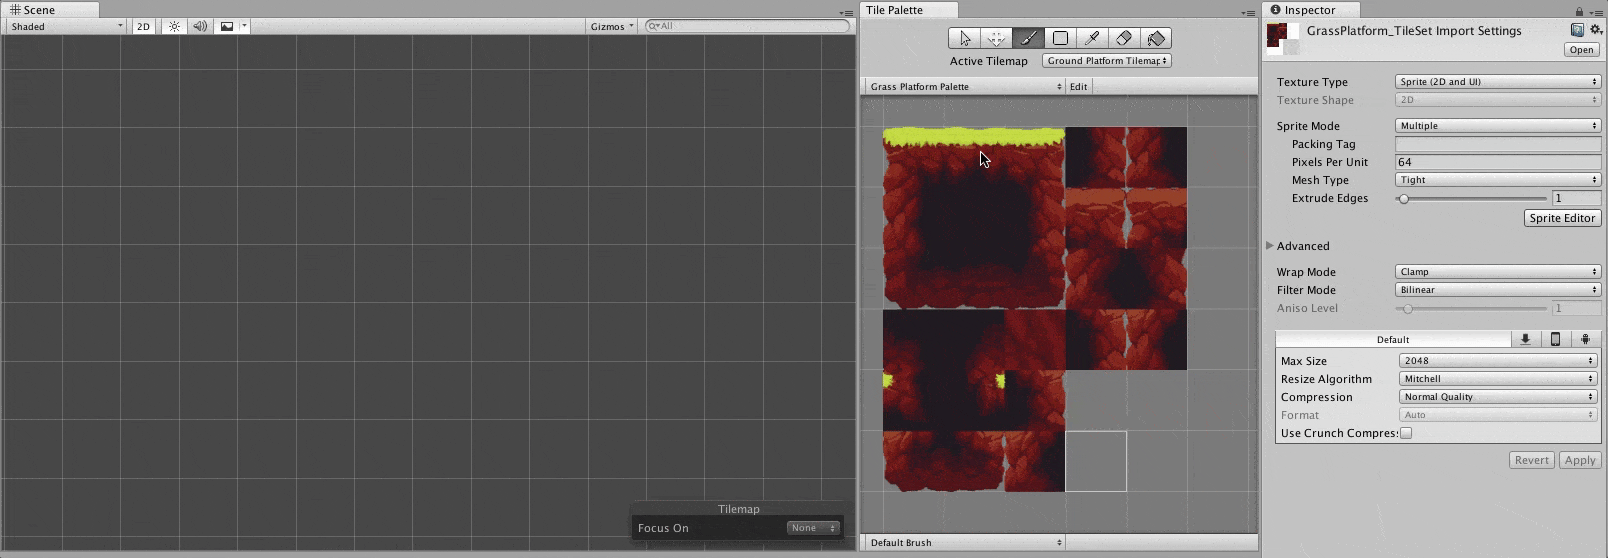
As my project already is setup for 2D Behaviour Mode, then ‘GrassPlatform_TileSet’ will automatically import with the Texture Type of ‘Sprite (2D and UI)’ which is the setting that the Tile asset will require to reference the Sprite.
由于我的项目已经设置为2D行为模式,因此“ GrassPlatform_TileSet”将自动以“ Sprite(2D和UI)”的纹理类型导入,这是Tile资产需要引用Sprite的设置。
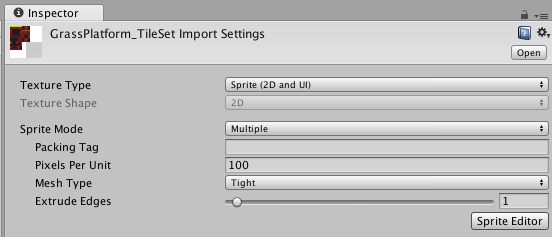
As the ‘GrassPlatform_TileSet’ is a series of sprites in one image, we will need to slice it into individual sprites; this can be done by setting the Sprite Mode from ‘Single’ to ‘Multiple’ and opening the Sprite Editor:
由于“ GrassPlatform_TileSet”是一个图像中的一系列精灵,因此我们需要将其切成单独的精灵。 这可以通过将Sprite Mode从“ Single”设置为“ Multiple”并打开Sprite Editor来完成:
The Sprite Editor window allows you to ‘slice’ an image into multiple sprites; so you can work on one spritesheet in your desired image editing software and define which areas of the image are treated as ‘individual’ sprites directly in Unity. No need to juggle and manage hundreds of individual image files!
Sprite Editor窗口允许您将图像“切片”为多个sprite。 因此,您可以在所需的图像编辑软件中处理一张Spritesheet,并直接在Unity中定义将图像的哪些区域视为“单个” Sprite。 无需处理和管理数百个单个图像文件!
As ‘GrassPlatform_TileSet’ is an image composited of a series of tiles, we can use the Sprite Editor’s Grid Slicing Settings to automatically split the image into multiple sprites. The dimensions of each ‘cell tile’ in this tileset are 64 pixels by 64 pixels, so we can input these setting and let the Sprite Editor auto-generate the required sprite slices:
由于“ GrassPlatform_TileSet”是由一系列图块组成的图像,因此我们可以使用“精灵编辑器”的“网格切片设置”将图像自动拆分为多个精灵。 此图块集中每个“单元图块”的尺寸为64像素乘64像素,因此我们可以输入以下设置,并让Sprite Editor自动生成所需的Sprite切片:
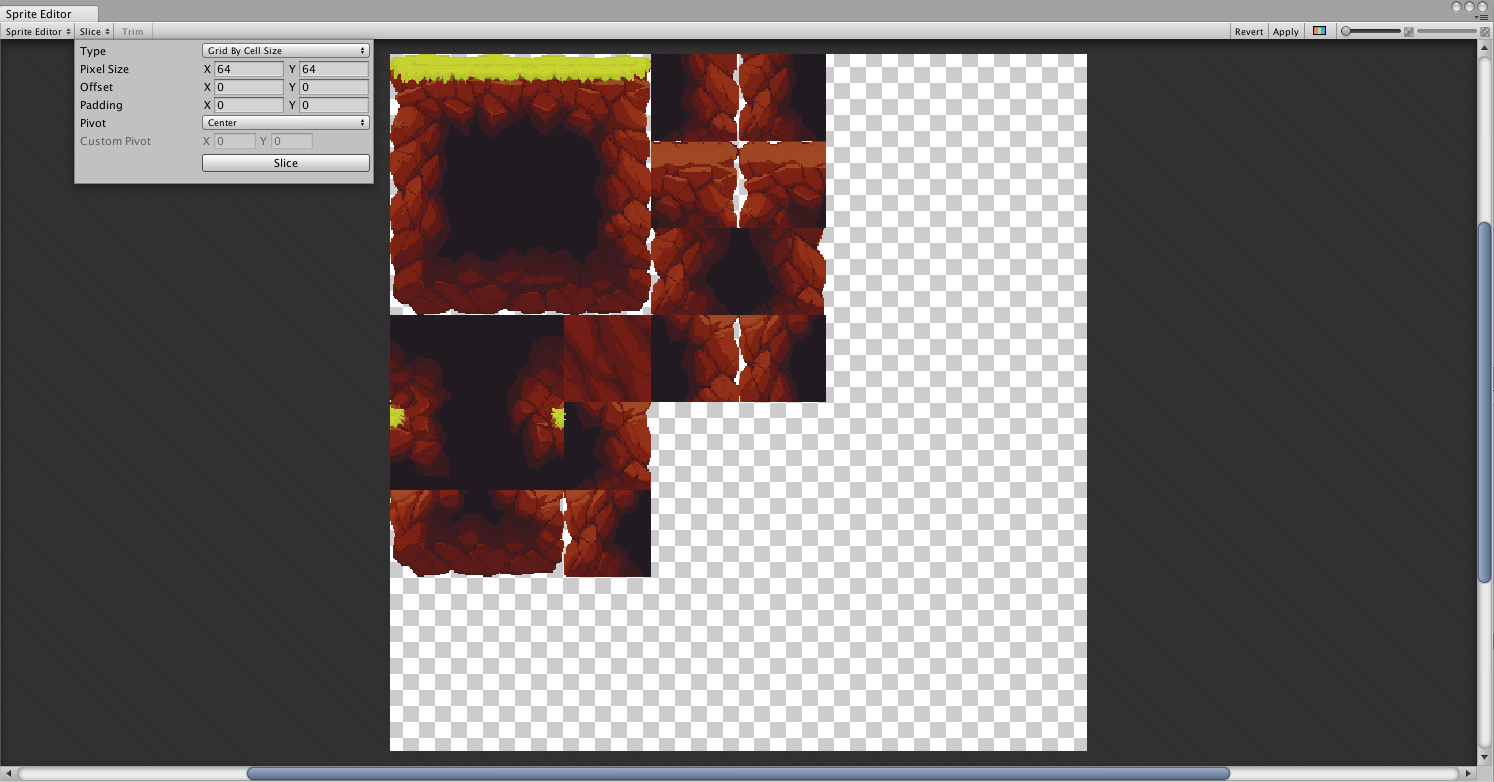
And after the ‘Slice’ button is clicked, we now have a sliced set of sprites!
单击“切片”按钮后,我们现在有了一组切片的精灵!
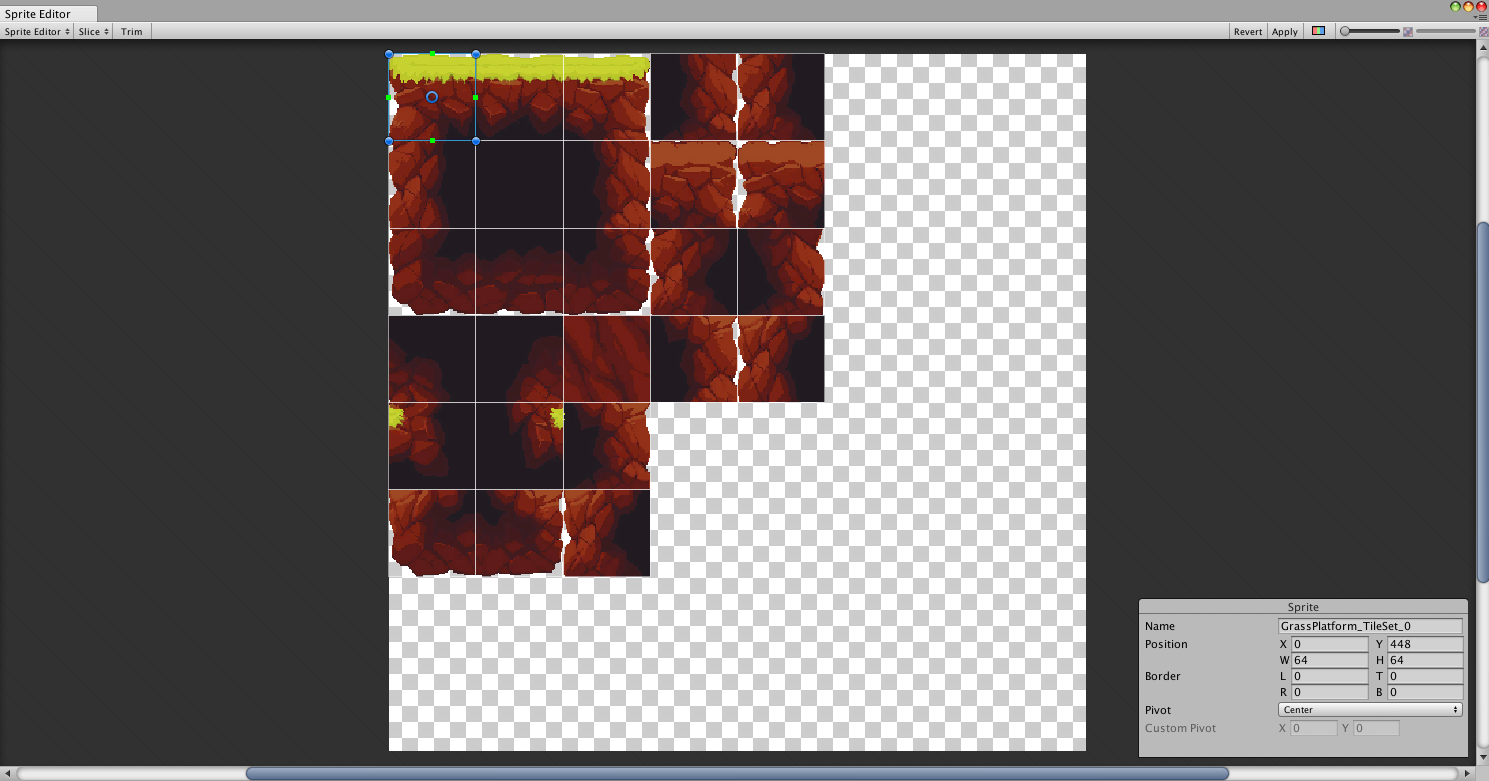
In the Sprite Editor window, each sliced sprite is then selectable and editable. For example, you can set names for each sprite and even manually tweak values such as position and pivots.
然后,在“精灵编辑器”窗口中,可以选择和编辑每个切片的精灵。 例如,您可以为每个精灵设置名称,甚至可以手动调整值,例如位置和枢轴。
We then need to ‘Apply’ the changes to the Sprite Asset (by clicking the aptly named ‘Apply’ button near the top-right corner of the Sprite Editor) which will then allow us to reference each sliced sprite individually in the Project window:
然后,我们需要“将”更改“应用”到Sprite资产(通过单击Sprite编辑器右上角附近的适当命名的“ Apply”按钮),然后允许我们在“项目”窗口中分别引用每个切片的Sprite:
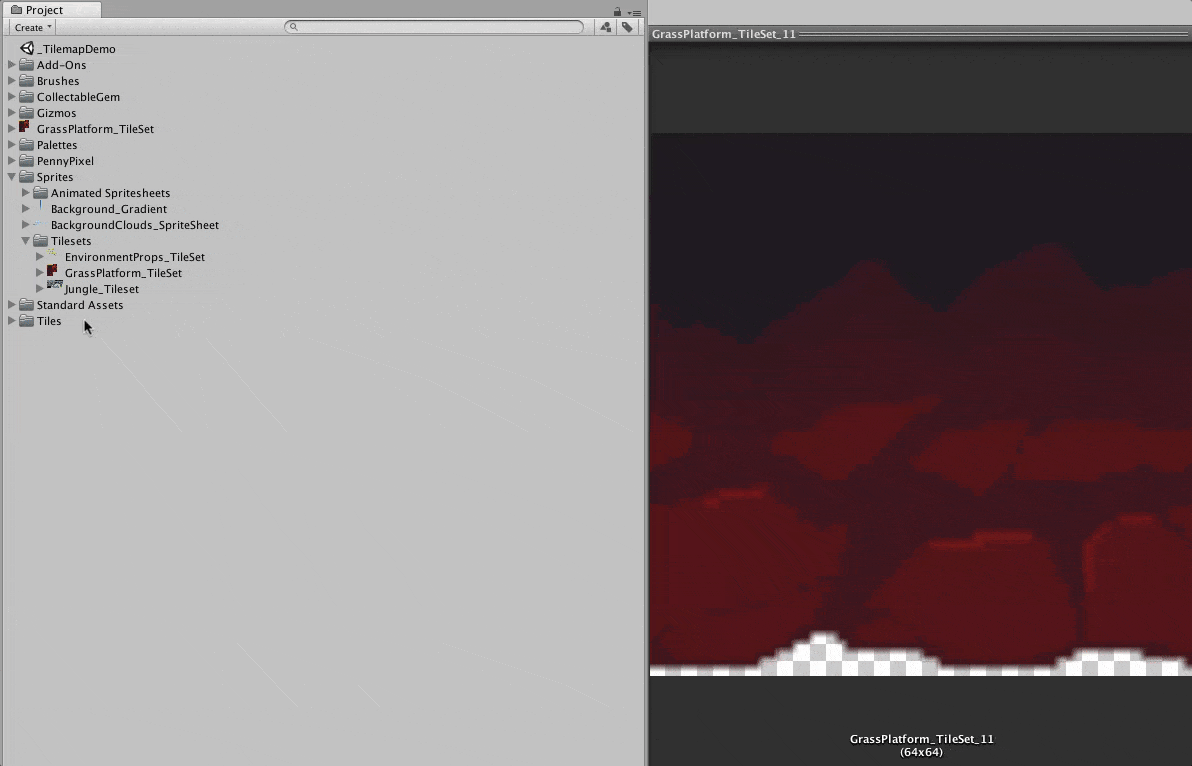
Now that our Sprite Sheet has been sliced into individual Sprites, we next need to ‘convert’ these into Tiles.
现在,我们的Sprite Sheet已被分割为单独的Sprite,接下来我们需要将它们“转换”为Tiles。
2)瓷砖资产 (2) Tile Asset)
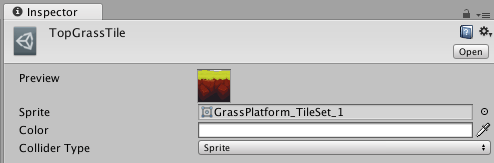
The Tile is a brand new asset added in Unity 2017.2. Its purpose is to hold data for the Tilemap to use at a specific cell on the grid.
Tile是Unity 2017.2中添加的全新资产。 其目的是保存供Tilemap使用的数据,以供网格上的特定单元使用。
The base default Tile asset (which can be generated from ‘Create -> Tile’ in the Project window) allows for a Sprite to be assigned to it and also other customisations such as the Tint of the Sprite and the type of Collider that it would use on the Tilemap (which will be explained later).
基本的默认Tile资产(可以从“项目”窗口中的“创建-> Tile”生成)可以将Sprite分配给它,还可以进行其他自定义设置,例如Sprite的Tint和对撞机的类型在Tilemap上使用(稍后将进行说明)。
3)瓷砖调色板窗口 (3) Tile Palette Window)
Unity 2017.2 introduces a new window: the Tile Palette! This window is integral to using the new Tilemap system as it acts as an interface to select which Tiles to use and how the Tilemap is to be edited with them.
Unity 2017.2引入了一个新窗口:“瓷砖调色板”! 该窗口是使用新的Tilemap系统不可或缺的一部分,因为它充当选择要使用的Tile以及如何使用它们编辑Tilemap的界面。
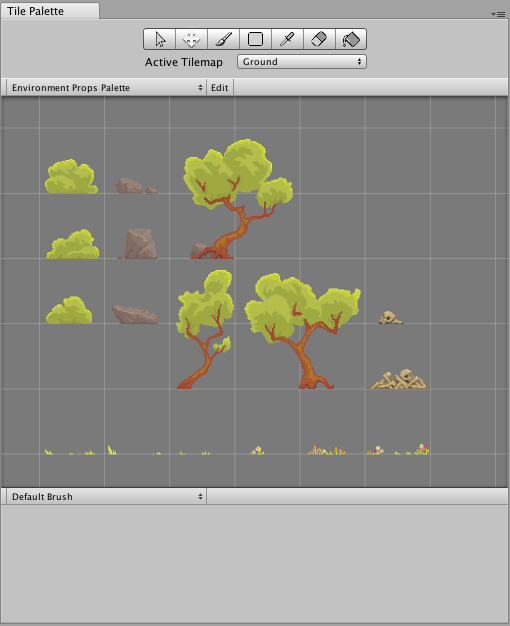
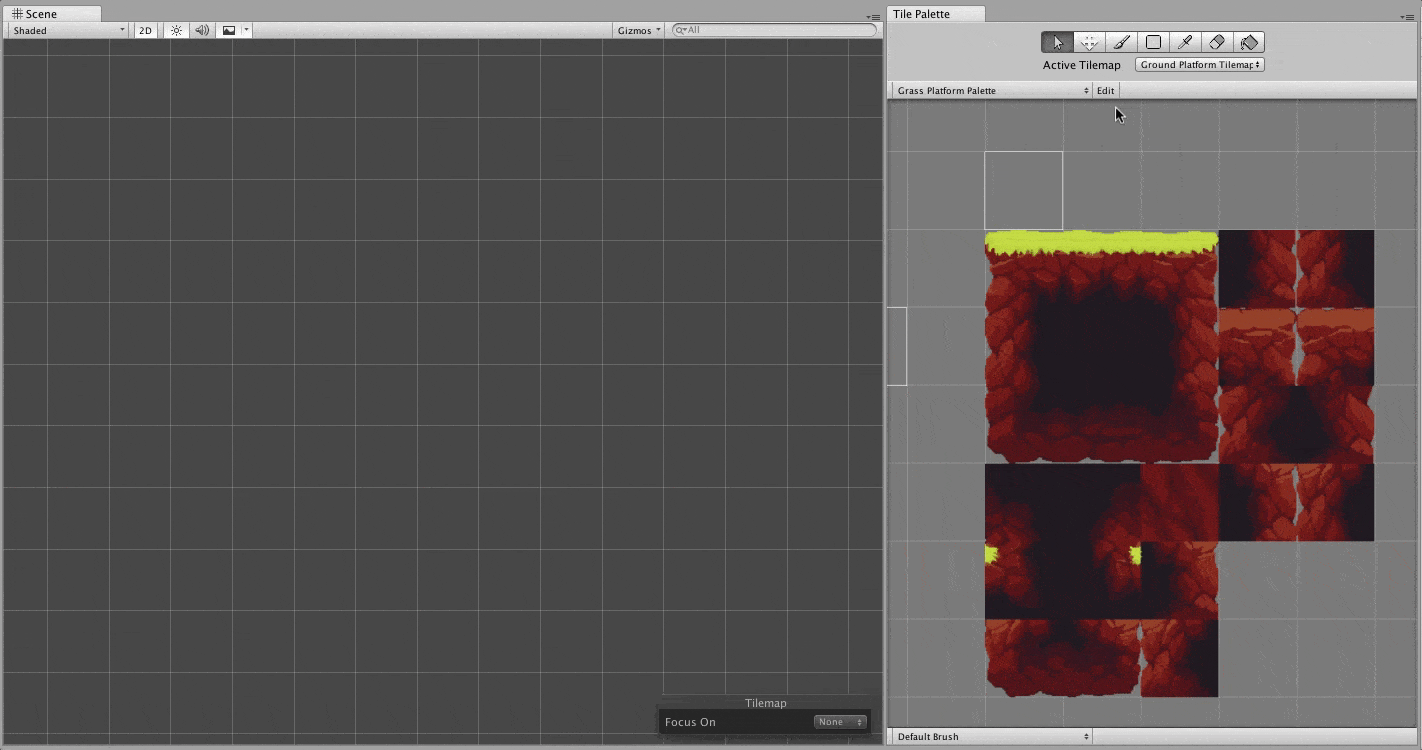
Before we can add the ’TopGrassTile’ Tile to the Tile Palette window, we first need to create a new Palette. Palettes can be used to organise your sets of Tiles instead of ‘storing’ all of them (could be hundreds or more!) on to one workspace in the window.
在将“ TopGrassTile”图块添加到“图块调色板”窗口之前,我们首先需要创建一个新的调色板。 调色板可用于组织您的图块集,而不是将所有图块(可能成百上千个!)“存储”到窗口中的一个工作区中。

In the drop-down Palette menu there is an option to create a brand new Palette:
在“调色板”下拉菜单中,有一个选项可以创建一个全新的调色板:
It’s as simple & easy as drag-and-drop to add ‘TopGrassTile’ to this newly created Palette!
就像拖放一样,将“ TopGrassTile”添加到这个新创建的Palette一样简单和容易!

However, in some situations we might be working with hundreds and hundreds of Sprites that build up our 2D scene. It would be very time-consuming to manually create a Tile asset for each of these Sprites and then drag-and-drop each one individually onto the Palette.
但是,在某些情况下,我们可能会使用数百个构建2D场景的Sprite。 为这些Sprite中的每个Sprite手动创建一个Tile资源,然后将其分别拖放到Palette上将非常耗时。
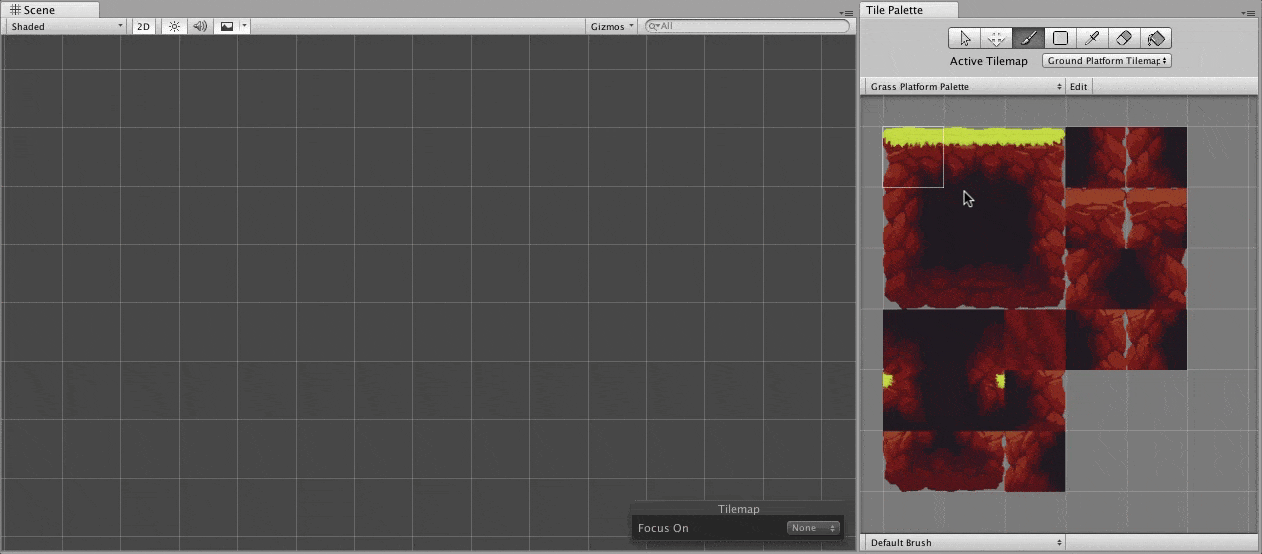
Thankfully, there is a workflow that can be used to automatically generate a set of Tiles (one for each Sprite) and assign all of them to the desired Palette. And it‘s also as simple & easy as drag-and-drop! Instead of dragging a Tile asset onto the Palette, drag the source Spritesheet that contains the sliced Sprites. In this case, ‘GrassPlatform_TileSet’:
值得庆幸的是,有一个工作流程可用于自动生成一组Tile(每个Sprite一个)并将所有瓦片分配给所需的Palette。 而且就像拖放一样简单,容易! 不要将Tile资产拖动到Palette上,而是拖动包含切片Sprite的源Spritesheet。 在这种情况下,“ GrassPlatform_TileSet”:
4)网格和图块 (4) Grid & Tilemap)
Now that our ‘GrassPlatform_TileSet’ spritesheet is successfully set up in the Tile Palette window, it’s time to start constructing a 2D Level!
现在,我们的“ GrassPlatform_TileSet”精灵表已在“ Tile Palette”窗口中成功设置,是时候开始构建2D Level了!
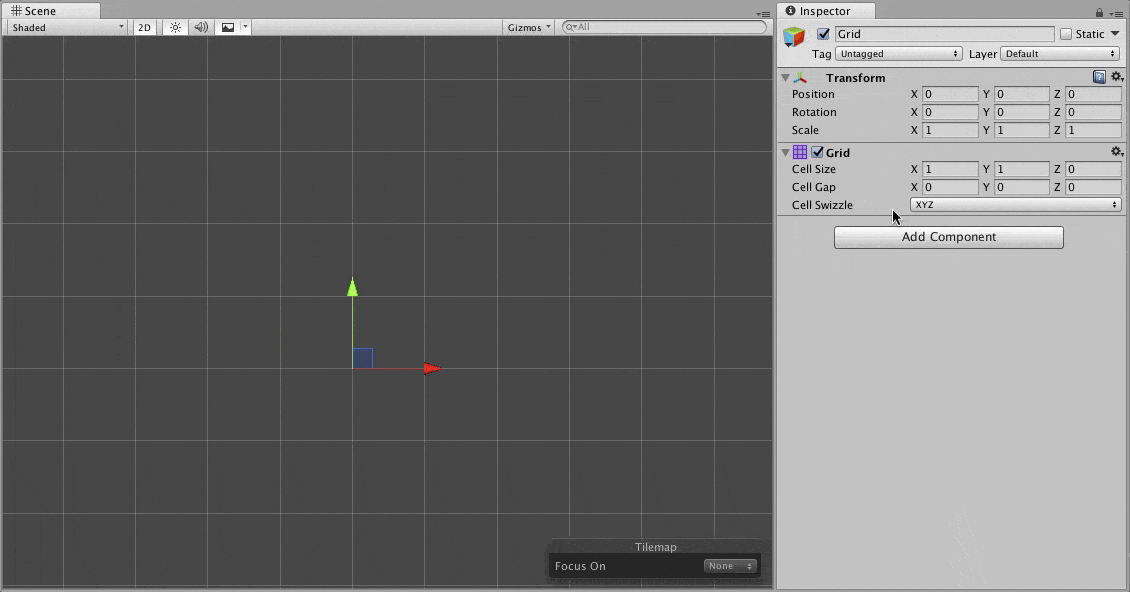
To begin, we need to can create a brand new ‘Tilemap’ in our current scene; this can be done from the ‘GameObject -> 2D Objects -> Tilemap’ drop-down menu. However, this not only creates a ‘Tilemap’ GameObject (With related components) but also a ‘Grid’ GameObject that the Tilemap gameObject is automatically a child of.
首先,我们需要在当前场景中创建一个全新的“ Tilemap”; 这可以通过“ GameObject-> 2D对象-> Tilemap”下拉菜单完成。 但是,这不仅会创建一个“ Tilemap”游戏对象(带有相关组件),还会创建一个“ Grid”游戏对象,Tilemap游戏对象自动成为其子对象。
The most similar GameObject structure to the ‘Grid <-> Tilemap’ setup is Unity’s UI System; where the Canvas parent GameObject acts as a layout container for all of its child UI GameObjects (Such as Text and Images). The ‘Grid’ GameObject uses the ‘Grid’ Component to define the dimensions of all of its child Tilemap GameObjects. There are options that allow for some customisation in the layout:
与“ Grid <-> Tilemap”设置最相似的GameObject结构是Unity的UI系统。 其中Canvas父级GameObject充当其所有子级UI GameObjects(例如Text和Images)的布局容器。 “网格”游戏对象使用“网格”组件来定义其所有子级Tilemap游戏对象的尺寸。 有一些选项允许在布局中进行一些自定义:
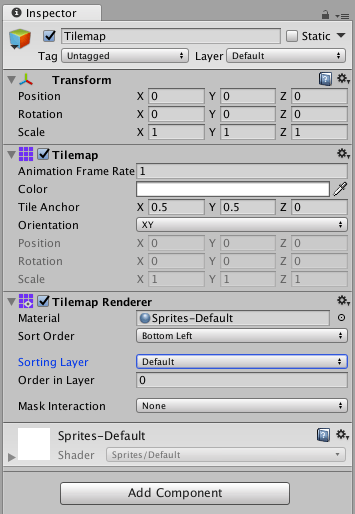
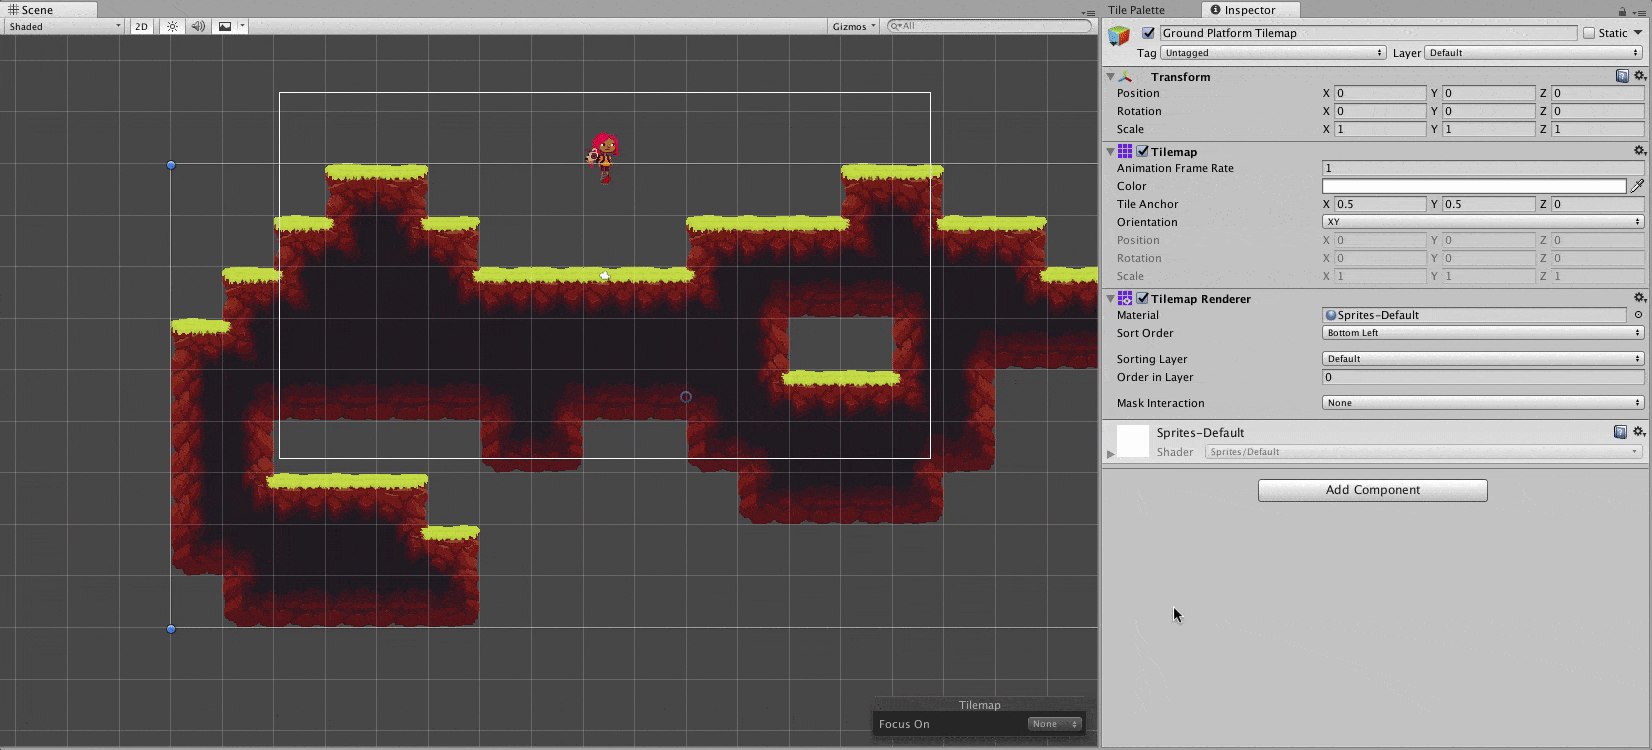
Each Tilemap Renderer gives you control over the Material used to render its Tiles, the Sorting Layer it uses (which is the same layer system that Sprite Renderers, UI Canvases and Particle Systems use!) and also how it reacts to the Sprite Mask.
每个Tilemap渲染器都使您可以控制用于渲染其Tile的材质,其使用的排序层(与Sprite Renderer,UI Canvas和粒子系统使用的层系统相同!),以及它对Sprite Mask的React方式。
5)在图块上绘画 (5) Painting onto the Tilemap)
Before Tiles can be painted onto the Tilemap, two things have to be selected: which Tilemap is currently focused and which Brush is currently in use.
在将Tile绘制到Tilemap上之前,必须选择两项:当前正在聚焦的Tilemap和当前正在使用的Brush。
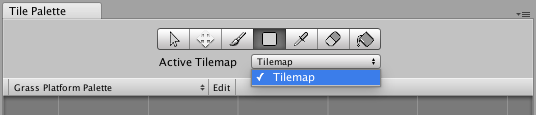
This drop-down list will show all instances of the ‘Tilemap’ component in the scene and will allow you to select one to be painted on and edited. The above screenshot only shows one ‘Tilemap’ option, and named after the default Tilemap GameObject, whereas a more complex scene with multiple Tilemaps could display a list of possible Active Tilemaps such as this:
此下拉列表将显示场景中“ Tilemap”组件的所有实例,并允许您选择要绘制和编辑的一个实例。 上面的屏幕截图仅显示了一个“ Tilemap”选项,并以默认的Tilemap GameObject命名,而具有多个Tilemap的更复杂的场景可能会显示可能的活动Tilemap列表,如下所示:
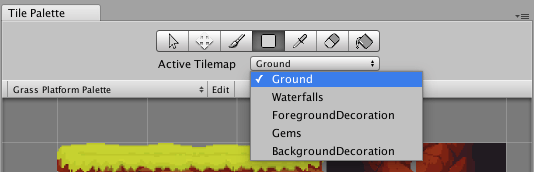
For the ‘GrassPlatform_TileSet’ example, renaming the “Tilemap’ GameObject to be more accurate will also update the Active Tilemap list name(s):
对于“ GrassPlatform_TileSet”示例,将“ Tilemap” GameObject重命名为更准确的做法也将更新“ Active Tilemap”列表名称:

The next thing to select is the current Brush. Whilst the Tile asset determines what data a cell would contain (Visuals, Collider Type, etc), a Brush asset defines how a Tile (or Tiles) would be placed onto a Tilemap. Currently, Unity only has one Brush (named ‘Default Brush’) built-in to be selected; and it has expected functionality of its name such as placing, erasing, moving and filling Tiles on the Tilemap. However, on the Unity Technologies Team GitHub there is a 2D Extras’ Repository that has a variety of examples of how you can script your own custom Brushes and Tiles! Once these are imported into your project, the current Brush menu (at the bottom of the Tile Palette window) will allow you to choose which Brush to use:
接下来要选择的是当前的画笔。 Tile资产确定单元格将包含哪些数据(视觉效果,对撞机类型等),而Brush资产定义如何将Tile(或Tiles)放置到Tilemap上。 当前,Unity仅内置一个画笔(名为“默认画笔”)可供选择; 并且它具有其预期的功能,例如在Tilemap上放置,擦除,移动和填充Tile。 但是,在Unity技术团队GitHub上有一个2D Extras的存储库 ,其中包含有关如何编写自己的自定义Brushes和Tiles脚本的各种示例! 将这些导入到项目中之后,当前的“画笔”菜单(位于“拼贴面板”窗口的底部)将允许您选择要使用的画笔:
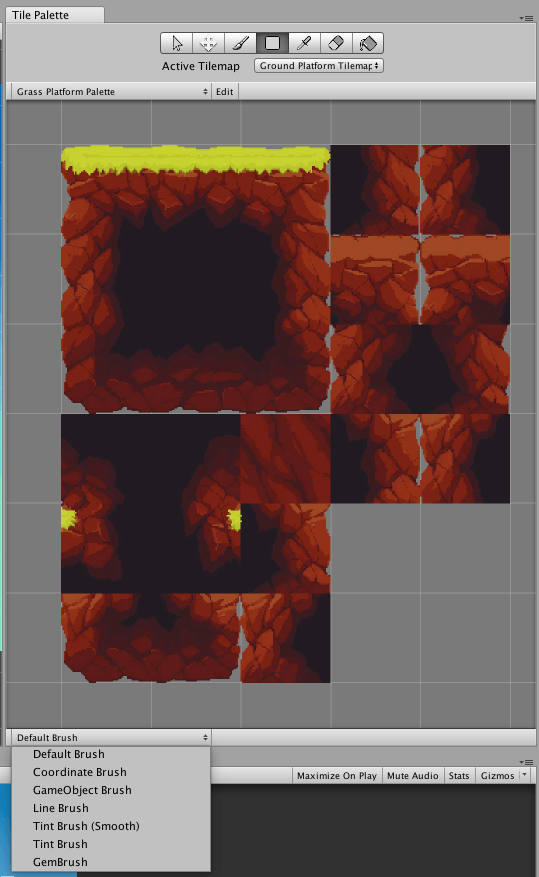
Whilst this article doesn’t dive into the use of Scriptable Brushes and Scriptable Tiles, it’s a very powerful area to study and integrate into your tilemap-based level-design toolset.
尽管本文并未深入探讨可脚本笔刷和可脚本砖的使用,但它是研究并集成到基于tilemap的关卡设计工具集中的一个非常强大的领域。
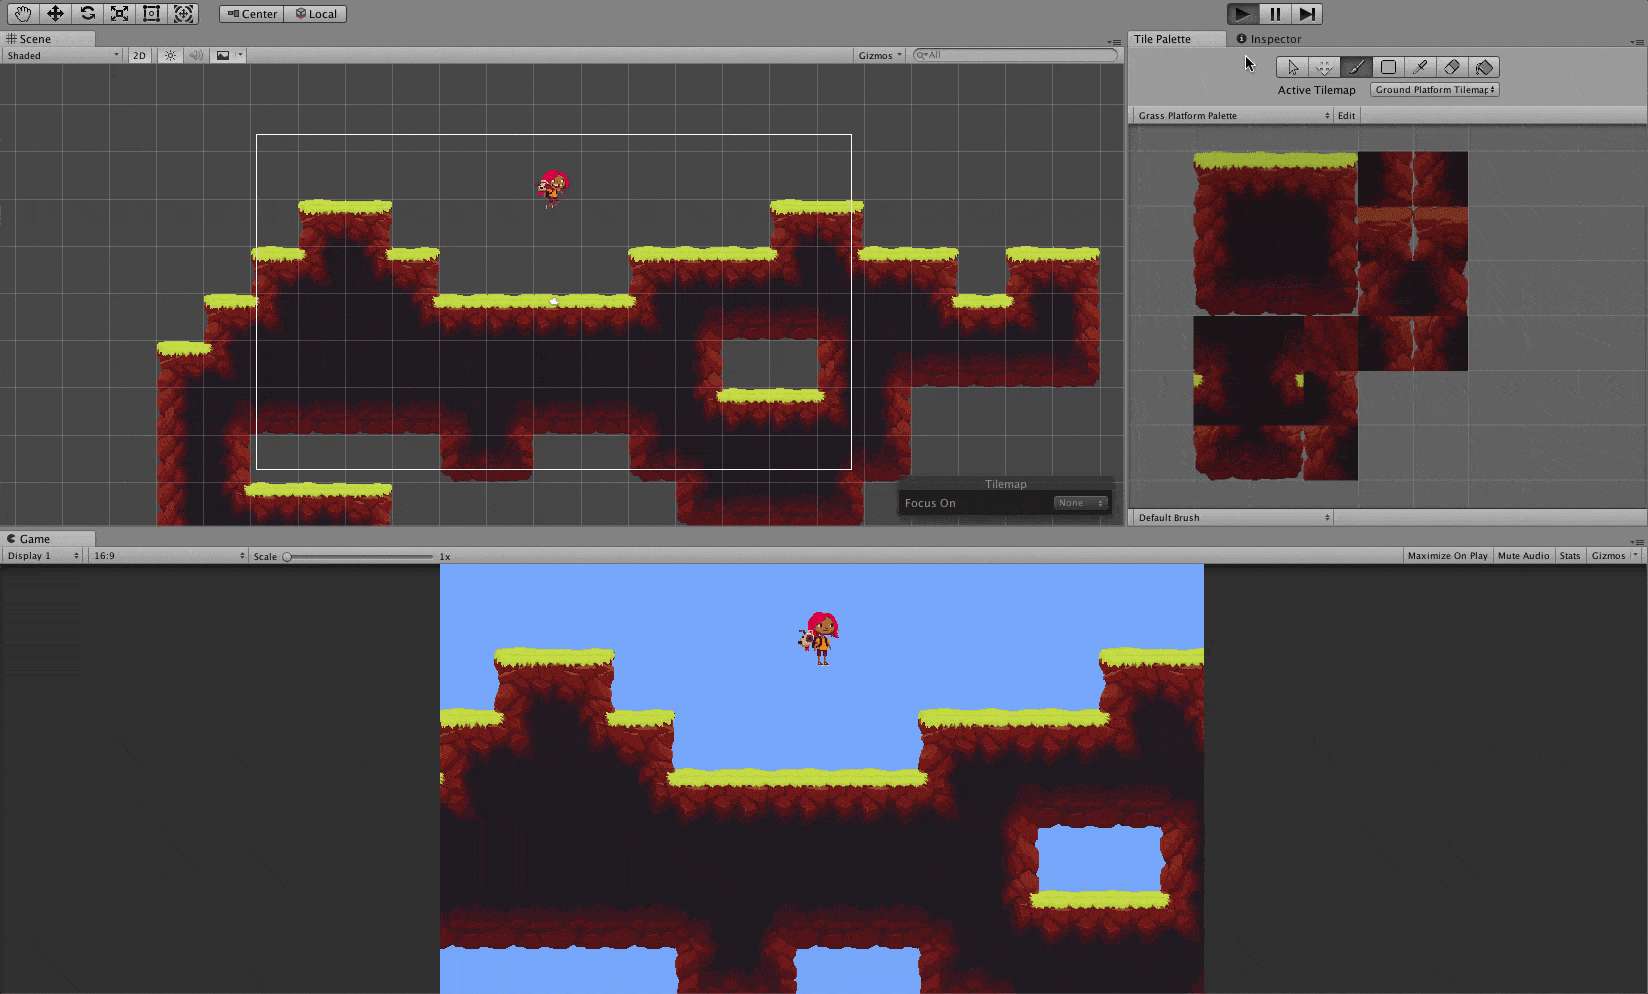
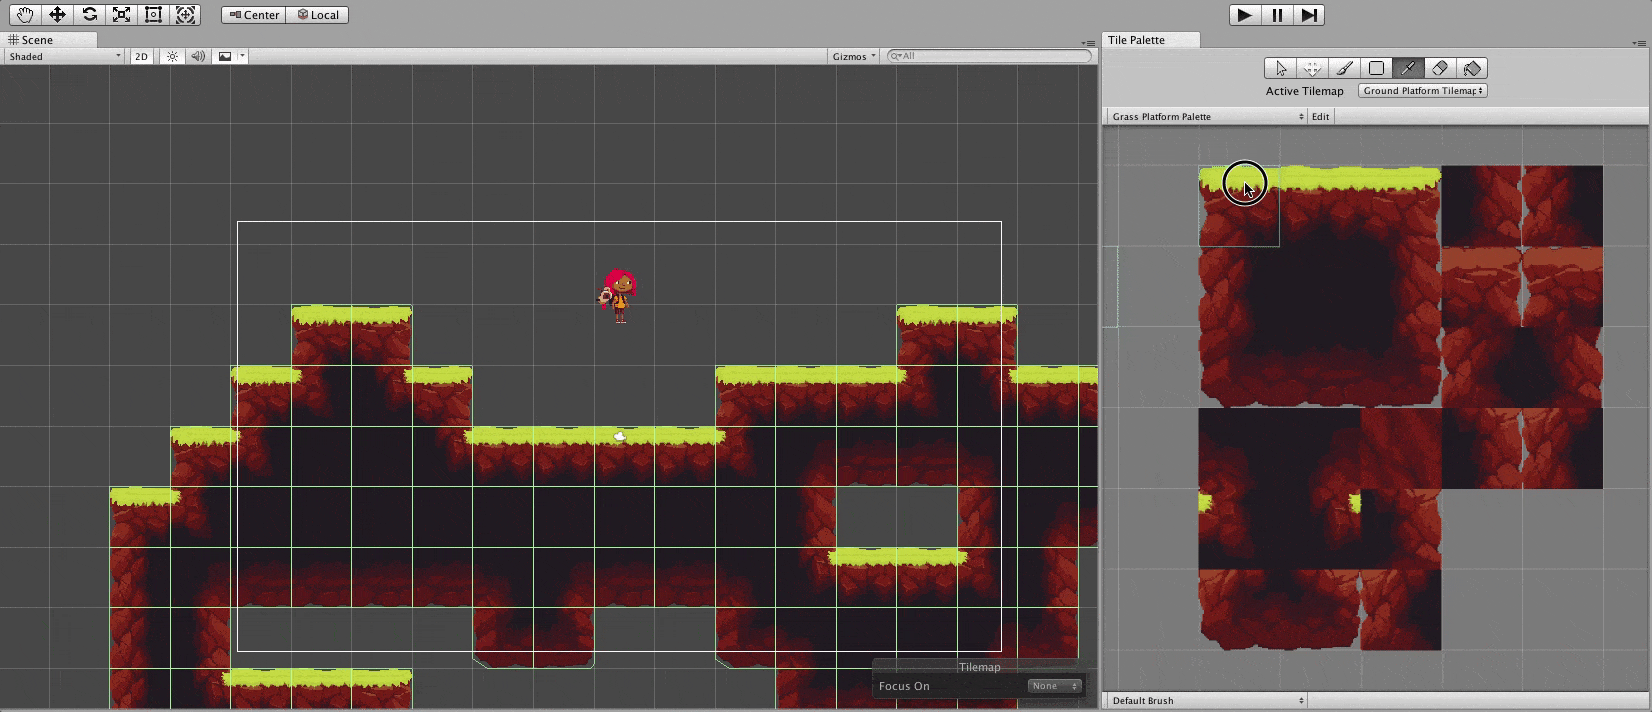
With the Active Tilemap and Current Brush set, we can then select a specific Tile, in the Tile Palette window, and then paint it onto the Tilemap in the Scene! You will also need to make sure that the ‘Paintbrush’ Icon in the Edit Tools is also selected:
设置“活动图块地图”和“当前画笔”后,我们可以在“图块调色板”窗口中选择特定的图块,然后将其绘制到场景中的“图块地图”上! 您还需要确保还选择了“编辑工具”中的“油漆刷”图标:
Success! Tiles are being painted on the Tilemap! However, you may notice that the Tiles are slightly smaller than the size of the Grid’s cells. This is not a bug, but we need to step back a bit for some explanation of why – and how you can change the default.
成功! 在图块地图上绘制图块! 但是,您可能会注意到Tiles略小于Grid单元的大小。 这不是错误,但我们需要退后一步来解释原因以及如何更改默认值。
The Grid component’s Cell Size uses Unity’s world space distance units (For example, a primitive Unity cube with default scaling of 1 for each axes will be the same size as one cell on the default Grid). Each Sprite asset has a Pixels Per Unit value in its Import Settings, with the default value being 100:
Grid组件的像元大小使用Unity的世界空间距离单位(例如,每个轴默认缩放比例为1的基本Unity多维数据集的大小与默认Grid上一个像元的大小相同)。 每个Sprite素材资源的“导入设置”中都有一个“像素单位”值,默认值为100:
As each of ‘GrassPlatform_TileSet’s sprites has a dimension of 64 pixels by 64 pixels, setting the Pixels Per Unit value accordingly will automatically adjust the scale of all instances of the sliced Sprites; thus fitting the related Tiles accurately into the Grid’s Cells!
由于每个“ GrassPlatform_TileSet”子画面的尺寸为64像素乘以64像素,因此相应地设置“每单位像素数”值将自动调整所有已切片子画面实例的比例。 从而将相关的图块准确地安装到网格的单元中!
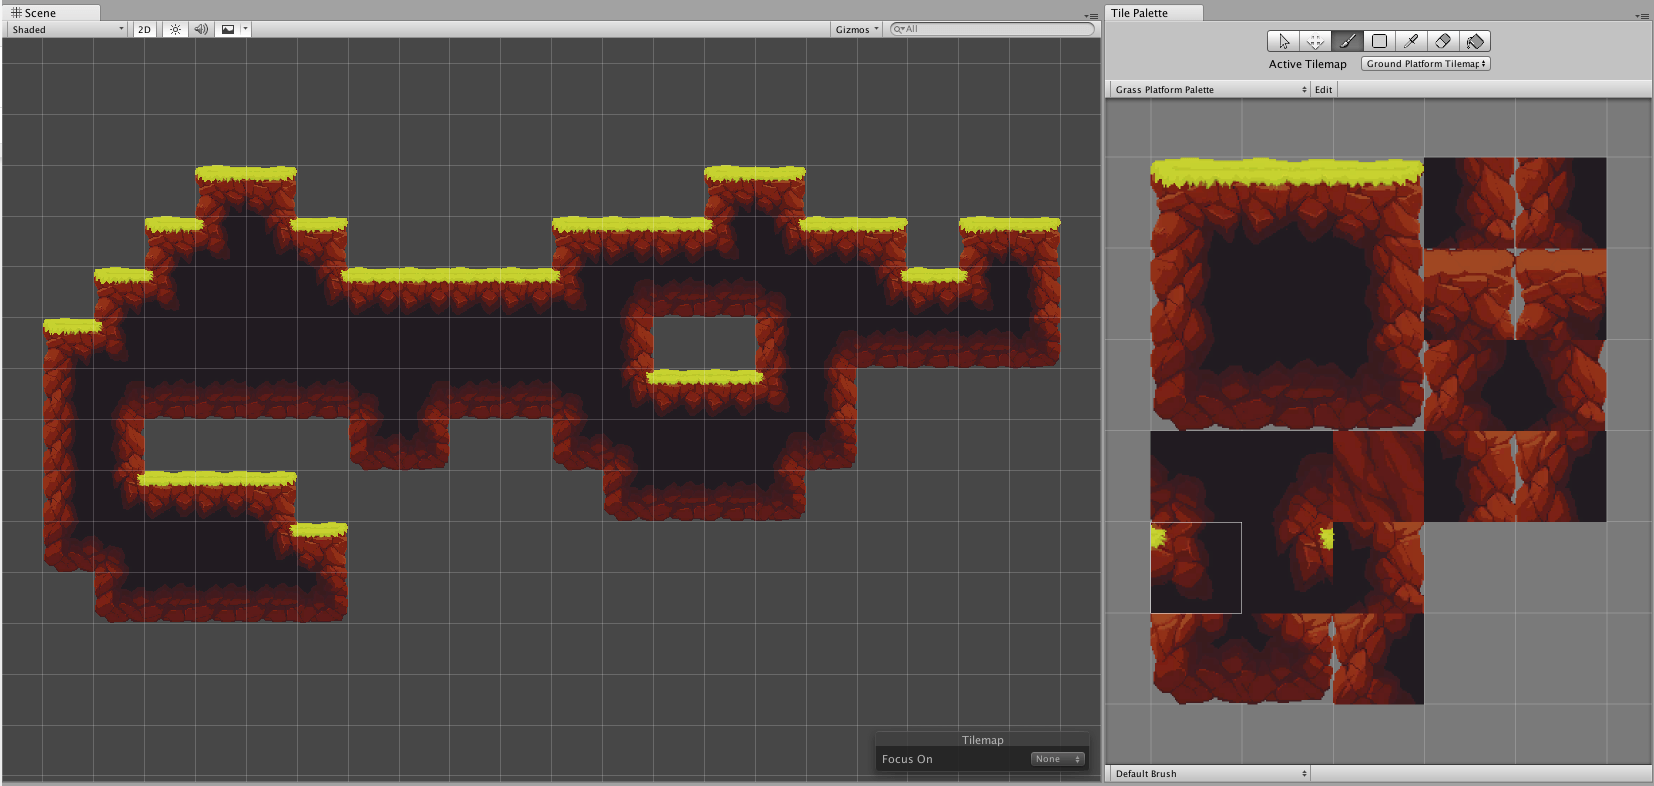
And now we can begin to create our Tilemap level using the various Editing Tools at the top of the Tile Palette window.
现在,我们可以使用Tile Palette窗口顶部的各种编辑工具开始创建Tilemap级别。
It’s worth noting that it’s also possible to select a range of multiple Tiles in the Tile Palette and paint them together as a group:
值得注意的是,还可以在“瓷砖调色板”中选择多个“瓷砖”范围并将它们作为一个组绘制在一起:
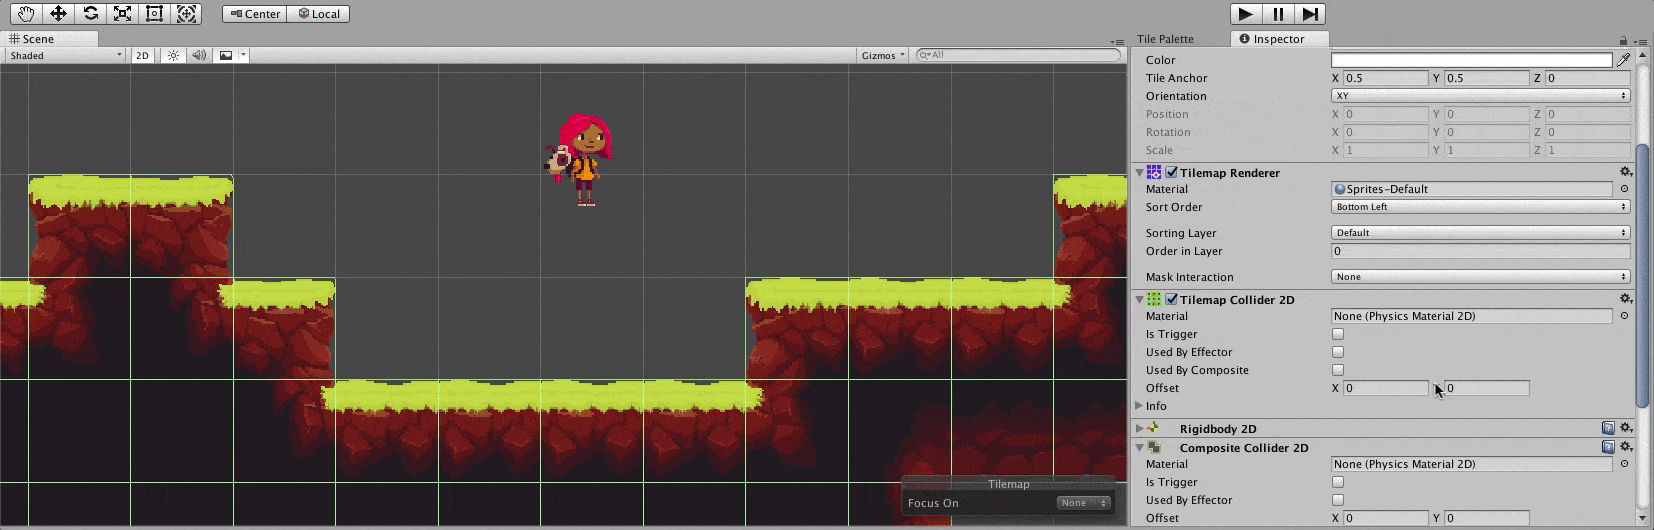
6)Tilemap Collider和Composite Collider (6) Tilemap Collider & Composite Collider)
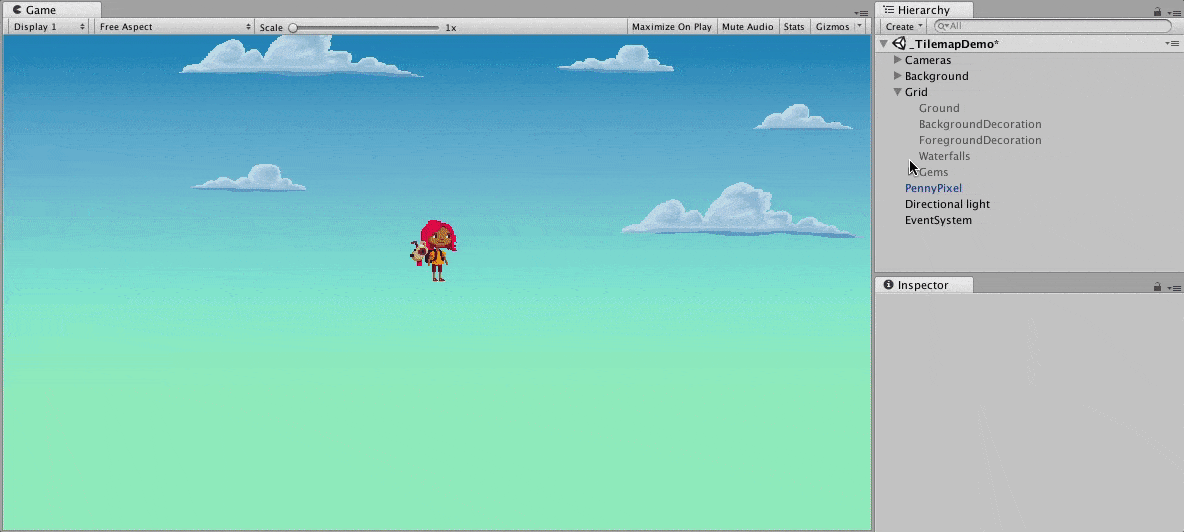
Now you have all the knowledge needed to manually paint a basic level such as this:
现在,您拥有了手动绘制基本级别所需的全部知识,例如:
Another useful component that was added to the 2D Physics Toolset is the Composite Collider. Adding this to the Tilemap Collider 2D will merge all of the Tile’s Colliders into one much more optimised geometry collider mesh!
添加到2D物理工具集中的另一个有用的组件是Composite Collider。 将其添加到Tilemap Collider 2D中会将所有Tile的碰撞器合并到一个优化得多的几何碰撞器网格中!
And that concludes this tutorial on the Tilemap asset and component workflow; from Image File to a basic constructed level that has an automatically-generated collider!
到此,本章结束了有关Tilemap资产和组件工作流程的教程。 从图像文件到具有自动生成的对撞机的基本构造级别!
There are many more areas to cover for the Tilemap System; for some more information I would recommend watching Matt Schell’s Live Training Video on 2D World Building.
Tilemap系统还有很多其他方面需要涵盖。 有关更多信息,我建议您观看2D World Building上Matt Schell的现场培训视频 。
However, if there are other topics that you would be interested in a deep-dive blogpost about, such as Scriptable Brushes, Scriptable Tiles, Animated Tiles, Rendering and Ordering Multiple Tilemaps etc, then please leave a comment below!
但是,如果您对其他博客感兴趣,例如脚本刷,脚本砖,动画砖,渲染和订购多个图块等,那么请在下面发表评论!
翻译自: https://blogs.unity3d.com/2018/01/25/2d-tilemap-asset-workflow-from-image-to-level/


 6943
6943

 被折叠的 条评论
为什么被折叠?
被折叠的 条评论
为什么被折叠?
 到【灌水乐园】发言


