


time machine
When you set up Time Machine, your Mac wants to use an entire external drive exclusively for backups. Here’s how you can get around that and use a Time Machine drive both for backups and file storage.
设置Time Machine时,Mac希望将整个外部驱动器专门用于备份。 这是解决该问题的方法,并将Time Machine驱动器用于备份和文件存储。
Using a 2 TB external drive for Time Machine backups of a Mac with a 128 GB solid-state drive doesn’t make much sense. Better to put that external drive to use storing video files and other data you might need.
将2 TB外部驱动器用于Time Machine备份具有128 GB固态驱动器的Mac并没有多大意义。 最好将外部驱动器用于存储您可能需要的视频文件和其他数据。
快速和肮脏的方法:将文件放在Time Machine驱动器上 (The Quick and Dirty Method: Put Files on the Time Machine Drive)
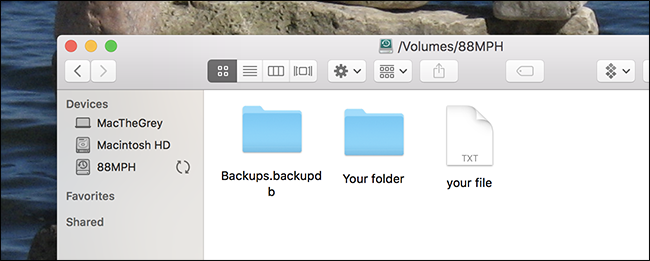
The easiest way to store files on your Time Machine drive is just placing the files on there directly. Plug in your Time Machine drive and open it in the Finder. You’ll see a folder named “Backups.backupdb”. Time Machine stores all its backup files under this folder. Just leave this folder alone and let Time Machine use it normally.
在Time Machine驱动器上存储文件的最简单方法是直接将文件放置在其中。 插入您的Time Machine驱动器,然后在Finder中打开它。 您会看到一个名为“ Backups.backupdb”的文件夹。 Time Machine的所有备份文件都存储在此文件夹下。 只需保留此文件夹,然后让Time Machine正常使用即可。
Place personal files and folders outside the Backups.backupdb folder. Don’t place anything inside the Backups.backupdb folder—Time Machine automatically deletes files and folders inside there to free up space, so you may find your personal files deleted if put them there.
将个人文件和文件夹放在Backups.backupdb文件夹之外。 请勿在Backups.backupdb文件夹中放置任何内容-Time Machine会自动删除其中的文件和文件夹以释放空间,因此,如果将个人文件放在其中,则可能会删除它们。
Bear in mind that Time Machine requires the drive be formatted with the Mac’s HFS+ file system, which means you won’t be able to easily access these files on Windows PCs or anything else that isn’t a Mac. Time Machine will also work toward filling up the entire drive, not leaving extra room for your files.
请记住,Time Machine需要使用Mac的HFS +文件系统对驱动器进行格式化,这意味着您将无法在Windows PC或非Mac的任何其他设备上轻松访问这些文件。 Time Machine还将努力填充整个驱动器,而不会为文件留出更多空间。
更好的选择:为备份和文件创建单独的分区 (A Better Option: Create Separate Partitions for Backups and Files)
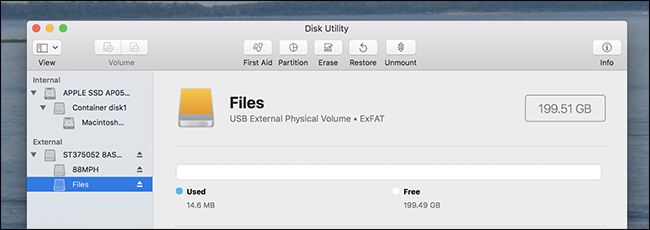
The ideal way to do this is to create separate partitions on the external drive. Use one for Time Machine backups and another for your personal files. This will ensure your Time Machine backups don’t grow too large, so you’ll always have room for your personal files. You can also make the files partition an ExFAT partition, which means you can use it with Windows PCs and practically any other device you can connect an external drive to.
理想的方法是在外部驱动器上创建单独的分区 。 一种用于Time Machine备份,另一种用于个人文件。 这将确保您的Time Machine备份不会变得太大,因此您将始终有空间容纳个人文件。 您还可以将文件分区设为ExFAT分区 ,这意味着您可以将其与Windows PC以及几乎任何可以连接外部驱动器的设备一起使用。
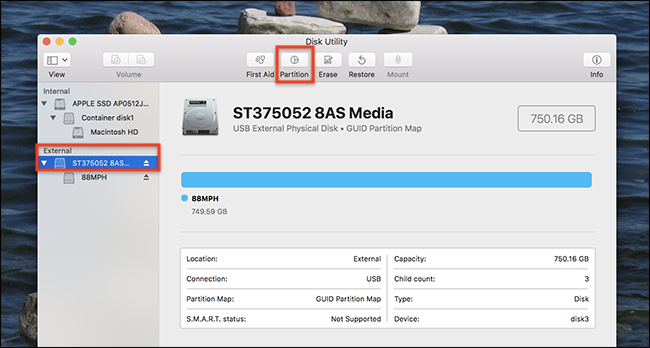
You’ll need to use the Disk Utility built into your Mac to work with partitions. Press Command+Space, type Disk Utility, and press Enter to open it.
您需要使用Mac内置的磁盘实用程序来处理分区。 按Command + Space ,键入Disk Utility,然后按Enter将其打开。
In the Disk Utility window, select the drive you’re using for Time Machine backups and click the Partition button in the toolbar.
在“磁盘工具”窗口中,选择用于Time Machine备份的驱动器,然后单击工具栏中的“分区”按钮。
If you’ve already set up the drive to work with Time Machine, click the “+” button to create a new partition, then resize it by moving the dial or by typing a specific number.
如果已经将驱动器设置为可与Time Machine一起使用,请单击“ +”按钮创建一个新分区,然后通过移动拨盘或键入特定数字来调整分区的大小。
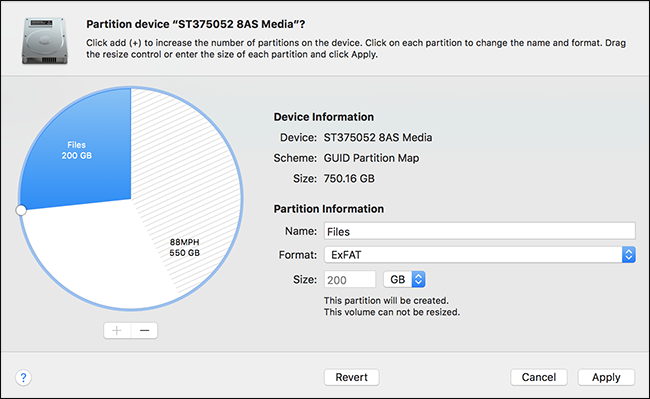
Choose the ExFAT file system if you plan to use this drive with Windows computers, or Mac OS Extended if you’re just using it with other Macs. Give the new partition a meaningful name—like “Files”—to keep track of which partition is which.
如果您打算将此驱动器用于Windows计算机,则选择ExFAT文件系统;如果您仅将其与其他Mac一起使用,则选择Mac OS Extended。 为新分区指定一个有意义的名称(例如“文件”),以跟踪哪个分区是哪个分区。
If you’re setting up the drive from scratch, or don’t mind wiping your Time Machine backups and starting over from scratch, you can also do that. Open the Partition tool for the drive, then delete any partitions that exist. Create two clearly labeled partitions, choosing Mac OS Extended (Case-sensitive) for the Time Machine partition and ExFAT for the file storage partition.
如果您是从头开始设置驱动器,或者不介意擦除Time Machine备份并从头开始,则也可以这样做。 打开驱动器的分区工具,然后删除存在的所有分区。 创建两个标记明确的分区,为Time Machine分区选择Mac OS Extended(区分大小写),为文件存储分区选择ExFAT。
Warning: This process will wipe all the files on the drive! You’ll have to start using Time Machine from scratch, so you’ll lose any old backups and personal files that may be stored anywhere on the drive.
警告:此过程将擦除驱动器上的所有文件! 您必须从头开始使用Time Machine,这样您将丢失所有可能存储在驱动器上任何位置的旧备份和个人文件。
If you resized an existing Time Machine partition, Time Machine should automatically keep using it for backups. If you wiped your drive or you’re setting up Time Machine from scratch, you’ll need to point it at that specific partition. Choose the Backups partition in Time Machine’s settings and Time Machine will back up to that specific partition only, not the entire drive.
如果调整现有Time Machine分区的大小,Time Machine应自动继续使用该分区进行备份。 如果擦除驱动器或从头开始设置Time Machine ,则需要将其指向该特定分区。 在Time Machine的设置中选择“备份”分区,Time Machine将仅备份到该特定分区,而不是整个驱动器。

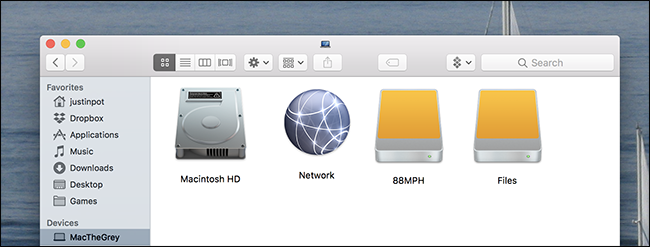
Every time you connect your drive to your computer, you’ll see two different volumes. These are the two partitions on the drive. You can save files to the files partition, leaving the backups partition for Time Machine alone. Bear in mind that the drive may be slow if you’re reading and writing files while Time Machine is backing up to it.
每次将驱动器连接到计算机时,都会看到两个不同的卷。 这是驱动器上的两个分区。 您可以将文件保存到文件分区,而单独保留Time Machine的备份分区。 请记住,如果在Time Machine备份驱动器的同时读取和写入文件,则驱动器可能会变慢。
Files you store on the external drive won’t be backed up by Time Machine, so bear that in mind. If the files are important, you’ll want to have redundant backups. On the other hand, if they’re just videos and other types of data you could download again from the Internet, there’s no need to have multiple redundant copies. You can always just download them again if your drive fails.
Time Machine不会备份您存储在外部驱动器上的文件,因此请记住这一点。 如果文件很重要,则需要冗余备份。 另一方面,如果它们只是视频和其他类型的数据,您可以从Internet重新下载,则无需多个冗余副本。 如果驱动器发生故障,您始终可以再次下载它们。
Image Credit: Piotr Adamowicz/Shutterstock.com
图片来源: Piotr Adamowicz / Shutterstock.com
翻译自: https://www.howtogeek.com/212445/how-to-use-a-time-machine-drive-for-both-file-storage-and-backups/
time machine


 601
601

 被折叠的 条评论
为什么被折叠?
被折叠的 条评论
为什么被折叠?
 到【灌水乐园】发言


