


第三章:使用MoveIt操控真实UR10e机器人
本实验需要用到的硬件设备:
ur10e机器人 (其他型号)、windows电脑、Intel RealSense D455 深度相机 (其他型号)
网线、usb数据线(用来连接安卓手机)
这是一个系列其中包含:
1.在VMware虚拟机中安装Ubuntu环境、ROS环境
2.安装UR驱动(用来连接UR真机)
3.安装MoveIt(用来控制UR10e机器人)
4.安装realsense的驱动
5.安装Aruco码驱动
6.手眼标定全实验过程
先说下目前所需工具的版本:
1.VMware Workstation Pro 17
2.Ubuntu 20.04
3.ROS Noetic Ninjemys
4.universal-robot-noetic-devel
上篇内容:
上篇我们从配置了UR机器人的网络设置,VMware的网络设置以及Windows主机的网络设置,使得可以通过VMware中的UR驱动成功连接到真实UR10e机器人,如有需要可自行点击下方链接回到第二章:
安装MoveIt:
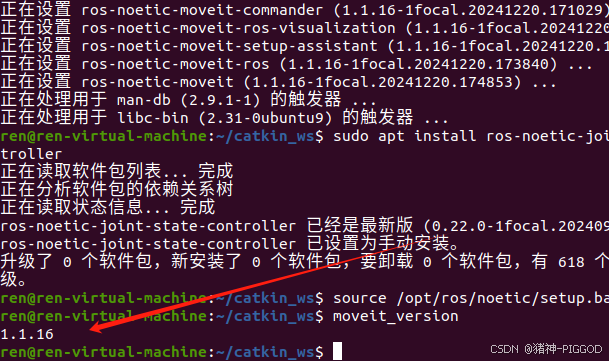
sudo apt-get install ros-noetic-moveit
sudo apt install ros-noetic-joint-state-controller
source /opt/ros/noetic/setup.bash
测试,可查看MoveIt的版本号:
moveit_version成功显示版本号
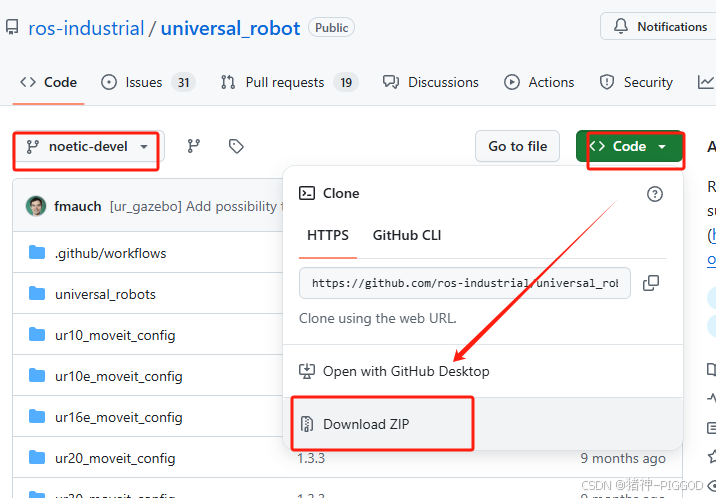
安装universal_robot:
# 进入工作空间(如果没有需要先创建)
cd ~/catkin_ws/src
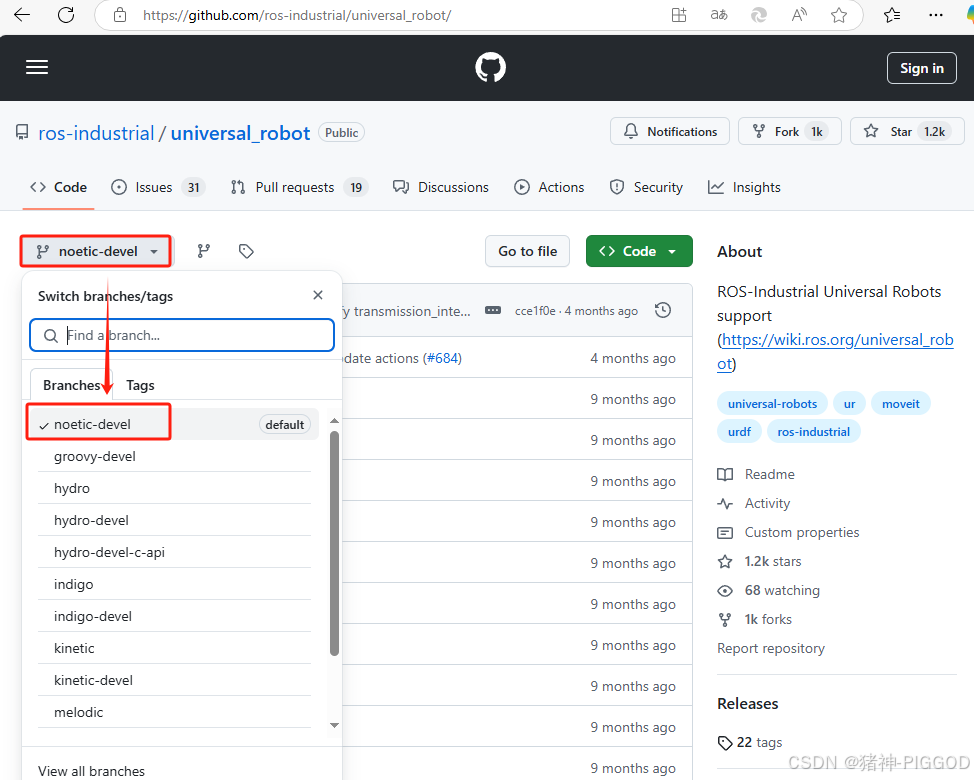
# 克隆 `universal_robot` 包(注意选择版本为noetic-devel)
git clone -b noetic-devel https://github.com/ros-industrial/universal_robot.git
# 返回到工作空间并编译
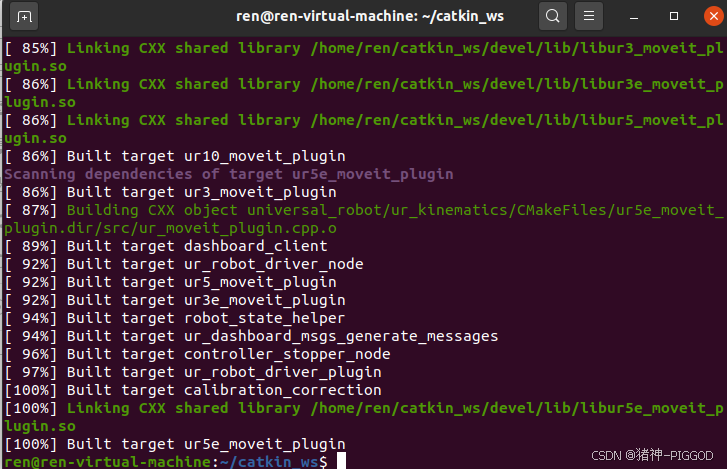
cd ~/catkin_ws
catkin_make
source devel/setup.bash
如果命令行下载太慢,就直接下载后,粘贴到虚拟机中(注意名字和目录就行)
然后再打开终端catkin_make编译:
github地址:
https://github.com/ros-industrial/universal_robot.git需要注意这里的版本一定要选择自己ROS的版本,我这里是noetic-devel
EEROR解决:
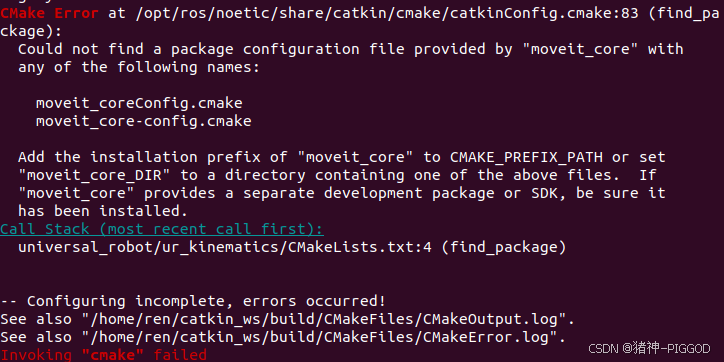
这就是MoveIt安装失败了,确定下版本重新安装。
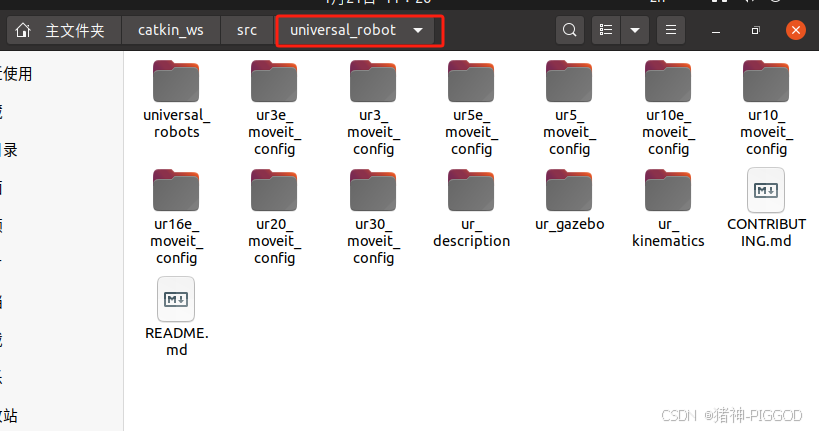
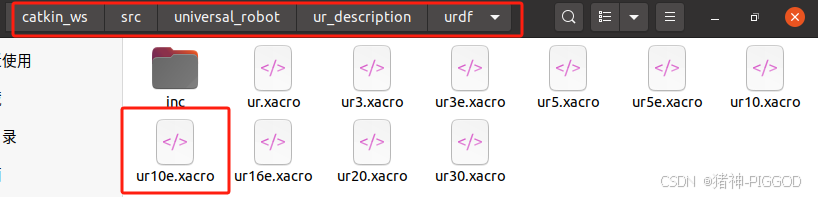
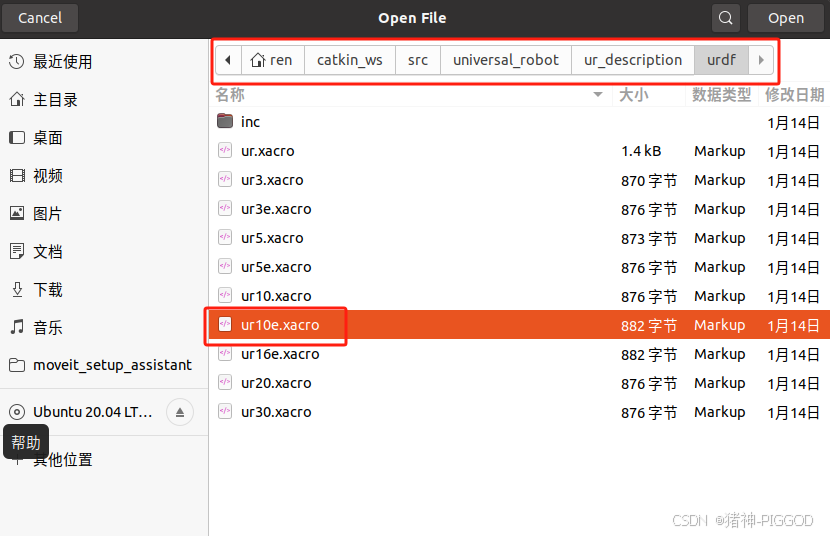
确定ur10e模型位置
我们来到这个文件夹下看下有没有我们需要的ur10e.xacro文件
配置MoveIt!Setup Assistant
这里需要两个终端同时启动
第一个终端启动
roscore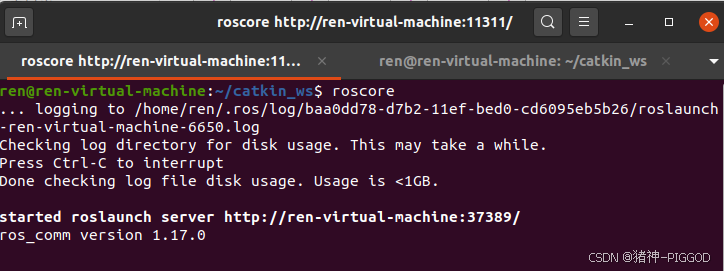
第二个终端启动
source devel/setup.bash
rosrun moveit_setup_assistant moveit_setup_assistant 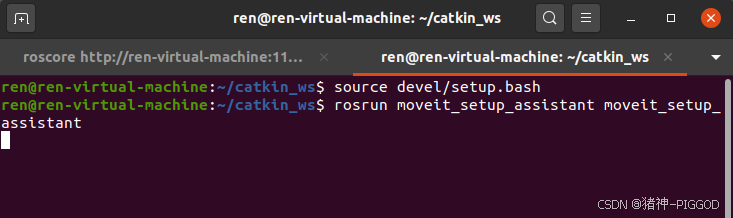
会弹出moveit配置助手的相关界面
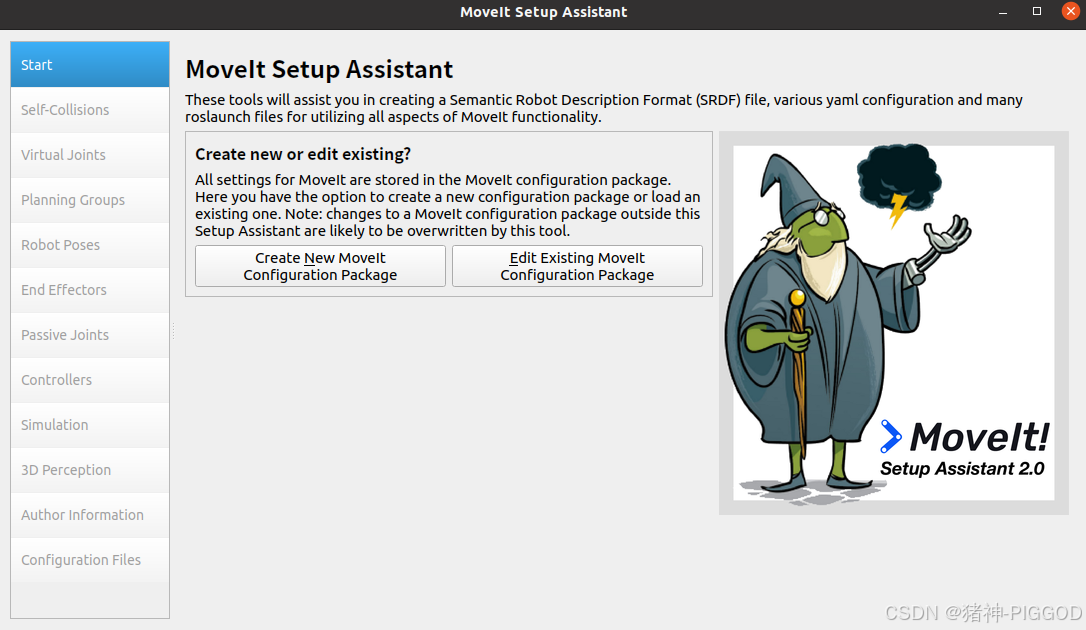
开始配置moveIt
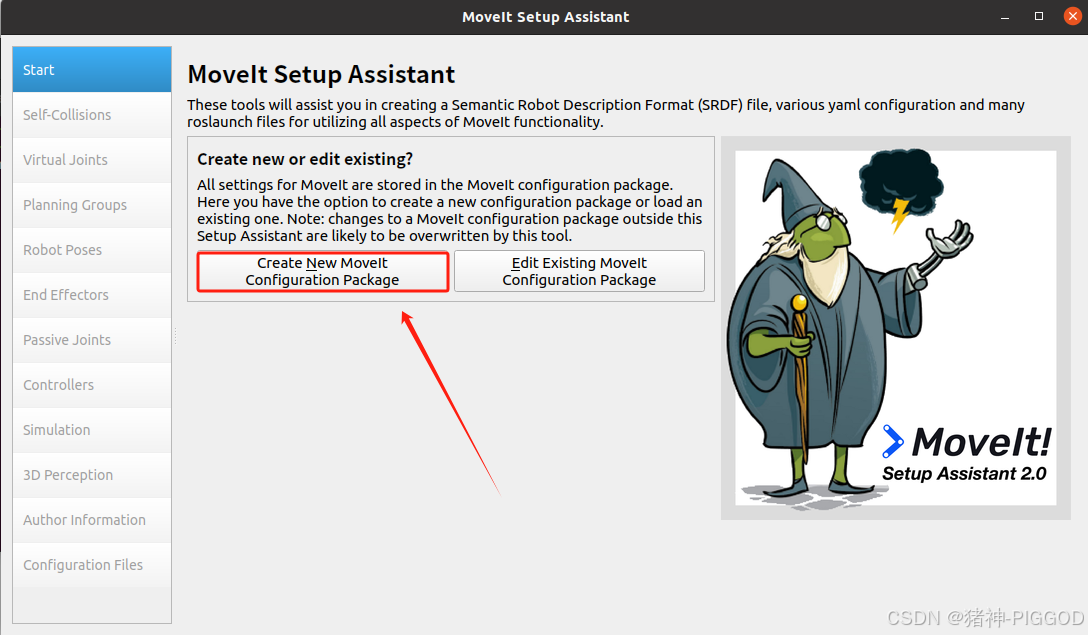
1·.点击“Create New Moveit Configuration Package”按钮
2.选择xacro模型文件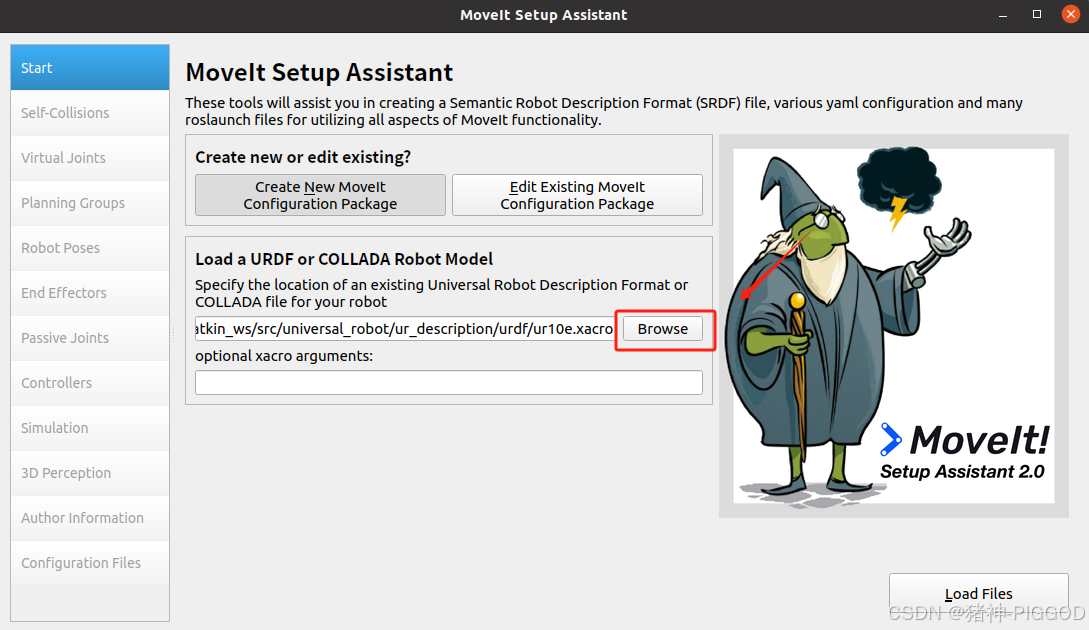
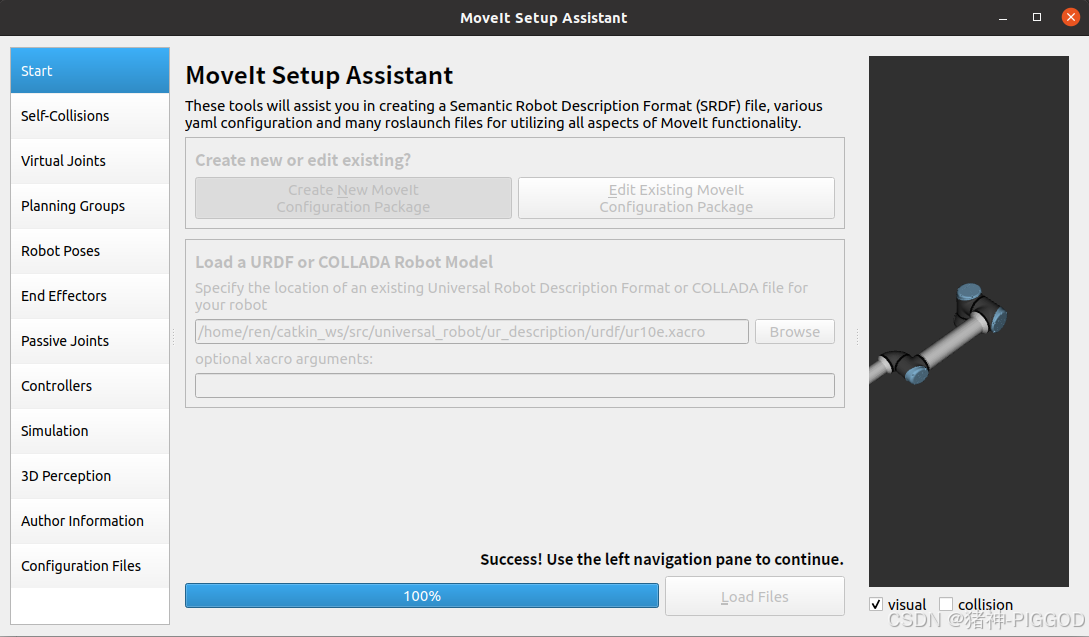
点击加载模型
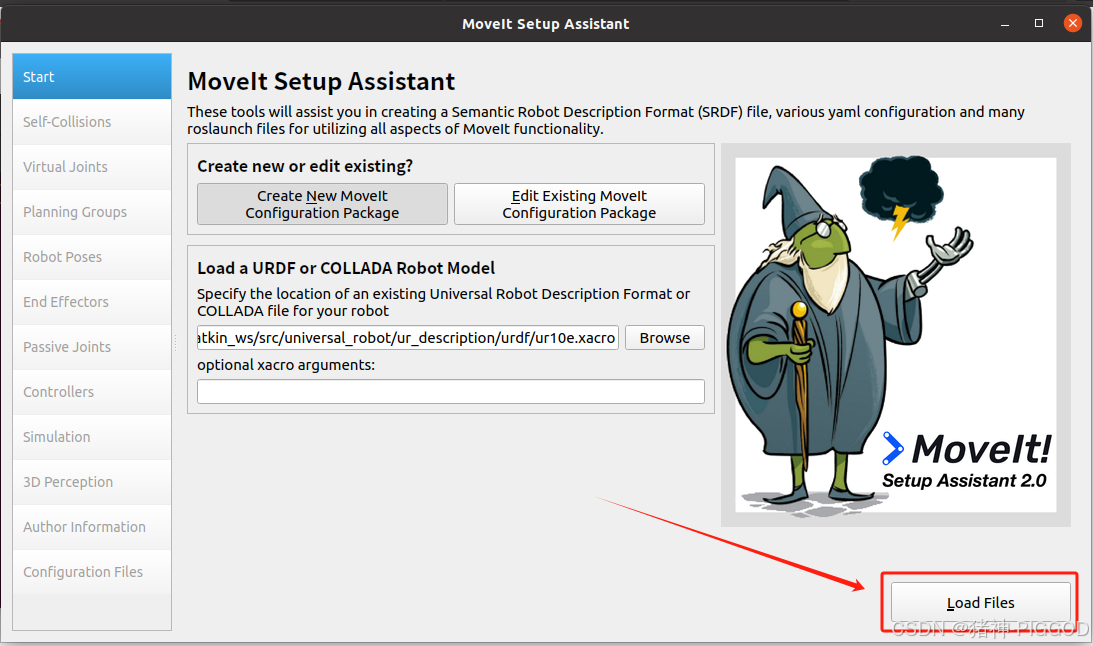
等待加载完成 (已经可以看到模型样子了)
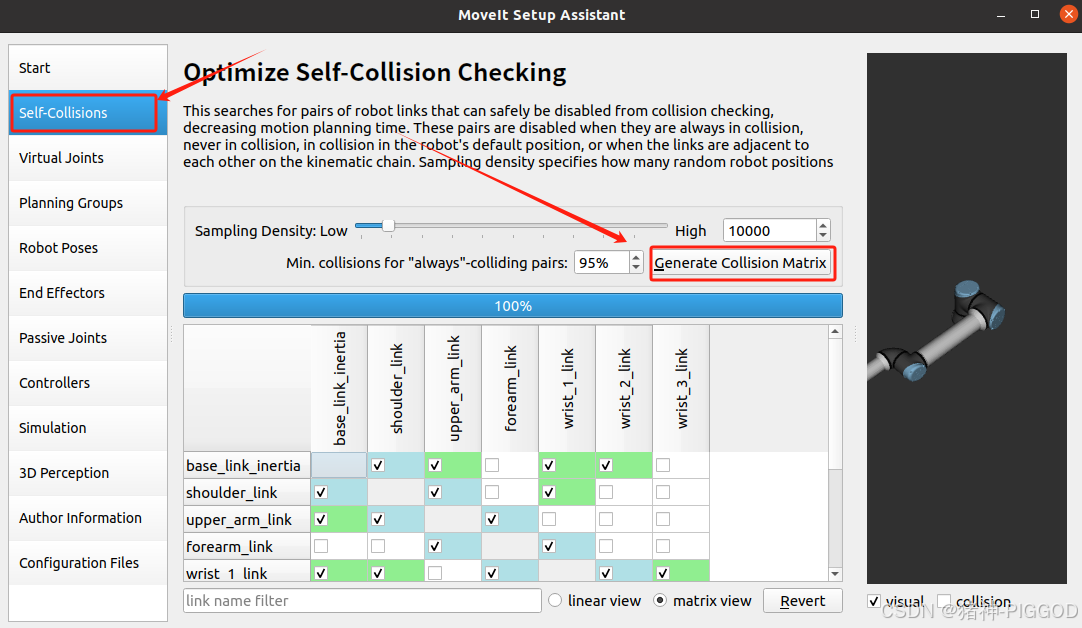
3.自我碰撞检测
直接点击“ 生成碰撞矩阵”按钮,配置助手会自动检测机器人哪些链接会进行自我碰撞
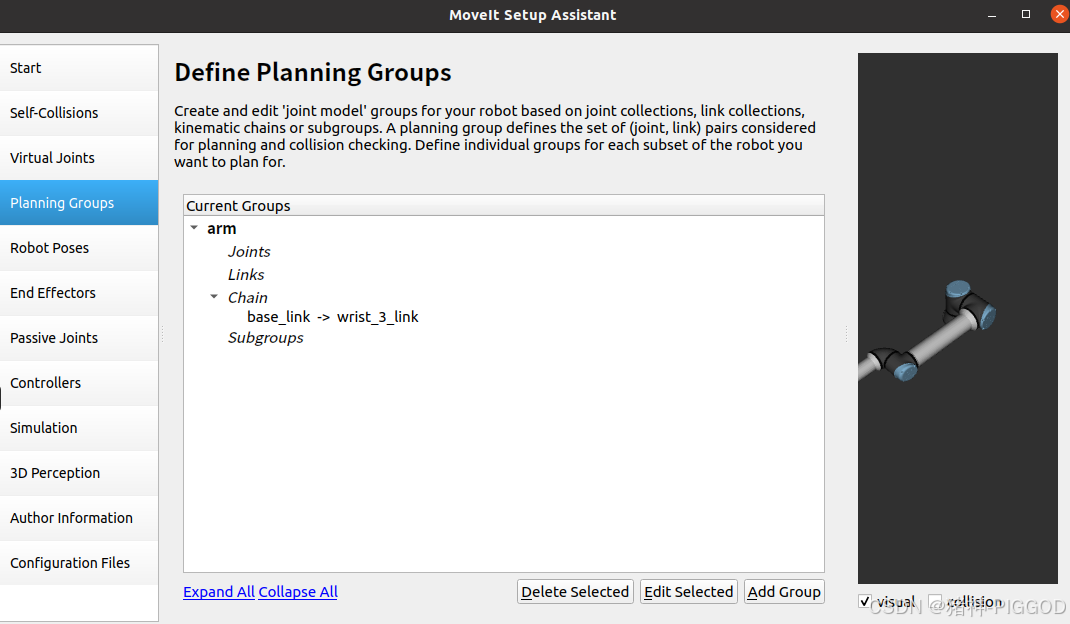
4.添加规划组 planning group
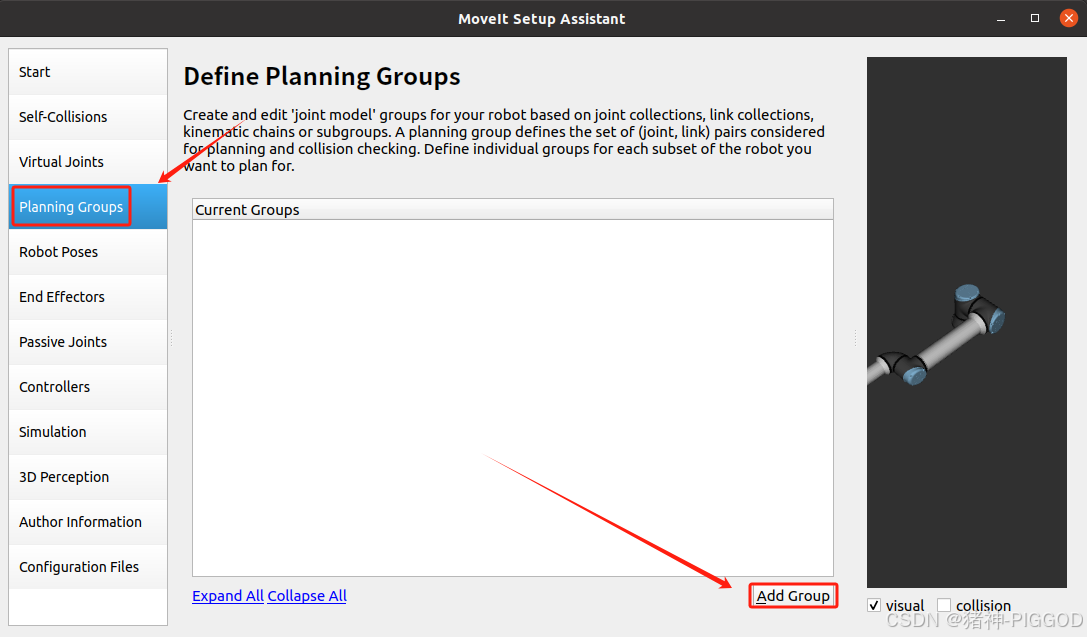
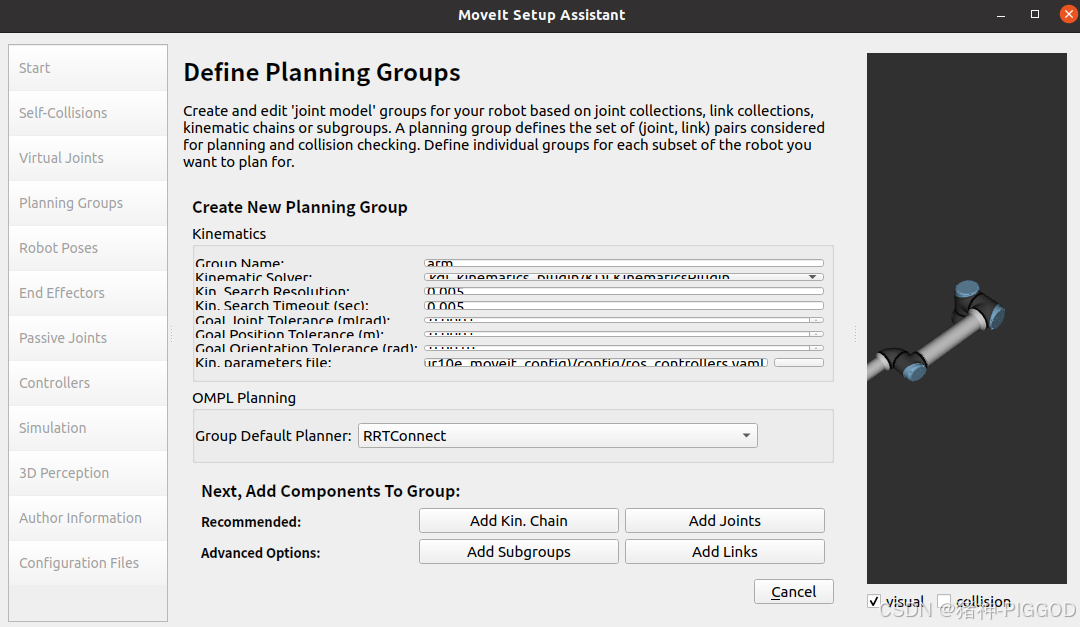
添加手臂规划组arm
输入名称 arm
运动学求解器选择kdl_kinematics_plugin/KDLKinematicsPlugin
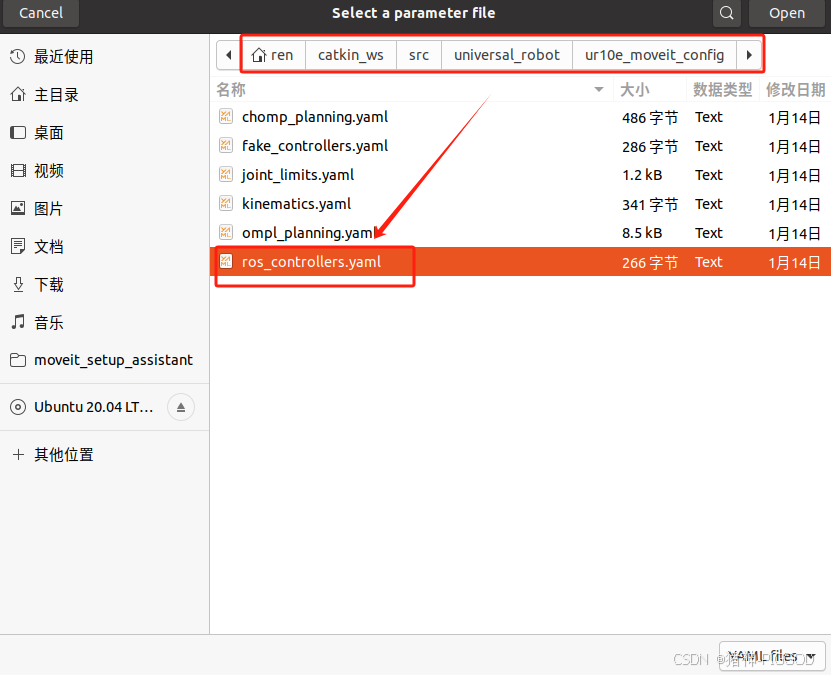
Kin.parameters file选择universal_robot里面的yaml配置文件
(位置在:~/catkin_ws/src/universal_robot/ur10e_moveit_config/ros_controllers.yaml)
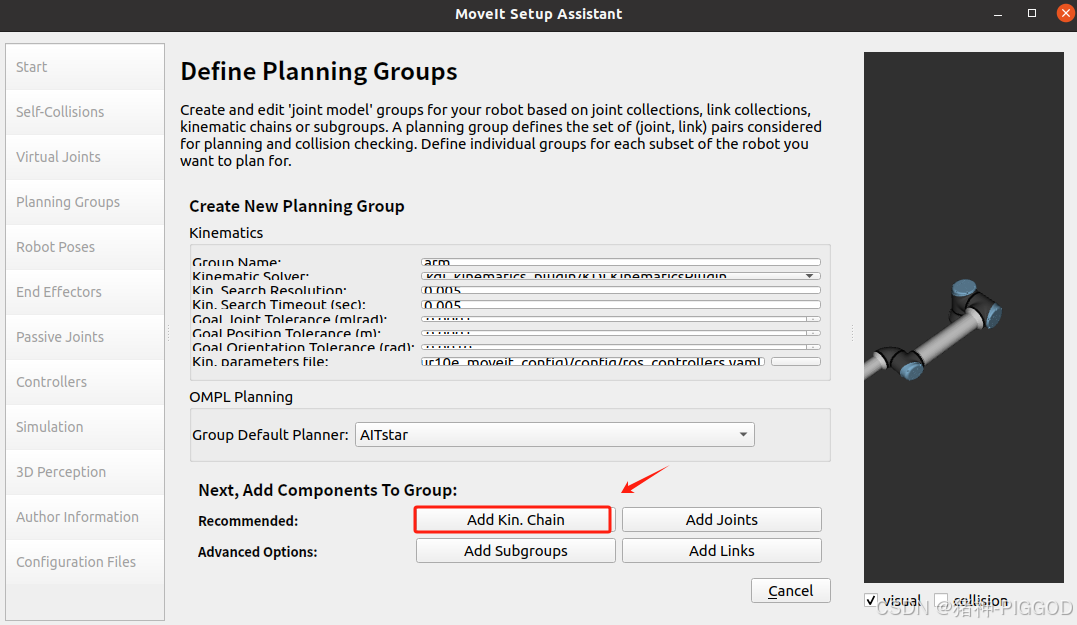
Group Default Planner选择RRTConnect
universal_robot里面的config文件位置
然后点击Add Kin.Chain按钮
添加末端执行器规划组
然后点击save保存
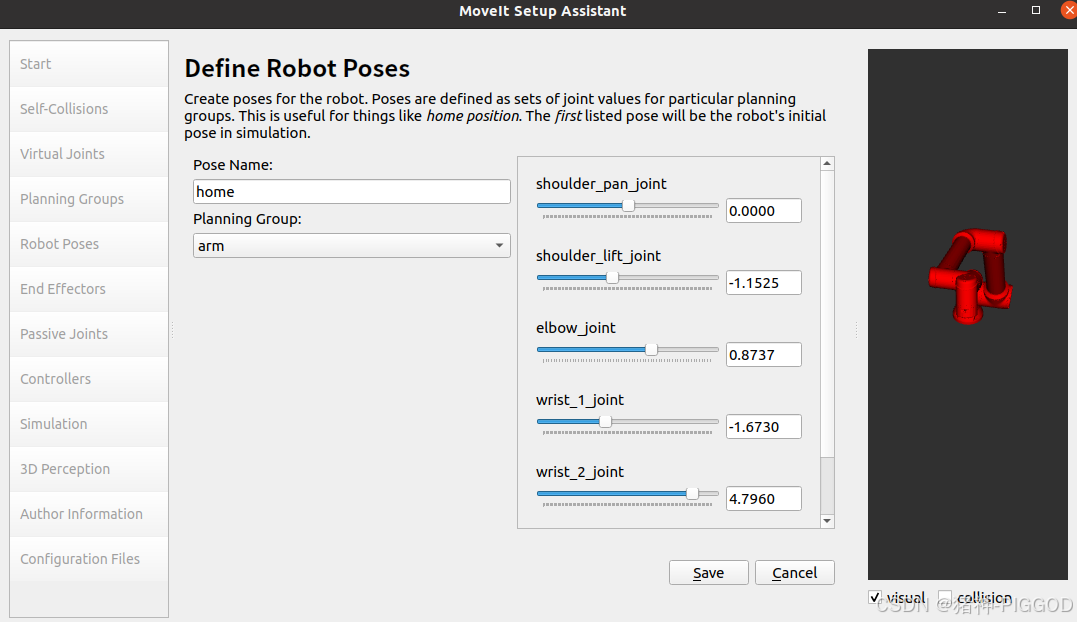
5.添加机器人姿态 Robot Poses
moveit允许添加预设的机器人姿态,方便之后使用,例如在后面进行运动规划的时候,一条语句就可以让机械臂运动到,预设的姿态。
- 选择左侧 Robot Poses
- 点击规划组arm,右侧会出现各个关节的滑条,拖动设置想要的姿态
- 点击Save保存
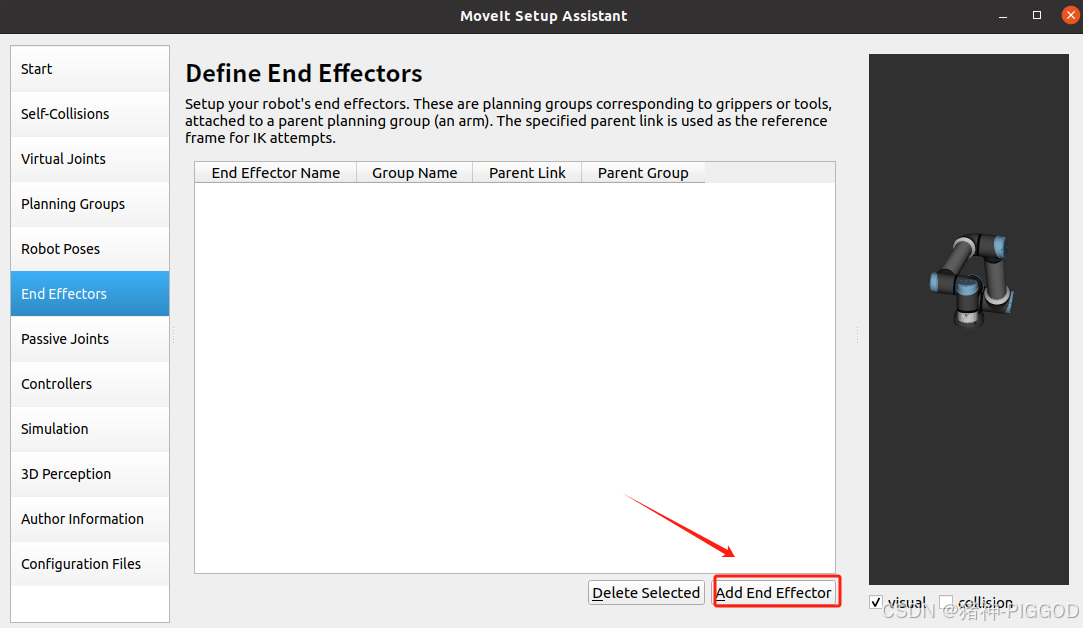
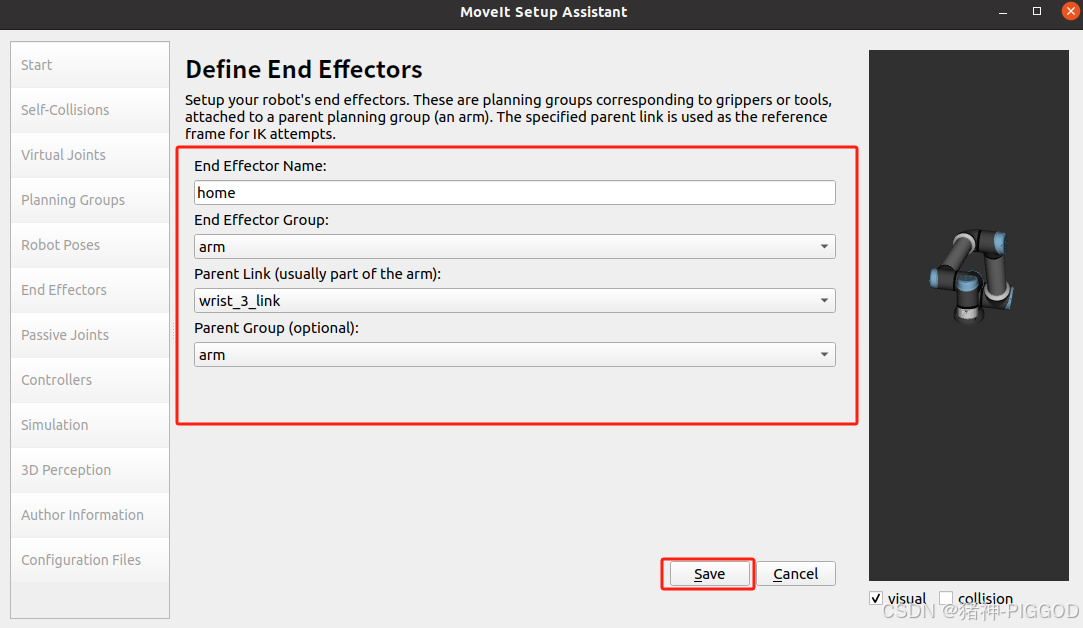
6.配置末端执行器End Effectors
然后点击Add End Effector
配置如下,然后点击Save
7.添加被动关节Passive Joints
如果机器人中有被动的关节(不是主动控制的关节),需要将其添加为被动关节,这样可以告诉MoveIt在规划运动的时候这些关节是无法主动控制的。
我们机械臂中没有被动关节,跳过这一步。
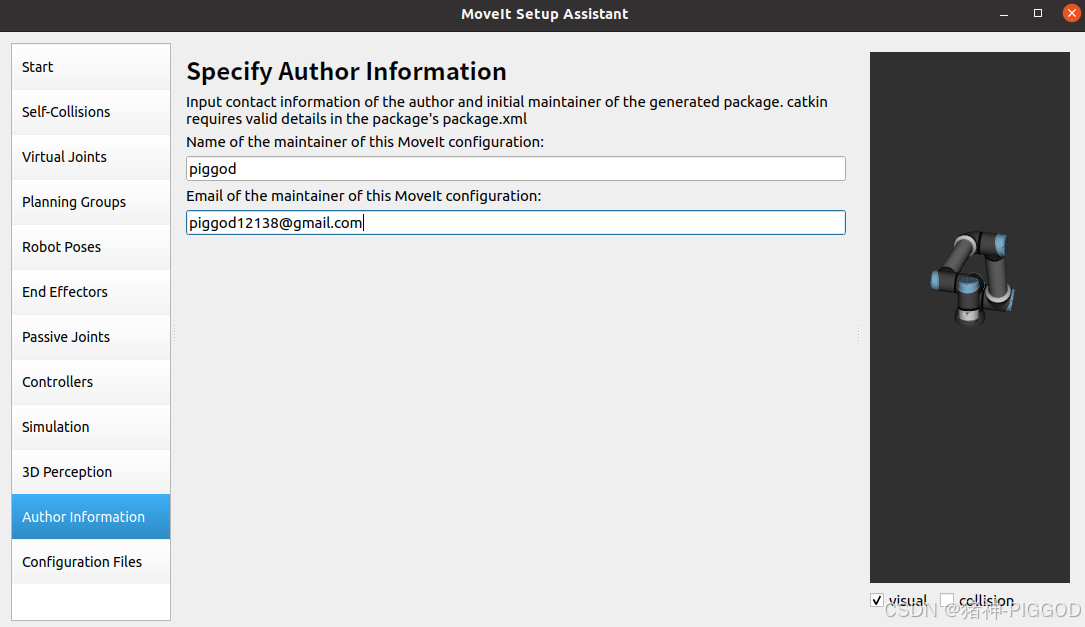
8.填写作者个人信息
点击Author Information,填写作者名称及邮箱,不填写则无法生成相关配置文件
(后续不会验证邮箱的)
9.生成Config文件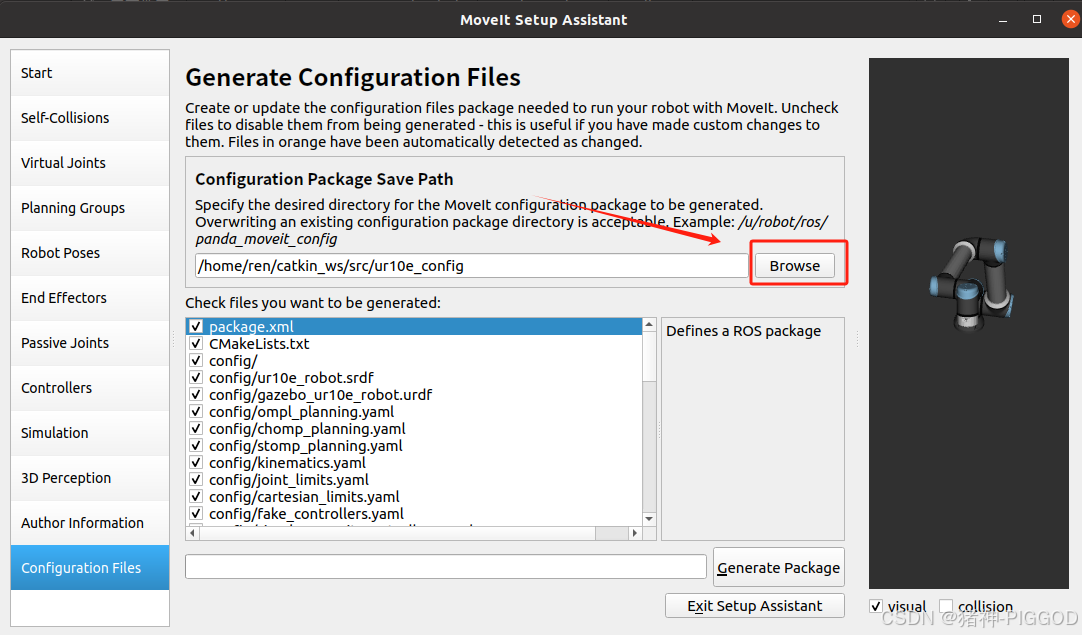
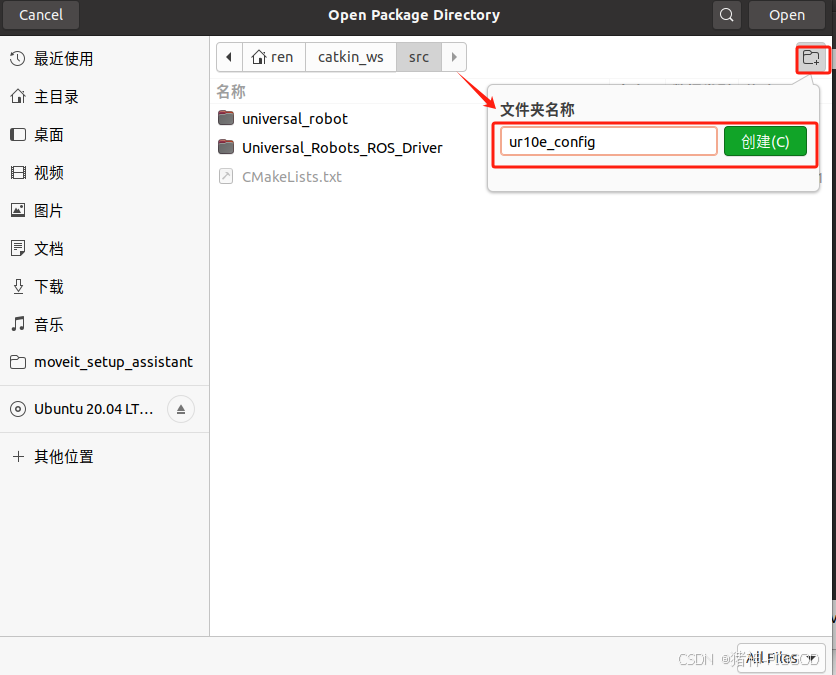
新建一个空文件夹 ,命名为ur10e_config,然后创建
 单击Generate Package保存,将配置助手生成的相关Config文件保存下来
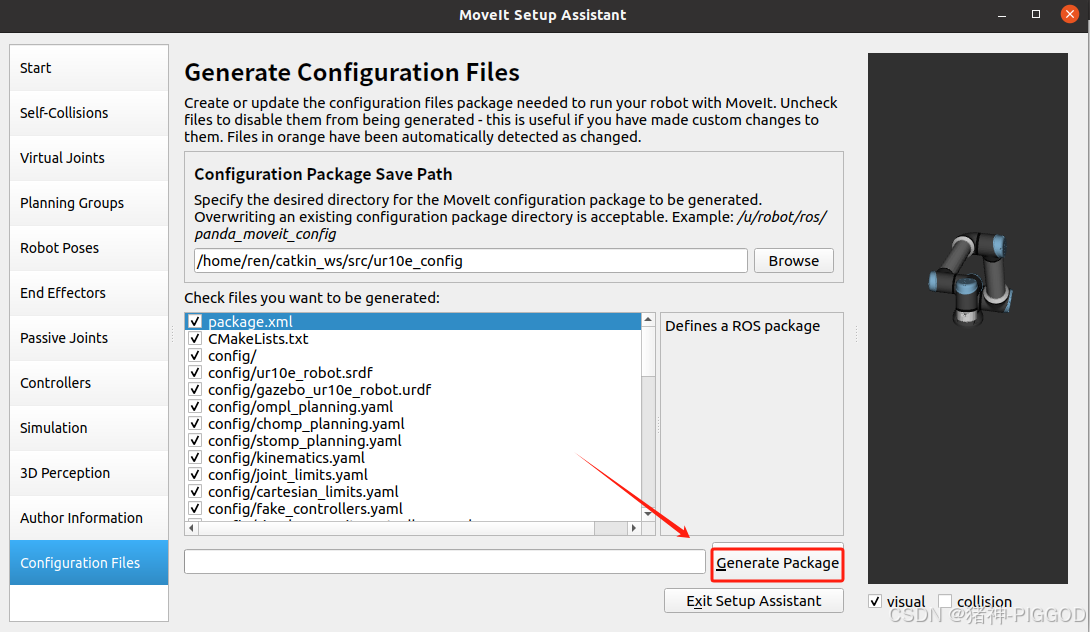
如果出现这个提示不用管,只是提示你下有些没有设置,不影响,点击OK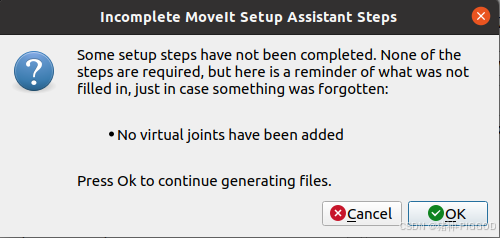
出现100%后就成功了,点击Exit Setup Assistant退出
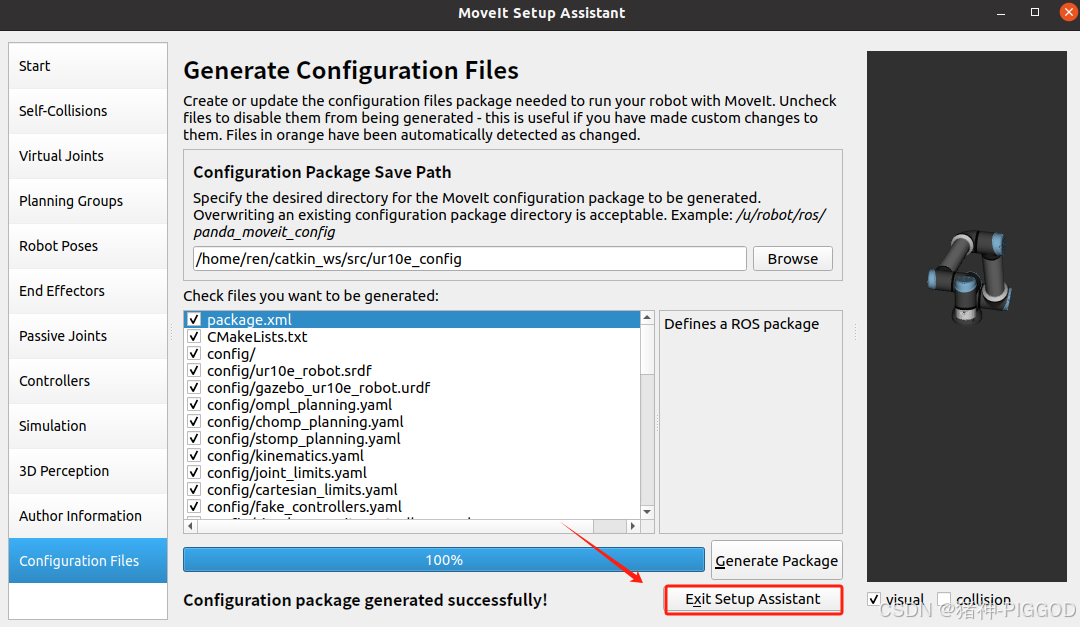
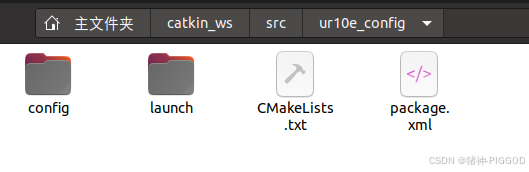
然后可以将所有终端关闭了,可以看到文件夹里面已经装好了驱动
使用MoveIt控制真实UR10e
1.首先启动UR驱动(在第二章中有详细配置)
#进入工作空间
cd ~/catkin_ws/

#启动ur机械臂
source devel/setup.bash
roslaunch ur_robot_driver ur10e_bringup.launch limited:=true robot_ip:=192.168.56.2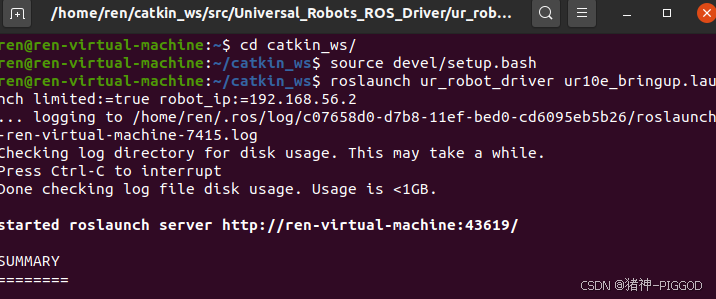
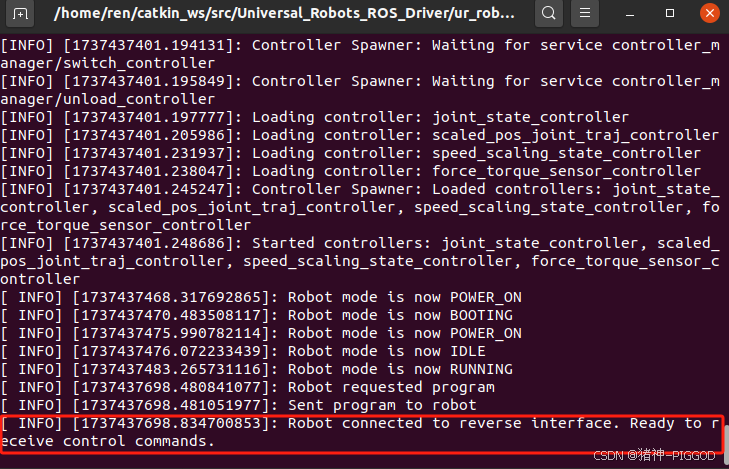
2.启示教器上的插件(在第二章中有详细配置)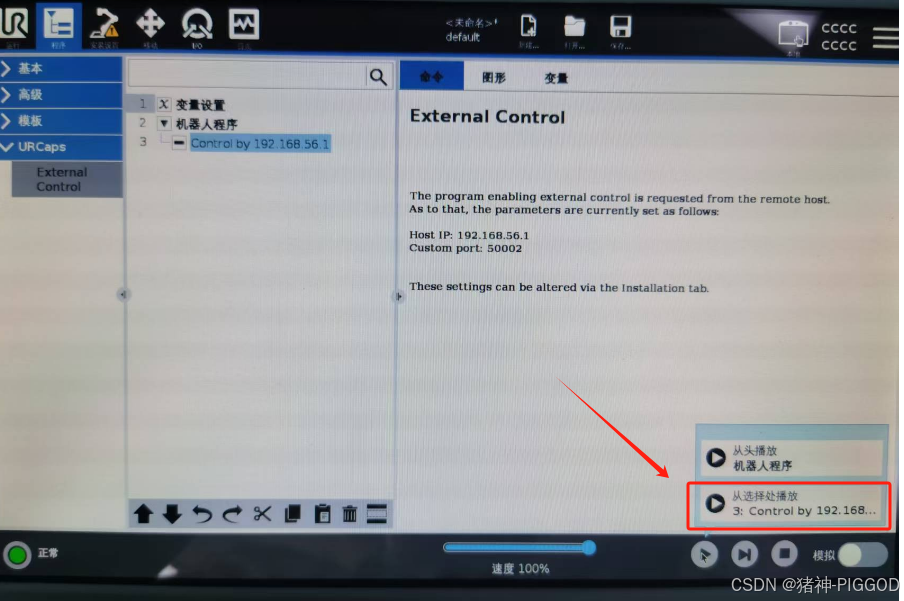
出现Robot connected to reverse interface. Ready to receive control commands.后就可以放着,然后打开MoveIt
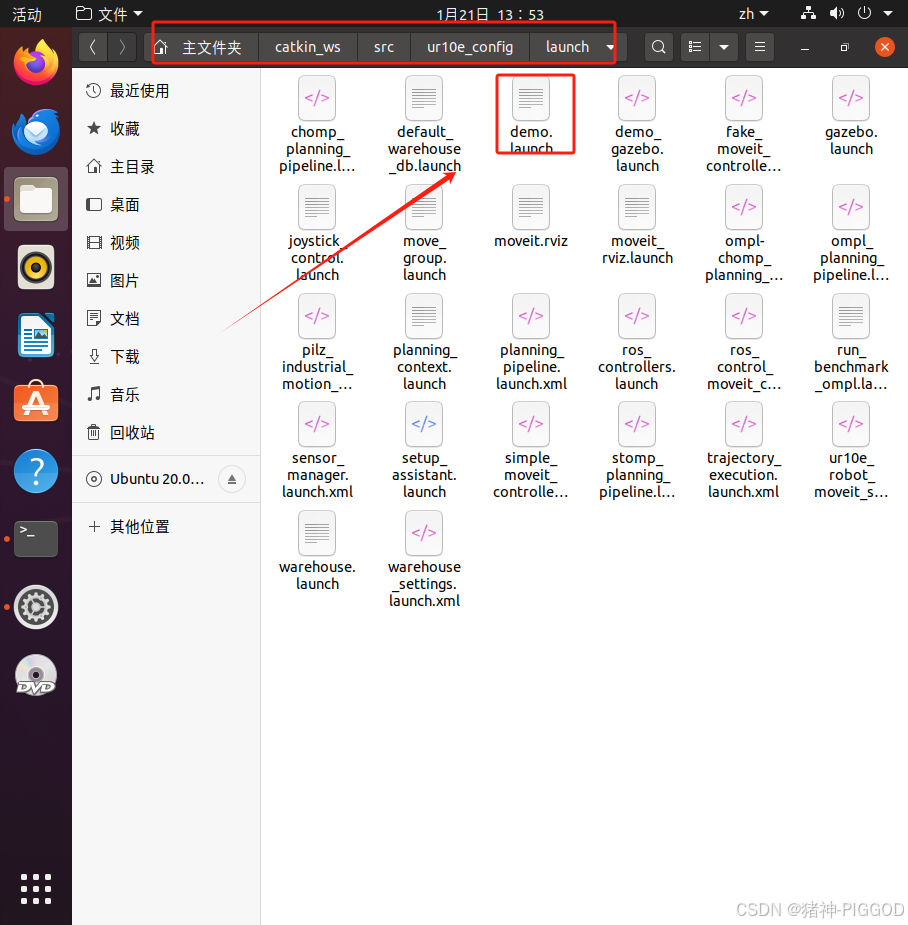
3.修改demo.launch文件
由于它默认是fake模式,需要手动修改成实机模式
在此文件夹下找到demo.launch文件
双击打开(将两个地方的fake替换成ros_control)
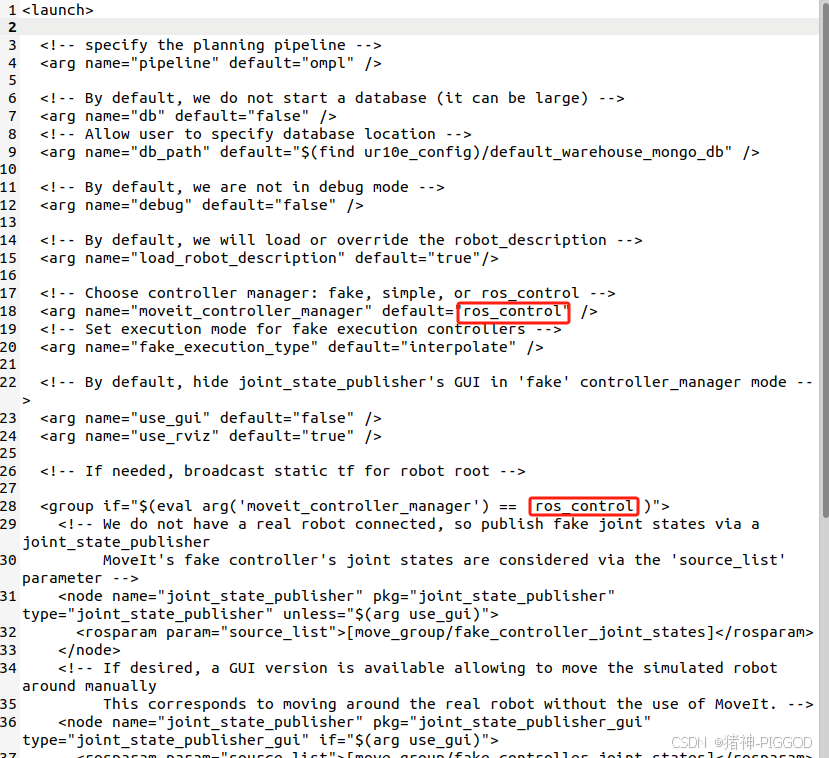
或者直接替换成我的代码
<launch>
<!-- specify the planning pipeline -->
<arg name="pipeline" default="ompl" />
<!-- By default, we do not start a database (it can be large) -->
<arg name="db" default="false" />
<!-- Allow user to specify database location -->
<arg name="db_path" default="$(find ur10e_config)/default_warehouse_mongo_db" />
<!-- By default, we are not in debug mode -->
<arg name="debug" default="false" />
<!-- By default, we will load or override the robot_description -->
<arg name="load_robot_description" default="true"/>
<!-- Choose controller manager: fake, simple, or ros_control -->
<arg name="moveit_controller_manager" default="ros_control" />
<!-- Set execution mode for fake execution controllers -->
<arg name="fake_execution_type" default="interpolate" />
<!-- By default, hide joint_state_publisher's GUI in 'fake' controller_manager mode -->
<arg name="use_gui" default="false" />
<arg name="use_rviz" default="true" />
<!-- If needed, broadcast static tf for robot root -->
<group if="$(eval arg('moveit_controller_manager') == 'ros_control')">
<!-- We do not have a real robot connected, so publish fake joint states via a joint_state_publisher
MoveIt's fake controller's joint states are considered via the 'source_list' parameter -->
<node name="joint_state_publisher" pkg="joint_state_publisher" type="joint_state_publisher" unless="$(arg use_gui)">
<rosparam param="source_list">[move_group/fake_controller_joint_states]</rosparam>
</node>
<!-- If desired, a GUI version is available allowing to move the simulated robot around manually
This corresponds to moving around the real robot without the use of MoveIt. -->
<node name="joint_state_publisher" pkg="joint_state_publisher_gui" type="joint_state_publisher_gui" if="$(arg use_gui)">
<rosparam param="source_list">[move_group/fake_controller_joint_states]</rosparam>
</node>
<!-- Given the published joint states, publish tf for the robot links -->
<node name="robot_state_publisher" pkg="robot_state_publisher" type="robot_state_publisher" respawn="true" output="screen" />
</group>
<!-- Run the main MoveIt executable without trajectory execution (we do not have controllers configured by default) -->
<include file="$(dirname)/move_group.launch">
<arg name="allow_trajectory_execution" value="true"/>
<arg name="moveit_controller_manager" value="$(arg moveit_controller_manager)" />
<arg name="fake_execution_type" value="$(arg fake_execution_type)"/>
<arg name="info" value="true"/>
<arg name="debug" value="$(arg debug)"/>
<arg name="pipeline" value="$(arg pipeline)"/>
<arg name="load_robot_description" value="$(arg load_robot_description)"/>
</include>
<!-- Run Rviz and load the default config to see the state of the move_group node -->
<include file="$(dirname)/moveit_rviz.launch" if="$(arg use_rviz)">
<arg name="rviz_config" value="$(dirname)/moveit.rviz"/>
<arg name="debug" value="$(arg debug)"/>
</include>
<!-- If database loading was enabled, start mongodb as well -->
<include file="$(dirname)/default_warehouse_db.launch" if="$(arg db)">
<arg name="moveit_warehouse_database_path" value="$(arg db_path)"/>
</include>
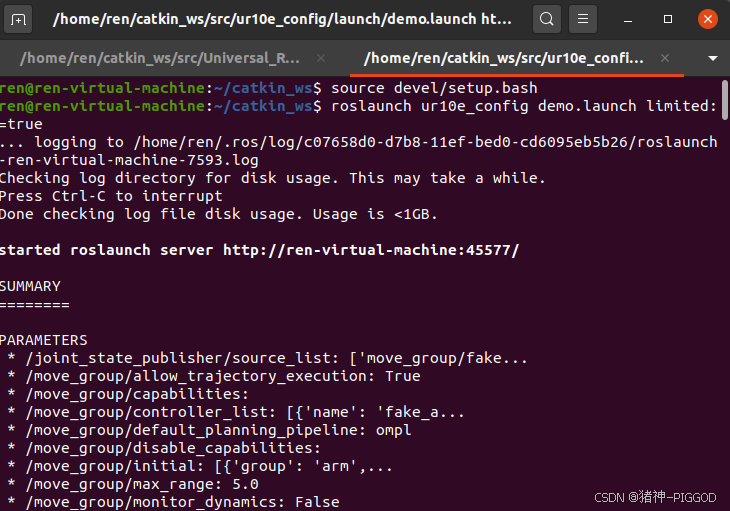
</launch>4.新建终端开启MoveIt
#进入工作空间
cd ~/catkin_ws/

#启动MoveIt
source devel/setup.bash
roslaunch ur10e_config demo.launch limited:=true
运行后,会自动弹出RViz
5. 添加新姿势
拖动蓝色圆球有新姿势,然后点击plan看下移动轨迹
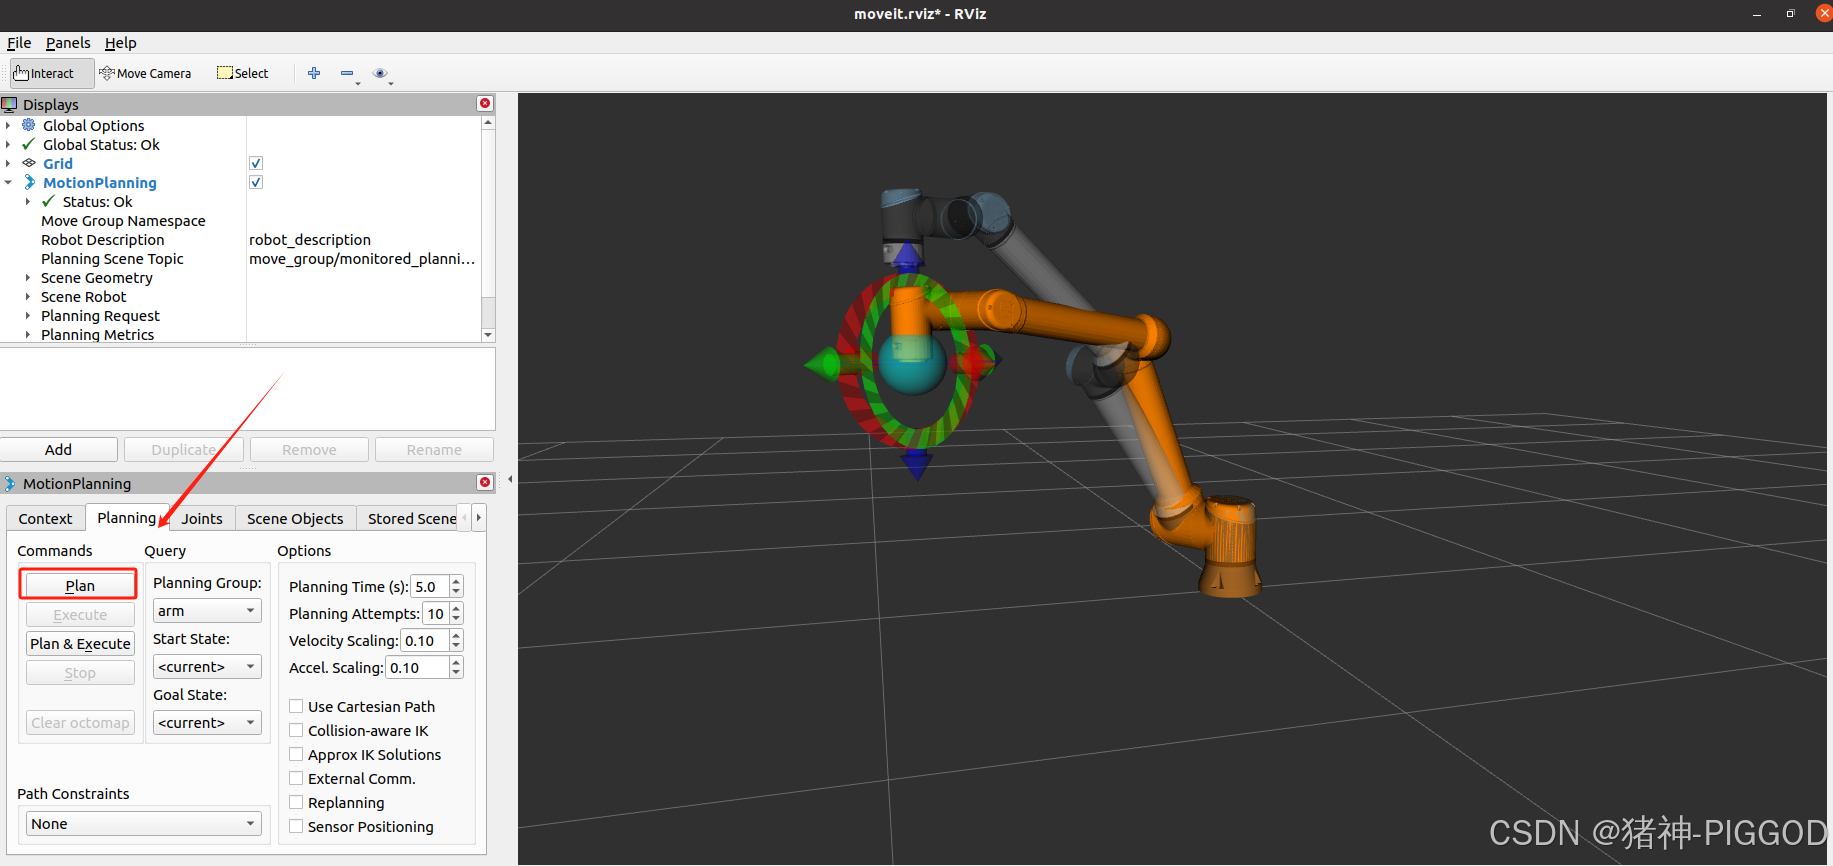
注:运动轨迹太夸张可以点击Reset重新摆姿势
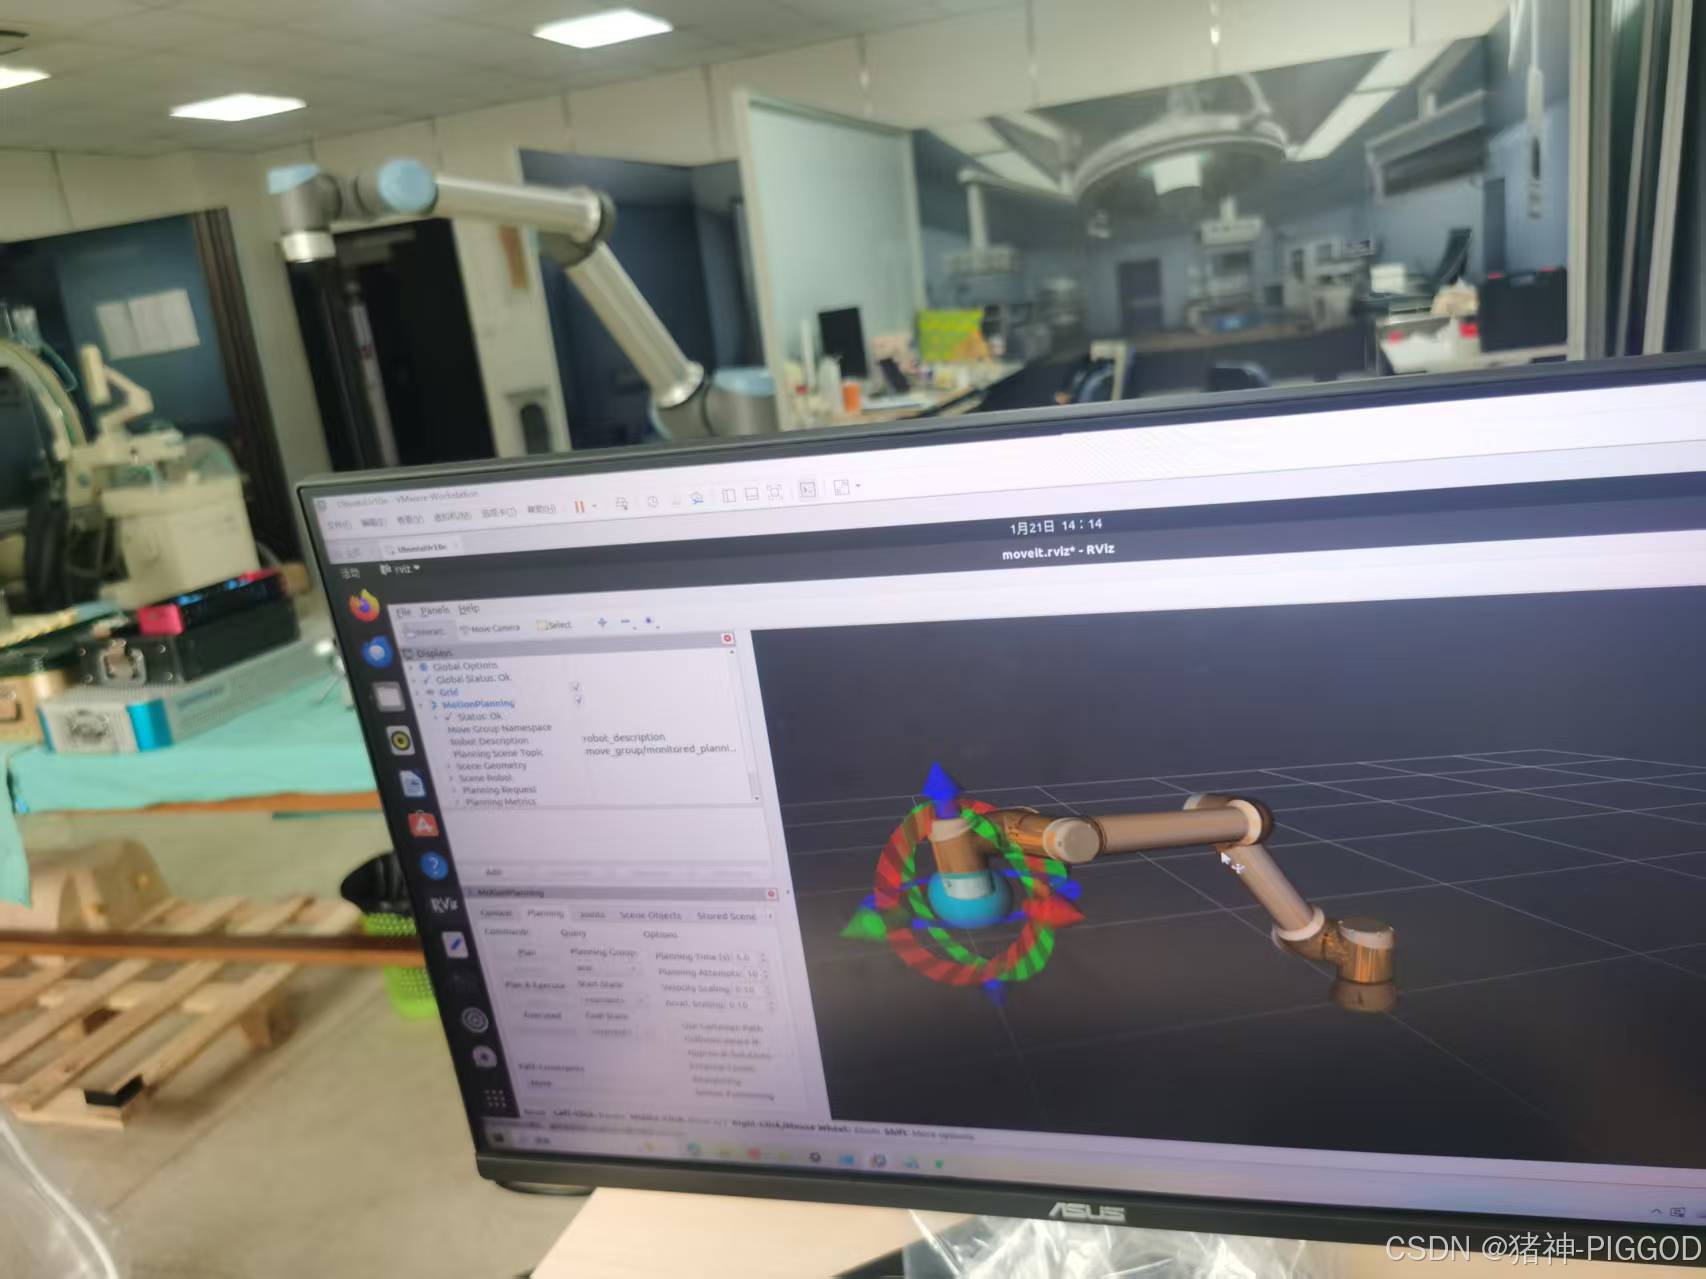
6.随后点击Execute后,观看真实机器人是否正常移动
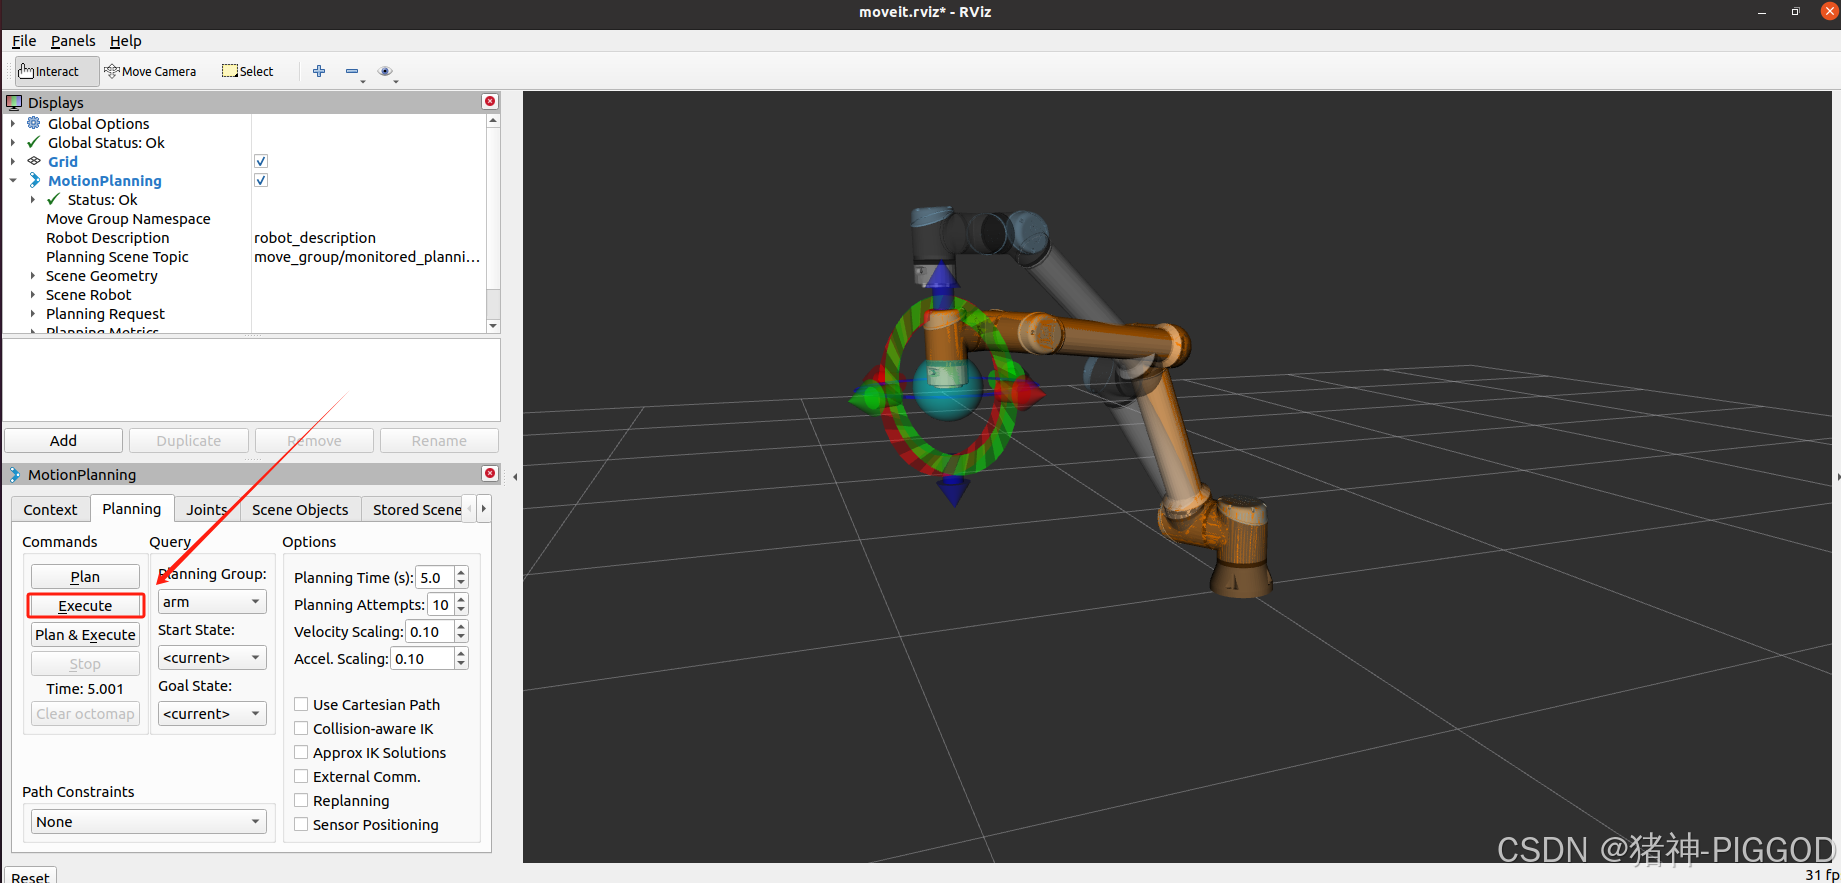
成功移动
总结:
1.安装了moveIt
2.配置了MoveIt!Setup Assistant
3.手动将fake演示改为了ros_control实机演示
4.成功使用MoveIt移动了UR机器人
下一篇将在VMware中安装Intel RealSense D455驱动,并看到realsense深度相机的视图(realsence驱动安装,并通过realsense-ros启动RGB-D相机)
免责声名:
一切均严格参照各类工具开源策略,没有任何侵权意图,本文章全由自己编写,如出现任何问题请联系我,我将删除。


 1118
1118

 被折叠的 条评论
为什么被折叠?
被折叠的 条评论
为什么被折叠?
 到【灌水乐园】发言


