


三维旋转 - 转换器:旋转矩阵、四元数、轴角表示、欧拉角
三维旋 - 转转换器:旋转矩阵、四元数、轴角表示、欧拉角
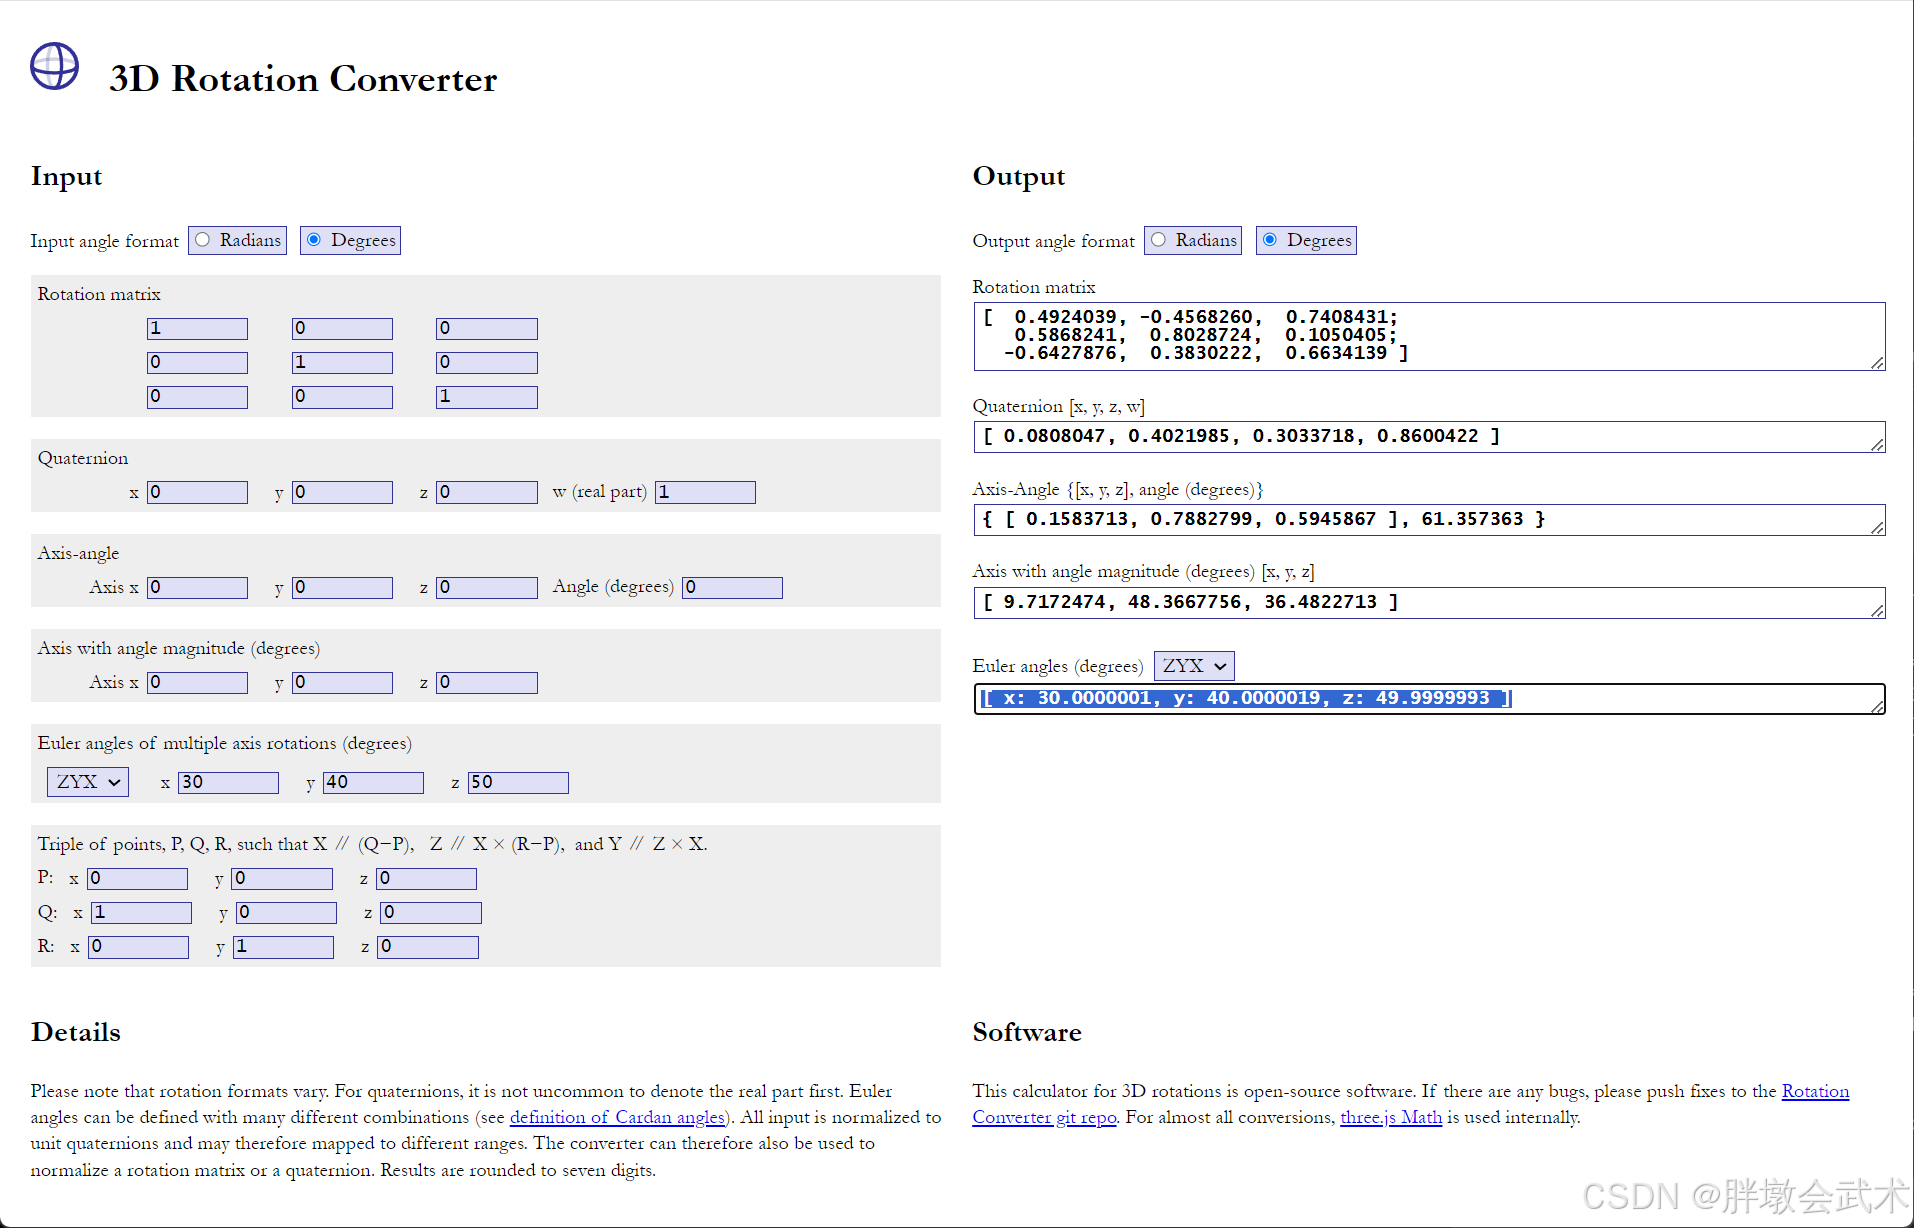
右边欧拉角的显示范围:[-180,180]
一、基本概念
在三维空间中,旋转可以通过多种方式表示,其中最常见的包括四元数、欧拉角、轴-角表示、旋转矩阵。它们各自有不同的应用场景和优缺点。
1.1、四元数(Quaternions)
维基百科:四元数(图形化理解):用于表示三维空间中旋转的数学表示法,由一个实数部分(w)和三个虚数组成(x, y, z),广泛应用于3D图形、机器人学和计算机视觉等领域。
1.1.1、优缺点
优势:
- 避免万向锁问题(Gimbal Lock):与欧拉角不同,四元数不受旋转顺序影响,通过组合旋转有效规避了传统表示法的局限性。
- 可以表示任意旋转:能够准确表示任意的三维旋转,适用于复杂的运动场景。
- 高效计算:在存储和计算需求上相较于3x3旋转矩阵更为高效,尤其在频繁进行旋转运算时,可以显著减少计算资源的消耗。
- 平滑插值:利用球形线性插值(Slerp)可以在两个旋转之间实现平滑过渡,特别适合动画生成和三维变换。
缺点:四元数的数学形式相对复杂,不如欧拉角直观,难以直接解释旋转的具体方向和角度。
1.1.2、表示法
- 平面方程:
q
=
w
+
x
i
+
y
j
+
z
k
\ q = w + xi + yj + zk
q=w+xi+yj+zk,其中:
w是标量;(x, y, z)是向量,分别对应于虚数单位i, j, k。
- 旋转表示:
q
=
(
c
o
s
θ
2
,
V
x
∗
s
i
n
θ
2
,
V
y
∗
s
i
n
θ
2
,
V
z
∗
s
i
n
θ
2
)
q = (cos \frac{θ}{2},Vx*sin\frac{θ}{2},Vy*sin\frac{θ}{2},Vz*sin\frac{θ}{2})
q=(cos2θ,Vx∗sin2θ,Vy∗sin2θ,Vz∗sin2θ),其中:
θ:是绕旋转轴的旋转角度(以弧度表示)。V = (Vx, Vy, Vz):是旋转轴的单位向量。
rotation = Rotation.from_quat([0, 0, 0.707, 0.707])
-
数组表示: q = ( w , x , y , z ) \ q = (w,x,y,z) q=(w,x,y,z),其中:
w是实部,表示旋转角度的余弦值- w = c o s θ 2 \ w = cos \frac{θ}{2} w=cos2θ
(x, y, z)是虚部,表示旋转轴方向乘以旋转角度的正弦值- x = V x ∗ s i n θ 2 , y = V y ∗ s i n θ 2 , z = V z ∗ s i n θ 2 \ x = Vx*sin\frac{θ}{2},y = Vy*sin\frac{θ}{2},z = Vz*sin\frac{θ}{2} x=Vx∗sin2θ,y=Vy∗sin2θ,z=Vz∗sin2θ
-
归一化:使得模长 ∣ ∣ q ∣ ∣ = 1 \ ||q|| = 1 ∣∣q∣∣=1,满足 w 2 + x 2 + y 2 + z 2 = 1 \ w^2 + x^2 + y^2 + z^2 = 1 w2+x2+y2+z2=1。这样可以有效表示旋转,而不引入缩放或扭曲。
-
共轭四元数:
q = (w, -x, -y, -z),用于逆旋转。
1.2、欧拉角(Euler Angles)
维基百科:欧拉角(图形化理解):用于表示三维空间中物体旋转的角度方法,通过三个角度来表示物体相对于固定坐标系的旋转。如:旋转顺序 ‘xyz’,表示物体先后绕(X、Y、Z)坐标轴旋转。
1.2.1、优缺点
- 优点:以角度表示旋转,简单直观且易于理解。
- 缺点:
- 存在万向节死锁问题(Gimbal Lock)
- 相对参考系: 每个旋转矩阵都是基于前一个旋转结果的。通过将新的旋转矩阵与之前的矩阵相乘,可以得到复合旋转的效果。
- 非固定坐标系:后一个旋转的参考坐标系是在前一个旋转之后的坐标系基础上进行的。这意味着每次旋转都会改变坐标系的方向,后续的旋转将受到之前旋转的影响。
- 欧拉角、旋转矩阵均具有万向锁,且具有以上特性。
- 虽然非固定坐标系,但反向旋转仍然是相对的、有效的操作。
1.2.3、表示法
# (1)创建的旋转对象具有万向锁。特别是在某些特定角度下(例如,当某个角接近90度)。
rotation = Rotation.from_euler('xyz', [α, β, γ], degrees=True)

# (2)将旋转对象转换为旋转矩阵时,旋转矩阵具有万向锁。因为它依赖于输入的欧拉角。
matrix = rotation.as_matrix()

# (3)四元数没有万向锁。将旋转对象转换为四元数时,虽然原始的欧拉角存在万向锁,但四元数自身并不受这个问题的影响。
quaternion = rotation.as_quat()
- 数组表示:
(
α
,
β
,
γ
)
\ (α,β,γ)
(α,β,γ)
- 旋转顺序:包括
'xyz'、'zyx'、'xzy'、'yzx'、'zxy'、'yxz',不同的旋转顺序会导致最终的旋转结果不同,可能导致万向锁问题。 - 旋转角度:若旋转顺序为
'xyz',则α,β,γ分别表示绕X轴、Y轴、Z轴的旋转角度。- 角度单位:常见单位是度(°),也可以用弧度(rad)表示。
- 转换公式: 弧度 = 角度 × 180 π \ 弧度 = 角度 × \frac{180}{π} 弧度=角度×π180
- 右手法则:正角度表示逆时针旋转,负角度表示顺时针旋转。
- 旋转顺序:包括
1.2.3、万向锁(Gimbal Lock)
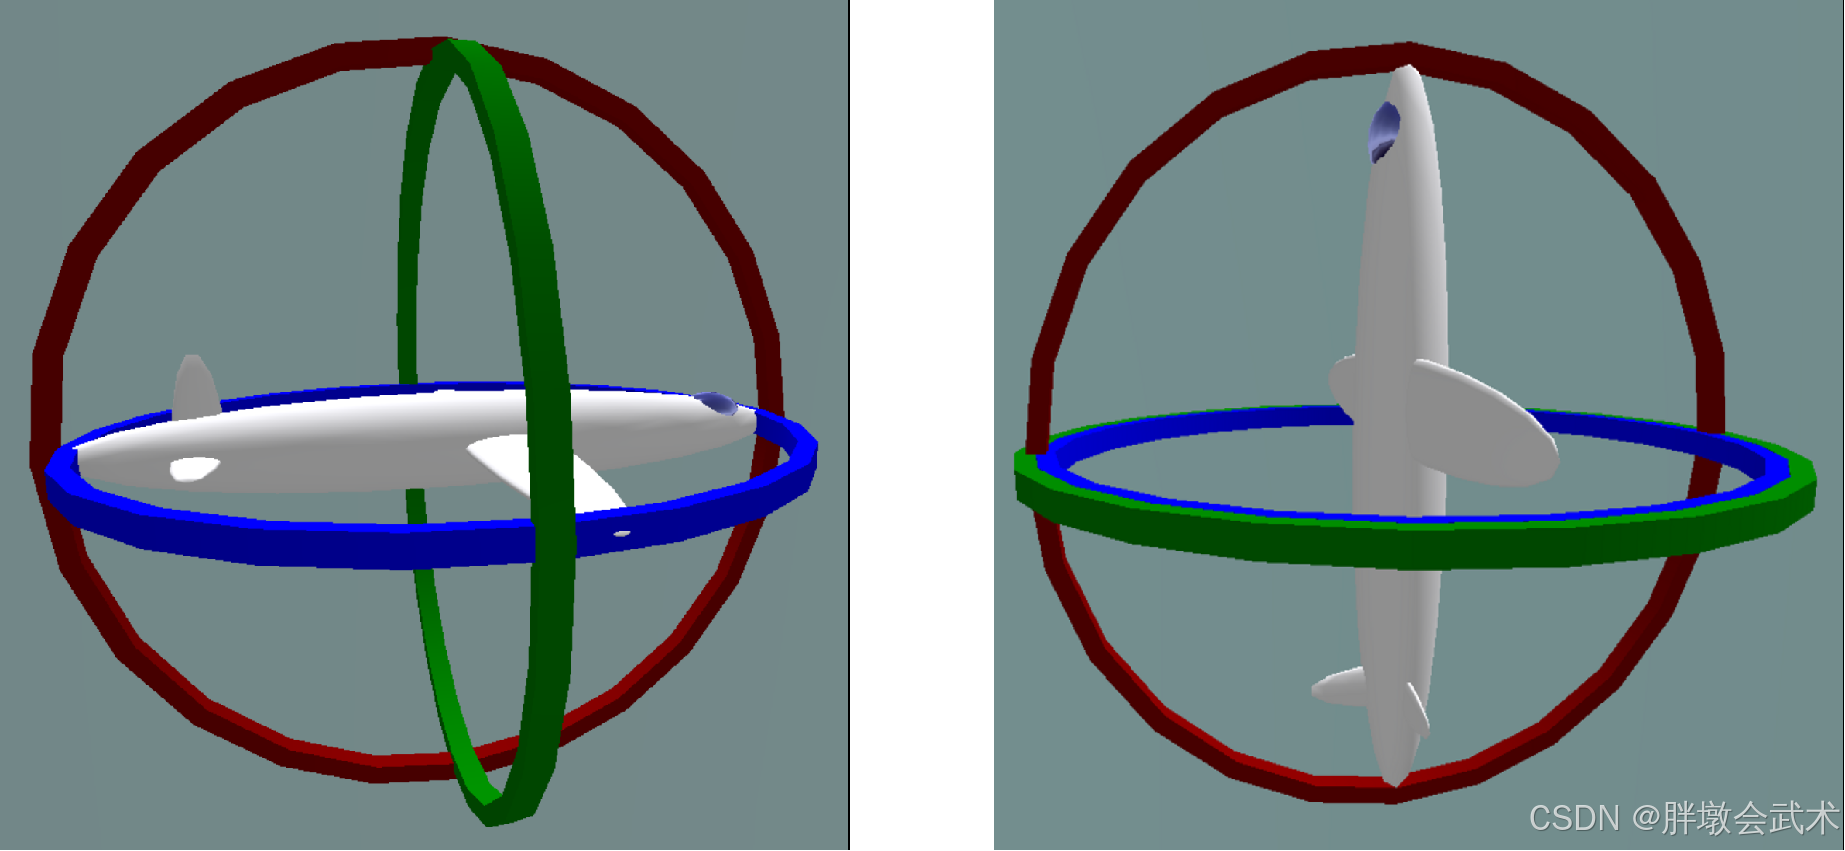
- 基本概念:在三维旋转系统中,万向锁是一种由旋转顺序引起的奇异性问题。当系统中的两个旋转轴重合时,导致失去一个自由度,从而限制了对物体旋转的控制。
- 平衡环与父子关系
平衡环(Gimbals):在旋转系统中,通常存在多个环,每个环对应一个旋转轴。所有轴都是相互关联的,一个环的运动必然改变其他环的相对方向。- 父环与子环:
父环(第一个运动的环):它的旋转会带动其他两个环运动,改变它们的自由度(方向)。子环(第二个运动的环):在父环的影响下,它进一步影响下一级环的运动,改变其自由度(方向)。- 假设旋转顺序是YXZ:(1)旋转y轴,则x和z轴都变;(2)旋转x轴,则只有z轴变化;(3)旋转z轴,则其它轴都不变。
- (第1个旋转)绕Y轴旋转:此时,X 轴和 Z 轴的方向都会发生变化。这个旋转不会导致任何问题。
- (第2个旋转)绕X轴旋转:
- Pitch ≠ ±90°:此时,绕 X 轴的旋转正常进行,系统保持稳定。
Pitch = ±90°:此时,X 轴和 Z 轴会变得平行,绕 Z 轴的旋转将与绕 Y 轴的旋转产生相同效果,导致系统失去一个自由度,出现奇异性,形成万向锁问题。- 共有六种旋转组合,可以导致万向锁现象,分别对应于三个轴(X、Y、Z)的不同旋转顺序:
XYZ、XZY、YXZ、YZX、ZXY、ZYX。
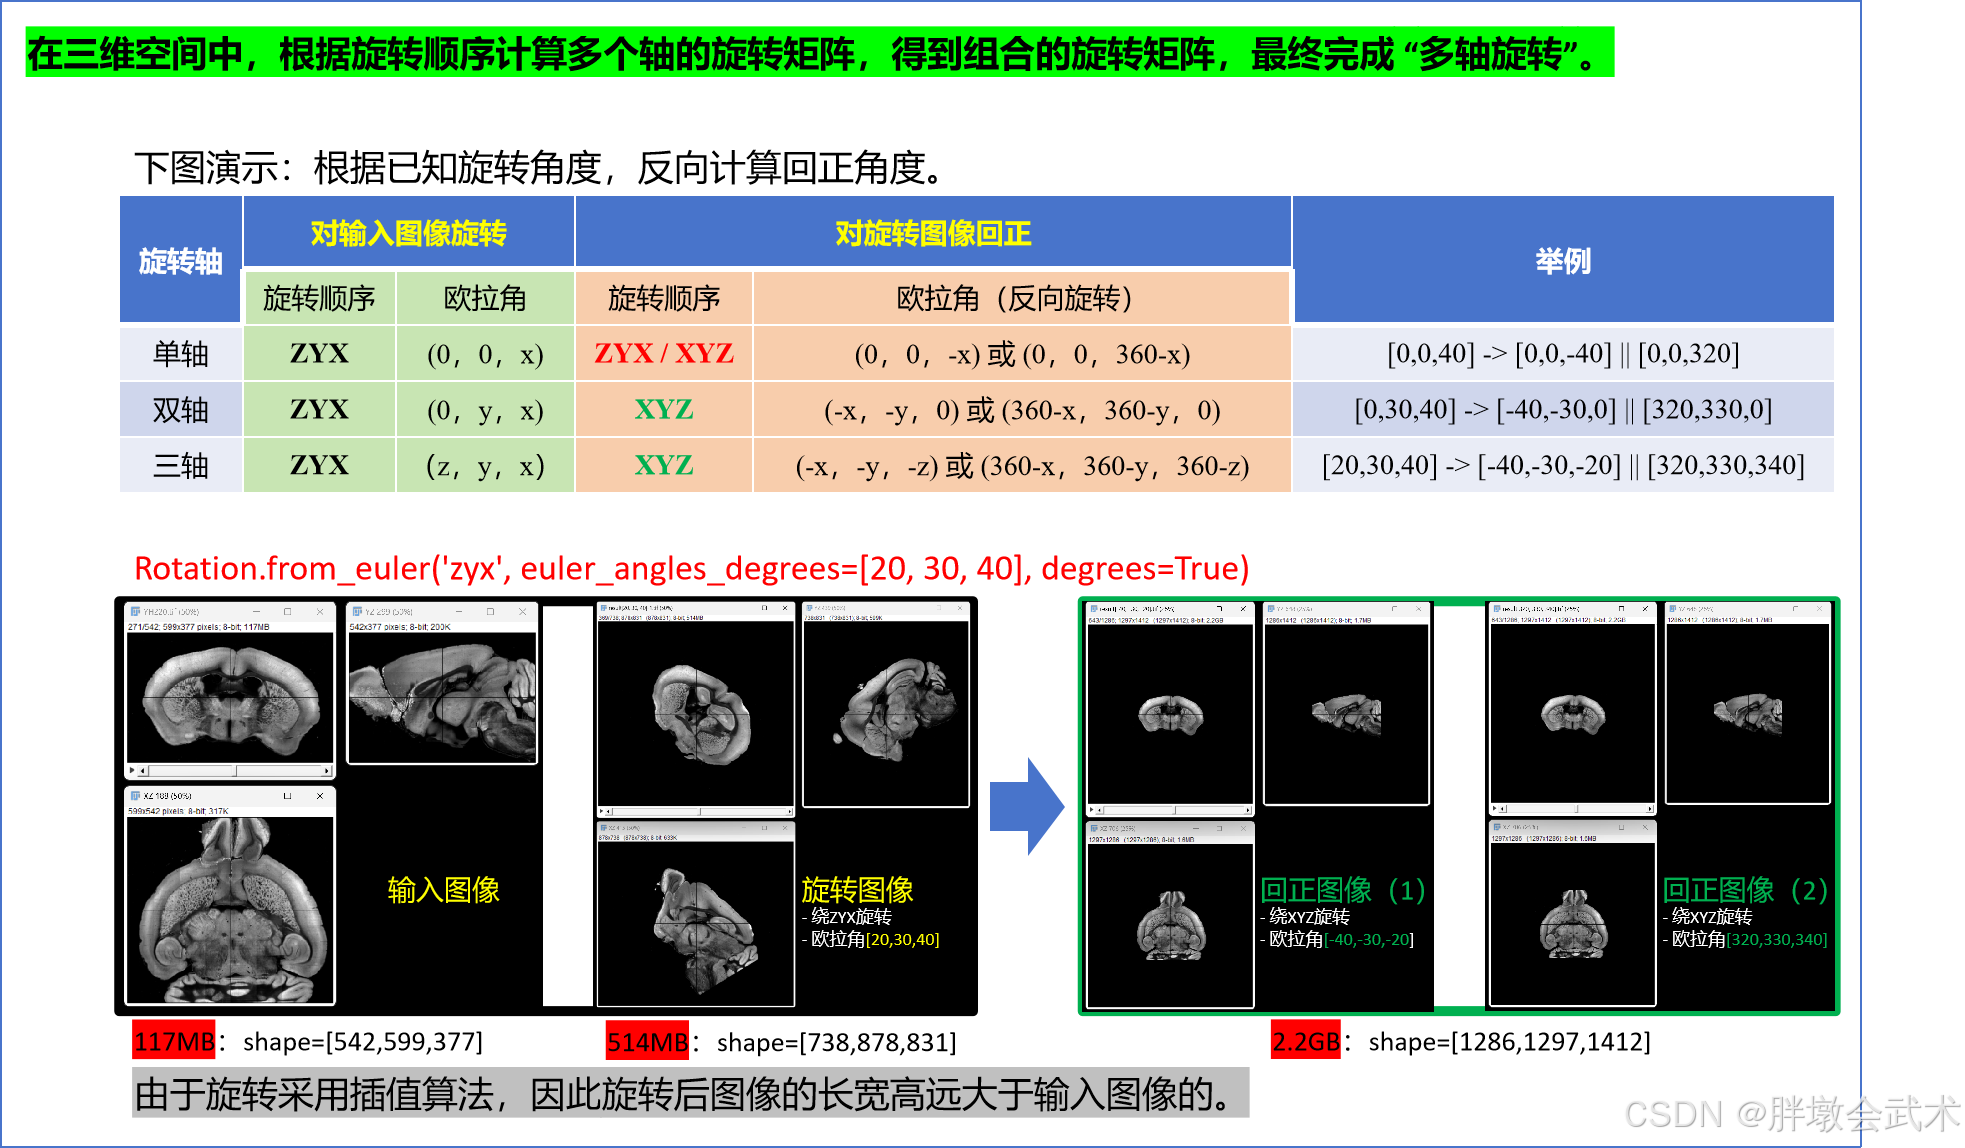
1.2.4、旋转图像 + 回正图像
虽然非固定坐标系,但反向旋转仍然是相对的、有效的操作。
1.3、轴角表示(Axis–angle representation)
维基百科:轴角表示(图形化理解):是一种用于表示三维空间中物体旋转的角度方法,使用一个旋转轴(V)和一个旋转角度(θ),来描述物体的旋转。
1.3.1、优缺点
- 优点:
- 直观:旋转角-轴表示法提供了一种直观的方式来理解旋转,特别是对物理系统的建模。
- 避免万向锁:由于直接指定旋转轴,避免了欧拉角中的万向锁问题。
- 支持单轴旋转或多轴组合旋转:
- 单轴旋转:通过给定的旋转轴和旋转角度进行旋转。
- 多轴旋转:通过多个单轴旋转的组合实现任意旋转。一是依次应用每个单轴旋转;二是通过矩阵乘法,计算最终的旋转矩阵,然后只应用一次旋转。
- 缺点:
- 复杂性:与欧拉角相比,旋转角-轴表示法在数学上较为复杂,特别是在组合多个旋转时。
- 不直观的插值:在使用插值(如球形线性插值)时,角-轴表示法可能不如四元数直观。
1.3.2、表示法
- 数组表示:
(
v
,
θ
)
\ (v,θ)
(v,θ)
- 旋转轴:表示旋转轴的方向;
- 由一个单位向量表示,通常记作 v = ( V x , V y , V z ) \ v = (Vx,Vy,Vz) v=(Vx,Vy,Vz)。
- 旋转角度:表示绕旋转轴的旋转角度;
- 角度单位:常见单位是度(°),也可以用弧度(rad)表示。
- 转换公式: 弧度 = 角度 × 180 π \ 弧度 = 角度 × \frac{180}{π} 弧度=角度×π180
- 右手法则:正角度表示逆时针旋转,负角度表示顺时针旋转。
- 旋转轴:表示旋转轴的方向;
右手法则:用于在三维空间中确定旋转方向和轴的方法。
步骤一:右手握拳
步骤二:大拇指指向旋转轴的正方向
步骤三:其余手指的弯曲方向表示旋转的正方向(通常是逆时针方向)
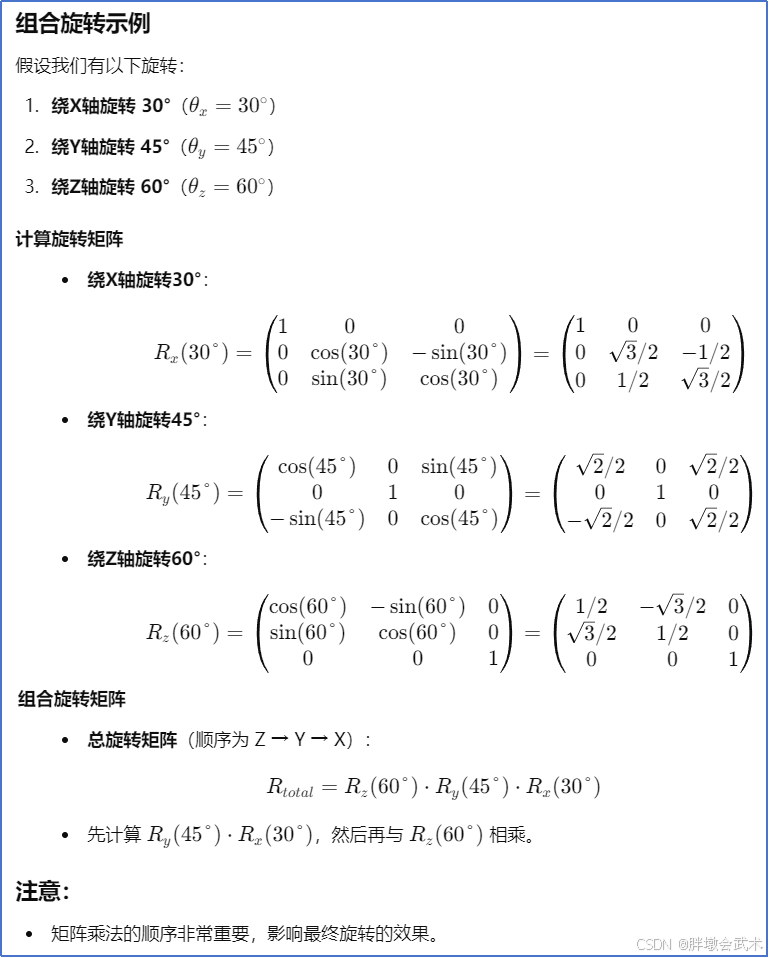
1.3.3、公式计算:单轴旋转 + 组合旋转
单轴旋转:假设我们有一个旋转轴 v = ( 0 , 0 , 1 ) \ v = (0,0,1) v=(0,0,1) 和旋转角度 θ = 90 ° \ θ = 90° θ=90°,其表示物体绕Z轴顺时针旋转90°。
多轴旋转
1.4、旋转矩阵 (Rotation Matrix)
1.4.1、优缺点 —— 具有万向锁
- 存在万向节死锁问题(Gimbal Lock)
- (相对参考系) 若为复合旋转,则后一个旋转的参考坐标系是在前一个旋转之后的坐标系的基础上进行的。
- 即:每个旋转矩阵都是基于前一个旋转后矩阵。
- 复合旋转的实现方式:多个矩阵相乘(顺序很重要)
- 这意味着每次旋转都会改变坐标系的方向,后续的旋转将受到之前旋转的影响。
多轴旋转:三个轴旋转
复合旋转:N个矩阵旋转
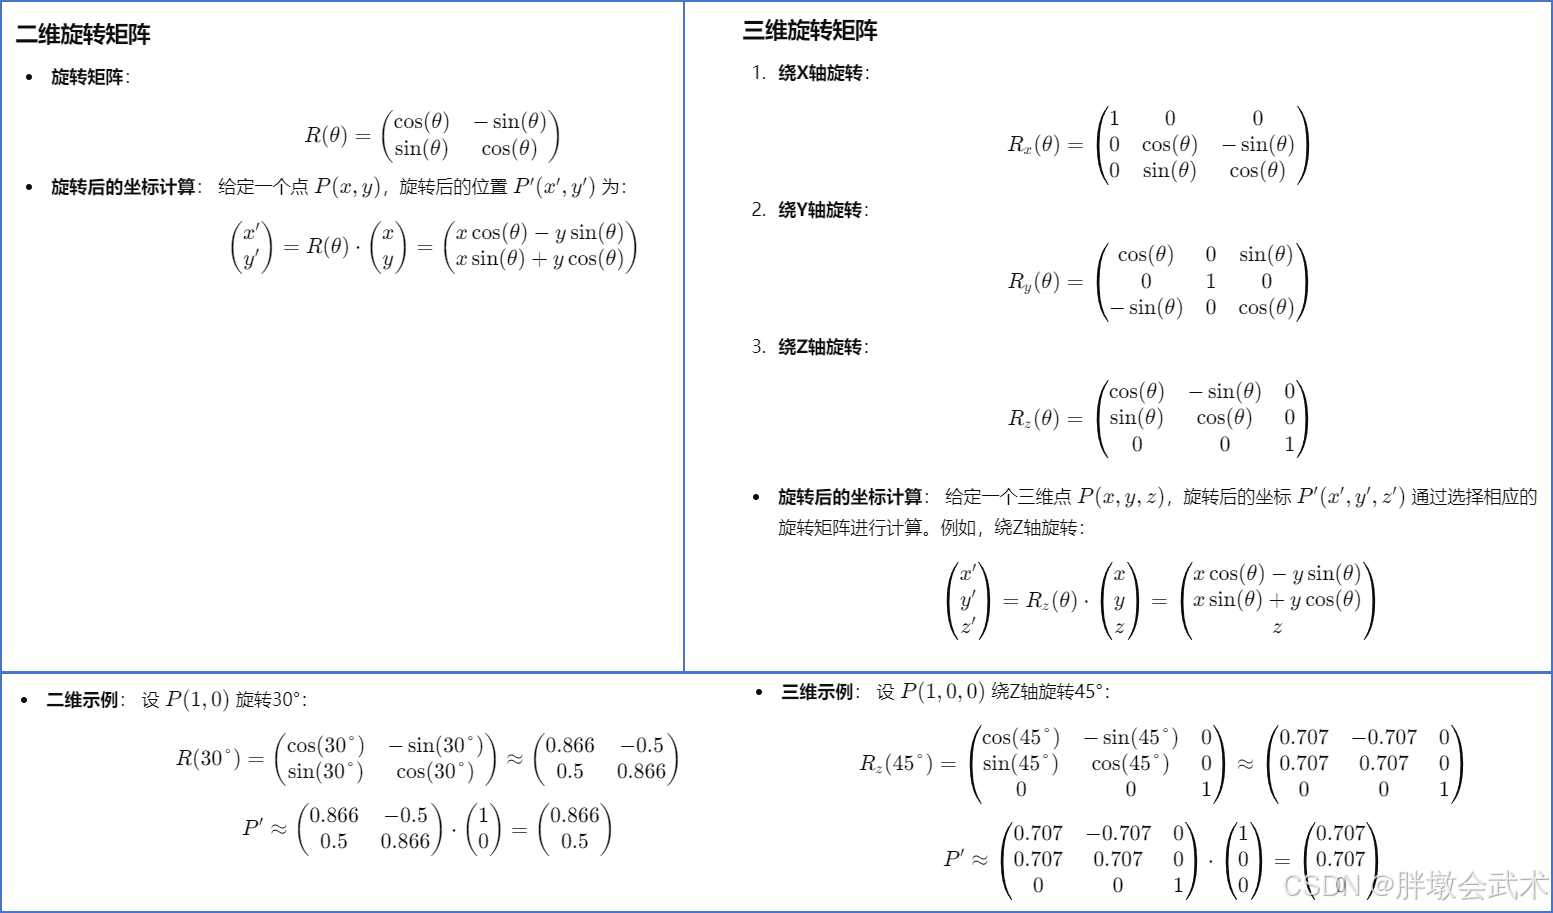
1.4.2、公式计算:2D旋转矩阵 + 3D旋转矩阵
定义:一个 2×2 矩阵,表示二维空间的旋转。
定义:一个 3×3 矩阵,表示三维空间的旋转。
二、基本知识
2.1、逆矩阵
对于一个旋转矩阵 𝑅,它的逆矩阵 𝑅−1 代表着相反的旋转。
旋转矩阵的一个重要特性是其转置矩阵也是其逆矩阵,即: 𝑅−1 = 𝑅T
逆矩阵:是指一个矩阵 𝐴 的逆矩阵 𝐴−1,使得当 𝐴 与 𝐴−1 相乘时,结果为单位矩阵 𝐼。𝐴 * 𝐴-1 = 𝐴-1 * 𝐴 = 𝐼- 条件:
- 只有方阵(行数与列数相等的矩阵)才可能有逆矩阵。
- 矩阵必须是非奇异的(即行列式不为零)。如果行列式为零,则矩阵不可逆。
- 应用:在解线性方程组中,使用逆矩阵可以直接求解 A * x = b 的解 x = A-1 * b。
import numpy as np

# 示例矩阵
A = np.array([[1, 2], [3, 4]])
# 计算矩阵的逆
A_inv = np.linalg.inv(A)
# 验证 A * A_inv 是否为单位矩阵
identity_matrix = np.dot(A, A_inv)

print("原始矩阵:\n", A)
print("逆矩阵:\n", A_inv)
print("单位矩阵:\n", identity_matrix)

"""
原始矩阵:
         [[1 2]
          [3 4]]
逆矩阵:
         [[-2.   1. ]
          [ 1.5 -0.5]]
单位矩阵:
         [[1.0000000e+00 0.0000000e+00]
          [8.8817842e-16 1.0000000e+00]]
"""
2.2、正交矩阵
正交矩阵(Orthogonal Matrix):是一种方阵,其行向量或列向量都互相正交(即彼此垂直),且每个向量的模长为1。
- 正交意味着任意两个不同的行向量(或列向量)之间的点积为零。
- 每一行的向量与其他行向量正交,并且每个行向量的模长为 1。
- 每一列的向量与其他列向量正交,并且每个列向量的模长为 1。
满足以下性质:
- (1)
单位矩阵性质:Q x QT = QT x Q = 𝐼。其中Q为正交矩阵,QT 是矩阵 Q 的转置矩阵,𝐼 是单位矩阵。- (2)
逆矩阵等于转置矩阵:正交矩阵的逆矩阵等于它的转置矩阵,即 Q-1 = QT 。- (3)
保持几何变换的特性不变:正交矩阵进行变换后,向量之间的距离和角度保持不变。这意味着它们在几何变换中不改变向量的长度和方向(即保长且保角),不会因变换而失真,常用于图像的旋转变换(旋转矩阵本身就是一种正交矩阵)。
import numpy as np

def is_orthogonal(matrix):
    identity_matrix = np.eye(matrix.shape[0])
    product = np.dot(matrix, matrix.T)
    return np.allclose(product, identity_matrix)

if __name__ == '__main__':
    Q = np.array([
        [1, 0, 0],
        [0, 0, 1],
        [0, 1, 0]
    ])
    print("是否为正交矩阵:", is_orthogonal(Q))
    # 是否为正交矩阵: True
2.3、计算三个角坐标的法向量,并转换为四元数
import numpy as np
import tifffile
from scipy.spatial.transform import Rotation


def calculate_normal(a, b, c):
    """根据三点成面,计算平面的法向量。
    参数: a, b, c      三个点的坐标,每个点的坐标应为一个包含三个元素的列表或一维数组。
    返回: np.ndarray   平面的法向量,归一化到单位长度。
    """
    ca = np.array(c) - np.array(a)  # 计算向量 AB(从点 A 到点 B)
    cb = np.array(c) - np.array(b)  # 计算向量 AC(从点 A 到点 C)
    normal = np.cross(ca, cb)  # 计算向量 AB 和 AC 的叉积,得到法向量
    norm = np.linalg.norm(normal)  # 计算法向量的模(长度)
    # 检查法向量的模是否为零,若为零则表示三点共线
    if norm == 0:
        raise ValueError("The points are collinear; cannot compute a valid normal vector.")
    return normal / norm  # 将法向量归一化(即将法向量的长度调整为 1)


def get_rotation_quaternion_from_vectors(vec1, vec2):
    """计算从起始向量 vec1 到目标向量 vec2 的旋转四元数。
    参数: vec1, vec2  表示单位向量或可以被归一化的三维向量。
    返回: np.ndarray  旋转四元数,格式为[x, y, z, w],其中 [x, y, z] 是旋转轴的分量,w 是旋转角度的余弦值。
    """
    # 归一化向量 vec1 和 vec2,以确保它们是单位向量
    vec1 = vec1 / np.linalg.norm(vec1)
    vec2 = vec2 / np.linalg.norm(vec2)
    # 计算 vec1 和 vec2 之间的点积
    dot_product = np.dot(vec1, vec2)

    # 当 vec1 和 vec2 完全重合时(点积接近 1),不需要旋转
    if np.isclose(dot_product, 1.0):
        return np.array([0, 0, 0, 1])  # No rotation needed
    # 当 vec1 和 vec2 完全反向时(点积接近 -1),需要旋转 180 度
    elif np.isclose(dot_product, -1.0):
        orthogonal_vector = np.array([1, 0, 0]) if not np.isclose(vec1[0], 1.0) else np.array([0, 1, 0])  # 选择一个正交向量作为旋转轴
        rotation_axis = np.cross(vec1, orthogonal_vector)  # 计算旋转轴的方向
        rotation_axis = rotation_axis / np.linalg.norm(rotation_axis)  # 归一化旋转轴
        return np.concatenate([rotation_axis, [0]])  # 返回旋转四元数,表示 180 度旋转的轴 [x, y, z] 和角度余弦 [0]
    else:
        rotation_axis = np.cross(vec1, vec2)  # 计算旋转轴,旋转角度的余弦值
        rotation_angle = np.arccos(dot_product)  # 归一化旋转轴
        rotation_axis = rotation_axis / np.linalg.norm(rotation_axis)
        # 计算四元数的分量 [x, y, z] 和角度余弦 [w]
        half_angle = rotation_angle / 2
        return np.concatenate([rotation_axis * np.sin(half_angle), [np.cos(half_angle)]])


def draw_lines_in_3d_array(shape):
    """在给定形状的 3D 数组中,从中心点绘制三条平行于 x、y 和 z 轴的线条。
    参数:shape : tuple    3D 数组的形状,例如 (10, 10, 10)。
    返回:np.ndarray       包含绘制线条的 3D 数组。
    """
    array = np.zeros(shape, dtype=int)  # 创建一个 3D 数组
    center = np.array(shape) // 2  # 计算数组的中心点

    array[center[0], :, :] = 100  # 绘制平行于 x 轴的线条
    array[:, center[1], :] = 200  # 绘制平行于 y 轴的线条
    array[:, :, center[2]] = 255  # 绘制平行于 z 轴的线条

    array[0:5, :, :] = 0
    return array


def convert_to_coronal(point):
    x, y, z = point
    return [x, z, y]  # 转换规则:y -> x', z -> y', x -> z'


"""函数功能:计算三个角坐标的法向量,并转换为四元数+欧拉角"""
if __name__ == '__main__':
    # (1)读取 TIFF 图像
    image = tifffile.imread(r"F:\py\YH220.tif")
    ###################################################################################
    # (2.1)给定DeepSlice输出结果:内外侧的三个角坐标(由点成面)
    anchor = [482.9774731174978, 199.13832937043094, 340.27020665122393,
              -512.449196037436, -3.1563973270278893, 16.393444685542704,
              -11.934029128587724, -8.76390048736451, -385.6476974914934]
    o = anchor[0:3]
    u = anchor[3:6]
    v = anchor[6:9]
    # (2.2)从内外侧(XYZ平面)换算到冠状面(XZY平面)
    o_coronal = convert_to_coronal(o)
    u_coronal = convert_to_coronal(u)
    v_coronal = convert_to_coronal(v)
    print(f"O-xyz in coronal plane: {o_coronal}")
    print(f"U-xyz in coronal plane: {u_coronal}")
    print(f"V-xyz in coronal plane: {v_coronal}")
    ###################################################################################
    # (3)计算法向量(x,y,z)
    normal = calculate_normal(o_coronal, u_coronal, v_coronal)  # 计算法向量
    # normal = [1, 1, 1]  # 自定义法向量

    """Z轴绕XY、X轴绕YZ面、Y轴绕XZ面"""
    target_normal = np.array([0, 0, 1])  # 目标法向量,通常是z轴(x,y,z) = (0,0,1)
    print(f"normal={normal}, target_normal={target_normal}")
    ##################################################################
    # (3)计算旋转四元数
    rotation_quaternion = get_rotation_quaternion_from_vectors(target_normal, normal)
    print(f"rotation_quaternion={rotation_quaternion}")  # 四元数
    rotation = Rotation.from_quat(rotation_quaternion)
    euler_angles_degrees = rotation.as_euler('zyx', degrees=True)
    print(f"euler_angles_degrees={euler_angles_degrees}")  # 单位:角度°

"""
O-xyz in coronal plane: [482.9774731174978, 340.27020665122393, 199.13832937043094]
U-xyz in coronal plane: [-512.449196037436, 16.393444685542704, -3.1563973270278893]
V-xyz in coronal plane: [-11.934029128587724, -385.6476974914934, -8.76390048736451]
normal=[-0.13760118 -0.18487668  0.97308095], target_normal=[0 0 1]
euler_angles_degrees=[ 0.74583918 -7.90906051 10.7574727 ]
"""
2.4、两两转换:四元数 + 欧拉角 + 旋转矩阵
import numpy as np
from scipy.spatial.transform import Rotation


def quaternion2euler(quaternion, is_degree=False):
    """将四元数转换为欧拉角(Euler Angles)。
    参数:     quaternion (array-like): 长度为4的四元数列表或数组,格式为 [x, y, z, w]。
             is_degree (bool): 如果为True,则返回的欧拉角将以度为单位,否则为弧度。
    返回:     euler (ndarray): 欧拉角表示的旋转角度。返回顺序为 'xyz'。
    """
    r = Rotation.from_quat(quaternion)  # 从四元数创建旋转对象
    euler = r.as_euler('xyz', degrees=is_degree)  # 将旋转对象转换为欧拉角表示,单位为弧度
    euler_true = r.as_euler('xyz', degrees=True)  # 将旋转对象转换为欧拉角表示,单位为度数
    print("创建旋转对象quaternion2euler:", r)
    print("旋转角度(弧度):", euler)
    print("旋转角度(度):", euler_true)
    return euler

def quaternion2rot(quaternion):
    """将四元数转换为旋转矩阵(Rotation Matrix)。
    参数:     quaternion (array-like): 长度为4的四元数列表或数组,格式为 [x, y, z, w]。
    返回:     rot (ndarray): 3x3 旋转矩阵。
    """
    r = Rotation.from_quat(quaternion)  # 从四元数创建旋转对象
    rot = r.as_matrix()  # 将旋转对象转换为旋转矩阵表示
    return rot


#############################################################################################
def euler2quaternion(euler, is_degree=False):
    """将欧拉角转换为四元数。
    参数:     euler (array-like): 长度为3的欧拉角列表或数组,格式为 [α, β, γ],表示绕 'xyz' 轴的旋转角度。
             is_degree (bool): 如果为True,则输入的欧拉角以度为单位,否则为弧度。
    返回:     quaternion (ndarray): 四元数表示的旋转,格式为 [x, y, z, w]。
    """
    r = Rotation.from_euler('xyz', euler, degrees=is_degree)  # 从欧拉角创建旋转对象
    quaternion = r.as_quat()  # 将旋转对象转换为四元数表示
    print("创建旋转对象euler2quaternion:", r)
    return quaternion

def euler2rot(euler, is_degree=False):
    """将欧拉角转换为旋转矩阵。
    参数:     euler (array-like): 长度为3的欧拉角列表或数组,格式为 [α, β, γ],表示绕 'xyz' 轴的旋转角度。
             is_degree (bool): 如果为True,则输入的欧拉角以度为单位,否则为弧度。
    返回:     rotation_matrix (ndarray): 3x3 旋转矩阵。
    """
    r = Rotation.from_euler('xyz', euler, degrees=is_degree)  # 从欧拉角创建旋转对象
    rotation_matrix = r.as_matrix()  # 将旋转对象转换为旋转矩阵表示
    print("创建旋转对象euler2rot:", r)
    return rotation_matrix


#############################################################################################
def rot2euler(R, is_degree=False):
    """将旋转矩阵转换为欧拉角。
    参数:     R (ndarray): 3x3 旋转矩阵。
             is_degree (bool): 如果为True,则返回的欧拉角将以度为单位,否则为弧度。。
    返回:     euler (ndarray): 欧拉角表示的旋转角度。返回顺序为 'xyz'。
    """
    r = Rotation.from_matrix(R)  # 从旋转矩阵创建旋转对象
    euler = r.as_euler('xyz', degrees=is_degree)  # 将旋转对象转换为欧拉角表示,单位为弧度或度数
    print("创建旋转对象rot2euler:", r)
    return euler

def rot2quaternion(R):
    """将旋转矩阵转换为四元数。
    参数:     R (ndarray): 3x3 旋转矩阵。
    返回:     quaternion (ndarray): 四元数表示的旋转,格式为 [x, y, z, w]。
    """
    r = Rotation.from_matrix(R)  # 从旋转矩阵创建旋转对象
    quaternion = r.as_quat()  # 将旋转对象转换为四元数表示
    return quaternion


if __name__ == '__main__':
    # (1)初始化数组
    eulerAngles = np.array([0, 0, 1.571])           # 初始化欧拉角
    quaternion = np.array([0, 0, 0.707, 0.707])     # 初始化四元数
    rotationMat = np.array([[0, -1, 0],
                            [1, 0, 0],
                            [0, 0, 1]])             # 初始化旋转角
    # (2)支持两两转换:四元数 - 欧拉角 - 旋转角
    rotationMat1 = euler2rot(eulerAngles)           # 欧拉角转换旋转角
    quaternion1 = euler2quaternion(eulerAngles)     # 欧拉角转换四元数

    eulerAngles2 = rot2euler(rotationMat)           # 旋转角转换欧拉角
    quaternion2 = rot2quaternion(rotationMat)       # 旋转角转换四元数

    rotationMat2 = quaternion2rot(quaternion)       # 四元数转换旋转角
    eulerAngles1 = quaternion2euler(quaternion)     # 四元数转换欧拉角

    print(f"eulerAngle = {eulerAngles} = {eulerAngles1} = {eulerAngles2}")
    print(f"quaternion = {quaternion} = {quaternion1} = {quaternion2}")
    print("rotationMat=", "\n", rotationMat, "\n", rotationMat1, "\n", rotationMat2)

# 创建旋转对象euler2rot: <scipy.spatial.transform._rotation.Rotation object at 0x000002727F51DB70>
# 创建旋转对象euler2quaternion: <scipy.spatial.transform._rotation.Rotation object at 0x000002727F51DB70>
# 创建旋转对象rot2euler: <scipy.spatial.transform._rotation.Rotation object at 0x000002727F51DB70>
# 创建旋转对象quaternion2euler: <scipy.spatial.transform._rotation.Rotation object at 0x000002727F51DB70>
# 旋转角度(弧度)= [0. 0. 1.57079633]
# 旋转角度(度)  = [0. 0. 90.]
"""****************************************************************************************************
eulerAngle  = [0 0 1.571]        =  [0 0 1.57079633]             =  [0 0 1.57079633]
quaternion  = [0 0 0.707 0.707]  =  [0 0 0.70717879 0.70703477]  =  [0 0 0.70710678 0.70710678]
rotationMat = [[ 0 -1  0]   =  [[-2.03673204e-04 -9.99999979e-01  0.00000000e+00]  =  [[ 0. -1.  0.]
               [ 1  0  0]   =   [ 9.99999979e-01 -2.03673204e-04  0.00000000e+00]  =   [ 1.  0.  0.]
               [ 0  0  1]]  =   [ 0.00000000e+00  0.00000000e+00  1.00000000e+00]] =   [ 0.  0.  1.]]
****************************************************************************************************"""
三、scipy函数详解
3.1、用于二维旋转:scipy.ndimage.rotate
- 用途:主要用于二维图像的旋转。
- 实现方式:通过在指定的平面内旋转数组来实现,使用样条插值进行旋转。
- 功能:可以旋转图像数组,并提供多种边界处理模式。
- 适用场景:适用于图像处理和计算机视觉中的图像旋转操作。
"""#############################################################################################
# 函数功能:旋转输入图像或数组。
# 函数说明:output = scipy.ndimage.rotate(input, angle, axes=(0, 1), reshape=True, mode='nearest', cval=0.0, order=3)
# 参数说明:
#         input:输入的图像或数组。
#         angle:浮点数,表示旋转角度(单位为度)。正值表示逆时针旋转,负值表示顺时针旋转。
#         axes:元组,表示旋转的两个轴。默认为 (0, 1),表示对二维图像进行旋转。如果输入是三维图像,可以设置为 (0, 1), (1, 2) 等。
#                     axes=(0, 1) 表示绕着XY面旋转
#                     axes=(0, 2) 表示绕着XZ面旋转
#                     axes=(1, 2) 表示绕着YZ面旋转
#         reshape:布尔值,默认为 True。表示是否调整输出图像的尺寸以适应旋转后的图像。如果为 False,则输出图像的尺寸保持不变,旋转部分可能会被裁剪。
#         mode:字符串,默认为 'nearest'。表示插值模式,决定了旋转后缺失像素的填充方式。选项包括 'nearest'(最近邻插值)、'reflect'(反射填充)、'wrap'(重复填充)等。
#         cval:浮点数,默认为 0.0。表示在旋转过程中填充空白区域时使用的值,仅在 mode='constant' 时有效。
#         order:整数,默认为 3。表示插值方法的阶数。范围为 0(最近邻插值)到 5(五次插值)。
# 返回值:
#         output:旋转后的图像或数组。
#############################################################################################"""
3.2、用于三维旋转:scipy.spatial.transform.Rotation
官网简介:scipy.spatial.transform.Rotation
- 用途:主要用于三维旋转。
- 实现方式:提供了多种表示旋转的方法,包括四元数、旋转矩阵、旋转向量、欧拉角等。
- 功能:可以进行旋转的组合、反转、应用于向量等操作。
- 适用场景:适用于需要精确控制和表示三维旋转的场景,如机器人学、计算机图形学等。
"""#############################################################################################
# 类功能:用于表示和操作旋转,包括欧拉角、四元数、旋转矩阵等多种表示方式。
# 类说明:scipy.spatial.transform.Rotation
# 常用方法:
#         - from_euler(cls, seq, angles, degrees=True): 从欧拉角创建旋转对象。
#         - from_quat(cls, quat): 从四元数创建旋转对象。
#         - from_rotvec(cls, rotvec): 从旋转向量创建旋转对象。
#         - from_matrix(cls, matrix): 从旋转矩阵创建旋转对象。
#         - as_euler(self, seq, degrees=True): 将旋转对象转换为欧拉角表示。
#         - as_quat(self): 将旋转对象转换为四元数表示。
#         - as_rotvec(self): 将旋转对象转换为旋转向量表示。
#         - as_matrix(self): 将旋转对象转换为旋转矩阵表示。
#         - apply(self, vectors, inverse=False): 对输入向量应用旋转变换。
#         - inv(self): 返回该旋转的逆旋转。
# 参数说明:
#         - seq: 字符串,表示欧拉角的旋转顺序(例如 'xyz')。
#         - angles: 数组或列表,表示欧拉角的角度。
#         - degrees: 布尔值,默认为 True。表示角度是否以度为单位(True)或弧度为单位(False)。
#         - quat: 数组或列表,表示四元数 (x, y, z, w)。
#         - rotvec: 数组或列表,表示旋转向量。
#         - matrix: 2D 数组,表示旋转矩阵。
#         - vectors: 2D 数组,表示要应用旋转的向量。
#         - inverse: 布尔值,默认为 False。表示是否应用逆旋转。
# 返回值:
#         创建一个 `Rotation` 对象,或根据调用方法返回相应的旋转表示。
#############################################################################################"""
3.3、用于仿射变换:scipy.ndimage.affine_transform
官网简介:scipy.ndimage.affine_transform
- 用途:用于仿射变换,包括旋转、缩放、平移等。
- 实现方式:通过应用一个仿射变换矩阵来实现,支持更复杂的变换。
- 功能:可以进行任意的仿射变换,包括旋转、缩放、平移和剪切。
- 适用场景:适用于需要进行复杂图像变换的场景,如图像配准、图像增强等。
不适合复杂旋转:对于复杂的三维旋转,仿射变换可能不如四元数(Quaternion)灵活和稳定,尤其是在处理连续旋转时容易出现万向节锁(Gimbal Lock)问题。精度问题:由于浮点数运算的精度限制,长时间或多次应用仿射变换可能会累积误差,导致变换结果不准确。不支持非线性变换:仿射变换只能表示线性变换,无法处理非线性变换,如透视变换。
"""#############################################################################################
# 函数功能:对输入数组应用仿射变换(包括旋转、缩放、平移等)。
# 函数说明:output = scipy.ndimage.affine_transform(input, matrix, offset=0.0, output_shape=None, order=3, mode='constant', cval=0.0, prefilter=True)
# 参数说明:
#         input:输入的图像或数组。
#         matrix:二维数组,表示仿射变换矩阵。形状为 (n, n),其中 n 为输入数组的维度。
#         offset:浮点数或数组,表示变换的偏移量。默认为 0.0。如果是数组,其形状应与输入数组的维度一致。
#         output_shape:元组,表示输出数组的形状。如果为 None,则输出数组的形状与输入数组相同。
#         order:整数,默认为 3。表示插值方法的阶数。范围为 0(最近邻插值)到 5(五次插值)。
#         mode:字符串,默认为 'constant'。表示边界条件处理模式。选项包括 'constant'(常量填充)、'nearest'(最近邻填充)、'reflect'(反射填充)、'wrap'(重复填充)等。
#         cval:浮点数,默认为 0.0。表示在 mode='constant' 时,填充空白区域使用的值。
#         prefilter:布尔值,默认为 True。表示是否在应用仿射变换之前对输入数组进行预滤波,以减少插值误差。
# 返回值:
#         output:经过仿射变换后的图像或数组。
#############################################################################################"""
3.3、应用旋转变换:Rotation.apply
"""#############################################################################################
# 方法功能:对输入向量或数组应用旋转变换。
# 方法说明:output = Rotation.apply(self, vectors, inverse=False)
# 参数说明:
#         vectors:输入的向量或数组,形状为 (N, 3) 或 (3,),表示 N 个三维向量或单个三维向量。
#         inverse:布尔值,默认为 False。表示是否应用旋转的逆变换。
# 返回值:
#         output:经过旋转变换后的向量或数组,形状与输入相同。
# 注意事项:
#         - `self` 是 `Rotation` 对象,包含旋转参数(如旋转矩阵、四元数、欧拉角等)。
#         - 输入的 `vectors` 可以是单个三维向量或多个三维向量组成的数组。
# 示例:
#         from scipy.spatial.transform import Rotation as R
#         import numpy as np
#
#         # 创建一个 45 度绕 Z 轴的旋转
#         r = R.from_euler('z', 45, degrees=True)
#
#         # 应用旋转到一个向量
#         vec = np.array([1, 0, 0])
#         rotated_vec = r.apply(vec)
#
#         # 输出结果
#         print(rotated_vec)
#############################################################################################"""
四、项目实战
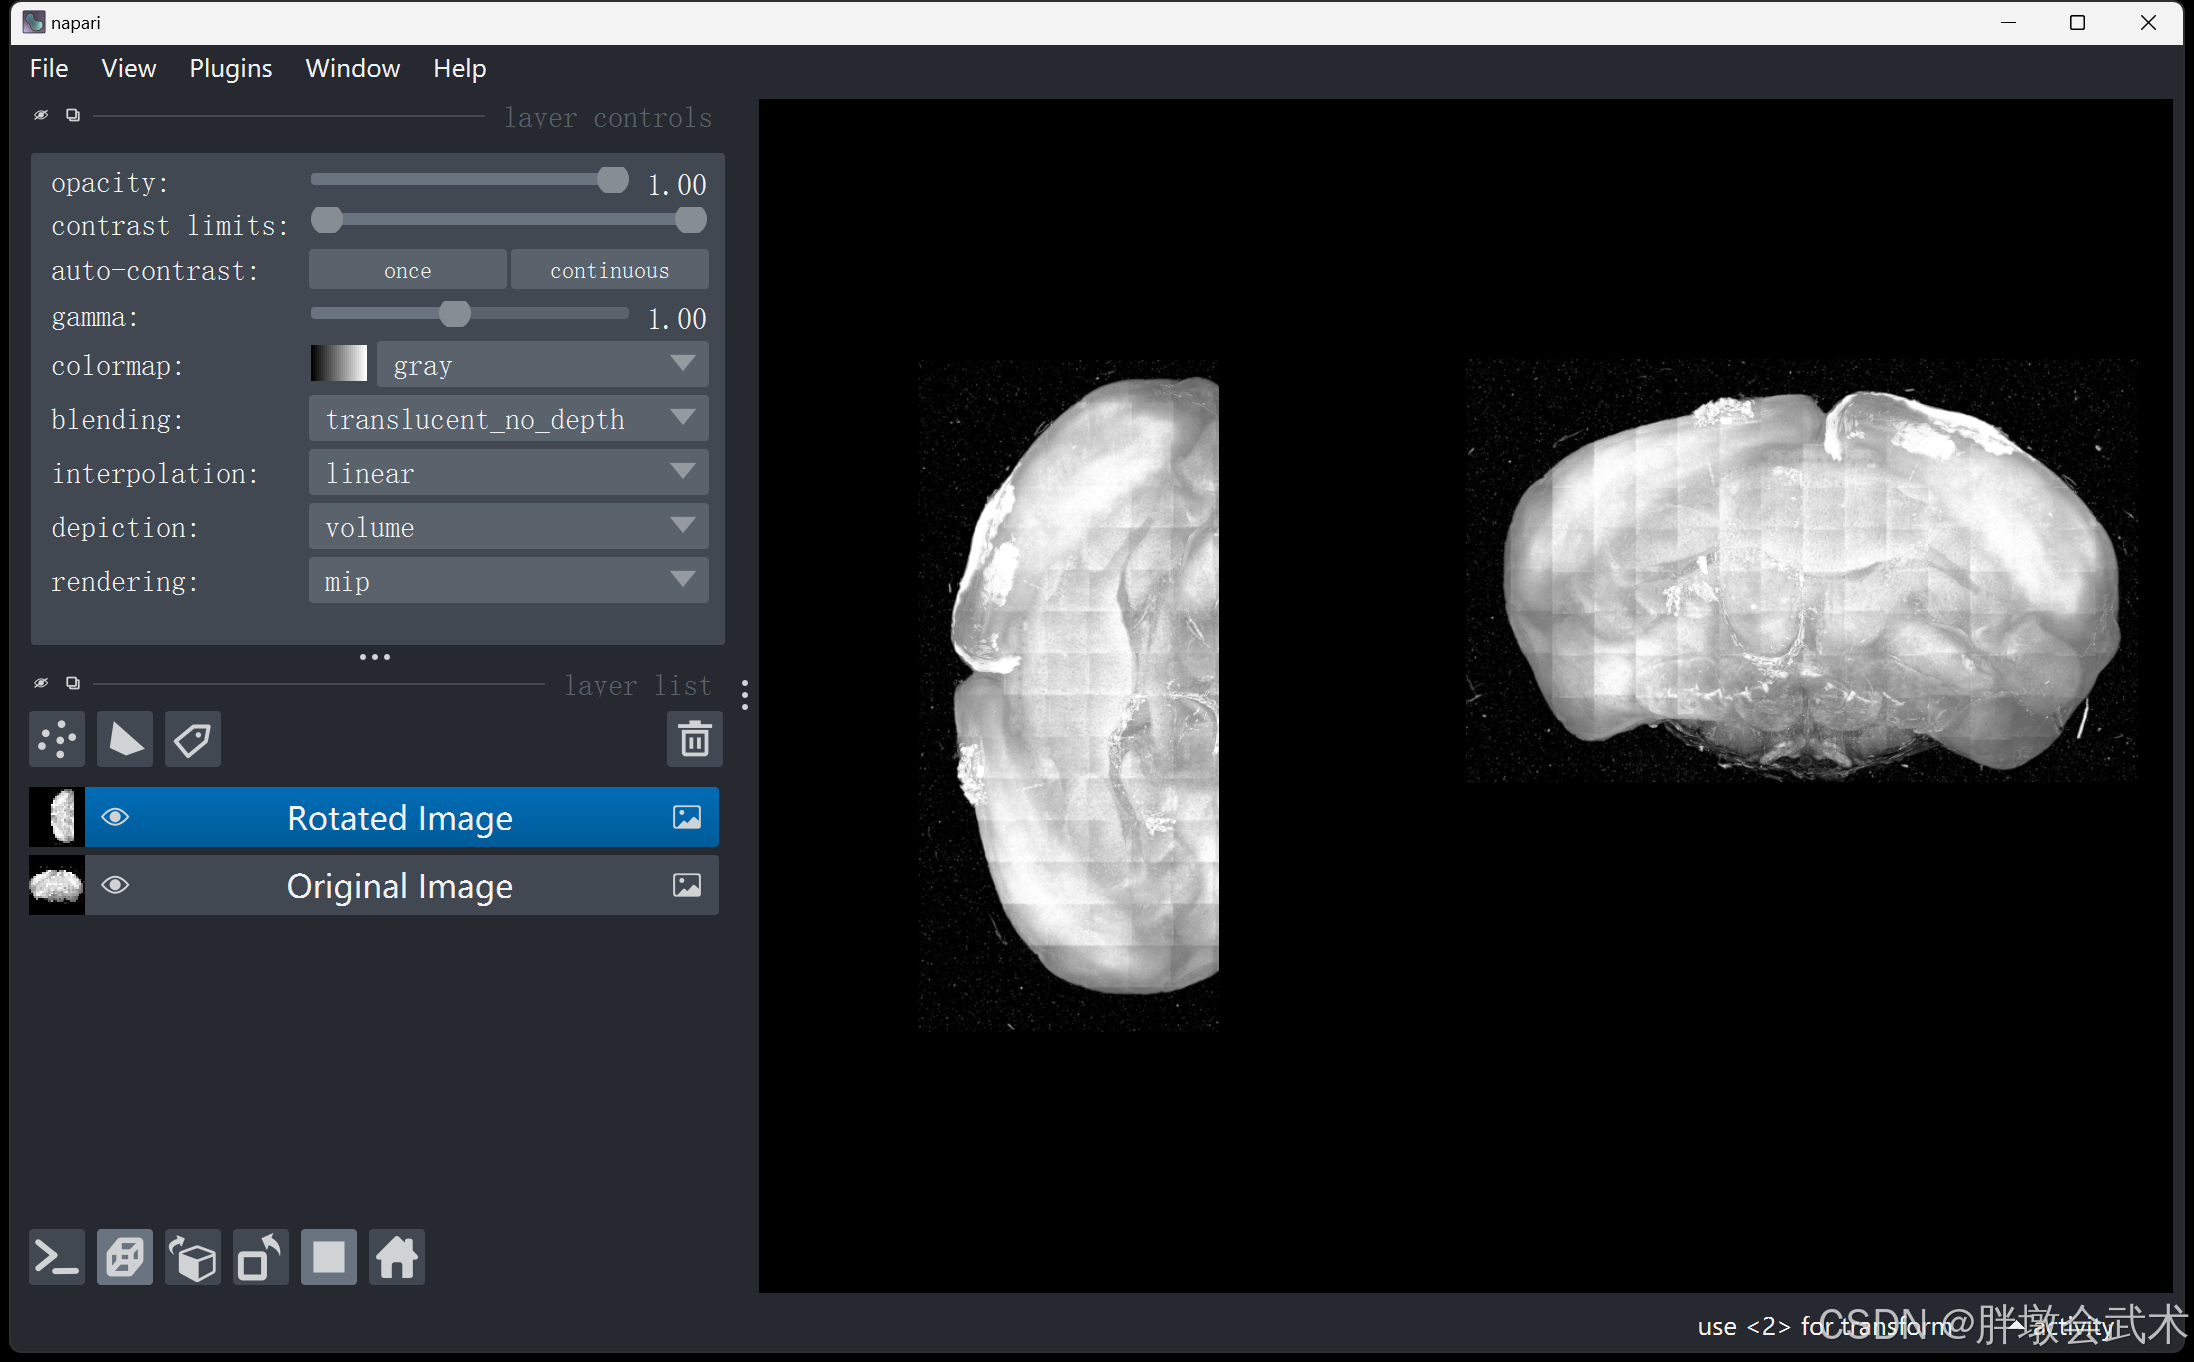
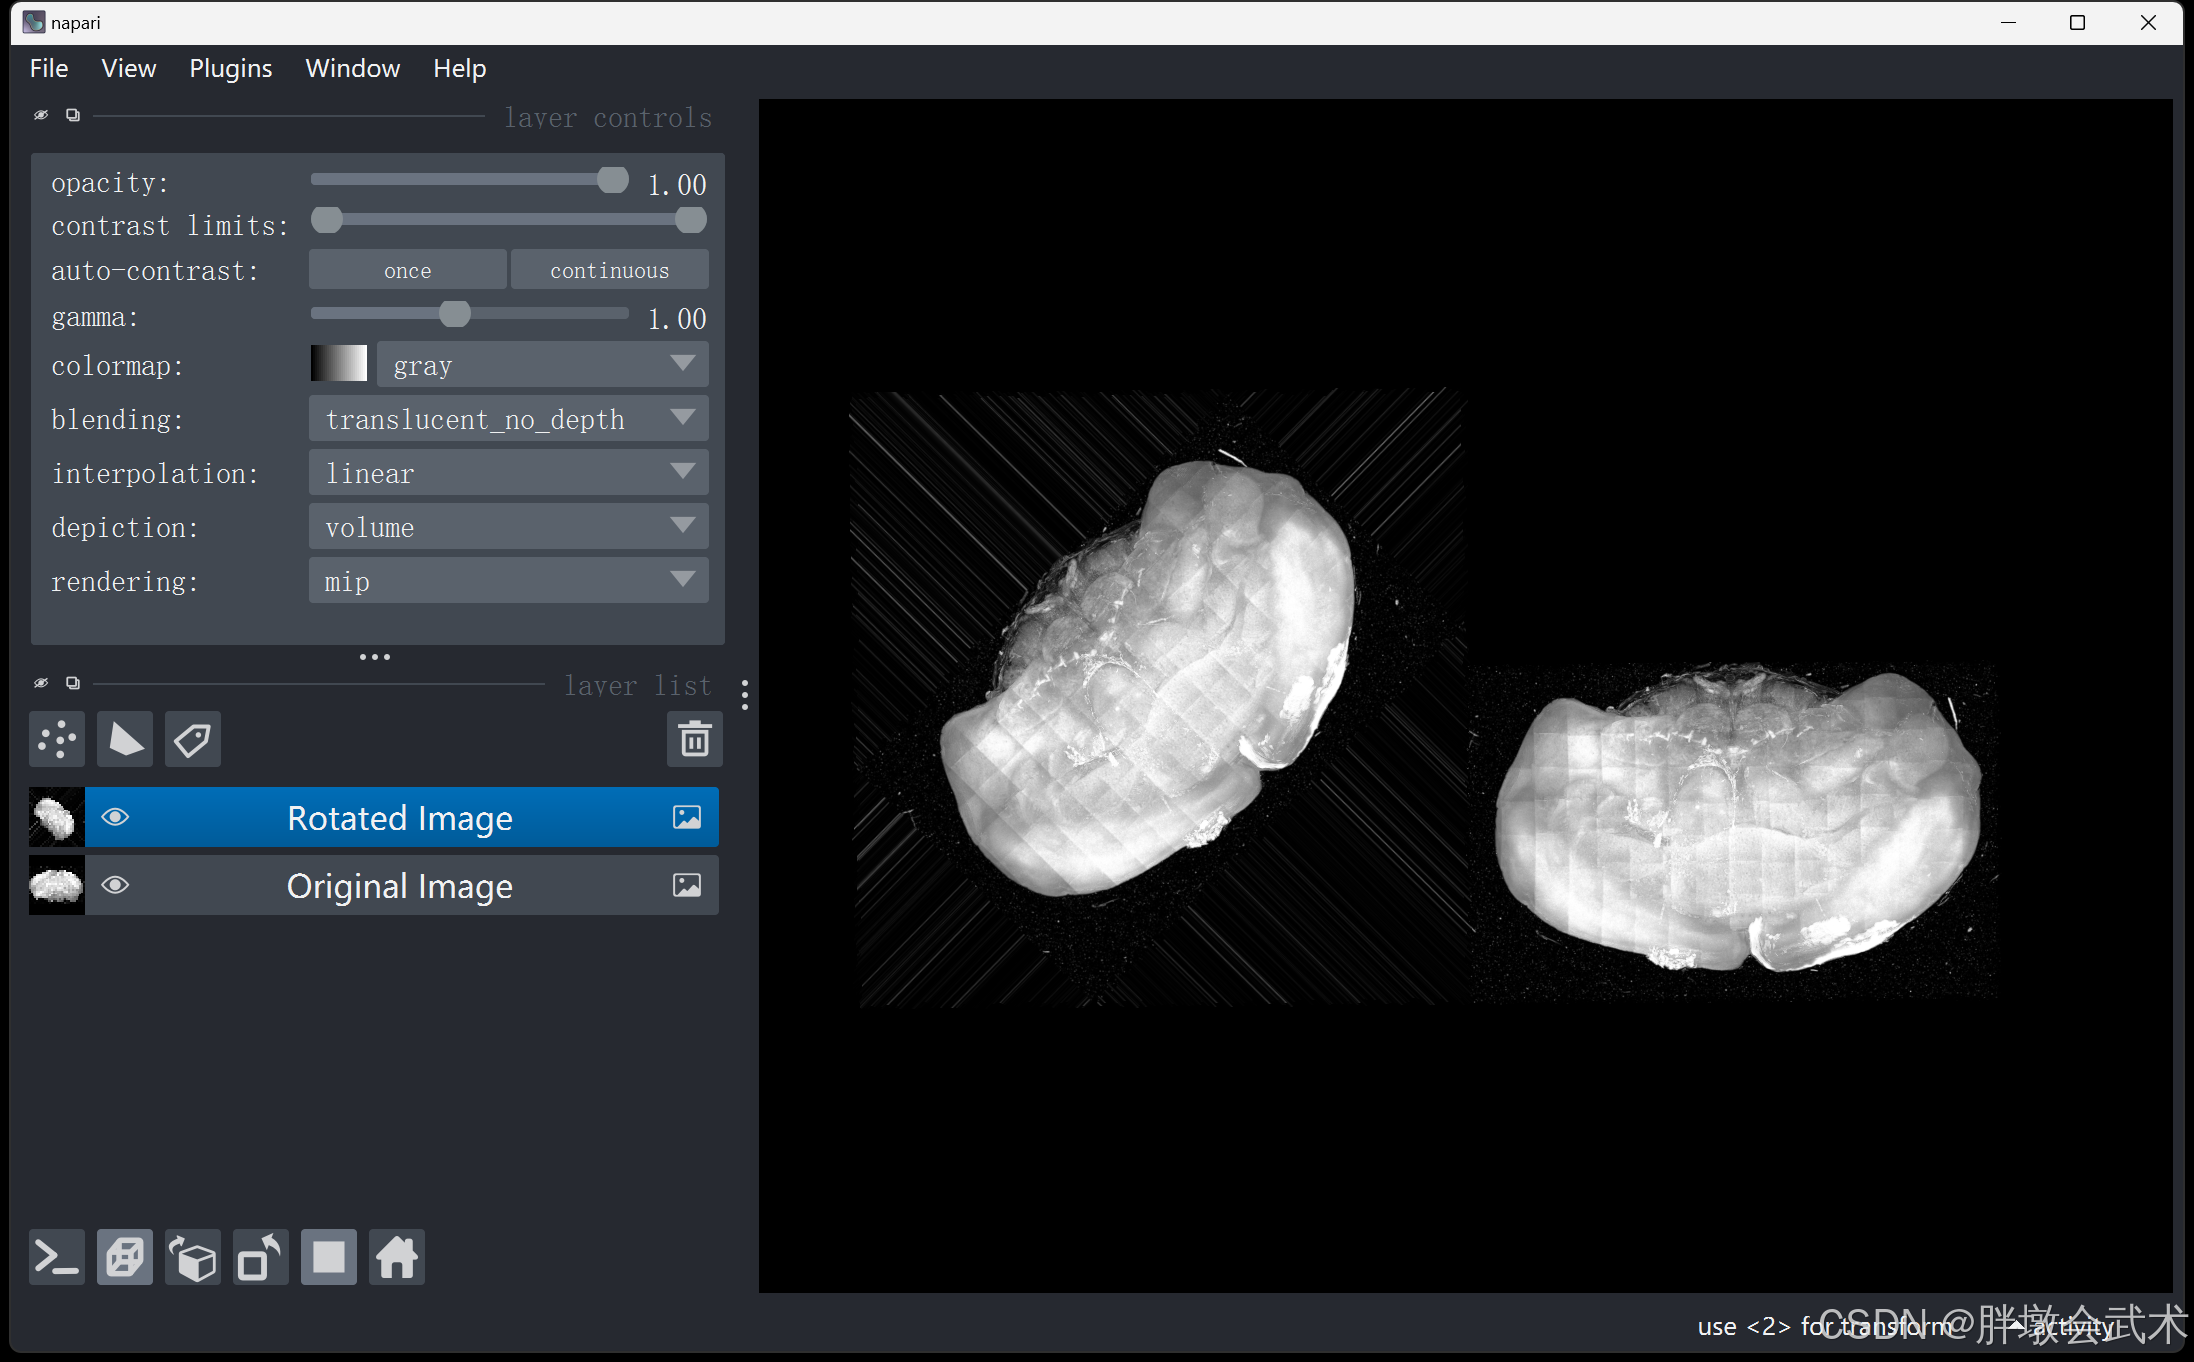
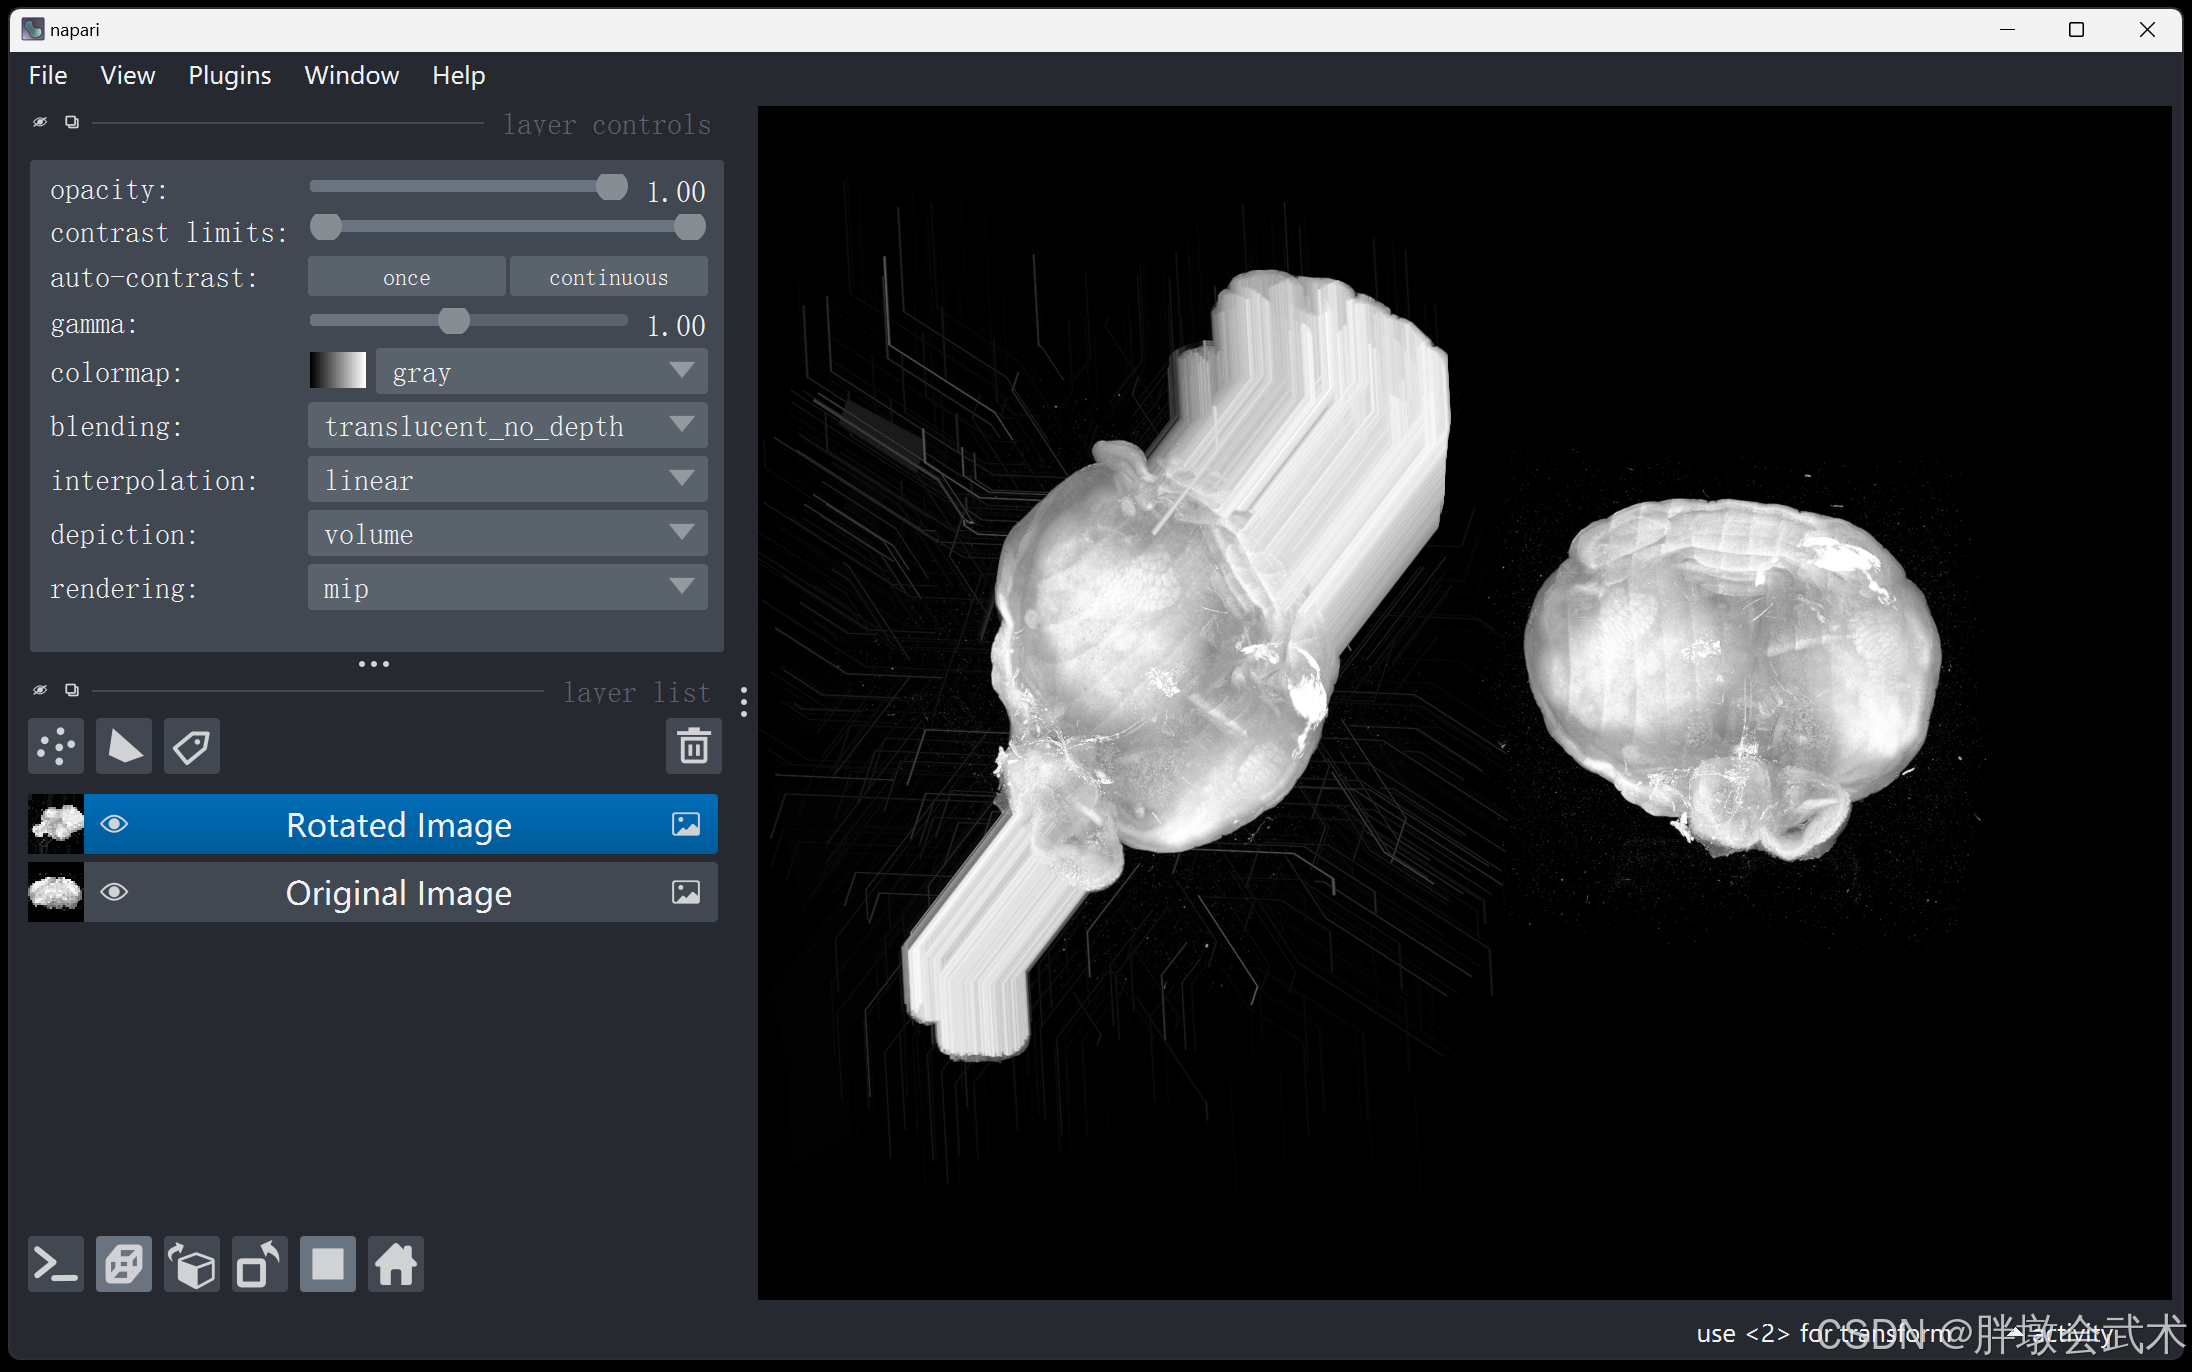
4.1、【欧拉角 + 旋转矩阵】三维旋转(√) —— 遍历旋转B坐标 = 图像A坐标 × 旋转矩阵 —— 时耗0.57s
(1)在立体空间中,旋转后图像具有尺度不变性;
(2)在像素空间中,旋转后图像对应的坐标值为浮点数(不包括旋转角度=90°/180°/360°);
- 方法一:【欧拉角 + 坐标映射】通过rotation.apply获得旋转后图像的尺寸和旋转坐标,遍历旋转坐标,然后将原始图像的像素值逐点映射并赋值给旋转后图像
- 问题1:由于坐标必须是整数值,但映射后的坐标为浮点值,且不管是什么取整方法(向上、向下、四舍五入等),都会出现旋转后图像的部分坐标无法获取,导致黑点现象。—— 即:旋转后图像的部分像素没有赋值,保留初始化为0。
- 问题2:旋转图像的尺寸不正确,比预期要小得多。
- 方法二:【欧拉角 + 旋转矩阵】通过矩阵计算获得旋转后图像的尺寸,遍历旋转后图像的坐标点,并通过逆矩阵计算逐点映射到输入图像的坐标点,然后将原始图像的像素值赋值给旋转后图像。
- 图像旋转的三视图
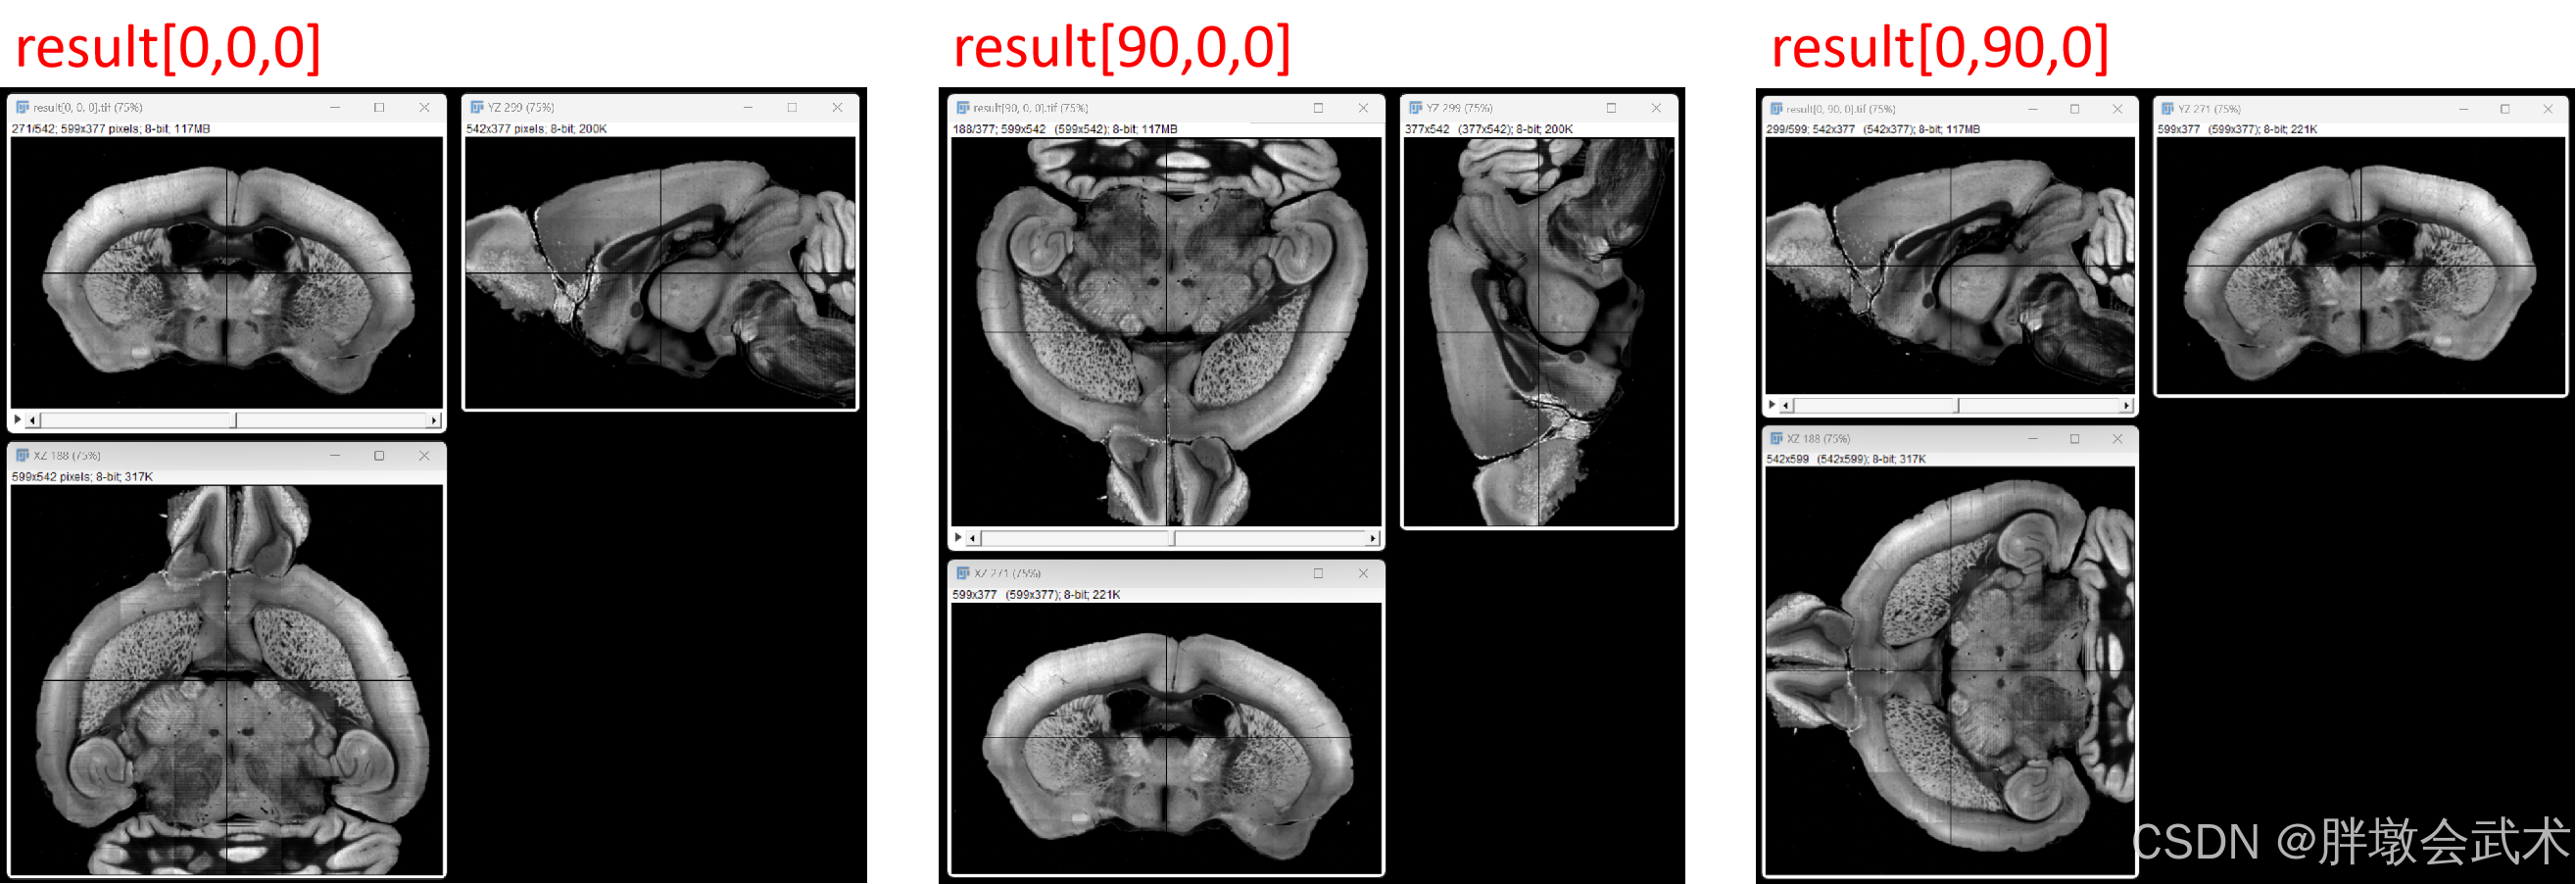
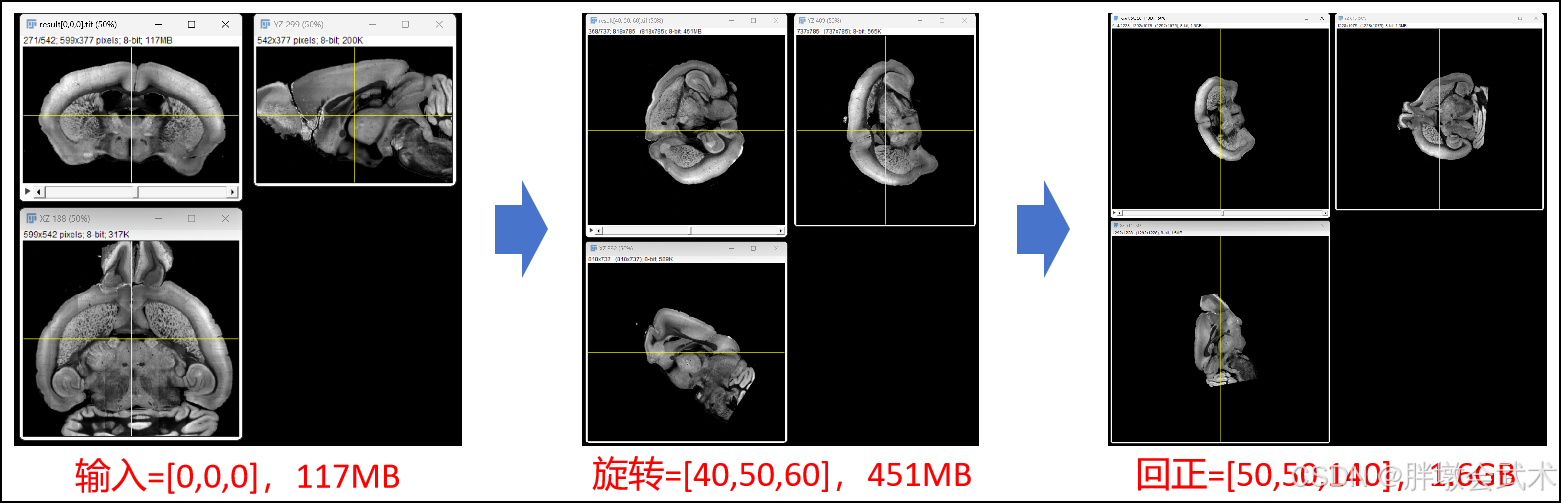
- 图像旋转的内存

from scipy.spatial.transform import Rotation
from numba import njit, prange
import numpy as np
import tifffile


@njit(parallel=True)
def fill_rotated_image(rotated_image, invert_matrix, min_coords, rotated_shape, image):
    for z in prange(rotated_shape[0]):
        for y in range(rotated_shape[1]):
            for x in range(rotated_shape[2]):
                # 使用np.dot实现矩阵乘法
                # B = np.array([z+min_coords[0], y+min_coords[1], x+min_coords[2]], dtype=np.float64)
                # transformed_coords = np.dot(B, invert_matrix)

                # (加速)手动计算矩阵乘法
                transformed_coords = (invert_matrix[0, 0] * (z + min_coords[0]) + invert_matrix[1, 0] * (y + min_coords[1]) + invert_matrix[2, 0] * (x + min_coords[2]),
                                      invert_matrix[0, 1] * (z + min_coords[0]) + invert_matrix[1, 1] * (y + min_coords[1]) + invert_matrix[2, 1] * (x + min_coords[2]),
                                      invert_matrix[0, 2] * (z + min_coords[0]) + invert_matrix[1, 2] * (y + min_coords[1]) + invert_matrix[2, 2] * (x + min_coords[2]))

                zi = int(transformed_coords[0])
                yi = int(transformed_coords[1])
                xi = int(transformed_coords[2])

                if 0 <= xi < image.shape[2] and 0 <= yi < image.shape[1] and 0 <= zi < image.shape[0]:
                    rotated_image[z, y, x] = image[zi, yi, xi]

    return rotated_image


def rotated_image3d(image, rotate_order='zyx', euler_angles_degrees=[360, 360, 360]):
    """将欧拉角转换为旋转矩阵,并通过矩阵计算完成3D图像旋转(Numba加速版本) A*B=C => B=A的逆矩阵*C
        :param image: 输入3D图像,形状为 (depth, height, width)。
        :param rotate_order: 旋转顺序,包括:'xyz'、'zyx'、'xzy'、'yzx'、'zxy'、'yxz'。
        :param euler_angles_degrees: 以度为单位的旋转角度,与旋转顺序一致。
        :return: 旋转后的3D图像
    """
    # euler_angles_degrees = [90, 0, 0]
    # euler_angles_radians = np.deg2rad(euler_angles_degrees)
    print("旋转角度ZYX(度):", euler_angles_degrees)
    # print("旋转角度(弧度)ZYX:", euler_angles_radians)  # 弧度 = 角度 × 180 / π

    # 计算旋转矩阵
    rotation = Rotation.from_euler(rotate_order, euler_angles_degrees, degrees=True)
    """################################################################################################################
    # (1)若为单轴旋转:旋转角度[0,0,x],则[0,0,-x]或[0,0,360-x]回正,其余保持不变。
    # (2)若为双轴或三轴旋转,如何回正? ———— ZYX旋转,XYZ回正(欧拉角的旋转角度+旋转顺序需对应)
    # 举例说明:
    #       rotation = Rotation.from_euler('zyx', euler_angles_degrees=[20, 30, 40], degrees=True)  # 绕zyx顺序(旋转)
    #       在上述旋转图像的基础上image[20,30,10],如何回正得到image[0,0,0]? ———— [180,180,180]无法回正
    #       rotation = Rotation.from_euler('xyz', euler_angles_degrees=[-40, -30, -20], degrees=True)  # 方法一:绕xyz顺序(回正)
    #       rotation = Rotation.from_euler('xyz', euler_angles_degrees=[320, 330, 340], degrees=True)  # 方法二:绕xyz顺序(回正)
    ################################################################################################################"""
    matrix = rotation.as_matrix()  # 将旋转对象转换为旋转矩阵表示
    invert_matrix = np.linalg.inv(matrix)  # 计算旋转矩阵的逆矩阵,用于将坐标变换回原来的位置
    print(f"旋转矩阵: {matrix}, \n逆矩阵: {invert_matrix}")

    # 定义3D图像的八个顶点坐标: (8,z,y,x)
    coord = np.array([[0, 0, 0],
                      [0, 0, image.shape[2]],
                      [0, image.shape[1], 0],
                      [0, image.shape[1], image.shape[2]],
                      [image.shape[0], 0, 0],
                      [image.shape[0], 0, image.shape[2]],
                      [image.shape[0], image.shape[1], 0],
                      [image.shape[0], image.shape[1], image.shape[2]]])

    # 将坐标矩阵与旋转矩阵相乘,计算每个顶点经过旋转后的坐标
    coord_rotate = np.dot(coord, matrix)
    min_coords = np.min(coord_rotate, axis=0)
    max_coords = np.max(coord_rotate, axis=0)
    print(f"min_coords: {min_coords}, max_coords: {max_coords}")

    rotated_shape = np.round(max_coords - min_coords).astype(int)
    print(f"输入形状ZYX: {image.shape}, 旋转形状ZYX: {rotated_shape}")
    rotated_image = np.zeros(rotated_shape, dtype=image.dtype)  # 创建一个空数组,用于存储旋转后的图像
    rotated_image = fill_rotated_image(rotated_image, invert_matrix, min_coords, rotated_shape, image)  # 3D图像旋转

    return rotated_image


"""
函数功能:沿着指定的欧拉角,计算旋转矩阵,并完成图像旋转。
	备注:欧拉角和旋转矩阵均具有万向锁问题
"""
if __name__ == '__main__':
    # (1)读取图像
    # image = tifffile.imread(r"F:/py/result[0, 0, 0].tif")
    image = tifffile.imread(r"F:/py/result[50, 90, 120].tif")
    ##################################################################
    # (2)旋转图像
    import time
    start_time = time.time()
    euler_angles_degrees = [-120, -90, -50]
    rotated_image = rotated_image3d(image, rotate_order='xyz', euler_angles_degrees=euler_angles_degrees)
    print(f"运行时间:{time.time() - start_time}")
    ##################################################################
    # (3)保存图像
    result_file_path = f"F:/py/result{euler_angles_degrees}.tif"
    tifffile.imwrite(result_file_path, rotated_image)
    ##################################################################
    # (4)可视化图像
    import napari
    viewer = napari.Viewer()
    viewer.add_image(image, name='image')
    viewer.add_image(rotated_image, name='rotated_image')
    viewer.grid.enabled = not viewer.grid.enabled  # 切换到网格模式
    napari.run()
4.2、【欧拉角 + 坐标映射】三维旋转(X) —— 遍历旋转B坐标 = 图像A坐标 —— 时耗3.92s
(1)在立体空间中,旋转后图像具有尺度不变性;
(2)在像素空间中,旋转后图像对应的坐标值为浮点数(不包括旋转角度=90°/180°/360°);
- 方法一:【欧拉角 + 坐标映射】通过rotation.apply获得旋转后图像的尺寸和旋转坐标,遍历旋转坐标,然后将原始图像的像素值逐点映射并赋值给旋转后图像
- 问题1:由于坐标必须是整数值,但映射后的坐标为浮点值,且不管是什么取整方法(向上、向下、四舍五入等),都会出现旋转后图像的部分坐标无法获取,导致黑点现象。—— 即:旋转后图像的部分像素没有赋值,保留初始化为0。
- 问题2:旋转图像的尺寸不正确,比预期要小得多。
- 方法二:【欧拉角 + 旋转矩阵】通过矩阵计算获得旋转后图像的尺寸,遍历旋转后图像的坐标点,并通过逆矩阵计算逐点映射到输入图像的坐标点,然后将原始图像的像素值赋值给旋转后图像。
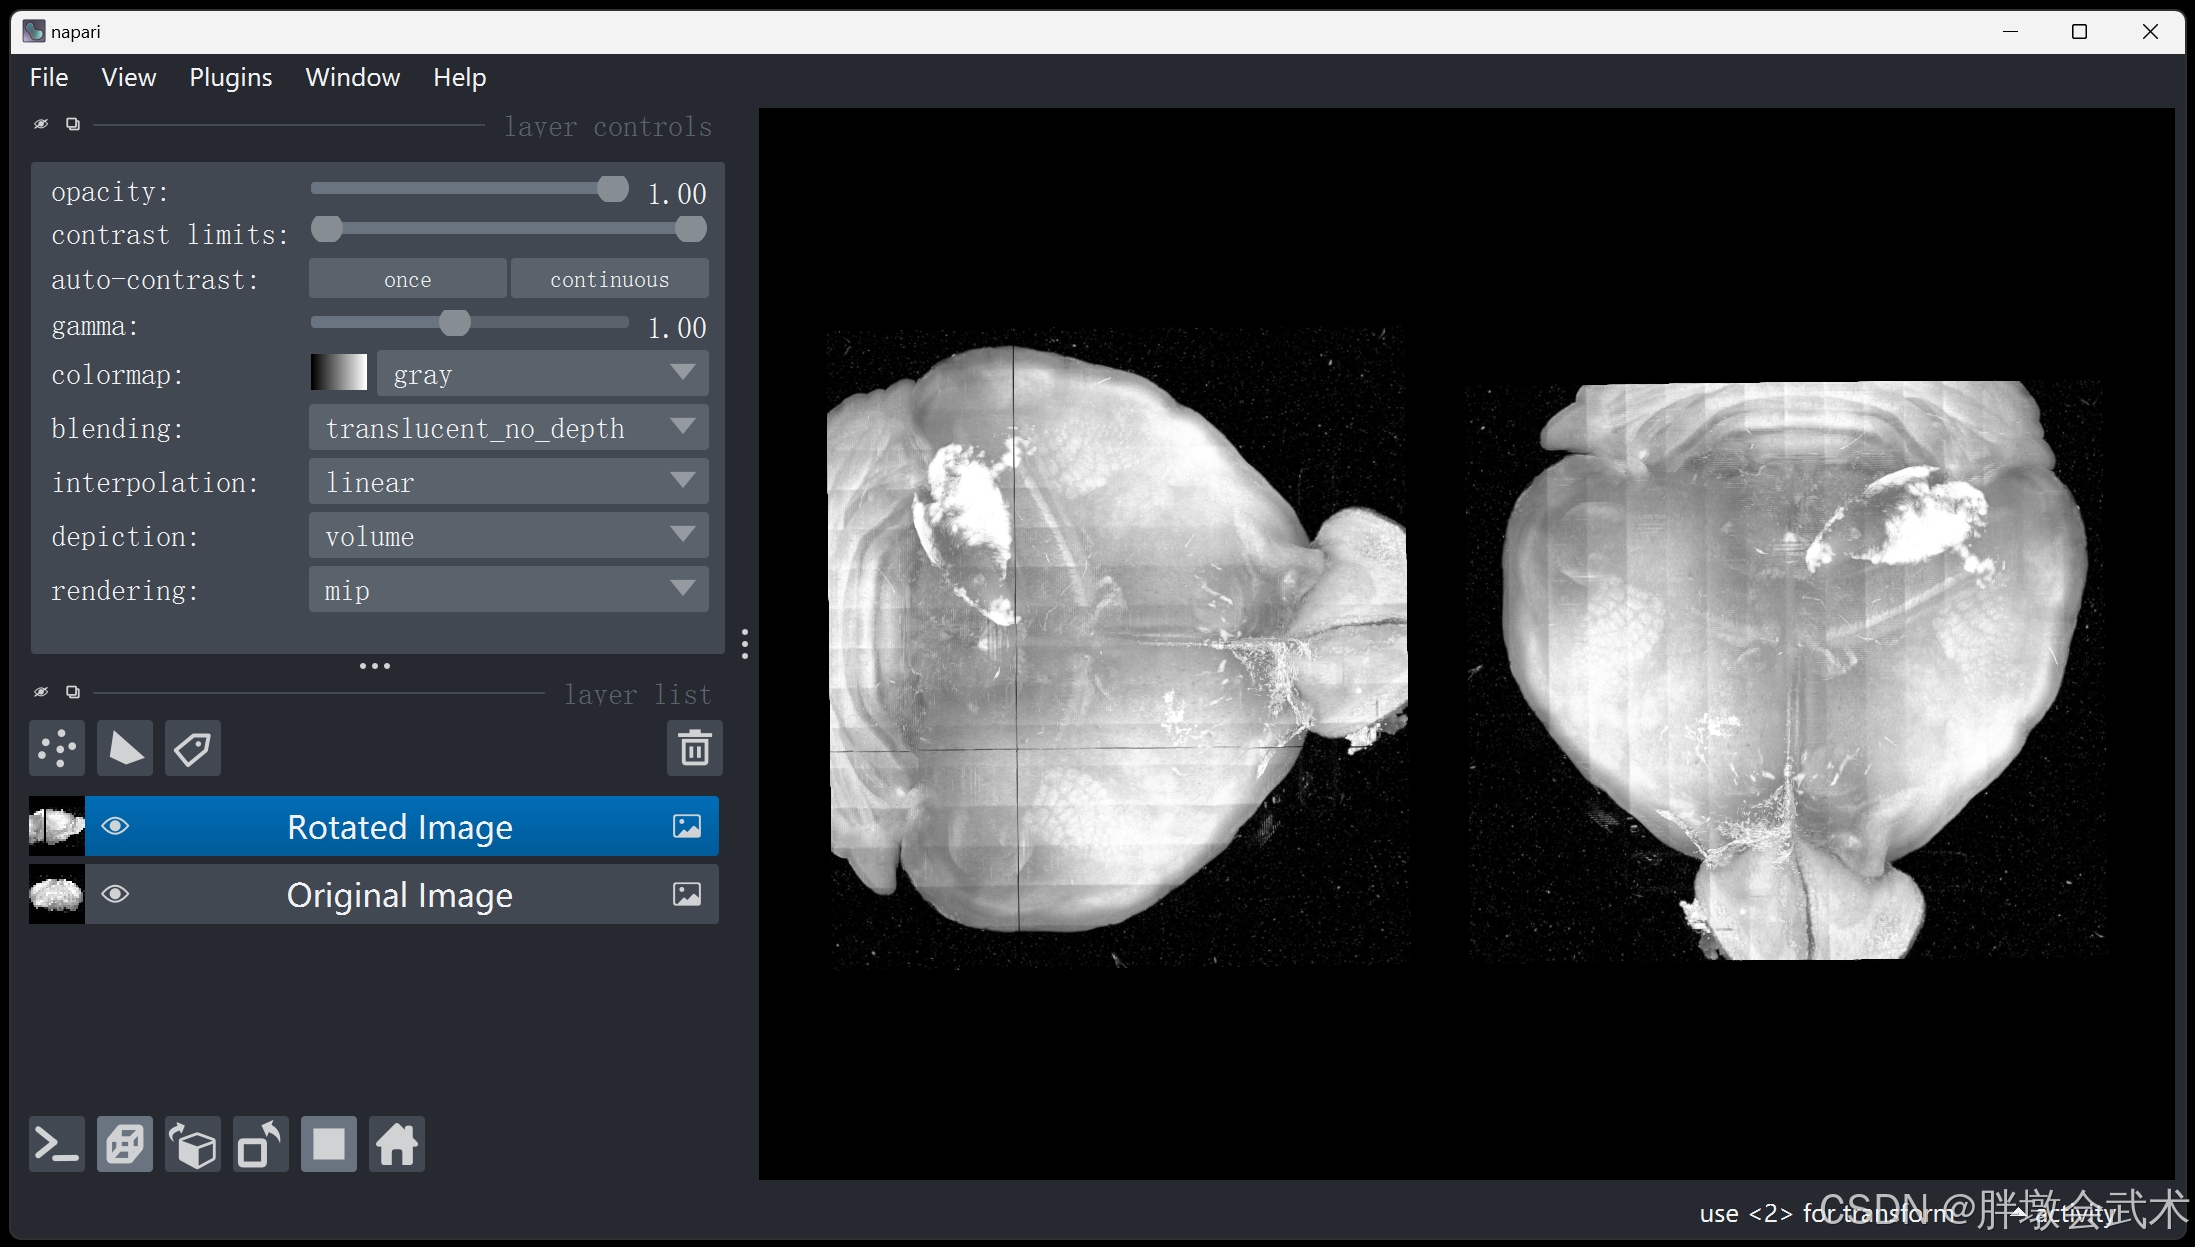
(左)旋转后;(右)旋转前 —— 少量坐标丢失,且为0
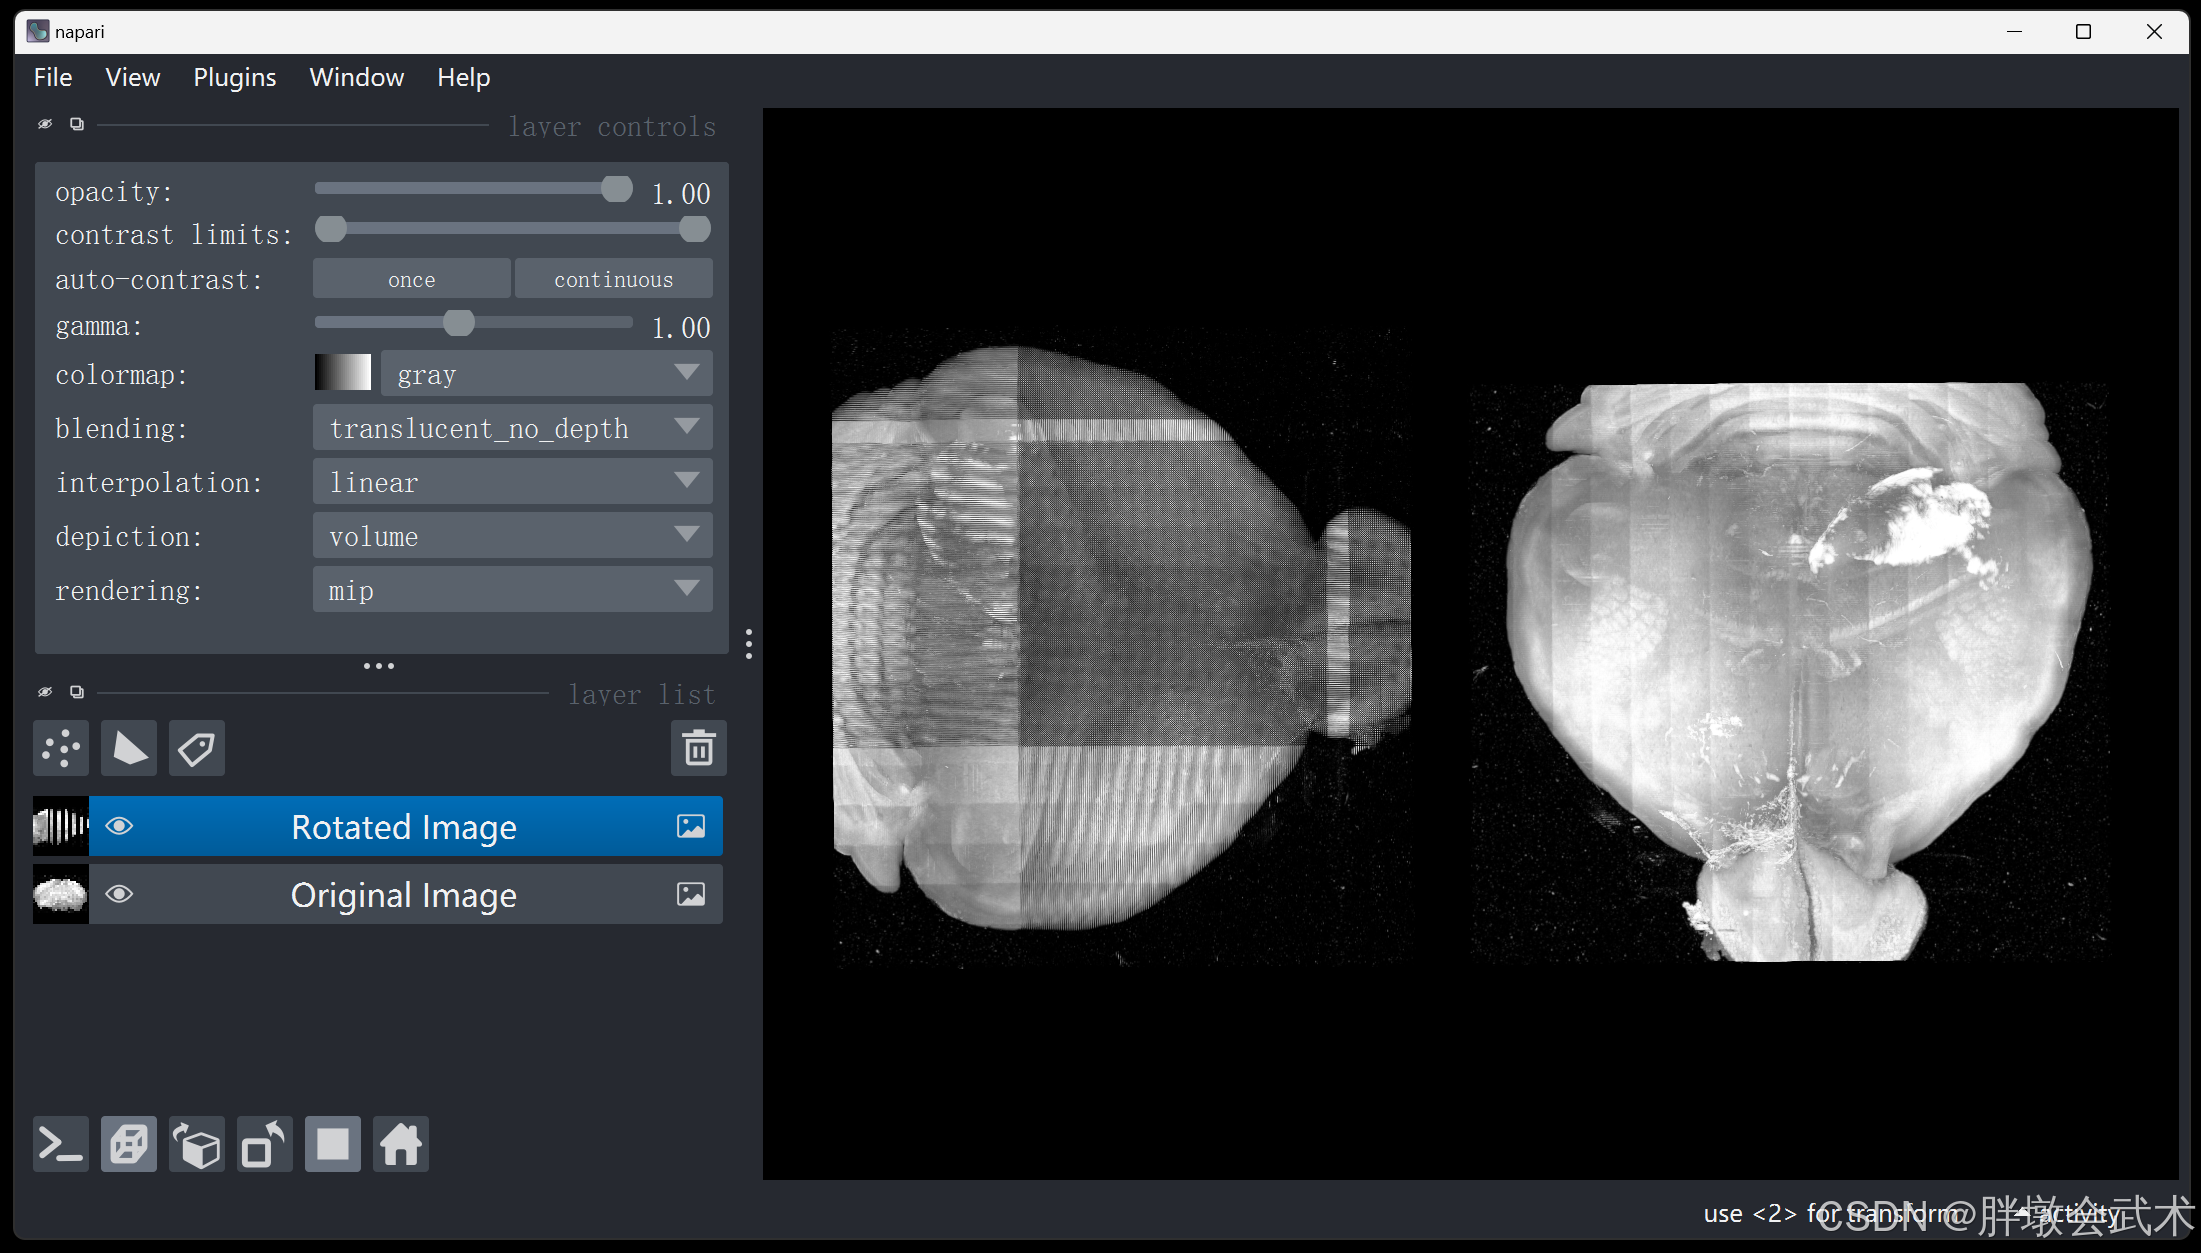
(左)旋转后;(右)旋转前 —— 部分坐标丢失,且为0
(左)旋转后;(右)旋转前 —— 部分帧丢失(形状不完整)
import numpy as np
from scipy.spatial.transform import Rotation
import tifffile
from numba import njit


@njit
def fill_rotated_image(rotated_image, rotated_coords, min_coords, rotated_shape, coords, image):
    for i in range(rotated_coords.shape[1]):
        z, y, x = rotated_coords[:, i]

        # 存在 "部分坐标丢失" 现象
        # xi = int(round(x - min_coords[0]))
        # yi = int(round(y - min_coords[1]))
        # zi = int(round(z - min_coords[2]))

        # 存在 "少量坐标丢失" 现象
        xi = int(np.floor(x - min_coords[0] + 0.5))
        yi = int(np.floor(y - min_coords[1] + 0.5))
        zi = int(np.floor(z - min_coords[2] + 0.5))

        if 0 <= zi < rotated_shape[0] and 0 <= yi < rotated_shape[1] and 0 <= xi < rotated_shape[2]:
            rotated_image[zi, yi, xi] = image[coords[0, i], coords[1, i], coords[2, i]]

        # if i % 1000 == 0:  # 只打印每1000步的进度
        #     print(f"{i}/{rotated_coords.shape[1]}")

    return rotated_image


def rotate_image(image, euler_angles_degrees):
    # euler_angles_degrees = rotation.as_euler('xyz', degrees=True)
    # print("旋转角度(度):", euler_angles_degrees)
    rotation = Rotation.from_euler('zyx', euler_angles_degrees, degrees=True)  # 'zyx' 表示ZYX顺序旋转

    shape = np.array(image.shape)
    coords = np.indices(shape).reshape(3, -1)
    center = (shape - 1) / 2.0
    coords_centered = coords - center[:, np.newaxis]  # 坐标中心变换
    #############################################################################
    rotated_coords = rotation.apply(coords_centered.T).T + center[:, np.newaxis]
    #############################################################################
    min_coords = np.floor(np.min(rotated_coords, axis=1)).astype(int)
    max_coords = np.ceil(np.max(rotated_coords, axis=1)).astype(int)
    print(f"min_coords: {min_coords}, max_coords: {max_coords}")

    rotated_shape = max_coords - min_coords + 1
    print(f"输入形状ZYX: {image.shape}, 旋转形状ZYX: {rotated_shape}")

    rotated_image = np.zeros(rotated_shape, dtype=image.dtype)  # 创建一个新的空数组,用于存储旋转后的图像
    rotated_image = fill_rotated_image(rotated_image, rotated_coords, min_coords, rotated_shape, coords, image)

    return rotated_image


"""
函数功能:沿着指定的欧拉角,计算旋转坐标,并完成图像旋转。
"""
if __name__ == '__main__':
    # (1)读取图像
    image = tifffile.imread(r"F:/py/YH220.tif")

    # (2)旋转图像
    import time
    start_time = time.time()
    euler_angles_degrees = [0, 0, 90]
    rotated_image = rotate_image(image, euler_angles_degrees)
    print(f"运行时间:{time.time() - start_time}")

    # (3)可视化图像
    import napari
    viewer = napari.Viewer()
    viewer.add_image(image, name='Original Image')
    viewer.add_image(rotated_image, name='Rotated Image')
    napari.run()
4.3、【轴角表示】只支持单轴旋转(✔),多轴旋转(X) —— 时耗55.30s
- 单轴旋转:
欧拉角 = [-45, 0, 0]—— 绕X轴逆时针旋转45度
- 多轴旋转:
欧拉角 = [-45, 35.26, -15]—— 分别绕XYZ轴逆时针旋转
import numpy as np
from scipy.ndimage import rotate
import tifffile


def rotate_image(image, euler_angles_degrees):
    """对每个轴进行旋转(自动改变形状)"""
    rotated_image = np.copy(image)
    rotated_image = rotate(rotated_image, euler_angles_degrees[0], axes=(1, 2), reshape=True, mode='nearest')  # X轴旋转
    rotated_image = rotate(rotated_image, euler_angles_degrees[1], axes=(0, 2), reshape=True, mode='nearest')  # Y轴旋转
    rotated_image = rotate(rotated_image, euler_angles_degrees[2], axes=(0, 1), reshape=True, mode='nearest')  # Z轴旋转

    print(f"输入形状:{image.shape}, 旋转形状:{rotated_image.shape}")
    return rotated_image


"""
函数功能:沿着指定的欧拉角,对每个轴进行旋转。
"""
if __name__ == '__main__':
    # (1)读取图像
    image = tifffile.imread(r"F:\py\YH220.tif")

    # (2)旋转图像
    import time
    start_time = time.time()
    euler_angles_degrees = [-45, 0, 0]
    rotated_image = rotate_image(image, euler_angles_degrees)
    print(f"运行时间:{time.time() - start_time}")

    # (3)可视化图像
    import napari
    viewer = napari.Viewer()
    viewer.add_image(image, name='Original Image')
    viewer.add_image(rotated_image, name='Rotated Image')
    napari.run()
五、实战应用
输入具有旋转角度的3D图像,并回正 —— 最大支持XYZ旋转角度[0°,90°]
将具有旋转角度的3D图像沿着ZYX迭代旋转10度,然后计算回正图像(以冠状面为主)的最小ZYX角度。
import numpy as np
from numba import njit, prange
from concurrent.futures import ThreadPoolExecutor, as_completed

import cv2
from scipy.spatial import ConvexHull
from scipy.spatial.transform import Rotation

import pandas as pd
from datetime import datetime
import os
import time
import tifffile


@njit(parallel=True)
def fill_rotated_image2d(rotated_image, invert_matrix, min_coords, image):
    """在3D空间中,对图像进行逆旋转,并将原始图像的像素值映射到旋转后的图像。
    参数:
        image:          ndarray 原始的3D图像,形状为 (depth, height, width)。
        invert_matrix:  ndarray 3x3的逆旋转矩阵,用于将旋转后的图像坐标转换回原始图像坐标。
        min_coords:     tuple of ints 原始图像的最小坐标 (min_z, min_y, min_x),用于平移旋转后的坐标对齐。
        rotated_image:  ndarray 旋转后的3D图像,形状为 (depth, height, width),此数组将被填充为最终的旋转图像。
    返回:
        rotated_image_x: ndarray 旋转图像的 xy 投影(冠状面)
        rotated_image_y: ndarray 旋转图像的 zx 投影(轴状面)
        rotated_image_z: ndarray 旋转图像的 zy 投影(矢状面)
    """
    # image.shape(ZYX)=[542, 377, 599]
    rotated_image_z = rotated_image[1, :, :]  # 冠状面X(xy绕Z轴) = [377, 599] = [y, x]
    rotated_image_y = rotated_image[:, 1, :]  # 轴状面Y(zx绕Y轴) = [542, 599] = [z, x]
    rotated_image_x = rotated_image[:, :, 1]  # 矢状面Z(zy绕X轴) = [542, 377] = [z, y]

    reference_frame_z = int(rotated_image.shape[0] / 2)
    reference_frame_y = int(rotated_image.shape[1] / 2)
    reference_frame_x = int(rotated_image.shape[2] / 2)

    for z in prange(rotated_image.shape[0]):
        for y in prange(rotated_image.shape[1]):
            for x in prange(rotated_image.shape[2]):
                # (加速)手动计算矩阵乘法: A[1,3] x B[3x3] = C[1x3]
                transformed_coords = (
                    invert_matrix[0, 0] * (z + min_coords[0]) + invert_matrix[1, 0] * (y + min_coords[1]) + invert_matrix[2, 0] * (x + min_coords[2]),
                    invert_matrix[0, 1] * (z + min_coords[0]) + invert_matrix[1, 1] * (y + min_coords[1]) + invert_matrix[2, 1] * (x + min_coords[2]),
                    invert_matrix[0, 2] * (z + min_coords[0]) + invert_matrix[1, 2] * (y + min_coords[1]) + invert_matrix[2, 2] * (x + min_coords[2])
                )
                # 变换后的坐标点逐点映射到输入坐标点
                zi, yi, xi = map(int, transformed_coords)
                # 检查索引是否在原始图像的范围内
                if 0 <= xi < image.shape[2] and 0 <= yi < image.shape[1] and 0 <= zi < image.shape[0]:
                    if z == reference_frame_z:
                        rotated_image_z[y, x] = image[zi, yi, xi]
                    if y == reference_frame_y:
                        rotated_image_y[z, x] = image[zi, yi, xi]
                    if x == reference_frame_x:
                        rotated_image_x[z, y] = image[zi, yi, xi]
    # print(f"矢状面zy: {rotated_image_x.shape}, 轴状面zx: {rotated_image_y.shape}, 冠状面xy: {rotated_image_z.shape}")
    return rotated_image_x, rotated_image_y, rotated_image_z  # 矢状面、轴状面、冠状面


def rotate_image2d(image, rotate_order='zyx', euler_angles_degrees=[0,0,0]):
    """根据指定的旋转顺序,应用欧拉角对3D图像进行2D投影旋转。
    参数:
        image:                  ndarray 3D图像数据,形状为 (depth, height, width)。
        rotate_order:           str, 指定旋转的顺序。
        euler_angles_degrees:   list of floats, 欧拉角旋转的角度值列表(单位为度),依次对应于 z 轴、y 轴和 x 轴的旋转角度。
    """
    # euler_angles_degrees = [0, 0, 15]  # 欧拉角
    # euler_angles_radians = np.deg2rad(euler_angles_degrees)  # 弧度 = 角度 × 180 / π
    # print("旋转角度(度)ZYX:", euler_angles_degrees)
    # print("旋转角度(弧度)ZYX:", euler_angles_radians)

    rotation = Rotation.from_euler(rotate_order, euler_angles_degrees, degrees=True)
    matrix = rotation.as_matrix()  # 将旋转对象转换为旋转矩阵
    invert_matrix = np.linalg.inv(matrix)
    # print(f"旋转矩阵: {matrix}, 逆矩阵: {invert_matrix}")

    coord = np.array([[0, 0, 0],
                      [0, 0, image.shape[2]],
                      [0, image.shape[1], 0],
                      [0, image.shape[1], image.shape[2]],
                      [image.shape[0], 0, 0],
                      [image.shape[0], 0, image.shape[2]],
                      [image.shape[0], image.shape[1], 0],
                      [image.shape[0], image.shape[1], image.shape[2]]])
    coord_rotate = np.dot(coord, matrix)
    min_coords = np.min(coord_rotate, axis=0)
    max_coords = np.max(coord_rotate, axis=0)
    # print(f"min_coords: {min_coords}, max_coords: {max_coords}")

    rotated_shape = np.round(max_coords - min_coords).astype(int)
    # print(f"输入形状ZYX: {image.shape}, 旋转形状ZYX: {rotated_shape}")
    rotated_image = np.zeros(rotated_shape, dtype=image.dtype)  # 创建一个新的空数组,用于存储旋转后的图像
    #################################################################
    # 三视图旋转(矢状面zy绕X轴、轴状面zx绕Y轴、冠状面xy绕Z轴)
    # start_time = time.time()  # 记录开始时间
    rotated_image_x, rotated_image_y, rotated_image_z = fill_rotated_image2d(rotated_image, invert_matrix, min_coords, image)
    # print(f"三视图旋转: {time.time() - start_time:.4f} 秒")  # 打印运行时间

    return rotated_image_x, rotated_image_y, rotated_image_z


#######################################################################################################################
def extract_points(gray_image):
    """提取图像中前景的坐标点:高斯滤波 + 阈值分割 + 轮廓检测(前提:前背景可分)"""
    # (1)数据类型转换(8bit)
    scale = 256.0 / (np.max(gray_image) - np.min(gray_image) + 1)  # 归一化
    image_8bit = np.clip(gray_image * scale + 0.5, 0, 255).astype(np.uint8)  # 截断函数 + 数据类型转换

    # (2)高斯模糊: 减少噪声 + 平滑效果
    blurred_image = cv2.GaussianBlur(image_8bit, (5, 5), 0)

    # (3)阈值分割
    # threshold_value, threshold_image = cv2.threshold(blurred_image, 50, 255, cv2.THRESH_BINARY)  # 二值分割
    threshold_value, thresholded_image = cv2.threshold(blurred_image, 0, np.max(gray_image), cv2.THRESH_BINARY + cv2.THRESH_OTSU)  # 大津阈值分割
    # 大津阈值: 适合前景与背景区别明显的图像,对于多类或背景复杂的图像效果可能不佳。
    # import skimage
    # threshold_otsu = skimage.filters.threshold_otsu(blurred_image)
    # binary_image = blurred_image > threshold  # 二值化图像
    # print(f"threshold_opencv={threshold_value}, threshold_skimage={threshold_otsu}")
    #######################################################################################################
    """cv2.findContours(): 只支持 8 位单通道的二值图像(类型为 CV_8UC1),不支持 16 位单通道的二值图像(CV_16UC1)。"""
    #######################################################################################################
    # (4)轮廓检测和提取
    contours, _ = cv2.findContours(thresholded_image, cv2.RETR_EXTERNAL, cv2.CHAIN_APPROX_SIMPLE)  # 找到前景轮廓
    points = []  # 存储满足条件的点
    for contour in contours:  # 遍历所有轮廓点
        if cv2.contourArea(contour) > gray_image.shape[0] / 2:  # 忽略小区域(可变参数)
            for point in contour:  # 遍历满足条件的轮廓点
                points.append(point[0])  # point[0] 是 (x, y) 坐标
    points = np.array(points)  # 点列表转换为 NumPy 数组

    return image_8bit, points


def draw_rectangle(gray_image, visualization=True):
    """绘制2D图像的最小矩形框(前提:前背景可分)"""
    # (1)提取点坐标
    image_8bit, points = extract_points(gray_image)
    if len(points) < 3:
        print("Not enough points to calculate convex hull")
        return

    # (2)计算凸包
    hull = ConvexHull(points)
    hull_points = points[hull.vertices]

    # (3)计算最小外接矩形
    rect = cv2.minAreaRect(hull_points.astype(np.float32))
    box = cv2.boxPoints(rect)
    box = np.intp(box)
    # angle = rect[2]  # cv2.minAreaRect 函数:返回矩形直线(具有最高y的点开始按顺时针排列 + 连接起点和重点)与水平线之间的夹角。角度范围[-90°, 0°]
    ################################################################################################
    """自定义角度计算:计算矩形的最长边和x轴的夹角,使得最终输出角度全部集成到[0°, 90°],默认[-90°, 0°]"""
    # 计算矩形四条边的长度
    edges = [np.linalg.norm(box[0] - box[1]), np.linalg.norm(box[1] - box[2]),
             np.linalg.norm(box[2] - box[3]), np.linalg.norm(box[3] - box[0])]
    longest_edge_idx = np.argmax(edges)  # 找到最长边的索引 ———— 取第一个最大长度的索引值:如: edges[1, 0.5, 1, 0.2].则索引值=0, edges[0].
    p1 = box[longest_edge_idx]  # 根据最长边的索引,找到最长边的两个端点
    p2 = box[(longest_edge_idx + 1) % 4]

    # 计算最长边与x轴的夹角
    direction_vector = np.abs(p2 - p1)  # 计算最长边的方向向量
    angle_rad = np.arctan2(direction_vector[1], direction_vector[0])  # 计算方向向量与 x 轴的夹角(单位:弧度)
    angle = np.degrees(angle_rad)  # 弧度转角度
    ################################################################################################
    # 解决特殊角度(最长边计算的角度范围0°<= angle <=90°)
    if np.isclose(angle, 90.0, atol=1e-2):
        angle = 0.0  # 90°置为0(处理负角度值)
    ################################################################################################
    # 如果是灰度图像,转换为 BGR 图像
    rectangle_image = cv2.cvtColor(image_8bit, cv2.COLOR_GRAY2BGR) if len(image_8bit.shape) == 2 else image_8bit.copy()

    if visualization:
        # 绘制边缘点(B图)
        for point in points:
            cv2.circle(rectangle_image, tuple(point.astype(int)), 3, (255, 0, 0), -1)
        # 绘制凸包(G图)
        for i in range(len(hull_points)):
            start_point = tuple(hull_points[i].astype(int))
            end_point = tuple(hull_points[(i + 1) % len(hull_points)].astype(int))
            cv2.line(rectangle_image, start_point, end_point, (0, 255, 0), 2)
        # 绘制最小外接矩形(R图)
        for i in range(4):
            cv2.line(rectangle_image, tuple(box[i]), tuple(box[(i + 1) % 4]), (0, 0, 255), 2)
        # 显示图像
        # cv2.imshow('Convex Hull and Minimum Bounding Rectangle', rectangle_image)
        # cv2.waitKey(0)
        # cv2.destroyAllWindows()
    ################################################################################################
    # (4)提取矩形框内的内容
    x_min = int(min(box[:, 0]))  # 计算矩形的边界
    x_max = int(max(box[:, 0]))
    y_min = int(min(box[:, 1]))
    y_max = int(max(box[:, 1]))
    cropped_image = image_8bit[y_min:y_max, x_min:x_max].copy()

    return rectangle_image, image_8bit, cropped_image, angle


#######################################################################################################################
def process_angle(image, rotate_order, euler_angles_degrees, visualization=False):
    """(进程)角度集成"""

    """(1)图像旋转,得到2D三视图"""
    z_angle, y_angle, x_angle = euler_angles_degrees[0], euler_angles_degrees[1], euler_angles_degrees[2]
    # start_time = time.time()  # 记录开始时间
    rotated_image_z, rotated_image_y, rotated_image_x = rotate_image2d(image, rotate_order, euler_angles_degrees)  # 图像旋转
    # print(f"旋转算法总时耗: {time.time() - start_time:.4f} 秒")  # 打印运行时间
    """(2)绘制最小矩形框"""
    rotated_image_z = cv2.rotate(rotated_image_z, cv2.ROTATE_90_COUNTERCLOCKWISE)  # 逆时针90°旋转
    rotated_image_z = cv2.flip(rotated_image_z, 0)  # 上下翻转

    rectangle_image_z, image_z_8bit, cropped_image_z, angle_z = draw_rectangle(rotated_image_z, visualization=visualization)
    rectangle_image_y, image_y_8bit, cropped_image_y, angle_y = draw_rectangle(rotated_image_y, visualization=visualization)
    rectangle_image_x, image_x_8bit, cropped_image_x, angle_x = draw_rectangle(rotated_image_x, visualization=visualization)
    #################################################################
    angle = [z_angle, y_angle, x_angle, angle_z, angle_y, angle_x]
    print(f"ZYX角度: {angle}")

    if visualization:
        import napari
        viewer = napari.Viewer()
        # viewer.add_image(image, name='image')
        viewer.add_image(rectangle_image_y, name='轴状面Y: zx绕Y轴')
        viewer.add_image(rectangle_image_z, name='矢状面Z: zy绕X轴')
        viewer.add_image(rectangle_image_x, name='冠状面X: xy绕Z轴')
        viewer.grid.enabled = not viewer.grid.enabled  # 切换到网格模式
        napari.run()

    return angle


def weight_calculation(angles, output_dir, is_save=True):
    # (1)权重计算
    angles_array = np.array(angles)  # 将列表转换为NumPy数组
    weighted_sums = np.sum(angles_array[:, 3:], axis=1)  # 计算每一行角度的加权和,由于权重为1:1:1,所以直接相加

    # (2)根据加权和最小排序
    # best_indices = np.argsort(weighted_sums)[:10]  # 获取加权和最小的前10个角度的索引
    best_indices = np.argsort(weighted_sums)  # 获取加权和最小的索引

    best_angles = angles_array[best_indices]  # 根据索引提取最优角度(加权和最小)
    best_weighted = weighted_sums[best_indices]
    ############################################################################################################
    # (3)将加权和添加到angles的第七列 ———— 按照权重从小到大排序
    results = np.hstack((best_angles, best_weighted[:, np.newaxis]))
    print(f"best_rotated_angles: {results[0]}")  # 打印最优旋转角度

    # (4)将数据保存到Excel文件时,(-0.0)自动被转换为(0) ———— 解决方法(耗时较长):第3-8列转为字符串 + 只保留一位小数
    angel_str = [[f"{item:.1f}" if isinstance(item, (int, float)) and 2 < col_idx < len(row) - 4 else item
                  for col_idx, item in enumerate(row)]
                 for row in results]

    # (5)将数据保存到EXCEl
    if is_save:
        df = pd.DataFrame(angel_str, columns=['z_angle', 'y_angle', 'x_angle',
                                              'angle_z', 'angle_y', 'angle_x',
                                              'weighted_sums'])
        end_datetime = datetime.now().strftime("%Y-%m-%d_%H_%M_%S")

        file_path = os.path.join(output_dir, f"result{end_datetime}.xlsx")
        df.to_excel(file_path, index=False)
        print(f"Data saved to result{end_datetime}.xlsx")

    return results


#######################################################################################################################
def extract_rectangle3d(image, rotate_order, euler_angles_degrees):
    """从2D图像中提取最小矩形框,并在3D图像中裁剪每一帧。
    参数:
        image:                  3D图像,形状为 (depth, height, width)
        rotate_order:           旋转顺序,用于旋转函数
        euler_angles_degrees:   欧拉角度,用于旋转图像
    返回:
        cropped_frames:         裁剪后的3D图像
    """

    """(1)图像旋转,得到2D三视图"""
    rotated_image_z, rotated_image_y, rotated_image_x = rotate_image2d(image, rotate_order, euler_angles_degrees)
    """(2)绘制2D图像的最小矩形框(前提:前背景可分)"""
    # (2.1)提取点坐标
    image_8bit, points = extract_points(rotated_image_x)
    # (2.2)计算凸包
    hull = ConvexHull(points)
    hull_points = points[hull.vertices]
    # (2.3)计算最小外接矩形
    rect = cv2.minAreaRect(hull_points.astype(np.float32))
    box = cv2.boxPoints(rect)
    box = np.intp(box)
    # (2.4)获取矩形框的左上角+右下角
    x_min = int(min(box[:, 0]))
    x_max = int(max(box[:, 0]))
    y_min = int(min(box[:, 1]))
    y_max = int(max(box[:, 1]))
    # # (2.5)确保边界在图像范围内
    # x_min, x_max = max(0, x_min), min(rotated_image_x.shape[1], x_max)
    # y_min, y_max = max(0, y_min), min(rotated_image_x.shape[0], y_max)

    # (2.5)确保边界在图像范围内,并向外扩展50个像素。左右/上下双边则为100个像素
    expand_value = 50  # 定义扩展的像素值
    x_min = max(0, x_min - expand_value)
    x_max = min(rotated_image_x.shape[1], x_max + expand_value)
    y_min = max(0, y_min - expand_value)
    y_max = min(rotated_image_x.shape[0], y_max + expand_value)
    # (2.6)裁剪3D图像的所有帧
    cropped_frames = image[:, y_min:y_max, x_min:x_max]
    cropped_frames = remove_black_frames(cropped_frames)

    return cropped_frames


def remove_black_frames(image):
    """移除首尾全为零的黑帧,但跳过中间的黑帧"""
    start = 0
    end = image.shape[0] - 1

    # 从首部开始检查全零帧
    while start <= end and np.all(image[start] == 0):
        start += 1

    # 从尾部开始检查全零帧
    while end >= start and np.all(image[end] == 0):
        end -= 1

    return image[start:end+1]  # 截取有效帧


def main(image, output_dir='./result', is_save=True, is_visualization=False):
    start_datetime = datetime.now().strftime("%Y-%m-%d_%H_%M_%S")
    print(f"初始时间: {start_datetime}")
    """##############################(1)遍历角度 + 2D图像旋转"""
    start_time = time.time()
    angles = best_rotation(image)
    print(f"遍历角度 + 旋转图像: {time.time() - start_time:.4f} 秒")

    # 读取并修改EXCEL数据
    # import pandas as pd
    # excel_file_path = r"F:\py\result2024-09-25_15_05_46.xlsx"
    # df = pd.read_excel(excel_file_path, sheet_name=0)
    # angles = df.values[:, 0:9].tolist()
    """##############################(2)权重计算 + 结果保存"""
    start_time = time.time()
    results = weight_calculation(angles, output_dir)
    print(f"权重计算 + 结果保存: {time.time() - start_time:.4f} 秒")
    """##############################(3)最优角度 + 3D图像旋转"""
    # (组合旋转的方式是矩阵相乘,即先后旋转两次)
    import rotate_image

    print("*"*100)
    # euler_angles_degrees = [50, 90, 290]
    euler_angles_degrees = [int(results[0, 0]), int(results[0, 1]), int(results[0, 2])]  # 提取最优角度
    rotated_image = rotate_image.rotated_image3d(image, rotate_order='zyx', euler_angles_degrees=euler_angles_degrees)
    print("*"*100)
    """##############################(4)裁剪最小矩形3D"""
    # euler_angles_degrees2 = [0, 0, 0]
    extract_image = extract_rectangle3d(rotated_image, rotate_order='zyx',  euler_angles_degrees=euler_angles_degrees)
    """##############################(5)保存图像 + 可视化图像"""
    if is_save:
        result_file_path = os.path.join(output_dir, f"result{euler_angles_degrees}.tif")
        tifffile.imwrite(result_file_path, extract_image)

    if is_visualization:
        import napari
        viewer = napari.Viewer()
        viewer.add_image(image, name='image')
        viewer.add_image(rotated_image, name='rotated_image')
        viewer.add_image(extract_image, name='extract_image')
        viewer.grid.enabled = not viewer.grid.enabled  # 切换到网格模式
        napari.run()

    return extract_image


#######################################################################################################################
def best_rotation(image):
    """多线程加速版本(在prange基础上,约加速两倍)"""
    with ThreadPoolExecutor(max_workers=os.cpu_count()) as executor:
        angle_params = [(image, 'zyx', [z, y, x], False) for z in range(-50, 50 + 1, 10)
                                                         for y in range(-50, 50 + 1, 10)
                                                         for x in range(-50, 50 + 1, 10)]
        # results = list(executor.map(process_angle, angle_params))
        results = executor.map(lambda params: process_angle(*params), angle_params)
        angles = list(results)
    return angles


# def best_rotation(image):
#     """(调试)不加速版本"""
#     angles = []
#     for z_angle in range(-90, 90+1, 5):
#         for y_angle in range(-90, 90+1, 5):
#             for x_angle in range(-90, 90+1, 5):
#                 # euler_angles_degrees = [z_angle, y_angle, x_angle]
#                 euler_angles_degrees = [10, 0, 0]  # [240, 270, 310]、[-120, -90, -50]
#
#                 angle = process_angle(image=image,
#                                       rotate_order='zyx',
#                                       euler_angles_degrees=euler_angles_degrees,
#                                       visualization=True)
#                 angles.append(angle)
#     return angles
#######################################################################################################################


"""
函数功能:输入具有一定旋转角度的3D图像,然后计算回正图像(以冠状面为主)的最小ZYX角度。(只支持具有旋转不变形的各项同性图像)
详细步骤:
        (1)遍历角度并旋转图像 —— 用于加速,提取3D图像的中间帧,并获得2D图像的三视图。
        (2)前背景分割(图像可分是算法的使用前提) ———— 如:在切片机图像中,背景为0,皮质为10+,前景为100+(分割效果不佳)
        (3)绘制三视图的最小矩阵框,并判断与x轴的倾斜角度。
                    ———— 该步骤决定了算法最大支持的旋转角度为90°,且最佳范围为[-45°, 45°],因为其不具有判断正反和三视图位置的功能。
                    ———— 正反和三视图位置的判断,可以使用AI模型预测,但也带来了模型对数据的兼容性问题。
                    备注:输入图像的回正角度必须在此范围内。
        (4)提取加权和最小的权重值,获得最优旋转角度
        (5)最优角度的3D图像旋转(需要3D图像旋转算法支持)
        (6)后处理: 从2D图像的三视图中提取最小矩形框,并在旋转后的3D图像中裁剪每一帧,后去除首尾的黑帧。
"""
if __name__ == '__main__':
    image = tifffile.imread("result[0,0,0].tif")
    output_image = main(image, output_dir='', is_save=True, is_visualization=True)


 1021
1021

 被折叠的 条评论
为什么被折叠?
被折叠的 条评论
为什么被折叠?
 到【灌水乐园】发言


