


Addressables
The Addressables system provides tools and scripts to organize and package content for your application and an API to load and release assets at runtime.
When you make an asset "Addressable," you can use that asset's address to load it from anywhere. Whether that asset resides in the local application or on a content delivery network, the Addressable system locates and returns it.
Adopt the Addressables system to help improve your project in the following areas:
Flexibility: Addressables give you the flexibility to adjust where you host your assets. You can install assets with your application or download them on demand. You can change where you access a specific asset at any stage in your project without rewriting any game code.
Dependency management: The system automatically loads all dependencies of any assets you load, so that all meshes, shaders, animations, and other assets load before the system returns the content to you.
Memory management: The system unloads assets as well as loads them, counting references automatically and providing a robust profiler to help you spot potential memory problems.
Content packing: Because the system maps and understands complex dependency chains, it package AssetBundles efficiently, even when you move or rename assets. You can prepare assets for both local and remote deployment, to support downloadable content and reduced application size.
For an introduction to the Addressables system see Simplify your content management with Addressables.
NOTE
The Addressables system builds upon Unity AssetBundles. If you want to use AssetBundles in your projects without writing your own detailed management code, you should use Addressables.
Adding Addressables to an existing Project
You can adopt Addressables in an existing Unity Project by installing the Addressables package. To do this, you need to assign addresses to your assets and refactor any runtime loading code. See Upgrading to the Addressables system for more information.
Although you can integrate Addressables at any stage in a project’s development, Unity recommends that you start using Addressables immediately in new projects to avoid unnecessary code refactoring and content planning changes later in development.
///////////////////////////////////////////////////////////////
Upgrading to the Addressables system
This article covers how to modify your existing project to take advantage of Addressable assets.
Outside of the Addressables system, Unity provides a few "traditional" ways to reference and load assets:
Scene data: Assets you add directly to a Scene or to a component in a Scene, which the application loads automatically. Unity packages serialized scene data and the assets directly referenced by a scene into a single archive that it includes in your built player application. See Converting Scenes and Using Addressable assets in non-Addressable Scenes.
Prefabs: Assets you create using GameObjects and components, and save outside a Scene. See Converting Prefabs.
Resources folders: Assets you place in your project’s Resources folders and load using the Resources API. Unity packages assets in Resources files into a single archive that it includes in your built player application. The Resources archive is separate from the Scene data archive. See Converting Resources folders.
AssetBundles: Assets you package in AssetBundles and load with the AssetBundle API. See Converting AssetBundles.
StreamingAssets: Files you place in the StreamingAssets folder. Unity includes any files in the StreamingAssets folder in your built player application as is. See Files in StreamingAssets
Converting to Addressables
Content built using Addressables only reference other assets built in that Addressables build. Content that is used or referenced to that is included within both Addressables, and the Player build through the Scene data and Resource folders is duplicated on disk and in memory if they are both loaded. Due to this limitation the recommended best practice is to convert all Scene data and Resource folders to the Addressables build system. Reducing the memory overhead due to duplication and allowing all content to be managed using Addressables. Allowing for the content to be either local or remote as well as updatable through Content Update builds.
Converting Scenes
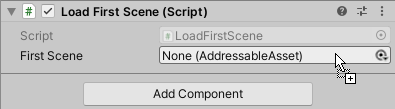
The easiest way to integrate Addressables into a project is to move your Scenes out of the Build Settings list and make those scenes Addressable. You do need to have one Scene in the list, which is the Scene Unity loads at application startup. You can make a new Scene for this that does nothing else than load your first Addressable Scene.
To convert your Scenes:
Make a new "initialization" Scene.
Open the Build Settings window (menu: File > Build Settings).
Add the initialization Scene to the Scene list.
Remove the other Scenes from the list.
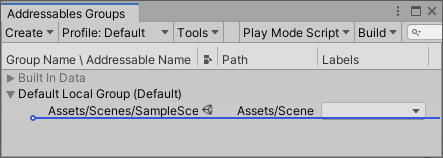
Click on each Scene in the project list and check the Addressable option in its Inspector window. Alternatively, you can drag Scene assets to a group in the Addressables Groups window. (Don't make your new initialization Scene Addressable.)
Update the code you use to load Scenes to use the Addressables class Scene loading methods rather than the SceneManager methods.
At this point, you have included all the assets you have in your Scenes in an Addressable group and the Addressables system packages them in an AssetBundle when you build your Addressables content. If you only use one group for all your Scenes, the runtime loading and memory performance should be roughly equivalent to your project’s pre-Addressables state.
You can now split your one, large Addressable Scene group into multiple groups. The best way to do that depends on the project goals. To proceed, you can move your Scenes into their own groups so that you can load and unload each of them independently of each other. As you do this, you can use the Analyze tool to check for duplicated assets that are shared between multiple Scenes. You can avoid duplicating an asset referenced from two different bundles by making the asset itself Addressable. It's often better to move shared assets to their own group as well to reduce interdependencies among your AssetBundles.
Using Addressable assets in non-Addressable Scenes
For Scenes that you don't want to make Addressable, you can still use Addressable assets as part of the Scene data through AssetReferences.
When you add an AssetReference field to a custom MonoBehaviour or ScriptableObject class, you can assign an Addressable asset to the field in the Unity Editor in much the same way that you would assign an asset as a direct reference. The main difference is that you need to add code to your class to load and release the asset assigned to the AssetReference field (whereas Unity loads direct references automatically when it instantiates your object in the Scene).
NOTE
You cannot use Addressable assets for the fields of any UnityEngine components in a non-Addressable Scene. For example, if you assign an Addressable mesh asset to a MeshFilter component in a non-Addressable Scene, Unity does not use the Addressable version of that mesh data for the Scene. Instead, Unity copies the mesh asset and includes two versions of the mesh in your application, one in the AssetBundle built for the Addressable group containing the mesh and one in the built-in Scene data of the non-Addressable Scene. (When used in an Addressable Scene, Unity does not copy the mesh data and always loads it from the AssetBundle.)
To replace direct references with AssetReferences in your custom classes, follow these steps:
Replace your direct references to objects with asset references (for example, public GameObject directRefMember; becomes public AssetReference assetRefMember;).
Drag assets onto the appropriate component’s Inspector, as you would for a direct reference.
Add runtime code to load the assigned asset using the Addressables API.
Add code to release the loaded asset when no longer needed.
See Asset References for more information about using AssetReference fields.
See Loading Addressable assets for more information about loading Addressable assets.
Converting Prefabs
To convert a Prefab into an Addressable asset, check the Addressables option in its Inspector window or drag it to a group in the Addressables Groups window.
You don't always need to make Prefabs Addressable when used in an Addressable Scene; Addressables automatically includes Prefabs that you add to the Scene hierarchy as part of the data contained in the Scene’s AssetBundle. If you use a Prefab in more than one Scene, however, you should make the Prefab into an Addressable asset so that the Prefab data isn't duplicated in each Scene that uses it. You must also make a Prefab Addressable if you want to load and instantiate it dynamically at runtime.
NOTE
If you use a Prefab in a non-Addressable Scene, Unity copies the Prefab data into the built-in Scene data whether the Prefab is Addressable or not. You can identify assets duplicated between your Addressable asset groups and your non-Addressable Scene data using the Check Scene to Addressable Duplicate Dependencies rule in the Analyze tool.
Converting Resources folders
If your project loads assets in Resources folders, you can migrate those assets to the Addressables system:
Make the assets Addressable. To do this, either enable the Addressable option in each asset's Inspector window or drag the assets to groups in the Addressables Groups window.
Change any runtime code that loads assets using the Resources API to load them with the Addressables API.
Add code to release loaded assets when no longer needed.
As with Scenes, if you keep all the former Resources assets in one group, the loading and memory performance should be equivalent. Depending on your project, you can improve performance and flexibility by dividing your assets into separate groups. Use the Analyze tool to check for unwanted duplication across AssetBundles.
When you mark an asset in a Resources folder as Addressable, the system automatically moves the asset to a new folder in your project named Resources_moved. The default address for a moved asset is the old path, omitting the folder name. For example, your loading code might change from:
Resources.LoadAsync\<GameObject\>("desert/tank.prefab"); to:
Addressables.LoadAssetAsync\<GameObject\>("desert/tank.prefab");.You might have to implement some functionality of the Resources class differently after modifying your project to use the Addressables system.
For example, consider the Resources.LoadAll function. Previously, if you had assets in a folder Resources/MyPrefabs/, and ran Resources.LoadAll<SampleType>("MyPrefabs");, it would have loaded all the assets in Resources/MyPrefabs/ matching type SampleType. The Addressables system doesn't support this exact functionality, but you can achieve similar results using Addressable labels.
Converting AssetBundles
When you first open the Addressables Groups window, Unity offers to convert all AssetBundles into Addressables groups. This is the easiest way to migrate your AssetBundle setup to the Addressables system. You must still update your runtime code to load and release assets using the Addressables API.
If you want to convert your AssetBundle setup manually, click the Ignore button. The process for manually migrating your AssetBundles to Addressables is similar to that described for Scenes and the Resources folder:
Make the assets Addressable by enabling the Addressable option on each asset’s Inspector window or by dragging the asset to a group in the Addressables Groups window. The Addressables system ignores existing AssetBundle and Label settings for an asset.
Change any runtime code that loads assets using the AssetBundle or UnityWebRequestAssetBundle APIs to load them with the Addressables API. You don't need to explicitly load AssetBundle objects themselves or the dependencies of an asset; the Addressables system handles those aspects automatically.
Add code to release loaded assets when no longer needed.
NOTE
The default path for the address of an asset is its file path. If you use the path as the asset's address, you'd load the asset in the same manner as you would load from a bundle. The Addressable Asset System handles the loading of the bundle and all its dependencies.
If you chose the automatic conversion option or manually added your assets to equivalent Addressables groups, then, depending on your group settings, you end up with the same set of bundles containing the same assets. (The bundle files themselves won't be identical.) You can check for unwanted duplication and other potential issues using the Analyze tool. You can make sure that asset loading and unloading behaves as you expect using the [Event viewer] window.
Files in StreamingAssets
You can continue to load files from the StreamingAssets folder when you use the Addressables system. However, files in this folder cannot be Addressable nor can files reference other assets in your project.
The Addressables system does place its runtime configuration files and local AssetBundles in the StreamingAssets folder during a build. (Addressables removes these files at the conclusion of the build process; you won’t see them in the Editor.)
/////////////////////////////////////////////////////////////
Getting started
Once you have installed the Addressables package in your Unity Project, you can get started.
The basic steps to using Addressables include:
Make your assets Addressable
Reference and load those assets in code using the Addressables API
Build your Addressable assets
See the Space Shooter project in the Addressables-Sample repository for an example of a project set up to use Addressable assets.
NOTE
This Getting Started topic doesn't discuss the various ways you can organize your Addressable content. For information on that topic, see Organizing Addressable Assets.
Installation
To install the Addressables package in your project, use the Unity Package Manager:
Open the Package Manager (menu: Window > Package Manager).
Set the package list to display packages from the Unity Registry.
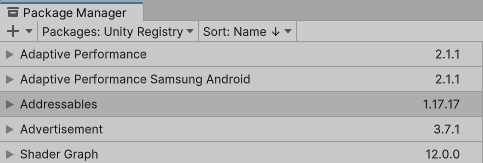
Select the Addressables package in the list.
Click Install (at the bottom, right-hand side of the Package Manager window).
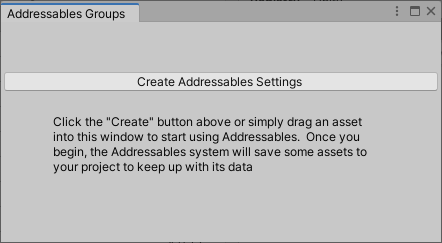
To set up the Addressables system in your Project after installation, open the Addressables Groups window and click Create Addressables Settings.

Before initializing the Addressables system in a Project
When you run the Create Addressables Settings command, the Addressables system creates a folder called, AddressableAssetsData, in which it stores settings files and other assets it uses to keep track of your Addressables setup. You should add the files in this folder to your source control system. Note that Addressables can create additional files as you change your Addressables configuration. See Addressables Settings for more information about the settings themselves.
NOTE
For instructions on installing a specific version of Addressables or for general information about managing the packages in a Project, see Packages.
Making an asset Addressable
You can mark an asset as Addressable in the following ways:
Check the Addressable box in the asset's Inspector:

Drag or assign the asset to an AssetReference field in an Inspector:
Drag the asset into a group on the Addressables Groups window:
Put the asset in a Project folder that's marked as Addressable:

Once you make an asset Addressable, the Addressables system adds it to a default group (unless you place it in a specific group). Addressables packs assets in a group into AssetBundles according to your group settings when you make a content build. You can load these assets using the Addressables API.
NOTE
If you make an asset in a Resources folder Addressable, Unity moves the asset out of the Resources folder. You can move the asset to a different folder in your Project, but you cannot store Addressable assets in a Resources folder.
Using an Addressable Asset
To load an Addressable Asset, you can:
See Loading assets for more detailed information about loading Addressable assets.
Loading Addressable assets uses asynchronous operations. See Operations for information about the different ways to tackle asynchronous programming in Unity scripts.
TIP
You can find more involved examples of how to use Addressable assets in the Addressables-Sample repo.
Using AssetReferences
To use an AssetReference, add an AssetReference field to a MonoBehaviour or ScriptableObject. After you create an object of that type, you can assign an asset to the field in your object's Inspector window.
NOTE
If you assign a non-Addressable asset to an AssetReference field, Unity automatically makes that asset Addressable and adds it to your default Addressables group. AssetReferences also let you use Addressable assets in a Scene that isn't itself Addressable.
Unity does not load or release the referenced asset automatically; you must load and release the asset using the Addressables API:
using UnityEngine;
using UnityEngine.AddressableAssets;
using UnityEngine.ResourceManagement.AsyncOperations;

internalclassLoadWithReference : MonoBehaviour
{
    // Assign in Editorpublic AssetReference reference;

    // Start the load operation on startvoidStart()
    {
        AsyncOperationHandle handle = reference.LoadAssetAsync<GameObject>();
        handle.Completed += Handle_Completed;
    }

    // Instantiate the loaded prefab on completeprivatevoidHandle_Completed(AsyncOperationHandle obj)
    {
        if (obj.Status == AsyncOperationStatus.Succeeded)
        {
            Instantiate(reference.Asset, transform);
        }
        else
        {
            Debug.LogError($"AssetReference {reference.RuntimeKey} failed to load.");
        }
    }

    // Release asset when parent object is destroyedprivatevoidOnDestroy()
    {
        reference.ReleaseAsset();
    }
}
See Loading an AssetReference for additional information about loading AssetReferences.
Loading by address
You can use the address string to load an Asset:
using UnityEngine;
using UnityEngine.AddressableAssets;
using UnityEngine.ResourceManagement.AsyncOperations;

internalclassLoadWithAddress : MonoBehaviour
{
    // Assign in Editor or in codepublicstring address;

    // Retain handle to release asset and operationprivate AsyncOperationHandle<GameObject> handle;

    // Start the load operation on startvoidStart()
    {
        handle = Addressables.LoadAssetAsync<GameObject>(address);
        handle.Completed += Handle_Completed;
    }

    // Instantiate the loaded prefab on completeprivatevoidHandle_Completed(AsyncOperationHandle<GameObject> operation)
    {
        if (operation.Status == AsyncOperationStatus.Succeeded)
        {
            Instantiate(operation.Result, transform);
        }
        else
        {
            Debug.LogError($"Asset for {address} failed to load.");
        }
    }

    // Release asset when parent object is destroyedprivatevoidOnDestroy()
    {
        Addressables.Release(handle);
    }
}
Remember that every time you load an Asset, you must also release it.
See Loading a single asset for more information.
Loading by label
You can load sets of assets that have the same label in one operation:
using System.Collections.Generic;
using UnityEngine;
using UnityEngine.AddressableAssets;
using UnityEngine.ResourceManagement.AsyncOperations;

internalclassLoadWithLabels : MonoBehaviour
{
    // Label strings to loadpublic List<string> keys = new List<string>() {"characters", "animals"};

    // Operation handle used to load and release assets
    AsyncOperationHandle<IList<GameObject>> loadHandle;

    // Load Addressables by LabelvoidStart()
    {
        float x = 0, z = 0;
        loadHandle = Addressables.LoadAssetsAsync<GameObject>(
            keys, // Either a single key or a List of keys
            addressable =>
            {
                //Gets called for every loaded assetif (addressable != null)
                {
                    Instantiate<GameObject>(addressable,
                        new Vector3(x++ * 2.0f, 0, z * 2.0f),
                        Quaternion.identity,
                        transform);
                    if (x > 9)
                    {
                        x = 0;
                        z++;
                    }
                }
            }, Addressables.MergeMode.Union, // How to combine multiple labels false); // Whether to fail if any asset fails to load
        loadHandle.Completed += LoadHandle_Completed;
    }

    privatevoidLoadHandle_Completed(AsyncOperationHandle<IList<GameObject>> operation)
    {
        if (operation.Status != AsyncOperationStatus.Succeeded)
            Debug.LogWarning("Some assets did not load.");
    }

    privatevoidOnDestroy()
    {
        // Release all the loaded assets associated with loadHandle
        Addressables.Release(loadHandle);
    }
}
See Loading multiple assets for more information.
Managing Addressable assets
To manage your Addressable assets, use the Addressables Groups window. Use this window to create Addressables groups, move assets between groups, and assign addresses and labels to assets.
When you first install and set up the Addressables package, it creates a default group for Addressable assets. The Addressables system assigns any assets you mark as Addressable to this group by default. In the early stages of a Project, you might find it acceptable to keep your assets in this single group, but as you add more content, you should consider creating additional groups so that you have better control over which resources your application loads and keeps in memory at any given time.
Key group settings include:
Build path: where to save your content after a content build.
Load path: where your app or game looks for built content at runtime.
NOTE
You can (and usually should) use Profile variables to set these paths. See Profiles for more information.
Bundle mode: how to package the content in the group into a bundle. You can choose the following options:
One bundle containing all group assets
A bundle for each entry in the group (particularly useful if you mark entire folders as Addressable and want their contents built together)
A bundle for each unique combination of labels assigned to group assets
Content update restriction: Setting this value appropriately allows you to publish smaller content updates. See Content update builds for more information. If you always publish full builds to update your app and don't download content from a remote source, you can ignore this setting.
For more information on strategies to consider when deciding how to organize your assets, see Organizing Addressable assets.
For more information on using the Addressables Groups window, see Groups.
Building Addressable assets
The Addressables content build step converts the assets in your Addressables groups into AssetBundles based on the group settings and the current platform set in the Editor.
In Unity 2021.2+, you can configure the Addressables system to build your Addressables content as part of every Player build or you can build your content separately before making a Player build. See Building Addressables content with Player builds for more information about configuring these options.
If you configure Unity to build your content as part of the Player build, use the normal Build or Build and Run buttons on the Editor Build Settings window to start a build. Unity builds your Addressables content as a pre-build step before it builds the Player.
In earlier versions of Unity, or if you configure Unity to build your content separately, you must make an Addressables build using the Build menu on the Addressables Groups window as described in [Making builds]. The next time you build the Player for your project, it uses the artifacts produced by the last Addressables content build run for the current platform. See [Build scripting] for information about automating your Addressables build process.
To initiate a content build from the Addressables Groups window:

Open the Addressables Groups window (menu: Windows > Asset Management > Addressables > Groups).
Choose an option from the Build menu:
New Build: perform a build with a specific build script. Use the Default Build Script if you don't have your own custom one.
Update a Previous Build: builds an update based on an existing build. To update a previous build, the Addressables system needs the addressables_content_state.bin file produced by the earlier build. You can find this file in the Assets/AddressableAssetsData/Platform folder of your Unity Project. See Content Updates for more information about updating content.
Clean Build: deletes cached build files.
By default, the build creates files in the locations defined in your Profile settings for the LocalBuildPath and RemoteBuildPath variables. The files that Unity uses for your player builds include AssetBundles (.bundle), catalog JSON and hash files, and settings files.
WARNING
In most cases, you should not change the local build or load paths from their default values. If you do, you must copy the local build artifacts from your custom build location to the project's StreamingAssets folder before making a Player build. Altering these paths also precludes building your Addressables as part of the Player build.
If you have groups that you build to the RemoteBuildPath, it is your responsibility to upload those AssetBundles, catalog, and hash files to your hosting server. (If your Project doesn't use remote content, set all groups to use the local build and load paths.)
A content build also creates the following files that Addressables doesn't use directly in a player build:
addressables_content_state.bin: used to make a content update build. If you support dynamic content updates, you must save this file after each content release. Otherwise, you can ignore this file.
AddressablesBuildTEP.json: logs build performance data. See Build Profiling.
See Building Addressable content for more information about how to set up and perform a content build.
Starting a full content build
To make a full content build:
Set the desired Platform Target on the Build Settings window.
Open the Addressables Groups window (menu: Asset Management > Addressables > Groups).
Choose the__ New Build > Default Build Script__ command from the Build menu of the Groups window.
The build process starts.
After the build is complete, you can perform a player build and upload any remote files from your RemoteBuildPath to your hosting server.
IMPORTANT
If you plan to publish remote content updates without rebuilding your application, you must preserve the addressables_content_state.bin file for each published build. Without this file, you can only create a full content build and player build, not an update. See Content update builds for more information.
Remote content distribution
You can use Addressables to support remote distribution of content through a Content Delivery Network (CDN) or other hosting service. Unity provides the Unity Cloud Content Delivery (CCD) service for this purpose, but you can use any CDN or host you prefer.
Before building content for remote distribution, you must:
Enable the Build Remote Catalog option in your AddressableAssetSettings (access using menu: Windows > Asset Management > Addressables > Settings).
Configure the RemoteLoadPath in the Profile you use to publish content to reflect the remote URL at which you plan to access the content.
For each Addressables group containing assets you want to deliver remotely, set the Build Path to RemoteBuildPath and the Load Path to RemoteLoadPath.
Set desired Platform Target on the Unity Build Settings window.
After you make a content build (using the Addressables Groups window) and a player build (using the Build Settings window), you must upload the files created in the folder designated by your profile's RemoteBuildPath to your hosting service. The files to upload include:
AssetBundles (name.bundle)
Catalog (catalog_timestamp.json)
Hash (catalog_timestamp.hash)
See Distributing remote content for more information.
Incremental content updates
When you distribute content remotely, you can reduce the amount of data your users need to download for an update by publishing incremental content update builds. An incremental update build allows you to publish remote bundles which contain only the assets that have changed since you last published an update rather than republishing everything. The assets in these smaller, updated bundles override the existing assets.
IMPORTANT
You must turn on the Build Remote Catalog option before you publish a player build if you want to have the option to publish incremental updates. Without a remote catalog, an installed application doesn't check for updates.
For more detailed information about content updates, including examples, see Content update builds.
Starting a content update build
To make a content update, rather than a full build:
On the Build Settings window, set the Platform Target to match the target of the previous content build that you are now updating.
Open the Addressables Groups window (menu: Asset Management > Addressables > Groups).
From the Tools menu, run the Check for Content Update Restrictions command. The Build Data File browser window opens.
Locate the addressables_content_state.bin file produced by the previous build. This file is in a subfolder of Assets/AddressableAssestsData named for the target platform.
Click Open. The Content Update Preview window searches for changes and identifies assets that must be moved to a new group for the update. If you have not changed any assets in groups set to "Cannot Change Post Release," then no changes will be listed in the preview. (When you change an asset in a group set to "Can Change Post Release," then Addressables rebuilds all the AssetBundles for the group; Addressables does not move the changed assets to a new group in this case.)
Click Apply Changes to accept any changes.
From the Build menu, run the__ Update a Previous Build__ command.
Open the addressables_content_state.bin file produced by the previous build.
The build process starts.
After the build is complete, you can upload the files from your RemoteBuildPath to your hosting server.
IMPORTANT
Addressables uses the addressables_content_state.bin file to identify which assets you changed. You must preserve a copy of this file for each published build. Without the file, you can only create a full content build, not an update.
/////////////////////////////////////////////////////////
Overview of the Addressables system
Addressables provides a system that can grow with your project. You can start with a simple setup and then reorganize as your project grows in complexity and your team grows in size, and you can do this all with minimal code changes.
For example, you could start with a single group of Addressable assets, which Unity loads as a set. Then, as you add more content, you could split your assets into multiple groups so that you can load only the ones you need at a given time. As your team grows in size, you could make separate Unity Projects for developing different types of assets. These auxiliary Projects can produce their own Addressables content builds that you load from the main Project (again with minimal code changes).
This overview discusses the following concepts to help you understand how to manage and use your assets with the Addressables system:
Asset address: a string ID that identifies an Addressable asset. You can use an address as a key to load the asset.
AssetReferences: a type you can use to support the assignment of Addressable assets to fields in an Inspector window. You can use an AssetReference instance as a key to load the asset. The AssetReference class also provides its own loading methods.
Label: a tag that you can assign to multiple assets and use to load related assets together as a group. You can use a label as a key to load the asset.
Asset location: a runtime object that describes how to load an asset and its dependencies. You can use a location object as a key to load the asset.
Key: an object that identifies one ore more Addressables. Keys include addresses, labels, AssetReference instances and location objects.
Asset loading and unloading: the Addressables API provides its own functions to load and release Assets at runtime.
Dependencies: An asset dependency is one asset used by another, such as a Prefab used in a Scene asset or a Material used in a Prefab asset.
Dependency and resource management: the Addressables system uses reference counting to track which assets and AssetBundles are in use, including whether the system should load or unload dependencies (other referenced Assets).
Group: you assign assets to groups in the Editor. The group settings determine how Addressables packages the group assets into AssetBundles and how it loads them at runtime.
Content catalogs: Addressables uses catalogs to map your assets to the resources that contain them.
Content builds: when using Addressables, you make a content build to collate and package your assets as a separate step before you make a player build.
Multiple platform support: the build system separates content built by platform and resolves the correct path at runtime.
Addressables tools: the Addressables package contains several windows and tools to organize, build, and optimize your content.
By default, Addressables uses AssetBundles to package your assets. You can also implement your own IResourceProvider class to support other ways to access assets.
Asset addresses
A key feature of the Addressables system is that you assign addresses to your assets and use those addresses to load them at runtime. The Addressables resource manager looks up the address in the content catalog to find out where the asset is stored. (Assets can be built-in to your application, cached locally, or hosted remotely.) The resource manager loads the asset and any dependencies, downloading the content first, if necessary.
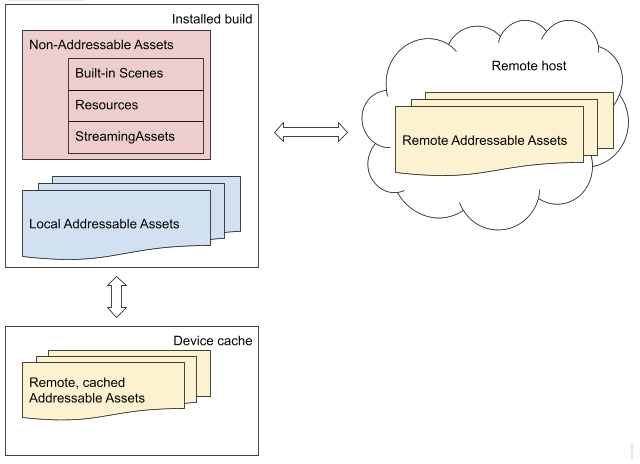
Addressables loads Assets by address no matter where they're located
Because an address isn't tied to the physical location of the Asset, you have much more flexibility when managing and optimizing your Assets, both in the Unity Editor and at runtime. Catalogs map Addresses to physical locations.
Although, you should typically assign unique addresses to your assets, an asset address is not required to be unique. You can assign the same address string to more than one asset when useful. For example, if you have variants of an asset, you could assign the same address to all the variants and use labels to distinguish between the variants:
Asset 1: address: "plate_armor_rusty", label: "hd"
Asset 2: address: "plate_armor_rusty", label: "sd"
Addressables API functions that only load a single asset, such as LoadAssetAsync, load the first instance found if you call them with an address assigned to multiple assets. Other functions, like LoadAssetsAsync, load multiple assets in one operation and load all the assets with the specified address.
TIP
You can use the MergeMode parameter of LoadAssetsAsync to load the intersection of two keys.
In the example above, you could specify the address, "plate_armor_rusty", and the label, "hd", as keys and intersection as the merge mode to load "Asset 1". You could change the label value to "sd" to load "Asset 2".
See Making an asset Addressable for how to assign addresses to assets.
See Loading assets for how to load assets by keys, including addresses.
AssetReference
An AssetReference is a type that you can set to any kind of Addressable asset. Unity does not automatically load the asset assigned to the reference, so you have more control over when to load and unload it.
Use fields of type AssetReference in your MonoBehaviours and ScriptableObjects to help you specify which Addressable asset to use for that field (instead of using the string that specifies the address). AssetReferences support drag-and-drop and object picker assignment, which can make them more convenient to use in an Editor Inspector.
In addition to the base AssetReference type, Addressables provides a few more specialized types, such as AssetReferenceGameObject and AssetReferenceTexture. You can use these specialized subclasses to eliminate the possiblity of assigning the wrong type of asset to an AssetReference field. In addition, you can use the AssetReferenceUILabelRestriction attribute to limit assignment to Assets with specific labels.
See Using AssetReferences for more information.
Loading and releasing assets
To load an Addressable asset, you can use its address or other key such as a label or AssetReference. See Loading Addressable Assets for more information. You only need to load the main asset; Addressables loads any dependent assets automatically.
When your application no longer needs access to an Addressable asset at runtime, you must release it so that Addressables can free the associated memory. The Addressables system keeps a reference count of loaded assets. It doesn't unload an asset until the reference count returns to zero. Thus, you don't need to keep track of whether an asset or its dependencies are still in use; you only need to make sure that anytime you explicitly load an asset, you release it when your application no longer needs that instance. See Releasing Addressable assets for more information.
Dependency and resource management
One asset in Unity can depend on another. A Scene might reference one or more Prefabs; a Prefab might use one or more Materials. The same Material can be used by more than one Prefab and those Prefabs can exist in different AssetBundles. When you load an Addressable asset, the system automatically finds and loads any dependent assets that it references. When the system unloads an asset, it also unloads its dependencies -- unless they're still being used by a different asset.
As you load and release assets, the Addressables system keeps a reference count for each item. When an asset is no longer referenced, Addressables unloads it. If the asset was in a bundle that no longer contains any assets that are in use, Addressables also unloads the bundle.
See Memory management for more information.
Addressables groups and labels
Use Addressables groups to organize your content. All Addressable Assets belong to a group. If you don't explicitly assign an asset to a group, Addressables adds it to the default group.
You can set the group settings to specify how the Addressables build system should package the assets in a group into bundles. For example, you can choose whether or not all the assets in a group should be packed together in a single AssetBundle file.
Use labels to tag content that you want to treat together in some way. For example, if you had labels defined for "red", "hat", and "feather", you could load all red hats with feathers in a single operation, whether or not they are part of the same AssetBundle. In addition, you can use labels to determine how assets in a group are packed into bundles.
Add an asset to a group and move assets between groups using the Addressables Groups window. You can also assign labels to your assets in the Groups window.
Group schemas
The schemas assigned to a group define the settings used to build the assets in a group. Different schemas can define different groups of settings. For example, one standard schema defines the settings for how to pack and compress your assets into AssetBundles (among other options). Another standard schema defines which of the categories, "Can Change Post Release" and "Cannot Change Post Release" the assets in the group belong to.
You can define your own schemas to use with custom build scripts.
See Schemas for more information about group schemas.
Content catalogs
The Addressables system produces a content catalog file that maps the addresses of your assets to their physical locations. It can also create a hash file containing the hash (a mathematical fingerprint) of the catalog. If you are hosting your Addressable assets remotely, the system uses this hash file to determine if the content catalog has changed and needs to be downloaded. See Content catalogs for more information.
The Profile selected when you perform a content build determines how the addresses in the content catalog map to resource loading paths. See Profiles for more information.
See Distributing content remotely for information about hosting content remotely.
Content builds
The Addressables system separates the building of Addressable content from the build of your player. A content build produces the content catalog, catalog hash, and the AssetBundles containing your assets.
Because asset formats are platform-specific, you must make a content build for each platform before building a player.
See Building Addressable content for more information.
Play mode scripts
When you run your game or application in the Editor Play mode, it can be inconvenient and slow to always perform a content build before pressing the Play button. At the same time, you do want to be able to run your game in a state as close to a built player as possible. For flexibility, Addressables provides three options that determine how the Addressables system locates and loads assets in Play mode:
Use the Asset database: Addressables loads Assets directly from the Asset database. This option typically provides the fastest iteration speed if you are making both code and Asset changes, but also least resembles a production build.
Simulate groups: Addressables loads Assets while simulating groups. This option is helpful if you are working on organizing and optimizing your Addressables groups themselves. It provides Addressables events without requiring a full content rebuild after every change.
Use existing build: Addressables loads content from your last content build. This option most resembles a production build and can provide fast iteration turnaround if you aren't changing Assets.
See Play mode Scripts for more information.
Support for multiple platforms
Addressables supports projects designed for multiple platforms by including the target platform name in the build path and by making sure that it copies the correct platform files to the StreamingAssets folder when you make a player build.
Addressables tools
The Addressables system provides a few tools and windows to help you manage your Addressable assets:
Addressable Groups window: The Groups window is the main interface for managing assets, group settings, and making builds..
Profiles window: helps set up paths used by your builds.
Addressables Event Viewer: monitor and profile runtime events related to your Addressable assets.
Analyze tool: the Analyze tool runs analysis rules that check whether your Addressables content conforms to the set of rules you have defined. The Addressables system provides some basic rules, such as checking for duplicate assets; you can add your own rules using the AnalyzeRule class.
Hosting tool: the Hosting tool provides a simple asset hosting service that runs from the Unity Editor to aide development and testing of your project.
Build layout report: describes the AssetBundles produced by a content build.
//////////////////////////////////////////////////////////
Configuring Addressables
The following topics provide an overview of the configuration options for setting up the Addressables system in a project and links to more detailed information:
Initialization
The Addressables system uses a set of ScriptableObject assets to store your configuration settings. The system stores these settings assets in the Assets/AddressableAssetsData folder of your Unity project. It creates this folder and default settings objects when you initialize Addressables from the Groups window. Open the Groups window (menu: Window > Asset Management > Addressables > Groups) after installing the Addressables package.
The first time you open the Groups window, click Create Addressables Settings to run the initialization command to create the settings folder and assets:
Before initializing the Addressables system in a Project
Add the AddressableAssetsData folder and its contents to your source control system.
See Getting started for a quick guide to using the Addressable system and Managing Addressables in the Editor for information on ways to organize your Addressable assets.
System settings
The AddressableAssetsSettings object contains the global, system settings for your Project. You can access these settings from the menu: Window > Asset Management > Addressables > Settings or from the Tools menu on the Groups window.
See Addressable system settings for information about each setting.
Group settings
The Addressables system uses the Groups you define to determine how to package your Addressable assets into local and remote AsssetBundles. Each group has its own settings object that you can use to control that group's options. Addressables creates a new settings object whenever you create a group.
See Groups and Group settings for more information.
Profiles
Profiles let you configure sets of build variables as appropriate for the purpose of build. For example, you could configure a profile to use for development builds of your project, one for test builds, and another for publishing release builds. You can create as many profiles as you need.
See Profiles for more information.
Asset hosting service
The Addressables system provides a asset hosting service that runs within the Unity Editor. You can use this service to test your remote content via an HTTP connection.
See Asset hosting service for more information.
Unity Preferences
The Addressables package adds its own section to the Unity Editor Preferences window. The Addressables preferences include:
Debug Build Layout
When enabled, the build system produces the Build layout report. This option is disabled by default since it increases the time need to create a build. The build report contains a detailed description of each AssetBundle produced by the build.
See Diagnostic tools for a description of this and other analysis tools.
Build Addressables on Player Build (Unity 2021.2+)
Determines whether Unity builds Addressables content as part of your Player build.
Building Addressables content together with the Player can be convenient, but does increase build time, especially on large projects, since this rebuilds the Addressables content even when you haven't modified any assets. If you don't change your Addressables content between most builds, consider disabling this option.
The options include:
Build Addressables content on Player Build: Always build Addressables content when building the Player.
Do not Build Addressables content on Player Build: Never build Addressables content when building the Player. (If you modify Addressables content, you must rebuild it manually before building the Player.)
Use global Settings (stored in preferences): Use the value specified in the Unity Editor Preferences (under Addressables). This option allows every project contributor to set the option as they choose.
The first two options override the global Preference for the current Project and affect all contributors who build the Project. Otherwise, the global Preference applies to all Unity projects.
See Building Addressables content with Player builds for more information.
Additional topics
See the following topics on more involved setup options:
/////////////////////////////////////////////
Managing Addressables in the Editor
While it's impossible to comprehensively catalog all the different ways you can organize the assets in your project, Organizing Addressable assets outlines several considerations to take into account when you plan your organizational strategy.
You should also understand How Addressables interact with your Project assets while you consider how to manage your assets.
Addressable Groups are the primary unit of organization with which you manage Addressable assets. An important consideration when using Addressables are your options for Packing groups into AssetBundles.
In addition to your group settings, you can use the following to control how Addressables work in a project:
Addressable Asset Settings: the Project-level settings
Profiles: defines collections of build path settings that you can switch between depending on the purpose of a build. (Primarily of interest if you plan to distribute content remotely.)
Labels: edit the Addressable asset labels used in your project.
Play Mode Scripts: choose how the Addressables system loads assets when you enter Play mode in the Editor.
AssetReferences provide a UI-friendly way to use Addressable assets. You can include AssetReference fields in your MonoBehaviour and ScriptableObject classes and then assign assets to them in the Editor using drag-and-drop or the object picker dialog.
The Addressables system provides the following additional tools to aid development:
Analyze tool: provides various analysis rules that you can run to verify that you have organized your assets the way you want, including a report on how Addressables will package your assets into bundles.
Event viewer: provides a profile view that shows when your assets are loaded and released. Use the Event viewer to verify that you are releasing assets and to monitor peak memory use.
Hosting Service: provides a simple asset server that you can use to host remote assets for local development.
Build layout report: provides a description of the AssetBundles produced by a build.
Build profile log: provides a log profiling the build process itself so that you can see which parts take the longest.
Organizing Addressable Assets
There’s no single best way to organize your assets; it depends on the specific requirements of each project. Aspects to consider when planning how to manage your assets in a project include:
Logical organization: keeping assets in logical categories can make it easier to understand your organization and spot items that are out of place.
Runtime performance: performance bottlenecks can occur if your bundles become very large, or alternatively if you have a very large number of bundles.
Runtime memory management: keeping assets together that you use together can help lower peak memory requirements.
Scale: some ways of organizing assets might work well in small games, but not large ones, and vice versa.
Platform characteristics: the characteristics and requirements of a platform can be a large consideration in how to organize your assets. Some examples:
Platforms that provide abundant virtual memory can handle large bundle sizes better than those with limited virtual memory.
Some platforms don't support downloading content, ruling out remote distribution of assets entirely.
Some platforms don't support AssetBundle caching, so putting assets in local bundles, when possible, is more efficient.
Distribution: whether you distribute your content remotely or not means, at the very least, that you must separate your remote content from your local content.
How often assets are updated: keep assets that you expect to update frequently separate from those that you plan to rarely update.
Version control: the more people who work on the same assets and asset groups, the greater the chance for version control conflicts to occur in a project.
Common strategies
Typical strategies include:
Concurrent usage: group assets that you load at the same time together, such as all the assets for a given level. This strategy is often the most effective in the long term and can help reduce peak memory use in a project.
Logical entity: group assets belonging to the same logical entity together. For example, UI layout assets, textures, sound effects. Or character models and animations.
Type: group assets of the same type together. For example, music files, textures.
Depending on the needs of your project, one of these strategies might make more sense than the others. For example, in a game with many levels, organizing according to concurrent usage might be the most efficient both from a project management and from a runtime memory performance standpoint. At the same time, you might use different strategies for different types of assets. For example, your UI assets for menu screens might all be grouped together in a level-based game that otherwise groups its level data separately. You might also pack a group that contains the assets for a level into bundles that contain a particular type of asset.
See Preparing Assets for AssetBundles for additional information.
Safely editing loaded Assets
You can safely edit loaded Assets in the following situations:
The Asset is loaded from an Asset Bundle.
The application is running in a Player, not in the Editor.
When you enable the Use Existing Build (requires built groups) option in Play Mode Scripts.
In these cases, the Assets exist as a copy in active memory. Changes made to these copied Assets don't affect the saved Asset Bundle on disk and any changes don't persist between sessions.
For other situations, including when you enable the Use Asset Database (fastest) or Simulate Groups (advanced) properties in the playmode settings, Unity loads the Assets directly from the Project files. This means that Unity saves any modifications to the Asset during runtime to the Project Asset file and that those changes will persist between different sessions.
If you want to make runtime changes to an Asset, Unity recommends that you create a new instance of the GameObject you want to modify and use the copy for any runtime changes. This eliminates the risk that you might accidentally modify the original Asset file. The following code example demonstrates creating a new copy of a loaded Asset:
var op = Addressables.LoadAssetAsync<GameObject>("myKey");
yieldreturn op;
if (op.Result != null)
{
    GameObject inst = UnityEngine.Object.Instantiate(op.Result);
    // can now use and safely make edits to inst, without the source Project Asset being changed.
}
If you use the above method to use a copy of an Asset, be aware of the following:
You must use either the original Asset or the AsyncOperationHandle when you release the Asset, not the current instance of the Asset.
When you instantiate an Asset that has references to other Assets in this way, Unity doesn't create new instances of the referenced Assets. The references for the newly instantiated copy target the original Project Asset.
Unity invokes MonoBehaviour methods like Start(), OnEnable(), and OnDisable() on the new instance.
//////////////////////////////////////////////////////
Addressable Asset Settings
You can access the main Addressable system option on the Addressable Asset Settings Inspector (menu: Window > Asset Management > Addressables > Settings).
The Addressables system stores the settings asset in the AddressableSettingsData folder (under your Project Assets folder). If this folder doesn't exist yet, you must initialize the Addressables system from the Groups window (menu: Window > Asset Management > Addressables > Groups).
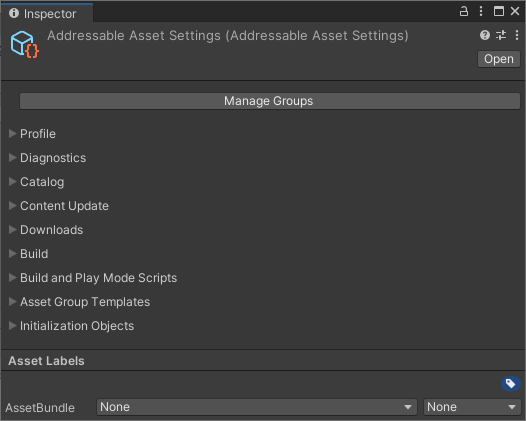
The Addressable Asset Settings Inspector
The Inspector contains the following sections:
You can click the Manage Groups button to open the Groups window.
Profile

Profile settings
Use the Profile in Use list to choose the active profile. The active profile determines the value of variables used by the Addressables build scripts.
Click the Manage Profiles button to open the Profiles window where you can create new profiles and change profile variables.
See Profiles for more information about profiles.
Diagnostics

Diagnostics settings
Property | Function |
Send Profiler Events | Enables profiler events. You must enable this setting to use the Addressables Event Viewer window. |
Log Runtime Exceptions | Logs runtime exceptions for asset loading operations (in addition to recording the error to the AsyncOperationHandle.OperationException property). |
Enable all logging
By default, Addressable Assets only logs warnings and errors. You can enable detailed logging by opening the Player settings window (menu: Edit > Project Settings... > Player), navigating to the Other Settings > Configuration section, and adding "ADDRESSABLES_LOG_ALL" to the Scripting Define Symbols field.
Catalog

Catalog settings
Settings related to the Addressables Catalog, which maps the address of an asset to its physical location.
Property | Function |
Player Version Override | Overrides the timestamp used to formulate the remote catalog name. If set, the remote catalog is named, Catalog_<Player Version Override>.json. If left blank, then the timestamp is used. Note that when you use a unique remote catalog name for every new build, you can host multiple versions of your content at the same base URL. If you use the same override string for every build, then all players will load the new catalog. Note also that player update builds always use the same remote catalog name as the build they are updating (see Content update builds). |
Compress Local Catalog | Builds the catalog in a compressed AssetBundle file. Reduces the storage size of the catalog, but increases the time to build and to load the catalog. |
Optimize Catalog Size | Reduces the size of the catalog by creating a lookup table for internal IDs. Can increase the time required to load the catalog. |
Content Update
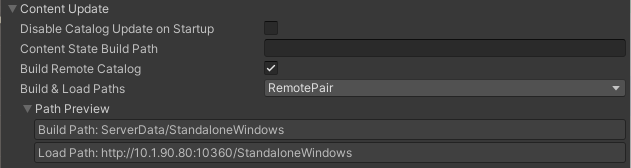
Content update settings
Settings that control remote content builds and updates.
Property | Function |
Only update catalogs manually | Disables the automatic check for an updated remote catalog when the Addressables system initializes at runtime. You can manually check for an updated catalog. |
Content State Build Path | Where to build the content state file produced by the default build script. |
Build Remote Catalog | Enable to build a remote catalog. |
Build & Load Paths | Where to build and load the remote catalog. Choose a Profile path pair from the list or select <custom> if you want to set the build and load paths separately. Only visible when you enable Build Remote Catalog. |
Build Path | Where to build the remote catalog. Typically, you should use the RemoteBuildPath Profile variable. Only shown if you set Build & Load Paths to <custom>. |
Load Path | The URL at which to access the remote catalog. Typically, you should use the RemoteLoadPath Profile variable. Only shown if you set Build & Load Paths to <custom>. |
Downloads

Download settings
Settings that affect catalog and AssetBundle download handling.
Property | Function |
Custom certificate handler | The class to use for custom certificate handling. The list contains all classes in the project that extend UnityEngine.Networking.CertificateHandler. |
Max Concurrent Web Requests | The system queues any requests beyond this limit. 2-4 concurrent downloads are recommended to reach optimum download speeds. |
Catalog Download Timeout | How many seconds to wait for a catalog file to download. |
Build
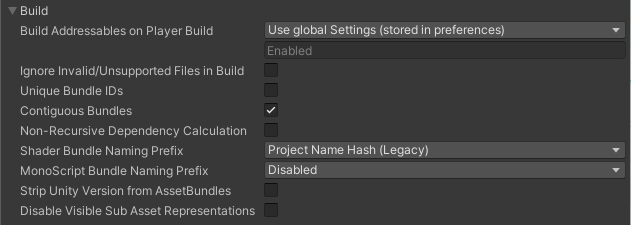
Build settings
Settings that affect all builds.
Property | Function |
Build Addressables on Player Build | Whether Unity builds Addressables content as part of your Player build. • Build Addressables content on Player Build: Always build Addressables content when building the Player. • Do not Build Addressables content on Player Build: Never build Addressables content when building the Player. (If you modify Addressables content, you must rebuild it manually before building the Player.) • Use global Settings (stored in preferences): Use the value specified in the Unity Editor Preferences (under Addressables). The first two options override the global Preference for the current Project and affect all contributors who build the Project. Otherwise, the global, Preferences value applies to all Unity projects. See Building content for more information. |
Ignore Invalid/Unsupported Files in Build | If enabled, the Addressables build script excludes invalid or unsupported files rather than aborting the build. |
Unique Bundle IDs | Whether to produce a unique name for a bundle in every build. See Unique Bundle IDs for more information. |
Contiguous Bundles | Produces a more efficient bundle layout. If you have bundles produced by Addressables 1.12.1 or earlier, disable this option to minimize bundle changes. |
Non-Recursive Dependency Calculation | Enable this option to improve build times and reduce runtime memory overhead when assets have circular dependencies. Examples: • A prefab assigned to Bundle A references a material assigned to Bundle B. If this option is disabled, Unity needs to calculate the material's dependencies twice, once for each bundle. If this option is enabled, Unity only needs to calculate the material's dependencies once, for Bundle B. • Many scenes reference the same material. If this option is disabled, Unity opens each scene to calculate shader usage, which is a costly operation. If this option is enabled, Unity only loads the material and doesn't need to open any scenes for dependency calculation. This option is enabled by default when using Unity version 2021.2 or later. Disabling this option invalidates previously built bundles because the rebuilt bundles will have a different build layout. Therefore this option should remain enabled unless builds have been shipped. Some circular dependencies can fail to load when the option is enabled because the referenced asset is always assigned to the same bundle location, even when more content is added to the build. This issue often occurs for Monoscripts. Building the MonoScript bundle (see MonoScript Bundle Naming Prefix) can help resolve these load failures. |
Shader Bundle Naming Prefix | How to name the bundle produced for Unity shaders. |
MonoScript Bundle Naming Prefix | How to name the bundle containing all MonoScripts. The bundle ensures that Unity loads all Monoscripts before any MonoBehaviors can reference them. It also decreases the number of duplicated or complex Monoscript dependencies and so, reduces runtime memory overhead. |
Strip Unity Version From AssetBundles | Whether to remove the Unity version from the bundle header. |
Disable Visible Sub Asset Representations | Enable this option to improve build times if you do not use subobjects directly (Sprites, sub-meshes, etc). |
Build and Play Mode Scripts

Configured build and Play mode scripts
Configures the IDataBuilder scripts available in the project. If you create a custom Build or Play Mode script, you must add it to this list before you can use it.
The Addressables packages contains a few build scripts that handle the default build processes and provide different ways to access your data in Play mode. You can find these scripts in the AddressableAssetData/DataBuilders folder.
NOTE
Build and Play Mode scripts are ScriptableObject assets. Follow the instructions in the ScriptableObject manual page to create a ScriptableObject asset for a Build or Play Mode script.
To add a custom script, click on the + button and select the ScriptableObject asset which represents the desired script from the file panel.
See Custom Build Scripting for more information about custom scripts.
Asset Group Templates

Configured group templates
Defines the list of templates that you can use to create new groups. When you create a new template, you must add it to this list before you can use it.
The Addressables package contains one template that includes the schemas used by the default build scripts. You can find the template in the AddressableAssetData/AssetGroupTemplates folder.
NOTE
Group templates are ScriptableObject assets. Follow the instructions in the ScriptableObject manual page to create a ScriptableObject asset for a group template.
To add a custom template, click on the + button and select the ScriptableObject asset which represents the desired template from the file panel.
See Group templates for information on creating custom templates.
Initialization object list

Configured InitializationObjects
Configures the initialization objects for the project. Initialization objects are ScriptableObject classes that implement the IObjectInitializationDataProvider interface. You can create these objects to pass data to the Addressables initialization process at runtime.
NOTE
Initialization objects are ScriptableObject assets. Follow the instructions in the ScriptableObject manual page to create a ScriptableObject asset for a initialization object.
To add an initialization object, click on the + button and select the ScriptableObject asset which represents the desired object from the file panel.
See Customizing initialization for more information.
/////////////////////////////////////////////////
Packing groups into AssetBundles
You have a few options when choosing how the assets in a group are packed into AssetBundles:
You can pack all Addressables assigned to a group together in a single bundle. This corresponds to the "Pack Together" bundle mode. For more information see Advanced Group Settings.
You can pack each Addressable assigned to a group separately in its own bundle. This corresponds to the "Pack Separately" bundle mode. For more information see Advanced Group Settings.
You can pack all Addressables sharing the same set of labels into their own bundles. This corresponds to the "Pack Together By Label" bundle mode. For more information see Advanced Group Settings.
Scene assets are always packed separately from other Addressable assets in the group. Thus a group containing a mix of Scene and non-Scene assets always produces at least two bundles when built, one for scenes and one for everything else.
Assets in folders that are marked as Addressable and compound assets like Sprite Sheets are treated specially when you choose to pack each Addressable separately:
All the assets in a folder that is marked as Addressable are packed together in the same folder (except for assets in the folder that are individually marked as Addressable themselves).
Sprites in an Addressable Sprite Atlas are included in the same bundle.
See Content Packing & Loading settings for more information.
NOTE
Keeping many assets in the same group can increase the chance of version control conflicts when many people work on the same project.
The choice whether to pack your content into a few large bundles or into many smaller bundles, can have consequences at either extreme:
Dangers of too many bundles:
Each bundle has memory overhead. This is tied to a number of factors, outlined on that page, but the short version is that this overhead can be significant. If you anticipate 100's or even 1000's of bundles loaded in memory at once, this could mean a noticeable amount of memory eaten up.
There are concurrency limits for downloading bundles. If you have 1000's of bundles you need all at once, they cannot not all be downloaded at the same time. Some number will be downloaded, and as they finish, more will trigger. In practice this is a fairly minor concern, so minor that you'll often be gated by the total size of your download, rather than how many bundles it's broken into.
Bundle information can bloat the catalog. To be able to download or load catalogs, we store string-based information about your bundles. 1000's of bundles worth of data can greatly increase the size of the catalog.
Greater likelihood of duplicated assets. Say two materials are marked as Addressable and each depend on the same texture. If they are in the same bundle, then the texture is pulled in once, and referenced by both. If they are in separate bundles, and the texture is not itself Addressable, then it will be duplicated. You then either need to mark the texture as Addressable, accept the duplication, or put the materials in the same bundle. See Asset and AssetBundle dependencies for more information.
Dangers of too few bundles:
The UnityWebRequest (which we use to download) does not resume failed downloads. So if a large bundle is downloading and your user loses connection, the download is started over once they regain connection.
Items can be loaded individually from bundles, but cannot be unloaded individually. For example, if you have 10 materials in a bundle, load all 10, then tell Addressables to release 9 of them, all 10 will likely be in memory. See Memory management for more information.
Scale implications as your project grows larger
As your project grows larger, keep an eye on the following aspects of your assets and bundles:
Total bundle size: Historically Unity has not supported files larger than 4GB. This has been fixed in some recent editor versions, but there can still be issues. It is recommended to keep the content of a given bundle under this limit for best compatibility across all platforms.
Bundle layout at scale: The memory and performance trade-offs between the number of AssetBundles produced by your content build and the size of those bundles can change as your project grows larger.
Bundle dependencies: When an Addressable asset is loaded, all of its bundle dependencies are also loaded. Be aware of any references between assets when creating Addressable groups. See Asset and AssetBundle dependencies for more information.
Sub assets affecting UI performance: There is no hard limit here, but if you have many assets, and those assets have many subassets, it may be best to turn off sub-asset display. This option only affects how the data is displayed in the Groups window, and does not affect what you can and cannot load at runtime. The option is available in the groups window under Tools > Show Sprite and Subobject Addresses. Disabling this will make the UI more responsive.
Group hierarchy display: Another UI-only option to help with scale is Group Hierarchy with Dashes. This is available within the inspector of the top level settings. With this enabled, groups that contain dashes '-' in their names will display as if the dashes represented folder hierarchy. This does not affect the actual group name, or the way things are built. For example, two groups called "x-y-z" and "x-y-w" would display as if inside a folder called "x", there was a folder called "y". Inside that folder were two groups, called "x-y-z" and "x-y-w". This will not really affect UI responsiveness, but simply makes it easier to browse a large collection of groups.
///////////////////////////////////////////////////////////
Groups
A group is the main organizational unit of the Addressables system. Create and manage your groups and the assets they contain with the Addressables Groups window.
You can control how Unity handles assets during a content build by organizing your Addressables into groups and assigning different settings to each group as required. See Organizing Addressable Assets for information about how to organize your assets.
When you initiate a content build, the build scripts create AssetBundles containing the assets in a group. The build determines the number of bundles to create and where to create them from both the settings of the group and your overall Addressables system settings. See Builds for more information.
NOTE
Addressable Groups only exist in the Unity Editor. The Addressables runtime code does not use a group concept. However, you can assign a label to the assets in a group if you want to find and load all the assets that were part of that group. See Loading Addressable assets for more information about selecting the assets to load using labels.
Managing groups
To manage your groups and Addressables assets, open the Addressables Groups window by going to Window > Asset Management > ** Addressables** > Groups. See Addressables Groups window for details about the features of this window.
Create a group
To create a group:
Open the Addressables Groups window - to Window > Asset Management > ** Addressables** and select Groups.
Select Create in the toolbar to open the Create menu.
Select Group > Packed Asset to create a new group. (If you have created your own Group Templates, they are also displayed in the menu.)
Select the new group and right-click (mac: cmd + click) to open its context menu.
Select Rename and assign the desired name.
Open the context menu again and select Inspect Group Settings.
Adjust the group settings as desired.
For groups containing assets that you plan to distribute with your main application, the default settings are a reasonable starting point. For groups containing assets that you plan to distribute remotely, you must change the build and load paths to use the remote versions of the Profile path variables. (To build AssetBundles for remote distribution, you must also enable the Build Remote Catalog option in your Addressable System Settings.)
See Group settings for more information about individual settings.
Manage assets in a group
Adding assets to a group
Use one of the following methods to add an asset to a group:
Drag the assets from the Project window into the Group window and drop them into the desired group.
Drag the assets from one group into another.
Select the asset to open it in the Inspector window and enable the Addressables option. This adds the asset to the default group. Use the group context menu to change which group is the default group.
Add the folder containing the assets to a group - all assets added to the folder are included in the group.
NOTE
If you add assets in a Resources folder to a group, the Addressables system first moves the assets to a non-Resource location. You can move the assets elsewhere, but Addressable assets can't be stored in a Resources folder in your Project.
Remove assets from a group
Select one or more assets in the Groups window and right-click (macOS: cmd + click) to open the context menu, then select Remove Addressables. You can also select the assets and press the Delete key to remove the assets from the group.
Add or remove labels
Select one or more assets in the Groups window, then select the label field for one of the selected assets.
Assigning labels
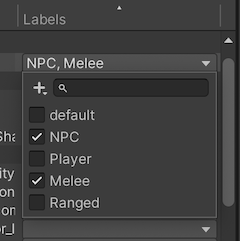
To assign labels, enable or disable the checkboxes for the desired labels.
To add, remove or rename your labels, select the Plus button, then select Manage Labels. To only add a new label, select the Plus button and then select New Label. See Labels for more information on how to use labels.
Group context menu
To open the Group context menu and access group-related commands, right-click (macOS: cmd + click) on a group name.
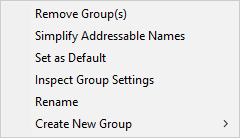
The Group content menu
Command | Action |
Remove Group(s) | Removes the Group and deletes its associated ScriptableObject asset. Unity reverts any assets in the group into non-Addressable assets. |
Simplify Addressable Names | Shortens the name of assets in the group by removing path-like components and extensions. |
Set as Default | Sets the group as the default group. When you mark an asset as Addressable without explicitly assigning a group, Unity adds the asset to the default group. |
Inspect Group Settings | Selects the group asset in the Unity Project window and in the Inspector window so that you can view the settings. |
Rename | Enables you to edit the name of the group. |
Create New Group | Creates a new group based on a group template. |
Asset context menu
To open the Addressable Asset context menu and access asset-related commands, right-click (macOS: cmd + click) on an asset.
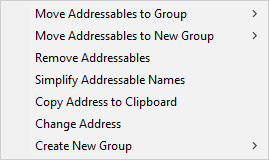
Addressable Asset context menu
Command | Action |
Move Addressables to Group | Move the selected assets to a different, existing group. |
Move Addressables to New Group | Create a new group with the same settings as the current group and move the selected assets to it. |
Remove Addressables | Remove the selected asset(s) from the Group and make the asset(s) non-Addressable. |
Simplify Addressable Names | Shortens the names of the selected assets by removing path-like components and extensions. |
Copy Address to CLipboard | Copies the asset's assigned address string to your system Clipboard. |
Change Address | Enables you to edit the asset's name. |
Create New Group | Create a new group based on a group template. This doesn't move the selected assets. |
///////////////////////////////////////////////////
Groups window
Use the Groups window to manage your groups and Addressable assets.
The Groups window also serves as a central location for starting content builds and accessing the tools and settings of the Addressables system.
A group is the main organizational unit of the Addressables system. Use this window to create and manage your groups and the assets they contain.
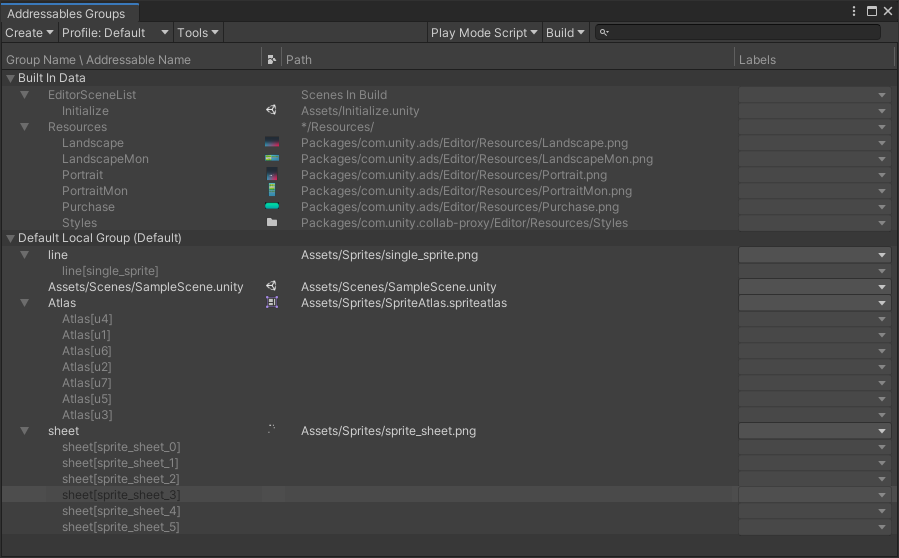
The Addressables Groups window showing the toolbar and list of groups and assets.
Group list
The Group list displays the Addressable groups in your Project. Expand a group in the list to show the assets it contains. You can also expand composite assets, such as Sprite sheets, to show the subobjects they contain.
When you first install the Addressables package, the Groups window displays two groups of assets:
Built In Data: contains assets in any Project Resource folders and any Scenes included in the Build Settings list. (None of these assets can be Addressable unless removed from Resources or the Scene list.)
Default Local Group (Default): Initially empty, any assets you make Addressable are added to this group. The group is set up so that its assets are built to your local build path and included in your Project builds. You can change the name, settings, and make another group the default group, if desired. Note that the settings of the default group are also used to create shared AssetBundles.
The list columns contain the following information:
Column | Purpose |
Notifications | Any notifications regarding a Group, or asset, that is flagged during the build. |
Group Name \ Addressable Name | The name of the item. For groups, this is an arbitrary name that you can assign. For assets, this is the Addressable address. You can edit the name or address using the context menu. |
Icon | The Unity asset icon based on asset type. |
Path | The path to the source asset in your Project. |
Labels | Shows any labels assigned to the asset. Click on a Label entry to change the assigned labels or to manage your label definitions. |
You can sort the assets shown in the Group list by clicking one of the column headers. This sorts the assets within each group, but does not reorder the groups themselves. You can change the order in which your groups are displayed by dragging them into the desired position.
Groups window toolbar
The toolbar at the top of the Addressables Group window provides access to the following commands and tools:
Create
Create a group.
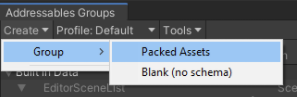
Choose a template for the group or Blank for no schema.
See Group templates for information about creating your own templates.
Profile
Set the active Profile to determine the paths used for building and loading Addressables.
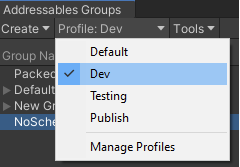
Select an existing profile or choose Manage Profiles to open the Profiles window.
See Profiles for more information.
Tools
Choose from a menu of settings windows and tools.
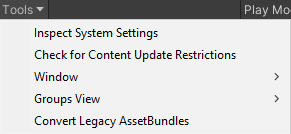
Inspect System Settings: open the Addressables Settings Inspector.
Check for Content Update Restrictions: run a pre-update content check. See Content Workflow: Update Restrictions for more information.
Window: open other Addressables system windows:
Profiles: open the Profiles window.
Labels: open the Labels window.
Analyze: open the Analyze tool
Hosting Services: open the Hosting window.
Event Viewer: open the Event Viewer window.
Groups View: set Group window display options:
Show Sprite and Subobject Addresses: whether to show Sprite and subobjects in the Group list or just the parent object.
Group Hierarchy with Dashes: when enabled, the Groups window displays groups that contain dashes '-' in their names as if the dashes represented a group hierarchy. For example, if you name two groups "x-y-z" and "x-y-w", the the window shows an entry called "x" with a child called "y", which contains two groups, called "x-y-z" and "x-y-w". Enabling this option affects the group display only.
Convert Legacy AssetBundles: Assigns non-Addressable assets to Addressable groups based on their current AssetBundle settings.
Play Mode Script
Set the active Play Mode Script.
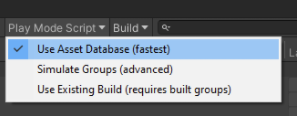
The active Play Mode Script determines how Addressables are loaded in the Editor Play mode. See Play Mode Scripts for more information.
Build Script
Select a content build command.
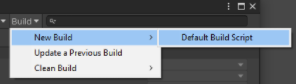
New Build: choose a build script to run a full content build.
Update a Previous Build: run a differential update based on an earlier build.
Clean Build: choose a command to clean existing build artifacts.
See Builds for more information.
Filter list
Find items in the group list matching the specified string.

An item is shown if the specified string matches any part of the text in any column in the list.
TIP
Click the magnifying glass icon to enable or disable Hierarchical Search, which shows results within their assigned group rather than as a flat list.
Play Mode Scripts
The active Play Mode Script determines how the Addressable system accesses Addressable assets when you run your game in the Editor Play mode. When you select a Play Mode Script, it remains the active script until you choose a different one. The Play Mode Script has no effect on asset loading when you build and run your application outside the Editor.
The Play Mode Scripts include:
Use Asset Database: loads assets directly from the Editor asset database (which is also used for all non-Addressable assets). You do not have to build your Addressable content when using this option.
Simulate Groups: analyzes content for layout and dependencies without creating AssetBundles. Loads assets from the asset database through the ResourceManager as if they were loaded through bundles. Simulates download speeds for remote AssetBundles and file loading speeds for local bundles by introducing a time delay. You can use the Event Viewer with this Play Mode script. See ProjectConfigData for configuration options.
Use Existing Build: loads Assets from bundles created by an earlier content build. You must run a full build using a Build Script such as Default Build Script before using this option. Remote content must be hosted at the RemoteLoadPath of the Profile used to build the content.
To find an asset
To locate an Addressable Asset in the Groups window, type all or part of its address, path, or a label into the filter control on the Groups window toolbar.

Filtering the group list by the string "NP" to find all assets labeled NPC
To locate the asset in your project, select it in the Groups window. Unity then selects the asset in the Project window and displays the asset's details in the Inspector window.
TIP
To view the groups of the assets found, enable Hierarchical Search; disable this option to only show groups if they match the search string. Click the magnifying glass icon in the search box to enable or disable Hierarchical Search.
To view subobject addresses, such as the Sprites in a Sprite Atlas, enable the Show Sprite and Subobject Addresses option using the Tools menu on the Groups window toolbar.
////////////////////////////////////////////////////
Group templates
A Group template defines which types of schema objects Unity creates for a new group. The Addressables system includes the Packed Assets template, which includes all the settings needed to build and load Addressables using the default build scripts.
If you want to create your own build scripts or utilities that need additional settings, you can define these settings in your own schema objects and create your own group templates. The following instructions describe how to do this:
Navigate to the desired location in your Assets folder using the Project panel.
Create a Blank Group Template (menu: Assets > Addressables > Group Templates > Blank Group Templates).
Assign a suitable name to the template.
In the Inspector window, add a description, if desired.
Click the Add Schema button and choose from the list of schemas.
Repeat the above steps to add as many new schemas as needed.
NOTE
If you use the default build script, a group must use the Content Packing & Loading schema. If you use content update builds, a group must include the Content Update Restrictions schema. See Builds for more information.
///////////////////////////////////////////////////
Group Settings
Group settings determine how Unity treats the assets in a group in content builds. Group settings control properties such as the location where AssetBundles are built or bundle compression settings.
A group's settings are declared in Schema objects attached to the group. When you create a group with the Packed Assets template, the Content Packing & Loading and Content Update Restriction schemas define the settings for the group. The default Build scripts expect these settings.
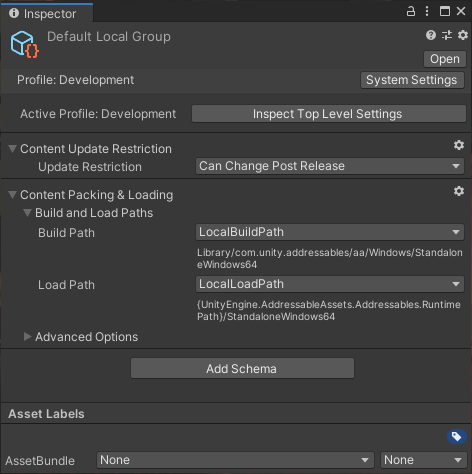
The Inspector window for the Default Local Group
NOTE
If you create a group with the Blank template, then no schemas are attached to the group. Assets in such a group cannot be processed by the default build scripts.
Schemas
A group schema is a ScriptableObject that defines a collection of settings for an Addressables group. You can assign any number of schemas to a group. The Addressables system defines a number of schemas for its own purposes. You can also create custom schemas to support your own build scripts and utilities.
The built-in schemas include:
Content Packing & Loading: this is the main Addressables schema used by the default build script and defines the settings for building and loading Addressable assets.
Content Update Restrictions: defines settings for making differential updates of a previous build. See Builds for more information about update builds.
Resources and Built In Scenes: a special-purpose schema defining settings for which types of built-in assets to display in the Built In Data group.
Defining custom schemas
To create your own schema, extend the AddressableAssetGroupSchema class (which is a kind of ScriptableObject).
using UnityEditor.AddressableAssets.Settings;

publicclass __CustomSchema __: AddressableAssetGroupSchema
{
   publicstring CustomDescription;
}
Once you have defined your custom schema object, you can add it to existing groups and group templates using the Add Schema buttons found on the Inspector windows of those entities.
You might also want to create a custom Editor script to help users interact with your custom settings. See Custom Inspector scripts.
In a build script, you can access the schema settings for a group using its AddressableAssetGroup object.
////////////////////////////////////////////////////////
Content Packing & Loading Schema
Build and Load Paths
The Build and Load Paths settings of the Content Packing & Loading schema determine where the artifacts for your content builds are created and where the Addressables system should look for them at runtime.
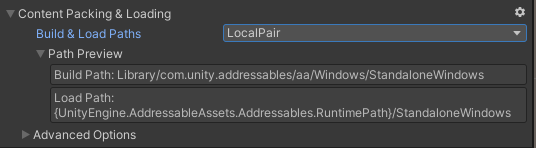
Building and loading paths
Setting | Purpose |
Build & Load Paths | The Profile path pair that defines where the Addressables build system creates artifacts for this group and where the Addressables system loads those artifacts at runtime. Choose a path pair from the list or select <custom> if you want to set the build and load paths separately. |
Build Path | A Profile variable that defines where the Addressables build system creates artifacts for this group. You can also set a custom string. Use one of the following for the build path: - LocalBuildPath: use for assets that you plan to distribute as part of your application installation. - RemoteBuildPath: use for assets that you plan to distribute using a remote hosting service such Unity Cloud Content Delivery or other Content Delivery Network. - <custom>: specify a string as the build path for this group. Only shown if you set Build & Load Paths to <custom>. |
Load Path | A Profile variable that defines where the Addressables system loads the build artifacts for this group at runtime. You can also set a custom string. Use one of the following for the load path: - LocalLoadPath: use for assets that you plan to distribute as part of your application installation. - RemoteLoadPath: use for assets that you plan to distribute using a remote hosting service such Unity Cloud Content Delivery or other Content Delivery Network. - <custom>: specify a string as the load path for this group. Only shown if you set Build & Load Paths to <custom>. |
The build and load path options are defined by variables in your Profiles. Note that only variables intended for a given purpose should be used for a setting. For example, choosing a load path variable for a build path setting wouldn't give you a useful result.
When you choose a Profile variable, the current evaluation of the path is shown in the Path Preview. Components of the path in braces, such as {UnityEngine.AddressableAssets.Addressable.RuntimePath}, indicate that static variable is used to construct the final path at runtime. That portion of the path is replaced by the current value of the static variable when the Addressables system initializes at runtime.
WARNING
In most cases, you should not change the local build or load paths from their default values. If you do, you must copy the local build artifacts from your custom build location to the project's [StreamingAssets] folder before making a Player build. Altering these paths also precludes building your Addressables as part of the Player build.
See Profiles for more information.
Advanced Options
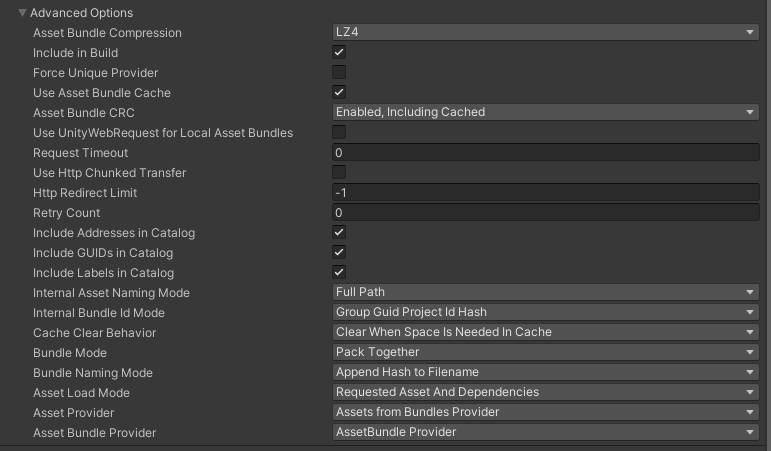
The Advanced Options section
Setting | Purpose |
Asset Bundle Compression | The compression type for all bundles produced from the group. LZ4 is usually the most efficient option, but other options can be better in specific circumstances. See AssetBundle Compression for more information. |
Include In Build | Whether to include assets in this group in a content build. |
Force Unique Provider | Whether Addressables uses unique instances of Resource Provider classes for this group. Enable this option if you have custom Provider implementations for the asset types in this group and instances of those Providers must not be shared between groups. |
Use Asset Bundle Cache | Whether to cache remotely distributed bundles. |
Asset Bundle CRC | Whether to verify a bundle's integrity before loading it. • Disabled: Never check bundle integrity. • Enabled, Including Cached: Always check bundle integrity. • Enabled, Excluding Cached: Check integrity of bundles when downloading. |
Use UnityWebRequest for Local Asset Bundles | Load local AssetBundle archives from this group using UnityWebRequestAssetBundle.GetAssetBundle instead of AssetBundle.LoadFromFileAsync. |
Request Timeout | The timeout interval for downloading remote bundles. |
Use Http Chunked Transfer | Whether to use the HTTP/1.1 chunked-transfer encoding method when downloading bundles. Deprecated and ignored in Unity 2019.3+. |
Http Redirect Limit | The number of redirects allowed when downloading bundles. Set to -1 for no limit. |
Retry Count | The number of times to retry failed downloads. |
Include Addresses in Catalog | Whether to include the address strings in the catalog. If you don't load assets in the group using their address strings, you can decrease the size of the catalog by not including them. |
Include GUIDs in Catalog | Whether to include GUID strings in the catalog. You must include GUID strings to access an asset with an AssetReference. If you don't load assets in the group using AssetReferences or GUID strings, you can decrease the size of the catalog by not including them. |
Include Labels in Catalog | Whether to include label strings in the catalog. If you don't load assets in the group using labels, you can decrease the size of the catalog by not including them. |
Internal Asset Naming Mode | Determines the identification of assets in AssetBundles and is used to load the asset from the bundle. This value is used as the internalId of the asset Location. Changing this setting affects a bundles CRC and Hash value. Warning: Do not modify this setting for Content update builds. The data stored in the content state file will become invalid. The different modes are: - Full Path: the path of the asset in your project. This mode is recommended to use during development because it allows you to identify Assets being loaded by their ID if needed. - Filename: the asset's filename. This can also be used to identify an asset. Note: You cannot have multiple assets with the same name. - GUID: a deterministic value for the asset. - Dynamic: the shortest id that can be constructed based on the assets in the group. This mode is recommended to use for release because it can reduce the amount of data in the AssetBundle and catalog, and lower runtime memory overhead. |
Internal Bundle Id Mode | Determines how an AssetBundle is identified internally. This affects how an AssetBundle locates dependencies that are contained in other bundles. Changing this value affects the CRC and Hash of this bundle and all other bundles that reference it. Warning: Do not modify this setting for Content update builds. The data stored in the content state file will become invalid. The different modes are: - Group Guid: unique identifier for the Group. This mode is recommended to use as it does not change. - Group Guid Project Id Hash: uses a combination of the Group GUID and the Cloud Project Id (if Cloud Services are enabled). This changes if the Project is bound to a different Cloud Project Id. This mode is recommended when sharing assets between multiple projects because the id constructed is deterministic and unique between projects. - Group Guid Project Id Entries Hash: uses a combination of the Group GUID, Cloud Project Id (if Cloud Services are enabled), and asset entries in the Group. Note that using this mode can easily cause bundle cache version issues. Adding or removing entries results in a different hash. |
Cache Clear Behavior | Determines when an installed application clears AssetBundles from the cache. |
Bundle Mode | How to pack the assets in this group into bundles: - Pack Together: create a single bundle containing all assets. - Pack Separately: create a bundle for each primary asset in the group. Subassets, such as Sprites in a Sprite sheet are packed together. Assets within a folder added to the group are also packed together. - Pack Together by Label: create a bundle for assets sharing the same combination of labels. |
Bundle Naming Mode | How to construct the file names of AssetBundles: - Filename: the filename is a string derived from the group name. No hash is appended to it. - Append Hash to Filename: the filename is a string derived from the group name with bundle hash appended to it. The bundle hash is calculated using the contents of the bundle. - Use Hash of AssetBundle: the filename is the bundle hash. - Use Hash of Filename: the filename is a hash calculated from the a string derived from the group name. |
Asset Load Mode | Whether to load assets individually as you request them (the default) or always load all assets in the group together. It is recommended to use Requested Asset and Dependencies for most cases. See Asset Load Mode for more information. |
Asset Provider | Defines which Provider class Addressables uses to load assets from the AssetBundles generated from this group. Set this option to Assets from Bundles Provider unless you have a custom Provider implementation to provide assets from an AssetBundle. |
Asset Bundle Provider | Defines which Provider class Addressables uses to load AssetBundles generated from this group. Set this option to AssetBundle Provider unless you have a custom Provider implementation to provide AssetBundles. |
AssetBundle Compression
Addressables provides three different options for bundle compression: Uncompressed, LZ4, and LZMA. Generally speaking, LZ4 should be used for local content, and LZMA for remote, but more details are outlined below as there can be exceptions to this.
You can set the compression option using the Advanced settings on each group. Compression does not affect in-memory size of your loaded content.
Uncompressed - This option is largest on disk, and generally fastest to load. If your game happens to have space to spare, this option should at least be considered for local content. A key advantage of uncompressed bundles is how they handle being patched. If you are developing for a platform where the platform itself provides patching (such as Steam or Switch), uncompressed bundles provide the most accurate (smallest) patching. Either of the other compression options will cause at least some bloat of patches.
LZ4 - If Uncompressed is not a viable option, then LZ4 should be used for all other local content. This is a chunk-based compression which provides the ability to load parts of the file without needing to load it in its entirety.
LZMA - LZMA should be used for all remote content, but not for any local content. It provides the smallest bundle size, but is slow to load. If you were to store local bundles in LZMA you could create a smaller player, but load times would be significantly worse than uncompressed or LZ4. For downloaded bundles, we avoid the slow load time by recompressing the downloaded bundle when storing it in the AssetBundle cache. By default, bundles will be stored in the cache with LZ4 compression.
NOTE
LZMA AssetBundle compression is not available for AssetBundles on WebGL. LZ4 compression can be used instead. For more WebGL AssetBundle information, see Building and running a WebGL project.
Note that the hardware characteristics of a platform can mean that uncompressed bundles are not always the fastest to load. The maximum speed of loading uncompressed bundles is gated by IO speed, while the speed of loading LZ4-compressed bundles can be gated by either IO speed or CPU, depending on hardware. On most platforms, loading LZ4-compressed bundles is CPU bound, and loading uncompressed bundles will be faster. On platforms that have low IO speeds and high CPU speeds, LZ4 loading can be faster. It is always a good practice to run performance analysis to validate whether your game fits the common patterns, or needs some unique tweaking.
More information on Unity's compression selection is available in the AssetBundle compression manual page.
AssetBundle CRC
Different CRC settings are best used depending upon different circumstances. Checking for a change in the file requires the entire AssetBundle to be decompressed and the check processed on the uncompressed bytes. This can impact performance negatively and may not be a worth while trade off. Corruption is likely to only happen during a download, disk storage is generally reliable and unlikely to have corrupted files after saving to disk. if your AssetBundle contains data that may be tampered with such as settings values, then you may want to consider enabling CRC checks on saved AssetBundles.
For local AssetBundles, if the application download performs a check on the download before saving to disk. Then consider setting this to Disabled as the download will have already been checked.
For remote AssetBundles, Enabled, Excluding cache is a good default. When downloading and caching an AssetBundle to disk, the bytes are decompressed and a CRC calculation is done during file saving. This will not impact performance and the corruption is most likely to occur during this phase from the download. including cache is good to use where the data needs to be checked everytime such as settings values.
Asset Load Mode
For most platforms and collection of content, it is recommended to use Requested Asset and Dependencies. This mode will only load what is required for the Assets requested with LoadAssetAsync or LoadAssetsAsync. Objects are loaded based in the order that they appear in a bundle file, which can result in reading the same file multiple times. Enabling the Contiguous Bundles option in Addressables Build settings can help reduce the number of extra file reads.
This prevents situations where Assets are loaded into memory that are not used.
Performance in situations where you will load all Assets that are packed together, such as a loading screen. Most types of content will have either have similar or improved performance when loading each individually using Requested Asset and Dependencies mode. This mode sequentially reads entire bundle files, which may be more preferrable in some platforms like the Switch.
NOTE
The examples below apply to Desktop and Mobile platforms. Performance may differ between platforms. The All Packed Assets and Dependencies mode typically performs better than loading assets individually on the Nintendo Switch due its hardware and memory reading limitations. It is recommended to profile loading performance for your specific content and platform to see what works for your Application.
Loading performance can vary between content type. As an example, large counts of serialized data such as Prefabs or ScriptableObjects with direct references to other serialized data will load faster using All Packed Assets and Dependencies. With some other Assets like Textures, you can often achieve better performance when you load each Asset individually.
If using Synchronous Addressables, there is little performance between between Asset load modes. Because of greater flexibility it is recommended to use Requested Asset and Dependencies where you know the content will be loaded synchronously.
On loading the first Asset with All Packed Assets and Dependencies, all Assets are loaded into memory. Later LoadAssetAsync calls for Assets from that pack will return the preloaded Asset without needing to load it.
Even though all the Assets in a group and any dependencies are loaded in memory when you use the All Packed Assets and Dependencies option, the reference count of an individual asset is not incremented unless you explicitly load it (or it is a dependency of an asset that you load explicitly). If you later call Resources.UnloadUnusedAssets, or you load a new Scene using LoadSceneMode.Single, then any unused assets (those with a reference count of zero) are unloaded.
//////////////////////////////////////////////////
Prevent Updates Schema
The Prevent Updates options determine how the Check for Content Update Restrictions tool treats assets in the group. To prepare your groups for a differential content update build rather than a full content build, on the [Groups window], go to Tools and run the Check for Content Update Restrictions command. The tool moves modified assets in any groups with Prevent Updates toggled on, to a new group.
The Prevent Updates options includes:
On: The tool doesn't move any assets. When you make the update build, if any assets in the bundle have changed, then the entire bundle is rebuilt.
Off: If any assets in the bundle have changed, then the Check for Content Update Restrictions tool moves them to a new group created for the update. When you make the update build, the assets in the AssetBundles created from this new group override the versions found in the existing bundles.
See Content update builds for more information.
/////////////////////////////////////////////////////////
Labels
You can tag your Addressable assets with one or more labels in the Groups window. Labels have a few uses in the Addressables system, including:
You can use one or more labels as keys to identify which assets to load at runtime.
You can pack assets in a group into AssetBundles based on their assigned labels.
You can use labels in the filter box of the Groups window to help find labeled assets
When you load assets using a list of labels, you can specify whether you want to load all assets having any label in the list or only assets that have every label in the list. For example, if you used the labels, "characters" and "animals" to load assets, you could choose to load the union of those two sets of assets, which includes all characters and all animals, or the intersection of those two sets, which includes only characters that are animals. See Loading multiple assets for more information.
When you choose to pack assets in a group based on their assigned labels (using the group Bundle Mode setting), the Addressables build script creates a bundle for each unique combination of labels in the group. For example, if you have assets in a group that you have labeled as either "cat" or "dog" and either "small" or "large", the build produces four bundles: one for small cats, one for small dogs, one for large cats, and another for large dogs.
Managing labels
Create and delete labels on the Labels window. Open the Labels window from the Tools menu on the Groups window toolbar.
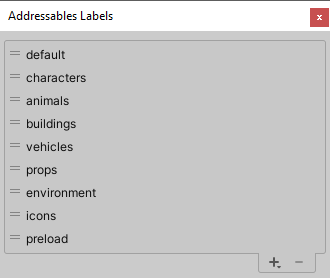
The Labels window
To create a new label, click the + button at the bottom of the list. Enter the new name and click Save.
To delete a label, select it in the list and then click the - button. Deleting a label also removes it from all assets.
TIP
Until you run an Addressables build, you can undo the deletion of a label by adding it back to the Labels dialog (using the exact same string). This also adds the label back to its original assets. After you run an Addressables build, however, re-adding a deleted label no longer reapplies it to any assets.
/////////////////////////////////////////////////////
Profiles
A profile contains a set of variables used by the Addressables build scripts. These variables define information such as where to save build artifacts and where to load data at runtime. You can add custom profile variables to use in your own build scripts.
Open the Profiles window (menu: Window > Asset Management > Addressables > Profiles) to edit profile values and create new profiles.
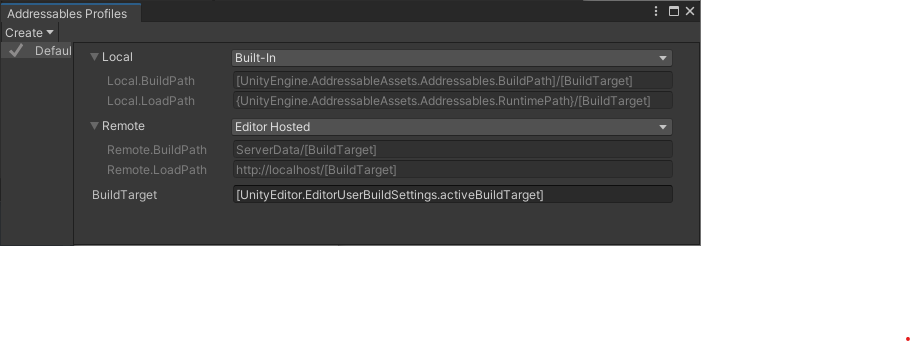
The Addressables Profiles window showing the default profile.
You can set up different profiles for the different phases or tasks in your development process. For example, you could create one profile to use while developing your project, one to use for testing, and one to use for final publishing or release. Setting up the profiles in advance and swapping between them is much less error prone than editing the values individually when you move to a different phase or perform a different task.
Right-click a profile name to set it as the active profile, rename the profile, or delete it.
Addressables defines five profile variables by default:
Local: defines two path variables for local content:
Local.BuildPath: where to build the files containing assets you want to install locally with your application. By default, this path is inside your Project Library folder.
Local.LoadPath: where to load assets installed locally with your application. By default, this path is in the StreamingAssets folder. Addressables automatically includes local content built to the default location in StreamingAssets when you build a Player (but not from other locations).
Remote: defines two path variables for remote content:
Remote.BuildPath: where to build the files containing assets you plan to distribute remotely.
Remote.LoadPath: the URL from which to download remote content and catalogs.
BuildTarget: the name of the build target, such as Android or StandaloneWindows64
You can choose the following pre-defined Bundle Locations for the Local and Remote path variables:
Built-In: the path definitions for local content. The build system automatically includes content built with this setting in your Player builds. You should not change these path values.
Editor Hosted: the path definitions to use with the Editor [Hosting service]. Depending on how you set up the hosting service, you might need to edit the load path to match the service URL.
Cloud Content Delivery: the path definitions for the Unity Cloud Content Delivery (CCD) service. Requires creating a Unity Project ID in the Services section of your Project settings (or linking to an existing ID). You must also install the CCD Management SDK package. See Addressable Asset system with Cloud Content Delivery for information about setting up and using the Cloud Content Delivey Bundle Location option.
Custom: Allows you to edit the values used for the build and load paths. See Profile variable syntax for information about setting a variable value using placeholders that Addressables evaluates at build-time and runtime.
WARNING
In most cases, you should not change the local build or load paths from their default values. If you do, you must manually copy the local build artifacts from your custom build location to the project's StreamingAssets folder before making a Player build. Altering these paths also precludes building your Addressables as part of the Player build.
See Builds for more information about how Addressables uses profiles during content builds.
TIP
Using multiple profiles is most helpful when you distribute content for your application remotely. If you distribute all content as part of your application install, then the single, default profile might be the only profile you need.
Setting the active profile
The active profile determines the set of variables used when you run a build script.
To set the active profile, either:
Open the Groups window (menu: Window > Asset Management > Addressables > Groups).
Click the Profile menu in the toolbar.
Choose the profile to make active.
Or:
Open the Profiles window (menu: Window > Asset Management > Addressables > Profiles).
Right- or cmd-click on a profile to open the context menu.
Choose Set Active.
NOTE
Build scripts include the Play Mode Scripts that Addressables invokes when you enter Play mode in the Editor. Some Play Mode scripts use variables from the active profile to locate content. See Play Mode Scripts for more information.
Adding a new profile
To create a new profile, select Create > Profile. A new profile row appears in the table.
Every profile must define a value for every variable. When you create a new profile, Addressables copies all values from the currently selected profile.
Profile variables
See [Profile Variables] for more information on how to use profile variables.
Specifying packing and loading paths
Once you set up the necessary variables in your profile, you can select the build and load paths for an asset group based on those specified variables.
To set your build and load paths:
Select an Addressable Assets group from the Project window.
In the group’s Inspector, under Content Packing & Loading > Build and Load Paths, select the desired path pair. If you choose the <custom> option, you can specify the build and load paths separately.
Notice that you do not enter the path directly, but rather select a variable representing the path defined in the Profiles window earlier. The Path Preview shows the current path, based on the active Profile. To edit a path directly in the Group settings Inspector, set Build & Load Paths to <custom> and also set the individual Build or Load Path to <custom>. The edited path applies to that group only.
Profile examples
Consider the following example, demonstrating the local development phase of your content.
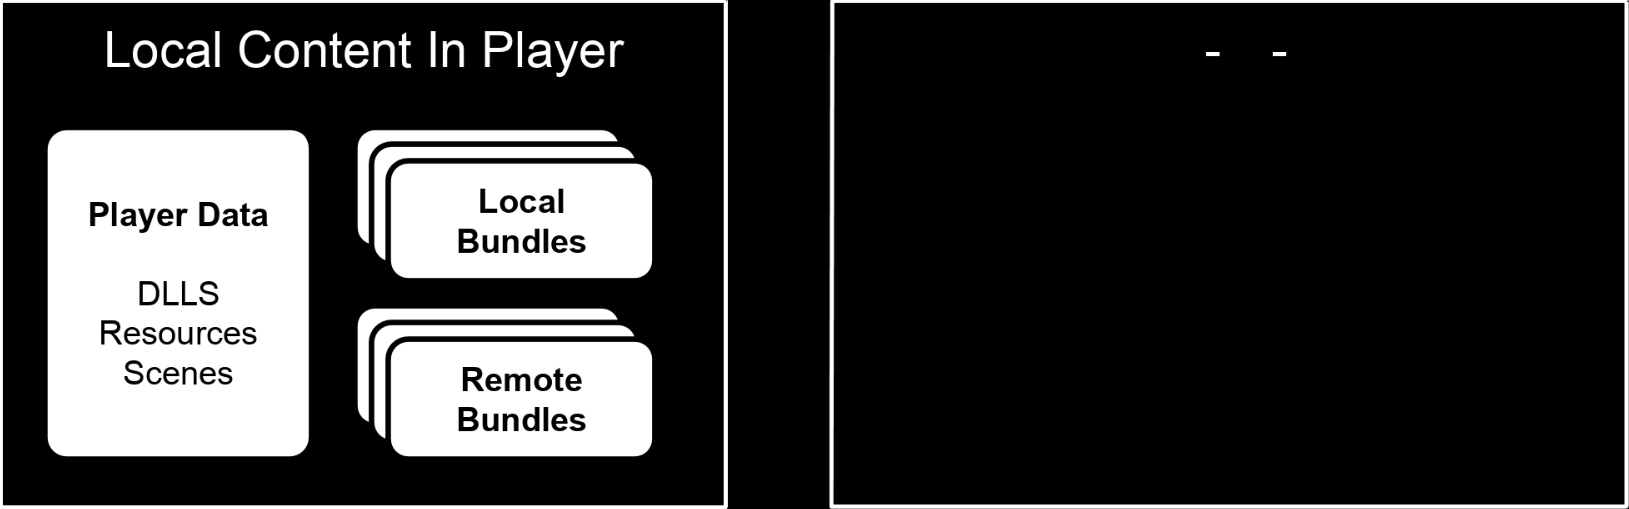
Content with local and remote bundles stored locally for development.
While in development, you would have both your local and remote bundles using local paths, as seen below.
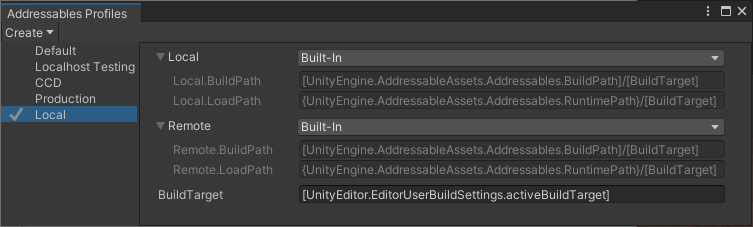
Paths set for local development.
In this instance, you can see that the local and remote paths are in fact local, which makes it unnecessary to set up a remote server just for local development.
Once the content is ready for production, you would move the remote bundles to a server, as the diagram below shows.
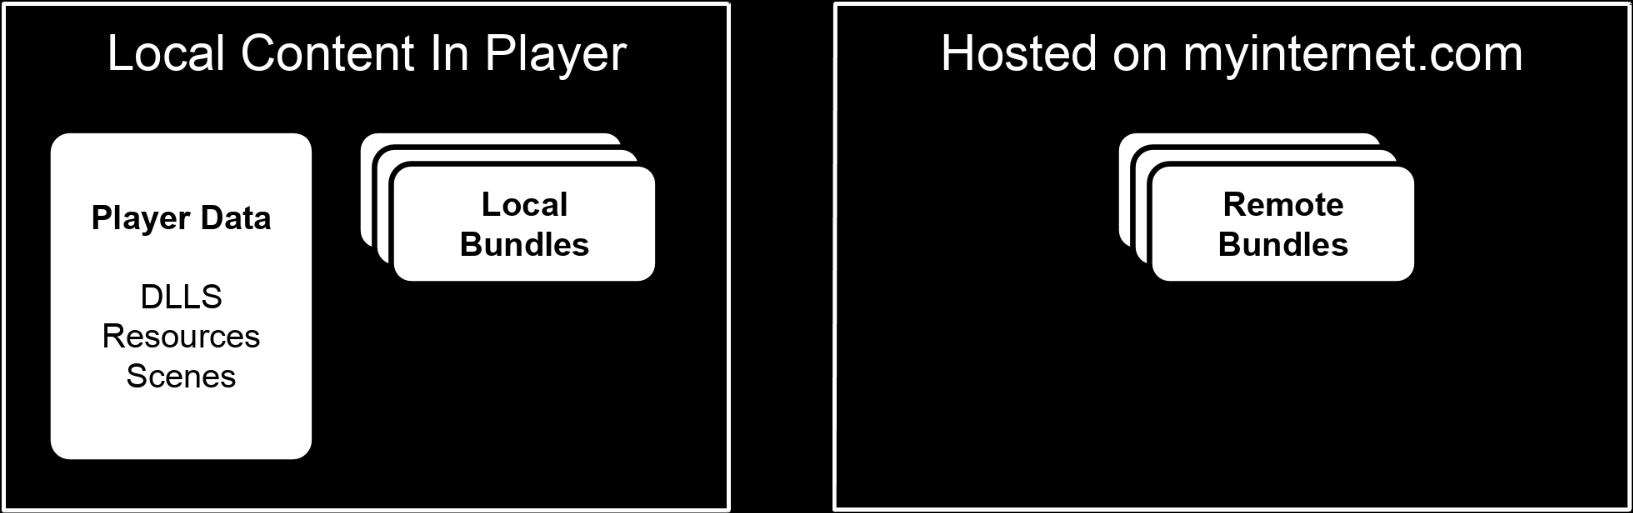
Content with the remote bundles moved to a server for production.
In this case, using profiles, you could change the remote load path for "Production" to that server. Without having to change your asset groups, you can change all of your remote bundles to actually become remote.
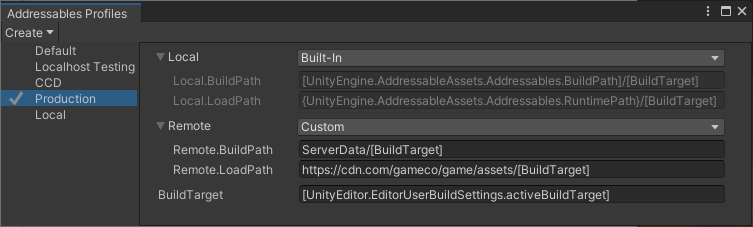
Paths set for hosting remote content
IMPORTANT
The Addressables system only copies data from Addressables.BuildPath to the StreamingAssets folder during a Player build -- it does not handle arbitrary paths specified through the LocalBuildPath or LocalLoadPath variables. If you build data to a different location or load data from a different location than the default, you must copy the data manually.
Similarly, you must manually upload remote AssetBundles and associated catalog and hash files to your server so that they can be accessed at the URL defined by RemoteLoadPath.
///////////////////////////////////////////////////////////////////////////
Profile Variables
Profile variables are generic key/value combinations that you can use to quickly alter Addressables configurations for different development situations.
There are two types of Profile Variables - standard, and path pairs. Standard variables are standalone key/value pairs. Path pairs use a special naming convention to connect sets of variables together.
Path pairs are typically used to switch between different build and load paths for different development situations. For example, you could use path pairs to modify the build and load paths for your Addressable content for various platforms.
Adding a new standard variable
You can add two kinds of variables to your profiles:
A basic variable, which defines a single value
A path pair, which defines a set of two path values. One value is for the build path and one is for the load path
You can use basic variables as components of your path values (for example, BuildTarget) and you can use them in your own build scripts. Use path pair variables to set the Build & Local Paths setting of your Addressables [Groups] and [remote catalog].
To add a new Profile variable, select either Variable or Build Load Path Variable from the Create menu. Assign the new variable a name and value, then select Save. Addressables then adds the new variable to all profiles.
Right-click (macOS: cmd + click) on the variable name to rename or delete the variable.
Path Pairs
Path pairs define a matched set of BuildPath and LoadPath variables. When you create a path pair, you can use the pair name to assign the [path setting] of an Addressable [Group] or remote catalog as a unit.
To create a path pair, go to Create and select Build Load Path Variables. Assign the path pair a prefix name and assign path strings to the individual fields.

A new path pair
The new path pair uses the Custom setting for the Bundle Location property with your initial values. You can change to a different Bundle Location if needed.
TIP
You can convert two regular variables for the build and load paths into a path pair by renaming them in the Profile window. Set one to VariableName.BuildPath and the other to VariableName.LoadPath.
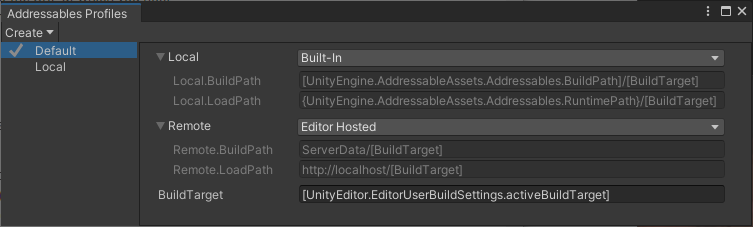
The Addressables Profiles window showing two profiles with two path pairs.
Default path values
The default values for the build and load paths are:
Local build path: [UnityEditor.EditorUserBuildSettings.activeBuildTarget]
Local load path: [UnityEngine.AddressableAssets.Addressables.BuildPath]/[BuildTarget]
Remote build path: ServerData/[BuildTarget]
Remote load path: http://localhost/[BuildTarget]
In most cases, you should not change the local path values. The Unity build system expects the AssetBundles and other files to exist in the default location. If you change the local paths, you must copy the files from the build path to the load path before making your Player build. The load path must always be within the Unity StreamingAssets folder.
If you distribute content remotely, you must modify the the remote load path to reflect the URL at which you host your remote content. You can set the remote build path to any convenient location; the build system does not rely on the default value.
Profile variable syntax
All Profile Variables are of type "string". You can assign them a fixed path or value. You can also use two syntax designations to derive all or part of a variable's value from static properties or other variables:
Brackets [ ]: Addressables evaluates entries surrounded by brackets at build time. The entries can be other profile variables (such as [BuildTarget]) or code variables (such as [UnityEditor.EditorUserBuildSettings.activeBuildTarget]). During a build, as it process your groups, Addressables evaluates the strings inside brackets and writes the result into the catalog.
Braces { }: Addressables evaluates entries surrounded by braces at runtime. You can use code variables of runtime classes (such as {UnityEngine.AddressableAssets.Addressables.RuntimePath}).
You can use static fields and properties inside either the brackets or braces. The names must be fully qualified and the types must be valid in context. For example, classes in the UnityEditor namespace can't be used at runtime. For more information about namespaces, see Microsoft's Namespaces documentation.
The code variables used in the default Profile variable settings include:
[UnityEditor.EditorUserBuildSettings.activeBuildTarget]
[UnityEngine.AddressableAssets.Addressables.BuildPath]
[UnityEngine.AddressableAssets.Addressables.RuntimePath]
For example: A load path of {MyNamespace.MyClass.MyURL}/content/[BuildTarget] is set on a group that creates an AssetBundle called "trees.bundle". During the build, the catalog registers the load path for that bundle as {MyNamespace.MyClass.MyURL}/content/Android/trees.bundle, evaluates [BuildTarget] as "Android", and adds the AssetBundle name to the path. At runtime as the Addressables system processes the catalog it evaluates {MyNamespace.MyClass.MyURL} to produce the final load path, http://example.com/content/Android/trees.bundle.
NOTE
Referencing a runtime variable in a Profile string doesn't prevent Unity from stripping that variable from your applications’ runtime libraries during the build optimization phase (if nothing else in your code references the same variable). See [Managed code stripping] for more information on how to prevent a class or member from being stripped.
////////////////////////////////////////////////////////////
Asset References
An AssetReference is a type that can reference an Addressable asset.
Use the AssetReference class in a MonoBehaviour or ScriptableObject. When you add a serializable AssetReference field to one of these classes, you can assign a value to the field in an Inspector window. You can restrict the assets that can be assigned to a field by type and by label.
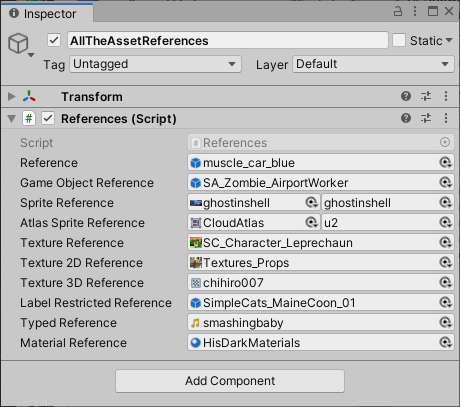
An Inspector window showing several AssetReference fields
To assign a value, drag an asset to the field or click on the object picker icon to open a dialog that lets you choose an Addressable asset.
If you drag a non-Addressable asset to an AssetReference field, the system automatically makes the asset Addressable and adds it to your default Addressables group. Sprite and SpriteAtlas assets can have subobjects. AssetReferences assigned these types of asset display an additional object picker that allows you to specify which subobject to reference.
See the Basic AssetReference, Component Reference, and Sprite Land projects in the Addressables-Sample repository for examples of using AssetReferences in a project.
IMPORTANT
To be able to assign assets from a group to an AssetReference field, the Include GUID in Catalog option must be enabled in the group’s Advanced Settings. The Include GUID in Catalog option is enabled by default.
AssetReference types
The Addressables API provides AssetReference subclasses for common types of assets. You can use the generic subclass, AssetReferenceT<TObject>, to restrict an AssetReference field to other asset types.
The types of AssetReference include:
AssetReference: can reference any asset type
AssetReferenceT<TObject>: can reference assets that are the same type as TObject
AssetReferenceTexture: can reference a Texture asset
AssetReferenceTexture2D: can reference a Texture2D asset
AssetReferenceTexture3D: can reference a Texture3D asset
AssetReferenceGameObject: can reference a Prefab asset
AssetReferenceAtlasedSprite: can reference a SpriteAtlas asset
AssetReferenceSprite: can reference a single Sprite asset
NOTE
If you want to use a CustomPropertyDrawer with a generic AssetReferenceT (or are using a version of Unity earlier than 2020.1), you must make a concrete subclass to support custom AssetReference types.
Adding AssetReference fields to a class
Add an AssetReference, or one of its subclasses, to a MonoBehaviour or ScriptableObject by declaring it as a serializable field to the class:
using System;
using UnityEngine;
using UnityEngine.AddressableAssets;

internalclassDeclaringReferences : MonoBehaviour
{
    // Any asset typepublic AssetReference reference;

    // Prefab assetspublic AssetReferenceGameObject gameObjectReference;

    // Sprite asset typespublic AssetReferenceSprite spriteReference;
    public AssetReferenceAtlasedSprite atlasSpriteReference;

    // Texture asset typespublic AssetReferenceTexture textureReference;
    public AssetReferenceTexture2D texture2DReference;
    public AssetReferenceTexture3D texture3DReference;

    // Any asset type with the specified labels
    [AssetReferenceUILabelRestriction("animals", "characters")]
    public AssetReference labelRestrictedReference;

    // Generic asset type (Unity 2020.3+)public AssetReferenceT<AudioClip> typedReference;

    // Custom asset reference classpublic AssetReferenceMaterial materialReference;

    [Serializable]
    publicclassAssetReferenceMaterial : AssetReferenceT<Material>
    {
        publicAssetReferenceMaterial(string guid) : base(guid)
        {
        }
    }

    privatevoidStart()
    {
        // Load assets...
    }

    privatevoidOnDestroy()
    {
        // Release assets...
    }
}
NOTE
Before Unity 2020.1, the Inspector window couldn't display generic fields by default. In earlier versions of Unity, you must make your own non-generic subclass of AssetReferenceT instead. See Creating a concrete subclass.
Loading and releasing AssetReferences
The AssetReference class provides its own methods to load, instantiate, and release a referenced asset. You can also use an AssetReference instance as a key to any Addressables class method that loads assets.
The following example instantiates an AssetReference as a child of the current GameObject and releases it when the parent is destroyed:
using UnityEngine;
using UnityEngine.AddressableAssets;

internalclassInstantiateReference : MonoBehaviour
{
    [SerializeField]
    private AssetReferenceGameObject reference;

    voidStart()
    {
        if (reference != null)
            reference.InstantiateAsync(this.transform);
    }

    privatevoidOnDestroy()
    {
        if (reference != null && reference.IsValid())
            reference.ReleaseAsset();
    }
}
See Loading an AssetReference for more information and examples about loading assets using AssetReferences.
Restricting AssetReference assignment to assets with specific labels
Use the AssetReferenceUILabelRestriction attribute to restrict the assets you can assign to an AssetReference field to those with specific labels. You can use this attribute reference in addition to AssetReference subclasses to restrict assignment by both type and label.
The following example prevents someone from assigning an Addressable asset to a reference that does not have either the label, "animals", or the label, "characters":
[AssetReferenceUILabelRestriction("animals", "characters")]
public AssetReference labelRestrictedReference;
NOTE
The attribute only prevents assigning assets without the specified label using an Inspector in the Unity Editor. Someone could still assign an asset without the label to the field using a script.
You cannot drag non-Addressable assets to a field with the AssetReferenceUILabelRestriction attribute.
Creating a concrete subclass
For those cases in which you cannot use the generic form of the AssetReference class directly (in versions of Unity prior to Unity 202.1 or when using the CustomPropertyDrawer attribute), you can create a concrete subclass.
To create a concrete subclass, inherit from the AssetReferenceT class and specify the asset type. You must also pass the GUID string to the base class constructor:
[Serializable]
internalclassAssetReferenceMaterial : AssetReferenceT<Material>
{
    publicAssetReferenceMaterial(string guid) : base(guid)
    {
    }
}
You can use your custom AssetReference subclass in another script the same way as other AssetReference types:
// Custom asset reference classpublic AssetReferenceMaterial materialReference;//////////////////////////////////////////////////////////
Building content
A content build processes your Addressables groups to produce the content catalog, [runtime settings], and the AssetBundles that contain your assets. Addressables uses these files to load content at runtime.
You can configure the Addressables system to build your Addressables content as part of every Player build or you can build your content separately before making a Player build. See Building Addressables content with Player builds for more information about configuring these options.
If you configure Unity to build your content as part of the Player build, use the normal Build or Build and Run buttons on the Editor Build Settings window to start a build. You can also invoke the Editor on the command line, passing in one of the -buildPlatformPlayer options or use an API such as BuildPipeline.BuildPlayer to start the build. In all cases, Unity builds your Addressables content as a pre-build step before building the Player.
If you configure Unity to build your content separately, you must start the Addressables build using the Build menu on the Addressables Groups window as described in Making builds. The next time you build the Player for your project, it uses the artifacts produced by the last Addressables content build run for the current platform. See Build scripting for information about automating your Addressables build process.
Your content build can produce two general categories of content:
Local content: content that's included directly in your player build. The Addressables system manages local content automatically as long as you use the default build path for your local content. If you change the local build path, you must copy the artifacts from the local build path to the project's Assets/StreamingAssets folder before making a Player build.
Remote content: content that's downloaded from a URL after your application is installed. It is your responsibility to upload remote content to a hosting server so your application can access it the designated URL (specified by your RemoteLoadPath).
See Build artifacts for more information about files produced by a content build.
Your Group settings determine which category a group belongs to; the active Profile determines the specific paths and URLs that the Addressables system uses to build and load the content. (Your Addressable Asset settings also contain options that affect your content builds, such as whether to build remote content at all.)
You can start builds from a script as well as from the Groups window. See Build scripting for more information on how to extend building Addressable content.
The Addressables system includes the following build scripts:
Default Build Script: performs a full content build based on Group, Profile, and Addressables system settings.
Update a Previous Build: performs a differential content build to update a previously created build.
Play Mode scripts: the Play Mode scripts are technically build scripts and control how the Editor accesses your content in Play Mode. See Play Mode Scripts for more information.
The build scripts also provide a function to clear the cached files they create. You can run these functions from the Build > Clean Build menu of the Groups window.
Building Addressables content with Player builds
When you modify Addressable assets during development, you must rebuild your Addressables content before you build the Player. You can run the Addressables content build as a separate step before building a Player or you can run both the Addressables content build and the Player build together.
Building Addressables content together with the Player can be convenient, but does increase build time, especially on large projects, since this rebuilds the Addressables content even when you haven't modified any assets. If you don't change your Addressables content between most builds, consider disabling this option.
The Build Addressables on Player Build setting in the Project Addressable Asset Settings specifies which option to use for building Addressables content. You can choose the appropriate option for each Project or defer to the global Preferences setting (which you can find in the Addressables section of your Unity Editor Preferences). When you set a Project-level setting, it applies to all contributors who build the Project. The Preferences setting applies to all Unity Projects that don't set a specific value.
NOTE
Building Addressables on Player Build requires Unity 2021.2+. In earlier versions of Unity, you must build your Addressables content as a separate step.
Build commands
Access build commands from the Build menu on the toolbar at the top of the Groups window.

The menu provides the following items:
New Build: choose a build script to run a full content build. The Addressables package includes one build script, Default Build Script. If you create custom build scripts, you can access them here (see Build scripting).
Update a Previous Build: run a differential update based on an earlier build. An update build can produce smaller downloads when you support remote content distribution and publish updated content. See Content update builds.
Clean Build: choose a command to clean existing build cache files. Each build script can provide a clean up function, which you can invoke from this menu. (See Build scripting.)
///////////////////////////////////////////
Making builds
When you use the Addressables package, you can build your content (AssetBundles) as a separate step from your application player. The Addressables package provides its own build scripts for this purpose, accessible from the toolbar of the Groups window.
You have two options when building o project. You can build your Addressables content as part of the Player build or you can build them as separate steps.
Making a full build
To build your content artifacts:
Configure your Group settings.
If you are distributing content remotely, configure your Profile and Addressables system settings to enable remote content distribution.
Select the correct Profile.
Launch the build from the Groups window.
TIP
If you encounter build or runtime loading issues during development, consider running the Clean > All command from the Build menu before you rebuild your content.
Setting up build and load paths
A Profile defines separate variables for the build and load paths of local versus remote content. You can create multiple profiles in order to use different paths for different kinds of builds. For example, you could have a profile to use while you develop your Project in the Editor and another for when you publish your final content builds.
For most Projects, you only need multiple profiles when you support remote content distribution. You don't typically need to change the local paths at different stages of your development process. Most projects should build local content to the default local build path and load it from the default local load path (which resolves to the StreamingAssets folder).
WARNING
Windows has a file path limit of 260 characters. If the build path of your content ends up creating a path that meets or exceeds the limit on Windows, the build fails. It is also possible to run into this issue if your project is located in a directory that is close to the character limit. The Scriptable Build Pipeline creates AssetBundles in a temporary directory during the build. This temporary path is a sub-directory of your project and can end up generating a string that goes over the Windows limit. If the Addressables content build fails with a Could not find a part of the path error, and you're on Windows, this is a likely culprit.
Default local paths
The local build path defaults to the path provided by Addressables.BuildPath, which is within the Library folder of your Unity project. Addressables appends a folder to the local build path based on your current platform build target setting. When you build for multiple platforms, the build places the artifacts for each platform in a different subfolder.
Likewise, the local load path defaults to that provided by Addressables.RuntimePath, which resolves to the StreamingAssets folder. Again Addressables adds the platform build target to the path.
When you build your local bundles to the default build path, then the build code temporarily copies the artifacts from the build path to the StreamingAssets folder when you build your player (and removes them after the build).
WARNING
If you build to or load from custom local paths, then it becomes your responsibility to copy your build artifacts to the correct place in your project before making a player build and to make sure your application can access those artifacts at runtime.
Default remote paths
Addressables sets the default remote build path to an arbitrarily chosen folder name, "ServerData", which is created under your Project folder. The build adds the current platform target to the path as a subfolder to separate the unique artifacts for different platforms.
The default remote load path is "http://localhost/" appended with the current profile BuildTarget variable. You MUST change this path to the base URL at which you plan to load your Addressable assets.
Use different profiles to set up the remote load path as appropriate for the type of development, testing, or publishing you are doing. For example, you could have a profile that loads assets from a localhost server for general development builds, a profile that loads assets from a staging environment for QA builds, and one that loads assets from your Content Delivery Network (CDN) for release builds. See Hosting for more information about configuring hosting.
NOTE
When running your game in the Editor, you can use the Use Asset Database Play Mode Script to bypass loading assets through the remote or local load paths. This can be convenient, especially when you don't have a localhost server set up. However, it can hide group configuration and asset assignment mistakes.
Setting up remote content builds
To set up a remote content build:
Navigate to your AdressablesSystemSetting asset (menu: Window > Asset Management > Addressables > Settings).
Under Catalog, enable the Build Remote Catalog option. The BuildPath and LoadPath settings for the catalog must be the same as those you use for your remote groups. In most cases, use the RemoteBuildPath and RemoteLoadPath profile variables.
For each group that you want to build as remote content, set the BuildPath and LoadPath to the RemoteBuildPath and RemoteLoadPath profile variables (or a custom value if desired).
Open the Profiles window (menu: Window > Asset Management > Addressables > Profiles).
Set the RemoteLoadPath variable to the URL where you plan to host your remote content. If you require different URLs for different types of builds, create a new Profile for each build type. See Profiles and Hosting for more information.
See Remote content distribution for additional information.
Performing the build
After you have your group and Addressables system settings configured, you can run a content build:
Open the Groups window (menu: Windows > Asset Management > Addressables > Groups).
Select the desired profile from the Profile menu on the toolbar.
Select the Default Build Script from the Build > New Build menu. (If you have created your own build scripts they will also be available from this menu.)
The Default Build Script creates one or more AssetBundles for each group and saves them to either the local or the remote build path.
Making an update build
When you distribute content remotely, you can perform a differential update of the previously published build to minimize the amount of data your users must download (compared to a full build).
Once you have configured your remote groups properly and have a previous build which contains remote content, you can perform a content update build by:
Open the Groups window (menu: Windows > Asset Management > Addressables > Groups).
Select the desired profile from the Profile menu on the toolbar.
Select the Update a Previous Build from the Build menu.
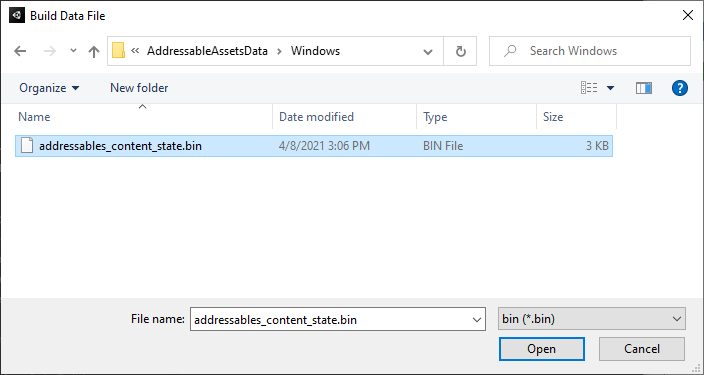
The file picker dialog opens.
Locate the addressables_content_state.bin file produced by the build you are updating. (The default location is in your Assets/AddressableAssetsData/TargetPlatform folder.)
Click Open to start the update build.
To update existing clients, copy the updated remote content to your hosting service (after appropriate testing). (An update build does include all of your local and remote content -- any player builds you create after a content update build will contain a complete set of Addressable assets.)
Note that updating a previous build does not change the addressables_content_state.bin file. Use the same version of the file for future update builds (until you publish another full build created from the New Build menu).
See Content Update Builds for information on how and when to use content update builds.
How to minimize changes to bundles
Content bundles can be large, and having to update the whole bundle for small changes can result in a large amount of data being updated for a small change to the MonoScript. Enabling the "MonoScript Bundle Naming Prefix" option in the Addressables settings will build an asset bundle that contains the MonoScript objects, separate to your serialized data. If there are no changes to the serialized class data then only the MonoScript bundle will have changed and other bundles will not need to be updated.
Changes to scripts that require rebuilding Addressables
Unity references classes in Addressables content using a MonoScript object - this object defines a class using the Assembly name, Namespace, and either the class name or the referenced class.
When loading content at runtime, Unity uses the MonoScript to load and create an instance of the runtime class from the player assemblies. Changes to MonoScripts need to be consistent between the Player and the built Addressables content. You must rebuild both the Player content and Addressables content to load the classes correctly.
The following actions can result in changes to the MonoScript data:
Moving the script file to a location that comes under another Assembly Definition File
Changing the name of the Assembly Definition File containing the class
Adding or Changing the class Namespace
Changing the class name
///////////////////////////////////////////////
How Addressables interact with other project assets
When you include a scene in your Project Build Settings and build a player, Unity includes that scene and any assets used in the scene in your game or application's built-in data. Similarly, Unity includes any assets found in your project's Resources folders in a separate, built-in collection of assets. (The difference is that assets in a scene are only loaded as part of a scene, whereas assets in Resources can be loaded independently.)
Addressable assets can either be built into your game or application as an additional set of "local" assets, or kept external to the game build as "remote" assets hosted on a server and downloaded when they are needed. You can update remote assets independently from the application itself (although remote assets cannot include code, so you can only change assets and serialized data).

How project assets are exported to a player build
However, if you use the same asset in more than one of these categories, then Unity makes copies of the asset when building rather than sharing a single instance. For example, if you used a Material in a built-in scene and also used it in a Prefab located in a Resources folder, you would end up with two copies of that Material in your build -- even if the Material asset itself is not located in Resources. If you then marked that same Material as Addressable, you would end up with three copies. (Files in the project StreamingAssets folder can never be referenced by assets outside that folder.)
NOTE
Before building a player, you must make a content build of your Addressable assets. During the player build, Unity copies your local Addressables to the StreamingAssets folder so that they are included in the build along with any assets you placed in StreamingAssets. (These assets are removed at the end of the build process.) It is your responsibility to upload the remote Addressables files produced by the content build to your hosting service. See Builds for more information.
When you use Addressables in a project, Unity recommends that you move your scenes and any data in Resources folders into Addressable groups and manage them as Addressables.
The Build Settings scene list must contain at least one scene. You can create a minimal scene that initializes your application or game.
A small amount of data in Resources folders typically doesn't cause performance issues. If you use 3rd party packages that place assets there, you don't need to move them unless they cause problems. (Addressable assets cannot be stored in Resources folders.)
Referencing Subobjects
Unity partially determines what to include in a content build based on how your assets and scripts reference each other. Subobject references make the process more complicated.
If an AssetReference points to a subobject of an Asset that is Addressable, Unity builds the entire object into the AssetBundle at build time. If the AssetReference points to an Addressable object (such as a GameObject, ScriptableObject, or Scene) which directly references a subobject, Unity only builds the subobject into the AssetBundle as an implicit dependency.
Asset and AssetBundle dependencies
When you add an asset to an Addressables group, that asset is packed into an AssetBundle when you make a content build. In this case the asset is explicitly included in the bundle, or in other words it is an explicit asset.
If an asset references other assets, then the referenced assets are dependencies of the original asset. This is known as an asset dependency. If the asset is packed into Assetbundle A and the referenced assets are packed into AssetBundle B, then bundle B is a dependency of bundle A. This is known as an AssetBundle dependency. See the AssetBundle dependencies manual page for more information.
Asset dependencies are treated depending on whether or not they are also Addressable. Dependencies that are Addressable are packed into AssetBundles according to the settings of the group they are in -- this could be the same bundle as the referencing asset or a different bundle. A dependency that is not Addressable is included in the bundle of its referencing asset. The referenced asset is implicitly included in the bundle, or in other words it is an implicit asset.
TIP
Use the Bundle Layout Preview Analyze rule to view explicit and implicit assets that will be included in AssetBundles based on the contents of Addressables groups. This is useful when previewing assets before making an content build. Use the Build Layout Report tool to display more detailed information about AssetBundles produced by a content build.
If more than one Addressable references the same implicit asset, then copies of the implicit asset are included in each bundle containing a referencing Addressable.
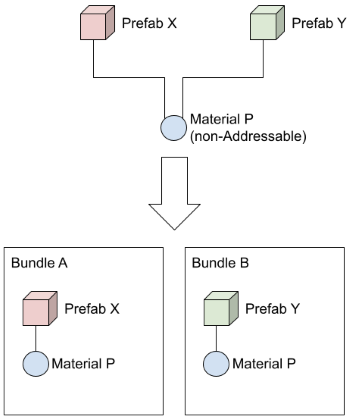
Non-Addressable assets are copied to each bundle with a referencing Addressable
A subtle consequence that can occur when an implicit asset is included in more than one bundle, is that multiple instances of that asset can be instantiated at runtime rather than the single instance your game logic expects. If you change the instance state at runtime, only the object from the same bundle can see the change since all the other assets now have their own individual instance rather than sharing the common one.
To eliminate this duplication, you can make the implicit asset an Addressable asset and include it in one of the existing bundles or add it to a different bundle. The bundle the asset is added to is loaded whenever you load one of the Addressables that reference it. If the Addressables are packed into a different AssetBundle than the referenced asset, then the bundle containing the referenced asset is an AssetBundle dependency.
Be aware that the dependent bundle must be loaded when you load ANY asset in the current bundle, not just the asset containing the reference. Although none of the assets in this other AssetBundle are loaded, loading a bundle has its own runtime cost. See Memory implications of loading AssetBundle dependencies for more information.
TIP
Use the Check Duplicate Bundle Dependencies Analyze rule to identify and resolve unwanted asset duplication resulting from your project content organization.
///////////////////////////////////////
Build scripting
There are a few ways in which you can use the Addressables API to customize your project build:
Start a build from a script
Override an existing script
Extend BuildScriptBase or implement IDataBuilder
When you customize a build script to handle different asset types or handle assets in a different way, you might also need to customize the [Play Mode Scripts] so that the Editor can handle those assets in the same way during Play mode.
Starting an Addressables build from a script
To start an Addressables build from another script, call the AddressableAssetSettings.BuildPlayerContent method.
Before starting the build, you should set the active Profile and the active build script. You can also set a different AddressableAssetSettings object than the default, if desired.
There are a few pieces of information that BuildPlayerContent takes into consideration when performing the build: the AddressableAssetSettingsDefaultObject, ActivePlayerDataBuilder, and the addressables_content_state.bin file.
Set the AddressableAssetSettings
The settings defined by AddressableAssetSettings include the list of groups and the profile to use.
To access the settings that you see in the Editor (menu: Window > Asset Management > Addressables > Settings), use the static AddressableAssetSettingsDefaultObject.Settings property. However, if desired, you can use a different settings object for a build.
To load a custom settings object in a build:
staticvoidgetSettingsObject(string settingsAsset)
{
    // This step is optional, you can also use the default settings://settings = AddressableAssetSettingsDefaultObject.Settings;

    settings
        = AssetDatabase.LoadAssetAtPath<ScriptableObject>(settingsAsset)
            as AddressableAssetSettings;

    if (settings == null)
        Debug.LogError($"{settingsAsset} couldn't be found or isn't " +
                       $"a settings object.");
}
Set the active Profile
A build started with BuildContent uses the variable settings of the active Profile. To set the active Profile as part of your customized build script, assign the ID of the desired profile to the activeProfileId field of the AddressableAssetSettingsDefaultObject.Settings object.
The AddressableAssetSettings object contains the list of profiles. Use the name of the desired profile to look up its ID value and then assign the ID to the activeProfileId variable:
staticvoidsetProfile(string profile)
{
    string profileId = settings.profileSettings.GetProfileId(profile);
    if (String.IsNullOrEmpty(profileId))
        Debug.LogWarning($"Couldn't find a profile named, {profile}, " +
                         $"using current profile instead.");
    else
        settings.activeProfileId = profileId;
}
Set the active build script
The BuildContent method launches the build based on the current ActivePlayerDataBuilder setting. To use a specific build script, assign the index of the IDataBuilder object in the AddressableAssetSetting.DataBuilders list to the [ActivePlayerDataBuilderIndex] property.
The build script must be a ScriptableObject that implements IDataBuilder and you must add it to the DataBuilders list in the AddressableAssetSettings instance. Once added to the list, use the standard List.IndexOf method to get the index of the object.
staticvoidsetBuilder(IDataBuilder builder)
{
    int index = settings.DataBuilders.IndexOf((ScriptableObject)builder);

    if (index > 0)
        settings.ActivePlayerDataBuilderIndex = index;
    else
        Debug.LogWarning($"{builder} must be added to the " +
                         $"DataBuilders list before it can be made " +
                         $"active. Using last run builder instead.");
}
Launch a build
After setting the profile and builder to use (if desired), you can launch the build:
staticboolbuildAddressableContent()
{
    AddressableAssetSettings
        .BuildPlayerContent(out AddressablesPlayerBuildResult result);
    bool success = string.IsNullOrEmpty(result.Error);

    if (!success)
    {
        Debug.LogError("Addressables build error encountered: " + result.Error);
    }

    return success;
}
To check for success, use BuildPlayerContent(out AddressablesPlayerBuildResult result). result.Error contains any error message returned if the Addressables build failed. If string.IsNullOrEmpty(result.Error) is true, the build was successful.
Example script to launch build
The following example adds a couple of menu commands to the Asset Management > Addressables menu in the Editor. The first command builds the Addressable content using the preset profile and build script. The second command builds the Addressable content, and, if it succeeds, builds the Player, too.
Note that if your build script makes setting changes that require a domain reload, you should run the build script using Unity command line options, instead of running it interactively in the Editor. See Domain reloads and Addressable builds for more information.
#if UNITY_EDITORusing UnityEditor;
    using UnityEditor.AddressableAssets.Build;
    using UnityEditor.AddressableAssets.Settings;
    using System;
    using UnityEngine;

    internalclassBuildLauncher
    {
        publicstaticstring build_script
            = "Assets/AddressableAssetsData/DataBuilders/BuildScriptPackedMode.asset";

        publicstaticstring settings_asset
            = "Assets/AddressableAssetsData/AddressableAssetSettings.asset";

        publicstaticstring profile_name = "Default";
        privatestatic AddressableAssetSettings settings;


        staticvoidgetSettingsObject(string settingsAsset)
        {
            // This step is optional, you can also use the default settings://settings = AddressableAssetSettingsDefaultObject.Settings;

            settings
                = AssetDatabase.LoadAssetAtPath<ScriptableObject>(settingsAsset)
                    as AddressableAssetSettings;

            if (settings == null)
                Debug.LogError($"{settingsAsset} couldn't be found or isn't " +
                               $"a settings object.");
        }


        staticvoidsetProfile(string profile)
        {
            string profileId = settings.profileSettings.GetProfileId(profile);
            if (String.IsNullOrEmpty(profileId))
                Debug.LogWarning($"Couldn't find a profile named, {profile}, " +
                                 $"using current profile instead.");
            else
                settings.activeProfileId = profileId;
        }


        staticvoidsetBuilder(IDataBuilder builder)
        {
            int index = settings.DataBuilders.IndexOf((ScriptableObject)builder);

            if (index > 0)
                settings.ActivePlayerDataBuilderIndex = index;
            else
                Debug.LogWarning($"{builder} must be added to the " +
                                 $"DataBuilders list before it can be made " +
                                 $"active. Using last run builder instead.");
        }


        staticboolbuildAddressableContent()
        {
            AddressableAssetSettings
                .BuildPlayerContent(out AddressablesPlayerBuildResult result);
            bool success = string.IsNullOrEmpty(result.Error);

            if (!success)
            {
                Debug.LogError("Addressables build error encountered: " + result.Error);
            }

            return success;
        }


        [MenuItem("Window/Asset Management/Addressables/Build Addressables only")]
        publicstaticboolBuildAddressables()
        {
            getSettingsObject(settings_asset);
            setProfile(profile_name);
            IDataBuilder builderScript
                = AssetDatabase.LoadAssetAtPath<ScriptableObject>(build_script) as IDataBuilder;

            if (builderScript == null)
            {
                Debug.LogError(build_script + " couldn't be found or isn't a build script.");
                returnfalse;
            }

            setBuilder(builderScript);

            return buildAddressableContent();
        }

        [MenuItem("Window/Asset Management/Addressables/Build Addressables and Player")]
        publicstaticvoidBuildAddressablesAndPlayer()
        {
            bool contentBuildSucceeded = BuildAddressables();

            if (contentBuildSucceeded)
            {
                var options = new BuildPlayerOptions();
                BuildPlayerOptions playerSettings
                    = BuildPlayerWindow.DefaultBuildMethods.GetBuildPlayerOptions(options);

                BuildPipeline.BuildPlayer(playerSettings);
            }
        }
    }
#endif
Domain reloads and Addressables builds
If your scripted build process involves changing settings that trigger a domain reload before it makes an Addressables build, then you should script such builds to use Unity's command line arguments rather than interactively running a script in the Editor. These types of settings include:
Changing the defined compiler symbols
Changing platform target or target group
When you run a script that triggers a domain reload interactively in the Editor (using a menu command, for example), your Editor script finishes executing before the domain reload occurs. Thus, if you immediately start an Addressables build, both your code and imported assets are still in their original state. You must wait for the domain reload to complete before you start the content build.
Waiting for the domain reload to finish is relatively straightforward when you run the build from the command line, but can be difficult or impossible to accomplish reliably in an interactive script (for a variety of reasons).
The following example script defines two functions that can be invoked when running Unity on the command line. The ChangeSettings example sets the specified define symbols. The BuildContentAndPlayer function runs the Addressables build and the Player build.
#if UNITY_EDITORusing System;
    using UnityEditor;
    using UnityEditor.AddressableAssets;
    using UnityEditor.AddressableAssets.Build;
    using UnityEditor.AddressableAssets.Settings;
    using UnityEditor.Build.Reporting;
    using UnityEngine;

    internalclassBatchBuild
    {
        publicstaticstring build_script
            = "Assets/AddressableAssetsData/DataBuilders/BuildScriptPackedMode.asset";

        publicstaticstring profile_name = "Default";

        publicstaticvoidChangeSettings()
        {
            string defines = "";
            string[] args = Environment.GetCommandLineArgs();

            foreach (var arg in args)
                if (arg.StartsWith("-defines=", System.StringComparison.CurrentCulture))
                    defines = arg.Substring(("-defines=".Length));

            var buildSettings = EditorUserBuildSettings.selectedBuildTargetGroup;
            PlayerSettings.SetScriptingDefineSymbolsForGroup(buildSettings, defines);
        }

        publicstaticvoidBuildContentAndPlayer()
        {
            AddressableAssetSettings settings
                = AddressableAssetSettingsDefaultObject.Settings;

            settings.activeProfileId
                = settings.profileSettings.GetProfileId(profile_name);

            IDataBuilder builder
                = AssetDatabase.LoadAssetAtPath<ScriptableObject>(build_script) as IDataBuilder;

            settings.ActivePlayerDataBuilderIndex
                = settings.DataBuilders.IndexOf((ScriptableObject)builder);

            AddressableAssetSettings.BuildPlayerContent(out AddressablesPlayerBuildResult result);

            if (!string.IsNullOrEmpty(result.Error))
                thrownew Exception(result.Error);

            BuildReport buildReport
                = BuildPipeline.BuildPlayer(EditorBuildSettings.scenes,
                    "d:/build/winApp.exe", EditorUserBuildSettings.activeBuildTarget,
                    BuildOptions.None);

            if (buildReport.summary.result != BuildResult.Succeeded)
                thrownew Exception(buildReport.summary.ToString());
        }
    }
#endif
To call these functions, use Unity's command line arguments in a terminal or command prompt or in a shell script:
D:\Unity\2020.3.0f1\Editor\Unity.exe -quit -batchMode -projectPath . -executeMethod BatchBuild.ChangeSettings -defines=FOO;BAR -buildTarget Android
D:\Unity\2020.3.0f1\Editor\Unity.exe -quit -batchMode -projectPath . -executeMethod BatchBuild.BuildContentAndPlayer -buildTarget Android
NOTE
If you specify the platform target as a command line parameter, you can perform an Addressables build in the same command. However, if you wanted to change the platform in a script, you should do it in a separate command, such as the ChangeSettings function in this example.
Custom Build Scripting
To configure a new custom script, add it to the Build and Play Mode Scripts list.
Custom scripts extend the BuildScriptBase class or implement the IDataBuilder interface. There are several overridable methods, such as ClearCachedData and CanBuildData<T>. If extending the BuildScriptBase class, the most notable method to override is BuildDataImplementation<TResult>. This is the method that is used to setup or build content.
A custom script is either a Build Script or a Play Mode Script. This is determined by how the CanBuildData<T> method is implemented. Build scripts can only build data of the type AddressablesPlayerBuildResult, so the method is implemented in this way:
publicoverridebool CanBuildData<T>()
{
    returntypeof(T).IsAssignableFrom(typeof(AddressablesPlayerBuildResult));
}
This allows the script to be listed in the Build/New Build/ menu.
Play Mode Scripts can only build data of the type AddressablesPlayModeBuildResult, so the method is implemented in this way:
publicoverridebool CanBuildData<T>()
{
    returntypeof(T).IsAssignableFrom(typeof(AddressablesPlayModeBuildResult));
}
This allows the script to be listed in the Play Mode Scripts menu.
See the Custom Build and Playmode Scripts Sample for an example.
Extend the default build script
If you want to use the same basic build as the default build script BuildScriptPackedMode, but want to treat specific groups or types of assets differently, you can extend the default build script and override the functions within it. If the group or asset the build script is processing is one that you want to treat differently, you can run your own code, otherwise you can call the base class version of the function to use the default algorithm.
See the Addressable variants project for an example.
Save the content state
If you support remote content distribution and update your content between player releases, you must record the state of your Addressables groups at the time of the build. Recording the state allows you to perform a differential build using the Update a Previous Build script.
See the implementation of BuildScriptPackedMode and ContentUpdateScript, for details.
Can I build Addressables when recompiling scripts?
If you have a pre-build step that triggers a domain reload, then you must take special care that the Addressables build itself does not start until after the domain reload is finished.
Using methods such as setting scripting define symbols (PlayerSettings.SetScriptingDefineSymbolsForGroup) or switching active build target (EditorUserBuildSettings.SwitchActiveBuildTarget), triggers scripts to recompile and reload. The execution of the Editor code will continue with the currently loaded domain until the domain reloads and execution stops. Any platform dependent compilation or custom defines will not be set until after the domain reloads. This can lead to unexpected issues where code relies on these defines to build correctly, and can be easily missed.
Is there a safe way to change scripts before building?
To switch Platform, or modify Editor scripts in code and then continue with the defines set, a domain reload must be performed. Note in this case, -quit argument should not be used or the Editor will exit immediately after execution of the invoked method.
When the domain reloads, InitializeOnLoad is invoked. The code below demonstrates how to set scripting define symbols and react to those in the Editor code, building Addressables after the domain reload completes. The same process can be done for switching platforms and platform dependent compilation.
[InitializeOnLoad]
public class BuildWithScriptingDefinesExample
{
    static BuildWithScriptingDefinesExample()
    {
        bool toBuild = SessionState.GetBool("BuildAddressables", false);
        SessionState.EraseBool("BuildAddressables");
        if (toBuild)
        {
            Debug.Log("Domain reload complete, building Addressables as requested");
            BuildAddressablesAndRevertDefines();
        }
    }

    [MenuItem("Build/Addressables with script define")]
    public static void BuildTest()
    {
#if !MYDEFINEHERE
        Debug.Log("Setting up SessionState to inform an Addressables build is requested on next Domain Reload");
        SessionState.SetBool("BuildAddressables", true);
        string originalDefines = PlayerSettings.GetScriptingDefineSymbolsForGroup(EditorUserBuildSettings.selectedBuildTargetGroup);
        string newDefines = string.IsNullOrEmpty(originalDefines) ? "MYDEFINEHERE" : originalDefines + ";MYDEFINEHERE";
        Debug.Log("Setting Scripting Defines, this will then start compiling and begin a domain reload of the Editor Scripts.");
        PlayerSettings.SetScriptingDefineSymbolsForGroup(EditorUserBuildSettings.selectedBuildTargetGroup, newDefines);
#endif
    }

    static void BuildAddressablesAndRevertDefines()
    {
#if MYDEFINEHERE
        Debug.Log("Correct scripting defines set for desired build");
        AddressableAssetSettings.BuildPlayerContent();
        string originalDefines = PlayerSettings.GetScriptingDefineSymbolsForGroup(EditorUserBuildSettings.selectedBuildTargetGroup);
        if (originalDefines.Contains(";MYDEFINEHERE"))
            originalDefines = originalDefines.Replace(";MYDEFINEHERE", "");
        else
            originalDefines = originalDefines.Replace("MYDEFINEHERE", "");
        PlayerSettings.SetScriptingDefineSymbolsForGroup(EditorUserBuildSettings.selectedBuildTargetGroup, originalDefines);
        AssetDatabase.SaveAssets();
#endif
        EditorApplication.Exit(0);
    }
}
//////////////////////////////////////////////////
Addressables and SpriteAtlases
Some SpriteAtlas options can change how Unity loads Sprites. This is important to consider if you want to use the Use Asset Database Play Mode Script.
The following examples demonstrate how Addressables handles SpriteAtlases differently than other Assets:
Addressable Sprites
Example 1:
You have three Addressable textures in three separate groups, where each texture builds to around 500KB. Since they exist in separate groups, Unity builds them into three separate AssetBundles. Each AssetBundle uses around 500KB and only contains the sprite texture and associated metadata, with no dependencies.
Example 2:
The three textures in Example 1 are put into a non-Addressable SpriteAtlas. In this case, Unity still generates three AssetBundles, but they are not the same size .One of the AssetBundles contains the atlas texture and uses about 1500KB. The other two AssetBundles only contain Sprite metadata and list the atlas AssetBundle as a dependency.
Although you can't control which AssetBundle contains the texture, the process is deterministic, so the same AssetBundle will contain the texture through different rebuilds. This is the main difference from the standard duplication of dependencies. The sprites are dependent on the SpriteAtlas texture to load, and yet that texture is not built into all three AssetBundles, but is instead built only into one.
Example 3:
This time, the SpriteAtlas from Example 2 is marked as Addressable in its own AssetBundle. Unity now creates four AssetBundles. If you use Unity version 2020.x or newer, this builds as you would expect. The three AssetBundles with the sprites are each only a few KB and have a dependency on the fourth AssetBundle, which contains the SpriteAtlas and is about 1500KB. If you are using 2019.4 or older, the texture itself may end up elsewhere. The three Sprite AssetBundles still depend on the SpriteAtlas AssetBundle. However, the SpriteAtlas AssetBundle may only contain metadata, and the texture may be in one of the other Sprite AssetBundles.
Addressable Prefabs With Sprite dependencies
Example 1:
You have three Addressable sprite prefabs - each prefab has a dependency on its own sprite (about 500KB). Building the three prefabs separately results in three AssetBundles of about 500KB each.
Example 2:
The three textures from the previous example are added to a SpriteAtlas, and that atlas is not marked as Addressable. In this scenario, the SpriteAtlas texture is duplicated. All three AssetBundles are approximately 1500KB. This is expected based on the general rules about duplication of dependencies, but goes against the behavior seen in "Addressable Sprite Example 2".
Example 3:
The SpriteAtlas from the previous example is now also marked as Addressable. Conforming to the rules of explicit inclusion, the SpriteAtlas texture is included only in the AssetBundle containing the SpriteAtlas. The AssetBundles with prefabs reference this fourth AssetBundle as a dependency. This will lead to three AssetBundles of about 500KB and one of approximately 1500KB.
Shaders
By default, Unity strips shaders variants that aren't used in any scenes. This can exclude variants that are only used in AssetBundles. To ensure that certain variants are not stripped, include them in the Shader Stripping properties in Graphics Settings.
For example, if you have Addressable assets that use lightmap-related shaders such as Mixed Lights, go to Edit > Project Settings > Graphics > Shader Stripping and set the Lightmap Mode property to Custom.
Quality Settings also affect shader variants used in AssetBundles.
/////////////////////////////////////////////////////
Build artifacts
A content build creates files in several locations; Unity doesn't include every file in a built player. Typically, Unity includes files associated with local content in the built player and excludes files associated with remote content.
Most of the files associated with local content are located in the Library/com.unity.addressables folder. This is a special subfolder in the Library folder which Unity uses to store Addressables files. For more information about the Library folder, see Importing assets.
Artifacts included in the player
During a player build, the Addressables system copies the following files from the Library/com.unity.addressables/aa/<AddressablesPlatform> folder to the StreamingAssets folder:
Local AssetBundles (.bundle): according to your group, profile, and platform settings. By default, these files are located in the BuildTarget subfolder. To change the build location of the bundle files produced by a group, modify the Build & Load Paths setting.
settings.json: contains Addressables configuration data used at runtime.
catalog.json: the content catalog used to locate and load assets at runtime (if no newer remote catalog is available). For more information about catalogs, see Content catalogs.
AddressablesLink/link.xml: prevents the Unity linker from stripping types used by your assets. For more information about code stripping, see Managed Code Stripping. In Unity version 2021.2 and later, this file temporarily copied the AddressableAssetSettings.ConfigFolder, or the Assets/Addressables_Temp folder if no settings file exists.
For a full list of platform names, see AddressablesPlatform.
Artifacts not included in the player
Remote content
Files used for remote content should be uploaded to a hosting server. By default these files are located in the ServerData folder.
The files are:
Remote AssetBundles (.bundle): according to your group, profile, and platform settings. By default these files are located in the BuildTarget subfolder. To change the build location of the files produced by a group, modify the Build & Load Paths setting.
catalog_{timestamp or player version}.json: a remote catalog which when downloaded will override the local catalog. This file is only created if the Build Remote Catalogs option in Content update settings is enabled. To change the build location of this file modify the Build & Load Paths in Content update settings. By default the filename includes the timestamp of the build. To use a version number instead, specify the value of the Player Version Override in Catalog settings. For more information about catalogs, see Content catalogs.
catalog_{timestamp or player version}.hash: a file used to check whether the remote catalog has changed since the last time a client app downloaded it. Just like the remote catalog file, this file is only created if the Build Remote Catalogs option in Content update settings is enabled. To change the build location of this file modify the Build & Load Paths in Content update settings. By default the filename includes the timestamp of the build. To use a version number instead, specify the value of the Player Version Override in Catalog settings. For more information about catalogs, see Content catalogs.
Content State File
The addressables_content_state.bin file is used for making a content update build. If you are supporting dynamic content updates, you must save this file after each full content build that you release. Otherwise, you can ignore this file.
By default this file is located in Assets/AddressableAssetsData/<AddressablesPlatform>. See AddressablesPlatform for all platform names. To change the build location of the file specify the value of the Content State Build Path in Content update settings.
NOTE
It is recommended to check this file into version control and create a new branch each time a player build is released.
Diagnostic Data
Additional files can be created to collect data about the content build.
The files are:
Library/com.unity.addressables/AddressablesBuildTEP.json: build performance data. See Build profiling.
Library/com.unity.addressables/buildlayoutreport: information about AssetBundles produced by the build. See Build layout report.
Content catalogs
Content catalogs are the data stores Addressables uses to look up an asset's physical location based on the key(s) provided to the system. Addressables builds a single catalog for all Addressable assets. The catalog is placed in the StreamingAssets folder when you build your application player. The local catalog can access remote as well as local assets, but if you want to update content between full builds of your application, you must create a remote catalog.
The remote catalog is a separate copy of the catalog that you host along with your remote content. Ultimately, Addressables only uses one of these catalogs. A hash file contains the hash (a mathematical fingerprint) of the catalog. If a remote catalog is built and it has a different hash than the local catalog, it is downloaded, cached, and used in place of the built-in local catalog. When you produce a content update build, the hash is updated and the new remote catalog points to the changed versions of any updated assets.
NOTE
You must enable the remote catalog for the full player build that you publish. Otherwise, the Addressables system does not check for a remote catalog and thus cannot detect any content updates. See Enabling the remote catalog.
Although Addressables produces one content catalog per project, you can load catalogs created by other Unity Projects to load Addressable assets produced by those Projects. This allows you to use separate Projects to develop and build some of your assets, which can make iteration and team collaboration easier on large productions. See Managing catalogs at runtime for information about loading catalogs.
Catalog settings
There are a variety of settings used for catalogs:
Catalog settings: options used to configure local and remote catalogs
Content update settings: options used to configure the remote catalog only
To minimize the catalog size, use the following settings:
Compress the local catalog. If your primary concern is how big the catalog is in your build, there is an option in Catalog settings called Compress Local Catalog. This option builds catalog that ships with your game into an AssetBundle. Compressing the catalog makes the file itself smaller, but note that this does increase catalog load time.
Disable built-in scenes and Resources. Addressables provides the ability to load content from Resources and from the built-in scenes list. By default this feature is on, which can bloat the catalog if you do not need this feature. To disable it, select the "Built In Data" group within the Groups window (Window > Asset Management > Addressables > Groups). From the settings for that group, you can uncheck "Include Resources Folders" and "Include Build Settings Scenes". Unchecking these options only removes the references to those asset types from the Addressables catalog. The content itself is still built into the player you create, and you can still load it via legacy API.
There are several group settings that can help reduce the catalog size, such as Internal Asset Naming Mode. For more information see Advanced Group settings.
Shared AssetBundles
In addition to the bundles created from your AddressableAssetGroups, a build can produce specialized bundles called "shared AssetBundles". These are the unitybuiltinshaders AssetBundle and the MonoScript AssetBundle.
The former is generated if any built-in shaders are used by assets included in the build. All Addressable assets that reference a shader that is built-in with the Unity Editor, such as the Standard Shader, do so by referencing this specialized shader AssetBundle. The naming method of the built-in shader bundle can be changed using the Shader Bundle Naming Prefix option in Addressables Build settings.
The latter can be toggled on or off by changing the MonoScript Bundle Naming Prefix option in Addressables Build settings. The MonoScript bundle has naming options listed here, which are typically used in multi-project situations. It is used to build MonoScript behaviors into AssetBundles that can be referenced as a dependency.
Shared AssetBundles derive their build options from the default AddressableAssetGroup. By default this group is named Default Local Group (Default) and uses local build and load paths. In this case the shared bundles cannot be updated as part of a Content Update, and can only be changed in a new player build. The Check for Content Update Restrictions tool will fail to detect the changes to the bundle because it is only generated during the content build. Therefore if you plan on making content changes to the shared bundles in the future, set the default group to use remote build and load paths and set its Update Restriction to Can Change Post Release.
//////////////////////////////////////////////////////////
Build artifacts
A content build creates files in several locations; Unity doesn't include every file in a built player. Typically, Unity includes files associated with local content in the built player and excludes files associated with remote content.
Most of the files associated with local content are located in the Library/com.unity.addressables folder. This is a special subfolder in the Library folder which Unity uses to store Addressables files. For more information about the Library folder, see Importing assets.
Artifacts included in the player
During a player build, the Addressables system copies the following files from the Library/com.unity.addressables/aa/<AddressablesPlatform> folder to the StreamingAssets folder:
Local AssetBundles (.bundle): according to your group, profile, and platform settings. By default, these files are located in the BuildTarget subfolder. To change the build location of the bundle files produced by a group, modify the Build & Load Paths setting.
settings.json: contains Addressables configuration data used at runtime.
catalog.json: the content catalog used to locate and load assets at runtime (if no newer remote catalog is available). For more information about catalogs, see Content catalogs.
AddressablesLink/link.xml: prevents the Unity linker from stripping types used by your assets. For more information about code stripping, see Managed Code Stripping. In Unity version 2021.2 and later, this file temporarily copied the AddressableAssetSettings.ConfigFolder, or the Assets/Addressables_Temp folder if no settings file exists.
For a full list of platform names, see AddressablesPlatform.
Artifacts not included in the player
Remote content
Files used for remote content should be uploaded to a hosting server. By default these files are located in the ServerData folder.
The files are:
Remote AssetBundles (.bundle): according to your group, profile, and platform settings. By default these files are located in the BuildTarget subfolder. To change the build location of the files produced by a group, modify the Build & Load Paths setting.
catalog_{timestamp or player version}.json: a remote catalog which when downloaded will override the local catalog. This file is only created if the Build Remote Catalogs option in Content update settings is enabled. To change the build location of this file modify the Build & Load Paths in Content update settings. By default the filename includes the timestamp of the build. To use a version number instead, specify the value of the Player Version Override in Catalog settings. For more information about catalogs, see Content catalogs.
catalog_{timestamp or player version}.hash: a file used to check whether the remote catalog has changed since the last time a client app downloaded it. Just like the remote catalog file, this file is only created if the Build Remote Catalogs option in Content update settings is enabled. To change the build location of this file modify the Build & Load Paths in Content update settings. By default the filename includes the timestamp of the build. To use a version number instead, specify the value of the Player Version Override in Catalog settings. For more information about catalogs, see Content catalogs.
Content State File
The addressables_content_state.bin file is used for making a content update build. If you are supporting dynamic content updates, you must save this file after each full content build that you release. Otherwise, you can ignore this file.
By default this file is located in Assets/AddressableAssetsData/<AddressablesPlatform>. See AddressablesPlatform for all platform names. To change the build location of the file specify the value of the Content State Build Path in Content update settings.
NOTE
It is recommended to check this file into version control and create a new branch each time a player build is released.
Diagnostic Data
Additional files can be created to collect data about the content build.
The files are:
Library/com.unity.addressables/AddressablesBuildTEP.json: build performance data. See Build profiling.
Library/com.unity.addressables/buildlayoutreport: information about AssetBundles produced by the build. See Build layout report.
Content catalogs
Content catalogs are the data stores Addressables uses to look up an asset's physical location based on the key(s) provided to the system. Addressables builds a single catalog for all Addressable assets. The catalog is placed in the StreamingAssets folder when you build your application player. The local catalog can access remote as well as local assets, but if you want to update content between full builds of your application, you must create a remote catalog.
The remote catalog is a separate copy of the catalog that you host along with your remote content. Ultimately, Addressables only uses one of these catalogs. A hash file contains the hash (a mathematical fingerprint) of the catalog. If a remote catalog is built and it has a different hash than the local catalog, it is downloaded, cached, and used in place of the built-in local catalog. When you produce a content update build, the hash is updated and the new remote catalog points to the changed versions of any updated assets.
NOTE
You must enable the remote catalog for the full player build that you publish. Otherwise, the Addressables system does not check for a remote catalog and thus cannot detect any content updates. See Enabling the remote catalog.
Although Addressables produces one content catalog per project, you can load catalogs created by other Unity Projects to load Addressable assets produced by those Projects. This allows you to use separate Projects to develop and build some of your assets, which can make iteration and team collaboration easier on large productions. See Managing catalogs at runtime for information about loading catalogs.
Catalog settings
There are a variety of settings used for catalogs:
Catalog settings: options used to configure local and remote catalogs
Content update settings: options used to configure the remote catalog only
To minimize the catalog size, use the following settings:
Compress the local catalog. If your primary concern is how big the catalog is in your build, there is an option in Catalog settings called Compress Local Catalog. This option builds catalog that ships with your game into an AssetBundle. Compressing the catalog makes the file itself smaller, but note that this does increase catalog load time.
Disable built-in scenes and Resources. Addressables provides the ability to load content from Resources and from the built-in scenes list. By default this feature is on, which can bloat the catalog if you do not need this feature. To disable it, select the "Built In Data" group within the Groups window (Window > Asset Management > Addressables > Groups). From the settings for that group, you can uncheck "Include Resources Folders" and "Include Build Settings Scenes". Unchecking these options only removes the references to those asset types from the Addressables catalog. The content itself is still built into the player you create, and you can still load it via legacy API.
There are several group settings that can help reduce the catalog size, such as Internal Asset Naming Mode. For more information see Advanced Group settings.
Shared AssetBundles
In addition to the bundles created from your AddressableAssetGroups, a build can produce specialized bundles called "shared AssetBundles". These are the unitybuiltinshaders AssetBundle and the MonoScript AssetBundle.
The former is generated if any built-in shaders are used by assets included in the build. All Addressable assets that reference a shader that is built-in with the Unity Editor, such as the Standard Shader, do so by referencing this specialized shader AssetBundle. The naming method of the built-in shader bundle can be changed using the Shader Bundle Naming Prefix option in Addressables Build settings.
The latter can be toggled on or off by changing the MonoScript Bundle Naming Prefix option in Addressables Build settings. The MonoScript bundle has naming options listed here, which are typically used in multi-project situations. It is used to build MonoScript behaviors into AssetBundles that can be referenced as a dependency.
Shared AssetBundles derive their build options from the default AddressableAssetGroup. By default this group is named Default Local Group (Default) and uses local build and load paths. In this case the shared bundles cannot be updated as part of a Content Update, and can only be changed in a new player build. The Check for Content Update Restrictions tool will fail to detect the changes to the bundle because it is only generated during the content build. Therefore if you plan on making content changes to the shared bundles in the future, set the default group to use remote build and load paths and set its Update Restriction to Can Change Post Release.
/////////////////////////////////////////////////
Content update builds
The Addressables package includes tools that you can use to reduce the size of updates to the content you distribute remotely.
The content update tools include:
Check for Content Update Restrictions tool: prepares your group organization for a content update build based on group settings
Update a Previous Build script: a build script that performs the content update build
IMPORTANT
You must save the addressables_content_state.bin file produced by the Default Build Script for each build that you intend to update in the future. This file is updated every time you run the build script. Be sure to save the version produced for the content build that you publish. See Settings for relevant Addressable Settings that handle the use of the previous content state file.
For information on how to set up your Addressable groups for content updates, see Group settings.
For information on how to perform a content update build, see Building content updates.
For general information about how content updates work, including examples, see Overview.
NOTE
On platforms that provide their own patching systems (such as Switch or Steam) or that do not support remote content distribution, do not use content update builds. Every build of your game should be a complete fresh content build. (In this case you can discard or ignore the addressables_content_state.bin file that is generated after each build for the platform.)
Overview
When you distribute content remotely, you can make content changes without needing to rebuild and republish your entire application. When the Addressables system initializes at runtime, it checks for an updated content catalog. If one exists, the system downloads the new catalog and, when it loads assets, downloads the newer versions of all your AssetBundles.
However, when you rebuild all of your content with a new content catalog, installed players must also redownload all of your remote AssetBundles, whether the assets in them have changed or not. If you have a large amount of content, redownloading everything can take a significant amount of time and may hurt player retention. To make this process more efficient, the Addressables package provides tools that you can run to identify changed assets and to produce a content update build.
The following diagram illustrates how you can use the Addressables tools to produce smaller content updates that only require your players to download new or changed content:
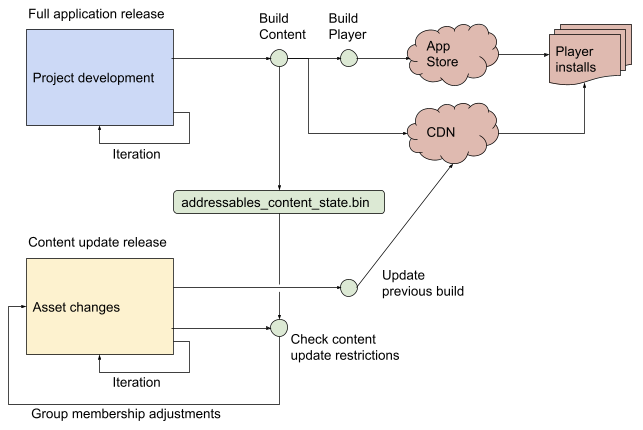
The workflow for reducing the size of content updates
When you release your full application, you first build your Addressables content, as normal, and then make a player build. The player build contains your local AssetBundles and you upload your remote AssetBundles to your Content Delivery Network (CDN) or other hosting service.
The Default Build Script that produces your Addressables content build always creates the addressables_content_state.bin file, which is required to efficiently publish content-only updates. You must save this file for each published full application release (on every platform).
Between full application releases, which require your users to download and install a new player build, you can make changes to your Addressable assets in the project. (Since AssetBundles do not include code, do not make code changes in the version of your project that you use to develop your asset changes.) You can change both local and remote assets.
When you are ready to publish a content update, we recommend running the Check Content Update Restrictions tool manually, or making sure the check is run as part of the update build process. See the section on Settings for more information. This check examines the addressables_content_state.bin file and moves changed assets to a new remote group, according to the settings of the group they are in.
To build the updated AssetBundles, run the Update a Previous Build script. This tool also uses the addressables_content_state.bin file. It rebuilds all of your content, but produces a modified catalog that accesses unchanged content from their original AssetBundles and changed content from the new AssetBundles.
The final step is to upload the updated content to your CDN. (You can upload all the new AssetBundles produced or just those with changed names -- bundles that haven't changed use the same names as the originals and will overwrite them.)
You can make additional content updates following the same process. Always use the addressables_content_state.bin file from your original release.
See Building content updates for step-by-step instructions.
When a full rebuild is required
Addressables can only distribute content, not code. As such, a code change generally requires a fresh player build, and usually a fresh build of content. Although a new player build can sometimes reuse old, existing content from a CDN, you must carefully analyze whether the type trees in the existing AssetBundles are compatible with your new code. This is advanced territory to explore carefully.
Note that Addressables itself is code, so updating Addressables or Unity version likely requires that you create a new player build and fresh content builds.
Settings
To publish content updates, your application must already use a remote catalog and host its remote content on an accessible server. See Enabling remote distribution for information about setting up content hosting and distribution.
In addition to enabling remote content distribution, you should also consider how to set each group's Update Restriction settings. These settings determine how the Check for Content Update Restriction tool treats changed content in your groups. Choose appropriate settings to help minimize the download size of your content updates. See Group Update Restriction settings.
The Addressable Asset Settings also contains a section for updating a previous build.
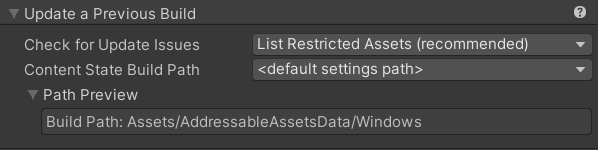
The two settings are Check For Update Issues which informs the system on if we should run the Check For Content Update Restrictions check automatically, and how to handle issues that are detected. The second is the Content State Build Path. This location serves two purposes:
It indicates where new Content Builds should put the previous state file
This is the location that Update a Previous Build attempts to pull the previous state file from automatically.
The Content State Build Path can be a remote location, should you want to have a shared previous state file on a server. The system handles remote locations for the previous state file a little differently.
New Content Builds place the previous state file to the ContentUpdateScript.PreviousContentStateFileCachePath, which is Library/com.unity.addressables/AddressablesBinFileDownload/ by default.
Update a Previous Build downloads the remote previous state file to ContentUpdateScript.PreviousContentStateFileCachePath and then reads the file like normal. If the file does not exist at the remote location, but one has already been placed in the cache path, the system loads the local file.
Another setting to consider if you want to update content on the fly (rather than at application startup), is the Unique Bundle IDs setting. Enabling this option can make it easier to load updated AssetBundles in the middle of an application session, but typically makes builds slower and updates larger. See Unique Bundle IDs setting.
Group Update Restriction settings
For each group in your project, the Update Restriction schema determines how a Group, and its assets, are handled in a content update. The setting is:
Prevent Updates: When toggled, the system treats assets in that group as static content that you expect to update infrequently, if at all. All local content should use this setting.
Choose the setting based on the type of content in a group and how frequently you expect to update that content (between full player builds of your application).
You can change content in a group no matter which setting you choose. The difference is how the Check for Content Update Restrictions and Update Previous Build tools treat the assets in the group and ultimately, how the installed applications access the updated content.
IMPORTANT
Do NOT change the Update Restriction setting of a group unless you are performing a full build. If you change your group settings before a content update, Addressables cannot generate the correct changes needed for the update build.
Prevent Updates Enabled (static content)
When you enable Prevent Updates, the Check for Content Update Restrictions tool moves any changed assets to a new group, which is set to build and load from your remote paths. This is the same check that can be automatically integrated with Updating a Previous Build. Regardless of if you manually run the tool, or let Update a Previous Build handle the check automatically, the subsequent content update sets up the remote catalog so that the changed assets are accessed from the new bundles, but the unchanged assets are still accessed from the original bundles.
NOTE
Although the update build produces versions of the original bundles without the changed assets, installed applications do not download these bundles unless the locally cached version is deleted for some reason.
Organize content that you don't expect to update frequently in groups set to groups with Prevent Updates. enabled. You can safely set up these groups to produce fewer, larger bundles since your users usually won't need to download these bundles more than once.
Any groups that you intend to load from the local load path should always be set to Prevent Updates. Likewise, any groups that produce large, remote bundles should also be set to Prevent Updates so that your users only need to download the changed assets if you do end up changing assets in these groups.
Prevent Updates Disabled (dynamic content)
When a group does not have Prevent Updates, then a content update rebuilds the entire bundle if any assets inside the group have changed. The Update a Previous Build script sets the catalog up so that installed applications load all assets in the group from the new bundles.
Organize content you expect to change frequently into groups with Prevent Updates disabled. Since all the assets in these groups are republished when any single asset changes, you should typically set up these groups to produce smaller bundles containing fewer assets.
Unique Bundle IDs setting
The Addressable Asset settings contain an option, Unique Bundle IDs, that affect content update builds. You can evaluate whether you need to enable this option if you run into AssetBundle ID conflicts when updating your application catalog at runtime.
Enabling the Unique Bundle IDs option allows you to load a changed version of an AssetBundle while the original bundle is still in memory. Building your AssetBundles with unique internal IDs makes it easier to update content at runtime without running into AssetBundle ID conflicts.
The option is not without drawbacks, however. When enabled, any AssetBundles containing assets that reference a changed asset must also be rebuilt. More bundles must be updated for a content update and all builds are slower.
You typically only need to use unique bundle IDs when you update content catalogs after the Addressable system has already initialized and you have started loading assets.
You can avoid AssetBundle loading conflicts and the need to enable unique IDs using one of the following methods:
Update the content catalog as part of Addressables initialization. By default, Addressables checks for a new catalog at initialization (as long as you don't enable the Only update catalogs manually option in your Addressable Asset settings). Choosing this method does preclude updating your application content in mid-session.
Unload all remote AssetBundles before updating the content catalog. Unloading all your remote bundles and assets also avoids bundle name conflicts, but could interrupt your user's session while they wait for the new content to load.
Building content updates
To build a content update, run the Update a Previous Build script:
We recommend running the Check for Content Update Restrictions tool if you don't want the Update a Previous Build to run the check automatically.
Open the Addressables Groups window in the Unity Editor (Window > Asset Management > Addressables > Groups).
From the Build menu on the toolbar, run the Update a Previous Build script.
The build generates a content catalog, a hash file, and AssetBundles.
The generated content catalog has the same name as the catalog in the original application build, overwriting the old catalog and hash file. The application loads the hash file at runtime to determine if a new catalog is available. The system loads unmodified assets from existing bundles that were shipped with the application or that the application has already downloaded.
The system uses the content version string and location information from the addressables_content_state.bin file to create the AssetBundles. Asset bundles that do not contain updated content are written using the same file names as those in the build selected for the update. If an AssetBundle contains updated content, a new bundle is generated that contains the updated content, with a new file name so that it can coexist with the original on your content hosting service. Only AssetBundles with new file names must be copied to the location that hosts your content (though you can safely upload them all).
The system also builds AssetBundles for content that cannot change, such as any local AssetBundles, but you do not need to upload them to the content hosting location, as no Addressables Asset entries reference them.
Note that you should not change the build scripts between building a new player and making content updates (e.g., player code, Addressables). This could cause unpredictable behavior in your application.
Additionally, if you delete the local content bundles created by your Addressables build from the Project Library folder, attempts to load Assets in those bundles fail when you run your game or application in the Editor and use the Use Existing Build (requires built groups) Play Mode script.
Check for Content Update Restrictions tool
The Check for Content Update Restrictions tool prepares your group organization for a content update build. The tool examines the addressables_content_state.bin file and and group settings. If a group's Update Restrictions option was set to Prevent Updates in the previous build, the tool gives you the option to move any changed assets to a new remote group. We recommend applying the suggested changes, or reverting changes to these assets, unless you have a specific reason not to. When you create the update build, the new catalog maps the changed assets to their new, remote AssetBundles, while still mapping the unchanged assets to their original AssetBundles. Checking for content update restrictions does not check groups with Prevent Updates disabled.
To run the tool:
Open the Addressables Groups window in the Unity Editor (Window > Asset Management > Addressables > Groups).
In the groups window, run the Check for Content Update Restrictions from the toolbar Tools menu.
Review the group changes made by the tool, if desired. You can change the names of any new remote groups the tool created, but moving assets to different groups can have unintended consequences.
Important: Before you run the Check for Content Update Restrictions tool, you should make a branch with your version control system. The tool rearranges your asset groups in a way suited for updating content. Branching ensures that next time you ship a full player build, you can return to your preferred content arrangement.
Checking for content updates at runtime
You can add a custom script to periodically check whether there are new Addressables content updates. Use the following function call to start the update:
where List<string> contains the list of modified locator IDs. You can filter this list to only update specific IDs, or pass it entirely into the UpdateCatalogs API.
If there is new content, you can either present the user with a button to perform the update, or do it automatically. Note that it is up to the developer to make sure that stale Assets are released.
The list of catalogs can be null and if so, the following script updates all catalogs that need an update:
The return value is the list of updated locators.
You may also want to remove any bundle cache entries that are no longer referenced as a result of updating the catalogs. If so, use this version of the UpdateCatalogs API instead where you can enable the additional parameter autoCleanBundleCache to remove any unneeded cache data:
See AssetBundle caching for additional information about the bundle cache.
See Unique Bundle IDs setting for additional information about updating content at runtime.
Content update examples
The following discussion walks through a hypothetical example to illustrate how Addressable content is handled during a content update. In this example, consider a shipped application built with the following Addressables groups:
Local_Static | Remote_Static | Remote_NonStatic |
AssetA | AssetL | AssetX |
AssetB | AssetM | AssetY |
AssetC | AssetN | AssetZ |
Note that Local_Static and Remote_Static are part of the Cannot Change Post Release groups.
Since this version is live, existing players have Local_Static on their devices, and potentially have either or both of the remote bundles cached locally.
If you modify one Asset from each group (AssetA, AssetL, and AssetX), then run Check for Content Update Restrictions, the results in your local Addressable settings are now:
Local_Static | Remote_Static | Remote_NonStatic | content_update_group (non-static) |
AssetX | AssetA | ||
AssetB | AssetM | AssetY | AssetL |
AssetC | AssetN | AssetZ |
Note that the prepare operation actually edits the Cannot Change Post Release groups, which may seem counterintuitive. The key, however, is that the system builds the above layout, but discards the build results for any such groups. As such, you end up with the following from a player's perspective:
Local_Static |
AssetA |
AssetB |
AssetC |
The Local_Static bundle is already on player devices, which you can't change. This old version of AssetA is no longer referenced. Instead, it is stuck on player devices as dead data.
Remote_Static |
AssetL |
AssetM |
AssetN |
The Remote_Static bundle is unchanged. If it is not already cached on a player's device, it will download when AssetM or AssetN is requested. Like AssetA, this old version of AssetL is no longer referenced.
Remote_NonStatic (old) |
AssetX |
AssetY |
AssetZ |
The Remote_NonStatic bundle is now old. You can delete it from the server or leave it there; either way it will not be downloaded from this point forward. If cached, it remains on player devices indefinitely unless you remove it. See AssetBundle caching for more information. Like AssetA and AssetL, this old version of AssetX is no longer referenced.
Remote_NonStatic (new) |
AssetX |
AssetY |
AssetZ |
The old Remote_NonStatic bundle is replaced with a new version, distinguished by its hash file. The modified version of AssetX is updated with this new bundle.
content_update_group |
AssetA |
AssetL |
The content_update_group bundle consists of the modified Assets that will be referenced moving forward.
Note that the example above has the following implications:
Any changed local Assets remain unused on the user's device forever.
If the user already cached a non-static bundle, they will need to redownload the bundle, including the unchanged Assets (in this instance, for example, AssetY and AssetZ). Ideally, the user has not cached the bundle, in which case they simply need to download the new Remote_NonStatic bundle.
If the user has already cached the Static_Remote bundle, they only need to download the updated asset (in this instance, AssetL via content_update_group). This is ideal in this case. If the user has not cached the bundle, they must download both the new AssetL via content_update_group and the now-defunct AssetL via the untouched Remote_Static bundle. Regardless of the initial cache state, at some point the user will have the defunct AssetL on their device, cached indefinitely despite never being accessed.
The best setup for your remote content will depend on your specific use case.
How Content Update Handles Dependencies
Directly changing an asset is not the only way to have it flagged as needing to be rebuilt as part of a content update. Changing an asset's dependencies is a less obvious factor that gets taken into account when building an update.
As an example, consider the Local_Static group from the example above:
Local_Static |
AssetA |
AssetB |
AssetC |
but now suppose the assets in this group have a dependency chain that looks like this: AssetA depends on Dependency1, which depends on Dependency2, AssetB depends on Dependency2, and AssetC depends on Dependency3 and all three dependencies are a mix of Addressable and non-Addressable assets.
Now, if only Dependency1 is changed and Check For Content Update Restriction is run, the resulting project structure looks like:
Local_Static | content_update_group |
AssetA | |
AssetB | |
AssetC |
If only Dependency2 is changed:
Local_Static | content_update_group |
AssetA | |
AssetB | |
AssetC |
Finally, if only Dependency3 is changed:
Local_Static | content_update_group |
AssetA | |
AssetB | |
AssetC |
This is because when a dependency is changed the entire dependency tree needs to be rebuilt.
Let's take a look at one more example with the following dependency tree. AssetA depends on AssetB, which depends on Dependency2, AssetB depends on Dependency2, and AssetC depends on Dependency3. Now, if Dependency2 is changed, the project structure looks like:
Local_Static | content_update_group |
AssetA | |
AssetB | |
AssetC |
because AssetA relies on AssetB and AssetB relies on Dependency2. Since the entire chain needs to be rebuilt both AssetA and AssetB will get put into the content_update_group.
////////////////////////////////////////////////////////
Build layout report
The build layout report provides detailed information and statistics about your Addressables builds, including:
Description of AssetBundles
Sizes of each Asset and AssetBundle
Explanation of non-Addressable Assets implicitly included in AssetBundles as dependencies. See Asset and AssetBundle dependencies for more information.
When enabled, the Addressables build script creates the report whenever you build Addressables content. You can enable the report in the Addressables section of the Preferences window. You can find the report in your project folder at Library/com.unity.addressables/buildlayout. Producing the report does increase build time.
See Building your Addressable content for more information about building content.
Creating a build report
To create a build report:
Enable the build report.
Open the Unity Preferences window (menu: Edit > Preferences).
Select Addressables from the list of preference types.
Check the Debug Build Layout option.

Perform a full build of your Addressables content. (See Builds for more information.)
In a file system window, navigate to the Library/com.unity.addressables/ folder of your Unity project.
Open the buildlayout file in a suitable text editor.
Report data
A build layout report contains the following information:
Summary: provides an overview of the build
Group: provides information for each group
Asset bundle: provides information about each bundle built for a group
Asset: provides information about each explicit asset in a bundle
File: provides information about each serialized file in an AssetBundle archive
Built-in bundles: provides information about bundles created for assets, such as the default shader, that are built into Unity
Summary section
Provides a summary of the build.
Name | Purpose |
Addressable Groups | The number of groups included in the build. |
Explicit Assets Addressed | The number of Addressable assets in the build (this number doesn't include assets in the build that are referenced by an Addressable asset, but which aren't marked as Addressable). |
Total Bundle | The number of AssetBundles created by the build, including how many contain Scene data. |
Total Build Size | The combined size of all AssetBundles. |
Total MonoScript Size | The size of serialized MonoBehaviour and SerializedObject instances. |
Total AssetBundle Object Size |
Group section
Reports how Addressables packed the assets in a group into AssetBundles.
Name | Purpose |
Group summary | Name, number of bundles created for group, total size, and number of explicit assets built for the group. |
Schemas | Schemas and settings for the group. |
Asset bundles |
AssetBundle information
Reports details for each AssetBundle built for a group.
Name | Purpose |
File name | The file name of the AssetBundle. |
Size | |
Compression | The compression setting used for the bundle. |
Object size | |
Bundle Dependencies | The list of other AssetBundles the current bundle depends upon. These bundles are always loaded with the current bundle. |
Expanded Bundle Dependencies | |
Explicit Assets | Asset information about Addressables included in the bundle. |
Files | File information about the files in the AssetBundle archive. Scene bundles contain up to two files per Scene, non-Scene bundles contain only one file. |
Asset information
Provides Information for each asset in the Explicit Assets section.
Name | Purpose |
Asset path | The path to the asset in your project |
Total Size | |
Size from Objects | |
Size from Streamed Data | |
File Index | The index of the file in the AssetBundle in which this asset is located. |
Addressable Name | The address of the asset. |
External References | |
Internal References |
File information
Provides details about each serialized file in an AssetBundle archive
Name | Purpose |
File summary | Index in file list, number and size of serialized MonoScripts in the file |
File sections | A serialized file can have one or more of the following sections: • No extension • .resS • .resource • .sharedAssets |
Data from Other Assets | Dependent assets referenced by assets in the file. |
Built-in Bundles
Lists any bundles that Addressables created from assets, such as the default shaders, that are provided as part of the Unity Engine. The Addressables build places such assets in the separate bundles listed here when needed to avoid duplicating the assets across multiple bundles as implicit dependencies.
/////////////////////////////////////////////////////
Build Profiling
The Addressables build process always creates a .json log file that contains build performance information. You can find the log file in your project folder at Library/com.unity.addressables/AddressablesBuildTEP.json.
View the log file with the chrome://tracing tool in Google Chrome or another Chromium-based browser.
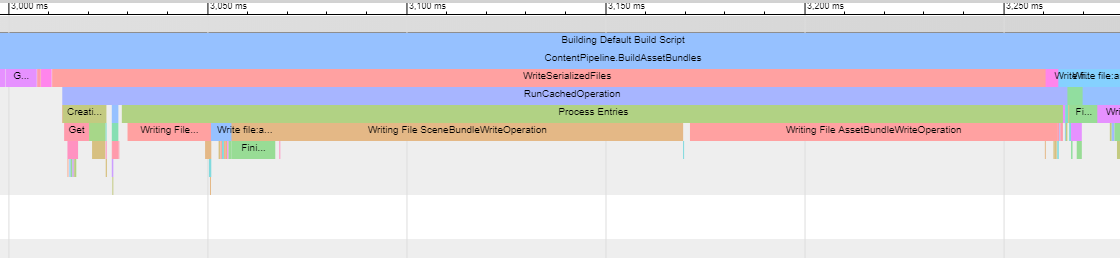
A sample log file displayed in chrome://tracing
To view the build profile:
Open a Chromium-based browser.
Enter chrome://tracing in the browser to open the Trace Event Profiling Tool.
Click the Load button.
In the file browser, navigate to your Unity project’s Library/com.unity.addressables folder.
Open the AddressablesBuildTEP.json file.
See Unity Scriptable Build Pipeline for more information about build performance logging.
////////////////////////////////////////////////////////////
Remote content distribution
Distributing content remotely can reduce initial app download size and install time. You can also update remotely distributed assets without republishing your app or game
When you assign a remote URL as the Load Path of a group, the Addressables system loads assets in the group from that URL. When you enable the Build Remote Catalog option, Addressables looks up the addresses of any remote assets in the remote catalog, allowing you to make changes to Addressable assets without forcing users to update and reinstall the entire game or application.
After enabling remote distribution, you can build your content in two ways:
A full content build using the New Build > Default Build Script: builds all content bundles and catalogs. Always perform a full build before rebuilding your player when preparing to publish or update your full application.
A content update build using the Update a Previous Build script: builds all content bundles and catalogs, but sets up the remote catalog so that installed applications only need to download the changed bundles. Run the Check for Content Update Restrictions tool to identify changes and prepare your groups before building an update.
After building a full build or an update, you must upload your remote catalog, catalog hash file, and remote bundles to your hosting service.
See Using Profiles to aid development for tips on setting up Addressables Profiles to help you develop, test, and publish remote content.
Enabling remote distribution
To enable remote distribution of your content, you must enable the remote catalog and set up the groups containing the assets you want to host remotely.
Enabling the remote catalog
Enable the remote catalog in your Addressable Asset Settings Inspector (menu: Window > Asset Management > Addressables > Settings).
Build Remote Catalog: enabled
Build & Load Paths: Remote
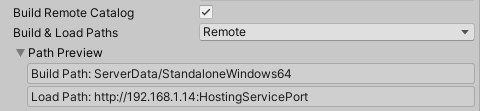
Enabling the remote catalog
The catalog and its accompanying hash file are built to the folder specified by the Build Path setting. You must upload these files so that they can be accessed at the URL specified by your Load Path setting. Unless you have a specific reason not to, use the Remote location so that the catalog is built to and loaded from the same paths as your remote bundles.
Setting up a remote group
To set up a group so that the assets in it can be hosted remotely, set the Build & Load Paths using the Remote location:
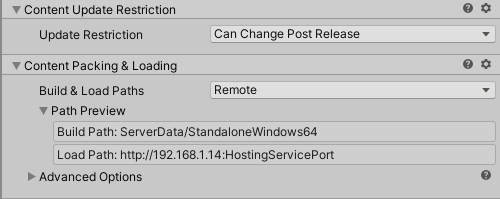
If you plan to publish content updates between publishing full rebuilds of your application, set the Update Restriction value according to how often you expect to update content in a group.
Choose Cannot Change Post Release for groups that produce larger bundles, especially if you do not anticipate changing most of the assets in the group. If you do change assets in a group with this setting, the Addressables tools move the changed assets to a new group for the update. Only the new bundles are downloaded by installed applications.
Choose Can Change Post Release for groups containing assets that you expect to change frequently. If you change assets in a group with this setting, the bundles containing those assets are rebuilt as a whole and will be redownloaded by installed applications. To reduce the amount of data that needs to be downloaded after an update, try to keep the bundles produced by groups with this setting as small as possible.
See Content update builds for more information about updating remote content.
The Advanced Options section contains some options that affect remote hosting and downloads (but aren't necessary to enable remote hosting). See Advanced Options for more information.
Using Profiles to aid development
A Profile defines variables that you can use to set the build and load paths for both your local and remote content.
When you distribute content remotely, you typically need to set different URLS (load paths) for your remote content depending on why you are making a build. Some examples of such situations include:
Builds for testing general game play and function
Early in development or when you need to test without access to a host, you might find it convenient to treat all your content as local content. For this situation set the Local and Remote profile variables using the Built-In location.
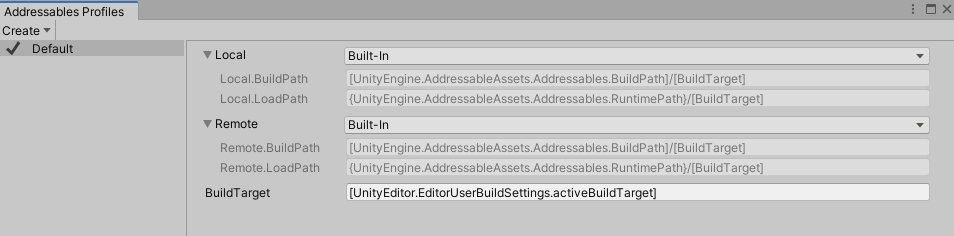
All content treated as local
Builds for local hosting
Later, when you set up a host on your local network (or localhost), you will need to change the Load Path for your remote groups to reflect the URL of the host. For example if using Editor Hosting, set the Remote profile variable using the Editor Hosting location.
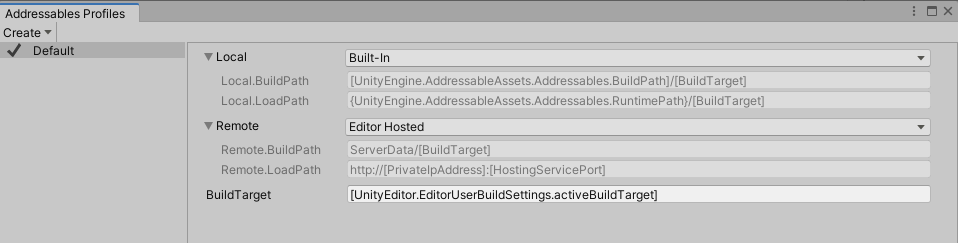
Remote content served from Editor Hosting
Builds for CDN
As you get closer to production, you might use a staging server and then, your production Content Delivery Network (CDN). For example if using Cloud Content Delivery, set the Remote profile variable using the Cloud Content Delivery location.
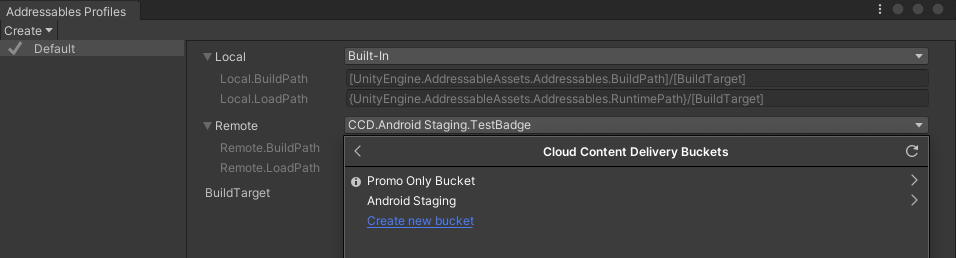
Remote content hosted on the Unity Cloud Content Delivery service
Other
Even after release, you might want to use different host URLs for beta testing or other purposes.
Rather than hand configuring the build and load paths every time you build, you can create a different Profile and set the variables appropriately. Then, you can easily switch between Profiles before making a content build without worrying about misconfiguring the paths.
If you use a script to launch your content builds, then you can use the Addressables API to choose a specific Profile for a build. See Starting an Addressables build from a script.
If you have complex URLs, you can reference static fields or properties in your Profile variables that are evaluated at build- or runtime. For example, rather than entering your CCD ProjectID as a string, you could create an Editor class that provides the information as a static property and reference it as, [CCDInfo.ProjectID]. See Profile variable syntax for more information. (InternalIdTransformFunc functions provide an additional method of handling complex URL requirements.)
NOTE
If your remote URL requires cannot be expressed as a static string see Custom URL evaluation for information about how you can rewrite the URL for assets, including AssetBundles, at runtime.
AssetBundle caching
By default, AssetBundles produced for an Addressables build are cached on the client device after they are downloaded. Cached bundles are only downloaded again if they are updated or if they are deleted from the cache.
An updated catalog can exclude bundle entries present in an older version of the catalog. When these entries are cached, their data is no longer needed on the device.
When you have unneeded cache data on the device, you can choose one of three options:
To delete the entire bundle cache, use Caching.ClearCache.
To remove cache entries that are no longer referenced at any time, use Addressables.CleanBundleCache. You usually call this function after initializing Addressables (see Customizing Addressables initialization) or after loading additional catalogs (see Managing catalogs at runtime).
To automatically call Addressables.CleanBundleCache after updating catalogs, use the parameter autoCleanBundleCache in Addressables.UpdateCatalogs. See Checking for content updates at runtime for an example script.
If you disable caching for a group, the remote bundles produced for the group are stored in memory when they are downloaded until you unload them or the application exits. The next time the application loads the bundle, Addressables downloads it again.
You can control whether the bundles produced by a group are cached or not with the Use Asset Bundle Cache setting under Advanced Options in the Group Inspector.
See AssetBundle compression for additional information about AssetBundle caching. The Addressables system sets the cache-related parameters of the UnityWebRequests it uses to download Addressable bundles based on the group settings.
Note that there are some limitations for WebGL AssetBundles. For more information, see Building and running a WebGL project.
Pre-downloading remote content
In situations where you want to predownload content so that it is cached on disk and faster to access when the application needs it, you can use the Addressables.DownloadDependenciesAsync method. This method downloads an Addressable entity and any dependencies as a background task.
Calling the Addressables.DownloadDependenciesAsync method loads the dependencies for the address or label that you pass in. Typically, this is the AssetBundle.
The AsyncOperationHandle struct returned by this call includes a PercentComplete attribute that you can use to monitor and display download progress. You can also have the app wait until the content has loaded.
Regarding PercentComplete
PercentComplete takes into account several aspects of the underlying operations being handled by a single AsyncOperationHandle. There may be instances where the progression isn't linear, or some semblance of linear. This can be due to quick operations being weighted the same as operations that will take longer.
For example, given an asset you wish to load from a remote location that takes a non-trivial amount of time to download and is reliant on a local bundle as a dependency you'll see your PercentComplete jump to 50% before continuing. This is because the local bundle is able to be loaded much quicker than the remote bundle. However, all the system is aware of is the need for two operations to be complete.
If you wish to ask the user for consent prior to download, use Addressables.GetDownloadSize to return how much space is needed to download the content from a given address or label. Note that this takes into account any previously downloaded bundles that are still in Unity's AssetBundle cache.
While it can be advantageous to download assets for your app in advance, there are instances where you might choose not to do so. For example:
If your app has a large amount of online content, and you generally expect users to only ever interact with a portion of it.
You have an app that must be connected online to function. If all your app's content is in small bundles, you might choose to download content as needed.
Rather than using the percent complete value to wait until the content is loaded, you can use the preload functionality to show that the download has started, then continue on. This implementation would require a loading or waiting screen to handle instances where the asset has not finished loading by the time it's needed.
Custom URL evaluation
There are several scenarios where you might need to customize the path or URL of an Asset (an AssetBundle generally) at runtime. The most common example is creating signed URLs. Another is dynamic host determination.
See ID transform function for more information.
/////////////////////////////////////////////////
Addressable Asset system with Cloud Content Delivery
You can use the Addressable asset system in conjunction with Unity Cloud Content Delivery (CCD) to distribute your remote Addressables content.
Note: The purpose of this page is to describe how to link the concepts of Addressable Assets to CCD, and isn't meant to be an in-depth discussion of these ideas. Before you read this page, make sure you are familiar with both the Addressable system and Cloud Content Delivery.
To set up Addressable assets to work with CCD:
See Getting Started for information about installing and implementing the Addressables package.
See Upgrading to the Addressables System for information about integrating Addressables in an existing Unity Project.
See Remote content distribution for information on how to set up your Project so that you can host your Addressables content on a remote server.
See Unity Cloud Content Delivery for more information about CCD.
Configure profile with CCD URL
TIP
The BuildPath and LoadPath variables stored in Profiles specify where the Addressables system creates your build artifacts and where it looks for your assets at runtime. Configure the remote paths to work with CCD. (Leave the local paths with their standard, default values, unless you have a specific reason to change them.)
If necessary, create a new profile for publishing builds to CCD on the Profiles window. Configure the remote path variables in this profile to access your content at the correct URL.
You can set the remote BuildPath to a convenient value. If you have multiple profiles, consider using a unique build path for each of them so that the build artifacts do not get mixed together, especially if you are hosting them from a different remote URL.
Set the remote LoadPath to one of the following two paths:
If you publish content using a badge:
https://(ProjectID).client-api.unity3dusercontent.com/client_api/v1/environments/(EnvironmentName)/buckets/(BucketID)/release_by_badge/(BadgeName)/entry_by_path/content/?path=If you publish using a release:
https://(ProjectID).client-api.unity3dusercontent.com/client_api/v1/environments/(EnvironmentName)/buckets/(BucketID)/releases/(ReleaseID)/entry_by_path/content/?path=where:
(ProjectID) is your CCD project's ID string
(EnvironmentName) is the name of the Environment of your project
(BucketID) is the Bucket ID string for a CCD bucket within your project
(ReleaseID) is the ID of a specific release within a bucket
(BadgeName) is the name of the specific CCD badge
See Profiles for information about how to create and edit profiles.
IMPORTANT
You must perform a full rebuild your Addressables content when you change the remote load path.
Using the Cloud Content Delivery Bundle Location Option in a Profile
If your project is set up to use the Unity Cloud Content Delivery service, you can set the profile's remote path pair to publish content to a designated bucket and badge.
IMPORTANT
This feature requires the Content Delivery Management API package.
To set up a Profile variable to use the CCD bundle location:
Open the Profile window (menu: Window > Asset Management > Addressables > Profiles).
Select the profile to change.
Change the Remote variable to use the Cloud Content Delivery Bundle Location.
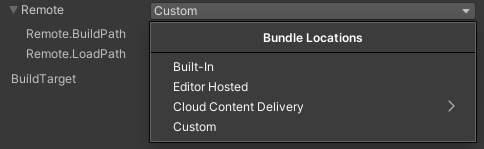
Cloud Content Delivery Bundle Location Option
Choose Automatic (set using CcdManager) or Specify the Environment, Bucket, and Badge option
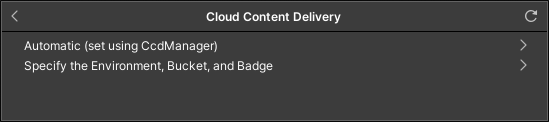
Cloud Content Delivery Bundle Location Option 2 > [!Note] > The CcdManager is a static class that is used to notify Addressables which Environment, Bucket, and Badge to load from at Runtime. See CcdManager.
If choosing Automatic, select the environment you wish to use

Cloud Content Delivery Bundle Location Automatic Environment Option
If choosing to specify, select the environment you wish to use
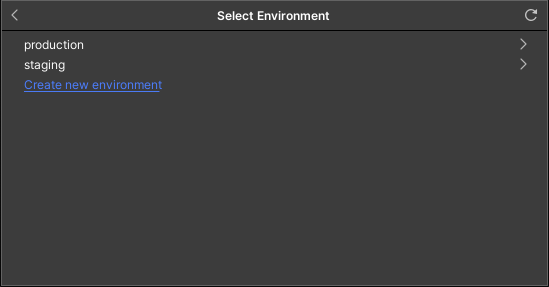
*Cloud Content Delivery Bundle Location Environment Option
Choose the Bucket to use.
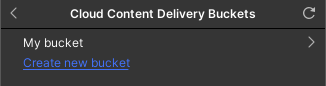
Cloud Content Delivery Bundle Location Bucket Option
NOTE
If no buckets are present, you will be shown this window before continuing.

Cloud Content Delivery Bundle Location No BucketOption
Choose the Badge.

Cloud Content Delivery Bundle Location Badge Option
Make this the active profile when building content for delivey with CCD.
See Profiles for information about how to modify profiles.
Configure groups with CCD URL
Configure groups to use Remote as their Build & Load Path in the inspector window.
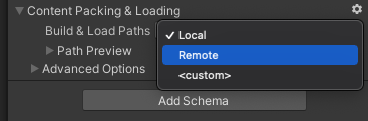
Group Build & Load Paths
See Groups for information about how to modify groups.
Build, upload and release Addressable content
Using to CCD Dashboard/CLI
To generate and upload Addressable content to your CCD project:
Set the profile you have set up for CCD as the active profile.
Build your Addressables content.
If you are making a full content build, see Building your Addressable content.
If your are updating an existing build with modified remote content, see Building for content updates.
Upload the files created at the remote build path using the CCD dashboard or command-line interface.
Create a release and update the badge using the CCD dashboard or command-line interface.
Building your Addressable content generates a content catalog (.json), a hash file (.hash), and one or more AssetBundle (.bundle) files. Upload these files to the bucket corresponding to the URL used in your profile load path.
If you have made changes to local content, you must create a new Player build.
If you are using the Unity Cloud Build service, you can configure your cloud builds to send content to CCD. See Using Addressables in Unity Cloud Build for information.
Using CCD Management package
To generate, upload, and release Addressable content to your CCD project:
Open the Groups window (menu: Window > Asset Management > Addressables > Groups).
Use the Build & Release option.
The CCD Management package will use the default build script behavior to generate the Addressable bundles. Then, all groups associated with a path pair that is connected to a CCD bucket and badge via the drop-down window will have their generated bundles uploaded by the management package to those remote target. Finally, the management package will a create release for those remote target and update their badge.

Build & Release option
CcdManager
When setting up the project profile path pairs and utilizing CCD, there is an option to use Automatic. This option utilizes the CcdManager to set static properties at Runtime to tell Addressables which Environment, Bucket, and Badge to reach out to for loading assets. The CcdManager has 3 main properties: EnvironmentName, BucketId, and Badge. Setting these properties at runtime before Addressables initializes will tell Addressables to look at these locations within CCD. To learn more about environments, buckets, and badges see CCD organization.
Example Snippet of setting CcdManager Properties:
   CcdManager.EnvironmentName = ENV_NAME;
   CcdManager.BucketId = BUCKET_ID;
   CcdManager.Badge = BADGE;

   // Addressables call to load or instantiate asset
NOTE
ANY Addressables call initializes the system so be sure to set the CcdManager prior to any Addressables call to ensure that there are no race conditions or unexpected behaviors.
/////////////////////////////////////////
Asset Hosting Services
Overview
Hosting Services is a development tool that provides an integrated facility for using Addressable Assets configuration data to serve packed content to local or network-connected application builds from within the Unity Editor. Hosting Services can improve iteration velocity when testing packed content and can also serve content to connected clients on local and remote networks.
Packed mode testing and iteration
Moving from Editor Play mode testing to platform application build testing introduces complexities and time costs to the development process. Hosting Services provide extensible Editor-embedded content delivery services that map directly to your Addressables group configuration. Using a custom Addressables profile, you can configure your application to load all content from the Unity Editor itself. This includes builds deployed to mobile devices, or any other platform, that have network access to your development system.
Setup
This article details the initial setup of Asset Hosting Services for your project. While the setup guide focuses on Editor workflows, you can use the API to configure Hosting Services by setting the HostingServicesManager property of the AddressableAssetSettings class.
Configuring a new Hosting Service
Use the Hosting window to add, configure, and enable new Hosting Services. In the Editor, select Window > Asset Management > Addressables > Hosting, or click the Tools > Window > Hosting Services button from the Addressables Groups window menu to access the Addressables Hosting window.
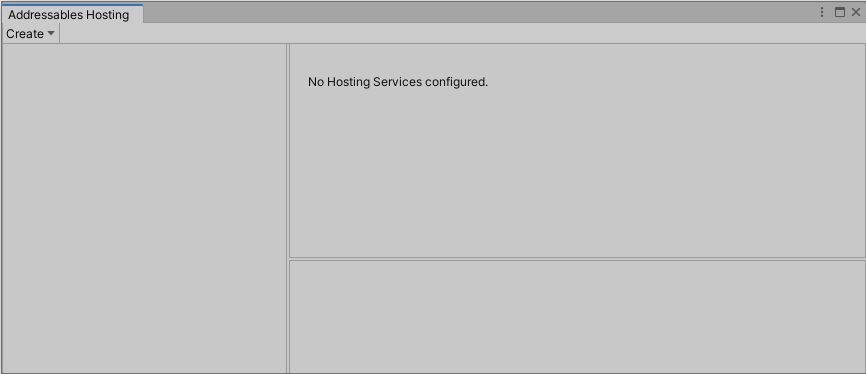
The Addressables Hosting window.
To add a new Local Hosting Service, click the Create > Local Hosting button.
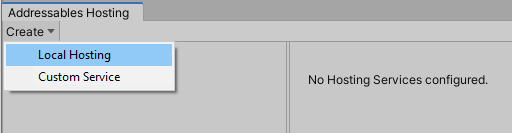
Adding a new Hosting Service.
Note: For more information on implementing custom hosting service types, see the section on custom services.
The newly added service appears in the Hosting Services section of the Addressables Hosting window. Use the Service Name field enter a name for the service.
The new service defaults to the disabled state. To start the service, select the Enable check box.
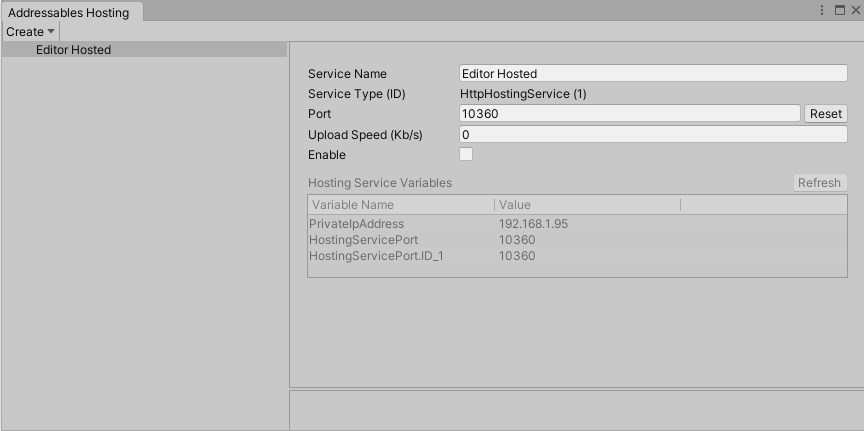
The updated Addressables Hosting window after adding a service.
The HTTP Hosting Service automatically assigns a port number when it starts. The service saves the port number and reuses it between Unity sessions. To choose a different port, either assign a specific port number in the Port field, or click the Reset button to assign a different, random port number.
In Editor versions 2022.1 and above, HTTP downloads are disallowed by default. In order for the default HTTPHostingService to work correctly, you need to set the Allow downloads over HTTP setting in Edit > Project Settings... > Player > Other Settings > Allow downloads over HTTP to something other than Not allowed.
WARNING
If you reset the port number, you must execute a full application build to generate and embed the correct URL.
NOTE
You may need to disable your local firewall or add exceptions to allow connections from mobile or other devices.
The HTTP Hosting Service is now enabled and ready to serve content from the directory specified in the remote BuildPath of each asset group.
Hosting Service profile setup
When working with Hosting Services during development, consider creating a profile that configures your asset groups to load from the Hosting Service. For more about profiles, see Addressable Assets Profiles.
Once in the Addressables Profiles window, create a new profile via Create > Profile. In the following example, the new profile is called "Editor Hosted".
Modify the remote loading URL to load from the Hosting Service. From the Addressables Hosting window, you can use the fields named [PrivateIpAddress] and [HostingServicePort] in the remote LoadPath variable to construct the path URL (for example, http://[PrivateIpAddress]:[HostingServicePort]).
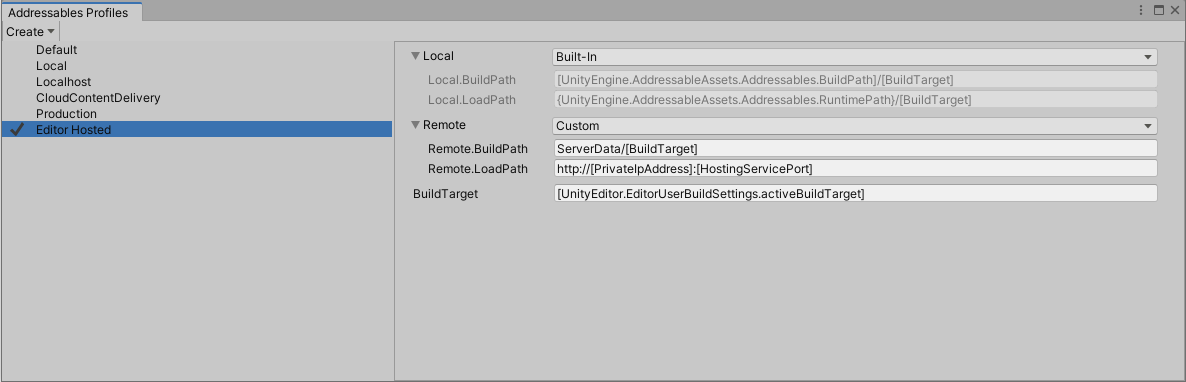
Configuring the service's profile.
Verify that each group is configured correctly. Ensure that you set the BuildPath and LoadPath paths to their respective profile keys that you modified for use with Hosting Services. In this example, you can see how the profile variables in the LoadPath should be expanded to build a correct base URL for loading assets from Hosted Services.
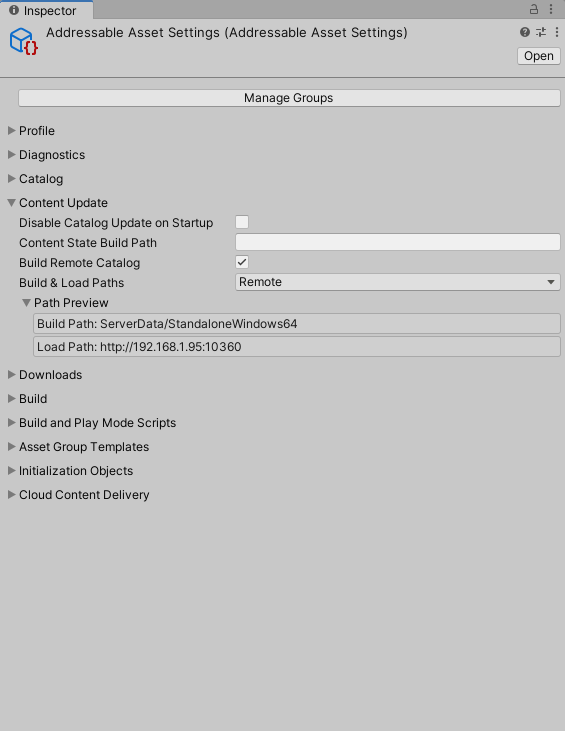
Inspecting the service's load paths.
TIP
Use the Path Preview to verify that the profile variables resolve to the correct variables. The load path URL IP address and port must match those shown for the service on the Addressables Hosting window.
Finally, select the new profile from the Addressables Groups window, create a build, and deploy to the target device. The Unity Editor now serves all load requests from the application through the HttpHostingService service. You can now make additions and changes to content without redeployment. Rebuild the Addressable content, and relaunch the already deployed application to refresh the content.
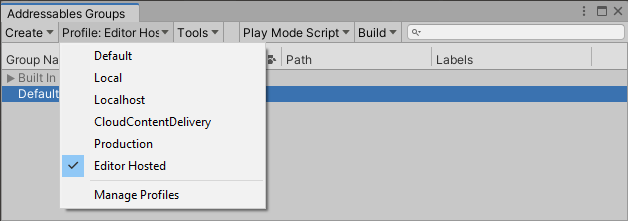
Selecting a Hosting Service profile.
Batch mode
You can also use Hosting Services to serve content from the Unity Editor running in batch mode. To do so, launch Unity from the command line with the following options:
-batchMode -executeMethod UnityEditor.AddressableAssets.HostingServicesManager.BatchModeThis loads the Hosting Services configuration from the default AddressableAssetSettings object, and starts all configured services.
To use an alternative AddressableAssetSettings configuration, create your own static method entry point, to call through the HostingServicesManager.BatchMode(AddressableAssetSettings settings) overload.
Custom services
You can create a custom service to implement your own logic for serving content-loading requests from the Addressable assets system. For example:
Support a custom IResourceProvider that uses a non-HTTP protocol for downloading content.
Manage an external process for serving content that matches your production CDN solution (such as an Apache HTTP server).
Implementing a custom service
The HostingServicesManager can manage any class that implements an IHostingService interface (for more details on method parameters and return values, see the API documentation.
To create a new custom service:
Follow the steps outlined in the configuring a new Hosting Service section above, but instead of selecting Create > Local Hosting button, select Create > Custom Service button instead.
Drag the applicable script into its field, or select it from the object picker. The dialog validates that the selected script implements the IHostingService interface.
To finish adding the service, click the Add button.
Moving forward, your custom service will appear in the Service Type drop-down options.
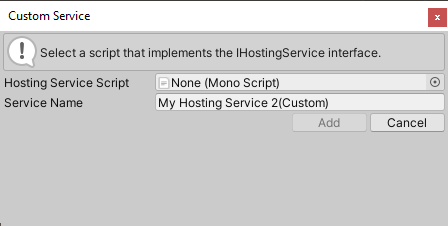
Adding a custom Asset Hosting Service.
///////////////////////////////////////////


 2777
2777

 被折叠的 条评论
为什么被折叠?
被折叠的 条评论
为什么被折叠?
 到【灌水乐园】发言


