


 本文探讨了如何在Unity中实现逼真的视觉效果,重点介绍了照明和渲染设置。通过设置线性渲染模式、HDR、延迟渲染路径以及正确的色调映射,可以为项目创建可信的外观。此外,文章提供了Spotlight隧道示例场景,帮助开发者学习和实验,以达到更真实的照明效果。
spotlight
Being part of the Spotlight Team, I am fortunate to be involved in some very interesting projects. The Spotlight Team at Unity works on games together with our customers and a significant part of my role is to help developers achieve the desired look and quality for their projects. I get to hear many stories from all across the industry and can identify common issues that content creators are facing. Several of the projects I have worked on aimed for fairly realistic visuals. Given the project’s art contents, how do we make a scene in Unity that will look believable?
作为Spotlight团队的一员,我很幸运地参与了一些非常有趣的项目。 Unity的Spotlight团队与我们的客户一起开发游戏,我的重要职责是帮助开发人员为其项目获得理想的外观和质量。 我听到了很多来自业界的故事,可以确定内容创作者面临的常见问题。 我从事的几个项目旨在获得相当逼真的视觉效果。 鉴于项目的艺术内容,我们如何在Unity中制作一个看起来可信的场景?
There are a multitude of topics that need to be covered in order to make believable visuals. In this post I’m going to discuss lighting and render settings. Further down the post I’ll also share our Spotlight Tunnel Sample Scene and explain how you can use it to learn and experiment.
为了使视觉效果可信,需要涵盖许多主题。 在这篇文章中,我将讨论照明和渲染设置。 在文章的后面,我还将分享我们的Spotlight隧道示例场景,并说明如何使用它来学习和实验。
准备Unity渲染设置 (Preparing Unity render settings)
Understanding how Unity’s rendering features can be used to realistically mimic the real world will help you to achieve your project’s visual goal.
了解如何使用Unity的渲染功能逼真地模拟现实世界将帮助您实现项目的视觉目标。
Linear rendering mode
In simple terms, this sets Unity to do lighting and shading calculations using physically accurate math before transforming the final output into the format that works best for monitors.
To specify a gamma or linear workflow,
go to Edit > Project Settings > Player and open Player Settings.
Then go to Other Settings > Rendering and change the Color Space to Linear.
线性渲染模式
简单来说,这会将Unity设置为使用物理上精确的数学进行照明和阴影计算,然后再将最终输出转换为最适合监视器的格式。
要指定伽玛或线性工作流程,
转到 编辑 > 项目设置 > 播放器, 然后打开 播放器设置 。
然后转到 其他设置 > 渲染 并将 颜色空间 更改 为 线性。
Defining your color space should be one of the earliest decisions in your project, because of the drastic impact on the final shading and lighting results.
定义色彩空间应该是项目中的最早决定之一,因为这会对最终的阴影和照明结果产生巨大影响。
Rendering mode.
In the Spotlight Tunnel Sample Scene, we use deferred rendering path. This allows content creators to work with multiple dynamic lights efficiently, combined multiple reflection cubemaps, and have the ability to use the existing Screen Space Reflection features in Unity 2017+.
To set this, go to Graphic Settings > Rendering Path or Camera > Rendering Path
You can find more information about render modes refer in this part of Unity documentation.
渲染模式。
在Spotlight隧道示例场景中,我们使用延迟的渲染路径。 这使内容创建者可以有效地使用多个动态光源,组合多个反射立方体贴图,并能够使用Unity 2017+中的现有“屏幕空间反射”功能。
要进行设置,请转到图形设置>渲染路径或相机>渲染路径
您可以在 Unity文档的这一部分中 找到有关渲染模式的更多信息 。
High Dynamic Range (HDR) Camera.
When rendering believable lighting, much like in real life, content creators will be dealing with lighting values and emissive surfaces that have a brightness higher than 1 (high dynamic range). These values then need to be remapped to the proper screen range (this is called tonemapping). This setting is crucial to allow the Unity camera to process these high values and not clip them.
To enable this, select the main camera on the scene and ensure that HDR is checked in the inspector tab for the selected camera.
高动态范围(HDR)相机。
在渲染逼真的照明时,就像在现实生活中一样,内容创建者将处理亮度高于1(高动态范围)的照明值和发光表面。 然后需要将这些值重新映射到适当的屏幕范围(这称为色调映射)。 此设置对于允许Unity相机处理这些高值而不进行裁剪非常重要。
要启用此功能,请在场景中选择主摄像机,并确保在检查器选项卡中为选定摄像机选中了HDR。
HDR Lightmap encoding. (optional)The Spotlight Tunnel sample scene didn’t use baked lighting, however, if you’re planning to work with High intensity (HDR) baked lighting, we recommend that you set the lightmap encoding to HDR lightmap to make sure the baked light result is consistent. The option can be found under Edit > Project > Player settings > Other settings > Lightmap encoding (Unity 2017.3+ only).Detailed information for Lightmap encoding can be found in the manual.
HDR光照贴图编码。 (可选的) Spotlight隧道示例场景未使用烘焙照明,但是,如果您打算使用高强度(HDR)烘焙照明,我们建议您将光照贴图编码设置为HDR光照贴图,以确保烘焙光照结果一致。 该选项可在“编辑”>“项目”>“播放器设置”>“其他设置”>“光照贴图编码”下找到(仅适用于Unity 2017.3+)。 可以在手册中找到 有关Lightmap编码的详细信息 。
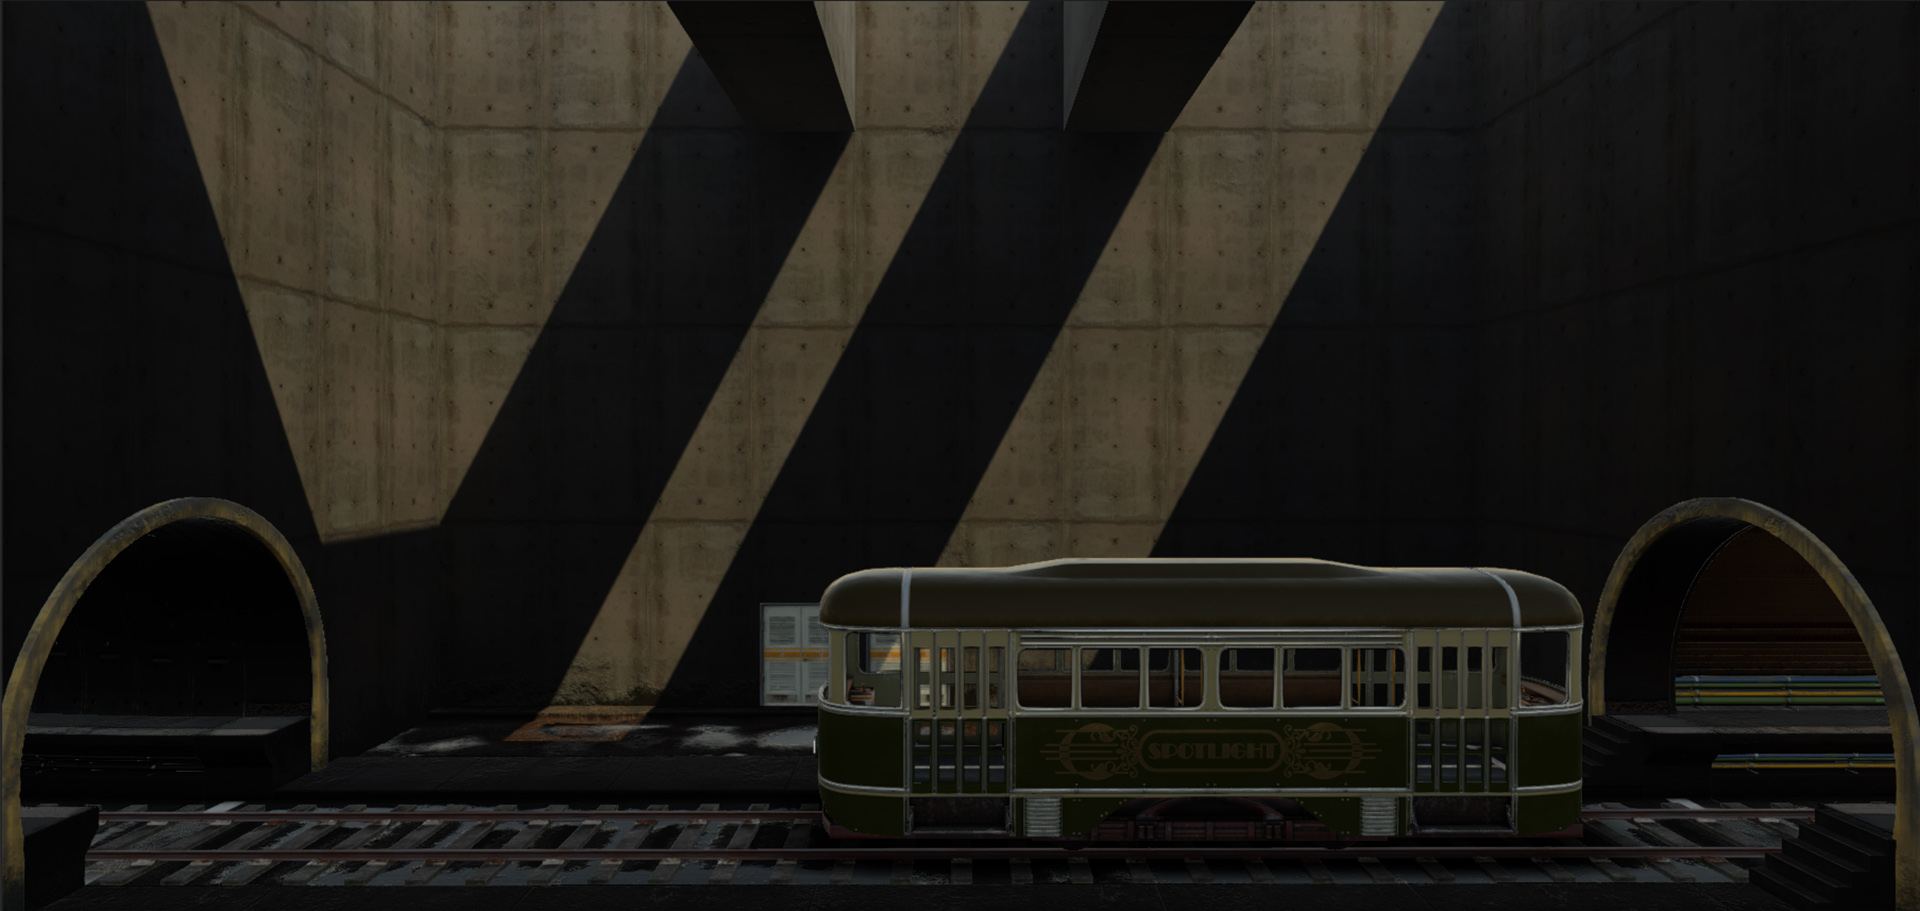
Tonemapper for your Scene (part of Post Processing Stack).
To display HDR lighting properly, a tonemapper needs to be enabled in the project.
Make sure to install Unity Post Processing Stack (version 1) from the Asset Store first.
场景的Tonemapper(后期处理堆栈的一部分)。
为了正确显示HDR照明,需要在项目中启用色调映射器。
确保 首先从资产商店 安装 Unity Post Processing Stack (版本1)。
Create a Post Process Profile Asset in your project and configure it as follows:
在您的项目中创建一个后处理配置文件资产,并按以下步骤进行配置:
Enable Color Grading > Tonemapper > ACES (Academy Color Encoding Standards)
启用颜色分级 > Tonemapper > ACES (学院色彩编码标准)
Enable Dithering. Dithering allows the Scene to alleviate banding artifact introduced by 8 Bit/channel output from HDR Scene. Modern engines use this technique to circumvent the limitation of 16M color output. Leave the rest of settings in tonemapper alone for now.
启用抖动 。 抖动允许场景减轻HDR场景的8位/通道输出所引入的条带失真。 现代引擎使用此技术来规避16M彩色输出的限制。 现在暂时将其余的设置保留在tonemapper中。
Select the “Main Camera” and add component Post Processing Behaviour.
选择“主摄像机”并添加组件 后处理行为 。
Assign the Post Process profile previously created to the profile slot. If you want to use Post Processing Stack Version 2, please refer to the readme of the package as it is currently in Beta.
将先前创建的后期处理配置文件分配给配置文件插槽。 如果要使用Post Processing Stack版本2,请参阅该程序包的自述文件,因为它目前处于Beta版中。
Enable Image effect for viewport.
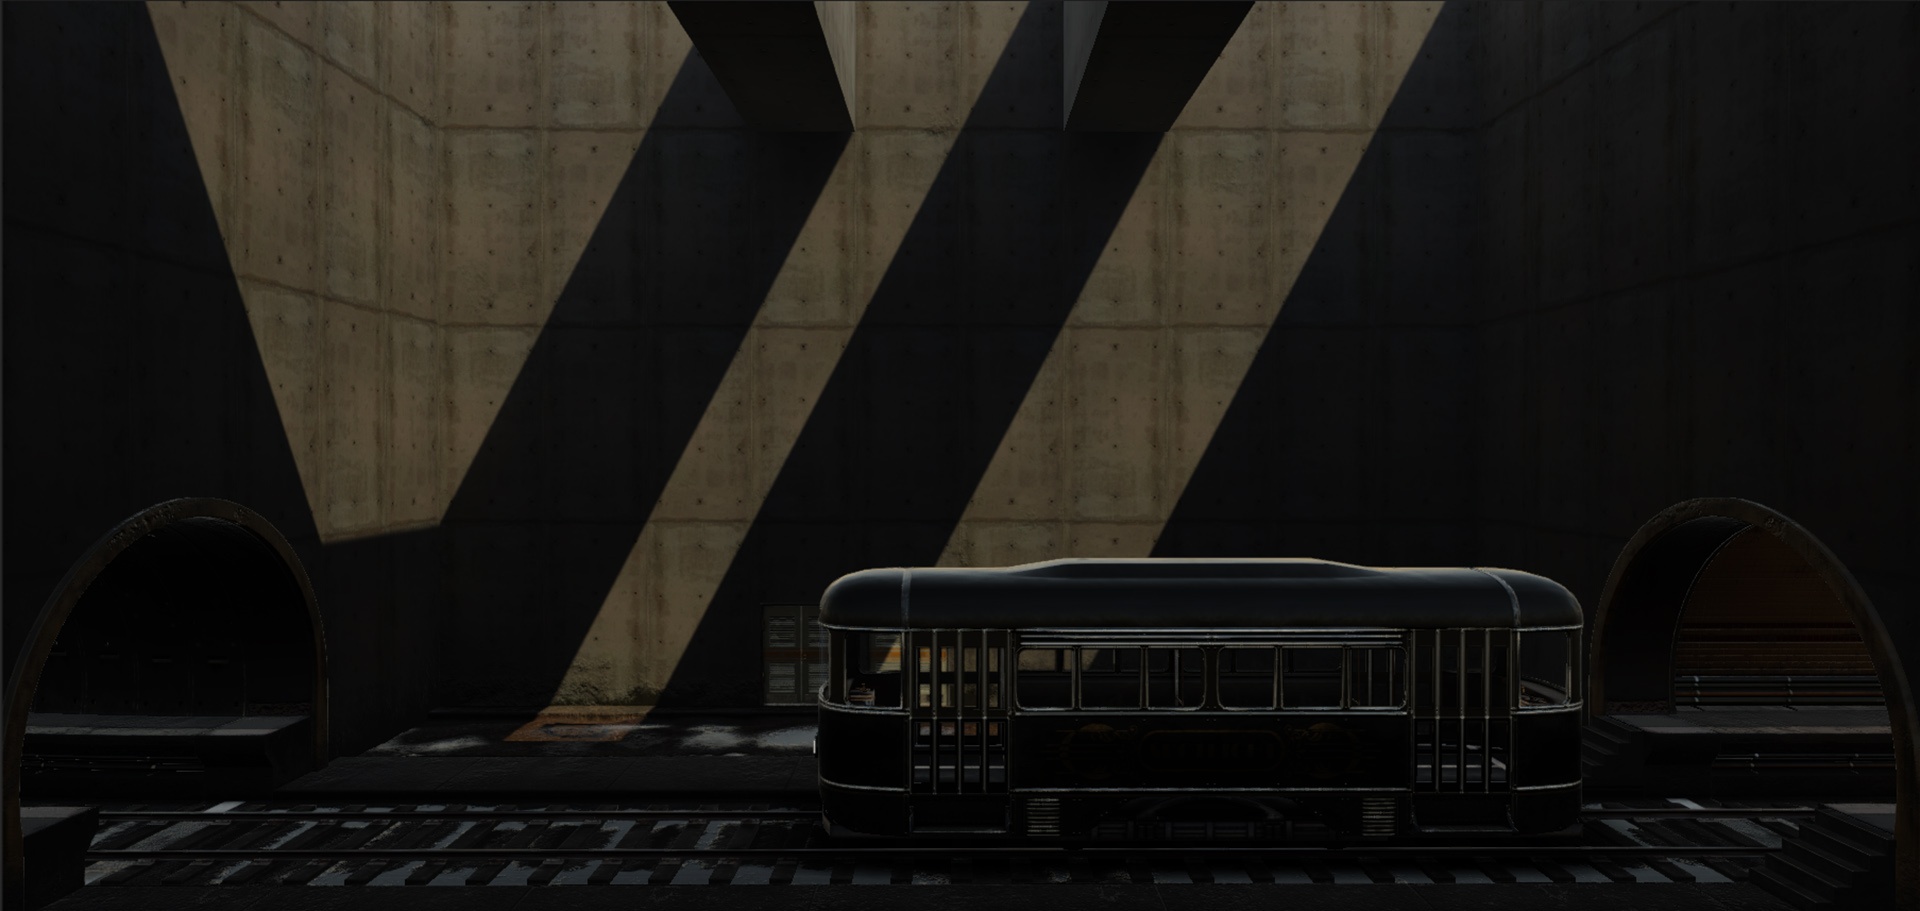
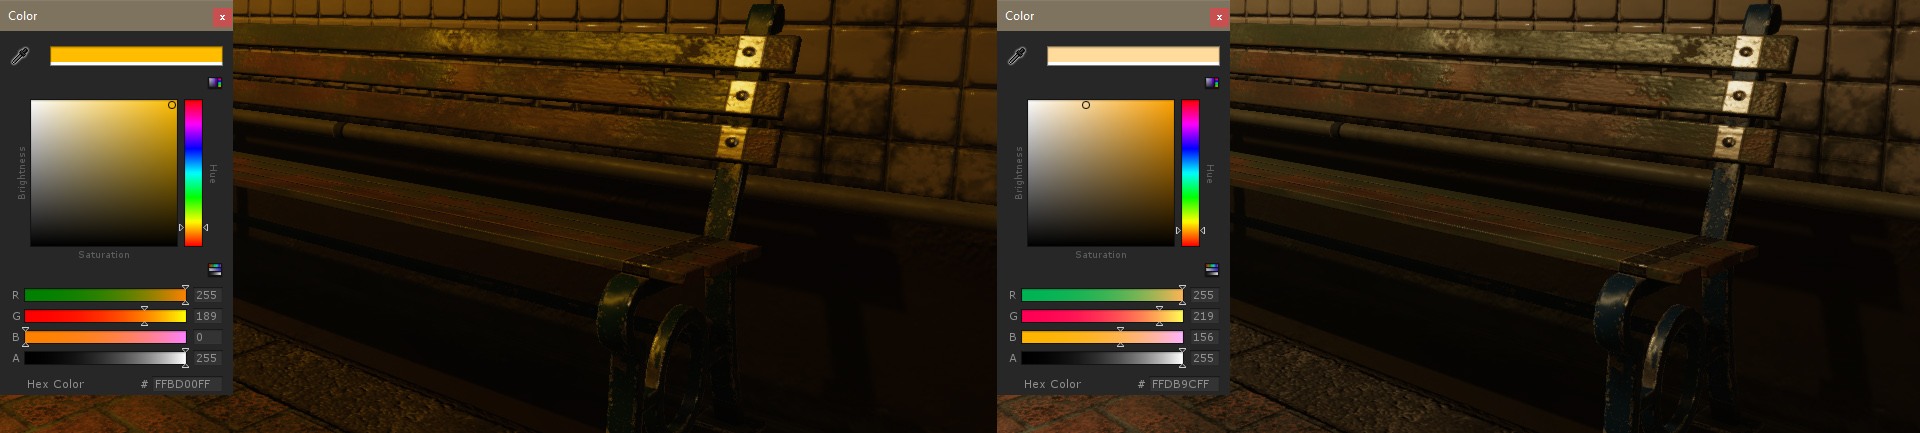
This enables you to see the tonemapper all the time while working with the Scene view.Notice the highlight rendition and the dark tunnel value separation improvements in the tonemapped Scene. If you look at the non-tonemapped Scene, you can see how the highlights didn’t converge to a unified color. (the yellowish burning sun in this case).
为视口启用图像效果。
这使您可以在使用“场景”视图时始终查看音调映射器。 注意色调映射场景中的高光渲染和暗隧道值分离改进。 如果查看非色调映射的场景,则可以看到高光如何不收敛为统一的颜色。 (在这种情况下为淡黄色的烈日)。

This setup essentially tries to replicate how a digital camera captures a scene with a fixed exposure (without exposure adaptation / eye adaptation features enabled).
此设置实质上是尝试复制数码相机如何以固定曝光(未启用曝光适应/眼睛适应功能)捕获场景。

在这一点上,内容创建者已经实现了适当的基础场景渲染设置,该设置应该可以为各种内容提供令人信服的结果。
照明和设置 (Lighting and setup)
Unity caters to lots of different lighting strategies/systems and project scenarios. We recommend that you check out our extensive documentation on lighting modes and setup to understand all the different options.
Unity迎合许多不同的照明策略/系统和项目方案。 我们建议您查阅有关照明模式和设置的大量文档,以了解所有不同的选项。
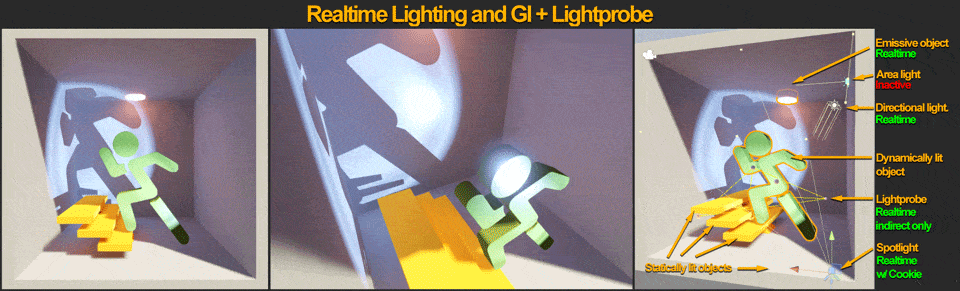
However, for fast iteration and simplicity, responsive visual feedback is necessary. For this reason, the Spotlight Tunnel Sample Scene is using real-time lighting with Realtime Global Illumination (GI). This will give us a nice range of specular response, good bounce lighting, and let us change our lights on the fly.
但是,为了快速迭代和简化,必须提供响应的视觉反馈。 因此,Spotlight隧道示例场景正在使用具有实时全局照明(GI)的实时照明。 这将为我们提供良好的镜面反射范围,良好的弹跳照明,并让我们即时更改灯光。
Realtime lighting with Realtime GI + Light Probe
使用实时GI +发光探头进行实时照明
At this stage, content creators are assumed to have meshes that are properly textured, and an assembled Scene.
在此阶段,假定内容创建者具有正确纹理化的网格和已组装的场景。
户外照明和设置 (Outdoor lighting and setup)

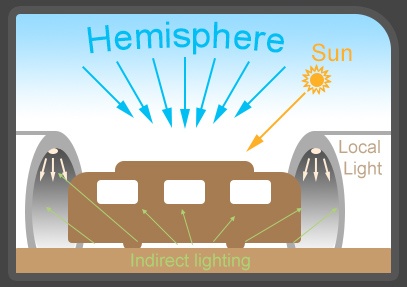
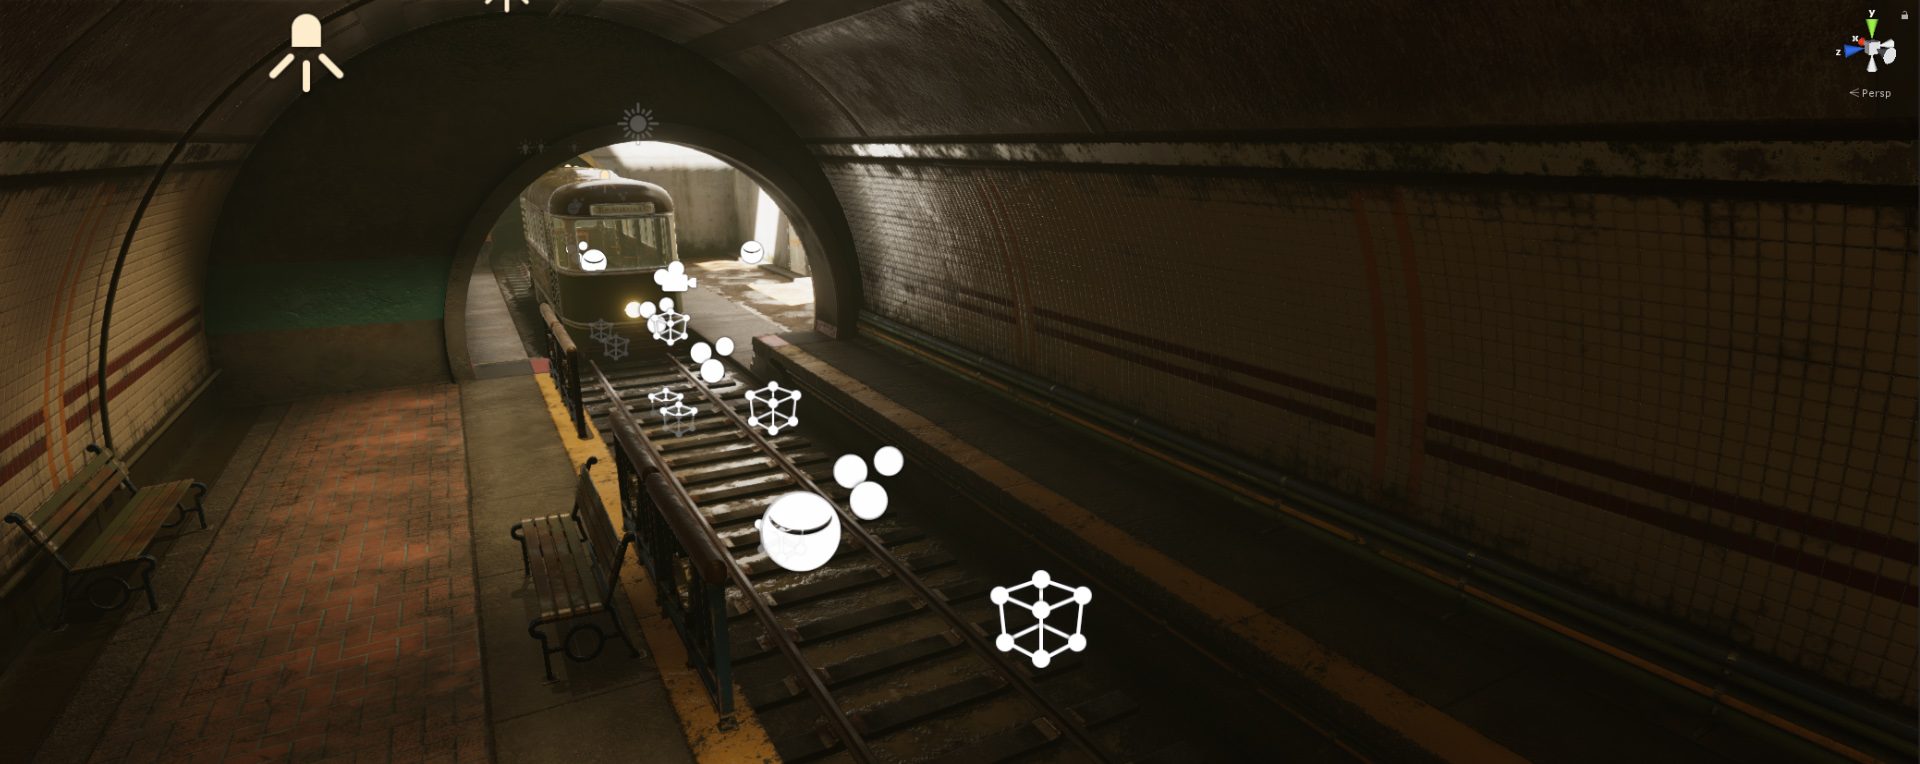
Indirect Illumination / Global Illumination. Directional light + ambient alone won’t create believable lighting. Proper hemisphere lighting requires occlusion of the skylight lighting. We also need to simulate sunlight bouncing off subjects in the scene. The sky currently renders a single color value to the Scene making it flat. This is where Realtime Global Illumination or Baked Lighting is required to calculate occlusion and indirect bounce lighting. In order to achieve that, follow these steps:
间接照明/全局照明。 单独的定向光+环境不会创建令人难以置信的照明。 适当的半球照明需要遮挡天窗照明。 我们还需要模拟阳光在场景中反弹。 当前,天空为场景渲染单一颜色值,使其平坦。 这是需要实时全局照明或烘焙照明来计算遮挡和间接反射照明的地方。 为此,请按照下列步骤操作:
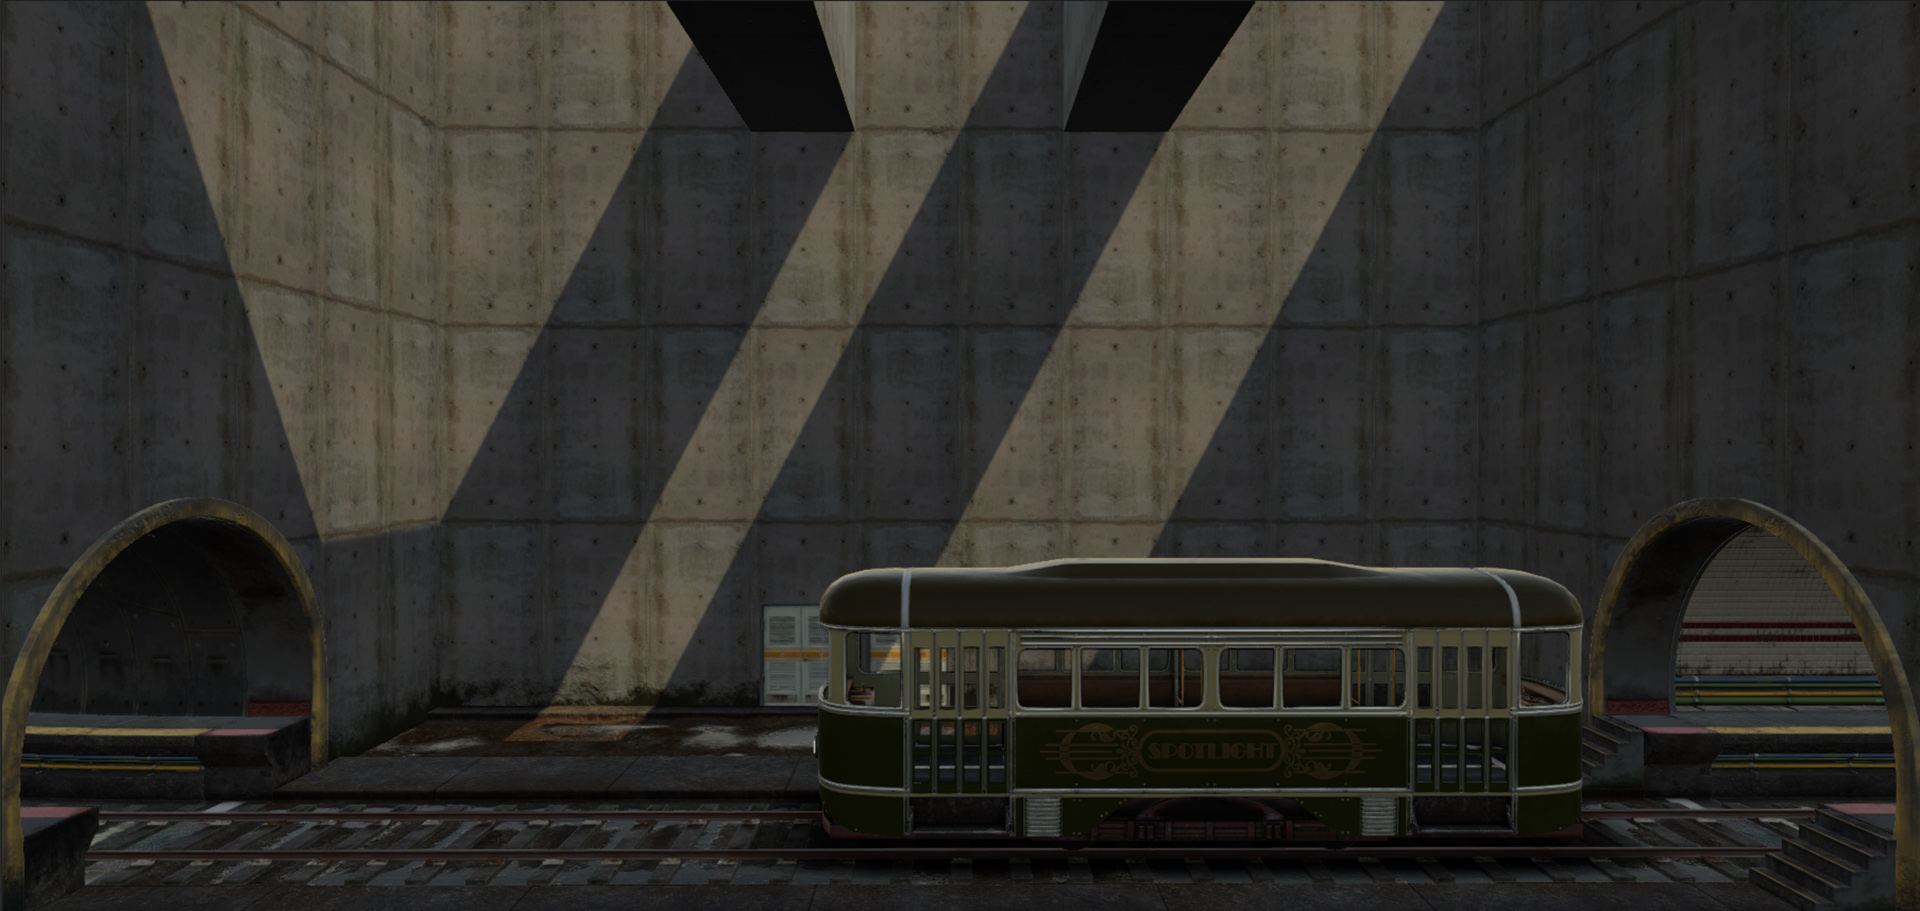
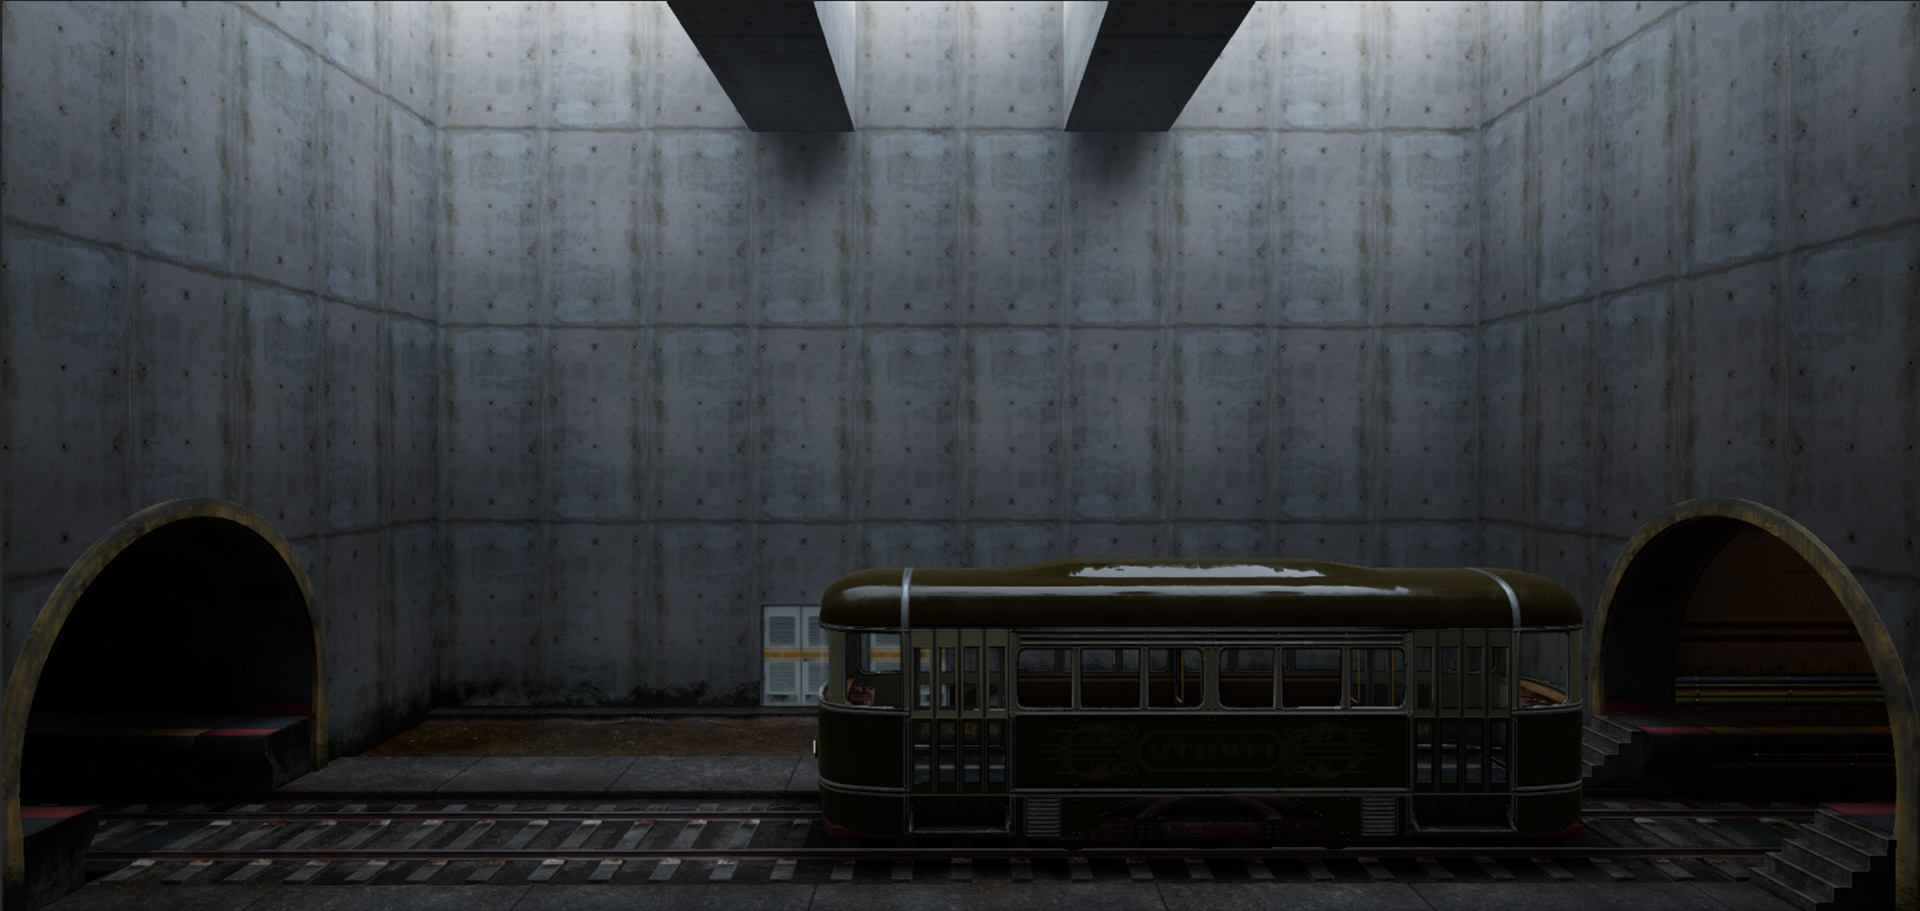
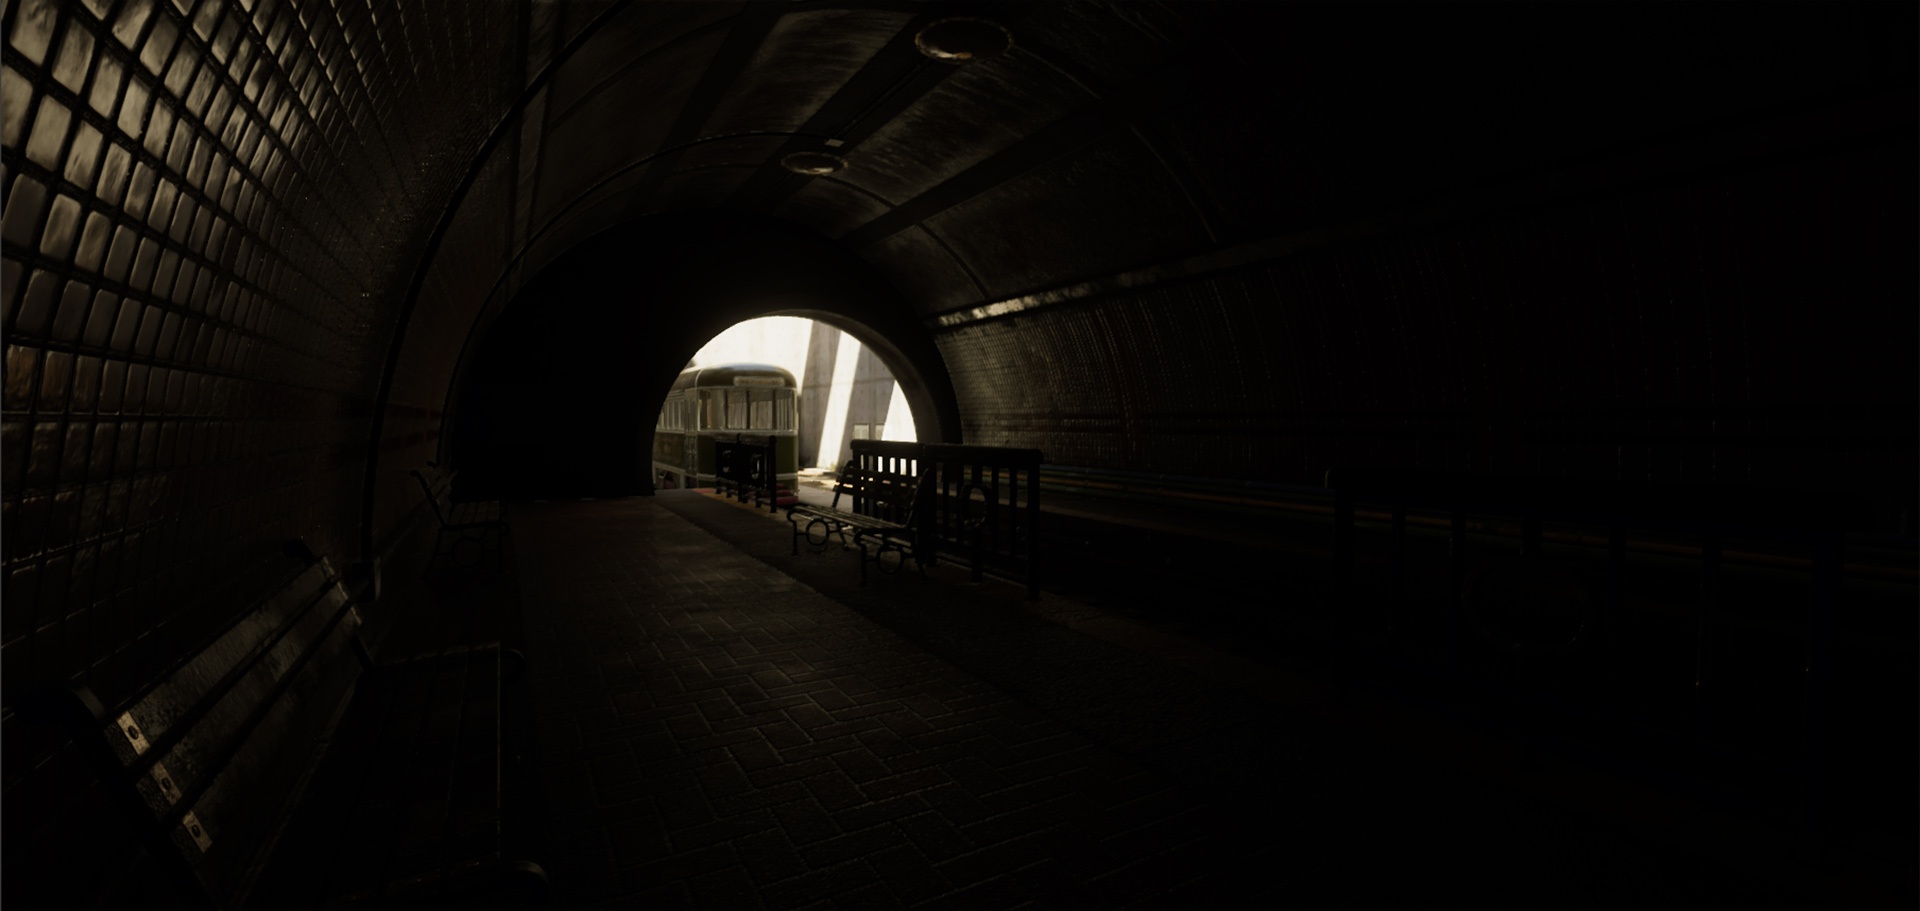
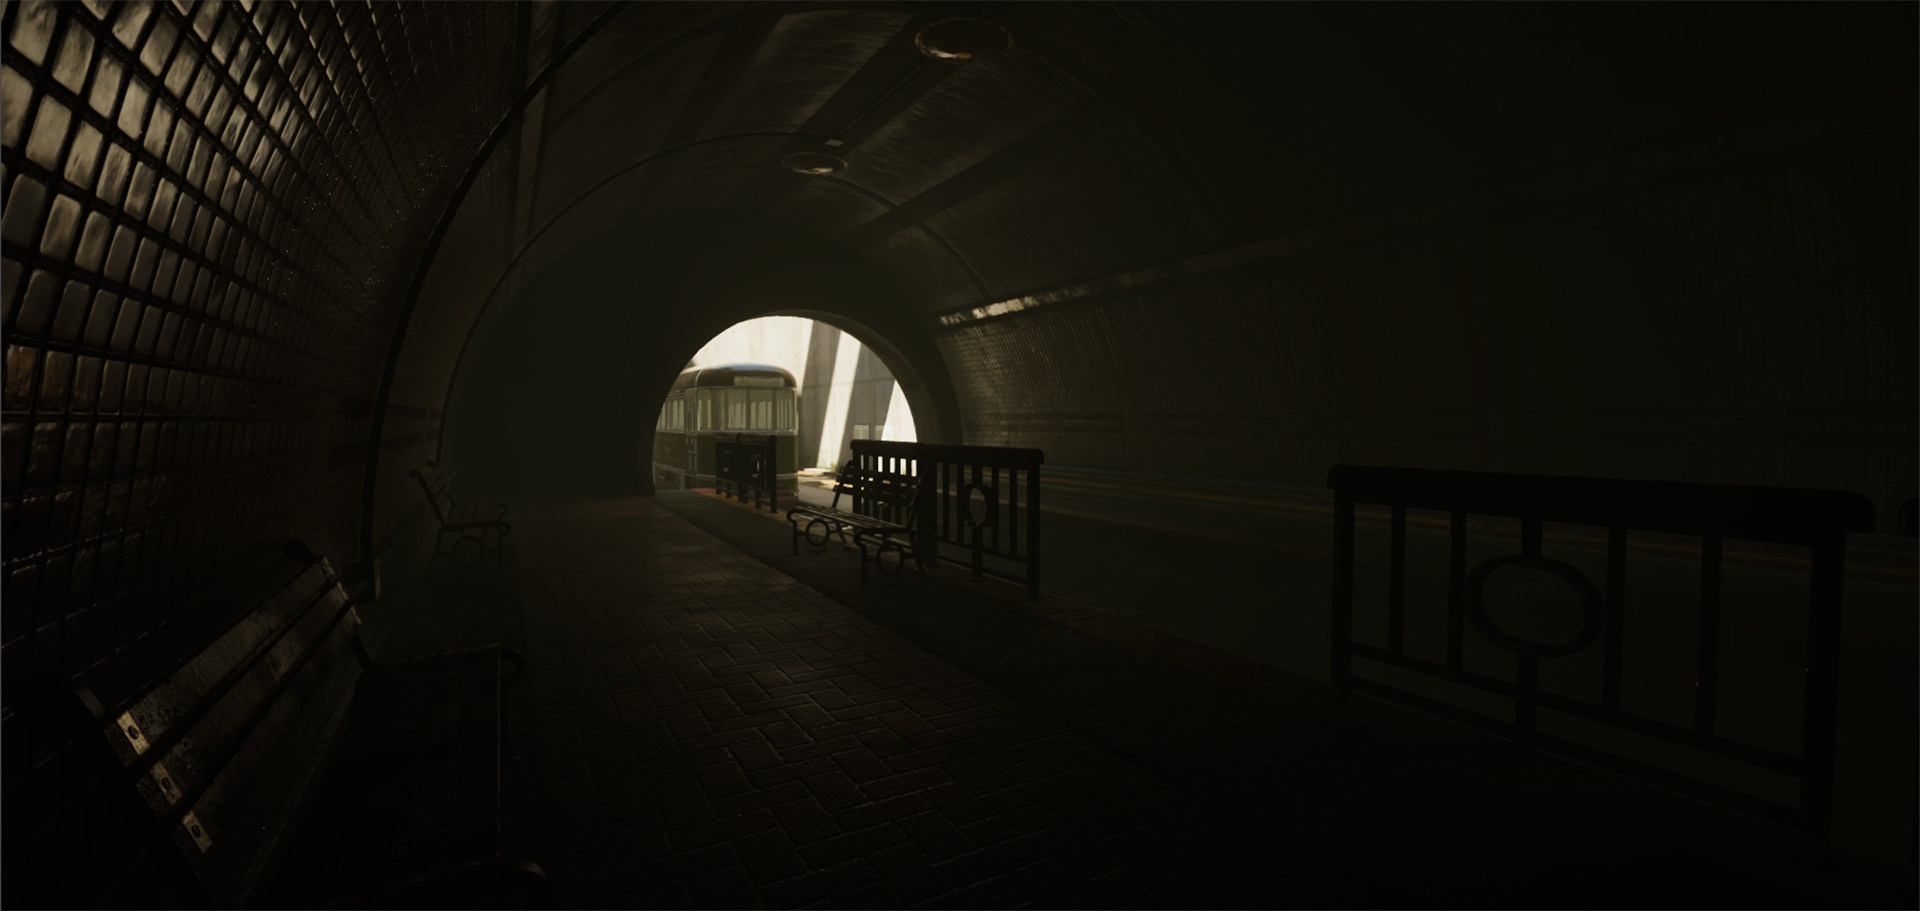
Whoa, the Scene is now dark after light generation has finished. To make matters worse, some elements of the Scene are out of place – notice the Tram and the door on the background. The static objects in the Scene currently have proper occlusion for hemisphere and indirect bounce response from the directional light, however, the rest of the objects lack a proper lighting setup.
哇,在完成发光后,场景现在很暗。 更糟的是,场景中的某些元素不合适-请注意电车和背景上的门。 场景中的静态对象当前对半球具有适当的遮挡,并且来自定向光的间接反射响应,但是,其余对象缺乏适当的照明设置。

HDR Lighting Value Many content creators don’t realize that, in reality, hemisphere lighting and sunlight are very bright light sources. They’re much brighter than the value 1. This is where HDR lighting comes into play.
HDR照明的价值许多内容创建者并未意识到,实际上,半球照明和阳光是非常明亮的光源。 它们比值1明亮得多。这就是HDR照明发挥作用的地方。
Screen Space Ambient Occlusion and Screen Space Reflection While the Scene lighting looks pretty good at this point, there’s additional details that you can add to Scene to push it further. Baking detailed occlusion usually isn’t possible because of the limited resolution set in the Realtime GI for reasonable performance. This is where Screen Space Ambient Occlusion can help. Enable SSAO in the Post Process Profile under Ambient occlusion. Settings for this example are set to Intensity 0.5, Radius to 1, Medium Sample count w/ Downsampling and Ambient Only checked for a start.
屏幕空间环境光遮挡和屏幕空间反射尽管“场景”照明在这一点上看起来不错,但您可以将其他细节添加到“场景”中以进一步推动它。 由于无法在Realtime GI中设置有限的分辨率以实现合理的性能,因此通常无法进行详细的遮挡。 屏幕空间环境光遮挡可以在此提供帮助。 在“环境光遮挡”下的“后处理”配置文件中启用SSAO。 此示例的设置设置为“强度0.5”,“半径”为1,“带有降采样的中等采样计数”和“仅环境”。
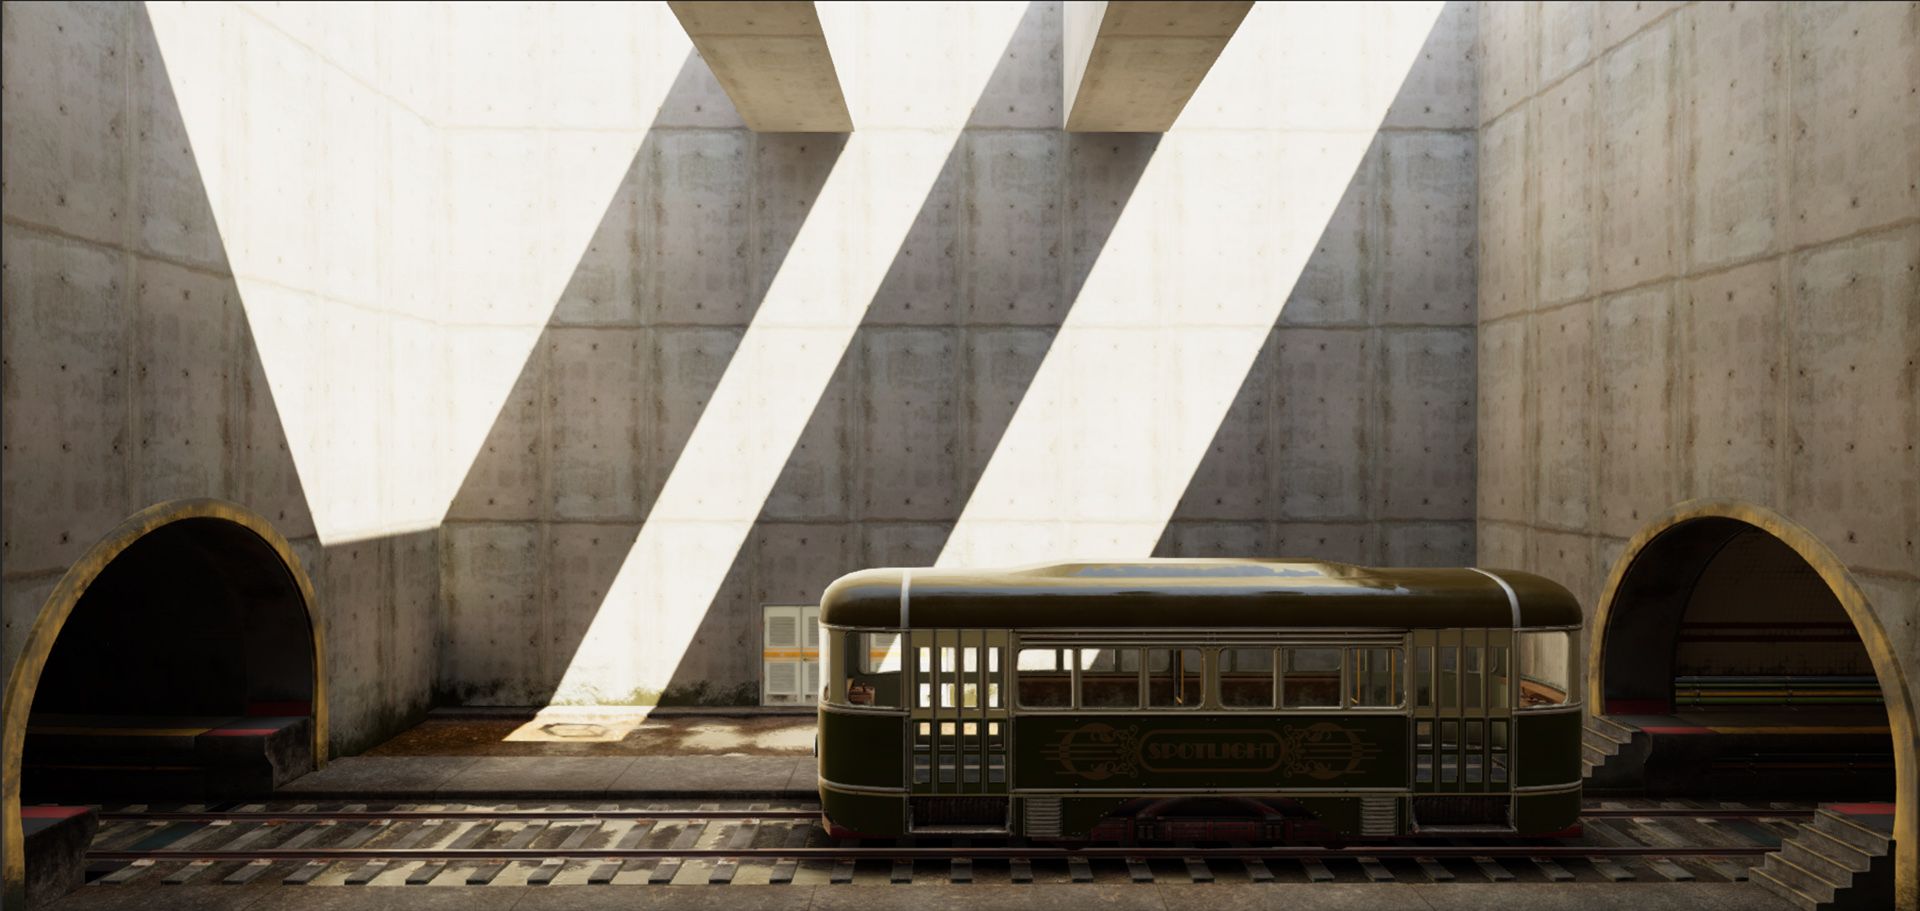
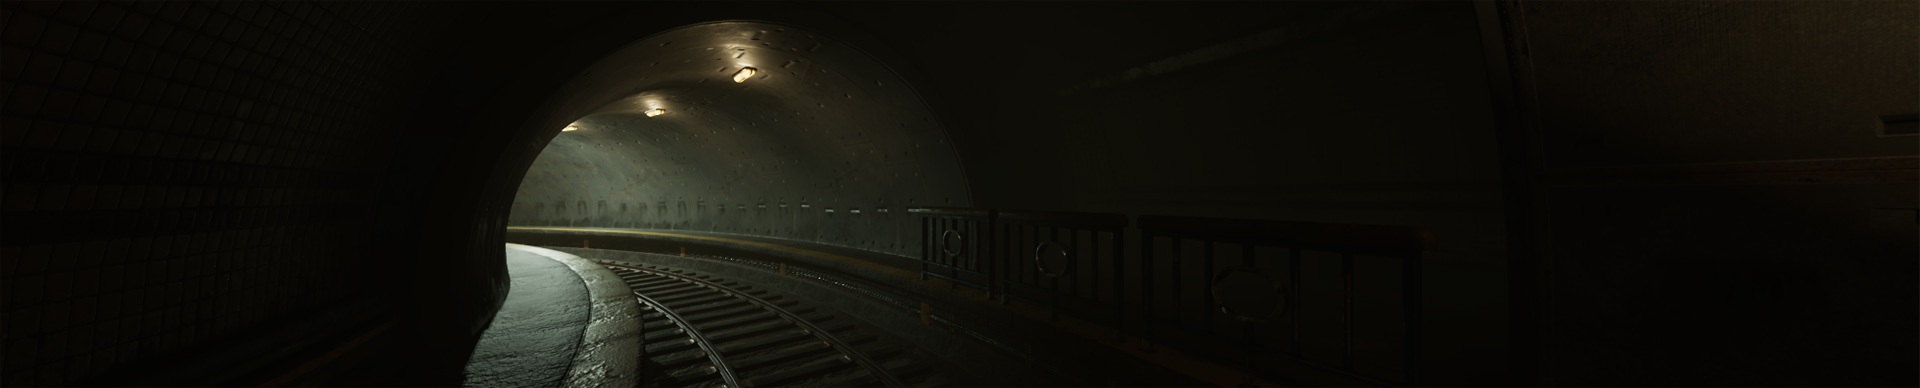
Fog At this stage the content creators have achieved somewhat believable outdoor and indoor value separation on a fixed exposure. Reflection is visible in the dark indoor areas as strong highlights and not dim muddy values.
雾在这个阶段,内容创建者在固定曝光量下实现了一定程度的室外和室内价值分离。 反射在黑暗的室内区域中可见,作为强烈的亮点,而不是模糊的浑浊值。
However, the Scene foreground elements and background elements aren’t showing up despite having strong perspective elements. A subtle fog in the Scene can create a massive difference in giving the Scene additional dimension.
但是,尽管场景元素具有很强的透视图元素,但它们并未出现。 场景中的细微雾会在为场景提供额外维度时产生巨大差异。
室内和局部照明 (Indoor and local lighting)
Spotlight / Pointlight The staples of real time local lighting are spotlights and pointlights. Area lighting can only be used when baking lighting, unless you’re using the HD Scriptable Render Pipeline (SRP), introduced in 2018.1 beta. There are new area lights that can be rendered in realtime in HD SRP mode.
聚光灯/聚光灯实时局部照明的主要内容是聚光灯和聚光灯。 除非您使用2018.1 beta版中引入的HD脚本渲染管道(SRP),否则区域照明只能在烘烤照明时使用。 在HD SRP模式下,可以实时渲染新的区域灯光。
Fundamentally, both of these types of lights emit light from one point in space and are limited by range with the spotlight having an additional limit by angle. More information about lighting is in the relevant section of Unity docs.
从根本上讲,这两种类型的光均从空间的一个点发出光,并受到范围的限制,而聚光灯具有附加的角度限制。 有关照明的更多信息,请参见Unity文档的相关部分。
The big differences between the two lights has to do with the way they cast shadows and interact with cookies. Shadowing with a point light costs 6 shadow maps compared to a spotlight’s single shadow map. For this reason shadow casting point lights are much more expensive and should be used very sparingly.
两种光源之间的巨大差异与它们投射阴影和与Cookie交互的方式有关。 与聚光灯的单个阴影贴图相比,使用点光源进行阴影化会生成6个阴影贴图。 因此,阴影投射点灯要昂贵得多,应谨慎使用。
NOTE: Baked lights don’t need to worry about this issue. Another difference is that a cookie texture on a Spotlight is a simple straight forward 2d texture while a pointlight requires a cubemap, usually authored in 3D software.
注意:烤灯不需要担心此问题。 另一个区别是,Spotlight上的Cookie纹理是简单的直截了当的2D纹理,而点光源则需要通常在3D软件中编写的立方体贴图。
Color and Intensity of light. Choosing the proper color and intensity for your lights needs to follow some loose guidelines to give plausible results.
光的颜色和强度。 为灯光选择合适的颜色和强度需要遵循一些宽松的准则,以得出合理的结果。
When selecting intensity for indoor lights, try to make sure no indoor lights have a greater intensity than the sun’s. This can create an unbalanced look depending on the Scene.Given this Sample Scene setting, it’s very unlikely that there’s high intensity lights shining from the ceiling that exceed the brightness of the daylight time.
在为室内灯光选择强度时,请尝试确保没有室内灯光的强度大于太阳的强度。 根据场景的不同,这可能会造成不平衡的外观。鉴于此``示例场景''设置,极不可能有高强度的光从天花板发出的光超过白天的亮度。

样本项目文件 (Sample project file)
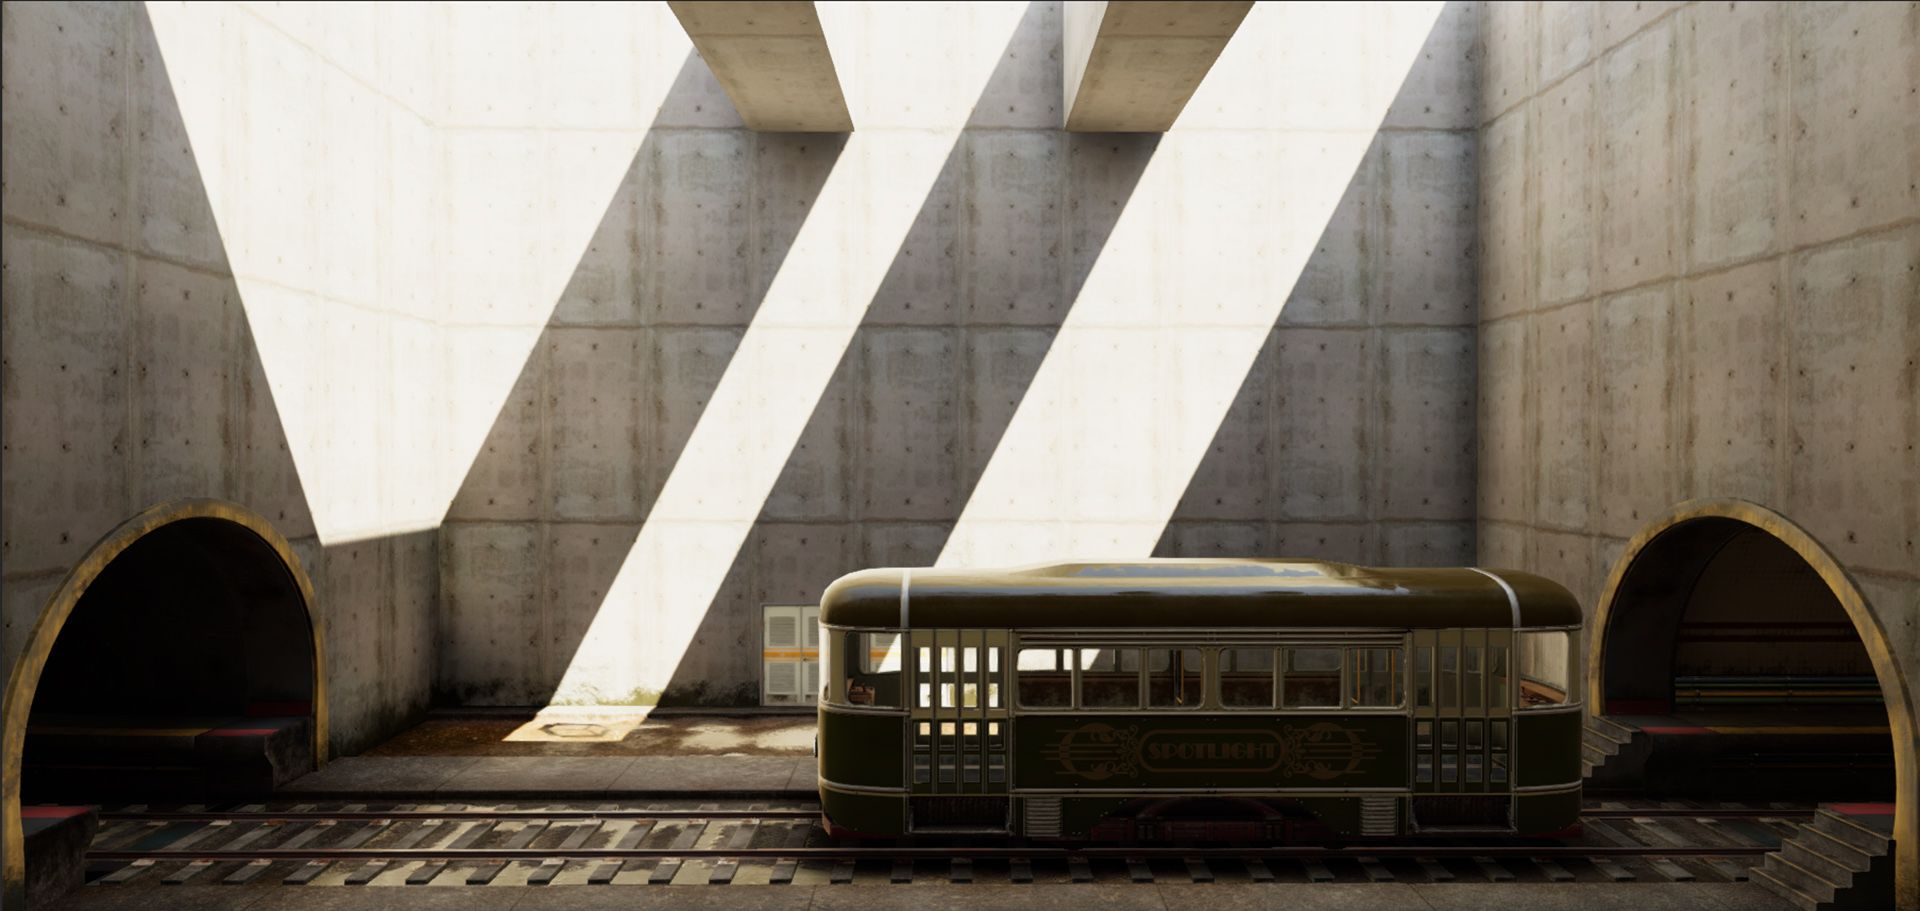
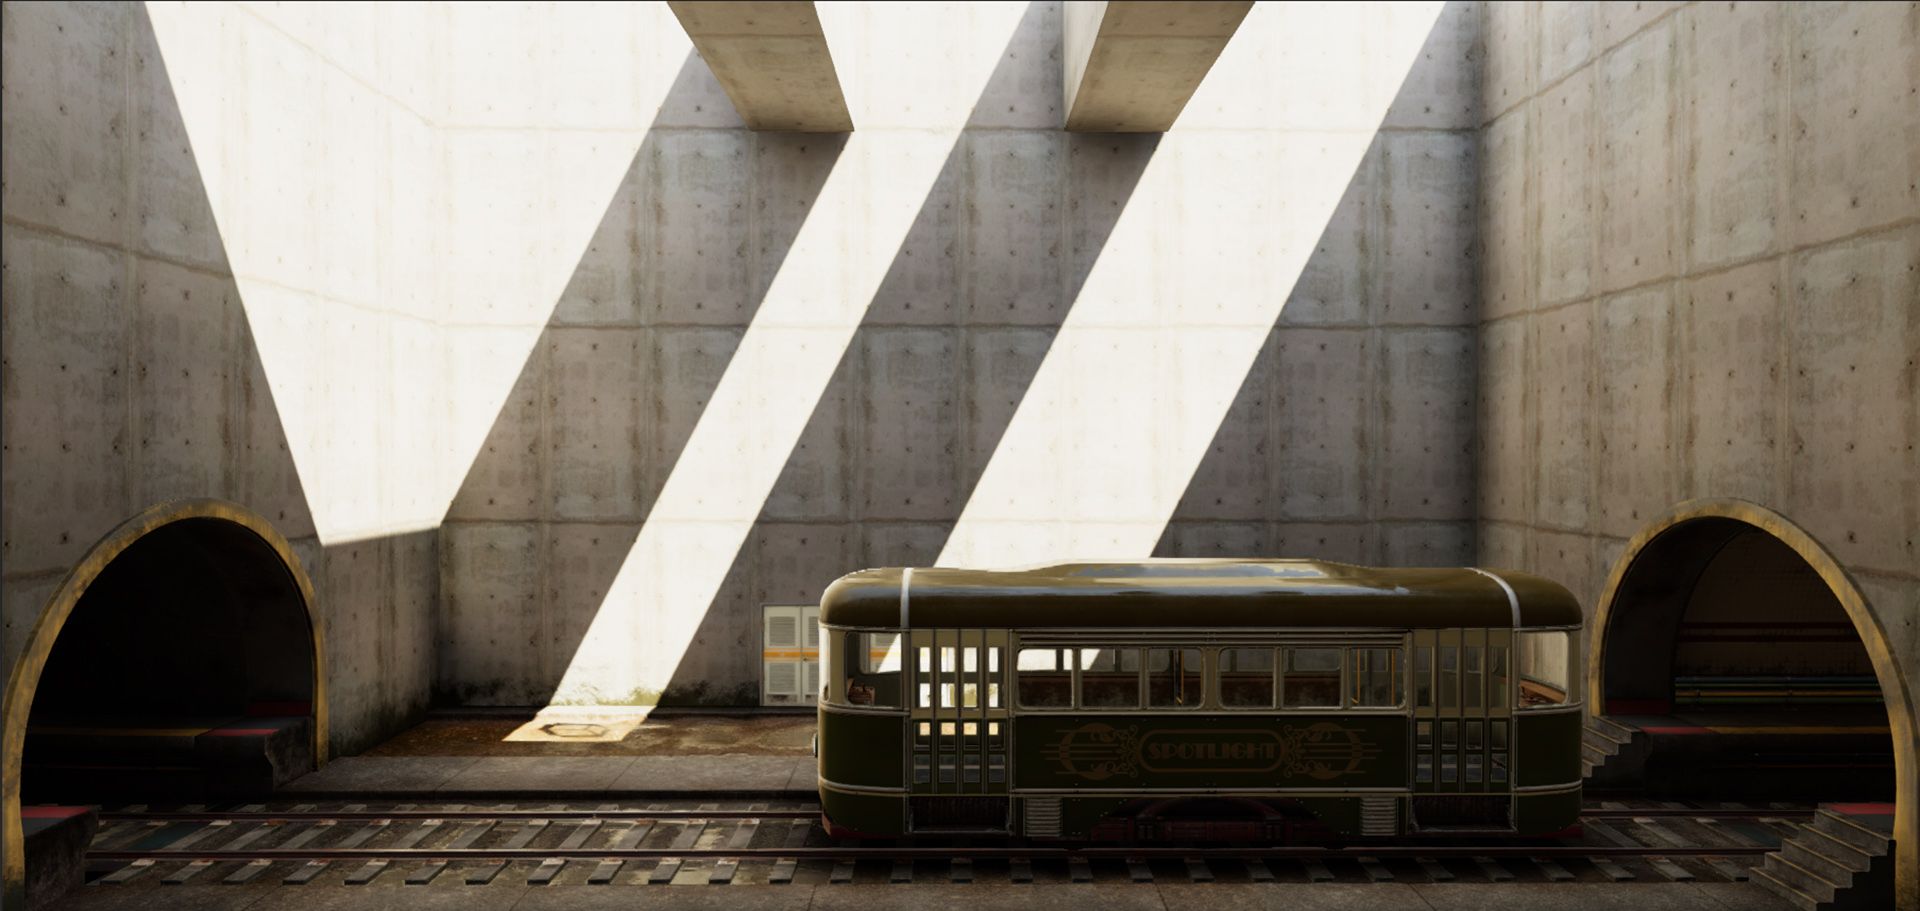
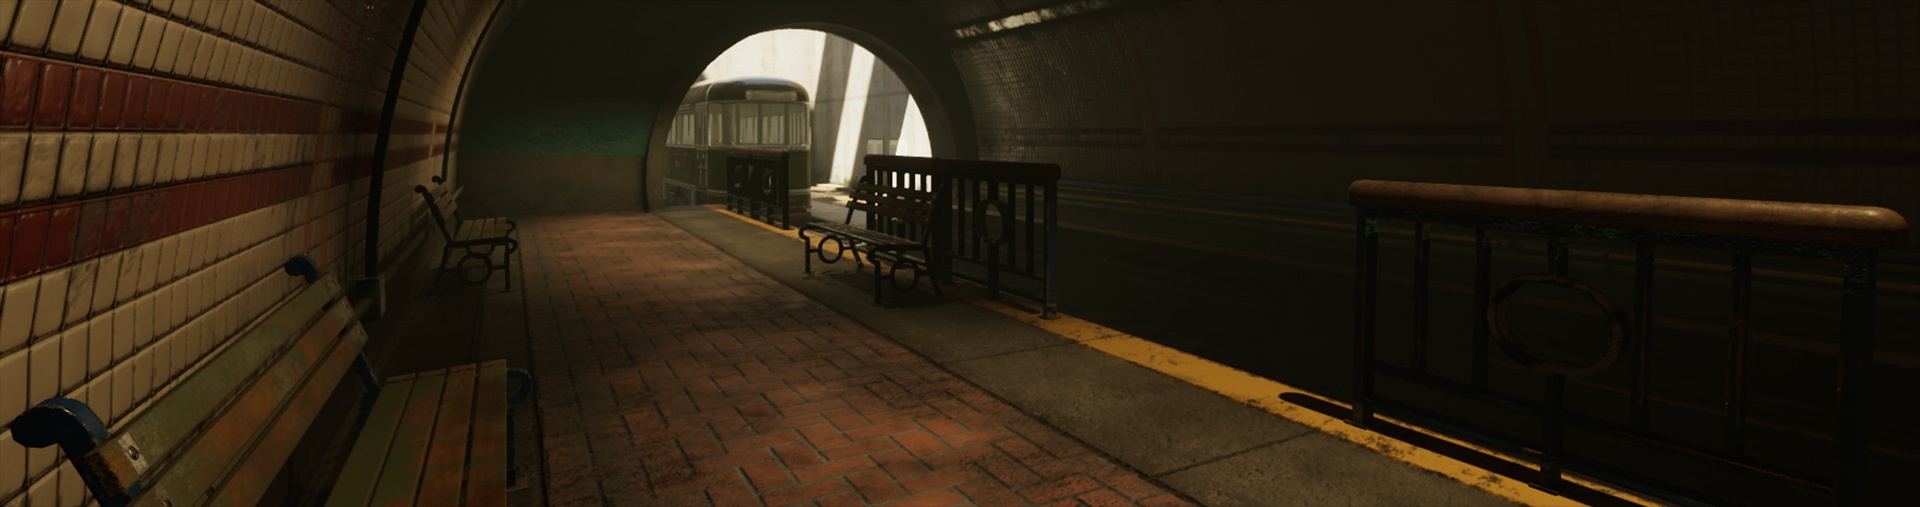
Unity San Francisco Spotlight Team has created the Spotlight Tunnel Sample Scene to help content creators do hands on learning and experimentation.
Unity San Francisco Spotlight团队创建了Spotlight隧道示例场景,以帮助内容创建者动手进行学习和实验。
Get the Spotlight Tunnel Sample project file here.
在此处获取Spotlight隧道示例项目文件。
Simply extract the project to the folder and open the project using Unity.
只需将项目提取到文件夹中,然后使用Unity打开项目。
Spotlight Tunnel Project was made with Unity 2017.1.0f3.
Spotlight隧道项目是使用Unity 2017.1.0f3创建的。
Opening this project in a newer version of Unity will require lighting rebuild as there might be lighting data format incompatibility between versions.
在更高版本的Unity中打开该项目将需要重建照明,因为版本之间可能存在照明数据格式不兼容的情况。
All assets provided in this project may only be used in a project developed with the Unity Engine.
该项目中提供的所有资产只能在使用Unity Engine开发的项目中使用。
As mentioned before, there are more of things that you need to know about when making believable visuals. You can learn more about this topic in this tutorial. We’re also going to add a full Best Practices Guide to the Unity Docs. Stay tuned!
如前所述,制作逼真的视觉效果时,您需要了解更多信息。 您可以在本教程中了解有关此主题的更多信息。 我们还将向Unity Docs添加完整的“最佳做法指南”。 敬请关注!
现在该轮到极限了。 (Now it’s your turn to push the limit.)
Hopefully this blog helps content creators to stay on track in achieving believable visuals in Unity. We can’t wait to be dazzled by all Unity content creators out there.
希望该博客可以帮助内容创建者在Unity中实现逼真的视觉效果。 我们迫不及待地被所有Unity内容创建者惊呆了。
spotlight


 1425
1425

 被折叠的 条评论
为什么被折叠?
被折叠的 条评论
为什么被折叠?
 到【灌水乐园】发言


