


本文由阿木实验室原创,联系我们请搜索微信公众号:阿木实验室
一、px4固件的模式
px4固件支持10几种飞行模式,从代码结构上分析分为基本模式、自定义模式、自定义子模式和外部模式。
1.基本模式;
基本模式又分为位置控制模式、自稳模式、手动模式。通常情况下,自驾仪处于自定义模式,目前还没有见过处于基本模式工作的代码,所以暂时不讨论基本模式。
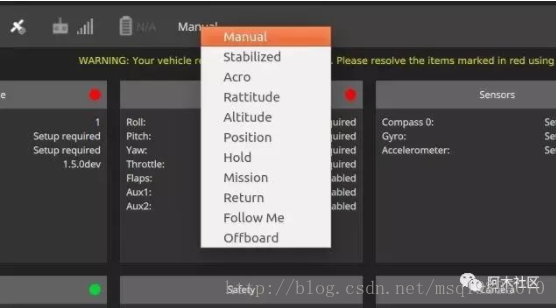
地面站的飞行模式列表
2.自定义模式
自定义模式分为手动模式、高度控制模式、位置控制模式、自动模式、特技模式、自稳模式和外部模式。
手动模式----manual
高度控制模式----altctl
位置控制模式----posctl
自动模式----auto
特技----acro
自稳模式----stabilized
外部模式----offboard
3.auto子模式
在所有自定义模式中,只有auto模式有子模式,分别为自动悬停、自动航点、自动返航、自动起飞、自动降落和自动跟随。
4.外部模式应用场合
外部模式是遵循m2m理念来设计的模式,用外接芯片或机载电脑来命令pixhawk实现飞行,外部是一个大概念,外接通讯模块用地面站通过网络驱动自驾仪飞行也算是外部模式的一种应用场景。
外部模式是一种模块化的设计方式,飞控只做关于飞行的事情,而其他任务,比如视觉识别,障碍分析等,都可以使用外部设备(机载电脑或其他智能设备)来进行,并发送mavlink指令让飞控完成飞行任务。这样的工作模式,各尽其职,飞控完成实时性高的飞行任务,外部设备完成运算量、数据量大的其他任务,具有更高的安全性。从软件结构上,也降低了耦合。外部模式接受来自 Cortex系列多核处理器的运算结果。通信采用SPI,串口,IIC模式,把多核处理器运算的结果,传输给飞控系统,来控制飞机的位置。
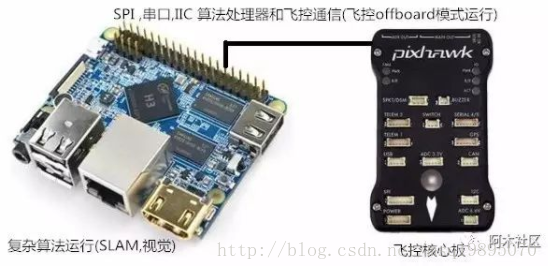
Cortex系列多核处理器运行复杂算法 和 飞控通信
二、jmavsim软件在环仿真
1.jmavsim环境的安装
软件在环仿真是一种以软件虚拟硬件的形式来仿真自驾仪的。搜索px4源码,可以发现大量的sitl关键字,几乎所有的设备驱动都具有软件仿真能力。
jmavsim的运行依赖于java 8的运行环境。原来的ubuntu默认有java的环境,但是这个默认的环境版本太低,去java官网下载java8的环境,安装设置好。
Ubuntu下面的java8的安装,自行百度即可,这里不做说明。
2.jmavsim的使用
在安装完java 8以后,我们就可以用make命令来进行仿真了。
首先打开终端,切换至firmware的下载路径,如:cd ~/downloads/px4/firmware
然后输入一下指令 make posix_sitl_default jmavsim
这句代码的意思是,编译firmware 目标代码编译为posix系统软件仿真代码,并用仿真器打开编译好的目标文件。
如果编译且运行成功,终端会出现以下信息
______ __ __ ___
| ___ \ \ \ / / / |
| |_/ / \ V / / /| |
| __/ / \ / /_| |
| | / /^\ \ \___ |
\_| \/ \/ |_/
px4 starting.
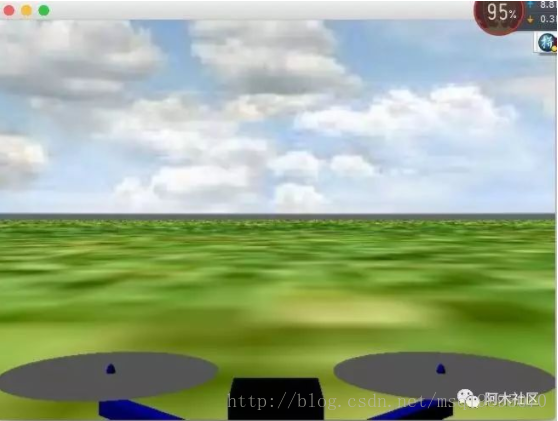
这时候出现了飞机的一个3D界面,打开模拟界面,这时候同时可以打开QGC地面站,地面站可以直接连上这个仿真的四旋翼,这时候地面站可以直接控制飞机了,切换模式,一键起飞等。和操作真的飞机一样,这样来验证飞机的逻辑功能非常有利。
注:QGC地面站有模拟摇杆,可以开启。

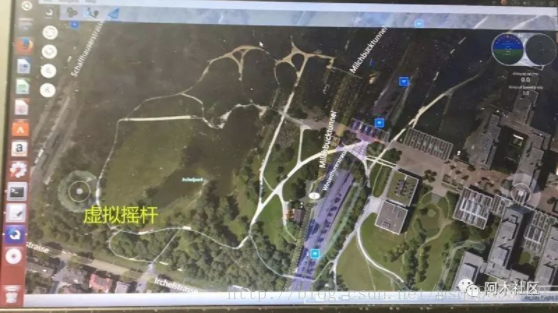
点击虚拟摇杆,就可以遥控这个仿真的飞机飞行。也可以在命令行 输入命令来控制飞机比如commander takeoff一键起飞等等。
3.在仿真环境中添加自己的代码
和普通编译一样,仿真模式也可以添加自己的模块。
路径同样在firmware/cmake/configs
在此文件夹下找到文件 posix_sitl_default.cmake
在此文件中添加自己的模块名就可以编译了。
要实现自己的代码被系统编译,只要修改以上的编译脚本即可,把自己写的应用添加即可。
4.仿真环境中的启动脚本
仿真环境下,也需要有编译脚本来指定什么文件应该被编译,如果已经编译了自己的模块,但是没有在启动脚本中启动自己的模块,模块依然是无法自动运行的。
仿真环境的启动脚本位置,会因为px4源码的版本不一样而放在不同的路径,不过不用担心,启动脚本存放的地方,仿真系统启动后会明确表示出所在路径。
首先,启动仿真器make posix_sitl_default jmavsim
如果成功可以看到上文中描述的图案,然后我们往上搜寻,可以发现某行有如下形式的信息:
rcS_dir: posix-configs/SITL/init/lpe
这句话是说目前启动的仿真器使用的启动脚本是posix-configs/SITL/init/lpe
所以以后我们只需要启动仿真器 然后查看rcS_dir就可以知道目前使用的启动脚本了,然后我们打开此文件,添加我们的模块启动代码,就可以在仿真器中使用我们自己写好的模块了。
5.自定义模块在仿真器中的注意事项。
填坑1:自定义模块中 千万不要使用exit(0)来结束进程,在nuttx中每个模块是一个进程,使用exit没有什么影响,但是仿真环境中,整个px4固件整个是一个基于posix系统的x86构架的进程,每个模块只是一个子线程,所以如果使用exit将会直接结束仿真器的进程,我们应该把exit的地方用return 0;来代替。
填坑2:如果使用的是mac系统,想要用地面站的摇杆来命令仿真器中的无人机飞行的话,解锁后,一定要先将方向摇杆旋转几圈,否则无人机会朝前方45度飞行。
三、进入offboard前的必备知识
1.vehicle_command命令
在进入offboard前,我们必须清楚一些基本的操作命令,所有可以使用的命令都在firmware/msg/vehicle_command.msg下有所记录。
打开文件,我们可以发现上面有很多常量,都是一些命令id,最下面才是这个 uorb topic的内容,如下:
float32 param1# Parameter 1, as defined by MAVLink uint32 VEHICLE_CMD enum.
float32 param2# Parameter 2, as defined by MAVLink uint32 VEHICLE_CMD enum.
float32 param3# Parameter 3, as defined by MAVLink uint32 VEHICLE_CMD enum.
float32 param4# Parameter 4, as defined by MAVLink uint32 VEHICLE_CMD enum.
float64 param5# Parameter 5, as defined by MAVLink uint32 VEHICLE_CMD enum.
float64 param6# Parameter 6, as defined by MAVLink uint32 VEHICLE_CMD enum.
float32 param7# Parameter 7, as defined by MAVLink uint32 VEHICLE_CMD enum.
uint32 command# Command ID, as defined MAVLink by uint32 VEHICLE_CMD enum.
uint32 target_system# System which should execute the command
uint32 target_component# Component which should execute the command, 0 for all components
uint32 source_system# System sending the command
uint32 source_component# Component sending the command
uint8 confirmation# 0: First transmission of this command. 1-255: Confirmation transmissions (e.g. for kill command)
我们需要做的就是,将想要的command id填入变量uint32 command,然后将参数填入param1 param2...,将target_system 和 target_component负值,并发布这个topic就可以命令px4了,target_system 和 target_component的值必须复制为vehicle_status这个topic里面的值,我们只需要订阅这个topic并进行负值就可以了。
2.vehicle_command_ack
如果我们publish了命令,那么px4在执行完命令以后会相应的发布一个vehicle_command_ack topic,我们可以先看看vehicle_command_ack的描述:
uint8 VEHICLE_RESULT_ACCEPTED = 0
uint8 VEHICLE_RESULT_TEMPORARILY_REJECTED = 1
uint8 VEHICLE_RESULT_DENIED = 2
uint8 VEHICLE_RESULT_UNSUPPORTED = 3
uint8 VEHICLE_RESULT_FAILED = 4
uint32 ORB_QUEUE_LENGTH = 3
uint16 command
uint8 result
可以看到这个topic只有两个变量,其中的result就是执行的结果,结果有5个取值,非别为上面的产量所描述的值,如果值为0(VEHICLE_RESULT_ACCEPTED)表示执行成功,其他表示失败原因。
从现在开始我们已经可以对px4做一些操作了。
例子1:改变当前模式,发布vehicle_command消息,来改变飞机当前模式状态
while(1)
{
_command.command = vehicle_command_s::VEHICLE_CMD_DO_SET_MODE;//设置模式命令id
_command.param1 = 1.0f;//基本模式为costum
_command.param2 = 3.0f;//自定义模式为posctl
_command.param3 = 0.0f;//自定义子模式为无
if (vehicle_command_pub != nullptr) {
orb_publish(ORB_ID(vehicle_command), vehicle_command_pub, &_command);//发布这个命令
} else {
vehicle_command_pub = orb_advertise(ORB_ID(vehicle_command), &_command);
}
vehicle_command_ack_s _ack;
fds.fd = vehicle_command_ack_sub;
while(1)
{
int pret = px4_poll(&fds, 1, 1000);//检测vehicle_command_ack topic是否有更改
if (pret <= 0)
{
mavlink_log_critical(&mavlink_log_pub, "recv _ack over 1 second,continue!");
continue;
}
orb_copy(ORB_ID(vehicle_command_ack), vehicle_command_ack_sub, &_ack);//拷贝vehicle_command_ack_s topic
break;
}
if (_ack.result == vehicle_command_s::VEHICLE_CMD_RESULT_ACCEPTED)//如果执行成功,跳出循环
{
break;
}
//如果执行失败,循环回去继续发送command
mavlink_log_critical(&mavlink_log_pub, "can't go into posctl mode,continue!");
usleep(10000);
}
例子2:解锁无人机
_command.command = vehicle_command_s::VEHICLE_CMD_COMPONENT_ARM_DISARM;//解锁命令id
_command.param1 = 1.0f;//1.0为解锁 0.0为加锁
if (vehicle_command_pub != nullptr) {
orb_publish(ORB_ID(vehicle_command), vehicle_command_pub, &_command);//发布这个命令
} else {
vehicle_command_pub = orb_advertise(ORB_ID(vehicle_command), &_command);
}
在vehicle_command中还有很多有用的命令,可以执行摸索。
四、进入offboard模式
1.使用遥控器进入offboard模式
如果使用的地面站,我们会清楚的看到在飞行模式设置中可以设置一个通道来专门进入offboard模式,这种模式只是临时的进入offboard,我不推荐这种进入offboard模式的方式,offboard本就是一种应该全部由代码去完成的模式。
2.使用代码进入offboard模式
上面我们已经讲过了vehicle_command的使用,使用代码进入offboard模式也是使用这种方式来进行的。
进入offboard模式的命令id是VEHICLE_CMD_NAV_GUIDED_ENABLE
遗憾的是,offboard模式是比较特殊的,直接使用命令来切换至offboard模式是不行的,我们需要先进行另外一个topic的发布----offboard_control_mode。
为了保证飞行的安全性,px4决定,必须要位置最低每秒2此的频率发布offboard_control_mode topic 才能保证offboard online,这是为了安全考虑,如果机载计算机突然死机或者失去了联结,那么px4在500ms后没有收到通讯将自动切换到开启offboard之前的模式。
所以,我们需要创建一个线程,循环发布offboard_control_mode topic,如果做实际项目的时候,那么这个项目应该更改为,不停的接受机载计算机发来的心跳包,如果有就发布offboard_control_mode topic,这样才能保证安全性.
接下来,我们就可以使用vehicle_command切换到offboard模式了。
进入offboard模式以后,我们会发现,无法使用位置命令,速度命令来命令飞机飞行,这是因为offboard_control_mode发布是我们没有进行正确的设置。offboard_control_mode topic结构如下:
# Off-board control mode
bool ignore_thrust
bool ignore_attitude
bool ignore_bodyrate
bool ignore_position
bool ignore_velocity
bool ignore_acceleration_force
bool ignore_alt_hold
我们需要忽略掉加速度控制,才能进行速度、位置、姿态的控制ignore_acceleration_force=true;
原因在如下代码中:
case vehicle_status_s::NAVIGATION_STATE_OFFBOARD:
control_mode.flag_control_manual_enabled = false;
control_mode.flag_control_auto_enabled = false;
control_mode.flag_control_offboard_enabled = true;
/*
* The control flags depend on what is ignored according to the offboard control mode topic
* Inner loop flags (e.g. attitude) also depend on outer loop ignore flags (e.g. position)
*/
control_mode.flag_control_rates_enabled = !offboard_control_mode.ignore_bodyrate ||
!offboard_control_mode.ignore_attitude ||
!offboard_control_mode.ignore_position ||
!offboard_control_mode.ignore_velocity ||
!offboard_control_mode.ignore_acceleration_force;
control_mode.flag_control_attitude_enabled = !offboard_control_mode.ignore_attitude ||
!offboard_control_mode.ignore_position ||
!offboard_control_mode.ignore_velocity ||
!offboard_control_mode.ignore_acceleration_force;
control_mode.flag_control_rattitude_enabled = false;
control_mode.flag_control_acceleration_enabled = !offboard_control_mode.ignore_acceleration_force &&
!status.in_transition_mode;
control_mode.flag_control_velocity_enabled = (!offboard_control_mode.ignore_velocity ||
!offboard_control_mode.ignore_position) && !status.in_transition_mode &&
!control_mode.flag_control_acceleration_enabled;
control_mode.flag_control_climb_rate_enabled = (!offboard_control_mode.ignore_velocity ||
!offboard_control_mode.ignore_position) && !control_mode.flag_control_acceleration_enabled;
control_mode.flag_control_position_enabled = !offboard_control_mode.ignore_position && !status.in_transition_mode &&
!control_mode.flag_control_acceleration_enabled;
control_mode.flag_control_altitude_enabled = (!offboard_control_mode.ignore_velocity ||
!offboard_control_mode.ignore_position) && !control_mode.flag_control_acceleration_enabled;
break;
可以看出,如果开启了加速度控制,那么位置控制、速度控制等 将不可用!
五、使用offboard模式在仿真器中飞行
1.position_setpoint_triplet topic
打开position_setpoint_triplet topic的定义我们可以看到如下信息:
px4/position_setpoint previous (消息成员,嵌套了其他消息)
px4/position_setpoint current
px4/position_setpoint next
uint8 nav_state# report the navigation state
可以看到position_setpoint_triplet是三个position_setpoint的组合形式,我们再打开position_setpoint:
uint8 SETPOINT_TYPE_POSITION=0# position setpoint
uint8 SETPOINT_TYPE_VELOCITY=1# velocity setpoint
uint8 SETPOINT_TYPE_LOITER=2# loiter setpoint
uint8 SETPOINT_TYPE_TAKEOFF=3# takeoff setpoint
uint8 SETPOINT_TYPE_LAND=4# land setpoint, altitude must be ignored, descend until landing
uint8 SETPOINT_TYPE_IDLE=5# do nothing, switch off motors or keep at idle speed (MC)
uint8 SETPOINT_TYPE_OFFBOARD=6 # setpoint in NED frame (x, y, z, vx, vy, vz) set by offboard
uint8 SETPOINT_TYPE_FOLLOW_TARGET=7 # setpoint in NED frame (x, y, z, vx, vy, vz) set by follow target
bool valid# true if setpoint is valid
uint8 type# setpoint type to adjust behavior of position controller
float32 x# local position setpoint in m in NED
float32 y# local position setpoint in m in NED
float32 z# local position setpoint in m in NED
bool position_valid# true if local position setpoint valid
float32 vx# local velocity setpoint in m/s in NED
float32 vy# local velocity setpoint in m/s in NED
float32 vz# local velocity setpoint in m/s in NED
bool velocity_valid# true if local velocity setpoint valid
bool alt_valid# do not set for 3D position control. Set to true if you want z-position control while doing vx,vy velocity control.
float64 lat# latitude, in deg
float64 lon# longitude, in deg
float32 alt# altitude AMSL, in m
float32 yaw# yaw (only for multirotors), in rad [-PI..PI), NaN = hold current yaw
bool yaw_valid# true if yaw setpoint valid
bool disable_mc_yaw_control# control yaw for mc (used for vtol weather-vane mode)
float32 yawspeed# yawspeed (only for multirotors, in rad/s)
bool yawspeed_valid# true if yawspeed setpoint valid
float32 loiter_radius# loiter radius (only for fixed wing), in m
int8 loiter_direction# loiter direction: 1 = CW, -1 = CCW
float32 pitch_min# minimal pitch angle for fixed wing takeoff waypoints
float32 a_x# acceleration x setpoint
float32 a_y# acceleration y setpoint
float32 a_z# acceleration z setpoint
bool acceleration_valid# true if acceleration setpoint is valid/should be used
bool acceleration_is_force# interprete acceleration as force
float32 acceptance_radius # navigation acceptance_radius if we're doing waypoint navigation
float32 cruising_speed# the generally desired cruising speed (not a hard constraint)
float32 cruising_throttle# the generally desired cruising throttle (not a hard constraint)
在进入了offboard模式以后,我们只需要发布position_setpoint_triplet topic就可以命令飞机飞行了。
2.位置控制模块是怎样来使用position_setpoint_triplet的
我们首先开看位置控制模块使用offboard飞行的代码:
void
MulticopterPositionControl::control_offboard(float dt)
{
bool updated;
orb_check(_pos_sp_triplet_sub, &updated);
if (updated) {
orb_copy(ORB_ID(position_setpoint_triplet), _pos_sp_triplet_sub, &_pos_sp_triplet);
}
if (_pos_sp_triplet.current.valid) {
if (_control_mode.flag_control_position_enabled && _pos_sp_triplet.current.position_valid) {
/* control position */
_pos_sp(0) = _pos_sp_triplet.current.x;
_pos_sp(1) = _pos_sp_triplet.current.y;
} else if (_control_mode.flag_control_velocity_enabled && _pos_sp_triplet.current.velocity_valid) {
/* control velocity */
/* reset position setpoint to current position if needed */
reset_pos_sp();
/* set position setpoint move rate */
_vel_sp(0) = _pos_sp_triplet.current.vx;
_vel_sp(1) = _pos_sp_triplet.current.vy;
_run_pos_control = false; /* request velocity setpoint to be used, instead of position setpoint */
}
if (_pos_sp_triplet.current.yaw_valid) {
_att_sp.yaw_body = _pos_sp_triplet.current.yaw;
} else if (_pos_sp_triplet.current.yawspeed_valid) {
_att_sp.yaw_body = _att_sp.yaw_body + _pos_sp_triplet.current.yawspeed * dt;
}
if (_control_mode.flag_control_altitude_enabled && _pos_sp_triplet.current.alt_valid) {
/* control altitude as it is enabled */
_pos_sp(2) = _pos_sp_triplet.current.z;
_run_alt_control = true;
} else if (_control_mode.flag_control_altitude_enabled && _pos_sp_triplet.current.position_valid) {
/* control altitude because full position control is enabled */
_pos_sp(2) = _pos_sp_triplet.current.z;
_run_alt_control = true;
} else if (_control_mode.flag_control_climb_rate_enabled && _pos_sp_triplet.current.velocity_valid) {
/* reset alt setpoint to current altitude if needed */
reset_alt_sp();
/* set altitude setpoint move rate */
_vel_sp(2) = _pos_sp_triplet.current.vz;
_run_alt_control = false; /* request velocity setpoint to be used, instead of position setpoint */
}
} else {
reset_pos_sp();
reset_alt_sp();
}
}
从if (_pos_sp_triplet.current.valid)可以看出,offboard模式只使用了三组合中的current,所以我们设置pre,next是没有任何作用的,那么我们现在只需要关心current setpoint。
从if (_control_mode.flag_control_position_enabled && _pos_sp_triplet.current.position_valid)可以看出,如果我们开启了位置控制,并且current setpoint中的position_valid为true就会进行位置控制,如果两个条件其中一个不为真,才回去判断是否启动了速度控制,这里我们只分析位置控制。
那么_control_mode.flag_control_position_enabled的值是怎么来的呢,常见上文的代码:
control_mode.flag_control_position_enabled = !offboard_control_mode.ignore_position && !status.in_transition_mode && !control_mode.flag_control_acceleration_enabled;
如果我们发布的offboard_control_mode topic没有忽略位置控制 且 没有在垂直起降飞行器的变形阶段 且 没有开启加速度控制模式,那么位置控制就为true,这就是上文所描述的,为什么要关闭加速度控制模式。


 598
598

 被折叠的 条评论
为什么被折叠?
被折叠的 条评论
为什么被折叠?
 到【灌水乐园】发言


