


Arudino与机械臂电机的连接
需要的材料:
ArudinoUNO板子一个,面包板一个,杜邦线若干,小强机械臂自带的锂电池也需要用。
如下图
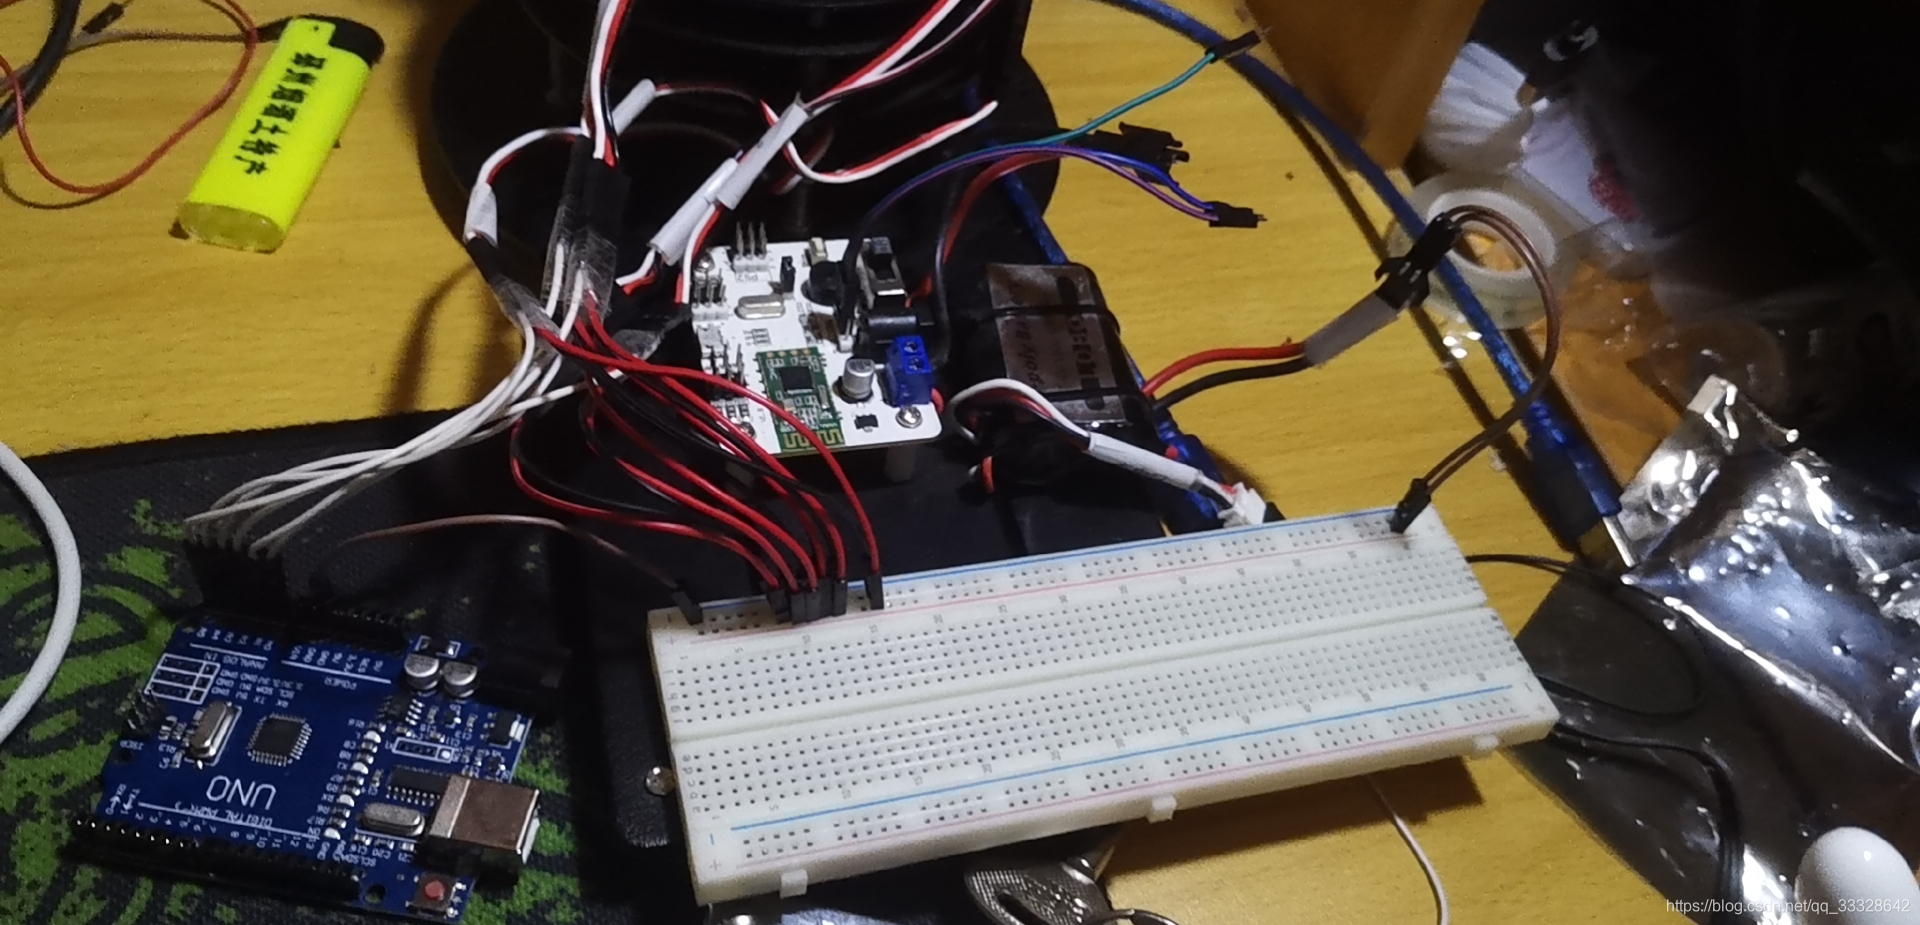
小强机械臂的6个伺服电机,每个电机有三根线,白色是信号线,连接到Arudino的每个端口,我选择的是A0,A1,A2,A3,A4,A5,.。
电机的红色线是正极,黑色线是负极,。电池的黑色线是负极,红色线是正极。
首先,我们将电池上的正负极对应插到面包板 上的正负极,然后再一次将电机的正负极线一次插到面包板的正负极。实现电机的并联。
最后,我们需要将面包板的负极和Arudino上的GND端口连接。完成这几步后,我们就完成了所有接线操作。
基于Moveit和Arudino的控制思路
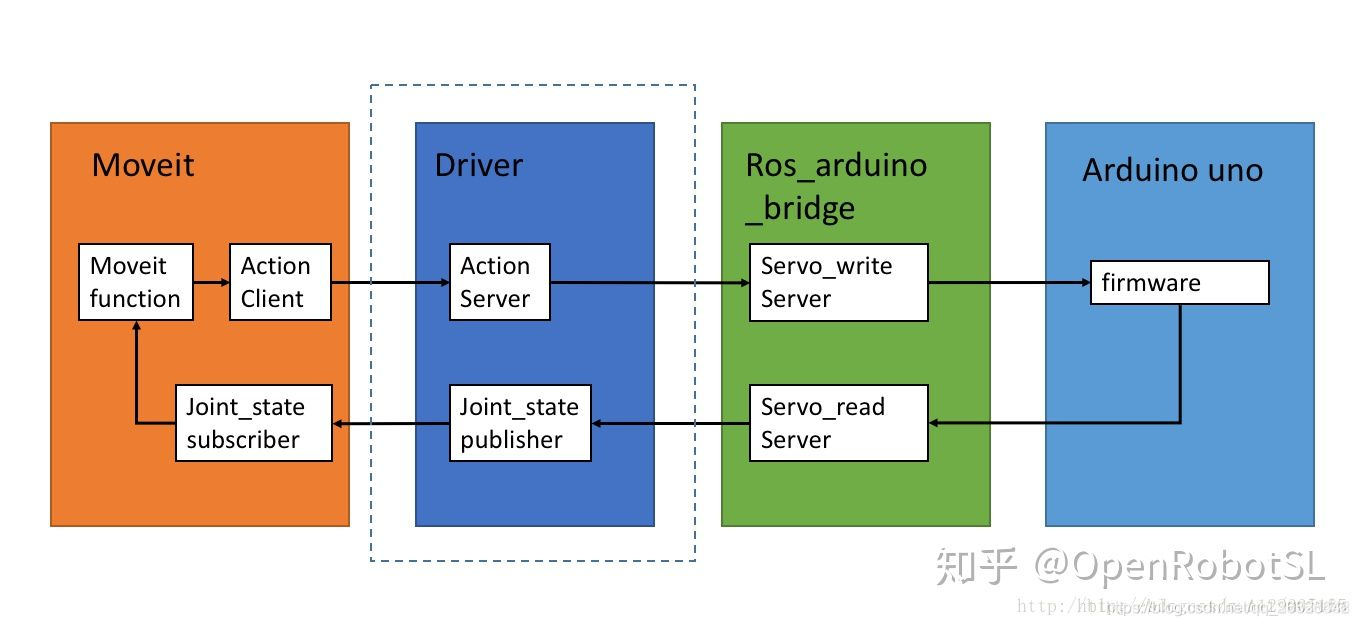
重点理解前两个模块的内容,moveit实际上是通过action这种交互机制来控制机械臂的,并且moveit只提供action client,因此driver中的action server需要自己编写,两者的接口类型为FollowJointTrajectoryAction。
编写action server节点:myrobot_driver.cpp
综上,自建的/joint_states话题+文中提到的action server = myrobot_driver节点,即自定义的Driver节点。另外,我手头上的机械臂只是简单的舵机驱动,没有角度反馈,所以可以通过获取movie规划得到的最后一组数据作为机械臂运动输出后的实际状态(没有闭环反馈就是很low……),代码如下
/*    myrobot_driver.cpp    */
#include <ros/ros.h>
#include <actionlib/server/simple_action_server.h>
#include <control_msgs/FollowJointTrajectoryAction.h>
#include <control_msgs/FollowJointTrajectoryActionGoal.h>
#include <control_msgs/FollowJointTrajectoryActionResult.h>
#include <sensor_msgs/JointState.h>
#include <std_msgs/Float64.h>
#include <iostream>
#include <string.h>
#include <stdio.h>
#include <vector>

/*------只是arm group部分,因此只有6个舵机-----*/
//换算舵机PWM值与弧度之间的关系
//舵机运动范围PWM500-2500,对应角度0°-270°,中间状态为1500(设定为偏置)
//关节弧度范围-2.36-2.36,0rad对应舵机中间状态1500
//换算得到每变化1rad,PWM变化423
#define scaler 423
#define offset 1500

using namespace std;

class FollowJointTrajectoryAction
{
protected:
    sensor_msgs::JointState js;
    std_msgs::Float64 joint1_pos, joint2_pos, joint3_pos, joint4_pos, joint5_pos, joint6_pos;
    ros::NodeHandle nh;
    std::string action_name_;
    ros::Publisher pub_joint;//给move_group识别的publisher,代替joint_state_publisher,发布joint_states
    ros::Publisher pub_joint1;//给下位机arduino识别的publiser
    ros::Publisher pub_joint2;//同上
    ros::Publisher pub_joint3;//同上
    ros::Publisher pub_joint4;//同上
    ros::Publisher pub_joint5;//同上
    ros::Publisher pub_joint6;//同上------
    //与moveit中action client通讯的action server
    actionlib::SimpleActionServer<control_msgs::FollowJointTrajectoryAction> as_;

    control_msgs::FollowJointTrajectoryActionResult result_;
    control_msgs::FollowJointTrajectoryActionGoal goal_;

public:
    FollowJointTrajectoryAction(std::string name) :
        as_(nh, name, false),
        action_name_(name)
    {
        as_.registerGoalCallback(boost::bind(&FollowJointTrajectoryAction::goalCB, this));
        as_.registerPreemptCallback(boost::bind(&FollowJointTrajectoryAction::preemptCB, this));
        as_.start();
        pub_joint = nh.advertise<sensor_msgs::JointState>("/joint_states", 10);
        pub_joint1 = nh.advertise<std_msgs::Float64>("joint1_value", 100);
        pub_joint2 = nh.advertise<std_msgs::Float64>("joint2_value", 100);
        pub_joint3 = nh.advertise<std_msgs::Float64>("joint3_value", 100);
        pub_joint4 = nh.advertise<std_msgs::Float64>("joint4_value", 100);
        pub_joint5 = nh.advertise<std_msgs::Float64>("joint5_value", 100);
        pub_joint6 = nh.advertise<std_msgs::Float64>("joint6_value", 100);//--------
        // ros::Rate loop_rate(10);
        js.name.resize(6);
        js.position.resize(6);
        //名字要与关节定义的名字一致
        js.name[0] = "joint1";
        js.name[1] = "joint2";
        js.name[2] = "joint3";
        js.name[3] = "joint4";
        js.name[4] = "joint5";
        js.name[5] = "joint6";//----------------------
        ROS_INFO("-------action start!-------");
    }
    ~FollowJointTrajectoryAction(void)
    {
    }

    void goalCB()
    {
        ROS_INFO("-------goal is receiveing!-------");
        std::vector<trajectory_msgs::JointTrajectoryPoint> points_;
        double points_end[6];
        double Pos_length;
        if (as_.isNewGoalAvailable()){
            js.position.clear();
            points_ = as_.acceptNewGoal()->trajectory.points;
            Pos_length = points_.size();
            for (int i = 0; i < 6; i++){
                //假设v是一个vector对象,v.at(n)和v[n]是一样的
                //但是前者会检查是否越界,后者不会
                points_end[i] = points_.at(Pos_length - 1).positions[i];
                js.position.push_back(points_end[i]);
            }
            js.header.stamp = ros::Time::now();
            //向move_group节点发布规划得到的关节值
            pub_joint.publish(js);
            //向下位机arduino节点发布规划得到的关节值,直接得到舵机PWM值
            //舵机2需要反向
            joint1_pos.data = js.position[0] * scaler + offset;
            joint2_pos.data = -js.position[1] * scaler + offset;
            joint3_pos.data = js.position[2] * scaler + offset;
            joint4_pos.data = js.position[3] * scaler + offset;
            joint5_pos.data = js.position[4] * scaler + offset;
            joint6_pos.data = js.position[5] * scaler + offset;//-----------------------
            pub_joint1.publish(joint1_pos);
            pub_joint2.publish(joint2_pos);
            pub_joint3.publish(joint3_pos);
            pub_joint4.publish(joint4_pos);
            pub_joint5.publish(joint5_pos);
            pub_joint6.publish(joint6_pos);
        ROS_INFO("-------goal is receive done!-------");
        }else{
            ROS_INFO("-------goal is not availabel!-------");
        }
        control_msgs::FollowJointTrajectoryResult result;
        result.error_code = 0;
        as_.setSucceeded(result);
    }

    void preemptCB()
    {
        ROS_INFO("%s: Preempted", action_name_.c_str());
        as_.setPreempted();
    }
};

int main(int argc, char *argv[])
{
    ros::init(argc, argv, "myrobot_driver");
    FollowJointTrajectoryAction followjointtrajectory("LOBOT/follow_joint_trajectory");//名称要与yaml配置一致
    ros::spin();
    return 0;
}
节点电监视器myrobot_sub.cpp
编写一个简单的myrobot_sub.cpp
为了省事,直接撸一个订阅节点,把myrobot_driver.cpp中写的jointX_value全部订阅监听一道,看算的舵机PWM值与弧度值之间是不是正确对应关系,也方便后面测试舵机。
#include <ros/ros.h>
#include <std_msgs/MultiArrayLayout.h>
#include <std_msgs/String.h>
#include <std_msgs/MultiArrayDimension.h>
#include <std_msgs/Int16MultiArray.h>
#include <sensor_msgs/JointState.h>
#include <std_msgs/Float64.h>
/*------只是arm group部分,因此只有五个舵机-----*/
#define scaler 423
#define offset 1500

float jointval[6] = {0.0, 0.0, 0.0, 0.0, 0.0,0.0};//------

void callback1(const std_msgs::Float64& pos_msg)
{
    jointval[0] =  pos_msg.data  ;//舵机1
    ROS_INFO("[%f] ", jointval[0]);
}

void callback2(const std_msgs::Float64& pos_msg)
{
    jointval[1] =  pos_msg.data ;//舵机2
    ROS_INFO("[%f] ", jointval[1]);
}

void callback3(const std_msgs::Float64& pos_msg)
{
    jointval[2] =  pos_msg.data ;//舵机3
    ROS_INFO("[%f] ", jointval[2]);
}

void callback4(const std_msgs::Float64& pos_msg)
{
    jointval[3] =  pos_msg.data;//舵机4
    ROS_INFO("[%f] ", jointval[3]);
}

void callback5(const std_msgs::Float64&pos_msg)
{
    jointval[4] =  pos_msg.data ;//舵机5
    ROS_INFO("[%f] ", jointval[4]);
    ROS_INFO("-----------done successfully-----------");
}

void callback6(const std_msgs::Float64&pos_msg)
{
    jointval[5] =  pos_msg.data ;//舵机6-----------------------------
    ROS_INFO("[%f] ", jointval[5]);
    ROS_INFO("-----------done successfully-----------");
}

int main(int argc, char *argv[])
{
    /* code for main function */
    ros::init(argc, argv, "ListenJointValue");

    ros::NodeHandle nh;
    ros::Subscriber sub1 = nh.subscribe("joint1_value", 1000, callback1);
    ros::Subscriber sub2 = nh.subscribe("joint2_value", 1000, callback2);
    ros::Subscriber sub3 = nh.subscribe("joint3_value", 1000, callback3);
    ros::Subscriber sub4 = nh.subscribe("joint4_value", 1000, callback4);
    ros::Subscriber sub5 = nh.subscribe("joint5_value", 1000, callback5);
    ros::Subscriber sub6 = nh.subscribe("joint6_value", 1000, callback6);//----------------

    ros::spin();


    return 0;
}
arduino端节点
模仿上面的myrobot_sub.cpp可以很快的写出arduino程序,只需要加个舵机初始化和驱动程序即可,简单来说就是订阅监听+驱动。
这个节点我们直接烧写到Arudino中,
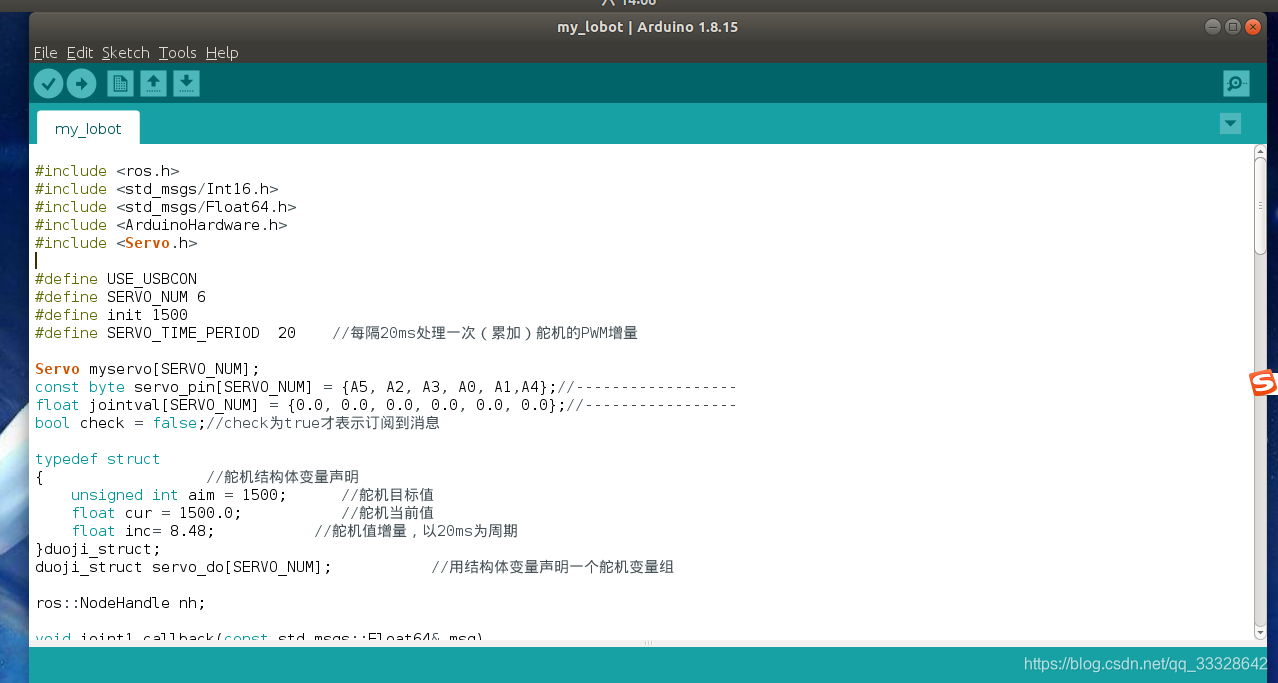
aArudino节点的程序
#include <ros.h>
#include <std_msgs/Int16.h>
#include <std_msgs/Float64.h>
#include <ArduinoHardware.h>
#include <Servo.h>

#define USE_USBCON
#define SERVO_NUM 6
#define init 1500
#define SERVO_TIME_PERIOD  20    //每隔20ms处理一次(累加)舵机的PWM增量

Servo myservo[SERVO_NUM];
const byte servo_pin[SERVO_NUM] = {A5, A2, A3, A0, A1,A4};//------------------
float jointval[SERVO_NUM] = {0.0, 0.0, 0.0, 0.0, 0.0, 0.0};//-----------------
bool check = false;//check为true才表示订阅到消息

typedef struct
{                  //舵机结构体变量声明
    unsigned int aim = 1500;      //舵机目标值
    float cur = 1500.0;           //舵机当前值
    float inc= 8.48;           //舵机值增量,以20ms为周期
}duoji_struct;
duoji_struct servo_do[SERVO_NUM];           //用结构体变量声明一个舵机变量组

ros::NodeHandle nh;

void joint1_callback(const std_msgs::Float64& msg)
{
  jointval[0] = msg.data;
  check = true;
}
void joint2_callback(const std_msgs::Float64& msg)
{
  jointval[1] = msg.data;
}
void joint3_callback(const std_msgs::Float64& msg)
{
  jointval[2] = msg.data;
}
void joint4_callback(const std_msgs::Float64& msg)
{
  jointval[3] = msg.data;
}
void joint5_callback(const std_msgs::Float64& msg)
{
  jointval[4] = msg.data;
}
void joint6_callback(const std_msgs::Float64& msg)
{
  jointval[5] = msg.data;//------------------------------------------
}

ros::Subscriber<std_msgs::Float64> sub1("joint1_value", joint1_callback);
ros::Subscriber<std_msgs::Float64> sub2("joint2_value", joint2_callback);
ros::Subscriber<std_msgs::Float64> sub3("joint3_value", joint3_callback);
ros::Subscriber<std_msgs::Float64> sub4("joint4_value", joint4_callback);
ros::Subscriber<std_msgs::Float64> sub5("joint5_value", joint5_callback);
ros::Subscriber<std_msgs::Float64> sub6("joint6_value", joint6_callback);//-------------

void AttachServosAndInit()
{
  for (byte i = 0; i < SERVO_NUM; i++)
  {
    myservo[i].attach(servo_pin[i]);
    myservo[i].writeMicroseconds(init);
  }
}

void subscribeToAll()
{
  nh.subscribe(sub1);
  nh.subscribe(sub2);
  nh.subscribe(sub3);
  nh.subscribe(sub4);
  nh.subscribe(sub5);
  nh.subscribe(sub6);//------------------------
}

/*
时间处理函数,第一个参数是上一次处理时间点, 第二个参数是处理时间间隔,
到达时间间隔返回0,否则返回1
*/
bool handleTimePeriod( unsigned long *ptr_time, unsigned int time_period) {
  if((millis() - *ptr_time) < time_period) {//millis()返回Arduino开始运行当前程序以来经历的毫秒数
      return 1;
  } else{
       *ptr_time = millis();
       return 0;
  }
}

//解析订阅得到的PWM
void analyJoint()
{
  for (byte i = 0; i < SERVO_NUM; i++)
    servo_do[i].aim = (int)jointval[i];
}

//舵机PWM增量处理函数,每隔SERVO_TIME_PERIOD毫秒处理一次,这样就实现了舵机的连续控制
void handleServo()
{
  static unsigned long systick_ms_bak = 0;
  if(handleTimePeriod(&systick_ms_bak, SERVO_TIME_PERIOD))return;  //20ms处理一次,不到20ms则返回不处理
  for(byte i = 0; i < SERVO_NUM; i++) {
    if(abs( servo_do[i].aim - servo_do[i].cur) <= abs (servo_do[i].inc) ) {//这里就体现了这个程序的精度,SERVO_TIME_PERIOD越小精度越高
       myservo[i].writeMicroseconds(servo_do[i].aim);
    } else {
      if (servo_do[i].aim < servo_do[i].cur )
        servo_do[i].cur -= servo_do[i].inc;
      else
        servo_do[i].cur += servo_do[i].inc;
      myservo[i].writeMicroseconds((int)servo_do[i].cur);
    }
  }
}

void setup(){
  nh.initNode();
  subscribeToAll();
  AttachServosAndInit();

}

void loop(){
  nh.spinOnce();
  analyJoint();
  if (check){//保证起始状态为中间位置
    handleServo();
  }
}
需要添加的库
我们可以看到,在文件的开头有一个ros.h,如果我们不安装对应的文件库,在编译的时候就会报错。
根据这个教程 把文件需要的库安装了就可以了。
运行代码
首先,需要编译代码。我是使用catkin build编译空间的,当然你也可以用catkin_make编译。
catkin build
source ~/ws_moveit/devel/setup.bash
这边及得吧ws_moveit改成你的工作空间的名字
下面就是在工作空间下打开终端
第一,打开Action server节点
source ~/ws_moveit/devel/setup.bash
rosrun probot_demo myrobot_driver
第二,打开另一个终端,打开监听器。这个是可选的。可以不打开
source ~/ws_moveit/devel/setup.bash
rosrun probot_demo myrobot_sub
第三,打开新的终端,启动rviz,启动 机械臂模型
source ~/ws_moveit/devel/setup.bash
roslaunch LOBOT_moveit_config demo.launch
再打开一个终端,启动 USB串口
source ~/ws_moveit/devel/setup.bash
rosrun rosserial_python serial_node.py /dev/ttyUSB0
最后,启动一个机械臂正像运动学
source ~/ws_moveit/devel/setup.bash
rosrun probot_demo moveit_fk_demo
上面的步骤,打击肯定觉得很烦,做没需要打开这么多终端?
所以,我们将上面的所有启动程序写在一个launch文件中。
文件命名为startup_robot.launch
<?xml version="1.0"?>
<launch>

  <node pkg="probot_demo" name="qidong_robot" type="myrobot_driver" />
  <include file="$(find LOBOT_moveit_config)/launch/demo.launch"/>
  <node pkg="rosserial_python" name="qidong_chuankou" type="serial_node.py" args="/dev/ttyUSB0"/>

</launch>
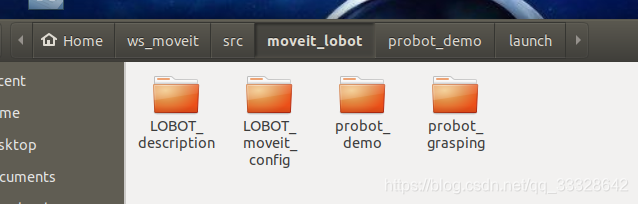
把这个文件放到其中一共功能包下面,创建一个luanch文件保存它。
我是放在probot_demo文件夹下面的:
在这个时候,主需要启动下面命令
roslaunch probot_demo startup_robot.launch
然后你可以在rviz下面控制机械臂运动,plan and excute
也可以执行我们的demo
即打开一个新的文件夹
source ~/ws_moveit/devel/setup.bash
rosrun probot_demo moveit_fk_demo
这也是可以的。
效果如下
LOBOT9


 1万+
1万+

 被折叠的 条评论
为什么被折叠?
被折叠的 条评论
为什么被折叠?
 到【灌水乐园】发言


