


Better Fog
起因是因为iq大神的better fog文章[1],伴随着向大神的学习态度,决定对实时雾效进行一个简单总结;
雾效是3D场景上非常重要的一个元素,他能增强场景的距离感,同时也能虚化远处的细节,另外对于雾气比较浓的场景,好的雾效能极大的提高场景的氛围感;
然而传统的雾效都比较简单,要么是线性雾,要么是指数雾;效果会比较单调
基于物理的雾效计算,则是大量使用RayMatching来进行体积雾渲染;对于天空大气部分,还要考虑Rayleigh scatting和Mie scattering[2];虽然效果极棒,但是计算量也是比较大的,对于小小手机来说还是略显吃力;
于是寻找介于上面两种规模之间的雾效,在手游上就显得更具有竞争性;
传统的指数雾:
float3 applyFog( in float3  rgb,       // original color of the pixel
               in float distance ) // camera to point distance
{
    float fogMount = 1.0 - exp( -distance*b );
    float3  fogColor  = float3(0.5,0.6,0.7);
    return lerp( rgb, fogColor, fogMount );
}
颜色变化
颜色变化版本1

传统雾效的颜色比较单一,可以考虑雾气中阳光的散射效果(从现实观察来扩充雾效,trick):
// Use dot(V, L)to get fog color
// in float3  rayDir;   // camera to point normalized vector
// in float3  sunDir;   // sun light direction
float sunAmount = max( dot( rayDir, sunDir ), 0.0 );
float3  fogColor  = lerp( float3(0.5,0.6,0.7), // bluish
                       float3(1.0,0.9,0.7), // yellowish
                       pow(sunAmount,8.0) );
这一部分虽然是非pbr,但是雾气效果会更加丰富,有一种低配bloom的效果;
颜色变化版本2
雾气与物体本身的插值可以进行拆分,然后向pbr的方向靠近:
// finalColor = lerp( pixelColor, fogColor, 1.0 - exp(-distance*b) ); // old
finalColor = pixelColor*(exp(-distance*b)) + fogColor*(1.0-exp(-distance*b));
拆分后的插值形式更接近PBRT中体散射的计算形式,第一部分可解释为体散射中的Out Sacttering与Absorption,第二项可解释为体散射中的InScattering[3];
这里b表示雾气散射距离的falloff参数,将pbr发扬光大,针对outscattering与inscattering可采用不同参数(更近一步,可针对不同波长的rgb采用不同参数);
float3 extColor = float3( exp(-distance*be.x), exp(-distance*be.y) exp(-distance*be.z) );
float3 insColor = float3( exp(-distance*bi.x), exp(-distance*bi.y) exp(-distance*bi.z) );
finalColor = pixelColor*extColor + fogColor*(1.0-insColor);
密度变化
HalfSpace常数密度
前面所提到的指数雾都是在一个假设下进行计算的,即整个空间都处在雾效所覆盖的区域,且雾气的密度为一常数;
对于山谷,或者沼泽这种区域,其雾气覆盖区域实际上位于某个水平面以下;这个就可以提出新的假设,即某个水平面以上没有雾气,水平面以下雾气密度为常数;
基于这种假设,就可以解析计算出视线所穿过的雾气厚度,从而计算出真正的fogCount;
详细推导参考这里[5];
雾气厚度为:
if(F_dot_V == 0)	//escape devided by zero
	d = saturate(-sign(F_dot_C))*length(V);
else
{
	d = saturate(k - F_dot_P / abs(F_dot_V));
	d *= length(V);
}
公式中各参数的含义可参考下图(图中列出来可能出现的四种情况):
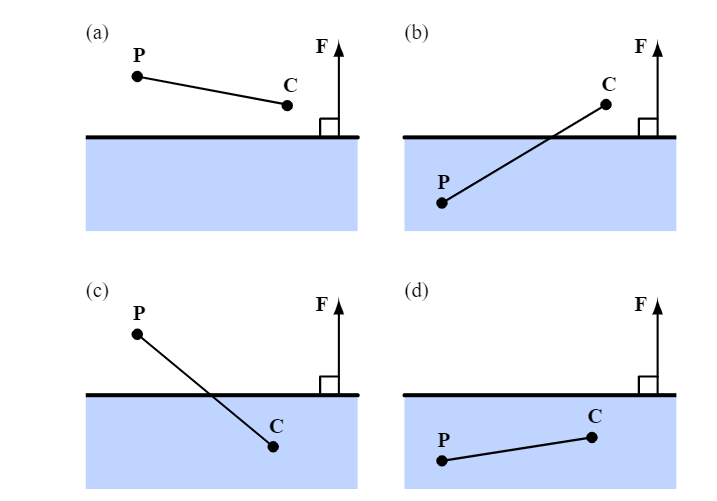
P点为场景坐标;C相机坐标;F为雾气平面的矢量表示;V=C-P;
F_dot_P实际上为P点到平面的距离;
F_dot_C实际上为C点到平面的距离;
而k为:
k
=
{
1
,
if
F
⋅
C
<
=
0
;
0
,
otherwise.
k= \begin{dcases} 1, &\text{if } F·C<=0; \\ 0, &\text{otherwise. } \end{dcases}
k={1,0,if F⋅C<=0;otherwise.
得到实际穿过的雾气厚度,就可以使用指数密度雾来进行后续的计算;
线性密度变化
有常数密度的假设,也可以有线性密度的假设,越接近地面雾气密度越大;
此种假设的有效雾气密度同样参考这里[5];
有效雾气厚度为:
float3 aV = a/2*V;
float c1 = k*(F_dot_P + F_dot_C);
float c2 = (1-2*k)*F_dot_P;
float d = min(c2, 0.0);
d = -length(aV) * (c1 - g * g / (abs(F_dot_V)+1e-5));	//escape devided by zero
此处a为雾气密度随高度变化的斜率,为正值;
指数密度变化
实际上雾气的密度应该考虑合理的变化,大气物理计算中就有基于密度随海拔指数衰减的假设;iq也采用密度随高度指数衰减的假设(指数衰减的另一个优点是指数积分的可解性);即:
d
(
x
)
=
a
⋅
e
−
b
y
d(x) = a·e^{-by}
d(x)=a⋅e−by
这里b就表示雾气密度的falloff参数,a表示初始的雾气密度,T表示视线在雾气中穿过的距离;fogMount在视线上的积分为:
d
(
x
)
=
a
⋅
e
−
b
⋅
o
y
1
−
e
−
b
⋅
k
y
⋅
T
b
⋅
k
y
d(x) = a·e^{-b·o_y}\frac{1-e^{-b·k_y·T}}{b·k_y}
d(x)=a⋅e−b⋅oyb⋅ky1−e−b⋅ky⋅T
用代码表示的话,即为:
// in float distance;   // camera to point distance
// in float3  rayOri;   // camera position
// in float3  rayDir;   // camera to point normalized vector
float opticalThickness = c * exp(-rayOri.y*b) * (1.0-exp( -distance*rayDir.y*b ))/rayDir.y;    //c = a/b
杨超的这篇文章[4]注解了iq的文章,并指出了iq积分概念上的分歧;我是同意这种观点的,即fogMount应该为opticalThickness,同样pbrt中对此部分也有介绍[3];实际的使用过程中,也确实杨超的理解效果会更好;即,积分后的代码为:
float3 applyFog( in float3  rgb,      // original color of the pixel
               in float distance, // camera to point distance
               in float3  rayOri,   // camera position
               in float3  rayDir )  // camera to point normalized vector
{
    float opticalThickness = c * exp(-rayOri.y*b) * (1.0-exp( -distance*rayDir.y*b ))/rayDir.y;
    float extinction = exp(-opticalThickness);
    float fogAmount = 1-extinction;
    float3  fogColor  = float3(0.5,0.6,0.7);
    return lerp( rgb, fogColor, fogAmount );
}
为了便于使用上的控制,可以添加startDistance与startHeight参数,startDistance表示没有雾效的空白距离,startHeight表示雾效密度还是衰减的位置,新的结果为:
float opticalThickness = c * exp(-(rayOri.y-startHeight)*b) * (1.0-exp( -(distance-startDistance)*rayDir.y*b ))/rayDir.y;
Unreal Exponential Hight Fog

理解了iq那部分的高度指数雾的介绍,在去看Unreal的高度指数雾的做法,就会容易理解很多;文件在HeightFogCommon.usf中;
// The exponential fog density function is d = GlobalDensity * exp(-HeightFalloff * z)
float CalculateLineIntegralShared(float FogHeightFalloff, float RayDirectionZ, float RayOriginTerms)
{
	float Falloff = max(-127.0f, FogHeightFalloff * RayDirectionZ);    // if it's lower than -127.0, then exp2() goes crazy in OpenGL's GLSL.
	float LineIntegral = ( 1.0f - exp2(-Falloff) ) / Falloff;
	float LineIntegralTaylor = log(2.0) - ( 0.5 * Pow2( log(2.0) ) ) * Falloff;		// Taylor expansion around 0

	return RayOriginTerms * ( abs(Falloff) > FLT_EPSILON2 ? LineIntegral : LineIntegralTaylor );
}

{   //以下为精简部分,详细内容请看源码
    float RayOriginTerms = FogStruct.ExponentialFogParameters.x;
    float RayOriginTermsSecond = FogStruct.ExponentialFogParameters2.x;
    float RayLength = CameraToReceiverLength;
    float RayDirectionZ = CameraToReceiver.z;

    // Calculate the "shared" line integral (this term is also used for the directional light inscattering) by adding the two line integrals together (from two different height falloffs and densities)
    float ExponentialHeightLineIntegralShared = CalculateLineIntegralShared(FogStruct.ExponentialFogParameters.y, RayDirectionZ, RayOriginTerms) + CalculateLineIntegralShared(FogStruct.ExponentialFogParameters2.y, RayDirectionZ, RayOriginTermsSecond);

    float ExponentialHeightLineIntegral = ExponentialHeightLineIntegralShared * RayLength;

    // Calculate the amount of light that made it through the fog using the transmission equation
    half ExpFogFactor = max(saturate(exp2(-ExponentialHeightLineIntegral)), MinFogOpacity);
}
首先同样是雾密度的指数假设,ExpFogFactor即为之前的fogMount;
ExponentialHeightLineIntegral为积分后得到的fogDensity,只不过这里采用了两层的指数雾密度计算;
ExponentialHeightLineIntegral = ExponentialHeightLineIntegralShared * RayLength,那么可知ExponentialHeightLineIntegralShared为积分后的指数密度除以RayLength,即fogDensity/RayLength;
ExponentialHeightLineIntegralShared数值的计算在CalculateLineIntegralShared函数中;
函数中RayOriginTerms为视线起点的雾气密度指数项,类比于iq公式中的 a ⋅ e − b ⋅ o y a·e^{-b·o_y} a⋅e−b⋅oy;
Falloff类比于iq公式中的 b ⋅ k y ⋅ T b·k_y·T b⋅ky⋅T;
LineIntegral即为前面所需要的fogDensity/RayLength;
LineIntegralTaylor为Falloff接近于0时,所使用的另一种积分近似形式,为了避免除零操作;
实际上Unreal高度雾的做法远比这里介绍的复杂,除了两次指数高度雾以外,还支持平行光散射效果(这一块与iq所介绍的一种方法相似,但是Unreal又引进了cos函数来模拟的方法)、下面要介绍的mip fog等;
Mip Fog

Mip Fog是顽皮狗在神秘海域4里面所引入的一种技术,其对雾效的主要改善实在雾的颜色上;Mip fog采用天空盒的颜色来作为雾气的颜色,并且考虑距离的变化,针对不同的距离使用不同的天空盒mip;
代码如下:
float mip = saturate(1 - (dist - _Near) / (_Far - _Near)) * _MipCount;
fogColor = texCUBElod(_Sky, float4(rayDir, mip));
不得不说这样对美术真的挺友好的,虽然不是完全的PBR,但是有一定的道理在里面;对雾效的效果提升还是挺明显的,是一个值得参考的方法;
Reference
[1]. https://www.iquilezles.org/www/articles/fog/fog.htm
[2]. https://www.scratchapixel.com/lessons/procedural-generation-virtual-worlds/simulating-sky
[3]. https://www.pbr-book.org/3ed-2018/Volume_Scattering/Volume_Scattering_Processes
[4]. https://zhuanlan.zhihu.com/p/61138643
[5]. https://www.terathon.com/lengyel/Lengyel-UnifiedFog.pdf
[6]. http://advances.realtimerendering.com/other/2016/naughty_dog/index.html


 784
784


 被折叠的 条评论
为什么被折叠?
被折叠的 条评论
为什么被折叠?
 到【灌水乐园】发言


