


public class SaveLoadLightSetting : Editor
{
public class LightmapSettingsHolder : ScriptableObject
{
public ColorSpace bakedColorSpace;
public LightmapDataHolder[] lightmaps;
public LightmapsMode lightmapsMode;
public LightProbes lightProbes;
}
[System.Serializable]
public class LightmapDataHolder
{
public Texture2D lightmapFar;
public Texture2D lightmapNear;
}
[MenuItem("Tools/Lightmapping/Save Lightmap Settings")]
static void SaveLightmapSettings()
{
LightmapSettingsHolder holder = ScriptableObject.CreateInstance<LightmapSettingsHolder>();
holder.bakedColorSpace = LightmapSettings.bakedColorSpace;
holder.lightmapsMode = LightmapSettings.lightmapsMode;
holder.lightProbes = LightmapSettings.lightProbes;
holder.lightmaps = new LightmapDataHolder[LightmapSettings.lightmaps.Length];
for (int i = 0; i < LightmapSettings.lightmaps.Length; i++)
{
holder.lightmaps[i] = new LightmapDataHolder();
holder.lightmaps[i].lightmapFar = LightmapSettings.lightmaps[i].lightmapColor;
holder.lightmaps[i].lightmapNear = LightmapSettings.lightmaps[i].lightmapDir;
}
AssetDatabase.CreateAsset(holder, "Assets/LightmapSettings.asset");
}
[MenuItem("Tools/Lightmapping/Load Lightmap Settings")]
static void LoadLightmapSettings()
{
LightmapSettingsHolder holder = (LightmapSettingsHolder)Selection.activeObject;
LightmapSettings.bakedColorSpace = holder.bakedColorSpace;
LightmapSettings.lightmapsMode = holder.lightmapsMode;
LightmapSettings.lightProbes = holder.lightProbes;
LightmapData[] lightmaps = new LightmapData[holder.lightmaps.Length];
for (int i = 0; i < holder.lightmaps.Length; i++)
{
lightmaps[i] = new LightmapData();
lightmaps[i].lightmapColor = holder.lightmaps[i].lightmapFar;
lightmaps[i].lightmapDir = holder.lightmaps[i].lightmapNear;
}
LightmapSettings.lightmaps = lightmaps;
}
}
一些参考生成的limp代码
public class PrefabLightmapData : MonoBehaviour
{
[System.Serializable]
struct RendererInfo
{
public Renderer renderer;
public int lightmapIndex;
public Vector4 lightmapOffsetScale;
}
[SerializeField]
RendererInfo[] m_RendererInfo;
[SerializeField]
Texture2D[] m_Lightmaps;
void Awake ()
{
if (m_RendererInfo == null || m_RendererInfo.Length == 0)
return;
var lightmaps = LightmapSettings.lightmaps;
var combinedLightmaps = new LightmapData[lightmaps.Length + m_Lightmaps.Length];
lightmaps.CopyTo(combinedLightmaps, 0);
for (int i = 0; i < m_Lightmaps.Length;i++)
{
combinedLightmaps[i+lightmaps.Length] = new LightmapData();
combinedLightmaps[i+lightmaps.Length].lightmapColor = m_Lightmaps[i];
}
ApplyRendererInfo(m_RendererInfo, lightmaps.Length);
LightmapSettings.lightmaps = combinedLightmaps;
}
static void ApplyRendererInfo (RendererInfo[] infos, int lightmapOffsetIndex)
{
for (int i=0;i<infos.Length;i++)
{
var info = infos[i];
#if UNITY_EDITOR
if (UnityEditor.GameObjectUtility.AreStaticEditorFlagsSet(info.renderer.gameObject, UnityEditor.StaticEditorFlags.BatchingStatic))
{
UnityEngine.Debug.LogWarning("The renderer " + info.renderer.name + " is marked Batching Static. The static batch is created when building the player. " +
"Setting the lightmap scale and offset will not affect lightmapping UVs as they have the scale and offset already burnt in." + info.renderer);
}
#endif
info.renderer.lightmapIndex = info.lightmapIndex + lightmapOffsetIndex;
info.renderer.lightmapScaleOffset = info.lightmapOffsetScale;
}
}
#if UNITY_EDITOR
[UnityEditor.MenuItem("Assets/Bake Prefab Lightmaps")]
static void GenerateLightmapInfo ()
{
if (UnityEditor.Lightmapping.giWorkflowMode != UnityEditor.Lightmapping.GIWorkflowMode.OnDemand)
{
Debug.LogError("ExtractLightmapData requires that you have baked you lightmaps and Auto mode is disabled.");
return;
}
UnityEditor.Lightmapping.Bake();
PrefabLightmapData[] prefabs = FindObjectsOfType<PrefabLightmapData>();
foreach (var instance in prefabs)
{
var gameObject = instance.gameObject;
var rendererInfos = new List<RendererInfo>();
var lightmaps = new List<Texture2D>();
GenerateLightmapInfo(gameObject, rendererInfos, lightmaps);
instance.m_RendererInfo = rendererInfos.ToArray();
instance.m_Lightmaps = lightmaps.ToArray();
var targetPrefab = UnityEditor.PrefabUtility.GetPrefabParent(gameObject) as GameObject;
if (targetPrefab != null)
{
UnityEditor.PrefabUtility.ReplacePrefab(gameObject, targetPrefab);
}
}
}
static void GenerateLightmapInfo (GameObject root, List<RendererInfo> rendererInfos, List<Texture2D> lightmaps)
{
var renderers = root.GetComponentsInChildren<MeshRenderer>();
foreach (MeshRenderer renderer in renderers)
{
if (renderer.lightmapIndex != -1)
{
RendererInfo info = new RendererInfo();
info.renderer = renderer;
info.lightmapOffsetScale = renderer.lightmapScaleOffset;
Texture2D lightmap = LightmapSettings.lightmaps[renderer.lightmapIndex].lightmapColor;
info.lightmapIndex = lightmaps.IndexOf(lightmap);
if (info.lightmapIndex == -1)
{
info.lightmapIndex = lightmaps.Count;
lightmaps.Add(lightmap);
}
rendererInfos.Add(info);
}
}
}
#endif
}
/
在程序实现上,整个游戏就只有一个场景,目的是可以对资源管理可以控制到很细的一个粒度。关卡的组织我们也自己实现了一套机制。
lightmap的动态载入主要有两方面的问题,lightmap的assetbundle和载入恢复场景的lightmap。
关于lightmap的assetbundle,最原始的思路是将所有的lightmap贴图全部bundle成一个包(这里需要记录下所有贴图的名字),然后客户端下载好lightmap包后,将所有贴图加载到内存里,然后设置到LightmapData里面去。另外一种思路是直接讲lightmapdata里面的信息通过scriptableobject序列化成asset,然后再对该asset进行bundle.鉴于第一种方法略微复杂,风刀直接使用了第二种方式。
ScriptableObject序列化的类,要求类型本身支持序列化,风刀测试了,LightMapData是不支持序列化的,不过这不会成为阻碍,我们把纹理数据从LightMapData里面取出来,序列化就OK了。因此,用于序列化lightmapdata的类
public class LightMapAsset : ScriptableObject
{
public Texture2D[] lightmapFar;
public Texture2D[] lightmapNear;
}
// 制作Asset
LightMapAsset lightmapAsset =ScriptableObject.CreateInstance<LightMapAsset>();
int Count = LightmapSettings.lightmaps.Length;
lightmapAsset.lightmapFar = new Texture2D[Count];
lightmapAsset.lightmapNear = new Texture2D[iCount];
for(int i=0; i<iCount; ++i)
{
// 这里把直接把lightmap纹理存起来
lightmapAsset.lightmapFar =LightmapSettings.lightmaps.lightmapFar;
lightmapAsset.lightmapNear =LightmapSettings.lightmaps.lightmapNear;
}
AssetDatabase.CreateAsset(asset, “Assets/”+AssetName);
UnityEngine.Object obj = AssetDatabase.LoadAssetAtPath(“Assets/” +AssetName, typeof(LightMapAsset));
// 打包
string ExportTargetPath = Application.dataPath + “/” + targetPath;
if (!File.Exists(ExportTargetPath))
{
Directory.CreateDirectory(ExportTargetPath);
}
string lightmapBundleName = SceneName + “_lightmap.bundle”;
BuildPipeline.BuildAssetBundle(obj, null, ExportTargetPath +lightmapBundleName.ToLower());
// 删除临时文件
AssetName = SceneName + “_lightmap.asset”;
AssetDatabase.DeleteAsset(“Assets/” + AssetName);
// 在游戏运行时恢复Lightmap数据就非常简单了,下面测试代码片段
if (info.www.assetBundle.mainAsset is LightMapAsset)
{
LightMapAsset lightmapAsset = info.www.assetBundle.mainAsset asLightMapAsset;
int Count = lightmapAsset.lightmapFar.Length;
LightmapData[] lightmapDatas = newLightmapData[Count];
for(int i=0; i<Count; ++i)
{
LightmapData Lightmap = newLightmapData();
Lightmap.lightmapFar =lightmapAsset.lightmapFar;
Lightmap.lightmapNear =lightmapAsset.lightmapNear;
lightmapDatas = Lightmap;
}
LightmapSettings.lightmaps = lightmapDatas;
}
还需要提到的一点是,在记录场景物件的信息时,需要记录GameObject的lightmapIndex和lightmapTilingOffset。当LightMap数据从外部加载完成后,要恢复物件lightmapIndex和lightmapTilingOffset。当Lightmap数据还没加载完成的时候,要把lightmapIndex设置为-1(不使用LightMap),否则会出现渲染错误。
//
unity5 里面,当场景里的物体保存成Prefab之后,LightMap的信息就会丢失。所以最后就写了个脚本,把每个Render里的lightmap纪录下来,当prefab实例化之后,重新设置。
相关设置:
注意事项:检查下是否勾选了 Static -> BatchingStatic ,如果勾选了,一定要去除勾选
using UnityEngine;
using System.Collections;
using System.Collections.Generic;
using UnityEngine.Rendering;
public class PrefabLightmapData :MonoBehaviour {
//LightMap信息
[System.Serializable]
publicstruct RendererInfo
{
publicRenderer renderer;
publicint lightmapIndex;
publicVector4 lightmapOffsetScale;
}
//场景中的Fog信息
[System.Serializable]
publicstruct FogInfo
{
publicbool fog;
publicFogMode fogMode;
publicColor fogColor;
publicfloat fogStartDistance;
publicfloat fogEndDistance;
publicfloat fogDensity;
}
publicFogInfo fogInfo;
publicList<RendererInfo> m_RendererInfo;
publicList<Texture2D> lightmapNear;
publicList<Texture2D> lightmapFar;
publicLightmapData[] lightmapData;
publicLightmapsMode lightmapsMode;
//地形的LightMap信息
publicTerrain terrain;
publicRendererInfo terrainRendererInfo;
//设置光照信息
[ContextMenu("SetUp")]
publicvoid SetUp(){
lightmapData= new LightmapData[lightmapNear.Count > lightmapFar.Count ?lightmapNear.Count : lightmapFar.Count];
for(inti = 0; i < lightmapData.Length; i ++){
lightmapData[i]=newLightmapData();
lightmapData[i].lightmapFar= i < lightmapFar.Count ? lightmapFar[i] : null;
lightmapData[i].lightmapNear= i < lightmapNear.Count ? lightmapNear[i] : null;
}
LightmapSettings.lightmapsMode= lightmapsMode;
LightmapSettings.lightmaps=lightmapData;
LoadLightmap();
RenderSettings.fog= fogInfo.fog;
RenderSettings.fogMode= fogInfo.fogMode;
RenderSettings.fogColor= fogInfo.fogColor;
RenderSettings.fogStartDistance= fogInfo.fogStartDistance;
RenderSettings.fogEndDistance= fogInfo.fogEndDistance;
RenderSettings.fogDensity= fogInfo.fogDensity;
}
//保存光照信息
[ContextMenu("SaveData")]
publicvoid SaveData(){
SaveLightmap();
}
publicvoid SaveLightmap()
{
fogInfo= new FogInfo ();
fogInfo.fog= RenderSettings.fog;
fogInfo.fogMode= RenderSettings.fogMode;
fogInfo.fogColor= RenderSettings.fogColor;
fogInfo.fogStartDistance= RenderSettings.fogStartDistance;
fogInfo.fogEndDistance= RenderSettings.fogEndDistance;
lightmapNear= new List<Texture2D>();
lightmapFar= new List<Texture2D>();
for(inti = 0; i < LightmapSettings.lightmaps.Length; i ++){
LightmapDatadata = LightmapSettings.lightmaps[i];
if(data.lightmapNear!= null){
lightmapNear.Add(data.lightmapNear);
}
if(data.lightmapFar!= null){
lightmapFar.Add(data.lightmapFar);
}
}
m_RendererInfo= new List<RendererInfo> ();
varrenderers = GetComponentsInChildren<MeshRenderer>();
foreach(MeshRenderer r in renderers) {
if(r.lightmapIndex != -1) {
RendererInfoinfo = new RendererInfo();
info.renderer= r;
info.lightmapOffsetScale= r.lightmapScaleOffset;
info.lightmapIndex= r.lightmapIndex;
m_RendererInfo.Add(info);
}
}
terrain= GetComponentInChildren<Terrain> ();
if(terrain != null) {
terrainRendererInfo= new RendererInfo();
terrainRendererInfo.lightmapOffsetScale= terrain.lightmapScaleOffset;
terrainRendererInfo.lightmapIndex= terrain.lightmapIndex;
}
lightmapsMode= LightmapSettings.lightmapsMode;
}
publicvoid LoadLightmap()
{
if(m_RendererInfo.Count <= 0) return;
if(terrain != null) {
terrain.lightmapScaleOffset= terrainRendererInfo.lightmapOffsetScale;
terrain.lightmapIndex= terrainRendererInfo.lightmapIndex;
}
foreach(var item in m_RendererInfo) {
item.renderer.lightmapIndex= item.lightmapIndex;
item.renderer.lightmapScaleOffset= item.lightmapOffsetScale;
}
}
}
当场景中LightMap烘培好了之后,在perfab根节点上面挂上这个脚本,右键-》SaveData,之后applyprefab。
在运行时场景初始化完成之后。调用SetUp方法,即可挂载lightMap。
重点!!我遇上个问题,需要保持原来存在的渲染场景,assetbundle才的LightMap能正常。否则就不会有LightMap,希望谁来个提示。
如果把原来渲染lightmap的场景删了,那么在手机上就会加载不到。
我估摸着是因为assetbundle的时候,没有把lightmap的贴图打包进去,只保存了引用的关系。
所以如果场景删了,那么lightmap的贴图也丢了。
首先推荐一篇文章,将的非常不错 http://www.edy.es/dev/docs/unity-5-lighting-cookbook/
1、灯光烘焙的速度非常慢。在Unity5中尤其慢(可能是因为效果和复杂度提升了,速度据说比Unity4慢几倍)。Unity5.3提升了烘焙速度。
2、所有被烘焙的物体设置成静态的(勾上Static),否则不参与烘焙
3、在Lighting--Scene面板中,注意几个Intensity参数。他们会影响最终的烘焙效果。 比如Ambient Intensity调大些环境光就会对场景造成影响,如果需要某些阴暗、蓝色、红色的场景,可以设置这里,一样的场景可以烘出不一样的效果。
不过这里也有一个坑,默认不改,这些Intensity都是1,会造成场景的曝光,看起来要比实际光照亮很多。
4、在Lighting--Object面板中,如果选择好一个3D模型,会有一些参数设置,其中有一个Scale In Lightmap,通过调整这个值,可以控制该物体在Lightmap中所占的纹理大小。比如调整成0.1,则此物体的光照纹理就只有原来的十分之一,而调整成0,则此物体虽然可以产生阴影,但是不接收任何光照信息。
在预览(Preview--BakedIntensity)中可以看到物体所占纹理大小。
5、接收阴影的模型(如地面),不要缩放。否则阴影就显示异常了。比如我们一开始把地面缩放了100倍,阴影直接就不显示了(其实是拉伸早成显示错误了)。
6、Unity5.3之前的版本有Bug。使用General GI---Directional进行烘焙的话,阴影无法显示。这个是因为Directional只支持Opengles3.0以及SM3.0以上的显卡和设备。当不支持时没有Fallback到Non-Directional,就出问题了。 一般来说这里选择Non-Directional就好了。
7、最终烘焙出来的效果,跟实时光照有一些初入。尤其是考虑到PBR的时候(Standard shader)。这个只能通过参数一步一步来调整。不过烘出一个效果可以接受的场景就好了,也没有必要追求一模一样。毕竟是完全不同的光照系统。
The source project for the screenshotsin this article is hosted at GitHub.
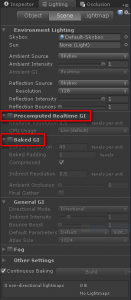
Standard realtime lighting
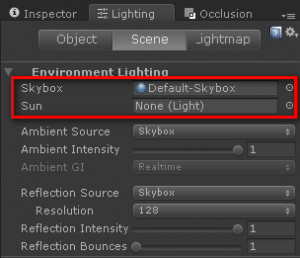
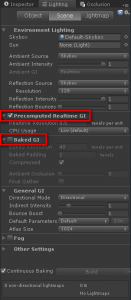
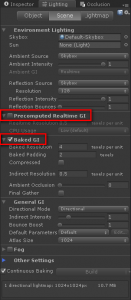
Standard realtime lighting includesambient light, environment reflection and realtime lights and shadows.It doesn’t require any GI or precomputed stuff whatsoever. Both optionsPrecomputed Realtime GI and Baked GI are disabled in Lighting > Scene.
1) Ambient Light
Equally affects all objects.
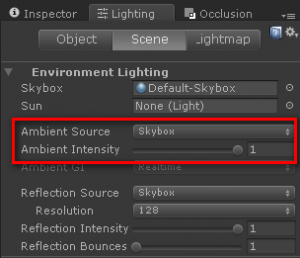
Ambient Source (Skybox, Gradient, Color)and Intensity
2) Environment Reflection
Reflected path that changes with theangle of the camera. Applied independently of Ambient. Affects the Fresnel effectas well.
If Reflection Probes are used theybecome the Reflection Source and Intensity for the objects under theirinfluence, so the global reflection settings don’t have effect on theseobjects. Reflection Bounces define how much times the reflection can bounceamong several probes (i.e. a probe capturing the objects under the influence ofanother probe).
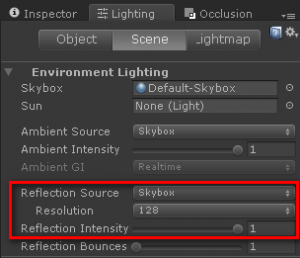
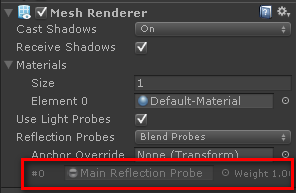
Left: Reflection Source (Skybox,Cubemap), Resolution and Reflection Intensity.
Right: A Reflection Probe affects this object, so the global EnvironmentReflection Source doesn’t affect this mesh.
3) Standard Lights
All standard realtime lights in thescene apply direct lighting and shadows on the objects.
The first Directional Light in the sceneis considered as Sun by default. The default Skybox getsits intensity and color adjusted depending on theSun’s horizontal inclination. Alternatively, a specific directional lightcan be selected as Sun for affecting the default Skybox:

Precomputed realtime lighting
Precomputed realtime lighting throwsin light bounces, color bleeding, and emissive materials in real time.Everything can change dynamically (light color and intensity, material color,material emission, etc) an the lighting gets updated in the scene accordinglyin real time.
Lighting > Scene > PrecomputedRealtime GI enabled, Baked GI disabled.
4) Light Bounces
Each light is configured to bounce offof objects and affect others.
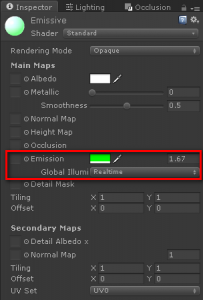
5) Emissive Materials
Objects flagged as Staticcontaining an emissive material emit light according to their geometry.
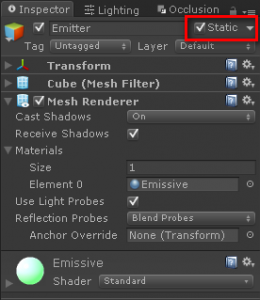
Precomputed realtime lighting iscalculated on the scene objects flagged as Static. Aprecompute phase is triggered whenever the Transform of any objectmarked as Static is modified, or when the Static flag itself changes.
The parameter Lighting > Scene >Precomputed Realtime GI > Realtime Resolution directlyaffects the time it will take to precompute the data. It’s ok to use values aslow as 0.01 – 0.5 for allow quickly prototyping while working inthe Editor.
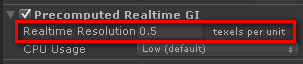
CPU Usage affects the reactions of thedynamic light changes in runtime. It doesn’t affect the CPU used for baking theprecomputed data in the editor.
Light bouncing and material emissionaffect static objects only. Light probes must be used forthe precomputed effects to be applied on dynamic objects aswell.
Ambient Light in precomputed realtimelighting
Ambient Light affects the parts ofthe static geometry that can be reached “from the exterior” by the light.Backfaces also count here. For instance, at interior scenes where thestatic geometry defines a closed hull, the ambient light won’t have effect atall in the static meshes. Any “gaps” or parts that are reachable from theexterior of the static geometry will be affected by the Ambient Lightaccordingly.
Baked lightmaps
Ambient Light, Standard Lights (baked ormixed), Light Bounces and Emissive Materias are baked into lightmap textures.Only Environment Reflection can change in runtime.
Lighting > Scene > BakedGI enabled, Precomputed Realtime GI disabled.
Standard Lights should be configured asBaked or Mixed for allowing to seamlessly switching among Bake only andRealtime only GI modes.
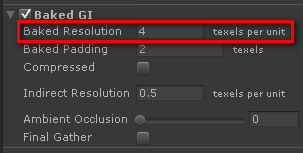
The parameter Lighting > Scene >Baked GI > Baked Resolution directly affects thetime it will take the lightmap to be generated. It’s ok to use values as low as1-4 for quickly prototyping while working in the Editor.
Modifying any parameter involved inlighting (Ambient Light, Standard Lights, Light Bounces, Emissive Materias) ormodifying any Static object will trigger a new lightmap calculation phase.
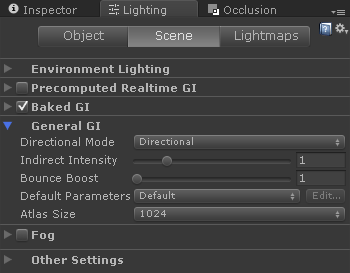
General GI settings
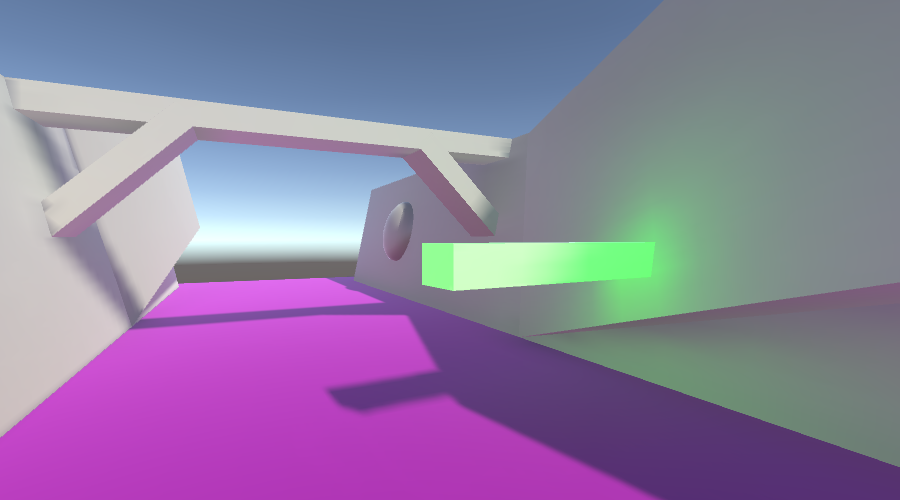
The Indirect Light isthe lighting effect of Ambient Light, Light Bounces and Emissive Materials(effect on nearby objects, not the emissive objects themselves), butnot Environment Reflection. Scene Window > Irradiance showsthe Indirect Light in the scene:

These settings affect the IndirectLight in both realtime and baked modes:
· Indirect intensity: Scales the indirect lighting(ambient + bounces + emissive)
· Bounce Boost: How strong the light bounces fromone surface to the next. The bounced light is multiplied by the albedo of thesurface intensified by this setting.
These settings affect the BakedGI mode only:
· Directional mode: whether to store directional andspecular information in the lightmaps in Baked GI mode.
· Atlas size: size of the lightmaps in Baked GI mode.
Combining different lighting methods
The tutorial Unity 5 – Lighting and Rendering is amust-read for understanding the insights of the Global Illumination (GI)in Unity 5. The quotes here are extracted from this tutorial.
Precomputed realtime lighting+ Baked lightmaps
It’s not a good idea, even given thatboth are enabled by default:
Although it is possible tosimultaneously use Baked GI lighting and Precomputed Realtime GI, be wary thatthe performance cost associated with rendering both systems simultaneously isthe sum of the cost of each of them. Not only do we have to store both sets oflightmaps in video memory, but we also pay the processing cost of decoding bothin shaders.
[…] The decision on which approachto take will have to be evaluated based on the nature of your particularproject and desired target platform. Remember that when targeting a range ofdifferent hardware, that often it is the least performant which will determinewhich approach is needed.
Standard realtime lighthting+ Baked lightmaps
This is aconvenient method for static and dynamic objects under the sameconstant lighting conditions:
Selecting the ‘Mixed’ baking mode [inthe Light component], GameObjects marked as static will still include thislight in their Baked GI lightmaps. However, unlike lights marked as ‘Baked’,Mixed lights will still contribute realtime, direct light to non-staticGameObjects within your scene. This can be useful in cases where you are usinglightmaps in your static environment, but you still want a character to use thesesame lights to cast realtime shadows onto lightmapped geometry.
Generating lightmap files
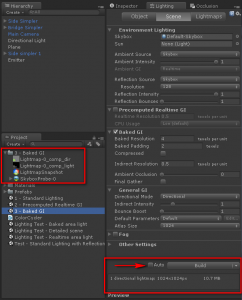
By default lightmap files are generatedand stored internally each time a lightmap calculation phase is triggered (i.e.by moving static elements).
Lightmaps can be calculated manually bydisabling the Auto checkbox in the Lighting window, thenclicking the Build button. The generated files are storedin a folder with the same name as the scene they belong to. Baked data includeslightmaps and reflection probes.
The parameters DirectionalMode and Atlas Size at the General GI sectionaffect the type and number of the lightmap files.


 1091
1091

 被折叠的 条评论
为什么被折叠?
被折叠的 条评论
为什么被折叠?
 到【灌水乐园】发言


