


 本文详细介绍了如何下载并安装APM固件,配置环境变量,运行APM仿真,以及在Gazebo环境中增加VTOL模型和进行多机协同模拟,包括使用mavros进行遥控操作。通过一步步指导,帮助读者完成从环境搭建到实际飞行的全过程。
APM+Gazebo 垂起固定翼VTOL软件在环仿真
1. APM软件环境
参考官网链接: link.
下载并安装APM固件
sudo apt-get update
git clone https://github.com/your-github-userid/ardupilot
cd ardupilot
git submodule update --init --recursive
Tools/environment_install/install-prereqs-ubuntu.sh -y
. ~/.profile
加入环境变量
打开.bashrc
sudo gedit ~/.bashrc
在文章末尾加入以下两句话
export PATH=$PATH:$HOME/ardupilot/Tools/autotest
export PATH=/usr/lib/ccache:$PATH
重新加载.bashrc文件,或重新打开终端
. ~/.bashrc
更新 MAVProxy and pymavlink
pip install --upgrade pymavlink MAVProxy --user
2. 运行APM仿真
参考官网链接: link.
cd ~/ardupilot/ArduPlane
sim_vehicle.py --map --console
出现图片中的效果,则说明运行成功了

在终端中输入以下命令,控制飞机
Change to GUIDED mode, arm the throttle, and then takeoff
mode guided
arm throttle
takeoff 40
Change to CIRCLE mode and set the radius to 2000cm
rc 3 1500
mode circle
param set circle_radius 2000
When you’re ready to land you can set the mode to RTL (or LAND)
mode rtl
3. Gazebo环境安装
参考链接: link.
ardupilot_gazebo
git clone https://github.com/SwiftGust/ardupilot_gazebo
cd ardupilot_gazebo
mkdir build
cd build
cmake ..
make -j4
sudo make install
修改环境变量
sudo gedit ~/.bashrc
文章末尾加入以下内容:
source /usr/share/gazebo/setup.sh
export GAZEBO_MODEL_PATH=~/ardupilot_gazebo/models:${GAZEBO_MODEL_PATH}
export GAZEBO_MODEL_PATH=~/ardupilot_gazebo/models_gazebo:${GAZEBO_MODEL_PATH}
export GAZEBO_RESOURCE_PATH=~/ardupilot_gazebo/worlds:${GAZEBO_RESOURCE_PATH}
export GAZEBO_PLUGIN_PATH=~/ardupilot_gazebo/build:${GAZEBO_PLUGIN_PATH}
ROVER
On 1st Terminal(Launch ArduRover SITL)
sim_vehicle.py -v APMrover2 -f gazebo-rover -m --mav10 --map --console -I1
On 2nd Termianal(Launch Gazebo with differential drive Rover model, Retrieved from Husky Model)
gazebo --verbose rover_ardupilot.world
COPTER (3DR IRIS)
On 1st Terminal(Launch ArduCopter SITL)
sim_vehicle.py -v ArduCopter -f gazebo-iris -m --mav10 --map --console -I0
On 2nd Terminal(Launch Gazebo with demo 3DR Iris model)
gazebo --verbose iris_ardupilot.world
PLANE
On 1st Terminal(Launch ArduPlane SITL)
sim_vehicle.py -v ArduPlane -f gazebo-zephyr -m --mav10 --map --console -I0
On 2nd Terminal(Launch Gazebo with demo Zephyr flying wing model)
gazebo --verbose zephyr_ardupilot_demo.world
4. 增加VTOL模型
首先要下载几个文件,文件下载链接:link.
standard_vtol.sdf 放到 ~/ardupilot_gazebo/models/standard_vtol 目录下,替换原始文件;
standard_vtol.world 放到 ~/ardupilot_gazebo/worlds 目录下。
gazebo_quadplane.parm 放到 ~/ardupilot/Tools/autotest/default_params 目录下;
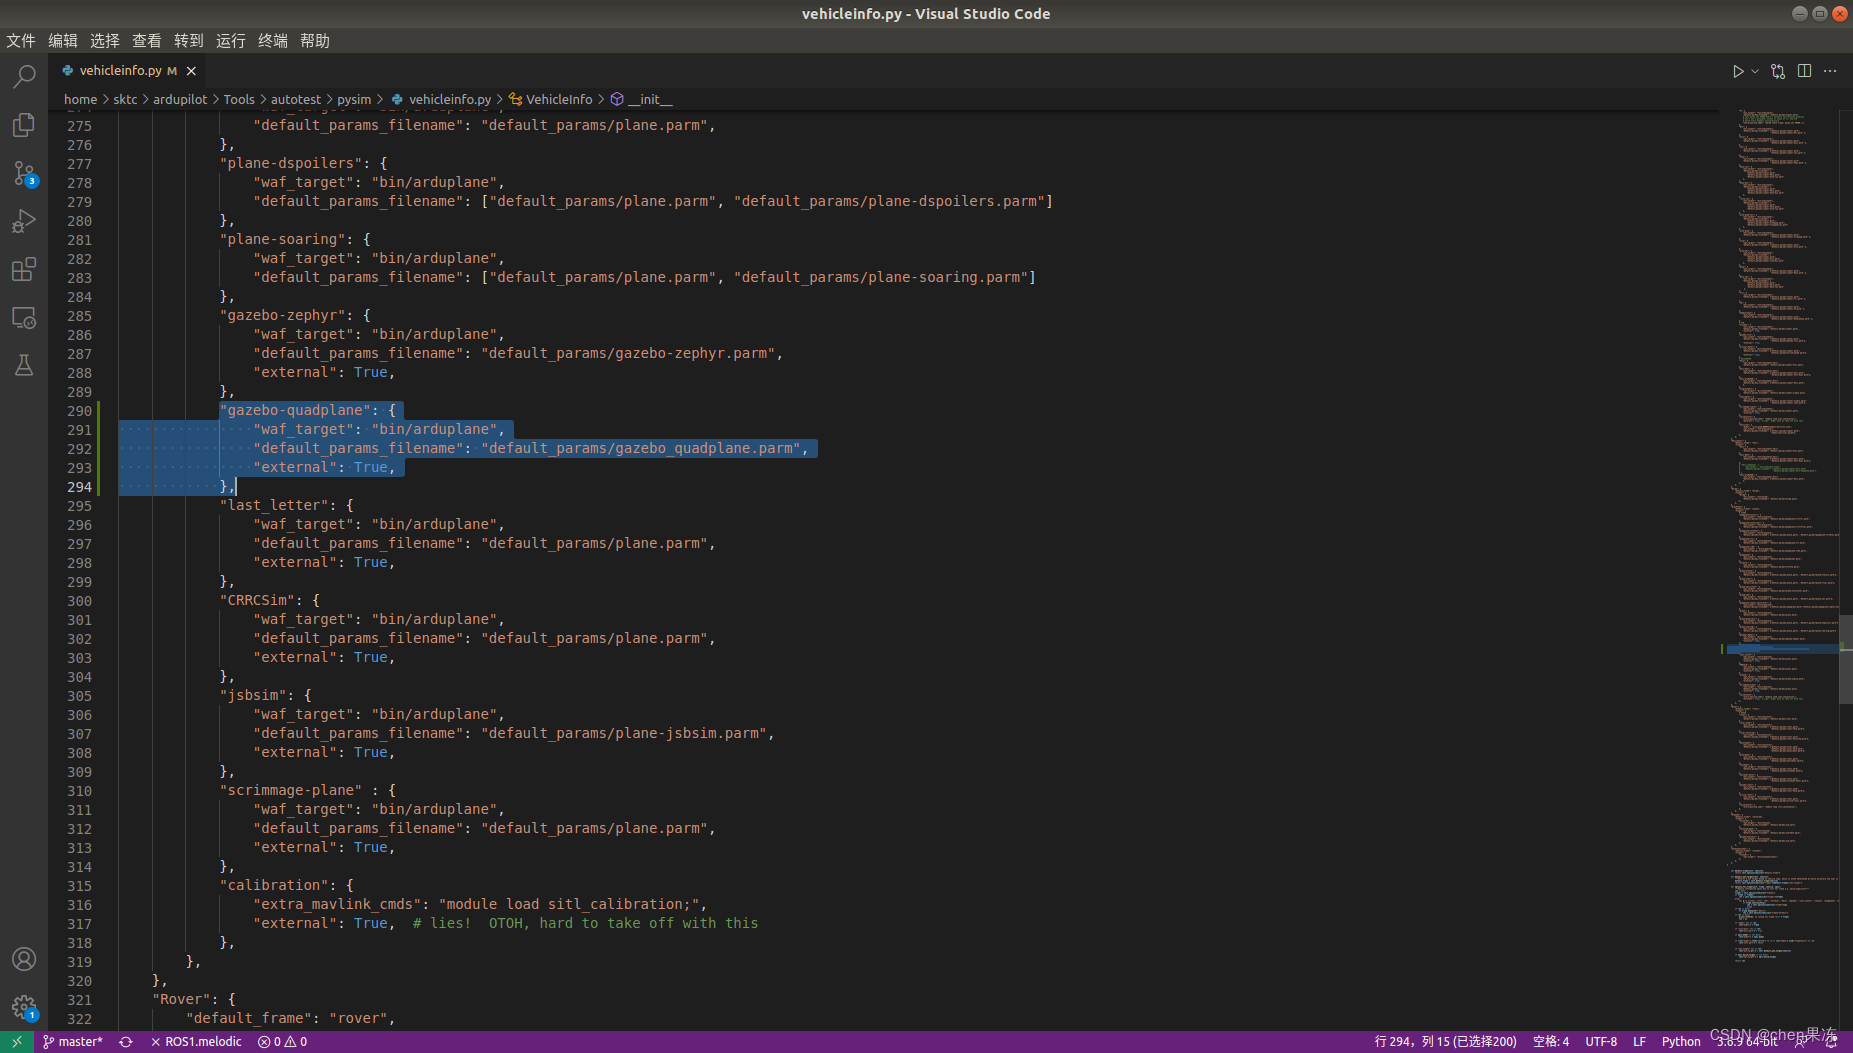
然后修改 ~/ardupilot/Tools/autotest/pysim 目录下的 vehicleinfo.py 文件内容,增加如下内容:
"gazebo-quadplane": {
                "waf_target": "bin/arduplane",
                "default_params_filename": "default_params/gazebo_quadplane.parm",
                "external": True,
            },
测试如下:
On 1st Terminal(Launch ArduPlane SITL)
sim_vehicle.py -v ArduPlane -f gazebo-quadplane ---map -console -m --mav10
On 2nd Terminal(Launch Gazebo with quadplane model)
gazebo --verbose worlds/standard_vtol.world
注:如果使用QGC,则去掉--map
5. 多机仿真
首先在~/ardupilot_gazebo/worlds 目录下创建一个 multi_standard_vtol.world 文件,文件内容如下:
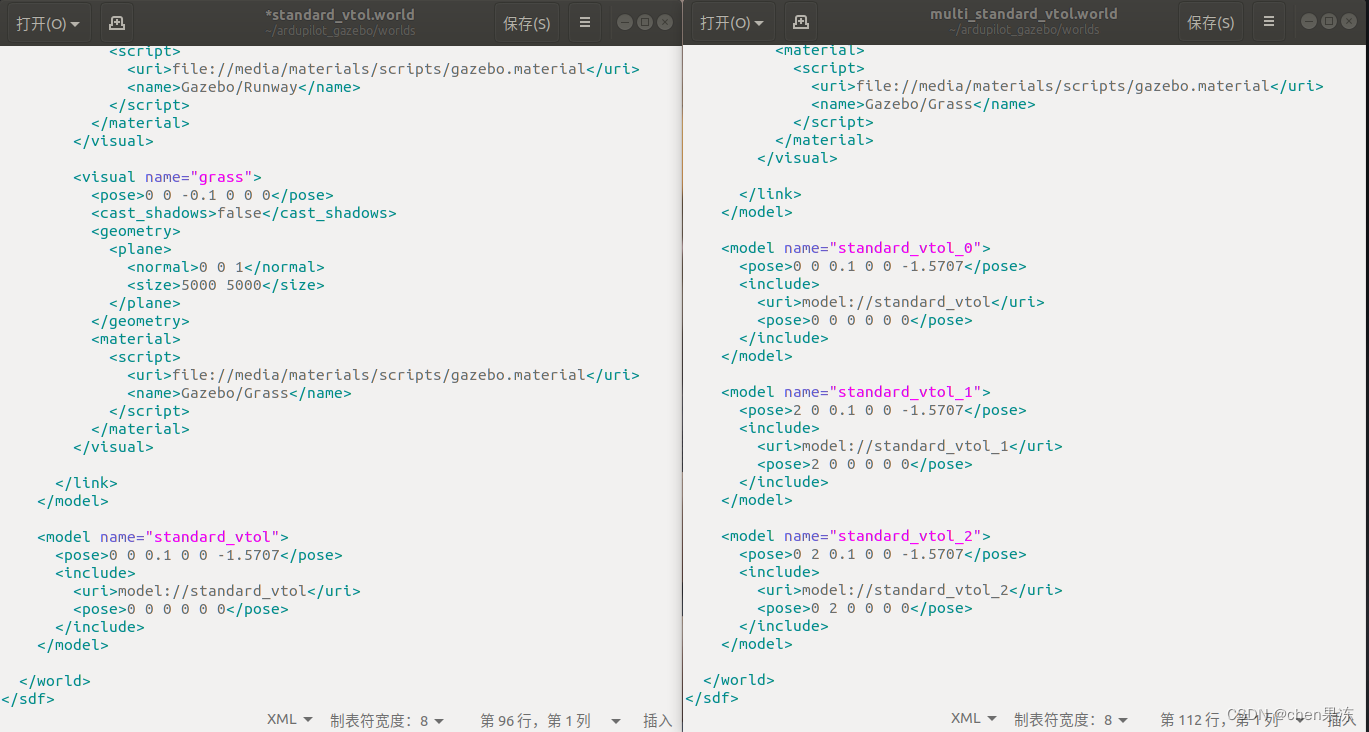
可以发现新加入了standard_vtol_1和standard_vtol_2,uri为model://standard_vtol_1和model://standard_vtol_2,因此需要在gazebo/models文件夹下面新建一个standard_vtol_1文件夹和一个standard_vtol_2文件夹,里面的model.config、model.sdf文件与standard_vtol里的基本相同。
除了,因为每个模型要与apm固件实现联合仿真,需要有固定的网络接口。参考相关资料及sim_vehicle.py 发现每加入一个模型,其对应的fdm_port_in、fdm_port_out就要加10,因此,
standard_vtol_1和standard_vtol_2里的model.sdf设置如下:

准备上述文件后,三个终端分别运行
sim_vehicle.py -v ArduPlane -f gazebo-quadplane --console -m --mav10 --sysid=1 -I0 has FDM in/out ports of 9002/9003 / GCS connection UDP:14550
sim_vehicle.py -v ArduPlane -f gazebo-quadplane --console -m --mav10 --sysid=2 -I1 has FDM in/out ports of 9012/9013 / GCS connection UDP:14560
sim_vehicle.py -v ArduPlane -f gazebo-quadplane --console -m --mav10 --sysid=3 -I2 has FDM in/out ports of 9022/9023 / GCS connection UDP:14570
另起一个终端运行
cd ~/ardupilot_gazebo
gazebo --verbose worlds/multi_standard_vtol.world
6. 使用mavros
修改apm.launch文件
<launch>
	<!-- vim: set ft=xml noet : -->
	<!-- example launch script for ArduPilot based FCU's -->

	<group ns="iris_0">
	<arg name="fcu_url" default="udp://127.0.0.1:14550@" />
	<arg name="gcs_url" default="" />
	<arg name="tgt_system" default="1" />
	<arg name="tgt_component" default="1" />
	<arg name="log_output" default="screen" />
	<arg name="fcu_protocol" default="v2.0" />
	<arg name="respawn_mavros" default="false" />

	<include file="$(find mavros)/launch/node.launch">
		<arg name="pluginlists_yaml" value="$(find mavros)/launch/apm_pluginlists.yaml" />
		<arg name="config_yaml" value="$(find mavros)/launch/apm_config.yaml" />

		<arg name="fcu_url" value="$(arg fcu_url)" />
		<arg name="gcs_url" value="$(arg gcs_url)" />
		<arg name="tgt_system" value="$(arg tgt_system)" />
		<arg name="tgt_component" value="$(arg tgt_component)" />
		<arg name="log_output" value="$(arg log_output)" />
		<arg name="fcu_protocol" value="$(arg fcu_protocol)" />
		<arg name="respawn_mavros" value="$(arg respawn_mavros)" />
	</include>
	</group>

	<group ns="iris_1">
	<arg name="fcu_url" default="udp://127.0.0.1:14560@" />
	<arg name="gcs_url" default="" />
	<arg name="tgt_system" default="2" />
	<arg name="tgt_component" default="1" />
	<arg name="log_output" default="screen" />
	<arg name="fcu_protocol" default="v2.0" />
	<arg name="respawn_mavros" default="false" />

	<include file="$(find mavros)/launch/node.launch">
		<arg name="pluginlists_yaml" value="$(find mavros)/launch/apm_pluginlists.yaml" />
		<arg name="config_yaml" value="$(find mavros)/launch/apm_config.yaml" />

		<arg name="fcu_url" value="$(arg fcu_url)" />
		<arg name="gcs_url" value="$(arg gcs_url)" />
		<arg name="tgt_system" value="$(arg tgt_system)" />
		<arg name="tgt_component" value="$(arg tgt_component)" />
		<arg name="log_output" value="$(arg log_output)" />
		<arg name="fcu_protocol" value="$(arg fcu_protocol)" />
		<arg name="respawn_mavros" value="$(arg respawn_mavros)" />
	</include>
	</group>

	<group ns="iris_2">
	<arg name="fcu_url" default="udp://127.0.0.1:14570@" />
	<arg name="gcs_url" default="" />
	<arg name="tgt_system" default="3" />
	<arg name="tgt_component" default="1" />
	<arg name="log_output" default="screen" />
	<arg name="fcu_protocol" default="v2.0" />
	<arg name="respawn_mavros" default="false" />

	<include file="$(find mavros)/launch/node.launch">
		<arg name="pluginlists_yaml" value="$(find mavros)/launch/apm_pluginlists.yaml" />
		<arg name="config_yaml" value="$(find mavros)/launch/apm_config.yaml" />

		<arg name="fcu_url" value="$(arg fcu_url)" />
		<arg name="gcs_url" value="$(arg gcs_url)" />
		<arg name="tgt_system" value="$(arg tgt_system)" />
		<arg name="tgt_component" value="$(arg tgt_component)" />
		<arg name="log_output" value="$(arg log_output)" />
		<arg name="fcu_protocol" value="$(arg fcu_protocol)" />
		<arg name="respawn_mavros" value="$(arg respawn_mavros)" />
	</include>
	</group>

</launch>
最后在终端中运行
roslaunch mavros apm.launch
注:udp://127.0.0.1:14550@中的udp地址可在终端中找到(–console to show mavproxy console, –map to have the copter on map)
sim_vehicle.py -v ArduCopter --console --map
"mavproxy.py" "--master" "tcp:127.0.0.1:5760" "--sitl" "127.0.0.1:5501" "--out" "127.0.0.1:14550" "--out" "127.0.0.1:14551" "--map" "--console"
与PX4不同的是,ardupilot里没有offboard模式,用guided模式代替
在guied模式下,直接设置航点不能起飞,需要先takeoff一下


 857
857

 被折叠的 条评论
为什么被折叠?
被折叠的 条评论
为什么被折叠?
 到【灌水乐园】发言


