


Nvidia Isaac Sim 入门教程 2024
版权信息
Copyright 2023-2024 Herman Ye@Auromix. All rights reserved.

This course and all of its associated content, including but not limited to text,
images, videos, and any other materials, are protected by copyright law.
The author holds all rights to this course and its contents.

Any unauthorized use, reproduction, distribution, or modification of this course
or its contents is strictly prohibited and may result in legal action.
This includes, but is not limited to:
Copying or distributing course materials without express written permission.
Reposting, sharing, or distributing course content on any platform without proper attribution and permission.
Creating derivative works based on this course without permission.
Permissions and Inquiries

If you wish to use or reproduce any part of this course for purposes other than personal learning,
please contact the author to request permission.

The course content is provided for educational purposes, and the author makes no warranties or representations
regarding the accuracy, completeness, or suitability of the course content for any specific purpose.
The author shall not be held liable for any damages, losses,
or other consequences resulting from the use or misuse of this course.

Please be aware that this course may contain materials or images obtained from third-party sources.
The author and course creator diligently endeavor to ensure that these materials
are used in full compliance with copyright and fair use regulations.
If you have concerns about any specific content in this regard,
please contact the author for clarification or resolution.

By enrolling in this course, you agree to abide by the terms and conditions outlined in this copyright notice.
学习目标
- 熟悉Isaac Sim代码开发环境的配置
- 熟悉Isaac Sim API的使用
- 能够使用Isaac Sim API搭建出独立python的基本仿真demo
难度级别
| 初级 | 中级 | 高级 |
|---|---|---|
| √ |
预计耗时
40 mins
学习前提
| 对象 | 类型 | 状态 |
|---|---|---|
| Ubuntu22.04操作系统 | 软件 | 已确认 |
| Isaac Sim环境配置 | 软件 | 已配置 |
| Isaac Sim基本概念 | 知识 | 已了解 |
| Isaac Sim图形界面 | 知识 | 已了解 |
了解Isaac Sim 核心API
NVIDIA Isaac Sim 基于 NVIDIA Omniverse Kit 和 USD 架构构建,但是使用 Pixar 的 USD Python API 与 Omniverse Kit 进行交互的学习曲线非常陡峭,而且通常步骤显得相当乏味。
因此,NVIDIA 提供了一组简化的 API 用于机器人应用程序,这些 API 抽象了 USD和OmniKit API 的复杂性,并将多个步骤合并为一个以便频繁执行的任务,这就是 Isaac Sim 核心 API。
在本章节中,将使用 Isaac Sim 提供的 API 来完成几个小的案例的代码编程的学习目标。
为Isaac Sim配置IDE
通常的代码开发都是在 VS Code 中进行的。因此,在这里我们将配置 Isaac Sim 的 VS Code 插件,使得在 VS Code 中编辑的代码能够实时在 Isaac Sim 的图形界面中响应,从而方便进行小段功能代码的调试和编写。
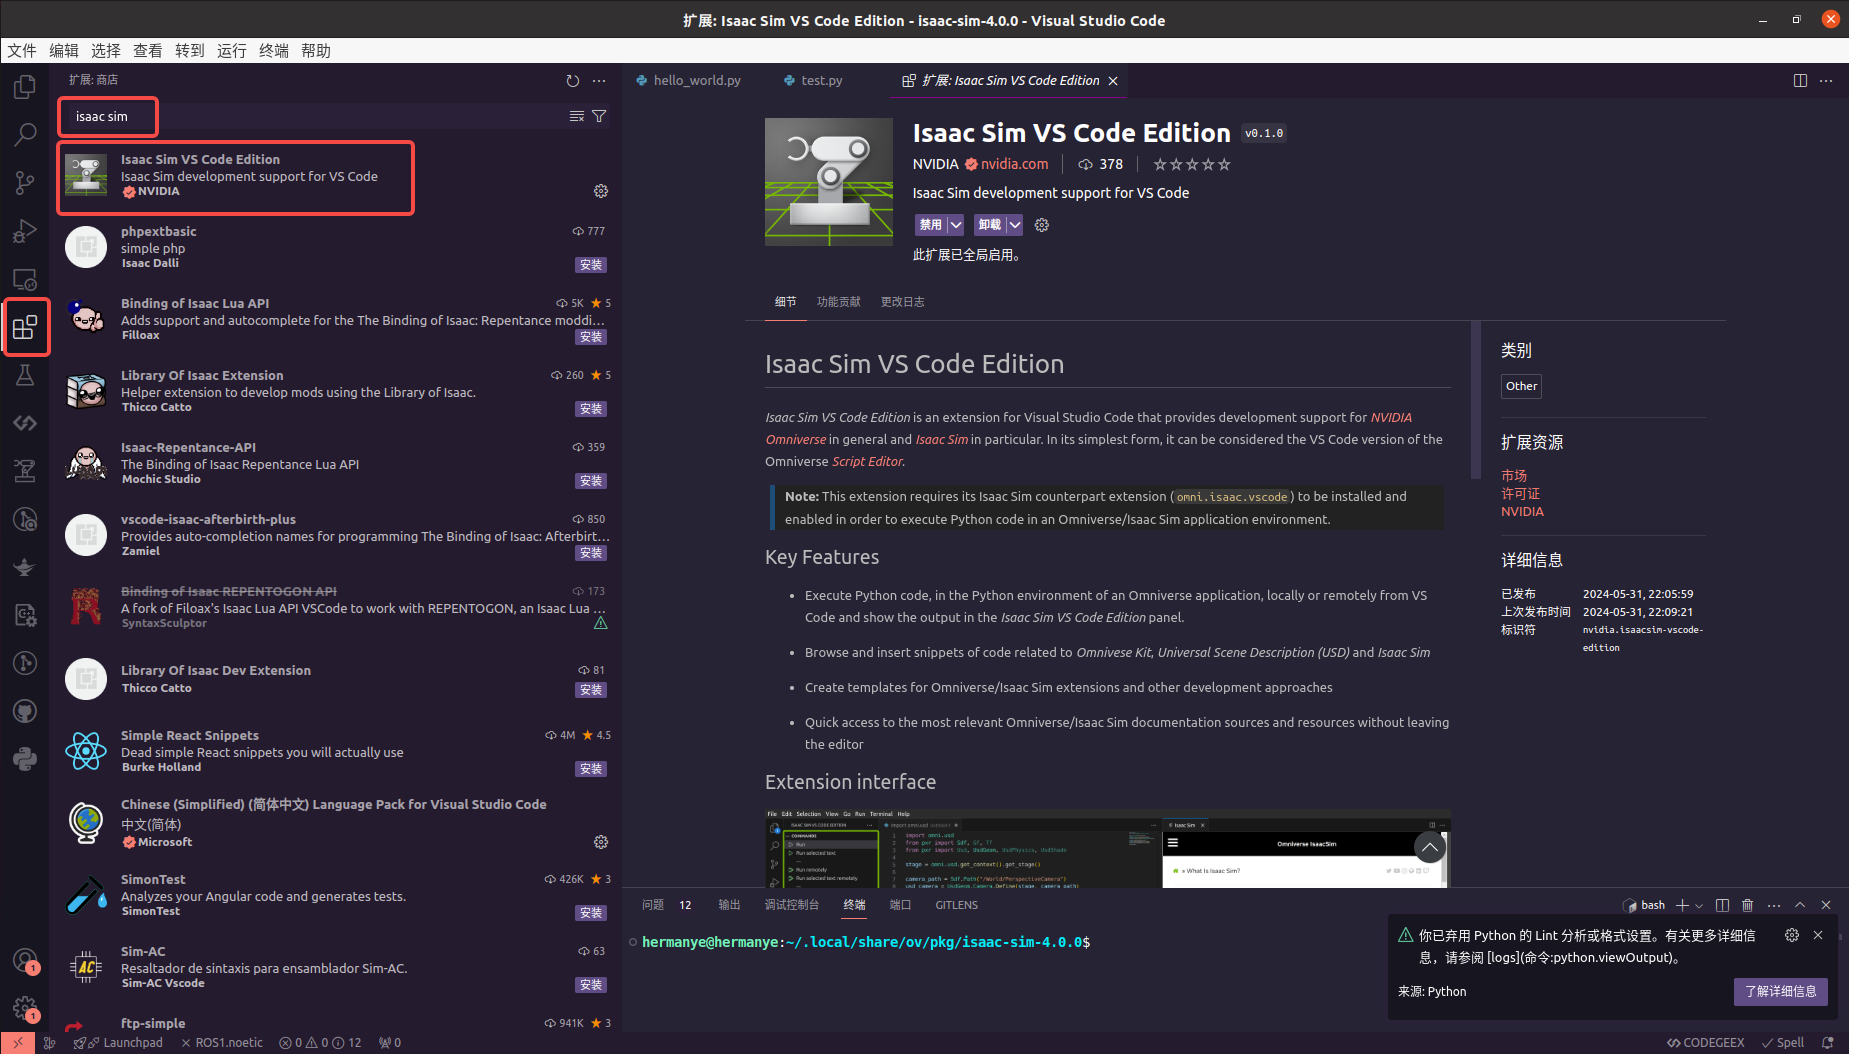
- 在 VS Code 中搜索 isaac sim,安装 Isaac Sim VS Code Edition 插件。,随后关闭VS Code。
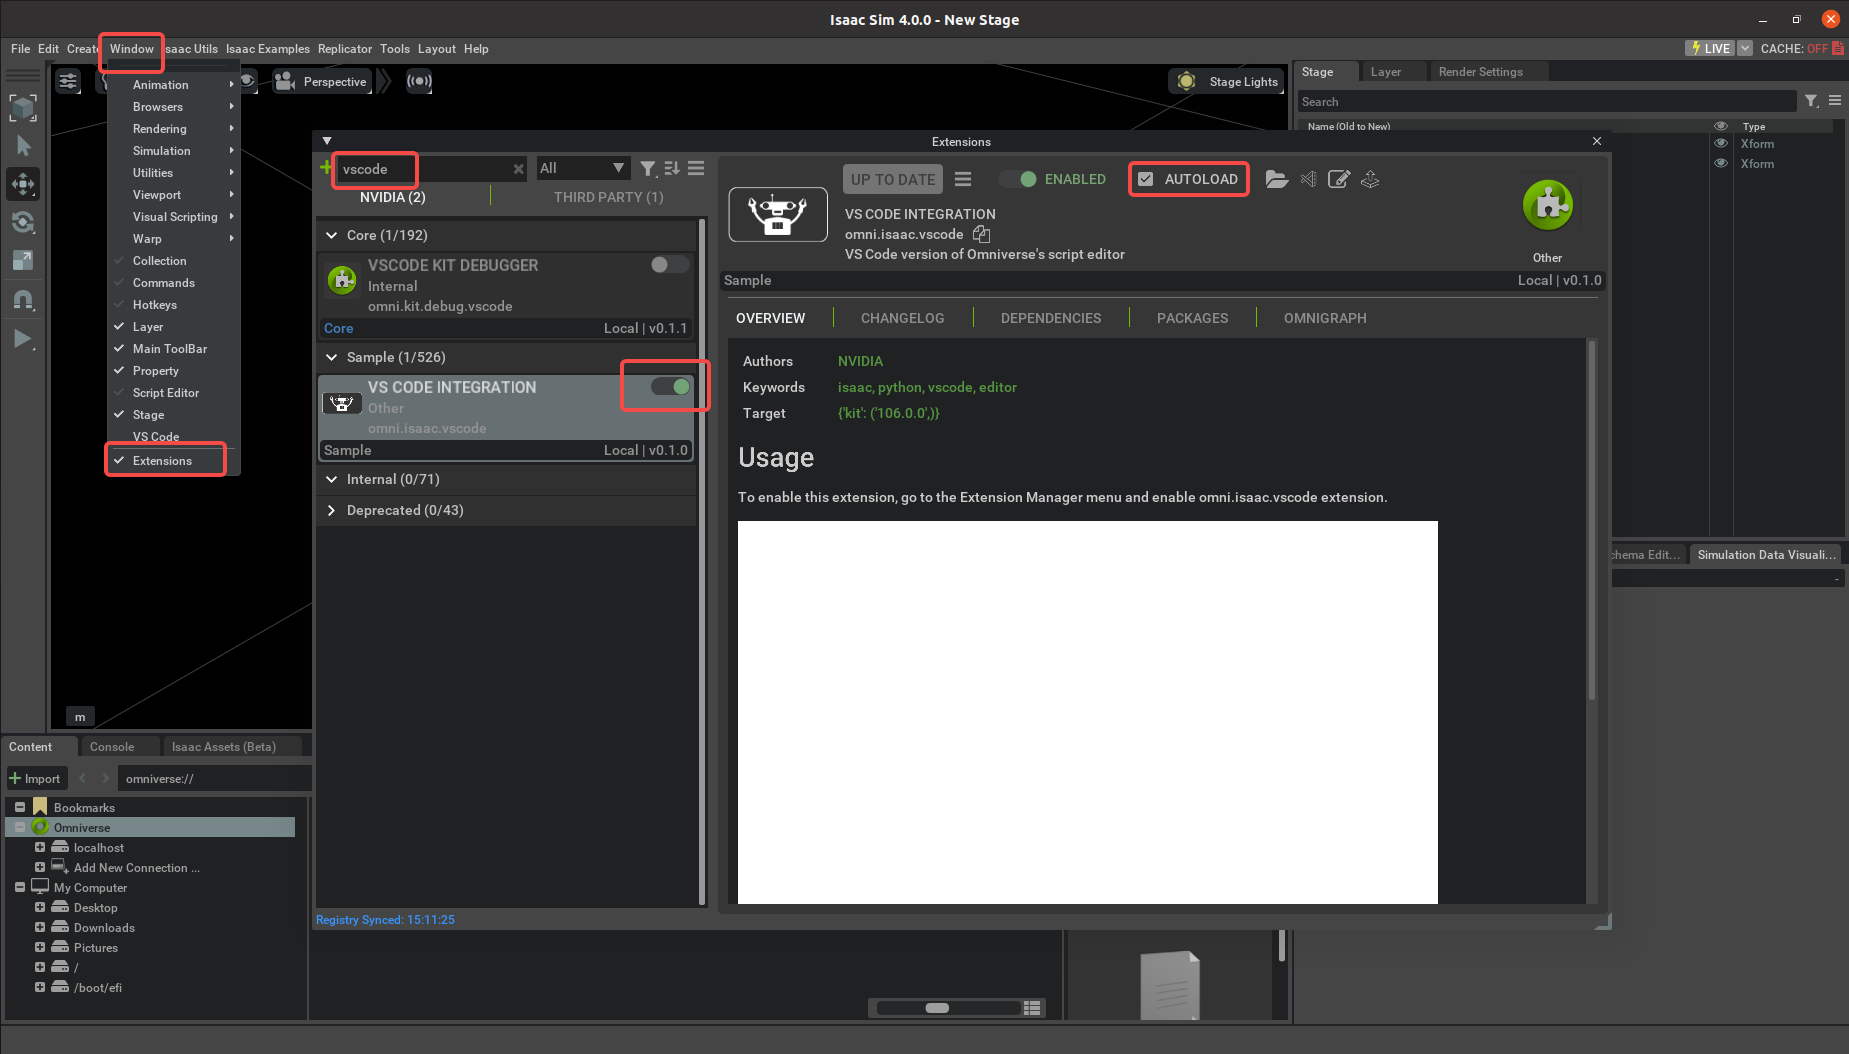
- 在Isaac Sim中,依次选择
Windows->Extension进入拓展管理器,在其中搜索omni.isaac.vscode并启用插件,并选择AUTOLOAD,方便每次启动Isaac Sim均启用VS Code插件。
-
在Isaac Sim中,依次选择
Windows->VS Code可以进入以Isaac目录的VS Code编辑工作,或者进入自行创建的VS Code项目工作区。 -
配置Isaac Sim IDE环境
如果是自己创建的VS Code项目工作区,IDE的分析器将会缺失Isaac Sim常见API包的路径信息,需要从Isaac Sim官方的IDE设置中获取同样的路径信息设置,它可以通过一个脚本来完成。
使得当前终端进入你的项目工作区的根目录,并执行这个由Auromix提供的一键配置命令:
# Change to your path for current terminal
cd <your_vscode_project_workspace_root_path>
# Run script
script_name="setup_isaac_sim_ide_environment.sh" && directory_name="/tmp" && download_url="https://raw.githubusercontent.com/Auromix/auro_sim/main/scripts" && full_script_path="${directory_name}/${script_name}" && wget -O $full_script_path $download_url/$script_name && sudo chmod +x $full_script_path && bash $full_script_path && rm -rf $full_script_path
注意:该一键配置脚本命令应当在你的项目工作区的根目录下执行。
- 创建测试代码片段到test.py文件。
from omni.isaac.core import World
from pxr import Usd, UsdGeom
import omni

# Create default plane
world = World()
world.scene.add_default_ground_plane()

# Add a sphere
stage = omni.usd.get_context().get_stage()
xformPrim = UsdGeom.Xform.Define(stage, "/hello")
spherePrim = UsdGeom.Sphere.Define(stage, "/hello/sphere")
- 点击VS Code左侧的Isaac Sim工具图标,并点击左上角的Run进行运行测试。
Isaac Sim VS Code 插件提供了运行脚本等命令,方便和Isaac Sim本体进行实时交互,同时提供了一些常用的代码片、模版和文档。

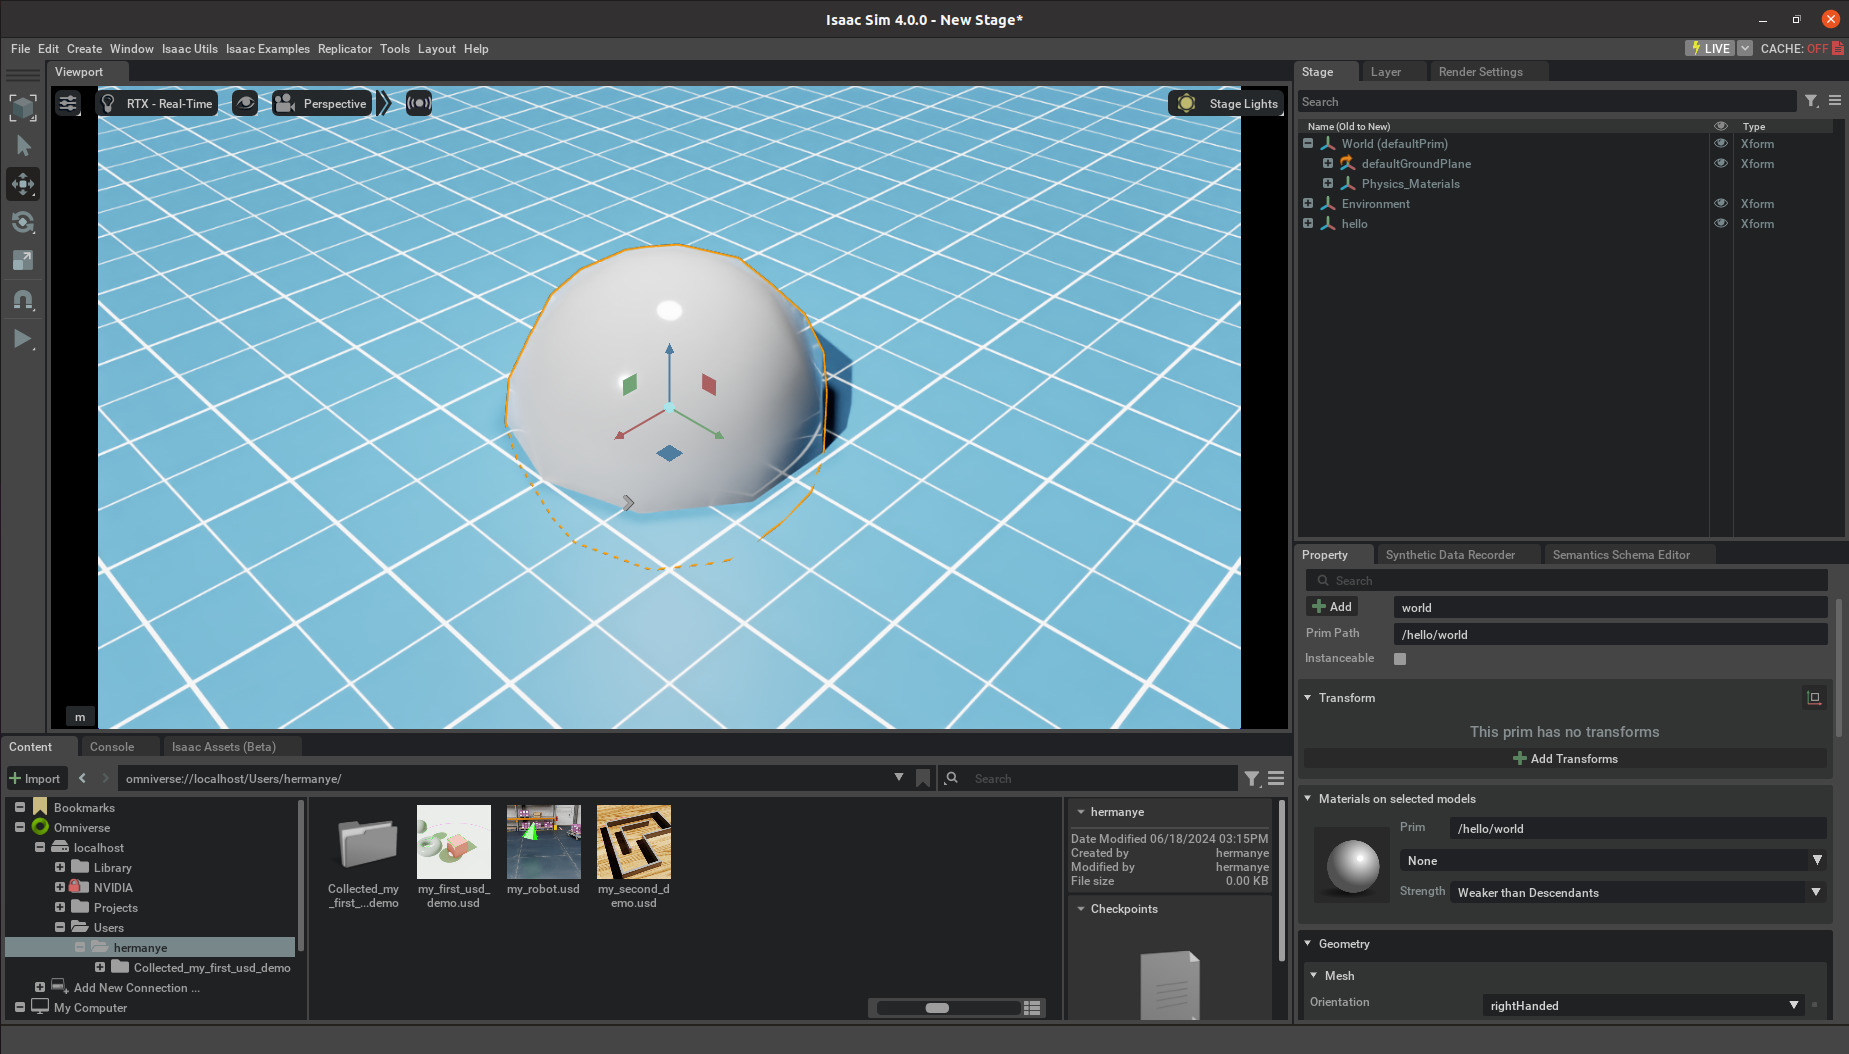
最终Isaac Sim中应当会出现代码片段中所添加的地面和球体。
熟悉常用的API
在这一章节,我们通过一些常见的案例来熟悉API,例如:
- 创建仿真世界
- 创建/导入物体
- 导入机器人
- 控制机器人
- Standalone python模式
创建仿真世界
在Isaac Sim中进行仿真,首先要先完成对于世界的创建,通常还会添加一个地面。
- 世界(World)
在Isaac Sim中,世界(World) 是核心概念,代表机器人工作的唯一环境。它被设计为一个高度封装的类,提供了许多简化函数和操作接口。World类是单例的(Singleton),这意味着在运行Isaac Sim时只能存在一个World实例。
通过World类,可以处理许多与时间相关的事件,如物理和渲染步进(Step)、添加步进时的回调函数(Callback)、重置整个场景(Scene)以及添加任务(Task)。
World is the core class that enables you to interact with the simulator in an easy and modular way. It takes care of many time-related events such as adding callbacks, stepping physics, resetting the scene, adding tasks, etc. The World class is a Singleton which means only one World can exist while running Omniverse Isaac Sim. Query the World for information about the simulation from different extensions.
- 场景(Scene)
场景(Scene) 类是 World类的一个属性。该类简化了用户对资产内容的操作,用户可以通过 场景(Scene) 类的方法方便地管理 USD 舞台(Stage)中已注册到 场景(Scene) 的资产。
它提供了简洁的 API 来添加(Add)、操作和检查舞台(Stage)中已注册到 场景(Scene) 的 USD 资产,并且可以设置这些资产的默认重置状态。
许多可以添加到 场景(Scene) 中的对象类(如方块)通常对应于已经存在于 舞台(Stage) 中的 USD prim,或者可以创建新的 USD prim 到 舞台(Stage) 并注册到 场景(Scene) 进行管理。这种方式简化了通过 场景(Scene) 设置和获取对象常见属性的操作。
用户与 世界(World) 的交互可以简化为使用 world.scene.add(user_object),其中 user_object 是来自 omni.isaac.core 的对象。
注意:如果添加到 舞台(Stage) 的基本对象(Prim)只是用于观察而不需要被操作,那么就不需要注册到 场景(Scene) 进行管理。
A world contains an instance of a Scene, think about it as a scene management class that manages the assets of interest in the USD stage. It provides an easy api to add, manipulate and inspect different USD assets in the stage as well as setting its default reset states. Many of the object classes available which could be added to a Scene usually takes an already existing USD prim in stage or creates a new USD prim, thus providing an easy way to set/ get its common properties.
现在,我们创建一个世界,并将默认的地面添加到舞台(Stage),并在场景(Scene)中注册这个地面,方便后续管理。
注意:选中代码片段,点击
ISAAC SIM VS CODE EDITION的Run selected text即可运行代码片段。
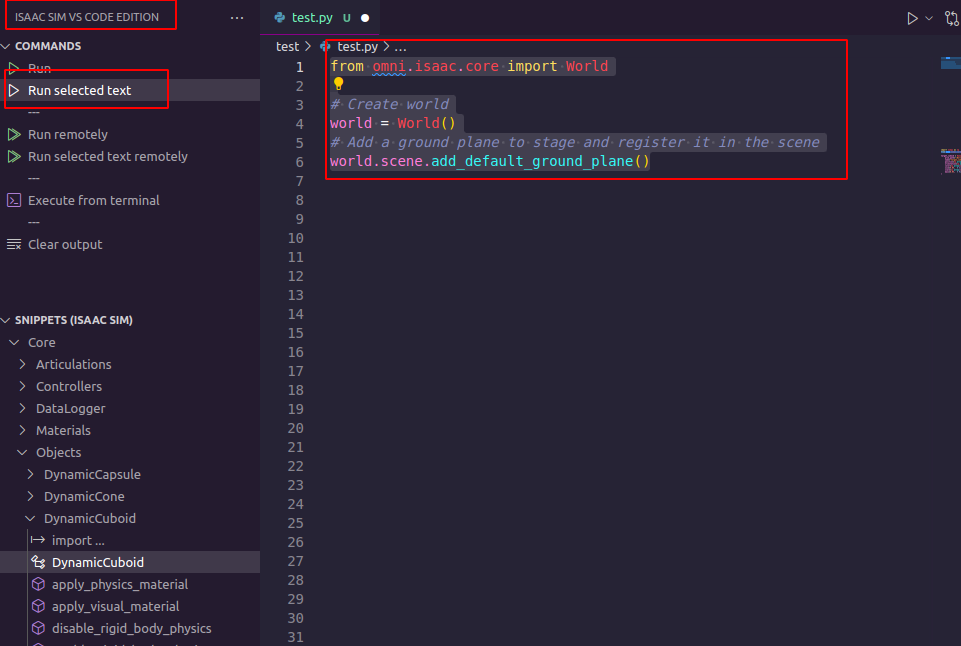
# create_ground_plane.py
from omni.isaac.core import World


# Instantiate World class
world = World()
# Add a ground plane to stage and register it in the scene
world.scene.add_default_ground_plane()
注意:在add_default_ground_plane()中包含了对add_reference_to_stage()的调用,因此ground plane是先被添加到了stage,随后通过Scene.add()注册到了场景中。
此时应当出现一个默认的蓝白网格地面。
注意:如果执行片段无效,这和重复执行某些片段导致的重复实例化被忽视相关,请重新打开Isaac Sim或执行清理,以下提供了两种执行清理的方式。
# Clear the world [recommend]
world.clear()
# Clear the stage
from omni.isaac.core.utils.stage import clear_stage
clear_stage()
创建/导入物体
在Isaac Sim中,物体可以被创建和导入,对于常见的基元(例如方块、球)等可以创建,对于复杂的资产例如可乐罐、桌子可以导入,常见的基元可以在omni.isaac.core.objects中找到。
物体可以具有不同的属性API,下面以小方块为例进行讲解:
- DynamicCuboid
动力学小方块是具备刚体属性的小方块(Cuboid),它具备刚体和碰撞体属性,能够和其他的刚体及碰撞体发生交互,会受到重力、碰撞等外力的影响而移动,属于omni.isaac.core.objects模块里的一种对象类。
omni.isaac.core.objects模块包含了用于创建常见形状体(胶囊体、圆锥体、长方体、圆柱体、球体)以及地面,它提供这些常见形状体的仅可视不可碰撞(Visual)、固定在原处但有碰撞属性(Fixed)、动力学(Dynamic)三个版本。
他们的继承都源于omni,isaac.core.prims.GeometryPrim(_SinglePrimWrapper),因此继承了这个类的各种方法,比如set/get_world_pose,其中的一部分还添加了刚体、碰撞体的API,使得具备了相关的方法和属性,例如get_linear_velocity。
下面给出了一些具备通俗解释的典型例子以作区分。
| 对象类 | 解释 | 引用 |
|---|---|---|
| DynamicCuboid | 可以发生碰撞,并且有刚体动力学属性(角速度线速度等)的小方块 | from omni.isaac.core.objects import DynamicCuboid |
| FixedSphere | 固定在指定位置的球,可以和其他碰撞体发生碰撞行为,但自身不会被移动 | from omni.isaac.core.objects import FixedSphere |
| VisualCylinder | 仅可以被看见的圆柱,像一个可见的幽灵,既不会动,也不会和其他物体发生碰撞 | from omni.isaac.core.objects import VisualCylinder |
| GroundPlane | 可以指定一些属性的地面 | from omni.isaac.core.objects import GroundPlane |

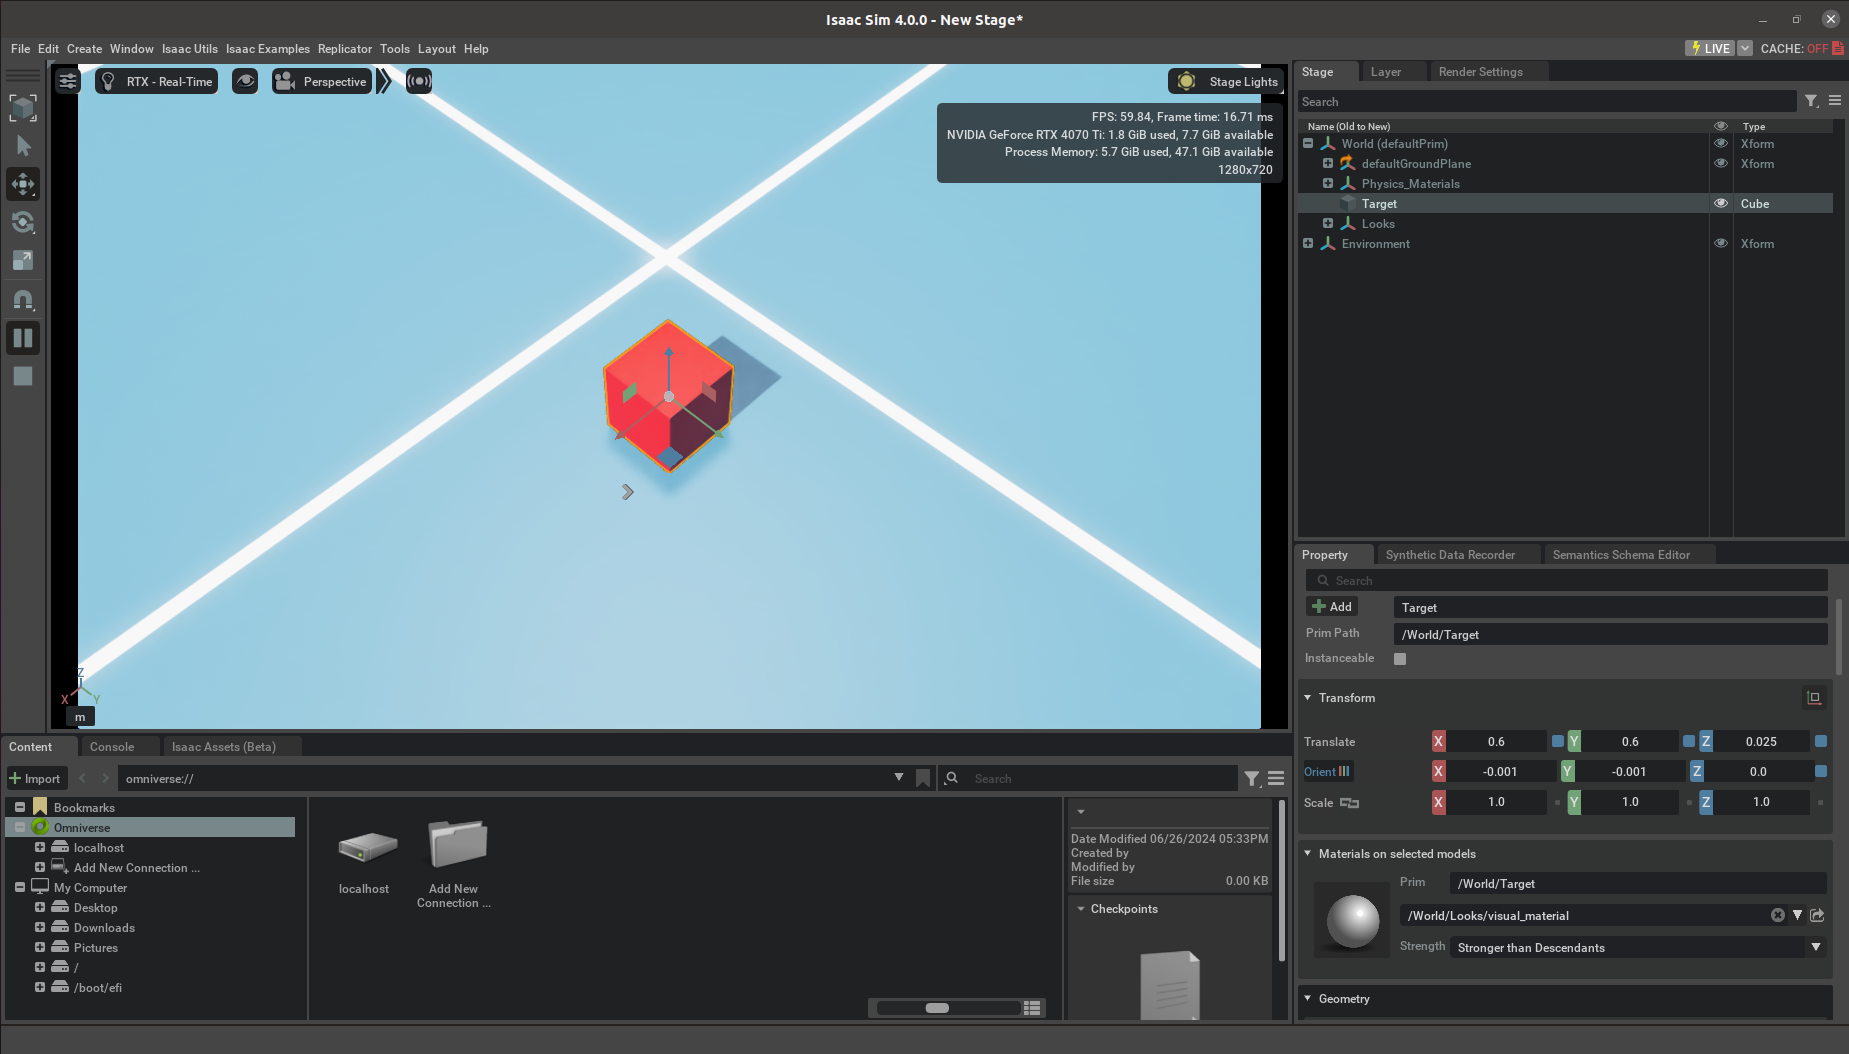
此处我们向舞台添加一个小方块,并将这个小方块注册到场景方便后续操作它。
以下展现了有许多参数的动力学小方块,但必要的参数只有prim_path和name,可以根据自己的开发需求,酌情添加超参。
# add_object.py
import numpy as np
from omni.isaac.core.objects import DynamicCuboid
from omni.isaac.core import World

# Instantiate World class
world = World()

# Add cuboid to the stage
target_cuboid = DynamicCuboid(
    prim_path="/World/Target",  # Path in the stage
    name="target_cuboid",  # Nickname in the scene
    position=np.array([0.6, 0.6, 0.1]),  # Initial position as an array [x, y, z]
    orientation=np.array(
        [1, 0, 0, 0]
    ),  # Initial orientation as an array [qw, qx, qy, qz]
    color=np.array([1, 0, 0]),  # Normalized RGB color (red)
    size=0.05,  # Size of the cuboid, size*scale = [length, width, height]
    scale=np.array([1, 1, 1]),  # Scale factors for the cuboid
    mass=0.05,  # Mass of the cuboid in kilograms
)

# Register the cuboid in the scene
world.scene.add(target_cuboid)
# Reset the world to reinitialize objects in the scene
world.reset()
按下PLAY,发现小物体在重力的作用下加速,随后坠落到地面上和地面发生碰撞行为,这表明它是一个刚体动力学物体,具备碰撞体属性和刚体属性。
同样,omni.isaac.core.objects中的类还带有一些可供使用的便捷方法,例如获取当前位置、获取速度:
# get_object_info.py
from omni.isaac.core import World

# Instantiate World class
world = World()
# Get the DynamicCuboid instance from the scene
cube = world.scene.get_object("target_cuboid")
print(cube)
# Get the world pose of the object
position, orientation = cube.get_world_pose()
print(f"Position(x,y,z)={position}")
print(f"Orientation(qw,qx,qy,qz)={orientation}")
# Get the linear and angular velocities of the object
# DynamicCuboid is subclass of RigidPrim, which has the dynamic related methods
linear_velocity = cube.get_linear_velocity()
angular_velocity = cube.get_angular_velocity()
mass = cube.get_mass()

print(f"Linear velocity={linear_velocity}")
print(f"Angular velocity={angular_velocity}")
print(f"Mass={mass}")
也可以将这个函数作为回调函数使用World类实例的方法add_physics_callback进行添加,在每次物理步进前,都将打印这个cube的状态。
注意: 由于builtins.ISAAC_LAUNCHED_FROM_TERMINAL=True对于交互式编程存在一些问题,比如world.reset()以及add_callback()。
在Isaac Sim 4.0.0版本中,无法正确地执行_init_stage导致PhysicsContext未被实例化,以交互方式添加回调函数似乎存在bug,回调相关代码只作示意,请勿执行以下部分。
# WARNING: DO NOT EXECUTE!
# All physics callbacks must take step_size as an argument
def print_target_cube_info(step_size):
    position, orientation = cube.get_world_pose()
    print(f"Position={position}")
    print(f"Orientation={orientation}")
    linear_velocity = cube.get_linear_velocity()
    print(f"Linear velocity={linear_velocity}")


# Add callback to world, callback will be called every physics step
world.add_physics_callback(callback_name="print_target_cube_info_callback", callback_fn=print_target_cube_info)
导入机器人
- Isaac Sim Assets
Isaac Sim的Assets存放在Nucleus服务器上,它可以是本地的也可以是远程的,为了获取Isaac Sim提供的官方Assets(包括常见的仿真环境和机器人等资产),需要使用以下代码,此处以Franka机械臂为例。
运行以下代码获取在Isaac Sim中的Franka机器人资产路径,并将机器人添加到stage中:
# import_robot.py
from omni.isaac.core.utils.nucleus import get_assets_root_path

# Get isaac sim assets folder root path
# It should be "omniverse://localhost/NVIDIA/Assets/Isaac/4.0"
assets_root_path = get_assets_root_path()
print(assets_root_path)
if assets_root_path is None:
    print("Could not find nucleus server with '/Isaac' folder")

# Get franka in isaac sim official assets folder
robot_asset_path = assets_root_path + "/Isaac/Robots/Franka/franka_alt_fingers.usd"
print(robot_asset_path)

# Add robot asset reference to stage
# This will create a new XFormPrim and point it to the usd file as a reference
from omni.isaac.core.utils.stage import add_reference_to_stage

add_reference_to_stage(usd_path=robot_asset_path, prim_path="/World/MyRobot")

- Robot
在Isaac Sim中,omni.isaac.core.robots中的机器人(Robot)被视作传感器(Sensors)和关节树(Articulation)的结合体,是一个封装类,使用这个机器人封装类来进行仿真中机器人的操作,可以更加便捷。
注意:在这里我们暂时不讨论传感器相关的内容,可以认为它继承自关节树类(class Articulation)机器人类(class Robot)和关节树类(class Articulation)基本一致。
-
Articulation
关节树类(class Articulation)来源于和其他常见形体类(方块、圆柱等)相同的祖类_SinglePrimWrapper,区别于其他的类,它是为机器人学设计的,因此提供了一系列的和机器人相关的类方法和属性,例如控制器、关节限位、设置关节力、速度、力矩控制、获取当前关节状态等。 -
Franka
omni.isaac.franka里的Franka类是对Robot类的继承,封装了Franka机械臂的资产导入以及夹爪等功能,使得抓取表现更加代码简洁、行为丝滑。
用户可以通过将Robot进行再次封装,实现针对于特定机器人的功能,例如人形机器人。
注意: 在本教程中,将不使用Franka封装,而是直接使用Robot封装来实现,这对于初学者的理解提升有帮助。
将机器人的Robot(Articulation类实例添加到场景中进行管理:
# Wrap the root of robot prim under a Robot(Articulation) class
# to use high level api to set/ get attributes as well as initializing physics handles needed
from omni.isaac.core.robots import Robot
from omni.isaac.core.world import World

world = World()
robot = Robot(prim_path="/World/MyRobot", name="my_robot")
# Add robot to the scene
world.scene.add(robot)
print(robot)

# Resetting the world needs to be called before querying anything related to an articulation specifically.
# Its recommended to always do a reset after adding your assets, for physics handles to be propagated properly
world.reset()
- 可以使用Robot类的Attributes和Properties来获取一些机器人的参数,例如当前关节值、自由度等
注意: Isaac Sim 4.0.0版本在交互式编程模式下对于物理上下文的处理存在问题,请不要通过交互式的方式执行本段代码,在本章节的后面部分将介绍通过独立的python脚本启动。
注意: 如果执意要执行交互式片段,请先点击Isaac Sim GUI中的Play按钮,随后再执行交互式片段。
注意:以交互式片段运行时,需要以异步方式运行,在本教程中不涉及异步,如有需要请参考以下片段:
# IGNORE THIS IF YOU DO NOT NEED IT
import asyncio
from omni.isaac.core.world import World
from omni.isaac.core.prims import RigidPrimView
from omni.isaac.core.objects import DynamicCuboid

async def init():
    if World.instance():
        World.instance().clear_instance()
    world=World()
    world.scene.add_default_ground_plane(z_position=-1.0)
    cube = DynamicCuboid(prim_path="/World/cube_0")
    rigid_prim_view = RigidPrimView(prim_paths_expr="/World/cube_[0-100]")
    # View classes are internally initialized when they are added to the scene and the world is reset
    world.scene.add(rigid_prim_view)
    await world.reset_async()
    # rigid_prim_view is now initialized and can be used

asyncio.ensure_future(init())
注意: 在添加任何资产到Isaac Sim中时,建议执行一遍world.reset(),它会确保物理引擎的句柄(handles)能够正确传播和初始化,进而确保仿真环境的物理状态一致和稳定。
# get_robot_info.py
# You can also get the robot from the scene by its nickname
from omni.isaac.core.world import World

world = World()
world.reset()
robot = world.scene.get_object("my_robot")


num_dof = robot.num_dof
num_of_body_parts = robot.num_bodies
num_of_all_joint = robot._articulation_view.num_joints
active_joint_names = robot.dof_names
active_joint_indexes = [robot.get_dof_index(x) for x in active_joint_names]
print(f"Num of dof(active joints)={num_dof}")
print(f"Num of all joints={num_of_all_joint}")
print(f"Num of body parts={num_of_body_parts}")
print(f"Active joint names={active_joint_names}")
print(f"Active joint indexes={active_joint_indexes}")


def print_dof_properties(robot, joint_name=None, index=None):
    """
    Function to query and print properties of a DOF based on joint_name or index.

    Args:
        robot: The robot instance of Robot class in omni.isaac.core.robots
        joint_name (str, optional): The name of the active joint
        index (int, optional): The index of the active joint

    Raises:
        ValueError: If neither joint_name nor index is provided or if both are provided
    """
    # Get DOF properties
    dof_properties = robot.dof_properties

    # Check if joint_name or index is correctly provided
    if joint_name is None and index is None:
        raise ValueError("Either joint_name or index must be provided.")
    if joint_name is not None and index is not None:
        raise ValueError(
            "Only one of joint_name or index should be provided, not both."
        )

    # Query DOF properties based on joint_name or index
    if joint_name is not None:
        joint_names = robot.dof_names
        if joint_name not in joint_names:
            raise ValueError(f"joint_name {joint_name} does not exist.")

        index = robot.get_dof_index(joint_name)
    elif index is not None:
        if index < 0 or index >= robot.num_dof:
            raise ValueError(f"index {index} is out of range.")
        joint_name = robot.dof_names[index]

    # Print DOF properties
    joint_properties = dof_properties[index]
    print(
        f"DOF properties (joint_name: {joint_name if joint_name else 'N/A'}, index: {index}):"
    )
    print(f"Type: {joint_properties['type']}")
    print(f"Lower limit: {joint_properties['lower']}")
    print(f"Upper limit: {joint_properties['upper']}")
    print(f"Drive mode: {joint_properties['driveMode']}")
    print(f"Max effort: {joint_properties['maxEffort']}")
    print(f"Max velocity: {joint_properties['maxVelocity']}")
    print(f"Stiffness: {joint_properties['stiffness']}")
    print(f"Damping: {joint_properties['damping']}")
    print("")
    return joint_properties


# for joint_name in active_joint_names:
#     print_dof_properties(robot, joint_name=joint_name)

for index in active_joint_indexes:
    print_dof_properties(robot, index=index)
以Standalone python模式运行Isaac Sim
目前我们已经尝试了通过交互式的代码方式和Isaac Sim进行了交互,但交互式的代码方式存在一些问题,在控制机器人前,我们将学习以Standalone python模式运行Isaac Sim的方法。
Isaac Sim通过独立的Python文件执行时,需要先预配置环境并启动Isaac Sim,这通过在python文件的头部执行以下代码来实现:
from isaacsim import SimulationApp
simulation_app = SimulationApp({"headless": False})
注意: 这两行必须在任何其他的omni相关包导入前执行,否则相关的包路径无法被正确地识别。
注意:在Isaac Sim 4.0.0版本以前,这个预配置通过from omni.isaac.kit import SimulationApp实现,如果无法找到isaacsim包,请检查你的Isaac Sim版本。
在通过独立的python文件和Isaac Sim进行交互时,我们可以使用循环来人为控制Isaac Sim的每次物理步进以及渲染步进。
for i in range(3000):
    world.step(render=True)
最终,我们关闭Isaac Sim。
simulation_app.close()
控制机器人
在Isaac Sim中,机器人(Articulation)的控制通过articulation_view实现,而Articulation Controller是对articulation_view中部分功能的PD控制器封装。
通常机器人的控制借由omni.isaac.core.controllers中的Articulation Controller和omni.isaac.core.articulations中的Articulation实现。
如果未给Articulation指定controller,那么它将默认给Articulation类实例生成一个self._articulation_controller = ArticulationController()。
- Articulation Controller
Articulation Controller是关节树上所有自由度关节的 PD 控制器,可以应用位置、速度和力来对机器人的整体关节进行控制。它可以指定下一次物理步进时要对机器人应用的动作,也可以指定对哪些关节进行操作。
通过将动作(Articulation action)应用到机器人,可以在仿真中移动机器人的关节,以下是一个完整的python脚本来导入机器人,并对机器人的关节进行控制。
# control_robot.py
import numpy as np
from isaacsim import SimulationApp

# See DEFAULT_LAUNCHER_CONFIG for available configuration
# https://docs.omniverse.nvidia.com/py/isaacsim/source/extensions/omni.isaac.kit/docs/index.html
launch_config = {"headless": False}
# Launch the Toolkit
simulation_app = SimulationApp(launch_config)

# Locate any other import statement after this point
from omni.isaac.core.world import World
from omni.isaac.core.utils.types import ArticulationAction
from omni.isaac.core.utils.nucleus import get_assets_root_path
from omni.isaac.core.utils.stage import add_reference_to_stage
from omni.isaac.core.robots import Robot

# Instantiate World class
world = World()
# Add a ground plane to stage and register it in the scene
world.scene.add_default_ground_plane()

# Get isaac sim assets folder root path
# It should be "omniverse://localhost/NVIDIA/Assets/Isaac/4.0"
assets_root_path = get_assets_root_path()
print(assets_root_path)
if assets_root_path is None:
    print("Could not find nucleus server with '/Isaac' folder")

# Get franka in isaac sim official assets folder
robot_asset_path = assets_root_path + "/Isaac/Robots/Franka/franka_alt_fingers.usd"
print(robot_asset_path)

# Add robot asset reference to stage
# This will create a new XFormPrim and point it to the usd file as a reference
add_reference_to_stage(usd_path=robot_asset_path, prim_path="/World/MyRobot")

# Wrap the root of robot prim under a Robot(Articulation) class
# to use high level api to set/ get attributes as well as initializing physics handles needed
robot = Robot(prim_path="/World/MyRobot", name="my_robot")
# Add robot to the scene
world.scene.add(robot)
print(robot)

# Resetting the world needs to be called before querying anything related to an articulation specifically.
# Its recommended to always do a reset after adding your assets, for physics handles to be propagated properly
world.reset()

# This is an implicit PD controller of the robot articulation
# Stiffness and damping (gains) can be set through the articulation view
articulation_controller = robot.get_articulation_controller()

# Get number of active joints in the robot
num_dof = robot.num_dof
# 7 arm joints + 2 gripper joints
print(f"Num of dof(active joints)={num_dof}")
# Get joint limits
joint_limits_lower = robot.dof_properties["lower"]
joint_limits_upper = robot.dof_properties["upper"]
print(f"Joint limits lower={joint_limits_lower} upper={joint_limits_upper}")

# Start simulation
all_steps = 10000
for i in range(all_steps):
    # Update joint positions every 500 steps
    if i % (all_steps / 20) == 0:
        # Generate radom joint positions within joint limits
        target_joint_positions = np.random.uniform(
            joint_limits_lower, joint_limits_upper
        )
        # Construct an action to apply to the articulation
        # joint_indices = None will apply the action to all joints
        target_action = ArticulationAction(
            joint_positions=target_joint_positions,
            joint_efforts=None,
            joint_velocities=None,
            joint_indices=None,
        )
        # Apply action
        articulation_controller.apply_action(target_action)
        print(f"Step {i}: target_joint_positions={target_joint_positions}")
    # Update world
    world.step(render=True)


# Close the running Toolkit
simulation_app.close()

完整的机器人任务
在完成了上面的API学习后,我们将尝试将这些API的步骤结合起来,并使用开源的运动规划算法,执行小方块的拾取和放置任务。
流程拆解
我们可以将简单的拾取和放置任务拆解成几个基本步骤:
- 创建仿真世界
- 创建目标小方块
- 加载机器人模型
- 获取物体抓取位态
- 将夹爪移动到抓取位姿
- 闭合夹爪
- 获取物体放置位姿
- 将夹爪移动到放置位姿
- 松开夹爪
配置机器人运动规划算法
-
isaac_sim_curobo_motion_generator
isaac_sim_curobo_motion_generator是一个由Auromix提供的用于在isaac sim中使用 CUDA 加速库 cuRobo 提供运动生成的封装框架。
此工具允许用户在 Isaac Sim 和实际应用中执行正向运动学、逆向运动学和带有碰撞避免的机器人运动生成。 -
cuRobo
cuRobo 是一个 由Nvidia提供的开源CUDA 加速库,提供快速机器人算法,包括运动学、碰撞检查、优化、几何规划、轨迹优化和运动生成,所有这些算法都通过并行计算显著加快运行速度。
注意: 在Isaac Manipulator中,cuRobo作为封装使用,但目前Isaac Manipulator尚未处于良好的应用状态,因此使用isaac_sim_curobo_motion_generator替代。
# Download
git clone git@github.com:Auromix/isaac_sim_curobo_motion_generator.git
cd isaac_sim_motion_generator
# Install in isaac sim python
omni_python -m pip install -e .
# Install curobo
cd isaac_sim_motion_generator
git submodule init
git submodule update
cd curobo
omni_python -m pip install tomli wheel ninja
omni_python -m pip install -e .[isaacsim] --no-build-isolation
# Config curobo
cd isaac_sim_motion_generator
bash config_isaac_sim_curobo_motion_generator.sh
- 测试isaac_sim_curobo_motion_generator
cd isaac_sim_motion_generator
omni_python examples/forward_kinematics.py
注意: omni_python是由Auromix提供的Isaac Sim环境配置脚本给出的命令别名,如果尚未配置,请参考本教程的Isaac Sim安装与配置章节。
在以下示例代码中,目标物体、机器人、机器人控制器、运动规划生成器被加入到仿真流程中,机器人将目标物体放置到指定位置,当目标物体被移动时,机器人再次将目标物体放回指定的位置。
注意: 常规的Pick and Place方法比下文中的在Z轴方向上抽离的方法更加复杂,需要考虑更多问题,这部分内容留待读者自行研究。
# pick_and_place.py
import numpy as np
from isaacsim import SimulationApp

# See DEFAULT_LAUNCHER_CONFIG for available configuration
# https://docs.omniverse.nvidia.com/py/isaacsim/source/extensions/omni.isaac.kit/docs/index.html
launch_config = {
    "headless": False,
    "width": "1920",
    "height": "1080",
}
# Launch the Toolkit
simulation_app = SimulationApp(launch_config)

# Locate any other import statement after this point
from omni.isaac.core.world import World
from omni.isaac.core.utils.types import ArticulationAction
from omni.isaac.core.utils.nucleus import get_assets_root_path
from omni.isaac.core.utils.stage import add_reference_to_stage
from omni.isaac.core.robots import Robot
from omni.isaac.core.objects import DynamicCuboid
from isaac_sim_motion_generator.curobo_motion_generator import CuroboMotionGenerator

# Instantiate World class
world = World()
# Add a ground plane to stage and register it in the scene
ground_plane = world.scene.add_default_ground_plane()

# Add target cuboid to the stage
target_cuboid = DynamicCuboid(
    prim_path="/World/Target",  # Path in the stage
    name="target_cuboid",  # Nickname in the scene
    position=np.array(
        [0.36303193, 0.43660322, 0.1]
    ),  # Initial position as an array [x, y, z]
    orientation=np.array(
        [1, 0, 0, 0]
    ),  # Initial orientation as an array [qw, qx, qy, qz]
    color=np.array([1, 0, 0]),  # Normalized RGB color (red)
    size=0.05,  # Size of the cuboid, size*scale = [length, width, height]
    scale=np.array([1, 1, 1]),  # Scale factors for the cuboid
    mass=0.01,  # Mass of the cuboid in kilograms
)

# Register the cuboid in the scene
world.scene.add(target_cuboid)
# Reset the world to reinitialize objects in the scene
world.reset()

# Get isaac sim assets folder root path
# It should be "omniverse://localhost/NVIDIA/Assets/Isaac/4.0"
assets_root_path = get_assets_root_path()
print(assets_root_path)
if assets_root_path is None:
    print("Could not find nucleus server with '/Isaac' folder")

# Get franka in isaac sim official assets folder
robot_asset_path = assets_root_path + "/Isaac/Robots/Franka/franka_alt_fingers.usd"
print(robot_asset_path)

# Add robot asset reference to stage
# This will create a new XFormPrim and point it to the usd file as a reference
add_reference_to_stage(usd_path=robot_asset_path, prim_path="/World/MyRobot")

# Wrap the root of robot prim under a Robot(Articulation) class
# to use high level api to set/ get attributes as well as initializing physics handles needed
robot = Robot(prim_path="/World/MyRobot", name="my_robot")
# Add robot to the scene
world.scene.add(robot)
print(robot)

# Resetting the world needs to be called before querying anything related to an articulation specifically.
# Its recommended to always do a reset after adding your assets, for physics handles to be propagated properly
world.reset()

# This is an implicit PD controller of the robot articulation
# Stiffness and damping (gains) can be set through the articulation view
articulation_controller = robot.get_articulation_controller()

# Get number of active joints in the robot
num_dof = robot.num_dof
# 7 arm joints + 2 gripper joints
print(f"Num of dof(active joints)={num_dof}")
# Get joint limits
joint_limits_lower = robot.dof_properties["lower"]
joint_limits_upper = robot.dof_properties["upper"]
print(f"Joint limits lower={joint_limits_lower} upper={joint_limits_upper}")

# Load robot world and user configuration
robot_config_file_name = "my_franka_robot_config.yml"
world_config_file_name = "collision_base.yml"
user_config_file_name = "isaac_sim_user_config.toml"
curobo_motion_generator = CuroboMotionGenerator(
    robot_config_file_name=robot_config_file_name,
    world_config_file_name=world_config_file_name,
    user_config_file_name=user_config_file_name,
)

# Motion generation (will take a few seconds to initialize)
curobo_motion_generator.init_motion_gen()


# Get curobo activated joint index in the robot active joint
curobo_activated_joint_index = [
    robot.get_dof_index(x) for x in curobo_motion_generator.joint_names
]
print(f"curobo joint names={curobo_motion_generator.joint_names}")
print(f"curobo_activated_joint_index ={curobo_activated_joint_index}")


# Init
target_cuboid_position, target_cuboid_orientation = (
    target_cuboid.get_world_pose()
)  # wxyz
target_cuboid_orientation = curobo_motion_generator.wxzy_to_xyzw(
    target_cuboid_orientation
)  # xyzw
target_cuboid_pose = np.concatenate([target_cuboid_position, target_cuboid_orientation])

static_counter = 0
need_to_pick_and_place = True
print("Please click PLAY to start.")
while simulation_app.is_running():
    # simulation_app.update()
    # Step
    world.step(render=True)

    # Wait for play
    if not world.is_playing():
        continue
    # Get current_time_step_index
    current_time_step_index = world.current_time_step_index
    # Init physics handle when simulation starts
    if current_time_step_index < 2:
        # Reset world simulation physics context
        world.reset()
        # Init robot articulation controller physics handle
        robot.initialize()
        # Set robot position to curobo default joint positions
        robot.set_joint_positions(
            curobo_motion_generator.default_joint_positions,
            curobo_activated_joint_index,
        )
    # Wait for a while
    if current_time_step_index < 60:
        continue

    # Update obstacle at init
    if current_time_step_index == 60:
        print(
            f"Initializing isaac sim obstacle world with respect to {robot.prim_path}..."
        )
        # Initialize obstacle world
        curobo_motion_generator.update_obstacle_from_isaac_sim(
            world=world,
            robot_prim_path=robot.prim_path,
            ignore_prim_paths=[
                robot.prim_path,
                ground_plane.prim_path,
                target_cuboid.prim_path,
            ],
        )
    # Update obstacle every 500 steps
    if current_time_step_index % 1000 == 0:
        curobo_motion_generator.update_obstacle_from_isaac_sim(
            world=world,
            robot_prim_path=robot.prim_path,
            ignore_prim_paths=[
                robot.prim_path,
                ground_plane.prim_path,
                target_cuboid.prim_path,
            ],
        )

    # Check if robot is static
    robot_static = False
    if robot.get_joint_velocities() is not None:
        if np.max(np.abs(robot.get_joint_velocities())) < 0.1:
            robot_static = True
    # Check if target object is static
    target_object_static = False
    if target_cuboid.get_linear_velocity() is not None:
        if np.max(np.abs(target_cuboid.get_linear_velocity())) < 0.01:
            target_object_static = True

    if target_object_static and robot_static:
        static_counter += 1
    else:
        static_counter = 0

    # Get current cube pose
    current_cuboid_position, current_cuboid_orientation = (
        target_cuboid.get_world_pose()
    )  # wxyz
    current_cuboid_orientation = curobo_motion_generator.wxzy_to_xyzw(
        current_cuboid_orientation
    )  # xyzw
    current_cuboid_pose = np.concatenate(
        [current_cuboid_position, current_cuboid_orientation]
    )

    if np.linalg.norm(target_cuboid_pose - current_cuboid_pose) > 3e-2:
        # Update target cuboid pose
        target_cuboid_pose = current_cuboid_pose
        # Reset static counter
        static_counter = 0
        need_to_pick_and_place = True

    if static_counter > 100 and need_to_pick_and_place:
        # Reset static counter
        static_counter = 0
        need_to_pick_and_place = False
        print(f"Target cuboid pose={target_cuboid_pose}")

        def pick_and_place(target_cuboid_pose):

            # Get current robot joint positions
            current_robot_joint_positions = robot.get_joint_positions().tolist()
            current_robot_joint_positions_without_gripper = (
                current_robot_joint_positions[:-2]
            )

            # Get pre_grasp pose
            z_offset = 0.15  # m
            pre_grasp_pose = target_cuboid_pose.copy()
            pre_grasp_pose[2] += z_offset
            # Manual set place pose
            place_pose = [0.06303193, 0.43660322, 0.02499907, 0.0, 0.0, 0.0, 1.0]
            pre_place_pose = place_pose.copy()
            pre_place_pose[2] += z_offset
            # Manual set wait pose
            wait_pose = [0.06303193, 0.43660322, 0.35, 0.0, 0.0, 0.0, 1.0]

            # Generate trajectory
            solution_to_pre_grasp_pose = curobo_motion_generator.motion_generate(
                start_joint_angles=current_robot_joint_positions_without_gripper,
                goal_end_effector_pose=pre_grasp_pose,
            )

            if solution_to_pre_grasp_pose is None:
                return None

            last_joint_angles = solution_to_pre_grasp_pose["positions"][-1]
            solution_to_grasp_pose = curobo_motion_generator.motion_generate(
                start_joint_angles=last_joint_angles,
                goal_end_effector_pose=target_cuboid_pose,
            )
            if solution_to_grasp_pose is None:
                return None

            last_joint_angles = solution_to_grasp_pose["positions"][-1]

            solution_to_pre_place_pose = curobo_motion_generator.motion_generate(
                start_joint_angles=last_joint_angles,
                goal_end_effector_pose=pre_place_pose,
            )
            if solution_to_pre_place_pose is None:
                return None

            last_joint_angles = solution_to_pre_place_pose["positions"][-1]

            solution_to_place_pose = curobo_motion_generator.motion_generate(
                start_joint_angles=last_joint_angles,
                goal_end_effector_pose=place_pose,
            )
            if solution_to_place_pose is None:
                return None

            last_joint_angles = solution_to_place_pose["positions"][-1]
            solution_to_wait_pose = curobo_motion_generator.motion_generate(
                start_joint_angles=last_joint_angles, goal_end_effector_pose=wait_pose
            )

            if solution_to_wait_pose is None:
                return None

            # Execute the trajectories
            # Pre grasp
            actions = curobo_motion_generator.convert_solution_to_isaac_sim_action(
                solution=solution_to_pre_grasp_pose, robot_prim=robot
            )
            for action_index, action in enumerate(actions):
                action.joint_indices = curobo_activated_joint_index[:-2]
                action.joint_positions = action.joint_positions[:-2]
                action.joint_velocities = action.joint_velocities[:-2]
                action.joint_efforts = None
                articulation_controller.apply_action(action)
                # Step
                world.step(render=True)
                print(f"Action pre grasp {action_index} / {len(actions)} executed")
            # Grasp
            actions = curobo_motion_generator.convert_solution_to_isaac_sim_action(
                solution=solution_to_grasp_pose, robot_prim=robot
            )
            for action_index, action in enumerate(actions):
                action.joint_indices = curobo_activated_joint_index[:-2]
                action.joint_positions = action.joint_positions[:-2]
                action.joint_velocities = action.joint_velocities[:-2]
                action.joint_efforts = None

                articulation_controller.apply_action(action)
                # Step
                world.step(render=True)
                print(f"Action grasp {action_index} / {len(actions)} executed")

            # Close gripper
            gripper_close_joint_positions = solution_to_grasp_pose["positions"][-1]
            gripper_close_joint_positions.append(
                joint_limits_lower[7] + target_cuboid.get_size() / 2 - 0.005
            )
            gripper_close_joint_positions.append(
                joint_limits_lower[8] + target_cuboid.get_size() / 2 - 0.005
            )
            gripper_close_action = ArticulationAction(
                joint_positions=gripper_close_joint_positions,
                joint_indices=curobo_activated_joint_index,
            )
            articulation_controller.apply_action(gripper_close_action)
            for _ in range(50):
                world.step(render=True)

            # Pre place
            actions = curobo_motion_generator.convert_solution_to_isaac_sim_action(
                solution=solution_to_pre_place_pose, robot_prim=robot
            )
            for action_index, action in enumerate(actions):
                action.joint_indices = curobo_activated_joint_index[:-2]
                action.joint_positions = action.joint_positions[:-2]
                action.joint_velocities = action.joint_velocities[:-2]
                action.joint_efforts = None
                articulation_controller.apply_action(action)
                # Step
                world.step(render=True)
                print(f"Action pre place {action_index} / {len(actions)} executed")
            # Place
            actions = curobo_motion_generator.convert_solution_to_isaac_sim_action(
                solution=solution_to_place_pose, robot_prim=robot
            )
            for action_index, action in enumerate(actions):
                action.joint_indices = curobo_activated_joint_index[:-2]
                action.joint_positions = action.joint_positions[:-2]
                action.joint_velocities = action.joint_velocities[:-2]
                action.joint_efforts = None
                articulation_controller.apply_action(action)
                # Step
                world.step(render=True)
                print(f"Action place {action_index} / {len(actions)} executed")

            # Open gripper
            gripper_open_joint_positions = solution_to_place_pose["positions"][-1]
            gripper_open_joint_positions.append(joint_limits_upper[7])
            gripper_open_joint_positions.append(joint_limits_upper[8])
            gripper_open_action = ArticulationAction(
                joint_positions=gripper_open_joint_positions,
                joint_indices=curobo_activated_joint_index,
            )
            articulation_controller.apply_action(gripper_open_action)
            for _ in range(50):
                world.step(render=True)

            # Default
            actions = curobo_motion_generator.convert_solution_to_isaac_sim_action(
                solution=solution_to_wait_pose, robot_prim=robot
            )
            for action_index, action in enumerate(actions):
                action.joint_indices = curobo_activated_joint_index[:-2]
                action.joint_positions = action.joint_positions[:-2]
                action.joint_velocities = action.joint_velocities[:-2]
                action.joint_efforts = None
                articulation_controller.apply_action(action)
                # Step
                world.step(render=True)
                print(f"Action default {action_index} / {len(actions)} executed")

        # Run pick and place
        pick_and_place(target_cuboid_pose)

        # Update object target pose
        current_cuboid_position, current_cuboid_orientation = (
            target_cuboid.get_world_pose()
        )  # wxyz
        current_cuboid_orientation = curobo_motion_generator.wxzy_to_xyzw(
            current_cuboid_orientation
        )  # xyzw
        current_cuboid_pose = np.concatenate(
            [current_cuboid_position, current_cuboid_orientation]
        )
        target_cuboid_pose = current_cuboid_pose


simulation_app.close()

注意: 本文中的示例代码,可以在auro_sim/examples/isaac_sim_examples中找到,如果你需要源代码,请访问auro_sim。
结尾语
恭喜你,已经学习了Isaac Sim代码编程的相关内容,能够利用代码控制机器人完成简单的pick and place任务,了解如何导入机器人和物体。
在下一章节,你将学习Isaac Sim中更深入的python代码编程。
如需企业内训定制、项目开发合作或个人学习支持,请联系:hermanye233@icloud.com


 1831
1831

 被折叠的 条评论
为什么被折叠?
被折叠的 条评论
为什么被折叠?
 到【灌水乐园】发言


